[Flutter] Socket.io를 이용한 통신 보드게임 어플 만들기 (게임 페이지 레이아웃-4)
✨주사위 영역 레이아웃 및 애니매이션
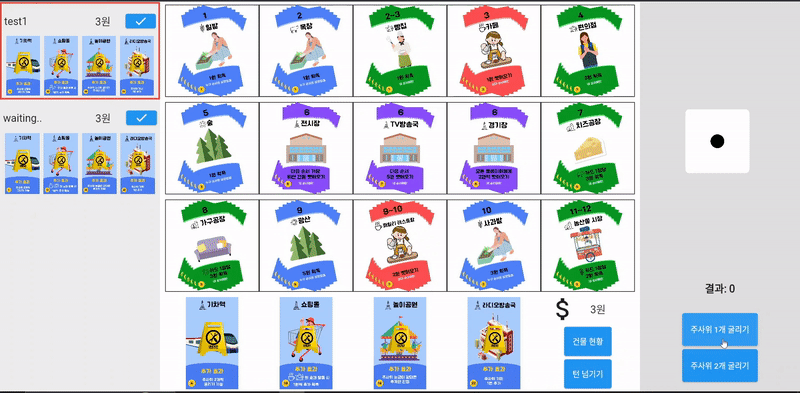
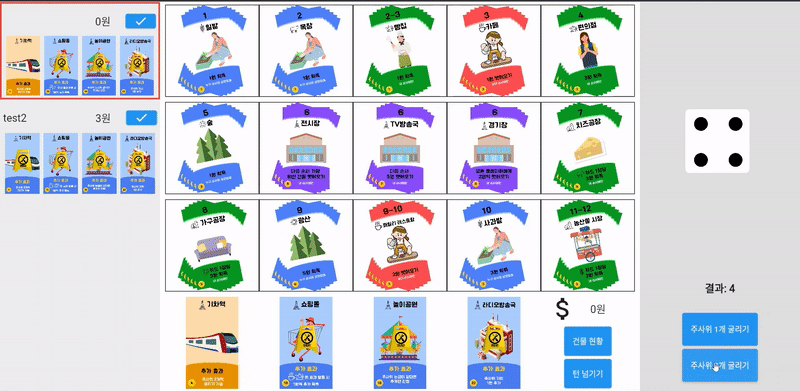
이번 포스팅에서는 주사위 영역의 레이아웃을 짜고 주사위 애니매이션을 구현하는 내용을 다루겠습니다. 주사위 1개 굴리기 버튼을 누르면 주사위를 1개만 굴리고 주사위 2개 굴리기 버튼을 누르면 2개를 굴리도록 구현할 것입니다.
📐주사위 레이아웃 구조
import 'package:flutter/material.dart';
class _GameScreenState extends State<GameScreen>
with SingleTickerProviderStateMixin, WidgetsBindingObserver {
late AnimationController _controller;
late Animation<double> _animation;
// 주사위 이미지를 위한 상태를 추가합니다.
int diceNumber1 = 1;
int diceNumber2 = 1;
int numberOfDiceToRoll = 1;
int diceResult = 0;
String? selectedCardPath; // 카드 선택 관련 변수
Map<String, int> cardCounts = {}; // 카드 개수 관련 Map
...
late MiniVillGame game;
void initState() {
...
_controller = AnimationController(
   duration: const Duration(seconds: 1),
   vsync: this,
);
_animation = Tween<double>(begin: 0, end: -100).animate(CurvedAnimation(
      parent: _controller,
      curve: Curves.easeInOut,
));
_controller.addListener(() {
      if (_controller.status == AnimationStatus.forward ||
          _controller.status == AnimationStatus.reverse) {
        diceNumber1 = Random().nextInt(6) + 1;
        diceNumber2 = Random().nextInt(6) + 1;
      }
    });
_controller.addStatusListener((status) async {
      if (status == AnimationStatus.completed) {
        _controller.reverse();
      } else if (status == AnimationStatus.dismissed) {
        // 주사위 관련 게임 로직 구현
        setState(() {
          diceResult = diceNumber1 + (numberOfDiceToRoll == 2 ? diceNumber2 : 0);
        }); // 임시 코드
      }
    });
game = MiniVillGame(widget.numOfPlayers);
cardCounts = Map.fromIterable(
game.centerCards,
key: (item) => item.imagePath,
value: (item) => item.availableCount,
);
}
Widget build(BuildContext context) {
double screenWidth = MediaQuery.of(context).size.width;
double sideSpaceWidth = screenWidth * 0.2;
...
return Scaffold(
body: Row(
children: [
//게임스크린 (플레이어 영역)
Container(
...
),
//게임스크린 (게임 보드 영역)
Expanded(
...
),
//게임스크린 (주사위 영역)
Container(
width: sideSpaceWidth,
color: Colors.grey[300],
child: Column(
mainAxisAlignment: MainAxisAlignment.spaceBetween,
children: [
Expanded(
flex: 5,
child: AnimatedBuilder(
animation: _controller,
builder: (BuildContext context, Widget? child) {
return Transform.translate(
offset: Offset(0, _animation.value),
child: Center(
child: Row(
mainAxisAlignment: MainAxisAlignment.center,
children: [
// 첫 번째 주사위 이미지
Image.asset(
'assets/dice/dice_$diceNumber1.png',
width: sideSpaceWidth * 0.4,
fit: BoxFit.fitWidth,
),
SizedBox(width: 10),
// 주사위 2개를 굴릴 때만 두 번째 주사위 이미지 표시
if (numberOfDiceToRoll == 2)
Image.asset(
'assets/dice/dice_$diceNumber2.png',
width: sideSpaceWidth * 0.4,
fit: BoxFit.fitWidth,
),
],
),
),
);
},
),
),
Expanded(
flex: 2,
child: Column(
children: [
Expanded(
flex: 10,
child: AutoSizeText(
'결과: $diceResult',
minFontSize: 5,
style: TextStyle(
fontSize: 20.0, fontWeight: FontWeight.bold),
maxLines: 1,
),
),
Expanded(
flex: 10,
child: ElevatedButton(
onPressed: () {
diceEvent(1);
},
child: AutoSizeText(
'주사위 1개 굴리기',
minFontSize: 5,
style: TextStyle(fontSize: 15.0), // 시작할 폰트 크기
maxLines: 1, // 최대 줄 수
),
),
),
Expanded(
flex: 1,
child: SizedBox(),
),
Expanded(
flex: 10,
child: ElevatedButton(
onPressed: () {
diceEvent(2);
},
child: AutoSizeText(
'주사위 2개 굴리기',
minFontSize: 5,
style: TextStyle(fontSize: 15.0), // 시작할 폰트 크기
maxLines: 1, // 최대 줄 수
),
),
),
Expanded(
flex: 3,
child: SizedBox(),
),
],
),
),
],
),
),
],
),
);
}
void diceEvent(int numberOfDice) {
// ...게임 로직 관련 코드
numberOfDiceToRoll = numberOfDice; // 임시 코드
_controller.forward();
}
// 커스텀 위젯 생성
...
}주사위를 위로 올렸다가 다시 떨어트리면서 주사위의 숫자를 1~6까지 랜덤으로 막 바뀌면서 주사위 효과를 더하고 애니매이션이 끝나면 주사위 값이 랜덤적으로 정해집니다.
numberOfDiceToRoll을 이용하여 주사위를 1개 굴릴 것인지 2개 굴릴 것인지 결정한 뒤에 애니매이션을 진행시킵니다. 전체적인 구조로 설명하기엔 어려우니 코드를 자세히 뜯어서 설명드리겠습니다.
📕_controller, _animation
_controller = AnimationController(
duration: const Duration(seconds: 1),
vsync: this,AnimationController은 애니메이션의 진행을 제어하는 클래스입니다. 시작, 정지, 역방향 등 애니메이션의 제어와 관련된 다양한 메소드를 제공합니다.
duration은 애니메이션의 길이를 정의합니다. 여기서는 1초로 지정되어 있습니다.
vsync은 화면 외의 프레임을 그리지 않도록 도와주며, 애니메이션과 위젯의 라이프 사이클을 동기화합니다. 여기서 this는 _GameScreenState를 의미하며,
with SingleTickerProviderStateMixin이 클래스 정의에 포함되어 있어야 합니다.
_animation = Tween<double>(begin: 0, end: -100).animate(CurvedAnimation(
parent: _controller,
curve: Curves.easeInOut,
));Tween<double>은 애니메이션의 범위를 정의합니다. 여기서는 double 타입의 0에서 -100 사이의 값을 사용합니다.
.animate는 Tween에 정의된 범위를 사용하여 애니메이션을 생성합니다.
CurvedAnimation은 애니메이션의 경로를 수정하여, 선형이 아닌 곡선 움직임을 생성합니다.
parent:는 해당 애니메이션의 부모를 나타내며 부모로 _controller를 사용합니다.
curve: Curves.easeInOut은 애니메이션의 속도 커브를 정의합니다. easeInOut은 애니메이션 시작과 끝에서 천천히, 중간에서 빠르게 움직이게 합니다.
_controller.addListener(() {
if (_controller.status == AnimationStatus.forward ||
_controller.status == AnimationStatus.reverse) {
diceNumber1 = Random().nextInt(6) + 1;
diceNumber2 = Random().nextInt(6) + 1;
}
});addListener는 애니메이션의 상태가 변경될 때마다 호출되는 콜백 함수를 추가합니다. 해당 코드는 애니매이션이 진행되는 동안 주사위가 무작위로 변하는 효과를 넣기 위해서 작성했습니다.
_controller.status는 애니메이션의 현재 상태를 반환하며 AnimationStatus.forward, AnimationStatus.reverse는 각각 애니메이션의 정방향, 역방향을 나타냅니다. 해당 코드처럼 or연산자를 이용하면 정방향과 역방향 애니매이션 모두 주사위가 무작위로 변하는 효과가 적용됩니다.
_controller.addStatusListener((status) async {
if (status == AnimationStatus.completed) {
_controller.reverse();
} else if (status == AnimationStatus.dismissed) {
// 주사위 관련 게임 로직 구현
setState(() {
diceResult = diceNumber1 + (numberOfDiceToRoll == 2 ? diceNumber2 : 0);
}); // 임시 코드
}
});addStatusListener는 애니메이션 상태가 변할 때마다 호출되는 콜백 함수를 추가합니다.
프로젝트 내용으로 설명하자면 주사위가 위로 올라가는 애니매이션이 끝나면 status가 AnimationStatus.forward에서 AnimationStatus.completed로 바뀌게 됩니다. 애니매이션 상태가 바뀜에 따라 해당 함수가 호출되고 status가 AnimationStatus.completed이기 때문에 _controller.reverse();가 실행됩니다.
그러면 주사위가 다시 아래로 떨어지는 애니매이션이 실행되고 애니매이션이 끝나면 status가 AnimationStatus.reverse에서 status == AnimationStatus.dismissed로 바뀌게 됩니다. 그러면 한번 더 해당 함수가 호출되고 주사위 결과값을 화면에 나타냅니다.
📘AnimatedBuilder 위젯
AnimatedBuilder(
  animation: _controller,
  builder: (BuildContext context, Widget? child) {
    return Transform.translate(
      offset: Offset(0, _animation.value),
      child: Center(
        child: Row(
          mainAxisAlignment: MainAxisAlignment.center,
          children: [
          	// 첫 번째 주사위 이미지
            Image.asset(
              'assets/dice/dice_$diceNumber1.png',
              width: sideSpaceWidth * 0.4,
              fit: BoxFit.fitWidth,
            ),
            SizedBox(width: 10),
            // 주사위 2개를 굴릴 때만 두 번째 주사위 이미지 표시
            if (numberOfDiceToRoll == 2)
              Image.asset(
                'assets/dice/dice_$diceNumber2.png',
                width: sideSpaceWidth * 0.4,
                fit: BoxFit.fitWidth,
              ),
          ],
        ),
      ),
    );
  },
)
AnimatedBuilder는 애니메이션과 연동하여 UI를 빌드하는 위젯입니다.
Transform.translate를 통해 주사위 이미지의 위치를 나타내는데 여기서 offset으로 (가로값, 세로값) 좌표값을 통해 위치를 나타냅니다.
offset의 값으로 (0,_animation.value)집어 넣었기 때문에 가로 값은 0으로 고정되고 세로 값은 _animation.value를 집어넣었기 때문에 수직으로 이동이 됩니다.
즉, 주사위가 상하로 움직이는 애니메이션 효과를 생성합니다.
그리고 조건문을 통해 numberOfDiceToRoll이 2라면 주사위 이미지를 하나 더 추가하여 주사위를 굴리게 됩니다.
ElevatedButton(
      onPressed: () {
        diceEvent(1);
      },
      child: AutoSizeText(
        '주사위 1개 굴리기',
        minFontSize: 5,
        style: TextStyle(fontSize: 15.0), // 시작할 폰트 크기
        maxLines: 1, // 최대 줄 수
      ),
    ),
void diceEvent(int numberOfDice) {
// ...게임 로직 관련 코드
numberOfDiceToRoll = numberOfDice; // 임시 코드
_controller.forward();
}numberOfDiceToRoll값은 ElevatedButton의 diceEvent함수 을 통해 지정해줍니다. 그리고 _controller.forward();를 통해 애니매이션을 실행시킵니다.
이제 전체적인 게임페이지의 레이아웃을 모두 구성하였습니다. 다음 포스팅부터는 게임 로직에 관련된 내용을 포스팅하겠습니다. 만약 오류가 나거나 잘 안되는 부분이 있었다면 마음껏 댓글을 남겨주십시오. 코드 지적 또한 환영입니다 😎
