[Flutter] Socket.io를 이용한 통신 보드게임 어플 만들기 (메인 페이지 레이아웃)
Flutter 기본 강의

해당 프로젝트는 Flutter의 아주 기본적인 사용방법은 생략할 예정입니다. 만약 Flutter에 대해서 전혀 모른다면 아래의 유튜브 강의를 추천해드릴테니 해당 강의를 모두 이해한 후에 프로젝트를 시작해주십시오.
메인페이지 미리보기
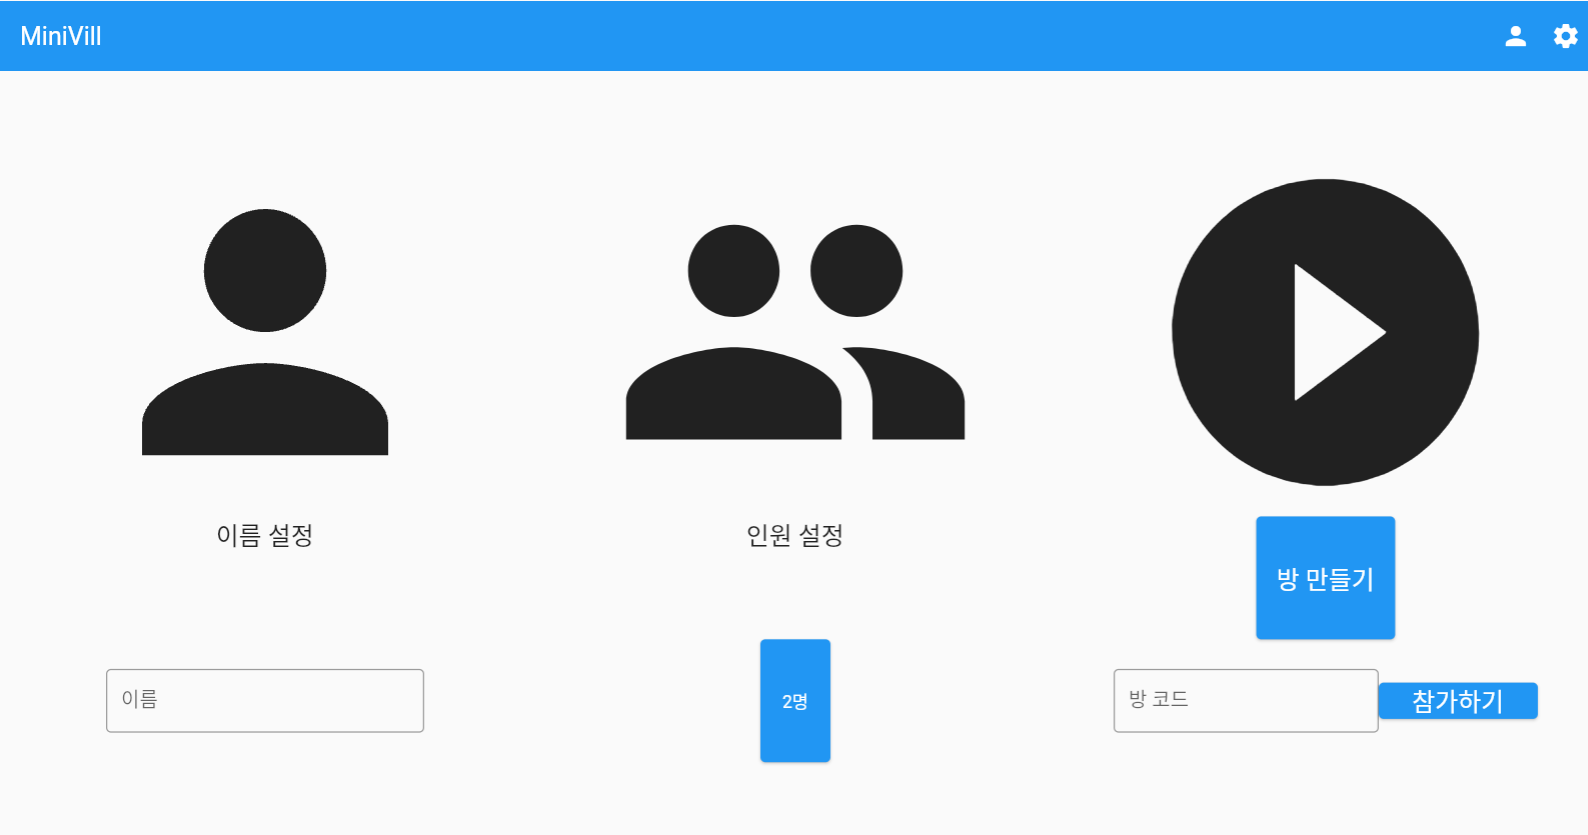
메인페이지는 다음 화면과 같이 구현할 것입니다. 플레이어의 이름을 설정할 TextField와 2~4명의 인원수를 조절한 ElevatedButton, 그리고 방을 만들거나 방코드를 입력하여 게임에 참여할 수 있는 요소들을 알맞게 배치할 것입니다.
메인페이지 구성
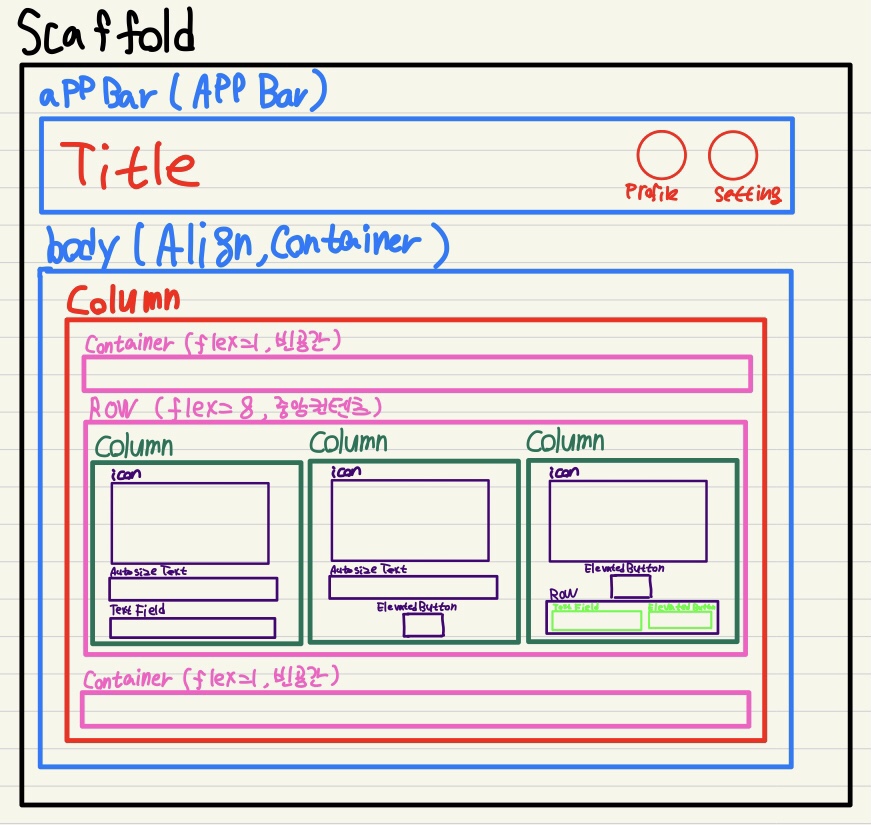
메인페이지의 구조입니다. 먼저 Flutter에서 제공하는 기본 앱 구조인 Scaffold를 사용하여 AppBar와 Body를 구성합니다. 이번 프로젝트에서는 가로형 어플을 개발하여 하단바가 필요없기 때문에 bottomNavigationBar은 넣지 않습니다. AppBar도 기능적인 부분을 추가할 계획은 없으니 생략하고 싶다면 생략해도 괜찮습니다.
Body부분에 대해서 설명하기 이전에 먼저 주의해야할 점을 알려드리겠습니다. 높이나 너비를 조절할때 절대적인 값을 지정해주면 안됩니다. 모든 핸드폰의 화면이 똑같지 않기 때문에 절대적인 값을 지정해준다면 많은 종류의 휴대폰에서 디자인이 완전히 망가지거나 화면이 짤리는 현상이 발생할 수 있습니다. 위젯을 배치할때는 항상 부모의 크기에 맞춰 배치할 수 있는 Expanded나 Flexible을 사용하여 주십시오. 해당 프로젝트에서는 모두 Expanded를 이용해서 위젯을 배치합니다.
Main함수
void main() {
  WidgetsFlutterBinding.ensureInitialized();
  SystemChrome.setPreferredOrientations(
      [DeviceOrientation.landscapeLeft, DeviceOrientation.landscapeRight]);
  runApp(const MyApp());
}WidgetsFlutterBinding.ensureInitialized();는 플러터 앱이 시작되기 전에 특정 초기화 작업이 필요할 때 주로 사용됩니다. 다시 말해, runApp() 호출 전에 플러터 프레임워크와 관련된 바인딩을 초기화하기 위해 사용됩니다.
SystemChrome.setPreferredOrientations([DeviceOrientation.landscapeLeft, DeviceOrientation.landscapeRight]);코드는 어플을 가로형으로 고정하기 위해서 사용합니다.
여기서 주의해야 할 점은 'package:flutter/services.dart'를 import 해줘야 하고 안드로이드에서 가로모드를 사용하기 위해선 android/app/main안에 있는 AndroidManifest.xml파일에 다음과 같이 android:screenOrientation="landscape"를 추가해줘야 합니다.
import 'package:flutter/services.dart';<application
...
...>
<activity
...
...
android:screenOrientation="landscape">
...
...
</activity>
</application>MyApp 위젯
class MyApp extends StatelessWidget {
const MyApp({Key? key}) : super(key: key);
Widget build(BuildContext context) {
return MaterialApp(
debugShowCheckedModeBanner: false,
initialRoute: '/',
routes: {
'/': (context) => MainScreen(),
},
);
}
}MyApp은 StatelessWidget을 상속받은 위젯으로, 상태를 가지지 않는 불변의 위젯입니다. 이는 앱의 최상위 레벨 위젯이며, 앱의 주요 구성 및 설정을 담당합니다.
debugShowCheckedModeBanner: false는 우측 상단의 디버그 배너를 숨기기 위한 속성입니다.
initialRoute: '/'는 앱이 처음 실행될 때 표시될 경로를 정의합니다. 여기서는 '/'가 기본 경로로 설정되어 있고 '/'는 MainScreen 위젯으로 연결되어 있습니다. 즉 사용자가 앱을 실행하면 MainScreen 위젯이 화면에 표시되는 것입니다.
MainScreen 위젯
class MainScreen extends StatefulWidget {
_MainScreenState createState() => _MainScreenState();
}
class _MainScreenState extends State<MainScreen> {
// 인원수 (기본 2명)
int numOfPlayers = 2;
// 방 생성 or 참가 여부 (true = 생성 / false = 참가)
bool createJoin = false;
// 방코드
String roomCode = "";
final roomCodeInputController = TextEditingController();
// 유저 이름
String userName = "";
final userNameInputController = TextEditingController();
Widget build(BuildContext context) {
return MaterialApp(
debugShowCheckedModeBanner: false,
home: Scaffold(
appBar: AppBar(
title: Text('MiniVill'),
elevation: 0.0,
actions: [
IconButton(
onPressed: () {},
icon: Icon(Icons.person),
),
IconButton(
onPressed: () {},
icon: Icon(Icons.settings),
)
],
),
body: Align(
alignment: Alignment.center,
child: Container(
width: double.infinity,
height: double.infinity,
color: Colors.transparent,
child: Column(
children: [
// Main body 위쪽 빈공간
Expanded(
flex: 1,
child: Container(),
),
// Main body 중앙 컨텐츠 공간
Expanded(
flex: 8,
child: Row(
children: [
// 이름설정 공간
Expanded(
flex: 1,
child: Column(
children: [
Expanded(
flex: 3,
child: FittedBox(
child: Icon(Icons.person),
),
),
Expanded(
flex: 1,
child: AutoSizeText(
'이름 설정',
minFontSize: 5,
style: TextStyle(fontSize: 20.0),
// 시작할 폰트 크기
maxLines: 1, // 최대 줄 수
),
),
Expanded(
flex: 1,
child: Row(
children: [
Expanded(
flex: 1,
child: SizedBox(),
),
Expanded(
flex: 3,
child: TextField(
decoration: InputDecoration(
border: OutlineInputBorder(),
labelText: '이름',
),
onChanged: (String) => userName =
String, // 'text' 파라미터를 사용하여 userName 변수에 값을 저장
),
),
Expanded(
flex: 1,
child: SizedBox(),
),
],
),
),
],
),
),
// 인원설정 공간
Expanded(
flex: 1,
child: Column(
children: [
Expanded(
flex: 3,
child: FittedBox(
child: Icon(Icons.people),
),
),
Expanded(
flex: 1,
child: AutoSizeText(
'인원 설정',
minFontSize: 5,
style: TextStyle(fontSize: 20.0),
// 시작할 폰트 크기
maxLines: 1, // 최대 줄 수
),
),
Expanded(
flex: 1,
child: ElevatedButton(
child: Text('$numOfPlayers명'),
onPressed: () {
setState(() {
numOfPlayers = numOfPlayers == 4
? 2
: numOfPlayers + 1;
});
},
),
),
],
),
),
// 방참가, 참여 공간
Expanded(
flex: 1,
child: Column(
children: [
Expanded(
flex: 3,
child: FittedBox(
child: Icon(Icons.play_circle_fill),
),
),
Expanded(
flex: 1,
child: ElevatedButton(
child: AutoSizeText(
'방 만들기',
minFontSize: 5,
style: TextStyle(fontSize: 20.0),
// 시작할 폰트 크기
maxLines: 1, // 최대 줄 수
),
onPressed: () {
createJoin = true;
Navigator.push(
context,
MaterialPageRoute(
builder: (context) => GameScreen(
numOfPlayers: numOfPlayers,
createJoin: createJoin,
roomCode: roomCode,
userName: userName),
),
);
},
),
),
Expanded(
flex: 1,
child: Row(
children: [
Expanded(
flex: 1,
child: SizedBox(),
),
Expanded(
flex: 5,
child: TextField(
decoration: InputDecoration(
border: OutlineInputBorder(),
labelText: '방 코드',
),
onChanged: (String) =>
roomCode = String),
),
Expanded(
flex: 3,
child: ElevatedButton(
child: AutoSizeText(
'참가하기',
minFontSize: 5,
style: TextStyle(fontSize: 20.0),
// 시작할 폰트 크기
maxLines: 2, // 최대 줄 수
),
onPressed: () {
createJoin = false;
Navigator.push(
context,
MaterialPageRoute(
builder: (context) => GameScreen(
numOfPlayers: numOfPlayers,
createJoin: createJoin,
roomCode: roomCode,
userName: userName),
),
);
},
),
),
Expanded(
flex: 1,
child: SizedBox(),
),
],
),
),
],
),
),
],
),
),
// Main body 아래쪽 빈공간
Expanded(
flex: 1,
child: Container(),
),
],
),
),
),
));
}
}
MainScreen은 유저가 이름을 입력하거나 인원수를 바꾸거나 방코드를 입력할때마다 화면이 바뀌어야하므로 StatefulWidget을 사용해야 합니다.
우선 변수부분을 살펴봅시다. numOfPlayers의 값은 삼항연산자를 이용하여 버튼을 누를때마다 numOfPlayers가 1씩 늘어나고 numOfPlayers가 4인 상태에서 누르면 다시 2가 되도록 코딩했습니다.
ElevatedButton(
     child: Text('$numOfPlayers명'),
     onPressed: () {
           setState(() {
                 numOfPlayers = numOfPlayers
                           == 4 ? 2: numOfPlayers + 1;
           });
     },
),
createJoin 변수는 서버와 관련된 변수이므로 해당 변수의 활용은 서버 관련한 내용을 다룰때 설명드리겠습니다.
userName과 roodCode는 onChanged를 이용하여 TextField의 값이 변할때마다 각 변수에 저장하도록 코딩하였습니다.
TextField(
      decoration: InputDecoration(
            border: OutlineInputBorder(),
            labelText: '이름',
      ),
      onChanged: (String) => userName = String,
),TextField(
decoration: InputDecoration(
border: OutlineInputBorder(),
labelText: '방 코드',
),
onChanged: (String) => roomCode = String
),그리고 방을 만들거나 방에 참가하면 이 값들을 저장하여 다음과 같이 GameScreen위젯으로 전달합니다.
Navigator.push(
      context,
      MaterialPageRoute(
            builder: (context) => GameScreen(
                                     numOfPlayers: numOfPlayers,
                                     createJoin: createJoin,
                                     roomCode: roomCode,
                                     userName: userName),
     ),
);
GameScreen에 대한 내용과 위젯 간 이동에 대한 내용은 다음 포스팅에 작성하겠습니다.
