
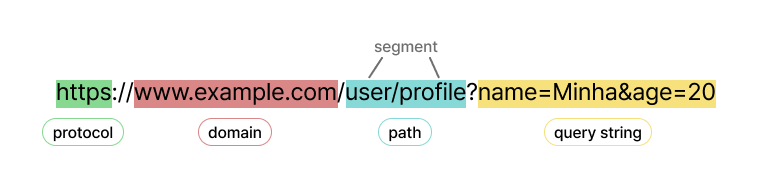
✅ URL 구조
✅ Vue Router
1. 세팅 및 라우터 인스턴스 생성
- 설치 :
npm install vue-router - main.js 설정
import { createApp } from 'vue';
import App from './App.vue';
import router from './router';

const app = createApp(App);
app.use(router);
app.mount('#app');
// router/index.js
const router = createRouter({
history: createWebHistory(), // HTML5 History API를 기반으로 하는 라우팅 모드
routes: [ ]
});2. router 생성
- 정적 import
- 장점 : 미리 불러오기 때문에 리소스에 대한 로딩이 빠르다
- 단점 : 필요없는 페이지에 대한 컴포넌트도 모두 불러온다
- 동적 import
- 장점 : 필요한 페이지만 불러와서 초기 로딩 속도가 빠르다
- 단점 : 페이지 이동 시마다 컴포넌트를 불러와야 한다
- vue 파일 내에서 vue-router 관련 import는 따로 하지 않아도, 전역으로 깔려있다.
형식
const routes = createRouter({
  history: // 히스토리 관리 방식식 정의
  routes: // 라우트 객체 포함
});
history 속성
- 지정할 수 있는 값 종류
createWebHistory: HTML5 히스토리 모드 사용. 슬래시(/)로 URL 관리createWebHashHistory: 해시 모드 사용. 해시(#)로 URL 관리
- 인자에 baseURL를 넣어 기본 URL 설정 가능
코드
routes: [ // 라우트 정의
  { // 정적 import
    path: '/', // URL 경로
    name: 'Home', // 라우터 고유한 이름
    component: Home, // URL로 접근했을 때 표시될 컴포넌트
  },
  { // 동적 import
	  path: '/about',
	  name: 'About',
	  component: () => import ("@/pages/About.vue"),
	  redirect: { name: 'AboutNew' }, // path를 바꾸는 과도기 단계, 리다이렉트 시키기
	},
	{
    // 기존 /about을 이 경로의 이름을 바꾸고 싶을 때
    path: '/about-new',
    name: 'AboutNew',
    component: () => import('@/pages/About.vue'),
    meta: { // 라우트에 대한 추가 정보 제공
      title: 'About',
      key: 'value',
  },
  {
    path: '/profile/:id', // 동적 params
    name: 'Profile',
    redirect: (to) => {
      return {
        name: 'Profile-new',
        params: { id: to.params.id }, // 리디렉션 할 때, 동적 params 전달 방식
        query: { q: to.query.q }, // 리디렉션 할 때, query 전달 방식
      };
    },
  },
  {
    path: '/profile-new/:id',
    name: 'Profile-new',
    component: () => import('@/pages/Profile.vue'),
    props: (route) => ({
	    ...route.params, // URL 파라미터를 그대로 props로 전달
	    customProp: 'someValue', // 추가적인 props
	  }),
  },
  {
    path: '/dashboard',
    name: 'Dashboard',
    components: {
	    // 동일한 이름의 RouterView로 매칭되어 렌더링
      default: () => import('@/pages/Dashboard.vue'),
      header: () => import('@/components/DashboardHeader.vue'),
      footer: () => import('@/components/DashboardFooter.vue'),
    },
    alias: '/dash', // URL 경로 별칭 설정 (/dashboard, /dash 둘 다 가능, 배열로 여러 개 설정 가능)
  },
  {
    path: '/product',
    name: 'Product',
    component: () => import('@/pages/Product.vue'), // 이게 없으면 묶어주는 역할로만
    children: [ // 하위 path
      {
        path: 'info',
        name: 'ProductInfo',
        component: () => import('@/pages/ProductInfo.vue'),
      },
      {
        path: ':item',
        name: 'ProductItem',
        component: () => import('@/pages/ProductItem.vue'),
        props: true, // URL 파라미터를 props로도 내려줌
      },
    ],
  },
  {
    path: '/:pathMatch(.*)*', // 와일드카드 경로 매칭 (사용자 정의 외 다른 모든 경로)
    name: 'NotFound',
    component: () => import('@/pages/NotFound.vue'),
  },
  {
    path: '/user-:afterUser(.*)', // user-* 형식의 url 매칭
    component: () => import('@/pages/UserGeneric.vue'),
  },
],
3. vue 에 라우팅 적용
라우팅된 컴포넌트 렌더링
<template>
	<RouterView />
</template>

혹은

<template>
	<RouterView name="header" />
	<RouterView />
	<RouterView name="footer" />
</template>
링크 생성
<template>
  <nav>
    <RouterLink to="/">Home</RouterLink>
    <RouterLink to="/about">About</RouterLink>
    <RouterLink :to="{ name: 'About' }">About2</RouterLink> // 이 방식도 가능
    <RouterLink
      :to="{
        name: 'User',
        params: { user: 'mike', id: '1' },
        query: { lang: 'ko' },
      }">
      User
    </RouterLink>
    <RouterLink :to="{ name: 'ProductInfo' }">Product</RouterLink>
    <RouterLink :to="{ name: 'ProductItem', params: { item: '2' } }"
      >Product2</RouterLink
    >
  </nav>
</template>
프로그래밍 탐색
- useRouter 사용
- Vue Router에서 제공하는 컴포저블(composable) 훅
- 라우터 인스턴스에 접근할 수 있도록 해주는 훅
- 프로그래밍적으로 라우팅을 변경하거나, 라우트 탐색 제어
- useRouter로 사용할 수 있는 메서드
- push
- replace : 이전 페이지의 히스토리를 남기지 않음
- forward, back, go
<script setup>
  const router = useRouter();
  const handleMethod = () => {
    //router.push('/');
    //router.replace('/');
    router.push({
      name: 'User',
      params: { user: 'mike', id: '1' },
      query: { lang: 'ko' },
    });
  };
</script>

<template>
  <h1>Not Found</h1>
  <button @click="handleMethod">홈으로 돌아가기</button>
</template>
동적 라우트 파라미터 & 쿼리 스트링
- useRoute 사용
- 현재 라우트 정보를 가져오는 컴포저블(composable) 훅
- 현재 경로, 동적 파라미터, 쿼리 문자열 등 현재 라우트와 관련된 정보 접근
- useRoute로 사용할 수 있는 속성
- path : 현재 경로
- params : 동적 세그먼트
- query : 쿼리 파라미터
- name : 라우트 이름
<script setup>
  const route = useRoute(); // 리액트에서는 훅, vue에서는 컴포져블
  const { id, user } = route.params;
  const { lang } = route.query;

  // 라우트 설정 시, props: true하면 사용 가능
  // props는 params만 가능 (즉, 세그먼트만 가능)
  // query string은 불가
  const props = defineProps({
    user: String,
    id: String,
  });
</script>

<template>
  <h1>User</h1>
  <p>{{ id }} / {{ user }} / {{ lang }}</p>
  <p>{{ props.id }} / {{ props.user }}</p>
</template>
4. 네비게이션 가드
- 라우팅 과정 중에 특정 지점에서 라우팅 전환을 가로채서 사용자 정의 기능을 추가할 때 사용
- 라우트 접근 제어 가능
- 다른 라우트로 리다이렉션 가능
- 라우트 변경 전에 데이터 불러오기 가능
전역 가드
- 모든 라우트가 공통적으로 영향 받음
- 라우트 전환 전 방식 :
beforeEach((현재값, 이전값, 이동 함수) => {}) - 라우팅 전환 직전 방식 :
router.beforeResolve((현재값, 이전값, 이동 함수) => {})- beforeEach로 라우트 확정된 이후 호출
- 라우트 전환 후 방식 :
afterEach((현재값, 이전값, 실패 정보}) => {})
const router = createRouter({
  routes: [],
})

// 라우트 전환 전 방식
router.beforeEach((to, from, next) => {
	// next를 반드시 호출해야 페이지 이동 가능
	// next(false)로 의도적으로 페이지 이동 막기 가능

	// 권한 체크를 하는 등의 로직
	const isAuthenticated = false;
	if (to.path === '/dashboard', && !isAuthenticated) {
	  next('/login')
	}

	// meta 속성을 이용해 탭 이름 변경 가능
	if(to.meta.title) {
	  document.title = to.meta.title
	}

	next()
})

// 라우트 전환 직전 발생
router.beforeResolve((to, from, next) => {})

// 라우트 전환 후 실행
router.afterEach((to, from, failure) => {
  // ...
});
라우트별 가드
- 특정 라우트 전환에서만 호출됨
- 라우트 객체 내에서 직접 설정
beforeEnter(현재값, 이전값, 이동 함수)
{
  path: '/about',
  name: 'about',
  component: () => import('../views/AboutView.vue'),
  beforeEnter: (to, from, next) => {
    // beforeEach와 동일
    // ...

    next()
  },
},
컴포넌트 내 가드
onBeforeRouteUpdate((미래값, 현재값) => {}): 동적 경로 매칭 - 동적 세그먼트 값 변경 시 호출onBeforeRouteLeave(): 라우트 벗어나기 전 호출
<script setup>
onBeforeRouteUpdate((to, from) => {
  // 동적 세그먼트 값 변경 시 호출
	return true; // 페이지 이동 허용
	return false; // 페이지 이동 금지
}

onBeforeRouteLeave((to, from) => {
	// 라우트 떠나기 전 호출
	return true; // 페이지 전환 허용
	return false; // 페이지 전환 금지
})
</script>
5. 스크롤 동작
- SPA 기반이기 때문에 라우트 전환 시 페이지가 새로고침 되지 않고 DOM만 업데이트 됨. 따라서 페이지가 전환되어도 스크롤이 유지됨
- 스크롤을 다시 상단으로 올리고 싶다면 스크롤 동작 함수 사용 가능
scrollBehavior((미래값, 현재값, 스크롤 위치 객체) => {})
const router = createRouter({
	history: ...
  routes: ...
  scrollBehavior((to, from, savedPosition) => {
	  // savedPosition은 브라우저의 앞/뒤 버튼을 눌렀을 때만 사용 가능
	  // 일반적인 라우트 전환에서는 undefined

	  // 브라우저 앞/뒤 버튼 누를 시, 스크롤 유지
	  // 그 외 라우트는 맨 위로
	  if(savedPosition) return savedPosition;
	  esle return { top: 0; }
  })
`
해시 주소를 이용해서 스크롤 이동
scrollBehavior((to, from, savedPosition) => {
	if(savedPosition) return savedPosition;

	// id의 속성값과 to.hash가 일치한 요소로
	// 위치에서 10px 만큼 위로 이동
	// 부드러운 스크롤 이동
	if(to.hash) return { el: to.hash, top:10,  behavior: 'smooth' }
})
✅ Pinia
- Vue의 전역 상태 관리 라이브러리
1. 세팅
- 설치 :
npm install pinia - main.js 설정
const pinia = createPinia(); // pinia 인스턴스 생성
const app = createApp(App);

app.use(pinia); // pinia 인스턴스 등록
app.mount('#app');
2. 스토어
- 애플리케이션의 상태를 중앙에서 관리하기 위한 것
- 보통 stores 폴더를 만들어 관리
- 기본 형태 (셋업 스토어)
export const useCountStore = defineStore('countStore', () => {});예시
export const useCountStore = defineStore('countStore', () => {
	const count = ref(0);
	const doubleCount = computed(() => count.value * 2);
	const increment = () => count.value++;

	return { count, doubleCount, increment };
});
3. 전역 상태 사용
- store를 호출하여 사용
- 객체 비구조화 할당
- 반응형이 깨져 화면에 업데이트가 되지 않음. 함수는 가능
- storeToRefs로 해결 가능
<script setup>
  const countStore = useCountStore();
</script>
<template>
  <p>{{ countStore.count }}</p>
  <button @click="countStore.increment">증가</button>
</template><script setup>
const countStore = useCountStore();
const { count, doubleCount } = storeToRefs(countStore);
const { increment } = countStore;
</script>
<template>
<p>{{ count }} / {{ doubleCount }}</p>
<button @click="increment">증가</button>
</template>📌 출처

프론트엔드를 공부하고 있는 학생입니다🐌