네임스페이스
#nginx.yaml
#yaml 템플릿
#들여쓰기 할때 tab아니고 space bar
apiVersion: v1
kind: Pod
metadata:
  name: nginx-pod
spec:
  containers:
  - name: nginx-container
    image: nginx:1.14
    ports:
    - containerPort: 80
      protocol: TCP
kubectl create -f nginx.yaml
kubectl get pods -n kube-systemkubectl create namespace 'ns 이름'
---
or
---
kubectl create namespace 'ns 이름'--dry-run -o yaml > 'ns 이름'.yaml
kubectl create -f 'ns 이름'.yaml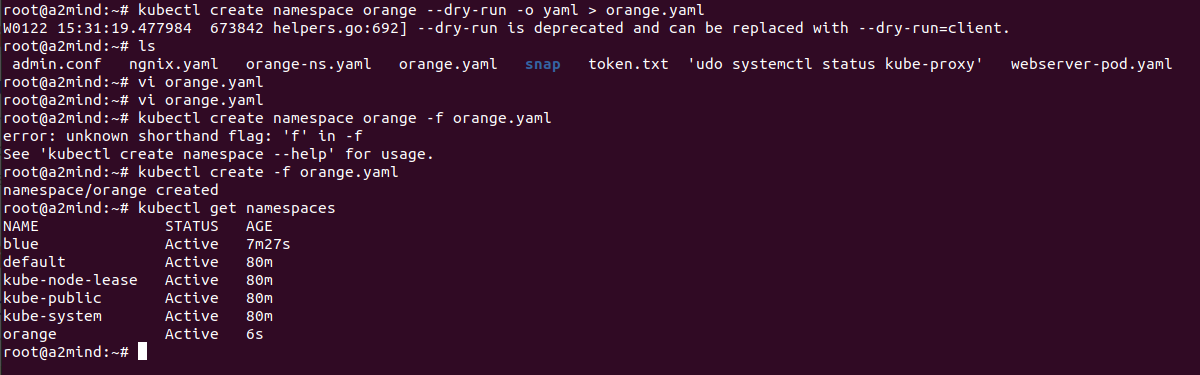
#해당 네임스페이스에 파드 생성
kubectl create -f nginx.yaml -n blue
kubectl get pods -> default namespace의 pod만 찾아줘
kubectl get pods -n '' -> 해당 namespace의 pod 찾아줘
kubectl get pods --all-namespaces -> 모든 pod 찾아네임스페이스 switch
기본으로 사용하는 네임스페이스를 default가 아니라 원하는 네임스페이스로 switch
#config context 바꾸기
kubectl config view
kubectl config set-context '네임스페이스 이름' --cluster=kubernetes --user=kubernetes-admin --namespace='네임스페이스 이름'

kubectl config current-context
kubectl config use-context 'context이름'
Api 확인
kubectl explane '오브젝트 ex)pod'
-> api 버전 확인 후 yaml파일 작성 가능
컨테이너를 표현하는 k8s 최소 단위
하나의 컨테이너 또는 여러개의 컨테이너기 포함될 수도 있음.
kubectl run webserver --image=nginx:1.14
kubectl create -f pod-nginx.yaml

#2초마다 해당 명령어를 반복 -> 모니터링 하기 좋음
watch kubectl get pods -o wide

#pod ip만 추출해서 보여주는 grep사용 + json형태로 보여줘
kubectl get pods 'pod 이름' -o json | grep -i podip

#pod에 접속해서 결과보기
curl [ip address] apiVersion: v1
kind: Pod
metadata:
name: nginx-pod
spec:
containers:
- name: nginx-container
image: nginx:1.14
ports:
- containerPort: 80
protocol: TCPmulti-container pod 생성하기
하나의 파드에 여러개의 컨테이너가 들어가는 형태
apiVersion: v1
kind: Pod
metadata:
  name: multipod
spec:
  containers:

#first pod
  - name: nginx-container
    image: nginx:1.14
    ports:
    - containerPort: 80

#second pod
  - name: centos-container
    image: centos:7
    command: ["/bin/sh", "-c", "while : ;do curl http://localhost:80/; sleep 3; done"]
yaml파일 만들어주고
kubectl create -f multi-pod.yaml
kubectl describe
두개의 컨테이너가 한 파드에 있고 두개의 컨테이너는 동일한 ip사용

# bash에 interactive하게 접근할 수 있도록 sudo 만들어서 접해줘
kubectl exec multipod -c nginx-container -it -- /bin/bash
exit
centos container에 들어가서 localhost:80해도 같은 ip를 쓰는 nginx 서버가 응답!
kubectl logs multipod -c nginx-containerpod 동작 flow
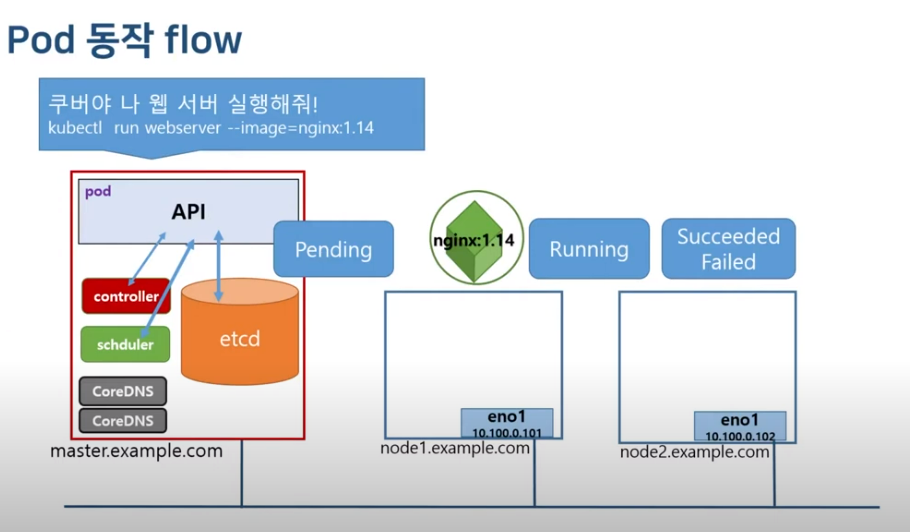
생성하거나 종료할때 아래 명령어 해주면 상태를 한줄씩 볼 수 있다.
kubectl get pods -o wide --watchpod 관리
# 동작중인 파드 정보 보기
kubectl get pods
kubectl get pods -o wide
kubectl descrive pod webserver

# 동작중인 파드 수정
kubectl edit pod webserver

# 동작중인 파드 삭
kubectl delete pod webserver
kubectl delete pod --all
livenessProbe self-healing
컨테이너 진단
3번 건강하지 않다고 판단되면 컨테이너 다시 시
pod spec에 정의해줘야함.
apiVersion: v1
kind: Pod
metadata:
  name: liveness-pod
spec:
  containers:
  - image: smlinux/unhealthy
    name: unhealthy-container
    ports:
    - containerPort: 8080
      protocol: TCP
    livenessProbe:
      httpGet:
        path: /
        port: 8080
livenessProbe 매커니즘
- httpGet : 지정한 ip주소 , port, path 에 CET요청을 보내 해당 컨테이너가 응답하는지 확인한다. 반환 코드가 200이 아니면 오류라고 판단해 컨테이너 다시 시작한다.
   livenessProbe:
      httpGet:
        path: /
port: 8080- tcpSocket : 지정된 포트에 TCP연결 시도. 연결되지 않으면 컨테이너 다시 시작한다.
livenessProbe:
	TcpSocket:
port: 22- exec : exec명령을 전달하고 명령의 종료코드가 0이 아니면 컨테이너를 다시 시작한다.
livenessProbe:
	exec:
		commands:
		- ls
		- /data/file
# 이 경우는 해당 파일이 있는지 확인
livenessProbe 매개변수
안쓰면 default값으로 적용
- initialDelaySeconds
- PeriodSeconds
- timeoutSeconds
- successThreshold
- failureThreshold
ex)
- 동작되는 pod내의 컨테이너에 /tmp/healthy파일이 있는지 5초마다 확인
- pod 실행 후 10초 후 부터 검사
- 성공횟수는 1번 실패는 연속 2회로 구성
apiVersion: v1
kind: Pod
metadata:
  name: liveness-pod
spec:
  containers:
  - name: busybox-container
    image: busybox
    args:
		- /bin/sh
		- -c
		- touch /tmp/healthy; sleep 30; rm -rf /tmp/healthy; sleep 600
    livenessProbe:
      exec:
				commands:
				- ls
				- /tmp/healthy
				initalDelaySeconds: 10
				successThreshold: 1
				failureThreshold: 2
init container & infra container
만약 nodejs로 만들어진 어플리케이션 로그인을 지원해주는 컨테이너가 있다고 하면 DB에 접근해서 정보를 가져와야하는데 여기서 그럼 DB에 접근해서 정보들을 가져오는 컨테이너가 init container가 된다.
init container가 있는 pod는 init container가 성공되야 main container가 구동된다.
init container
앱 컨테이너를 실행하기 전 미리 동작시킬 컨테이너
main container가 실행되기 전에 사전 작업이 필요한 경우 사용
apiVersion: v1
kind: Pod
metadata:
  name: myapp-pod
  labels:
    app.kubernetes.io/name: MyApp
spec:
  containers:
  - name: myapp-container
    image: busybox:1.28
    command: ['sh', '-c', 'echo The app is running! && sleep 3600']
  initContainers:
  - name: init-myservice
    image: busybox:1.28
    command: ['sh', '-c', "until nslookup myservice.$(cat /var/run/secrets/kubernetes.io/serviceaccount/namespace).svc.cluster.local; do echo waiting for myservice; sleep 2; done"]
  - name: init-mydb
    image: busybox:1.28
    command: ['sh', '-c', "until nslookup mydb.$(cat /var/run/secrets/kubernetes.io/serviceaccount/namespace).svc.cluster.local; do echo waiting for mydb; sleep 2; done"]
지금 main container는 my-app container이고
init container가 init-myservice, init-mydb 두개인 형태

지금 init이 실행이 안되서 main container도 ready상태가 되지 않는다.
# my-service
apiVersion: v1
kind: Service
metadata:
  name: myservice
spec:
  ports:
  - protocol: TCP
    port: 80
    targetPort: 9376
# my-db
apiVersion: v1
kind: Service
metadata:
name: mydb
spec:
ports:
- protocol: TCP
port: 80
targetPort: 9377infra container
pop 하나당 pause container가 생성됨.
마스터 노드에서 ssh 워커노드 하고 docker ps 해보면 구동되고 있는 container모두 확인 가
pause container는 pod 인프라를 구성해줌. 실제 작업을 수행하지는 않음
🚨 Trouble shooting
crypto/rsa verification error kubernetes
unset KUBECONFIG
export KUBECONFIG=/etc/kubernetes/admin.conf
mkdir -p $HOME/.kube
sudo cp -i /etc/kubernetes/admin.conf $HOME/.kube/config
sudo chown $(id -u):$(id -g) $HOME/.kube/config
static pod
원래 pod는 kubectl run 하면 마스터 노드의 api호출해서 schedular가 node를 배정해주는 그런 flow로 pod를 생성한다.
static pod는! Api 서버 없이 특정 노드에 있는 kublet 데몬에 의해 직접 관리
모든 노드는 kublet이라는 daemon을 가지고 있는데 kublet이 관리하는 staticpod 디렉토리에 yaml파일을 넣으면 static pod가 생기고 yaml파일을 지우면 pod가 삭제된다.
! 워커 노드의 shell에서 실행하는거~ !
cat /var/lib/kubelet/config.yaml
#  밑에 읽어보면 staticPodPath가 있음
# staticPodPath: /etc/kubernetes/manifests
# 여기에 pod yaml파일을 저장하면 kubelt daemon이 static pod를 생성
cd /etc/kubernetes/manifests
vi staticpod.yaml
rm staticpod.yaml
# 하면 pod가 삭제됨
apiVersion: v1
kind: Pod
metadata:
name: nginx-pod
spec:
containers:
- name: nginx-container
image: nginx:1.14
ports:
- containerPort: 80
protocol: TCP
마스터 노드의 api-server, controller-manager, scheduler 는 yaml파일을 사용하여 static pod로 사용되고 있다
Pod에 Resource 할당하기 (CPU/memory requests, limits)
지금까지 만든 pod는 제한이 없는 파드여서 하나의 파드가 노드의 모든 리소스를 다 써버릴 수 있다 → 최대로 쓸 수 있는 양 제한 limit
메모리 limit을 초과하면 사용되는 파드는 종료되며 다시 스케쥴링
scheduling할때 요구조건을 request → 파드를 실행하기 위한 최소 리소스의 양 요청
apiVersion: v1
kind: Pod
metadata:
  name: nginx-pod-resources
spec:
  containers:
  - name: nginx-container
    image: nginx:1.14
    ports:
    - containerPort: 80
      protocol: TCP
		resources:
			requests:
				memory: 500Mi
				cpu: 1
apiVersion: v1
kind: Pod
metadata:
name: nginx-pod-resources
spec:
containers:
- name: nginx-container
image: nginx:1.14
ports:
- containerPort: 80
protocol: TCP
resources:
limits:
memory: 500Mi
cpu: 1kubectl create -f nginx-pod-resources.yaml
kubectl describe pod nginx-pod-resourcesrequest만 설정하면 request만 설정되는데 limit을 설정하면 request는 limit과 동일한 값으로 설정된다.
너무 큰 request해버리면 pending됨
pod 환경변수 설정
pod실행 시 미리 정의된 컨테이너 환경변수를 변경할 수 있다.
apiVersion: v1
kind: Pod
metadata:
  name: nginx-pod-resources
spec:
  containers:
  - name: nginx-container
    image: nginx:1.14
    ports:
    - containerPort: 80
      protocol: TCP
    env:
    - name: MYVAR
      value: "test value"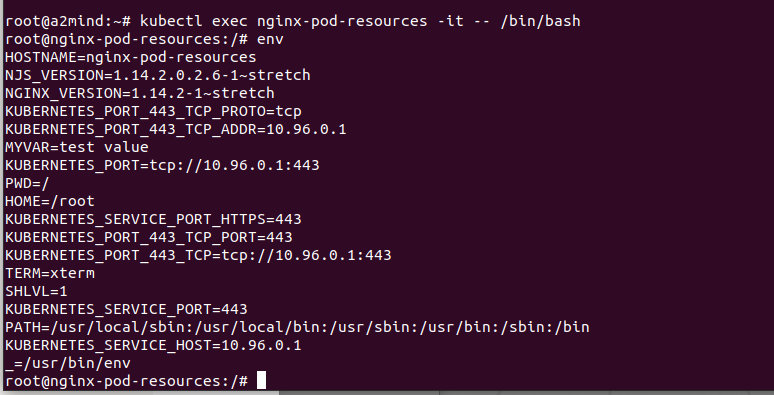
해당 컨테이너의 bash에 들어가서 env로 확인하면 내가 설정한 MYVAR = test value를 확인할 수 있다.
Pod 구성패턴
파드를 구성하고 실행하는 패턴
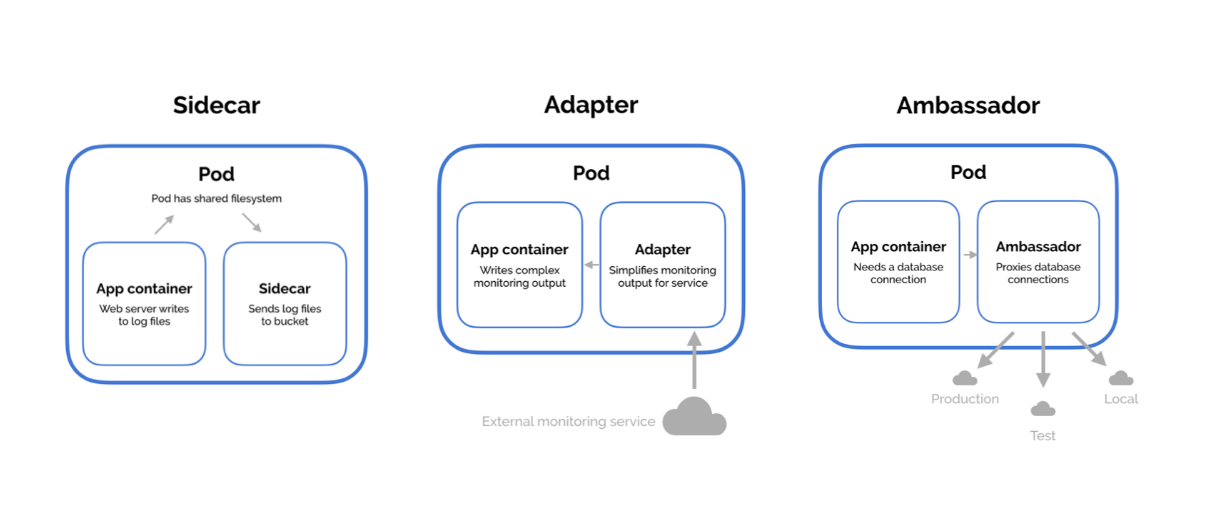
- sidecar
혼자서는 움직일 수 없는 파드 형태
ex) webserver에서 log생성하면 sidecar container에서 log분석
- adapter
밖에 있는 데이터를 받아와 다른 컨테이너에게 전달
- ambassador
로드밸런서 역할