이번 포스팅에서는 새로운 개념을 배우지 않는다. 다만, 배운 내용을 이용해 코드를 작성한 과정을 정리했다.
사용자가 입력한 name, password를 welcome.jsp 페이지에서 보여줄 것
/login URL + POST 메서드를 사용하는 경우, @RequestParam을 통해 name, password을 받아오고, welcome.jsp에서 name, password를 화면에 보여줄 수 있게끔 model을 이용했다.
// LoginController.java
@Controller
public class LoginController {

	@RequestMapping(method = RequestMethod.GET, value = "/login")
	public String gotoLoginPage() {
		return "login";
	}

	@RequestMapping(method = RequestMethod.POST, value = "/login")
	public String gotoWelcomePage(@RequestParam String name, @RequestParam String password, ModelMap model) {

		model.put("name", name);
		model.put("password", password);
		return "welcome";
	}
}

// welcome.jsp
<html>
	<head>
		<meta charset="UTF-8">
		<title>Welcome page</title>
	</head>
	<body>
		<div>Your Name : ${name}</div>
		<div>Your Password : ${password}</div>
	</body>
</html>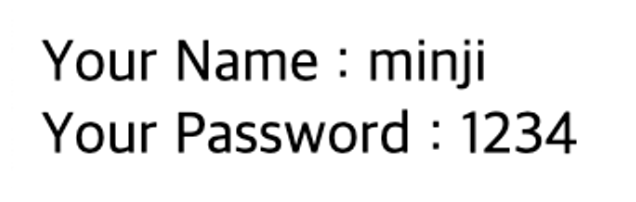
굳
하드코딩된 사용자 ID 및 패스워드 검증하기
이전 단계에서는 로그인 양식 구현 + 사용자의 name과 password를 welcome.jsp 페이지에 보여주기까지를 했다. 이번 포스팅에서는 약간의 인증 로직을 추가할 것이다.
인증 로직은 특정한 사용자 이름과 패스워드가 입력되면, 그 다음에 사용자를 welcome.jsp로 리다이렉션할 것이고, 입력이 되지 않았다면 다시 login.jsp로 send back시킬 것이다.
AuthenticationService 클래스 만들기
예를 들어 name == admin, password == adminPW 일때만 사용자를 welcome.jsp로 리다이렉션시키고, 그 이외의 값들이 들어오면 전부 login.jsp로 send back 시켜보자.
기능별로 구분해야 깔끔하니, 인증관련 클래스를 만들었다.
// AuthenticationService.java

public class AuthenticationService {

	public boolean authenticate(String userName, String userPassword) {

		boolean isValidUserName = userName.equalsIgnoreCase("admin");
		boolean isValidUserPassword = userPassword.equalsIgnoreCase("adminPW");

		return isValidUserName && isValidUserPassword;
	}

}

// LoginController.java
@Controller
public class LoginController {

	private AuthenticationService authenticationService;

	@Autowired
	public LoginController(AuthenticationService authenticationService) {
		super();
		this.authenticationService = authenticationService;
	}

	@RequestMapping(method = RequestMethod.GET, value = "/login")
	public String gotoLoginPage() {

		return "login";
	}

	@RequestMapping(method = RequestMethod.POST, value = "/login")
	public String gotoWelcomePage(@RequestParam String name, @RequestParam String password, ModelMap model) {

		if (authenticationService.authenticate(name, password)) {
			model.put("name", name);
			model.put("password", password);
			return "welcome";
		}
		return "login";
	}
}
gotoWelcomePage에서 authenticate메서드가 true를 반환하면, 올바른 사용자가의 name과 password를 받았으니 welcome.jsp로, false를 반환하면, 올바른 사용자의 name과 password를 받지 못했기에 login으로 돌아가도록 했다.
실행결과
근데,
Description:
Parameter 0 of constructor in com.firstWebApplication.springboot.myfirstWebapp.login.LoginController required a bean of type 'com.firstWebApplication.springboot.myfirstWebapp.login.AuthenticationService' that could not be found.
해당 AuthenticationService를 찾을 수 없었고,
Action:
Consider defining a bean of type 'com.firstWebApplication.springboot.myfirstWebapp.login.AuthenticationService' in your configuration.
스프링 빈으로 정의할 것을 알려주었다.
왜 그럴까 생각해서 에러가 난 AuthenticationService클래스 코드를 보니, 어떠한 어노테이션도 붙어있지 않아 스프링부트가 해당 객체를 관리할 수도 없고 인지조차 못한 것이었다!
비즈니스 논리를 가지고 있기에, AuthenticationService 클래스에 @Service 어노테이션을 추가해주었다.
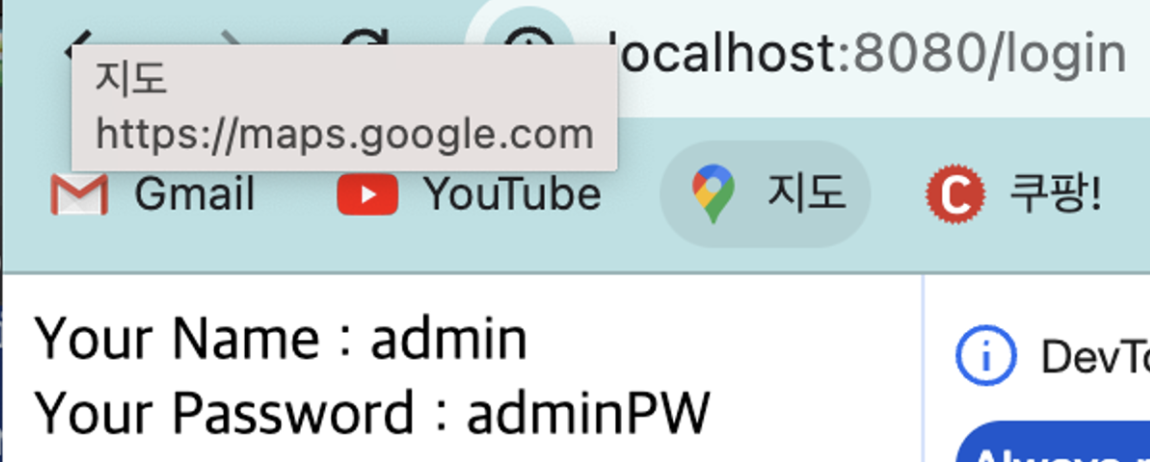
실행결과 admin, adminPW인 경우에만 welcome page로 간 것을 확인할 수 있었다. 그 이외의 name과 password를 입력했더니 login.jsp 페이지로 다시 돌아온 것을 확인했다.
에러 메세지 추가
/login URL에서 하드코딩된 name, password (admin, adminPW)가 아니라면, 다시 로그인을 시도하라는 에러 메세지를 추가하고 싶다.
핵심은, 에러 메세지 string을 jsp에 전달하고 싶다. 즉, 컨트롤러 코드와 뷰를 연결하는 model을 써야 했음이 핵심이었다.
// LoginController.java -> gotoWelcomePage()에 errorMsg추가
@Controller
public class LoginController {

	private AuthenticationService authenticationService;

	@Autowired
	public LoginController(AuthenticationService authenticationService) {
		super();
		this.authenticationService = authenticationService;
	}

	@RequestMapping(method = RequestMethod.GET, value = "/login")
	public String gotoLoginPage() {

		return "login";
	}

	@RequestMapping(method = RequestMethod.POST, value = "/login")
	public String gotoWelcomePage(@RequestParam String name, @RequestParam String password, ModelMap model) {

		if (authenticationService.authenticate(name, password)) {
			model.put("name", name);
			model.put("password", password);
			return "welcome";
		}
        String errorMsg = "admin login is failed! Please try again";
        model.put("error", errorMsg);
		return "login";
	}
}

// login.jsp
<html>
	<head>
		<title>login page</title>
	</head>
	<body>
		Welcome to the login page!

		<pre>${error}</pre>
		<form method = "post">
			Name : <input type = "text" name = "name"> <br>
			Password : <input type = "password" name = "password"> <br>
			<input type = "submit">
		</form>

	</body>
</html>
실행결과
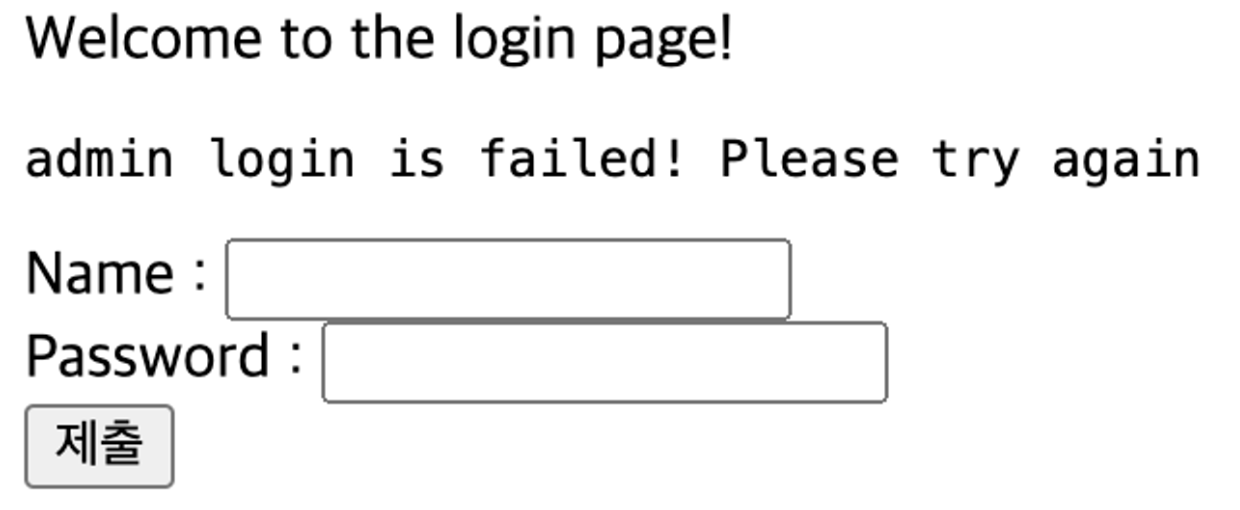
admin / adminPW가 아닌 값을 입력했더니, error 메세지가 떴다!
/login URL + POST 메서드에서 authentication메서드 반환값 결과 false라 모델에 error(key) - errorMsg(value) 값을 넣고, login view를 렌더링했다.
이 시리즈는 Udemy 강의의 내용을 정리한 것입니다.
https://www.udemy.com/course/spring-boot-and-spring-framework-korean/