TypeScript?
TypeScript의 필요성?
-
Javascript는 한줄한줄 읽어가는 인터프리터언어이자 변수의 자료형을 자유롭게 바꿔서 사용가능한 동적타이핑 언어라서 런타임오류가 보다 흔함
-
TypeScript는 이러한 한계를 극복하고자 정적타이핑을 지원하고, 실제 배포 이전에 타입체크를 진행함
TypeScript 프로젝트 만들기
프로젝트 생성 과정
- 터미널에서
npm init입력해서 Node.js 프로젝트 만들기 → 연달아 엔터를 입력해서 설정을 완료하면 package.json 파일이 생성됨 npm install --save-dev typescript입력해서 DevDependencies로 설치 ← 타입스크립트는 실제 프로젝트를 실행할 때는 사용하지 않고 개발할 때만 사용하므로!- 타입스크립트 사용시 필요한 설정파일 설치:
npx tsc --init
tsc: 타입스크립트의 컴파일러로, ts를 js로 바꿔주는 역할 - package.json 파일의
"scripts"에
(1)"build" : "tsc"추가
(2)"start" : "node main.js"추가 main.ts파일 생성 →console.log('Hi TypeScript')작성 후npm run build로 실행 (npm start로도 시작 가능)
→ 자동으로main.js파일 생성
TypeScript의 타입
-
타입 종류
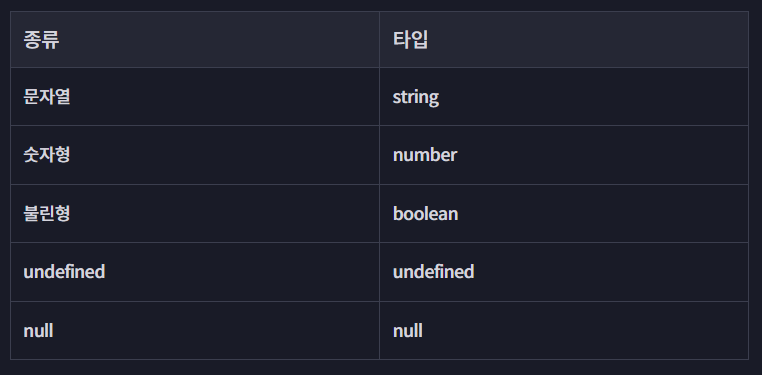
-
타입 할당하는 법
let size: number = 100; // 변수: size, 타입: number- 타입오류?
const product = {
  id: 'c001',
  name: '라이트 윈드 브레이커',
  price: 129000,
};

product.price = '139000원'; // 타입오류

const salePrice = product.price * 0.9;
console.log(`할인 가격: ${salePrice}`);- 기본형
let monsterName: string;
let level: number;
let hasGold: boolean;
let skill: undefined; // undefined와 null은 서로 다른 각각의 타입!
let area: null;

monsterName = '코드잇 고블린';
level = 255;
hasGold = false;
skill = undefined;
area = null;

// 숫자형의 종류들,, number의 is..메소드들을 활용해야 함
let num = 2/0; // = Infinity
let num2 = 0/0; // = NaN
TypeScript의 배열과 튜플
// 배열
const cart: string[] = [];
cart.push('c001');
cart.push('c002');
cart.push(3); // 오류! string인데 number 타입을 넣었으므로.

// 배열의 배열

const carts: string[][] = [
	['c001', 'c002'],
  	['c003'],
];

let mySize: number[] = [154, 34];
mySize = [4]; // 둘 다 가능
mySize = [];

// 튜플타입: 값의 개수와 타입까지 모두 지정 가능
let mySize: [number, number, string] = [142, 34, 'my'];
// 개수는 3개, 각각 숫자 숫자 문자열 타입의 값들이 담겨야 함!- 튜플에서 모든 값의 타입이 동일할 필요는 없음
TypeScript의 객체
let product: {
  id: string;
  name: string;
  price: number;
  membersOnly?: boolean;
  // ?를 사용해서 옵셔널로 작성하기: 반드시 값이 있을 필요는 없음.
  sizes: string[];
} = {
  id: 'c001',
  name: '코드잇 블랙 후디',
  price: 129000,
  membersOnly: true,
  sizes: ['M', 'L', 'XL'],
}

if (product.membersOnly) {
  console.log('회원 전용 상품');
} else {
  console.log('일반 상품');
}

// 만약 객체의 키값 부분의 타입만 정하고 싶다면?
let stock: {
  [id: string]: number;
} = {
  c001: 3,
  c002: 0,
  c003: 1
};- 문제풀이때는
{} = {}형태가 아닌,interface를 활용해야 통과됨
interface Monster {
    name: string;
    level: number;
    hasGold?: boolean;
    skills: string[];
}

let monster: Monster = {
    name: '코드잇 고블린',
    level: 22,
    hasGold: false,
    skills: ['태권도', '특공무술']
}
any
const product: any = {
  id: 'c001',
  name: '코드잇 블랙 후디',
  price: 129000,
  sizes: ['M', 'L', 'XL'],
};

console.log(product.reviews[2]); // any 없이는 타입오류 발생하는 부분- JSON을 parsing하기
// 1.
const parsedProduct: {
  name: string;
  price: number;
} = JSON.parse(
  '{ "name" : "코드잇", "price" : 12000 }'
);

// 2. as 사용하기
const parsedProduct = JSON.parse(
  '{ "name" : "코드잇", "price" : 12000 }'
) as {
  name: string;
  price: number;
};

// 3. <> ← 프론트엔드 코드에서 많이 사용되므로 혼동을 줄이기 위해 지양
const parsedProduct = <{
  name: string;
  price: number;
}> JSON.parse(
  '{ "name" : "코드잇", "price" : 12000 }'
);
함수의 타입
-
tsconfig.json파일에“strict”: true이므로noImplicitAny옵션도true임 -
함수의 타입을 지정하지 않으면 암묵적으로
any를 사용하는 것이므로 오류 발생
→ 함수의 타입을 지정해줘야 함
const stock: { [id: string]: number } = {
  c001: 3,
  c002: 1,
};
const cart: string[] = [];

function addToCart(id: string, quantity?: number): boolean { // 함수 파라미터와 리턴값의 타입을 지정함 + quantity 옵셔널로 만듦
  // 만약 quantity의 값이 없으면 1로 대체하고 싶다면? 앞에 ?를 붙여서 옵셔널로 만들어주고 조건문 만들기
  if (typeof quantity === ‘undefined’ ) {
    quantity = 1;
  }
  if (stock[id] < quantity) {
    return false;
  }

  stock[id] -= quantity;
  for (let i = 0; i < quantity; i++) {
    cart.push(id);
  }

  return true;
}

console.log(stock, cart);
const result1 = addToCart('c001', 1);
console.log(`결과1: ${result1}`);
console.log(stock, cart);
const result2 = addToCart('c002', 2);
console.log(`결과2: ${result2}`);
console.log(stock, cart);- 만약 quantity의 값이 없으면 1로 대체하고 싶다면, 앞에
?를 붙여서 옵셔널로 만들어주고 조건문 만들기 quantity: number = 1도 가능
const codeitmall: {
  stock: { [id: string]: number };
  cart: string[];
  addToCart: (id: string, quantity?: number) => boolean;
  addManyToCart: (...ids: string[]) => void; // 리턴값이 없는 함수를 void라고 지정
} = {
  stock: {
    c001: 3,
    c002: 1,
  },
  cart: [],
  addManyToCart,
};

function addToCart(id: string, quantity?: number): boolean {
  if (!quantity) {
    quantity = 1;
  }
  if (codeitmall.stock[id] < quantity) {
    return false;
  }

  codeitmall.stock[id] -= quantity;
  for (let i=0; i<quantity; i++) {
    codeitmall.cart.push(id);
  }
  return true;
}

function addManyToCart(...ids: string[]) {
  for (const id of ids) {
    addToCart(id);
  }
}- 예제
function getDiff(fromPoint: number[], toPoint: number[]) {
  let dx = toPoint[0] - fromPoint[0];
  let dy = toPoint[1] - fromPoint[1];
  return [dx, dy];
}

const monster: {
  name: string;
  level: number;
  hasGold?: boolean;
  skills: string[];
  getDiff: (fromPoint: number[], toPoint: number[]) => number[];
  move: (fromPoint: number[], toPoint: number[]) => void;
} = {
  name: '고블린',
  level: 22,
  skills: ['태권도', '특공무술'],
  getDiff: getDiff, // getDiff 메서드 추가
  move(fromPoint, toPoint) {
    let [dx, dy] = getDiff(fromPoint, toPoint);
    console.log(`오른쪽으로 ${dx} 위쪽으로 ${dy} 만큼 이동!`);
  }
}

const current: [number, number] = [0, 0];
const target: [number, number] = [4, 5];
monster.move(current, target);Enum: 열거형
- JavaScript에는 아예 없는 문법
// enum
enum Size {
  S,
  M,
  L,
  XL,
}

let product: {
  id: string;
  name: string;
  price: number;
  membersOnly?: boolean;
  // sizes: string[];
  sizes: Size[] // enum의 이름만 명시하면 됨
} = {
  id: 'c001',
  name: '코드잇 블랙 후디',
  price: 129000,
  // sizes: ['M', 'L'],
  sizes: [Size.M, Size.L],
};

console.log(Size.S); // 0
console.log(Size.M); // 1
console.log(Size.L); // 2
console.log(Size.XL); // 3-
enum이 0부터 시작하는 점에 주의해야 함!
JS에서 0은 false와 동일하므로,if (!size) {등으로 조건문을 작성하면 size의 값이 존재하지 않는 경우와 S인 경우를 같게 처리해버릴 수 있음 -
enum의 값을 정해두고 사용하는 것을 권장
// enum
enum Size {
  S = 'S',
  M = 'M',
  L = 'L',
  XL = 'XL',
}
Interface
- 객체타입이 여러군데에서 중복으로 사용되어서 유지보수나 수정에 용이하지 못한 경우 대체하여 사용함
enum Size {
  S = 'S',
  M = 'M',
  L = 'L',
  XL = 'XL',
}

interface Product { // 이름은 대문자로 시작하는 것이 일반적임
  id: string;
  name: string;
  price: number;
  membersOnly?: boolean;
}

interface ClothingProduct extends Product { // Product 타입을 상속받음
  sizes: Size[];
}

const product1: ClothingProduct = {
  id: 'c001',
  name: '코드잇 블랙 후드 집업',
  price: 129000,
  membersOnly: true,
  sizes: [Size.M, Size.L],
};

const product2: Product = {
  id: 'd001',
  name: '코드잇 텀블러',
  price: 25000,
};

// interface로 함수의 타입 선언하기
interface PrintProductFunction {
  (product: Product): void;
}

function printProduct: PrintProductFunction = (product) => {
  console.log(`${product.name}의 가격은 ${product.price}원입니다.`)
}

printProduct(product1);
printProduct(product2);-
Interface는 상속이 가능함:extends로 상속 -
예제
let monster: Monster = {
  id: 'g001',
  name: '고블린',
  level: 22,
  skills: ['태권도', '특공무술'],
  createdAt: new Date(),
  updatedAt: new Date(),
}

interface Entity {
    id: string;
    createdAt: Date;
    updatedAt: Date;
}

interface Monster extends Entity{
  name: string;
  level: number;
  hasGold?: boolean;
  skills: string[];
}

console.log(
  `${monster.name}(${monster.id})의 레벨은 ${monster.level}이고,\n` +
    `${monster.hasGold ? '해치우면 골드를 얻는' : '해치워도 골드를 주지 않는'} 몬스터입니다.\n` +
    `${monster.skills.length > 0 ? `가진 능력은 ${monster.skills.join (', ')}입니다.` : ''}`
);
기타 타입들
리터럴 타입 (Literal type)
let,const사용에 따라 타입이 다르게 추론됨
let productName1 = '코드잇 블랙 후드'; // 타입: string

// 리터럴 타입: 변수의 값 그 자체를 타입으로 선언해버림
const productName2 = '코드잇 텀블러'; // 타입: '코드잇 텀블러'

// 숫자형도 가능

let small = 1;
const large = 100; // 리터럴 타입- 이 때, 숫자형 리터럴 타입 (위의 100처럼)은 number에, 문자형 리터럴 타입 (위의 '코드잇 텀블러')은 string에 포함됨
function printSize(size: number) {
  console.log(`${size} 사이즈입니다.`);
}
printSize(large) // 가능!
function printSize(size: 100) {
console.log(`${size} 사이즈입니다.`);
}
printSize(small) // 불가능!타입 별칭 (Type Aliase)
- TS에서는 타입도 변수처럼 이름을 붙여줄 수 있음
- 모든 타입에 사용 가능
// 타입별칭
type Cart = string[]; // 이제부터 string[]을 Cart로 대체 가능
// cart의 타입을 한번에 바꿀 수 있음

// 타입별칭을 함수에 사용하기
type CartResultCallback = (result: boolean) => void;

// 타입별칭을 객체에 사용하기 ← 객체의 경우 interface 권장
type Product = { // interface Product {
  id: string;
  name: string;
}

const cart: Cart = [
  'c001',
  'c001',
  'c002',
];

interface User {
  username: string;
  email: string;
  cart: Cart;
}

const user: User = {
  username: 'codeit',
  email: 'typescript@codeit.kr',
  cart,
}
Union 타입
- 타입으로 연산이 가능
enum ClothingSize {
  S = 'S',
  M = 'M',
  L = 'L',
  XL = 'XL',
}

// enum 대신 union으로도 표현 가능
// type ClothingSize = 'S' | 'M' | 'L' | 'XL' ;

interface Product {
  id: string;
  name: string;
  price: number;
  membersOnly?: boolean;
}

interface ClothingProduct extends Product {
  sizes: ClothingSize[];
  color: string;
}

interface ShoeProduct extends Product {
  sizes: number[];
  handmade: boolean;
}

function printSizes(product: ClothingProduct | ShoeProduct) {
  // ClothingProduct이거나 ShoeProduct 타입이라는 뜻
  // 두 타입 다 파라미터로 사용 가능
  const availableSizes = product.sizes.join(', ');
  console.log(`구매 가능한 사이즈는 다음과 같습니다: ${availableSizes}`);

  if ('color' in product) { // ClothingProduct
    console.log(`색상: ${product.color}`);
  }

  if ('handmade' in product) { // ShoeProduct
    console.log(
      product.handmade
      ? '이 상품은 장인이 직접 만듭니다.'
      : '이 상품은 공장에서 제작되었습니다.'
    );
  }
}

const product1: ClothingProduct = {
  id: 'c001',
  name: '코드잇 블랙 후드 집업',
  price: 129000,
  membersOnly: true,
  sizes: [ClothingSize.M, ClothingSize.L],
  color: 'black',
};

const product2: ShoeProduct = {
  id: 's001',
  name: '코드잇 스니커즈',
  price: 69000,
  membersOnly: false,
  sizes: [220, 230, 240, 260, 280],
  handmade: false,
};

printSizes(product1);
printSizes(product2);- 예제코드
interface Equipment {
  id: string;
  name: string;
  price: number;
}

interface Weapon extends Equipment {
  attack: number
}

interface Armor extends Equipment {
  defence: number
}

function printEquipment(equipment: Weapon | Armor) {
  console.log(`이름: ${equipment.name}`);
  if ('attack' in equipment) {
      console.log(`이 장비는 공격력을 ${equipment.attack} 증가 시킵니다.`);
  }

  // 방어구인 경우 아래 코드를 실행합니다.
  if ('defence' in equipment) {
      console.log(`이 장비는 방어력을 ${equipment.defence} 증가 시킵니다.`);
  }
}

const item1: Weapon = {
  id: 'w001',
  name: '전쟁 도끼',
  price: 100,
  attack: 15,
};

const item2: Armor = {
  id: 'a001',
  name: '사슬 갑옷',
  price: 200,
  defence: 52,
};

printEquipment(item1);
printEquipment(item2);
Intersection 타입
- 타입을 합치는 법
// 공통으로 겹치는 부분의 interface
interface Id {
  id: string;
}

interface Timestamp {
  createdAt: Date;
  updatedAt: Date;
}

// intersection (&) 사용

type Product = Id & {
  name: string;
  price: number;
  membersOnly?: boolean;
}

type User = Id & Timestamp & {
  username: string;
  email: string;
}

type Review = Id & Timestamp & {
  productId: string;
  userId: string;
  content: string;
}

const product: Product = {
  id: 'c001',
  name: '코드잇 블랙 후드티',
  price: 129000,
}

const user: User = {
  id: 'user0001',
  username: 'codeit',
  email: 'typescript@codeit.kr',
  createdAt: new Date(),
  updatedAt: new Date(),
}

const review: Review = {
  id: 'review001',
  userId: user.id,
  productId: product.id,
  content: '아주 좋음',
  createdAt: new Date(),
  updatedAt: new Date(),
}-
전부 interface로 구현하고 상속(extends)을 이용해서 같은 결과 도출 가능
-
예제코드
interface Equipment {
  id: string;
  name: string;
  price: number;
}

interface Weapon extends Equipment {
  attack: number
}

interface Armor extends Equipment {
  defence: number
}

function printEquipment(equipment: Weapon & Armor) {
  console.log(`이름: ${equipment.name}`);
  console.log(`이 장비는 공격력을 ${equipment.attack}, 방어력을 ${equipment.defence} 증가 시킵니다.`);
}

const item1: Weapon & Armor = {
  id: 'g001',
  name: '서리불꽃 글러브',
  price: 100,
  attack: 5,
  defence: 42,
};

printEquipment(item1);
// 이름: 서리불꽃 글러브
// 이 장비는 공격력을 5, 방어력을 42 증가 시킵니다.
| (Union), & (Intersection)
-
A | B: A 타입이거나 B 타입이다 -
A & B: A 타입이랑 B 타입을 합친 것이다 -
퀴즈 1
type C = '바나나' | '바닐라' | '딸기';이므로바나나가 됨
type A = '바나나' | '바닐라';
type B = '바나나' | '딸기';
type C = A | B;

const c: C // = '바나나'- 퀴즈 2
'바나나'는 A와 B 모두에 속하므로
type A = '바나나' | '바닐라';
type B = '바나나' | '딸기';
type C = A & B;

const c: C // = '바나나'- 퀴즈 3
type A = { id: number };
type B = { name: string };
type C = A & B;

const c: C // = { id: 1, name: 'codeit' }- 퀴즈 4
interface A { ... }
interface B { ... }
type C = A | B;

const a: A = ...
const b: B =  ...
const c: C = ...

function f(obj: A) { ... }
function g(obj: B) { ... }
function h(obj: C) { ... }- h()에서 파라미터는 A 또는 B 타입이어야 함
- f()에서 파라미터는 A 또는 B 타입이어야 함
- g()에서 파라미터는 B 타입이어야 함
- h()에서 파라미터는 A 또는 B 타입이어야 함
- 퀴즈 5
interface A { ... }
interface B { ... }
type C = A & B;

const a: A = ...
const b: B =  ...
const c: C = ...

function f(obj: A) { ... }
function g(obj: B) { ... }
function h(obj: C) { ... }- h()에서 파라미터는 A와 B 타입 모든 성질을 가지고 있어야 함 → h(a) 불가
- f()에서 파라미터는 A 타입이어야 함 → f(c)도 가능
- g()에서 파라미터는 B 타입이어야 함
- h()에서 파라미터는 A와 B 타입의 성질을 모두 가지고 있어야 함
keyof, typeof 연산자
interface Product {
  id: string;
  name: string;
  price: number;
  membersOnly?: boolean;
}

// type ProductProperty = 'id' | 'name' | 'price' | 'membersOnly';

// Product에 있는 모든 key값들을 자동으로 가져와줌
type ProductProperty = keyof Product;

const productTableKeys: ProductProperty[] = ['name', 'price', 'membersOnly'];

// 아래와 같이 한번에 적어주는 것도 가능!
// const productTableKeys: (keyof Product)[] = ['name', 'price', 'membersOnly'];


const product: Product = {
  id: 'c001',
  name: '코드잇 블랙 후드 집업',
  price: 129000,
  membersOnly: true,
};

for (let key of productTableKeys) {
  console.log(`${key} | ${product[key]}`);
}

console.log(typeof product); -
typeof: 이미 존재하는 타입을 불러와서 타입을 정의할 때 사용 가능 -
keyof: 객체의 key값들을 가져와서 사용 가능 -
예제:
interface Item {
  id: string;
  name: string;
  price: number;
  description: string;
}

const itemTable: [keyof Item, string][] = [
  ['name', '이름'],
  ['price', '가격'],
  ['description', '설명'],
];

const item: Item = {
  id: 'h001',
  name: '힐링 포션',
  price: 200,
  description: '마시면 체력을 50 회복한다.',
};

for (let [propertyKey, propertyName] of itemTable) {
  console.log(`${propertyName} | ${item[propertyKey]}`);
}
Enum vs 타입별칭
https://www.codeit.kr/topics/typescript-basic/lessons/6438
총정리
https://www.codeit.kr/topics/typescript-basic/lessons/6439
Generic
// 파라미터의 타입: 숫자형
const shoeSizes: number[] = [230, 250, 280];
shoeSizes.map((num) => {

});
// 파라미터의 타입: 문자형
const clothingSizes: string[] = ['M', 'L', 'XL'];
clothingSizes.map((names) => {

});

// <T>: 타입파라미터
function printArray<T>(items: T[]) {
  for (const item of items) {
    console.log(item);
  }
}

printArray(shoeSizes);
printArray(clothingSizes);
-
주로
T,U,V등의 대문자들을 사용해서 임의의 타입을 나타냄 -
interface,type에서도 사용 가능
// interface
interface SizeProduct<T> extends Product {
  sizes: T[];
}

// type
type ClothingProduct = SizeProduct<ClothingSize>;
type Pair<T> - [T, T]
예제
자바스크립트의 Map이라는 자료구조를 활용하는 코드가 있습니다. VS Code에서 Map의 타입 힌트를 확인해 보면 아래와 같은데요. 주어진 코드에서 제네릭을 사용해서 보다 정확한 타입을 지정해 보세요.
const stock = new Map<string, number>();
// <string, number> 지정
stock.set('g001', 1);
stock.set('g002', 2);
console.log(stock.get('g001'));
console.log(stock.get('g002'));
알아두면 유용한 제네릭 타입들
https://www.codeit.kr/topics/typescript-basic/lessons/6442
tsconfig.json 파일
모듈 사용하기 (1:30초부터)
src폴더 생성
→Product.ts파일,Size.ts파일,main.ts파일 생성
// Product.ts
import Size from './Size'; // 확장자 안 적어도 괜찮음

interface Product {
  id: string;
  name: string;
  price: number;
  membersOnly?: boolean;
  sizes?: string[];
}
// Size.ts
enum Size { // default export enum은 불가능함
S = 'S',
M = 'M',
L = 'L',
XL = 'XL',
}
export default Size;// main.ts
const product1 = {
id: 'c001',
name: '코드잇 블랙 후드 집업',
price: 129000,
membersOnly: true,
sizes: ['S', 'M'],
};
const product2 = {
id: 'd001',
name: '코드잇 텀블러',
price: 25000,
};
console.log(product1);
console.log(product2);자주 사용하는 옵션
https://www.codeit.kr/topics/typescript-basic/lessons/6444
tsconfig.json 파일 불러오는 법
https://www.codeit.kr/topics/typescript-basic/lessons/6445
자바스크립트 서버에 TypeScript 적용하기
자바스크립트 서버 설정하기
- 터미널에서
npm init입력해서 Node.js 프로젝트 만들기 → 연달아 엔터를 입력해서 설정을 완료하면 package.json 파일이 생성됨 app.js파일 생성 후 아래 코드 입력: 간단히 상태코드 200으로 응답을 보내는 코드
import express from 'express';

const app = express();

app.get('/', (req, res) => {
  res.send();
});

app.listen(3000, () => {
  console.log('Server running on port 3000');
});-
package.json 파일 수정하기
(1)"type": "module"추가
(2)"main": "app.js"추가
(3)"scripts": { "start" : "node app.js" }추가 -
터미널에서
npm start명령어로 서버 시작해보기 -
테스트를 위한 http 파일 (
test.http) 생성 후GET http://localhost: 3000입력하고 send request 버튼 눌러서 200 OK 출력되는 것을 확인하기
타입스크립트 서버 설정하기
Ctrl+C옵션으로 서버 끄기npm install --save-dev typescript입력해서 DevDependencies로 설치 ← 타입스크립트는 실제 프로젝트를 실행할 때는 사용하지 않고 개발할 때만 사용하므로!- 타입스크립트 사용시 필요한 설정파일 설치:
npx tsc --init
tsc: 타입스크립트의 컴파일러로, ts를 js로 바꿔주는 역할
→tsconfig.json파일 생성 src디렉토리 안으로app.js파일 (소스코드)의 위치를 옮기고app.ts로 확장자 변경하기
→ 오류가 발생하므로 우선은 기존 코드 전체를 주석처리하고console.log('Hi TypeScript')입력tsconfig.json파일 수정하기
(1)"module": "commonjs"추가
(2) 소스코드 위치 설정:"rootDir": "src"추가
(3) 빌드된 파일이 내보내질 위치 설정:"outDir": "dist"추가- package.json의
"scripts"에
(1)"build" : "tsc"추가
(2)"start" : "node dist/app.js"추가
(3)"type": "module"삭제
(4)"main" : "dist/app.js"로 경로 수정 npm run build로 실행 (npm start로도 시작 가능)
→ 자동으로main.js파일 생성
개발환경 설정하기
-
TypeScript는 코드를 수정하면
npm run build로 JavaScript로 변경한 후npm start로 실행해가면서 매번 확인해야 함
→ts-node,nodemon이라는 패키지들을 설치해서 개발환경을 더 편하게 설정할 예정! -
ts-node: 명령어 간단화
npm install --save-dev ts-node명령어로 설치
package.json 파일로 가서"scripts": {"dev" : "ts-node src/app.ts" }부분 추가하기
→ 앞서npm run build,npm start의 두개의 명령어를 연달아 입력해야 했던 기존과는 달리npm run dev하나의 명령어로 한번에 실행 가능 -
nodemon: 변경사항 일일히 확인하는 불편함 없애기 ← nodemon reloads automatically
npm install --save-dev nodemon명령어로 설치
package.json 파일로 가서"scripts": {"dev" : "nodemon --watch src --exec ts-node src/app.ts" }부분 수정하기 →watch옵션으로src폴더를 관찰해줌
✨ 최신 버전의 파일에서는"scripts": {"dev" : "nodemon --watch src src/app.ts" }으로 줄여서 작성해도 같은 결과를 도출함