
reference:
1) https://medium.com/@sanjanashivananda07/mastering-user-authentication-building-a-simple-login-page-using-mern-stack-part-2-frontend-ad6602f7351d
(Part 2 — Frontend)
✅ Mastering User Authentication(Part 2 — Frontend) 👨💻
1. Initializing and setting up a React app 🚀
cd LoginPageApplicationReact Project를 생성할 폴더로 이동한다.
npx create-react-app frontend레퍼런스 가이드에서는 CRA를 통해 React를 생성하고 있다. Vite를 사용하고 싶다면 'yarn create vite'를 입력하면 된다.
cd frontend frontend 폴더로 경로를 변경한다.
npm start해당 커맨드를 통해 프로젝트를 실행한다. yarn으로 설치했다면, yarn start로 갈음할 수 있겠다.
Note❗️: React app을 초기화하고 세팅하는 과정에서 가장 중요한 것은 경로다. backend process와 frontend process를 반드시 분리해서, 각각의 process가 동시에 운영될 수 있도록 경로 설정을 해야 한다. 각종 Dependencies를 설치할 때에도 경로를 잘 확인해서 설치해야 한다.
2. File Structure 🚀
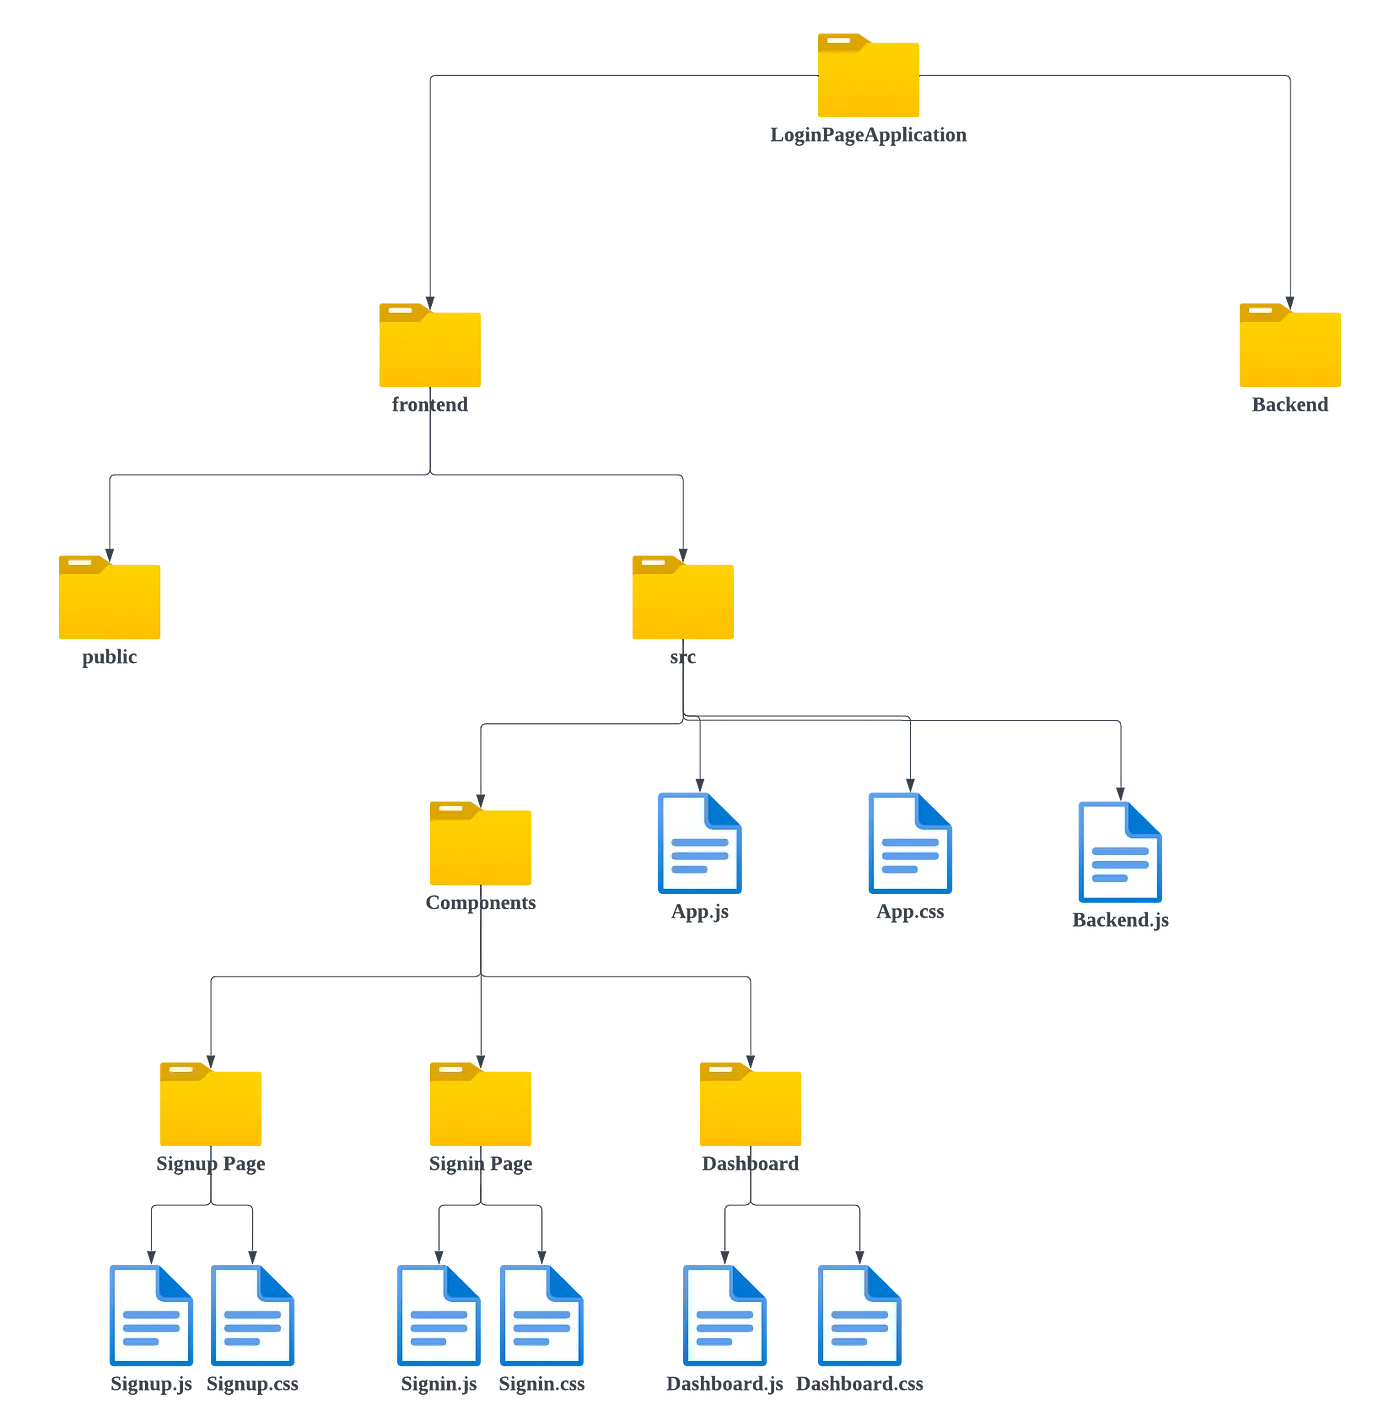
가이드에서는 위 경로를 기준으로 설명을 이어간다. 그냥 "그렇구나" 하면 되겠다.
3. Implementation 🚀
3-1. Integrating Backend to the Frontend 🟢
npm install axios초기 단계에서는 API 호출을 통해 백엔드와 프론트엔드를 통합하는 작업이 중요하다. 이 과정에서 Axios 라이브러리를 활용할 것이기에, Axios 설치가 선행되어야 한다.
LoginPageApplication/frontend/src/Backend.js
import axios from 'axios';

//USER AND AUTH ROUTES

//SIGNIN
export const signin = user => {
    // API call to sign in a user
    return axios.post("http://localhost:8000/api/signin", JSON.stringify(user), {
        headers: {
            Accept: "application/json",
            "Content-Type": "application/json"
        }
    })
    .then(response => {
        return response.data; // Return response data
    })
    .catch(err => {
        return err.response.data; // Return error response data
    })
}

//SIGNUP
export const signup = user => {
    // API call to sign up a user
    return axios.post("http://localhost:8000/api/signup", JSON.stringify(user),{
        headers: {
            Accept: "application/json",
            "Content-Type": "application/json"
        }
    })
    .then(response => {
        console.log(response.data);
        return response.data; // Return response data
    })
    .catch(err => {
        return err.response.data; // Return error response data
    })
}

//SETTING THE JWT TOKEN IN USER'S BROWSER
export const authenticate = (data, next) => {
    // Storing JWT token in user's browser
    if(typeof window !== "undefined"){
        localStorage.setItem("jwt", JSON.stringify(data));
        next();
    }
}

//SIGNOUT -> REMOVING JWT TOKEN
export const signout = (next) => {
    // Removing JWT token upon signout
    if (typeof window !== "undefined") {
        localStorage.removeItem("jwt");

        axios.get("http://localhost:8000/api/signout")
        .then(response => {
            console.log(response.data);
            next();
        })
        .catch(err => console.log(err));
    }
};

//VALIDATION IF USER IS SIGNED IN
export const isAuthenticated = () => {
    // Checking if the user is authenticated
    if (typeof window === "undefined") {
        return false
    }
    if(localStorage.getItem("jwt"))
        return JSON.parse(localStorage.getItem("jwt"));
    else
        return false
}
3-1-1. SIGNIN 🔴
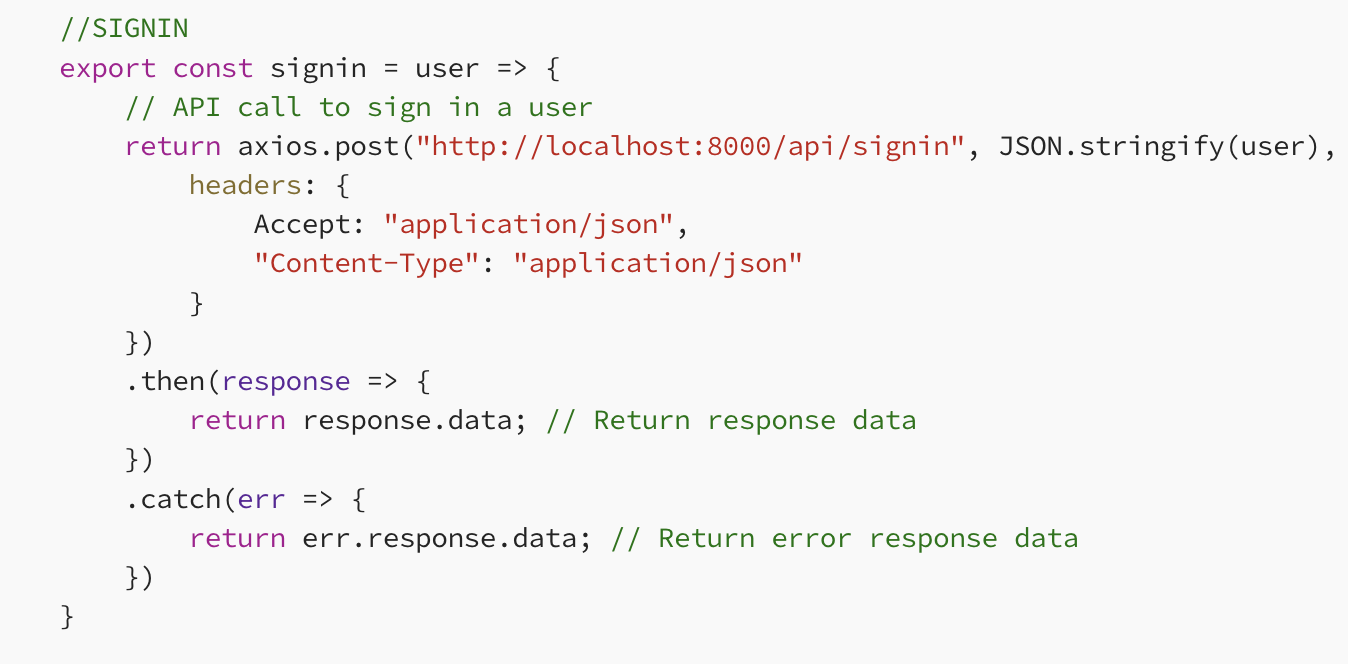
로그인에 관련된 로직이다.
가장 먼저 user라는 매개변수를 받는다. 이 매개변수는 로그인할 사용자의 정보가 포함된 객체다. axios.post 메서드를 사용해서 HTTP POST 요청을 보낸다. 해당 요청은 http://localhost:8000/api/signin URL로 전송될 것이다. 그런데 이때, JSON.stringify(user)를 통해 user 객체를 JSON 문자열로 변환한다. 변환된 문자열은 HTTP 요청의 body로 전달된다.
headers에는 1)Accept와 2)Content-Type이 포함된다. 1)Accept는 서버에, 응답으로 JSON 형식을 기대한다고 알리는 과정이다. 2)Content-Type은 반대로 요청 body의 데이터 형식이 JSON 임을 서버에 알리는 과정이다.
요청에 성공하면 then 메서드에 의해 response.data, 즉 서버가 반환한 응답의 데이터 부분을 반환하게 된다. 요청에 실패했다면 catch 메서드에 의해 error에 대한 내용을 반환하게 된다.
3-1-2. SIGNUP 🔴
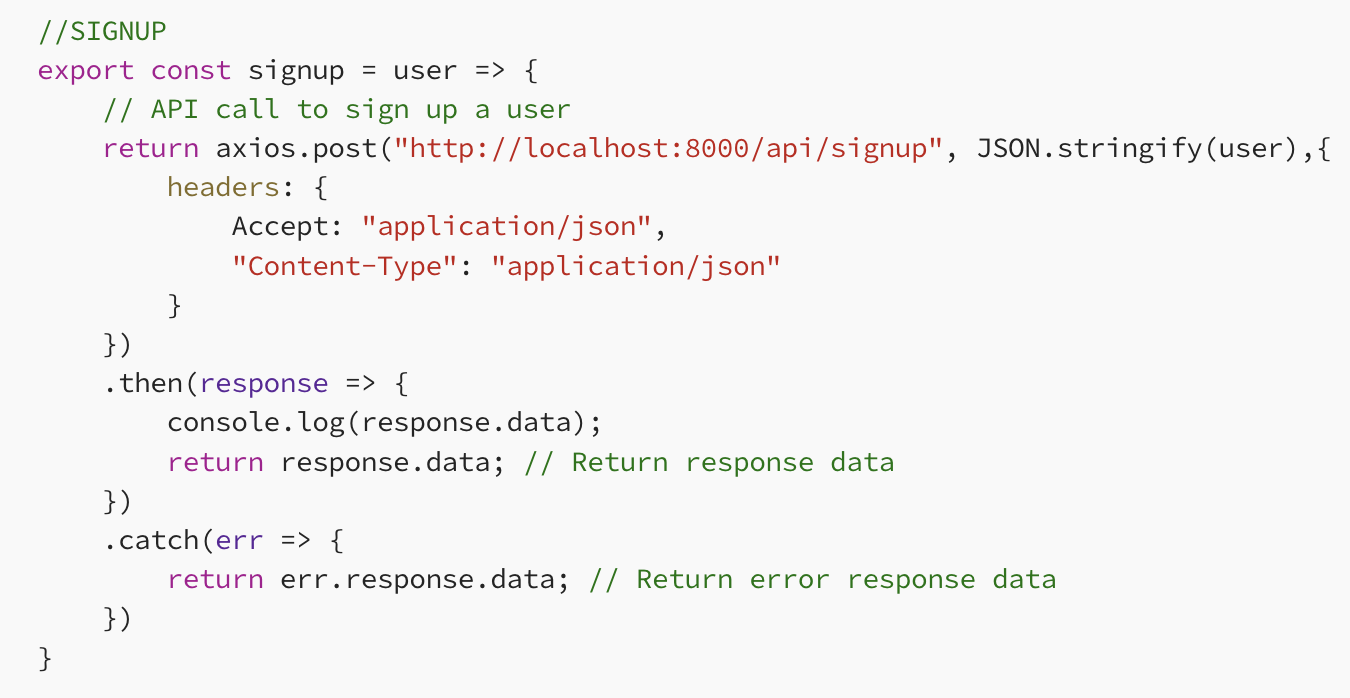
회원가입 로직이다. 로그인 코드와 다른 점은 엔드포인트 말고는 없기 때문에 한 번 읽어보고 넘어가기로 한다.
3-1-3. SETTING THE JWT TOKEN IN USER'S BROWSER 🔴
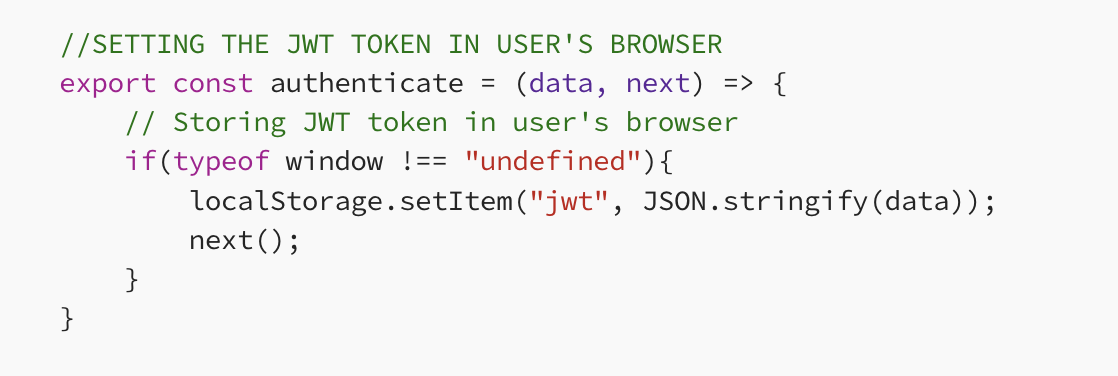
사용자의 브라우저에 JWT 토큰을 저장하는 로직이다. data와 next 두 개의 매개변수를 받고 있다.
data는 JWT 토큰이 포함된 데이터일 것이다. 일반적으로 로그인 성공 시 서버에서 받아오는 JWT 토큰이 data에 담긴다. next는 로그인 후의 후속 작업을 의미한다. 가령, 로그인 후 페이지를 리다이렉트하거나 상태를 업데이트할 때 사용할 수 있다.
그리고 조건을 살펴봐야 한다. typeof window !== "undefined"가 바로 그 조건이다. typeof 연산자는 피연산자의 데이터 유형을 문자열로 반환한다. 즉 typeof window는 window 객체의 데이터 유형인 객체(Object)를 의미한다. 서버 환경(Node.js)에서는 window 객체가 존재하지 않기에 typeof window에 대해 undefined를 반환한다.
즉 typeof window !== "undefined" 조건을 통해 확인하고 싶은 것은, 코드가 브라우저 환경에서 실행되고 있는가 여부이다. 서버 측 코드와 클라이언트 측 코드를 안전하게 분리하기 위한 장치라고 볼 수 있다. 이후 localstorage에 jwt라는 키를 사용해서 JWT 토큰을 저장한다.
3-1-4. SIGNOUT 🔴
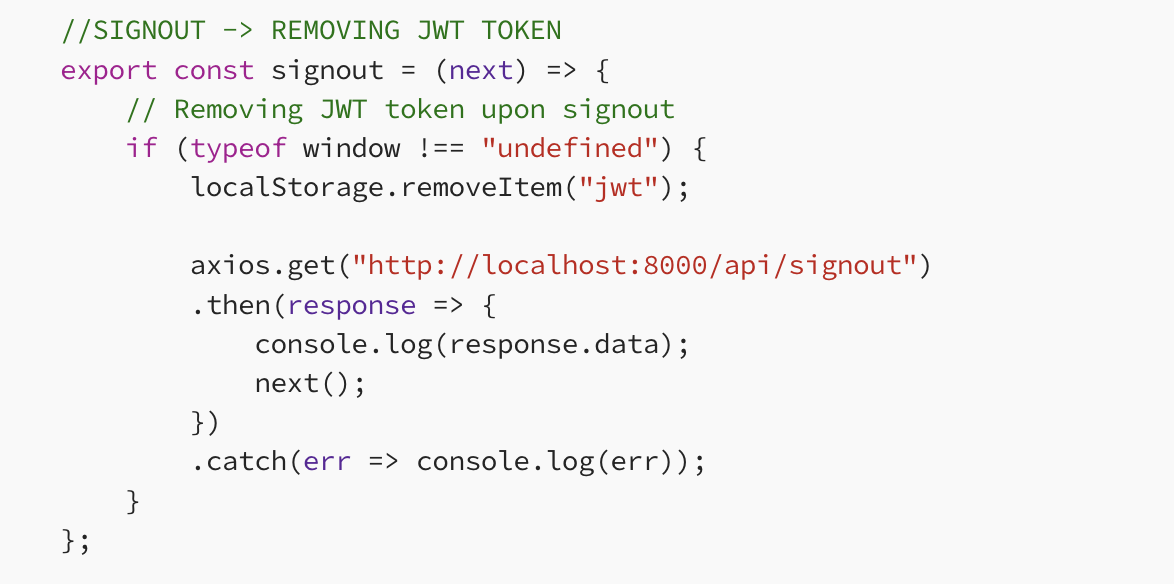
다음은 로그아웃 로직이다. 위 코드들을 잘 이해했다면 로그아웃 로직을 이해하는 데에는 큰 어려움이 없다. 브라우저 환경에서, 즉 localstorage에서 JWT 토큰을 제거해서 사용자의 인증 상태를 무효화한다. 그리고 axios.get 메서드를 통해 서버에 로그아웃을 처리하라는 신호를 보낸다.
3-1-5. VALIDATION IF USER IS SIGNED IN 🔴
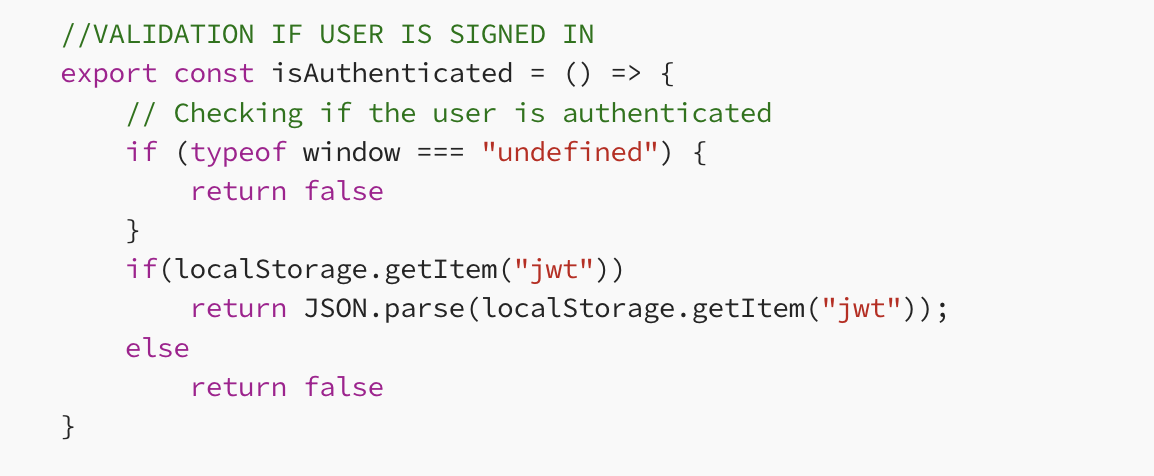
마지막으로 사용자 인증 여부를 확인하는 로직이다. typeof window === "undefined는 브라우저 환경이 아닌 서버 측 환경 상태라는 것을 의미한다. 서버 측 환경일 때 false를 반환한다는 것은, 브라우저가 아닌 환경에서는 인증되지 않은 것으로 간주하겠다는 말과 동일하다.
이어서 localstorage를 확인한다. localstorage에 JWT 토큰이 존재하는 경우 JWT 토큰을 반환하고, 토큰이 존재하지 않는 경우는 else 문에 의해 인증되지 않은 것으로 간주하게 된다.
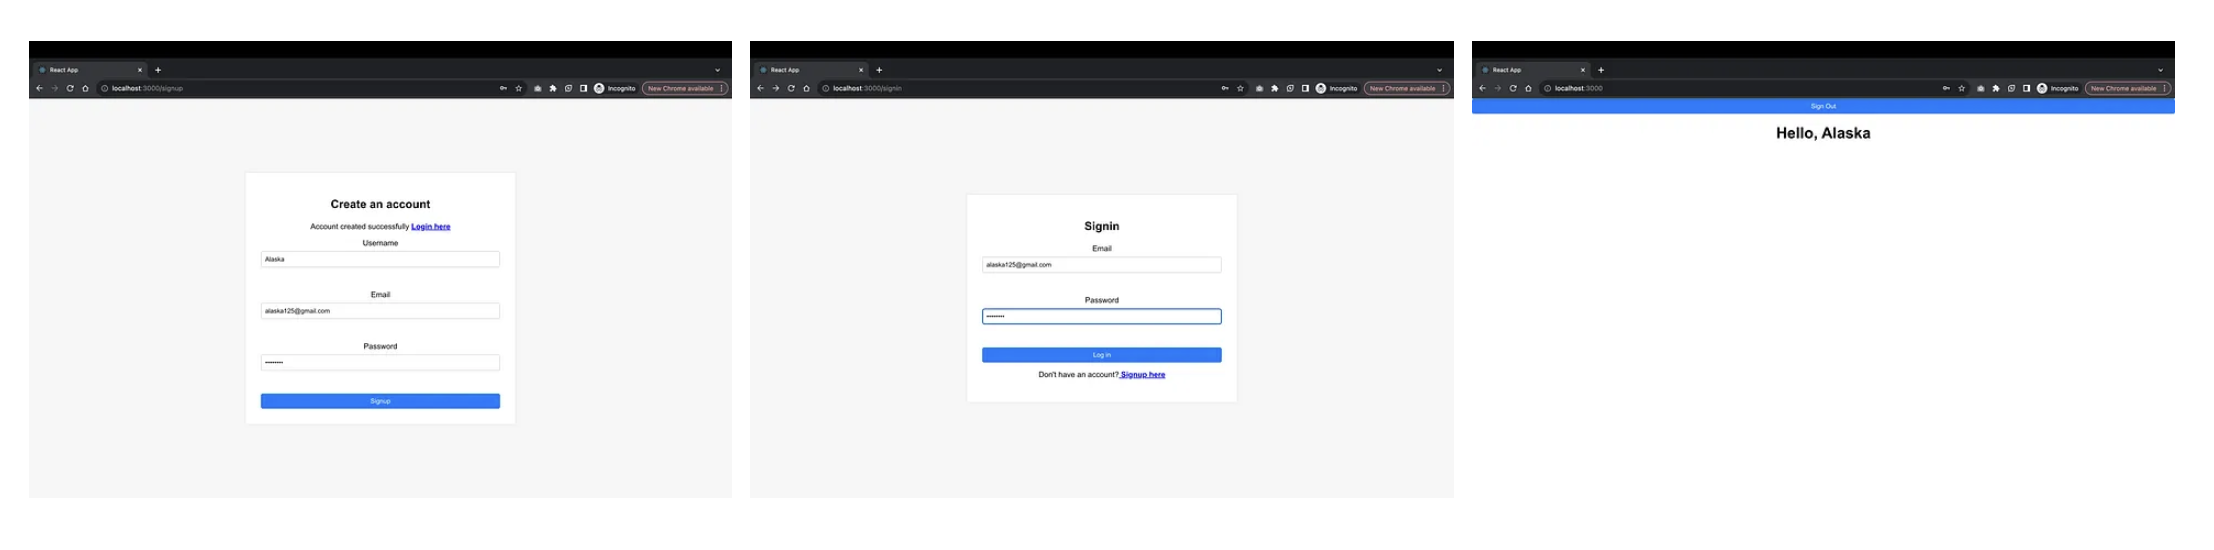
3-2. Now we build our Signup and Login Forms using JSX 🟢
LoginPageApplication/frontend/src/Components/SignupPage/Signup.js
import React from "react";

// Signup component for the signup form
function Signup() {

    return(
        <div className='form-container'>
            <div className='form-box'>
                <h2>Create an account</h2>
                {/* Input field for username */}
                <div className='form-group'>
                    <label htmlFor="name">Username</label>
                    <input type="text" id="name" name="name" required/>
                </div>
                {/* Input field for email */}
                <div className='form-group'>
                    <label htmlFor="email">Email</label>
                    <input type="text" id="email" name="email" required/>
                </div>
                {/* Input field for password */}
                <div className='form-group'>
                    <label htmlFor="password">Password</label>
                    <input type="password" id="password" name="password" required/>
                </div>
                {/* Signup button */}
                <div className="form-group-button">
                    <button>Signup</button>
                </div>
            </div>
        </div>
    )
}

export default Signup;
label과 input, 그리고 button으로 구성된 간단한 회원가입 UI이다. 넘어간다.
LoginPageApplication/frontend/src/Components/SigninPage/Signin.js
import React from 'react';

// Signin component for the login form
export function Signin(){

    return(
        <div className='form-container'>
            <div className='form-box'>
                <h2>Signin</h2>
                {/* Input fields for email */}
                <div className='form-group'>
                    <label htmlFor="email">Email</label>
                    <input type="text" id="email" name="email" required/>
                </div>
                {/* Input fields for password */}
                <div className='form-group'>
                    <label htmlFor="password">Password</label>
                    <input type="password" id="password" name="password" required/>
                </div>
                {/* Log in button */}
                <div className="form-group-button">
                    <button>Log in</button>
                </div>
                {/* Message for redirection to signup */}
                <div className='login-message'>
                <center><p className='login_redirect mt-2'>Don't have an account?<b><a href='/signup'> Signup here</a></b></p></center>
                </div>
            </div>
        </div>
    )
}

export default Signin;
마찬가지. 단순한 로그인 UI이다.
LoginPageApplication/frontend/src/Components/Dashboard/Dashboard.js
import React from 'react';

// Dashboard component
function Dashboard(){
    return(
        // Displaying a heading for the dashboard
        <h1>Dashboard</h1>
    )
}

export default Dashboard;
대쉬보드이다.
3-3. Implementing Routing with React Router 🟢
LoginPageApplication/frontend/src/App.js
import './App.css';
import Signin from './Components/SigninPage/Signin.js'
import Signup from './Components/SignupPage/Signup.js';
import Dashboard from './Components/Dashboard/Dashboard.js';
import {Routes, Route, BrowserRouter as Router} from 'react-router-dom';

function App() {
  return (
    <div className='App'>
      {/* Setting up the Router component from react-router-dom */}
      <Router>
        {/* Defining different Routes using Routes and Route components */}
        <Routes>
          {/* Route for the Dashboard component */}
          <Route exact path='/' element={<Dashboard/>} />
          {/* Route for the Login component */}
          <Route exact path="/signin" element={<Signin/>} />
          {/* Route for the Signup component */}
          <Route exact path='/signup' element={<Signup/>} />
        </Routes>
      </Router>
    </div>
  );
}

export default App;
별거 없다. 라우팅을 적용한 모습이다.
3-4. Data Flow: Sending Frontend Data to the Backend 🟢
사실상 frontend에서는 이 파트가 가장 중요하다. 상태 관리에 대한 논의이기 때문이다.
LoginPageApplication/frontend/src/Components/SignupPage/Signup.js
import React, {useState} from "react";
import { signup } from "../../Backend";

// Signup component for the signup form
function Signup() {

    const [formValues, setFormValues] = useState({
        email: "",
        name: "",
        password: "",
        error: "",
        loading: false,
        success: false,
    });

    // Destructuring values from the state
    const { name, email, password, error, loading, success } = formValues;

    // Handles changes in the input fields
    const handleChange = name => event => {
        setFormValues({ ...formValues, error: false, [name]: event.target.value });
    }

    // Submits the form data to the backend
    const onSubmit = async event => {
        event.preventDefault();
        setFormValues({ ...formValues, success: false, loading: true });

        // Placeholder for the signup function calling the backend
        signup({ name, email, password })
            .then(data => {
                if (data.error) {
                    setFormValues({ ...formValues, error: data.error, loading: false, success: false });
                } else {
                    setFormValues({ ...formValues, success: true });
                }
            })
            .catch();
    }

    // Displays error message if there's any
    const errorMessage = () => {
        return (
            <div className='error-message' style={{ display: error ? "" : "none", color: "red" }}>
                {error}
            </div>
        );
    }

    // Displays loading message during form submission
    const loadingMessage = () => {
        return (
            loading && (
                <div className="loading-message" style={{ display: error ? "" : "none", color: "red" }}>
                    <div className="loading-spinner"></div>
                    <p>Loading...</p>
                </div>
            )
        );
    }

    // Displays success message upon successful form submission
    const successMessage = () => {
        return (
            success && (
                <div>
                    <center><p className='login_redirect mt-2'>Account created successfully <b><a href='/login'>Login here</a></b></p></center>
                </div>
            )
        );
    }


    return (
        <div className='form-container'>
            <div className='form-box'>
                <h2>Create an account</h2>
                {errorMessage()}
                {loadingMessage()}
                {successMessage()}
                <div className='form-group'>
                    <label htmlFor="name">Username</label>
                    <input type="text" id="name" name="name" onChange={handleChange("name")} required />
                </div>
                <div className='form-group'>
                    <label htmlFor="email">Email</label>
                    <input type="text" id="email" name="email" onChange={handleChange("email")} required />
                </div>
                <div className='form-group'>
                    <label htmlFor="password">Password</label>
                    <input type="password" id="password" name="password" onChange={handleChange("password")} required />
                </div>
                <div className="form-group-button">
                    <button onClick={onSubmit}>Signup</button>
                </div>
            </div>
        </div>
    );
}

export default Signup;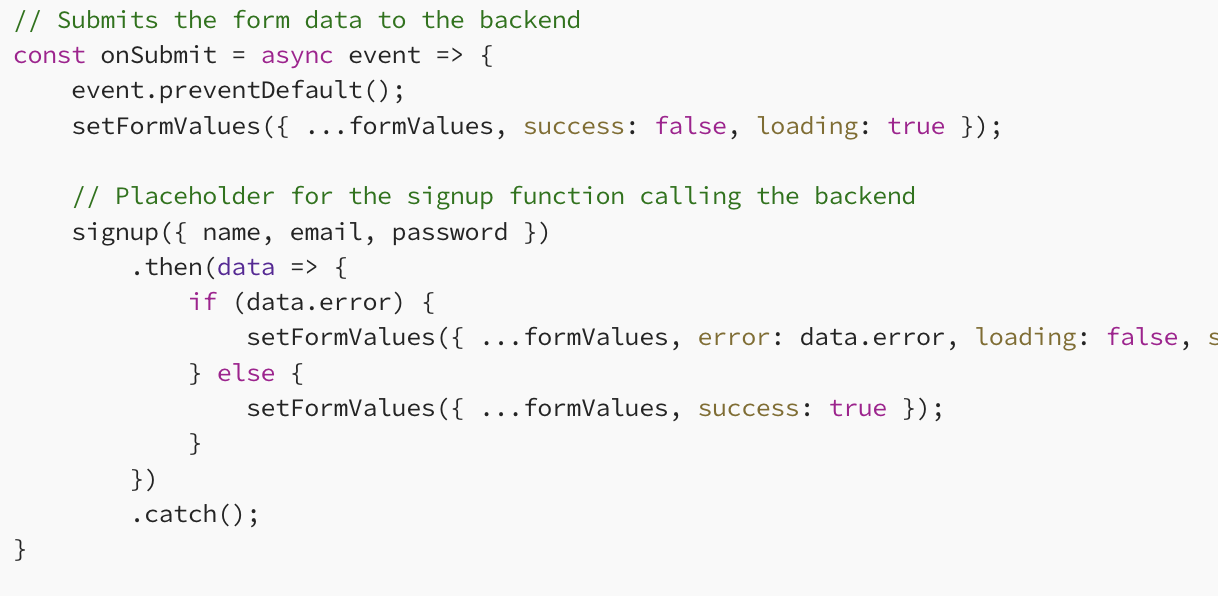
복잡해 보이지만 이 부분만 이해하면 된다. 데이터를 상태에 맞게 적절히 유지하면서 결국 name, email, password로 구성된 '객체' 데이터를, Backend.js에서 작성한 signup 함수에, user 파라미터로 전달하는 것이다.
LoginPageApplication/frontend/src/Components/SigninPage/Signin.js
import React, {useState} from 'react';
import { signin, authenticate } from '../../Backend';
import { Navigate } from 'react-router-dom';

// Signin component for the login form
export function Signin(){

    // Initializing states for form fields, error, loading, and success messages
    const [values, setValues] = useState({
        email: "",
        password: "",
        error: "",
        loading: false,
        success: false,
    });

    // Destructuring values from the state
    const { email, password, error, loading, success } = values;

    // Handles changes in the input fields
    const handleChange = name => event => {
        setValues({ ...values, error: false, [name]: event.target.value });
    }

    // Submits the form data to the backend for user authentication
    const onSubmit = async event => {
        event.preventDefault();
        setValues({ ...values, success: false, loading: true });
        signin({ email, password })
            .then(data => {
                if (data.error) {
                    setValues({ ...values, error: data.error, loading: false, success: false });
                } else {
                    authenticate(data, () => {
                        setValues({ ...values, success: true });
                    })
                }
            })
            .catch();
    }

    // Displays error message if there's any
    const errorMessage = () => {
        return (<div className='error-message' style={{ display: error ? "" : "none", color: "red" }}>
            {error}
        </div>);
    }

    // Displays loading message during form submission
    const loadingMessage = () => {
        return (
            loading && (
                <div className="loading-message" style={{ display: error ? "" : "none", color: "red" }}>
                    <div className="loading-spinner"></div>
                    <p>Loading...</p>
                </div>
            )
        );
    }


    return (
        success ? <Navigate to="/" /> :
            <div className='form-container'>
                <div className='form-box'>
                    <h2>Signin</h2>
                    {loadingMessage()}
                    {errorMessage()}
                    <div className='form-group'>
                        <label htmlFor="email">Email</label>
                        <input type="text" id="email" name="email" value={email} onChange={handleChange("email")} required />
                    </div>
                    <div className='form-group'>
                        <label htmlFor="password">Password</label>
                        <input type="password" id="password" name="password" value={password} onChange={handleChange("password")} required />
                    </div>
                    <div className="form-group-button">
                        <button onClick={onSubmit}>Log in</button>
                    </div>
                    <div className='login-message'>
                        <center><p className='login_redirect mt-2'>Don't have an account?<b><a href='/signup'> Signup here</a></b></p></center>
                    </div>
                </div>
            </div>
    )
}

export default Signin;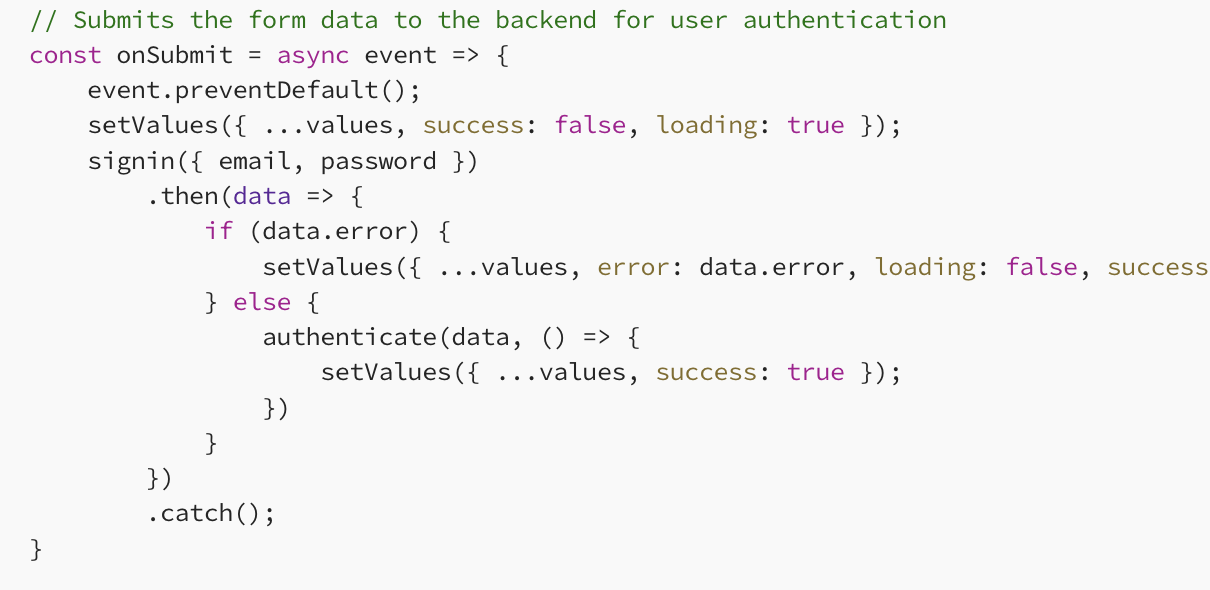

회원가입과 크게 다를 바가 없다. 다만 값을 전달받는 함수가 signin 함수라는 점, 사용자의 브라우저에 JWT 토큰을 저장하는 authenticate 함수를 사용한다는 점이 다르다.
유저 정보를 date라는 이름으로, 그리고 setValues에 대한 콜백 함수를 next라는 이름으로 authenticate 함수에 전달하고 있다. 즉 브라우저 환경이라면 JWT를 localstorage에 저장한 뒤, values 상태를 업데이트하는 것이다.
LoginPageApplication/frontend/src/Components/Dashboard/Dashboard.js
import React from 'react';
import { isAuthenticated, signout } from '../../Backend';
import { useNavigate } from 'react-router-dom';

const Dashboard = () => {
    const navigate = useNavigate(); // Initialize navigation
    const authenticatedUser = isAuthenticated(); // Check if the user is authenticated

    // Function to handle signout action
    const onSignout = () => {
        signout(); // Perform signout action
        console.log("Signed out");
        navigate('/signin'); // Redirect to login page after sign out
    };

    return (
        !authenticatedUser ? <h1>Please sign in</h1> :
            <div className='dashboard'>
                <button onClick={onSignout}>Sign Out</button>
                <h1>Hello, {authenticatedUser.user.name}</h1> {/* Display user's name */}
            </div>
    );
};

export default Dashboard;
대시보드에서는 1)사용자 인증 상태 확인, 2)로그아웃 처리에 집중한다.
직관적으로 이해할 수 있다.
3-5. Styling the User Interface with CSS 🟢
본 글에서 스타일링에 대해서는 자세히 다루지 않겠다. 스타일링이 목적인 글이 아니기 때문이다. 다만 나중에 코드가 필요할 수 있기 때문에 아카이빙은 해놓겠다.
LoginPageApplication/frontend/src/Components/SignupPage/Signup.css
body {
    font-family: Arial, sans-serif;
}

.form-container {
    display: flex;
    justify-content: center;
    align-items: center;
    height: 100vh;
    margin: 0;
    background-color: #f7f7f7;
}

.form-box {
    padding: 2rem;
    background-color: white;
    box-shadow: 0px 0px 5px 0px rgba(0,0,0,0.1);
    width: 100%;
    max-width: 500px;
}

h2 {
    margin-bottom: 1.5rem;
    text-align: center;
}

.form-group {
    margin-bottom: 1.5rem;
}

label {
    display: block;
    margin-bottom: 0.5rem;
}

input {
    width: 100%;
    padding: 0.5rem;
    margin-bottom: 1.5rem;
    box-sizing: border-box;
    border: 1px solid #ccc;
    border-radius: 4px;
}

button {
    background-color: #007bff;
    color: white;
    padding: 0.5rem 1rem;
    border: none;
    border-radius: 4px;
    cursor: pointer;
    width: 100%;
}

button:hover {
    background-color: #0056b3;
}

.error-message {
    margin-bottom: 1.5rem;
    text-align: center;
}

.loading-message {
    margin-bottom: 1.5rem;
    text-align: center;
}

.loading-spinner {
    width: 2rem;
    height: 2rem;
    border: 4px solid #f3f3f3;
    border-top: 4px solid #3498db;
    border-radius: 50%;
    animation: spin 1s linear infinite;
}

@keyframes spin {
    0% {
        transform: rotate(0deg);
    }
    100% {
        transform: rotate(360deg);
    }
}
LoginPageApplication/frontend/src/Components/Dashboard/Dashboard.css
body {
    font-family: Arial, sans-serif;
}

.form-container {
    display: flex;
    justify-content: center;
    align-items: center;
    height: 100vh;
    margin: 0;
    background-color: #f7f7f7;
}

.form-box {
    padding: 2rem;
    background-color: white;
    box-shadow: 0px 0px 5px 0px rgba(0,0,0,0.1);
    width: 100%;
    max-width: 500px;
}

h2 {
    margin-bottom: 1.5rem;
    text-align: center;
}

.form-group {
    margin-bottom: 1.5rem;
}

label {
    display: block;
    margin-bottom: 0.5rem;
}

input {
    width: 100%;
    padding: 0.5rem;
    margin-bottom: 1.5rem;
    box-sizing: border-box;
    border: 1px solid #ccc;
    border-radius: 4px;
}

button {
    background-color: #007bff;
    color: white;
    padding: 0.5rem 1rem;
    border: none;
    border-radius: 4px;
    cursor: pointer;
    width: 100%;
}

button:hover {
    background-color: #0056b3;
}

.error-message {
    margin-bottom: 1.5rem;
    text-align: center;
}

.loading-message {
    margin-bottom: 1.5rem;
    text-align: center;
}

.loading-spinner {
    width: 2rem;
    height: 2rem;
    border: 4px solid #f3f3f3;
    border-top: 4px solid #3498db;
    border-radius: 50%;
    animation: spin 1s linear infinite;
}

@keyframes spin {
    0% {
        transform: rotate(0deg);
    }
    100% {
        transform: rotate(360deg);
    }
}
4. Conclusion 🚀
감사합니다. Sanjana Shivananda님!
✅ 회고
똑바로 쳐다보는 것이 중요하다. 그 과정에서 감정을 배제하는 연습이 필요하다.
문제가 어렵게 느껴지는 이유는, 문제를 작은 단위로 분해할 만큼 쳐다보지 않았기 때문이다. 직면하지 못하는 이유는 '감정'말고는 다른 곳에서 원인을 찾기 힘들다.
피드백을 수용하지 못하는 이유는, 피드백을 통해 전달하고자 하는 사실이 아니라 그 외적인 감정적 교류에 시선을 돌리기 때문이다.
머리를 써야 할 때, 감정을 쓰면 안 된다.