
Live Activities
ActivityKit
Lock Screen(잠금화면)과Dynamic Island(다이나믹 아일랜드)에 실시간 정보 표시 제공 (only iPhone 용)widget extension이 필요 (없으면 새로 생성해야 한다)WidgetKit기능과 인터페이스를 위한SwiftUI를 사용ActivityKit의 역할은Live Activity의life cycle(수명 주기) 을 담당request,update,end
Displaying live data with Live Activities
Dynamic Island
compact presentation: 단일 Live Activity 가 표시되는 모드- 동일 앱의 데이터가
Leading side,Trailing side로 표시되는 모드

- 동일 앱의 데이터가
circular minimal presentation: 두가지 Live Activity 를 표시하는 모드- 좌측에
Minimal, 우측에 떨어진 형태로Minimal한 원형형태로 표시되는 모드

- 좌측에
expanded presentation: 길게 눌러서 확장된 형태로 표시되는 모드

- Dynamic Island 를 지원하려면 세가지 형태의 presentations 를 지원해야만 한다.

Displaying live data with Live Activities
Live Activities 표시
- 앱, 또는 사용자가 종료하지 않는 한 최대
8시간동안 활성화될 수 있다.- 8시간이 지나면 시스템이 자동으로 종료(비활성화), Dynamic Island는 즉시 제거
- 종료된 상태에서 사용자 또는 시스템이 제거하기 전까지 4시간동안 잠금화면에 남아있을 수 있다. (잠금화면 기준
최대 12시간동안 표시되는 셈)
- presentation 크기보다 작거나 같은 크기의
image assets가 필요하다.- 큰 사이즈의 경우 Live Activity 를 활성화할 수 없다.

- 큰 사이즈의 경우 Live Activity 를 활성화할 수 없다.
- Widget 과 달리
Network사용이나location업데이트를 할 수 없다. - 앱 내에서
ActivityKit프레임워크를 사용하거나ActivityKit push notifications(APN)알림수신을 통해 업데이트할 수 있다.- 업데이트된 동적 데이터 크기는 4KB를 초과할 수 없다.
Widget 구현
widget extension 생성
widget extension 내 여러 widget 을 넣을 수 있다.
기능별로 (location information 이 필요한 위젯끼리, 필요없는 위젯끼리) widget extension 을 여러개 만들 수 있다.
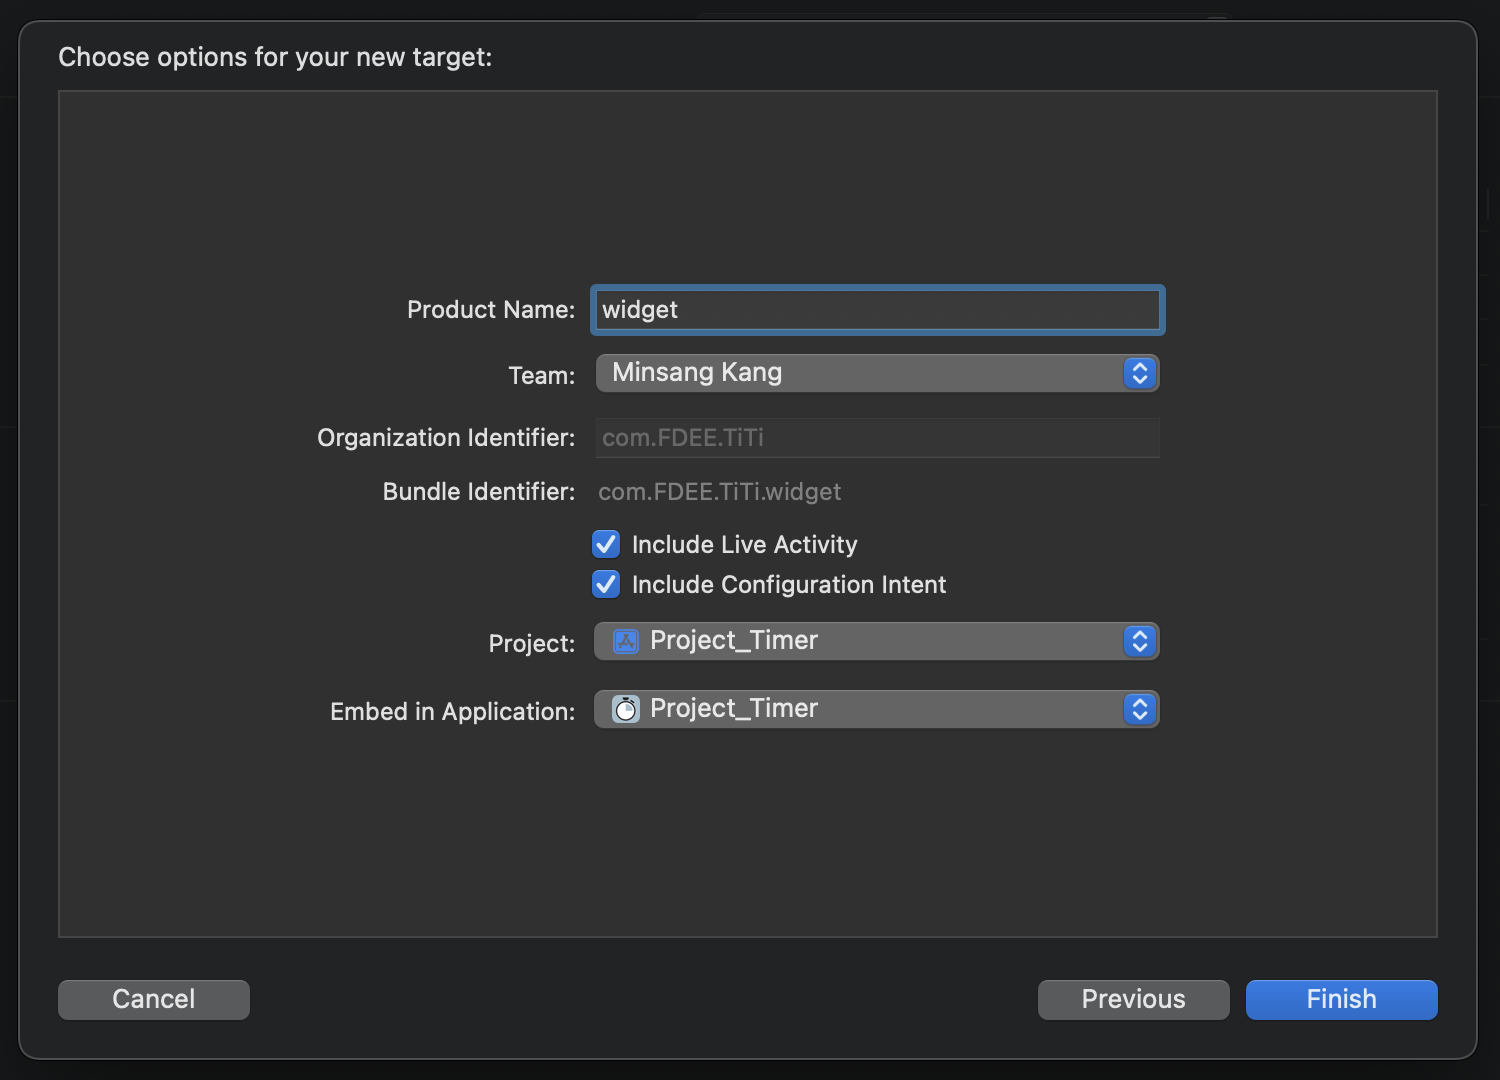
- File -> New -> Target -> iOS ->
Widget Extension클릭 - ProdductName(widget) 입력
Include Live Activity선택 (자동으로 Live Activity 를 Widget 내 추가하는 기본 코드 생성)Include Configuration Intent선택 (위젯을 꾹눌러 사용자 설정기능을 제공할지 여부)StaticConfiguration: 사용자가 구성할 수 있는 속성이 없는 위젯인 경우 (뉴스 위젯)IntentConfiguration: 사용자가 구성할 수 있는 속성이 있는 위젯인 경우
- 자동으로 Widget protocol 을 준수하는 기본 위젯 구현코드가 생성된다.
- IntentConfiguration 선택한 경우 다음 정보를 초기화 해야 한다.
kind: 위젯 식별 문자열provider:TimelineProvider를 준수하는 WidgetKit 을 주기적으로 부르는 객체, 주기적으로TimelineEntry를 content 로 반환한다.intent: 사용자가 구성할 수 있는 속성을 정의content: closure 를 통해 provider 의TimelineEntry를 받아 위젯을 표시하는 SwiftUI View 부분configurationDisplayName: 위젯 표시명description: 위젯 설명내용supportedFamilies: 위젯 크기설정
StaticConfiguration 설정된 단일 위젯 GameStatusWidget 예시코드
@main
struct GameStatusWidget: Widget {
    var body: some WidgetConfiguration {
        StaticConfiguration(
            kind: "com.mygame.game-status",
            provider: GameStatusProvider(),
        ) { entry in
            GameStatusView(entry.gameStatus)
        }
        .configurationDisplayName("Game Status")
        .description("Shows an overview of your game status")
        .supportedFamilies([.systemSmall, .systemMedium, .systemLarge, .systemExtraLarge])
    }
}@main부분이 widget extension 의 시작점을 나타낸다.- 여러 위젯을 지원하려면
Widget->WidgetBundle을 통해 시작점을 설정해야 한다. - 정의한 위젯이
widget gallery(위젯선택창) 에 표시되려면 앱을 실행한적이 있어야 표시된다.
TimelineEntry 제공
- timeline provider 는
TinelineEntry들로 구성된timeline을 생성합니다. TimelineEntry는 widget 을 업데이트하기 위한date값과status값을 지닙니다.
gameStatus 를 지닌 GameStatusEntry 예시코드
struct GameStatusEntry: TimelineEntry {
    var date: Date
    var gameStatus: String
}
widget gallery(위젯선책창)에 위젯을 서버응답이 지연되기 전에 빠르게 표시하기 위한 용도로 provider 에서preview snapshot을 제공해야 한다. (isPreview값이 True 인 경우getSnapshot함수를 통해 반환)
TimelineProvider 의 preview snapshot 제공하는 예시코드
struct GameStatusProvider: TimelineProvider {
    var hasFetchedGameStatus: Bool
    var gameStatusFromServer: String

    func getSnapshot(in context: Context, completion: @escaping (Entry) -> Void) {
        let date = Date()
        let entry: GameStatusEntry

        if context.isPreview && !hasFetchedGameStatus {
            entry = GameStatusEntry(date: date, gameStatus: "—")
        } else {
            entry = GameStatusEntry(date: date, gameStatus: gameStatusFromServer)
        }
        completion(entry)
}- WidgetKit 은 snapshot 을 요청한 후
getTimeline함수를 호출합니다. (provider 에게 정기적인timeline을 요청) timeline은 tinelineentries와 WidgetKit 에서 후속 timeline을 요청할 때 reload 하는policy로 구성됩니다.
server 로부터 status 를 받는 timeline 과 15분 간격 reload 하는 예시코드
struct GameStatusProvider: TimelineProvider {
    func getTimeline(in context: Context, completion: @escaping (Timeline<GameStatusEntry>) -> Void) {
        // Create a timeline entry for "now."
        let date = Date()
        let entry = GameStatusEntry(
            date: date,
            gameStatus: gameStatusFromServer
        )

        // Create a date that's 15 minutes in the future.
        let nextUpdateDate = Calendar.current.date(byAdding: .minute, value: 15, to: date)!

        // Create the timeline with the entry and a reload policy with the date
        // for the next update.
        let timeline = Timeline(
            entries:[entry],
            policy: .after(nextUpdateDate)
        )

        // Call the completion to pass the timeline to WidgetKit.
        completion(timeline)
    }
}
Placeholder widget 표시
redacted함수를 통해 백그라운드에서 데이터를 로드중일 때 placeholder 를 표시할 수 있습니다.- 잠금화면과 같은 민감한 정보표시를 억제하려면 redacted 함수의 callback 으로
unredacted함수를 사용합니다.
Widget Content 표시
- 사용자가 위젯을 선택할 때 위젯의 형태(family)를 선택합니다.
- 위젯이 지원하는 family 에 대해 제공해야 합니다.
struct GameStatusView : View {
    @Environment(\.widgetFamily) var family: WidgetFamily
    var gameStatus: GameStatus
    var selectedCharacter: CharacterDetail

    @ViewBuilder
    var body: some View {
        switch family {
        case .systemSmall: GameTurnSummary(gameStatus)
        case .systemMedium: GameStatusWithLastTurnResult(gameStatus)
        case .systemLarge: GameStatusWithStatistics(gameStatus)
        case .systemExtraLarge: GameStatusWithStatisticsExtraLarge(gameStatus)
        case .accessoryCircular: HealthLevelCircular(selectedCharacter)
        case .accessoryRectangular: HealthLevelRectangular(selectedCharacter)
        case .accessoryInline: HealthLevelInline(selectedCharacter)
        default: GameDetailsNotAvailable()
        }
    }
}accessoryCircular,accessoryRectangular,accessoryInline의 경우 홈화면의 위젯 보다 훨씬 작은 위젯입니다.- view 들의 type 이 다르기 때문에
@ViewBuilder로 선언합니다. IntentConfiguration이 설정된 위젯인 경우IntentTimelineProvider를 준수하는 provider 를 사용합니다.- WidgetKit 은 scroll, switch 와 같은 interactive 한 요소들의 경우 지원않습니다.
read-only정보만 표시합니다. - widget 지원하는 SwiftUI 목록
- widget 은 snapshot 표시를 기반으로 하지만 계속되서 업데이트되는 위젯을 표시하고 싶은 경우 Keeping a Widget Up to Date 를 참고
Widget 터치 액션
widgetURL을 설정하여 위젯을 터치했을 경우 앱 내 특정창으로 이동할 수 있습니다.- 앱의 life cycle 에 따라
onOpenURL,application(_:open:options:),application(_:open:)으로 수신할 수 있습니다.
widgetURL 설정된 widget SwiftUI 예시코드
@ViewBuilder
var body: some View {
    ZStack {
        AvatarView(entry.character)
            .widgetURL(entry.character.url)
            .foregroundColor(.white)
    }
    .background(Color.gameBackground)
}WidgetBundle
- 2가지 이상의 widget 을 제공할 경우
WidgetBundle구조체를 사용하여 Widget 의 body 내 그룹화할 수 있습니다.
widgetBundle 예시 코드
@main
struct GameWidgets: WidgetBundle {
    @WidgetBundleBuilder
    var body: some Widget {
        GameStatusWidget()
        CharacterDetailWidget()
        LeaderboardWidget()
    }
}- simulator 또는 device 에서 앱 설치하는 과정 없이 해당 코드를 통해 preview 를 확인할 수 있습니다.
@Environment(\.widgetFamily) var family

Group {
    EmojiRangerWidgetEntryView(entry: SimpleEntry(date: Date(), relevance: nil, character: .panda))
        .previewContext(WidgetPreviewContext(family: .accessoryCircular))
        .previewDisplayName("\(family)")
  EmojiRangerWidgetEntryView(entry: SimpleEntry(date: Date(), relevance: nil, character: .panda))
        .previewContext(WidgetPreviewContext(family: .accessoryRectangular))
        .previewDisplayName("\(family)")
    EmojiRangerWidgetEntryView(entry: SimpleEntry(date: Date(), relevance: nil, character: .panda))
        .previewContext(WidgetPreviewContext(family: .accessoryInline))
        .previewDisplayName("\(family)")
    EmojiRangerWidgetEntryView(entry: SimpleEntry(date: Date(), relevance: nil, character: .panda))
        .previewContext(WidgetPreviewContext(family: .systemSmall))
	      .previewDisplayName("\(family)")
    EmojiRangerWidgetEntryView(entry: SimpleEntry(date: Date(), relevance: nil, character: .panda))
        .previewContext(WidgetPreviewContext(family: .systemMedium))
  	      .previewDisplayName("\(family)")
}Live Activitys 구현
Live Activitys 추가
- Live Activity 의 UI 는
widget extension내 추가하는 식 widget extension을 생성 및 추가
Info.plist파일 내 key:NSSupportsLiveActivities, value:YES(Boolean) 추가
ActivityAttributes구조체를 정의
ActivityAttributes를 통해ActivityConfiguration을 생성
Live Activities의configure,start,update,end관련 코드를 작성
ActivityAttributes 구조체 작성
widget extension을 추가 후Live Activity를 표시하기 위한 데이터인ActivityAttributes를 작성해야 한다.정적인 데이터의 경우 변수로 추가동적인 데이터의 경우ContentState구조체 내 추가
import Foundation
import ActivityKit

struct PizzaDeliveryAttributes: ActivityAttributes {
    public typealias PizzaDeliveryStatus = ContentState

    public struct ContentState: Codable, Hashable {
        var driverName: String
        var deliveryTimer: ClosedRange<Date>
    }

    var numberOfPizzas: Int
    var totalAmount: String
    var orderNumber: String
}
widget extension 내 ActivityConfiguration 추가
WidgetKit으로 Widget 을 반환하는 코드 내ActivityConfiguration을 추가합니다.- 만약 새로운 widget extension target 을 추가할 경우
Include Live Activities를 선택하면 자동으로 widget 과 Live Activity 가 포함된widget bundle을 생성합니다.
import SwiftUI
import WidgetKit

@main
struct PizzaDeliveryActivityWidget: Widget {
    var body: some WidgetConfiguration {
        ActivityConfiguration(for: PizzaDeliveryAttributes.self) { context in
            // Create the presentation that appears on the Lock Screen and as a
            // banner on the Home Screen of devices that don't support the
            // Dynamic Island.
            // ...
        } dynamicIsland: { context in
            // Create the presentations that appear in the Dynamic Island.
            // ...
        }
    }
}
WidgetBundle 추가
- 이미 widget 들을 사용하여
WidgetBundle이 있는 경우Live Activity를 추가합니다. - 만약 WidgetBundle 없이 단일 위젯을 제공한 경우 WidgetBundle 을 생성 후 Live Activity 를 추가합니다.
@main
struct PizzaDeliveryWidgets: WidgetBundle {
    var body: some Widget {
        FavoritePizzaWidget()

        if #available(iOS 16.1, *) {
            PizzaDeliveryLiveActivity()
        }
    }
}
Lock Screen presentation 작성 (잠금화면 UI)
Widget extension내에서SwiftUI를 사용하여 Live ActivityUI를 작성합니다.- Widget 과 마찬가지로 UI의 크기를 지정하지 않아도 됩니다. (시스템이 적절하게 설정)
widget extension 코드
@main
struct PizzaDeliveryWidget: Widget {
    var body: some WidgetConfiguration {
        ActivityConfiguration(for: PizzaDeliveryAttributes.self) { context in
            // Create the presentation that appears on the Lock Screen and as a
            // banner on the Home Screen of devices that don't support the
            // Dynamic Island.
            LockScreenLiveActivityView(context: context)
        } dynamicIsland: { context in
            // Create the presentations that appear in the Dynamic Island.
            // ...
        }
    }
}
Lock Screen 용 Live Activity UI 코드
struct LockScreenLiveActivityView: View {
    let context: ActivityViewContext<PizzaDeliveryAttributes>

    var body: some View {
        VStack {
            Spacer()
            Text("\(context.state.driverName) is on their way with your pizza!")
            Spacer()
            HStack {
                Spacer()
                Label {
                    Text("\(context.attributes.numberOfPizzas) Pizzas")
                } icon: {
                    Image(systemName: "bag")
                        .foregroundColor(.indigo)
                }
                .font(.title2)
                Spacer()
                Label {
                    Text(timerInterval: context.state.deliveryTimer, countsDown: true)
                        .multilineTextAlignment(.center)
                        .frame(width: 50)
                        .monospacedDigit()
                } icon: {
                    Image(systemName: "timer")
                        .foregroundColor(.indigo)
                }
                .font(.title2)
                Spacer()
            }
            Spacer()
        }
        .activitySystemActionForegroundColor(.indigo)
        .activityBackgroundTint(.cyan)
    }
}- update(_:alertConfiguration:) 함수를 통해 Live Activitys 를 업데이트 합니다.
- Dynamic Island 를 지원하지 않는 기기에서 update 가 된 경우 banner 형식으로 표시됩니다.
- 높이의 경우 160 points 를 넘으면 안된다.
Live Activities 설정
ActivityAttributes구조체를 지닌ActivityContent객체를 통해 설정할 수 있다.staleDate는 옵셔널 설정이지만, 설정하면 오래된 정보인지를 표시할 수 있다.relevanceScore값을 통해 잠금화면과 다이나믹아일랜드에 어떤 Activity 를 표시할 지 우선순위를 정할 수 있다. (기본적으로 먼저 시작된 Activity 를 표시, 큰값을 우선적으로 표시: 100 ~ 50)activity: Activity 프로퍼티를 지니고 있어야 종료 및 업데이트를 반영할 수 있다.
ActivityContent 객체 설정 예시코드 (30분 후 업데이트)
if ActivityAuthorizationInfo().areActivitiesEnabled {
    var future = Calendar.current.date(byAdding: .minute, value: (Int(minutes) ?? 0), to: Date())!
    future = Calendar.current.date(byAdding: .second, value: (Int(seconds) ?? 0), to: future)!
    let date = Date.now...future
    let initialContentState = PizzaDeliveryAttributes.ContentState(driverName: "Bill James", deliveryTimer:date)
    let activityAttributes = PizzaDeliveryAttributes(numberOfPizzas: 3, totalAmount: "$42.00", orderNumber: "12345")

    let activityContent = ActivityContent(state: initialContentState, staleDate: Calendar.current.date(byAdding: .minute, value: 30, to: Date())!)

    // Start the Live Activity.
    do {
        deliveryActivity = try Activity.request(attributes: activityAttributes, content: activityContent)
        print("Requested a pizza delivery Live Activity \(String(describing: deliveryActivity?.id)).")
    } catch (let error) {
        print("Error requesting pizza delivery Live Activity \(error.localizedDescription).")
    }
}
iOS Developer