섹션2 들어와서 여유 부리다가 한대 얻어맞은 부분... 복습이 무조건 필요한 부분이다.
과제 - Underbar
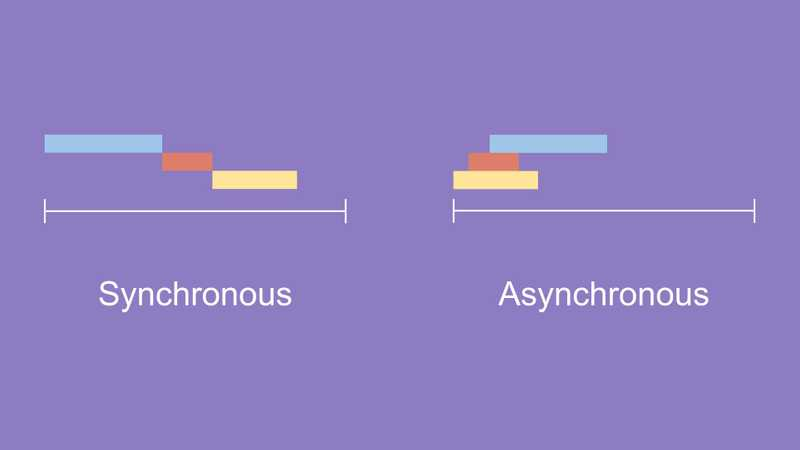
동기와 비동기
동기적 처리란?
'특정 코드의 실행이 완료될 때까지 기다리고 난 후 다음 코드를 수행하는 것’
비동기적 처리란?
‘특정 코드의 실행이 완료될 때까지 기다리지 않고 다음 코드들을 수행하는 것’
주문을 받는 매장을 예로 들어보자
첫번째 손님의 주문을 받고 주문 상품을 전달하기까지 두번째 손님의 주문을 받지 않는 처리 방식이 동기적 처리방식이 되겠고, 첫번째 손님의 주문을 받으면 상품 준비에 들어가고 곧바로 두번째 손님의 주문을 받는 처리 방식은 비동기 처리방식이라고 할 수 있겠다.
그니까 동기는 사장 혼자 운영하는 개인카페고 비동기는 직원이 많은 프렌차이즈 카페다
const printString = (string) => {
  setTimeout(function () {
    console.log(string);
  }, Math.floor(Math.random() * 100) + 1);
};

const printAll = () => {
  printString('A');
  printString('B');
  printString('C');
};

printAll();
출력 ABC, BCA, CAB 등 순서를 보장하지 않음
callback
'비동기로 작동하는 코드를 제어할 수 있는 방법' 즉, 비동기를 동기화할 수 있음
const printString = (string, callback) => {
  setTimeout(function () {
    console.log(string);
    callback();
  }, Math.floor(Math.random() * 100) + 1);
};

const printAll = () => {
  printString('A', () => {
    printString('B', () => {
      printString('C', () => {});
    });
  });
};

printAll();
출력 ABC
각각 순서를 보장하게끔 안에 넣어버리면 됨
callback hell
Callback 함수를 통해 비동기 코드의 순서를 제어할 수 있지만 코드가 길어질 수록 복잡해지고 가독성이 낮아지는 Callback Hell이 발생하는 단점이 있다.
const printString = (string, callback) => {
  setTimeout(function () {
    console.log(string);
    callback();
  }, Math.floor(Math.random() * 100) + 1);
};

const printAll = () => {
  printString('A', () => {
    printString('B', () => {
      printString('C', () => {
        printString('D', () => {
          printString('E', () => {
            printString('F', () => {
              printString('G', () => {
                printString('H', () => {
                  printString('I', () => {
                    printString('J', () => {
                      printString('K', () => {
                        printString('L', () => {
                          printString('M', () => {
                            printString('N', () => {
                              printString('O', () => {
                                printString('P', () => {});
                              });
                            });
                          });
                        });
                      });
                    });
                  });
                });
              });
            });
          });
        });
      });
    });
  });
};

printAll();
Promise
'비동기로 작동하는 코드를 제어할 수 있는 다른 방법'
Promise는 class이기 때문에 new 키워드를 통해 Promise 객체를 생성,비동기 처리를 수행할 콜백 함수(executor)를 인수로 전달받는데 이 콜백 함수는 resolve, reject 함수를 인수로 전달받는다.
Promise 객체가 생성되면 executor는 자동으로 실행되고 작성했던 코드들이 작동한다. 코드가 정상적으로 처리가 되었다면 resolve 함수를 호출하고 에러가 발생했을 경우에는 reject 함수를 호출
let promise = new Promise((resolve, reject) => {
	// 1. 정상적으로 처리되는 경우
	// resolve의 인자에 값을 전달할 수도 있습니다.
	resolve(value);

	// 2. 에러가 발생하는 경우
	// reject의 인자에 에러메세지를 전달할 수도 있습니다.
	reject(error);
});
new Promise가 반환하는 Promise 객체는 state, result 내부 프로퍼티를 갖는다. 하지만 직접 접근할 수 없고 .then, .catch, .finally 의 메서드를 사용해야 접근이 가능하다.
State
기본 상태(state)는 pending(대기), 비동기 처리를 수행할 콜백 함수(executor)가 성공적으로 작동했다면 fulfilled (이행)로 변경이 되고, 에러가 발생했다면 rejected (거부)가 된다.
Result
처음은 undefined, 비동기 처리를 수행할 콜백 함수(executor)가 성공적으로 작동하여resolve(value)가 호출되면 value로, 에러가 발생하여 reject(error)가 호출되면 error로 변한다.
Then
executor에 작성했던 코드들이 정상적으로 처리가 되었다면 resolve 함수를 호출하고 .then 메서드로 접근할 수 있다. 또한 .then 안에서 리턴한 값이 Promise면 Promise의 내부 프로퍼티 result를 다음 .then 의 콜백 함수의 인자로 받아오고, Promise가 아니라면 리턴한 값을 .then 의 콜백 함수의 인자로 받아올 수 있다.
let promise = new Promise((resolve, reject) => {
	resolve("성공");
});

promise.then(value => {
	console.log(value);
	// "성공"
})
Catch
executor에 작성했던 코드들이 에러가 발생했을 경우에는 reject 함수를 호출하고 .catch 메서드로 접근할 수 있다.
let promise = new Promise(function(resolve, reject) {
	reject(new Error("에러"))
});

promise.catch(error => {
	console.log(error);
	// Error: 에러
})
Finally
executor에 작성했던 코드들의 정상 처리 여부와 상관없이 .finally 메서드로 접근할 수 있다.
let promise = new Promise(function(resolve, reject) {
	resolve("성공");
});

promise
.then(value => {
	console.log(value);
	// "성공"
})
.catch(error => {
	console.log(error);
})
.finally(() => {
	console.log("성공이든 실패든 작동!");
	// "성공이든 실패든 작동!"
})
Promise chaining
Promise chaining가 필요하는 경우는 비동기 작업을 순차적으로 진행해야 하는 경우다. Promise chaining이 가능한 이유는 .then, .catch, .finally 의 메서드들은 Promise를 반환하기 때문이다. 따라서 .then을 통해 연결할 수 있고, 에러가 발생할 경우 .catch 로 처리하면 된다.
let promise = new Promise(function(resolve, reject) {
	resolve('성공');
	...
});

promise
  .then((value) => {
    console.log(value);
    return '성공';
  })
  .then((value) => {
    console.log(value);
    return '성공';
  })
  .then((value) => {
    console.log(value);
    return '성공';
  })
  .catch((error) => {
    console.log(error);
    return '실패';
  })
  .finally(() => {
    console.log('성공이든 실패든 작동!');
  });
예제
const printString = (string) => {
  return new Promise((resolve, reject) => {
    setTimeout(() => {
      resolve();
      console.log(string);
    }, Math.floor(Math.random() * 100) + 1);
  });
};

const printAll = () => {
  printString('A')
    .then(() => {
      return printString('B');
    })
    .then(() => {
      return printString('C');
    });
};

printAll();
출력 ABC
let promise = new Promise(function (resolve, reject) {
  resolve('성공');
  // reject("실패");
});

promise
  .then((value) => {
    console.log(value);
    return '성공';
  })
  .then((value) => {
    console.log(value);
    return '성공';
  })
  .then((value) => {
    console.log(value);
    return '성공';
  })
  .catch((error) => {
    console.log(error);
    return '실패';
  })
  .finally(() => {
    console.log('성공이든 실패든 작동!');
  });
출력 성공 성공 성공 성공이든 실패든 작동!
Promise.all()
const promiseOne = () => new Promise((resolve, reject) => setTimeout(() => resolve('1초'), 1000));
const promiseTwo = () => new Promise((resolve, reject) => setTimeout(() => resolve('2초'), 2000));
const promiseThree = () => new Promise((resolve, reject) => setTimeout(() => resolve('3초'), 3000));
Promise.all()은 여러 개의 비동기 작업을 동시에 처리하고 싶을때 사용한다.
인자는 배열. 해당 배열에 있는 모든 Promise에서 executor 내 작성했던 코드들이 정상적으로 처리가 되었다면 결과를 배열에 저장해 새로운 Promise를 반환 해준다.
앞서 배운 Promise chaining을 사용했을 경우는 코드들이 순차적으로 동작되기 때문에 총 6초의 시간이 걸리게 되고, 같은 코드가 중복되는 현상도 발생하게 된다.
// 기존
const result = [];
promiseOne()
  .then(value => {
    result.push(value);
    return promiseTwo();
  })
  .then(value => {
    result.push(value);
    return promiseThree();
  })
  .then(value => {
    result.push(value);
   console.log(result);
	 // ['1초', '2초', '3초']
  })
위 코드의 문제를 Promise.all()로 비동기 작업들을 동시에 처리가능하다.따라서 3초 안에 모든 작업이 종료된다. Promise chaining로 작성한 코드보다 간결하다.
Promise.all은 인자로 받는 배열에 있는 Promise 중 하나라도 에러가 발생하게 되면 나머지 Promise의 state와 상관없이 즉시 종료된다.
Promise.all([
	new Promise((resolve, reject) => setTimeout(() => reject(new Error('에러1'))), 1000),
	new Promise((resolve, reject) => setTimeout(() => reject(new Error('에러2'))), 2000),
	new Promise((resolve, reject) => setTimeout(() => reject(new Error('에러3'))), 3000),
])
	.then((value) => console.log(value))
  .catch((err) => console.log(err));
	// Error: 에러1
1초 후에 에러가 발생하고 Error: 에러1이 반환된 후로는 더 이상 작동하지 않고 종료된다.
Promise Hell
Promise를 통해 비동기 코드의 순서를 제어할 수 있지만 Callback 함수와 같이 코드가 길어질수록 복잡해지고 가독성이 낮아지는 Promise Hell이 발생하는 단점이 있다.
const printString = (string) => {
  return new Promise((resolve, reject) => {
    setTimeout(() => {
      resolve(string);
    }, Math.floor(Math.random() * 100) + 1);
  });
};

const printAll = () => {
  printString('A').then((value) => {
    console.log(value);

    printString('B').then((value) => {
      console.log(value);

      printString('C').then((value) => {
        console.log(value);

        printString('D').then((value) => {
          console.log(value);

          printString('E').then((value) => {
            console.log(value);

            printString('F').then((value) => {
              console.log(value);

              printString('G').then((value) => {
                console.log(value);
              });
            });
          });
        });
      });
    });
  });
};

printAll();
Async/Await
JavaScript는 ES8에서 async/await키워드를 제공한다. 이를 통해 복잡한 Promise 코드를 간결하게 작성할 수 있게 되었다. 함수 앞에 async 키워드를 사용하고 async 함수 내에서만 await 키워드를 사용하면 된다
// 함수 선언식
async function funcDeclarations() {
	await 작성하고자 하는 코드
	...
}

// 함수 표현식
const funcExpression = async function () {
	await 작성하고자 하는 코드
	...
}

// 화살표 함수
const ArrowFunc = async () => {
	await 작성하고자 하는 코드
	...
}
Async/Await 예제
const printString = (string) => {
  return new Promise((resolve, reject) => {
    setTimeout(() => {
      resolve();
      console.log(string);
    }, Math.floor(Math.random() * 100) + 1);
  });
};

const printAll = async () => {
  await printString('A');
  await printString('B');
  await printString('C');
};
과제 - Part 1 - 타이머 API, Part 2 - fs 모듈
Node.js
<script src="불러오고싶은_스크립트.js"></script>

const fs = require('fs'); // 파일 시스템 모듈을 불러옵니다
const dns = require('dns'); // DNS 모듈을 불러옵니다
이제 fs.readFile 메서드 등을 사용할 수 있습니다!
Node.js에서 다른 파일을 불러오는 require 구문
3rd-party 모듈
서드 파티 모듈(3rd-party module)은 해당 프로그래밍 언어에서 공식적으로 제공하는 빌트인 모듈(built-in module)이 아닌 모든 외부 모듈을 일컫는다. 예를 들어, Node.js에서 underscore는 Node.js 공식 문서에 없는 모듈이기 때문에 서드 파티 모듈이다. underscore 와 같은 서드 파티 모듈을 다운로드하기 위해서는 npm을 사용해야 한다.
터미널에서 다음과 같이 입력해 underscore 를 설치할 수 있다.
npm install underscore

const _ = require('underscore');
fs.readFile(path[, options], callback)
메서드 fs.readFile 은 로컬에 존재하는 파일을 읽어온다. 비동기적으로 파일 내용 전체를 읽고, 이 메서드를 실행할 때에는 전달인자 세 개를 받는다.
path \<string> | \<Buffer> | \<URL> | \<integer>
options \<Object> | \<string>
callback \<Function>
fetch API
비동기 요청의 가장 대표적인 사례는 단연 네트워크 요청이다. 네트워크를 통해 이루어지는 요청은 그 형태가 다양하다. 그중에서 URL로 요청하는 경우가 가장 흔하다. URL로 요청하는 것을 가능하게 해 주는 API가 바로 fetch API이다.

시시각각 변하는 정보와, 늘 고정적인 정보가 따로 분리되어 있다
이 중에서 최신 뉴스나 날씨/미세먼지 정보가 바로 동적으로 데이터를 받아야 하는 정보이다.
fetch API는 위와 같이, 특정 URL로부터 정보를 받아오는 역할을 한다. 이 과정이 비동기로 이루어지기 때문에, 경우에 따라 다소 시간이 걸릴 수 있다. 이렇게 시간이 소요되는 작업을 요구할 경우에는 blocking이 발생하면 안 되므로, 특정 DOM에 정보가 표시될 때까지 로딩 창을 대신 띄우는 경우도 있다.
let url =
  "https://koreanjson.com/posts/1";
fetch(url)
  .then((response) => response.json())
  .then((json) => console.log(json))
  .catch((error) => console.log(error));
콘솔에서 fetch API를 사용하여 데이터를 요청할 수 있다.
과제 - fetch API
Axios
'브라우저, Node.js를 위한 Promise API를 활용하는 HTTP 비동기 통신 라이브러리'
Axios는 Fetch API보다 사용이 간편하면서 추가적인 기능들이 포함되어 있다.
Fetch API vs Axios
| Axios | Fetch API |
|---|---|
| 써드파티 라이브러리로 설치가 필요합니다. | 빌트인 API라 별도의 설치 필요없습니다. |
| 자동으로 JSON데이터 형식으로 변환됩니다. | .json() 메서드를 사용해야 합니다. |
Axios 설치
npm install axiosGET 요청
axios.get("url"[,config])https://stackblitz.com/edit/js-pfuguh?file=index.js
https://stackblitz.com/edit/js-eybohs?file=index.js
POST 요청
axios.post("url"[, data[, config]])https://stackblitz.com/edit/js-ffzs19?file=index.js
https://stackblitz.com/edit/js-2axytq?file=index.js