Docker Compose 이해
- 목적 : 1개 이상의 도커 컨테이너 생성 시 컨테이너들의 설정을 관리할 수 있도록 해주는 기능
- 방법 :
docker-compose.yaml파일에 컨테이너들의 설정을 입력 - 사용 :
.yaml파일이 있는 위치에서docker compose up명령어를 입력하여 실행 - yaml 파일은 들여쓰기 문법을 사용하며 Airflow의 Docker Compose는 아래와 같이 구분
x-airflow-common: # 각 서비스에 공통 적용될 항목들
services: # 컨테이너로 실행할 서비스를 정의
volumns: # 컨테이너에 연결할 볼륨을 정의
networks: # 컨테이너에 연결할 네트워크를 정의
x-airflow-common
- 공통으로 사용할 항목을
&를 붙여서 지정 &아래의 모든 영역은 공통 항목으로 묶여 한번에 가져올 수 있음
x-airflow-common:
  &airflow-common
  image: ${AIRFLOW_IMAGE_NAME:-apache/airflow:3.0.1}
  environment:
    &airflow-common-env
    AIRFLOW__CORE__EXECUTOR: CeleryExecutor
services
- 컨테이너로 올릴 서비스 목록을 지정
- 공통 항목을
<<: *airflow-common과 같은 형식으로 불러오기 - 환경 변수가 있을 경우
environment아래에 입력 ports는 호스트에서 컨테이너에 접속하기 위해 맵핑할 포트를 명시expose는ports와 다르게 내부 컨테이너 간에 연결할 때 사용할 포트를 명시
depends_on은 컨테이너의 실행 순서를 정의airflow-apiserver는airflow-init에 대한 종속적 관계
services:
  airflow-apiserver:
    <<: *airflow-common
    command: api-server
    ports:
      - "8080:8080"
    healthcheck:
      test: ["CMD", "curl", "--fail", "http://localhost:8080/api/v2/version"]
      interval: 30s
      timeout: 10s
      retries: 5
      start_period: 30s
    restart: always
    depends_on:
      <<: *airflow-common-depends-on
      airflow-init:
        condition: service_completed_successfully
volumes
- 컨테이너 내 데이터를 유지하기 위해 외부와 연결하기 위한 볼륨 정보
- 볼륨 리스트를 보려면
docker volume ls명령어 사용
volumes:
postgres-db-volume:- 서비스를 정의할 때 생성한 볼륨과 컨테이너의 내부 경로를 연결 가능
services:
  postgres:
    volumes:
      - postgres-db-volume:/var/lib/postgresql/data
networks
- 컨테이너를 격리된 네트워크로 그룹화하기 위한 네트워크 정보
- 컨테이너는 유동 IP를 가지게 되어 재가동할 때마다 IP 주소가 변경될 수 있는데, 고정 IP를 할당하기 위해 networks 활용 가능
- 네트워크 리스트를 보려면
docker network ls명령어 사용
networks:
  network_custom:
    driver: bridge
    ipam:
      driver: default
      config:
        - subnet: 172.28.0.0/16
gateway: 172.28.0.1- Airflow에서 기본적으로 사용하는
airflow_default네트워크 대역이172.18.0.0/16서브넷 범위인데, 아래에서 새 컨테이너를 만들기 위해 겹치지 않는 대역의network_custom을 정의
% docker network inspect {network_id}
[
    {
        "Name": "airflow_default",
        ...
        "IPAM": {
            "Driver": "default",
            "Options": null,
            "Config": [
                {
                    "Subnet": "172.18.0.0/16",
                    "Gateway": "172.18.0.1"
                }
            ]
        },
        ...
    }
]
Postgres 컨테이너 생성
Docker Compose 작성
- Airflow에서 기본으로 사용하는 Postgres 컨테이너 외에 새로운 Postgres 컨테이너 하나를 추가로 생성
- DB 사용자에 대한 정보는 환경 변수
environment로 입력 - 5432 포트로 접속할 수 있게 포트 맵핑 적용
- 기존의
postgres컨테이너도 5431 포트로 접속할 수 있게 마찬가지로 포트 맵핑 적용
- 기존의
postgres-custom-db-volume볼륨을 추가하고 컨테이너 내부 경로와 연결- 위에서 정의한
network_custom네트워크에 연결하면서 IP 주소는172.28.0.3으로 고정- 다른 컨테이너에도
network_custom및 겹치지 않는 고정 IP 주소를 할당
- 다른 컨테이너에도
services:
  postgres_custom:
    image: postgres:13
    environment:
      POSTGRES_USER: minyeamer
      POSTGRES_PASSWORD: minyeamer
      POSGRES_DB: minyeamer
      TZ: Asia/Seoul
    volumes:
      - postgres-custom-db-volume:/var/lib/postgresql/data
    ports:
      - 5432:5432
    networks:
      network_custom:
        ipv4_address: 172.28.0.3

  postgres:
    image: postgres:13
    ...
    ports:
      - 5431:5432
    networks:
      network_custom:
        ipv4_address: 172.28.0.4

  ...

volumes:
  postgres-db-volume:
  postgres-custom-db-volume:

networks:
  network_custom:
    ...
Docker Compose 실행
- 실행 후 컨테이너 목록을 조회하면
airflow-postgres_custom-1명칭의 컨테이너가 같이 올라온 것을 확인
% docker ps
CONTAINER ID   IMAGE                  COMMAND                  CREATED          STATUS                    PORTS                    NAMES
72541e89bff4   apache/airflow:3.0.1   "/usr/bin/dumb-init …"   57 seconds ago   Up 20 seconds (healthy)   8080/tcp                 airflow-airflow-worker-1
1735bc475bff   apache/airflow:3.0.1   "/usr/bin/dumb-init …"   57 seconds ago   Up 36 seconds (healthy)   0.0.0.0:8080->8080/tcp   airflow-airflow-apiserver-1
d2b680f273e3   apache/airflow:3.0.1   "/usr/bin/dumb-init …"   57 seconds ago   Up 36 seconds (healthy)   8080/tcp                 airflow-airflow-scheduler-1
f23c6d30d22c   apache/airflow:3.0.1   "/usr/bin/dumb-init …"   57 seconds ago   Up 36 seconds (healthy)   8080/tcp                 airflow-airflow-dag-processor-1
09992f09ac5e   apache/airflow:3.0.1   "/usr/bin/dumb-init …"   57 seconds ago   Up 36 seconds (healthy)   8080/tcp                 airflow-airflow-triggerer-1
5c1b13f33229   postgres:13            "docker-entrypoint.s…"   58 seconds ago   Up 56 seconds             0.0.0.0:5432->5432/tcp   airflow-postgres_custom-1
e23d4eb919fc   postgres:13            "docker-entrypoint.s…"   58 seconds ago   Up 56 seconds (healthy)   0.0.0.0:5431->5432/tcp   airflow-postgres-1
86fc82a16953   redis:7.2-bookworm     "docker-entrypoint.s…"   58 seconds ago   Up 56 seconds (healthy)   6379/tcp                 airflow-redis-1
DBeaver 접속
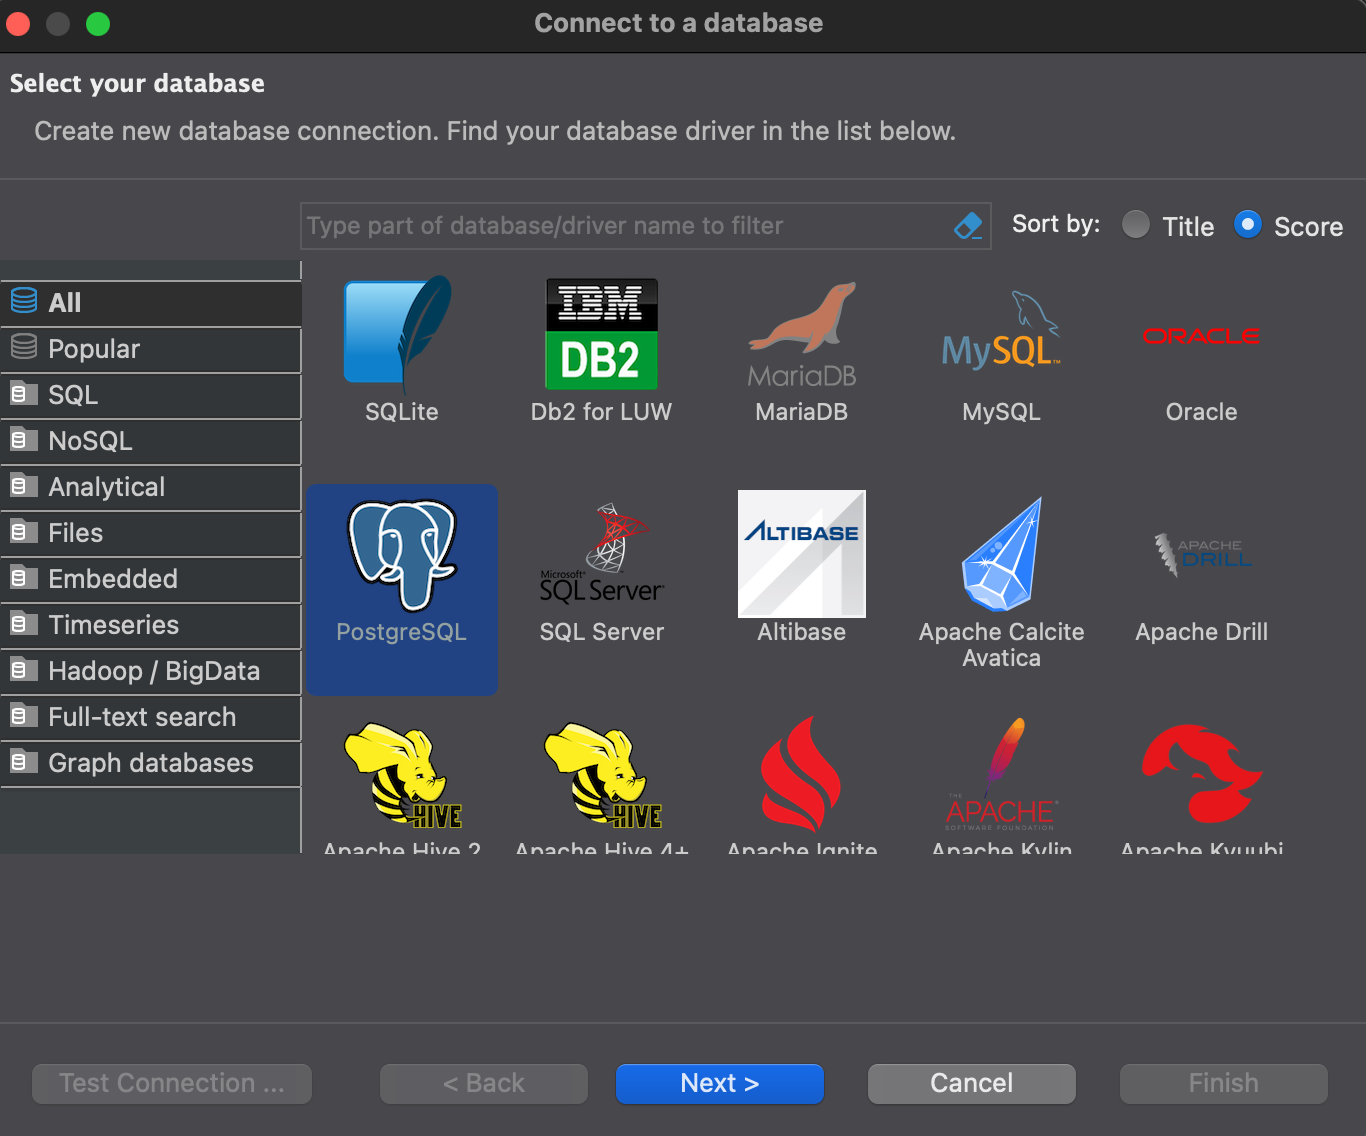
- DBeaver Community 버전을 다운로드 및 설치한 후 실행
- 좌측 상단의
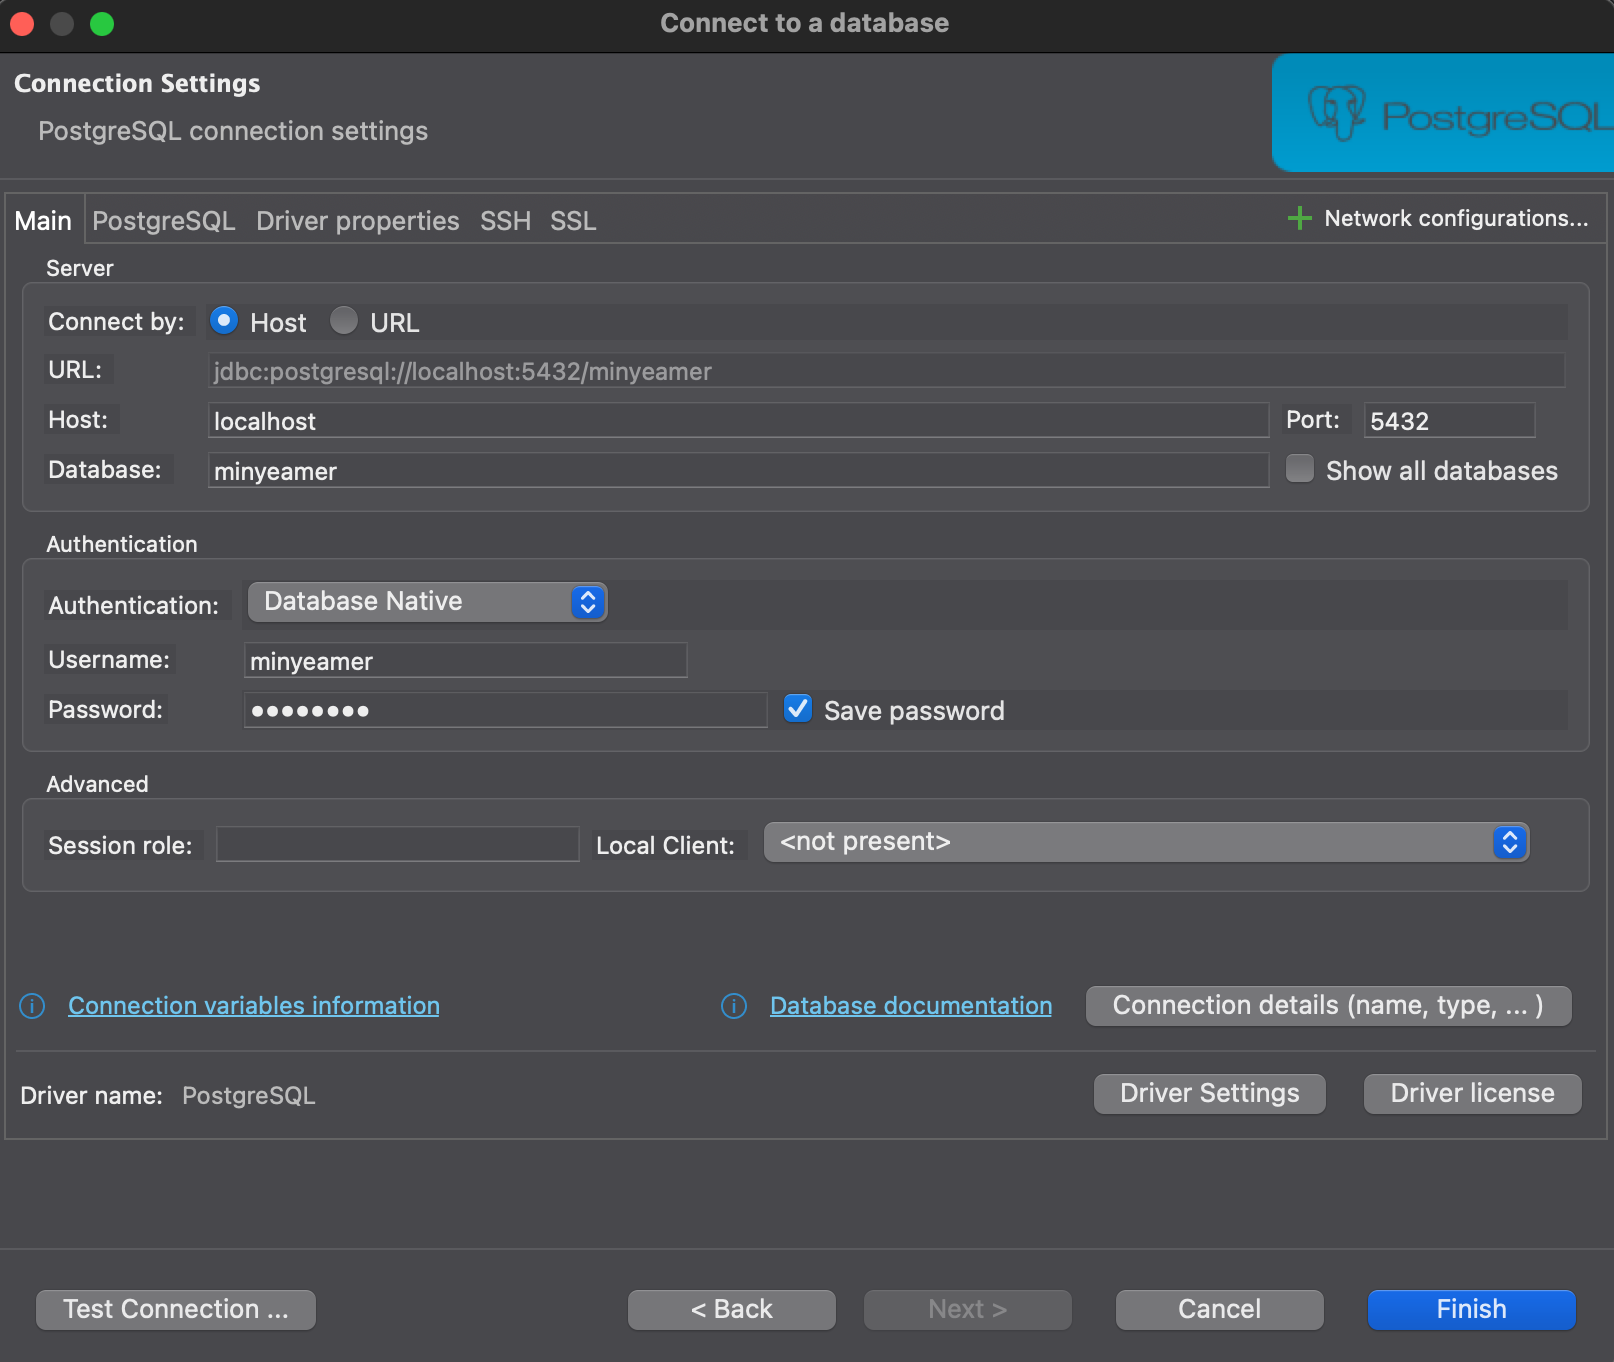
New Database Connection을 클릭해 PostgreSQL 연결을 생성- Port는 Docker Compose에서 맵핑한 5432 사용
- Database, Username, Password 또한 Docker Compose에서 지정한 값을 사용
 |  |
|---|
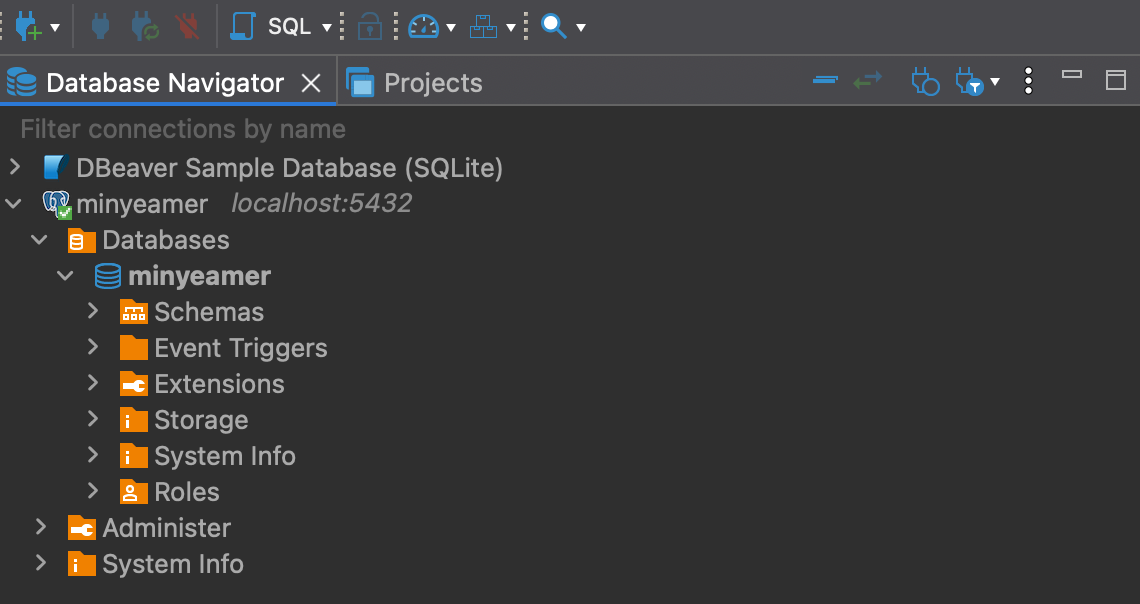
- 정상적으로 연결되었다면 아래와 같이 Database 명칭을 확인 가능
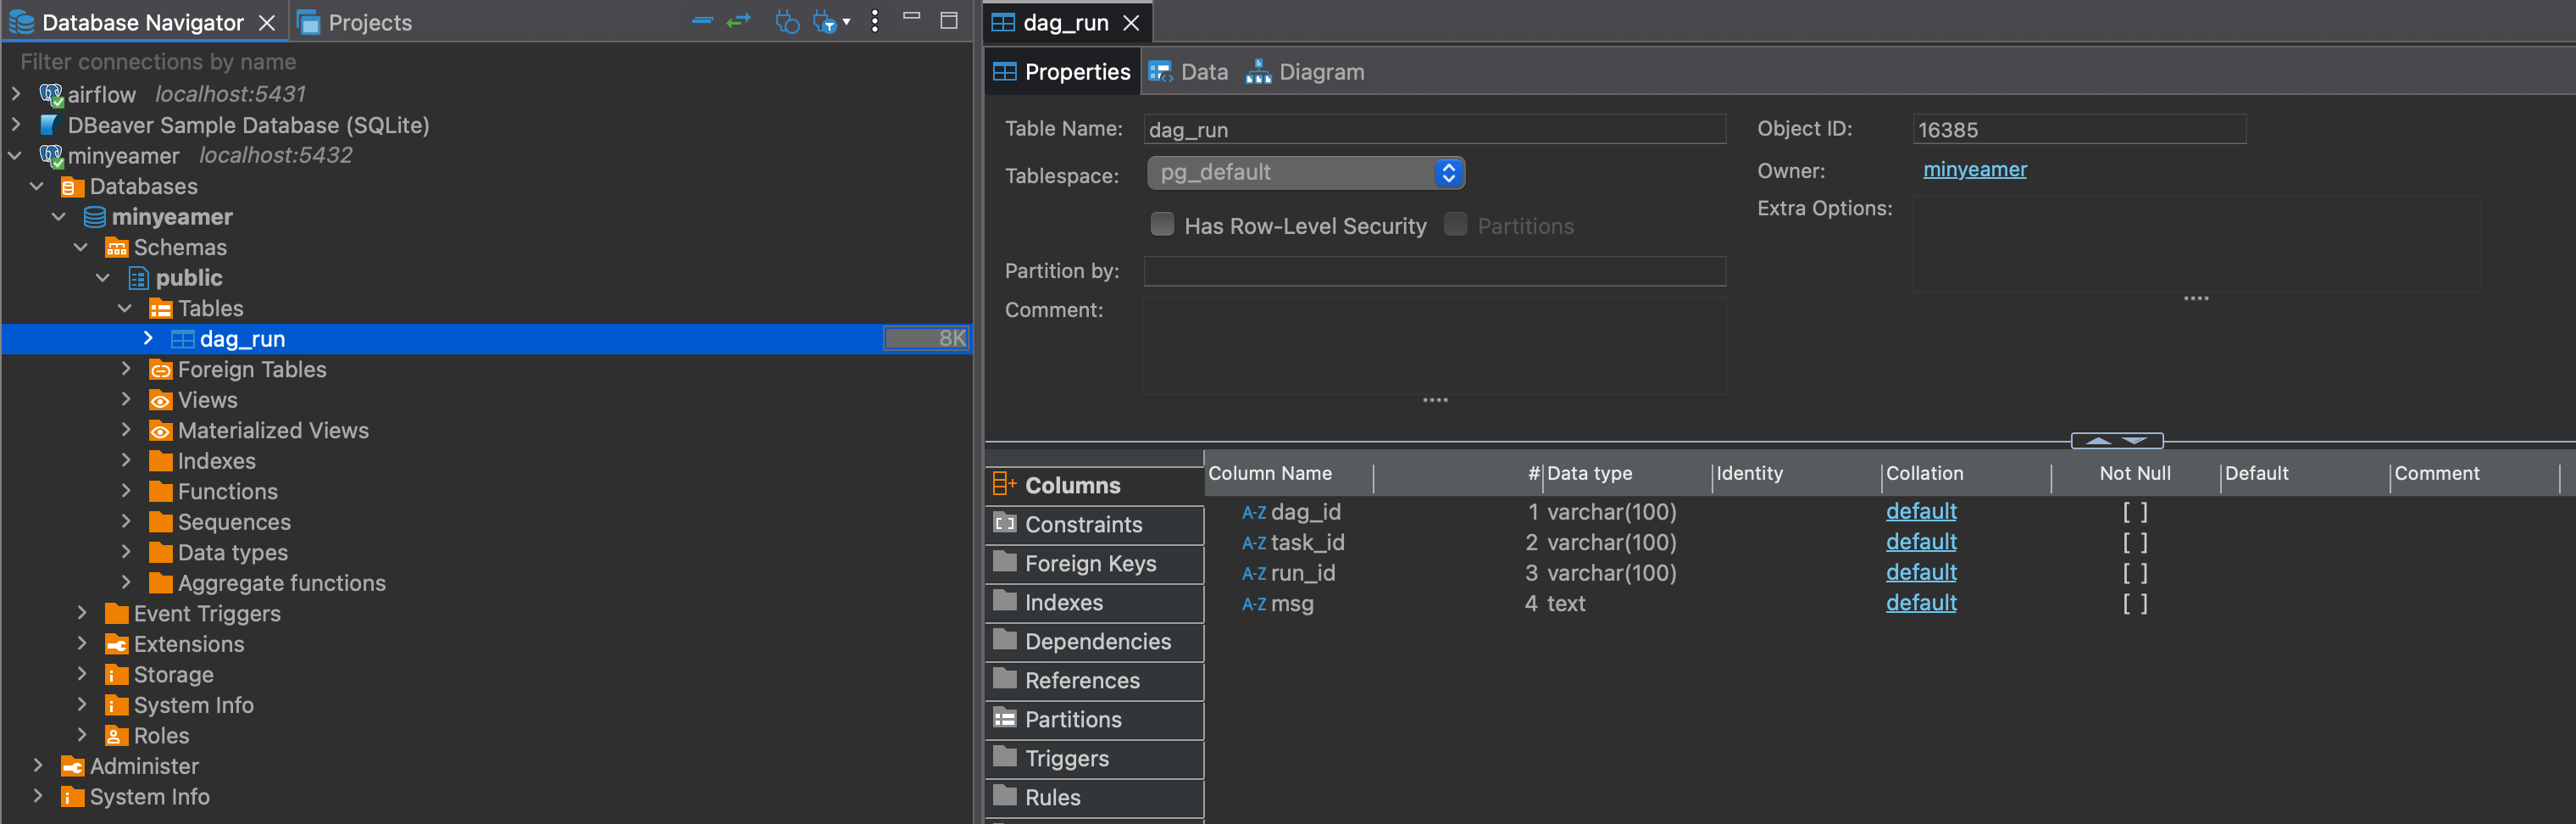
Postgres 테이블 생성
PythonOperator를 사용해 새로 생성한 PostgreSQL 컨테이너에 임의의 값을 INSERT 하는 작업을 구현하기 전에, 아래와 같이public.dag_run테이블을 생성
CREATE TABLE public.dag_run (
	dag_id varchar(100) NULL,
	task_id varchar(100) NULL,
	run_id varchar(100) NULL,
	msg text NULL
);- 테이블이 정상적으로 만들어졌다면 새로고침 후 아래와 같이 테이블 내 컬럼 내역을 확인 가능
PythonOperator 활용
- PostgreSQL에 연결해 현재 실행 정보를
INSERT INTO로 추가하는 함수insert_into_postgres()를 실행- DB 연결 시
conn세션 객체 생성 후.close()로 종료하는 구문을closing으로 대체 - DB 세션에서 쿼리를 실행하는
cursor객체를 만들고 해당 객체를 통해 SQL문을 수행 - 함수에 인수로 전달하는 DB 연결 정보는 마찬가지로 Docker Compose에서 지정한 값을 사용
- DB 연결 시
# dags/python_with_postgres.py
from airflow.sdk import DAG
from airflow.providers.standard.operators.python import PythonOperator
import pendulum
with DAG(
dag_id="python_with_postgres",
schedule=None,
start_date=pendulum.datetime(2025, 1, 1, tz="Asia/Seoul"),
catchup=False,
tags=["example", "hook"],
) as dag:
def insert_into_postgres(ip: str, port: str, dbname: str, user: str, passwd: str, **kwargs):
import psycopg2
from contextlib import closing
with closing(psycopg2.connect(host=ip, dbname=dbname, user=user, password=passwd, port=int(port))) as conn:
with closing(conn.cursor()) as cursor:
dag_id = kwargs.get("ti").dag_id
task_id = kwargs.get("ti").task_id
run_id = kwargs.get("ti").run_id
msg = "INSERT INTO 수행"
sql = "INSERT INTO dag_run VALUES (%s,%s,%s,%s);"
cursor.execute(sql,(dag_id,task_id,run_id,msg))
conn.commit()
postgres_task = PythonOperator(
task_id="postgres_task",
python_callable=insert_into_postgres,
op_args=["172.28.0.3", "5432", "minyeamer", "minyeamer", "minyeamer"]
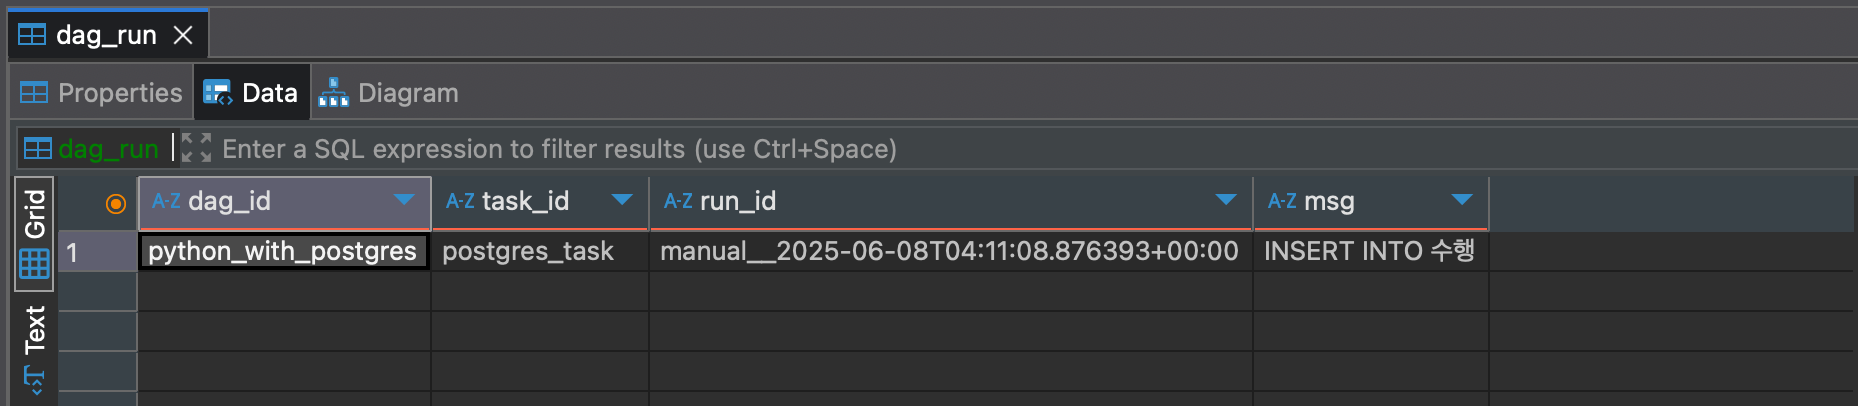
)DAG 실행
- DAG을 실행한 후 DBeaver에서
dag_run테이블 조회 시 아래와 같이 하나의 행이 올라온 것을 확인
문제점 및 해결방법
- 문제점 : DB 접속정보가 노출되고 접속정보가 변경되면 대응하기가 어려움
- 해결방법
- Variable 이용
- Hook 이용
Connection & Hook
- Connection : Airflow에서 외부와 연동하기 위해 설정하는 기본 정보
- Hook : Airflow에서 외부 솔루션의 기능을 사용할 수 있도록 미리 구현된 메서드를 가진 클래스
Hook
- Connection 정보를 통해 생성되는 객체로, 접속정보가 코드상 노출되지 않음
- 외부의 특정 솔루션을 다룰 수 있는 메서드가 구현되어 있음
- Operator와 같이 Task를 만들어내지는 못하기 때문에 Operator 내 함수에서 사용
Postgres Provider 문서 보기
https://airflow.apache.org/docs/apache-airflow-providers-postgres/6.1.3/index.html
- Providers에 속한 Postgres 문서에서 Connection 접속 과정을 조회 가능
def get_conn(self) -> connection:
    """Establish a connection to a postgres database."""
    conn = deepcopy(self.connection)

    # check for authentication via AWS IAM
    if conn.extra_dejson.get("iam", False):
        conn.login, conn.password, conn.port = self.get_iam_token(conn)

    conn_args = {
        "host": conn.host,
        "user": conn.login,
        "password": conn.password,
        "dbname": self.database or conn.schema,
        "port": conn.port,
    }
    raw_cursor = conn.extra_dejson.get("cursor", False)
    if raw_cursor:
        conn_args["cursor_factory"] = self._get_cursor(raw_cursor)

    if self.options:
        conn_args["options"] = self.options

    for arg_name, arg_val in conn.extra_dejson.items():
        if arg_name not in self.ignored_extra_options:
            conn_args[arg_name] = arg_val

    self.conn = psycopg2.connect(**conn_args)
return self.conn- Connection으로부터
host,login,password,database,port정보를 읽어서 DB 연결에 대한 파라미터로 활용하는 것을 확인 - 마지막 줄에는
psycopg2.connect()연결에 대한psycopg2.extensions.connection세션 객체를 반환
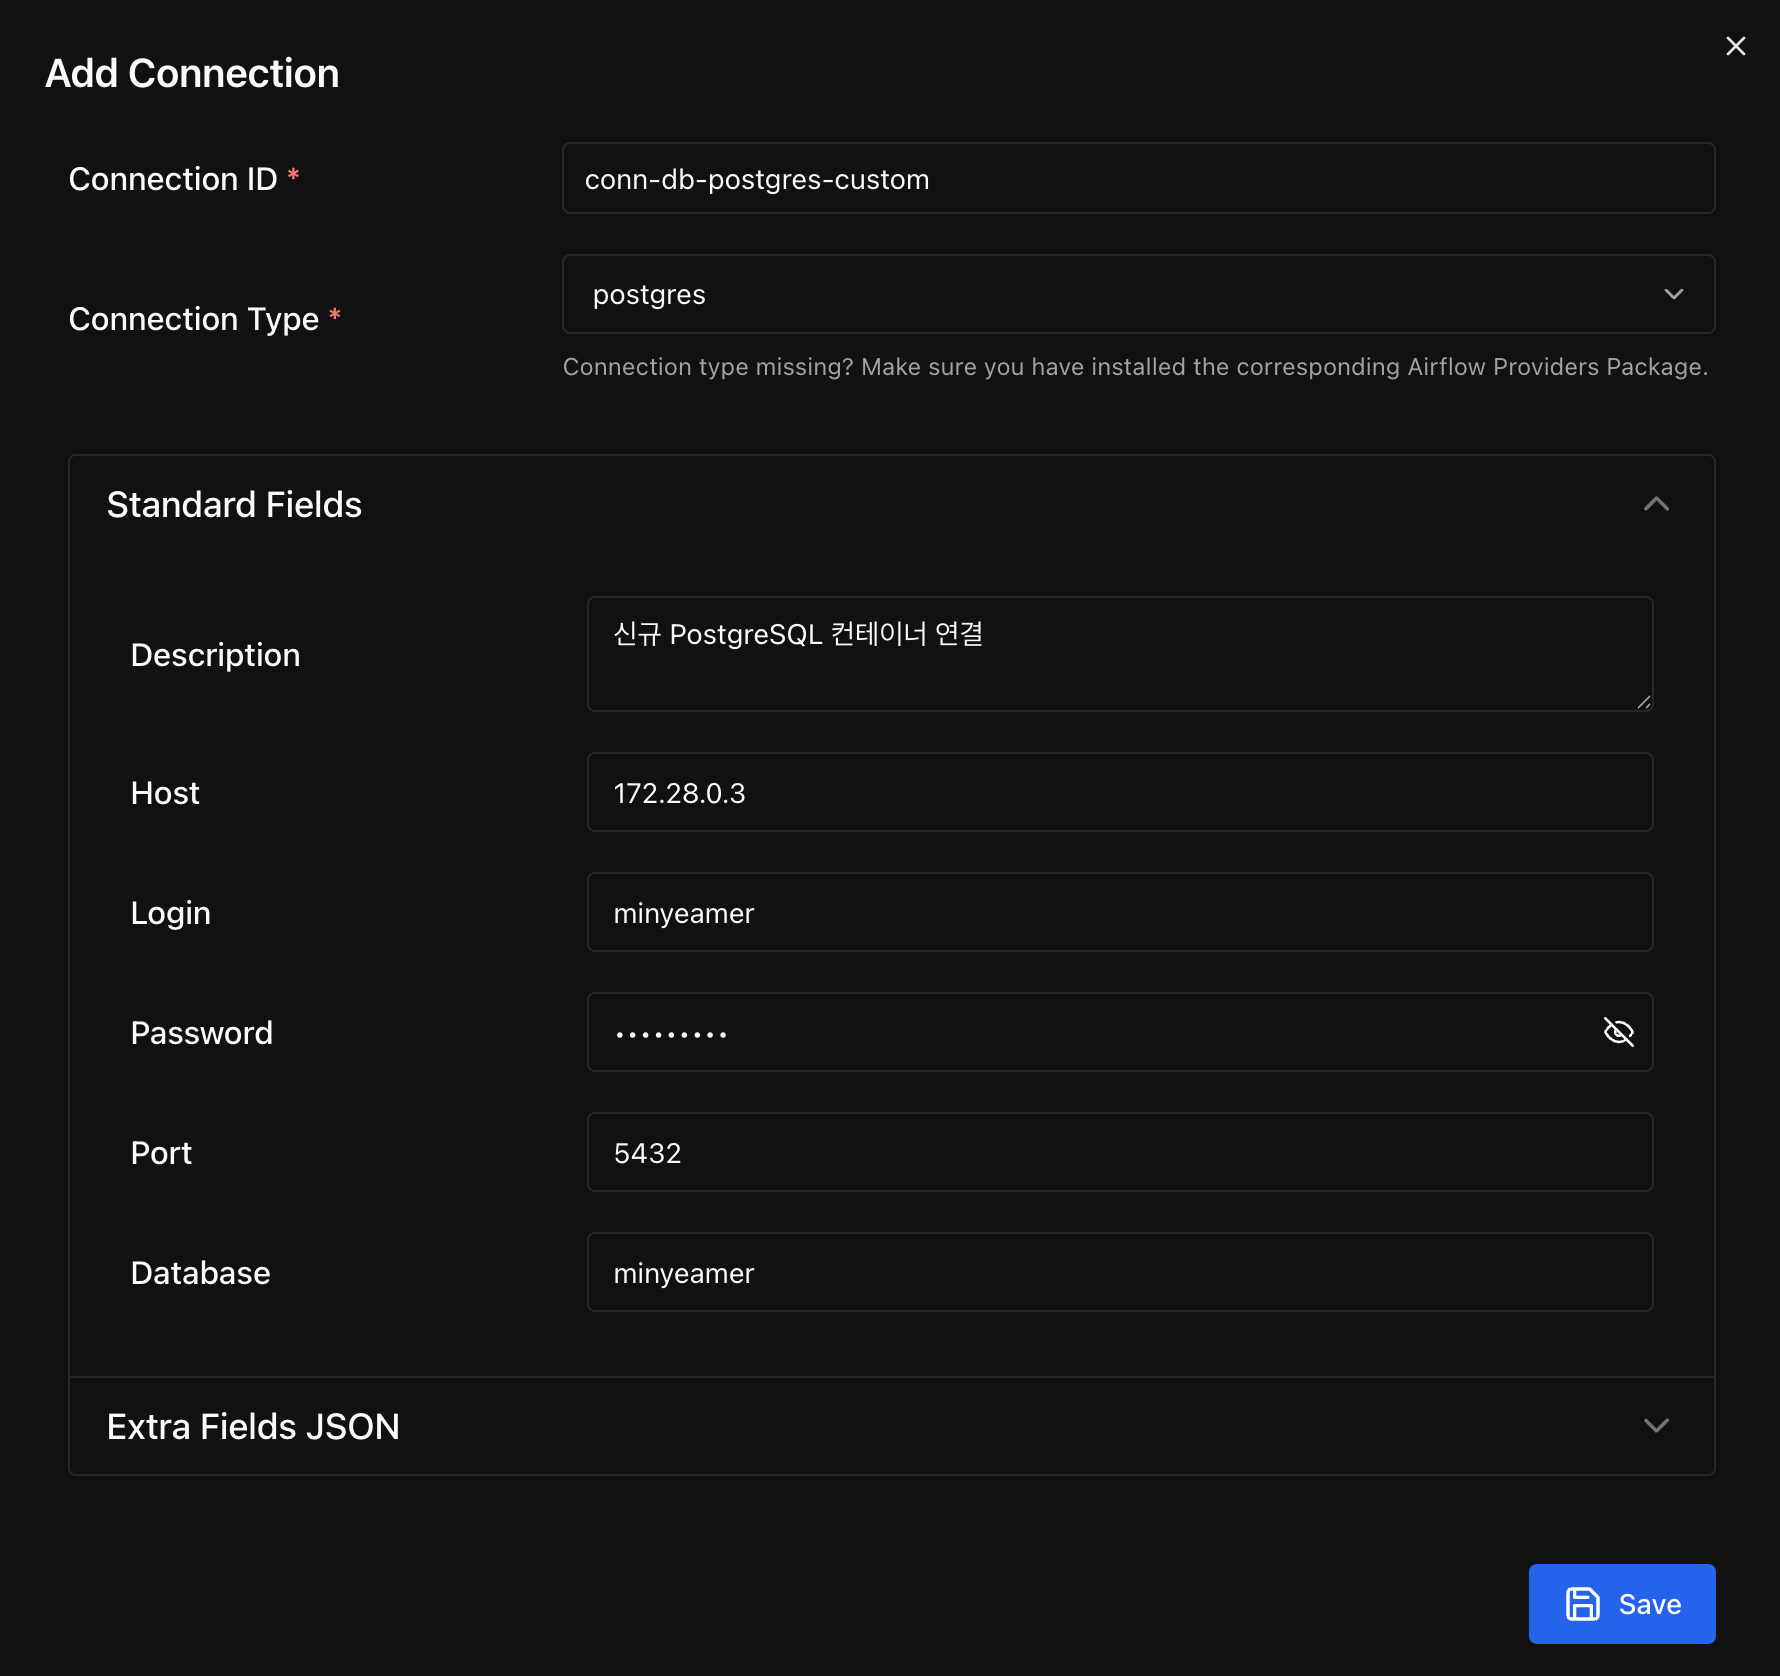
Connection 추가
- postgres 타입의 Connection을 새로 생성
- 연결 정보로 Docker Compose에서 지정한 값을 입력
- Connection에 입력한 각 항목은 앞서 확인한
get_conn()메서드에서 PostgreSQL 연결 시 사용
PostgresHook 활용
- Provider 패키지를 설치하고, 기존에
psycopg2라이브러리로 직접 PostgreSQL에 연결하던 부분을PostgresHook으로 변경
pip install apache-airflow-providers-postgres# dags/python_with_postgres_hook.py
from airflow.sdk import DAG
from airflow.providers.standard.operators.python import PythonOperator
import pendulum
with DAG(
dag_id="python_with_postgres_hook",
schedule=None,
start_date=pendulum.datetime(2025, 1, 1, tz="Asia/Seoul"),
catchup=False,
tags=["example", "hook"],
) as dag:
def insert_into_postgres(postgres_conn_id: str, **kwargs):
from airflow.providers.postgres.hooks.postgres import PostgresHook
from contextlib import closing
postgres_hook = PostgresHook(postgres_conn_id)
with closing(postgres_hook.get_conn()) as conn:
with closing(conn.cursor()) as cursor:
dag_id = kwargs.get("ti").dag_id
task_id = kwargs.get("ti").task_id
run_id = kwargs.get("ti").run_id
msg = "INSERT INTO 수행"
sql = "INSERT INTO dag_run VALUES (%s,%s,%s,%s);"
cursor.execute(sql,(dag_id,task_id,run_id,msg))
conn.commit()
postgres_task = PythonOperator(
task_id="postgres_task",
python_callable=insert_into_postgres,
op_kwargs={"postgres_conn_id":"conn-db-postgres-custom"}
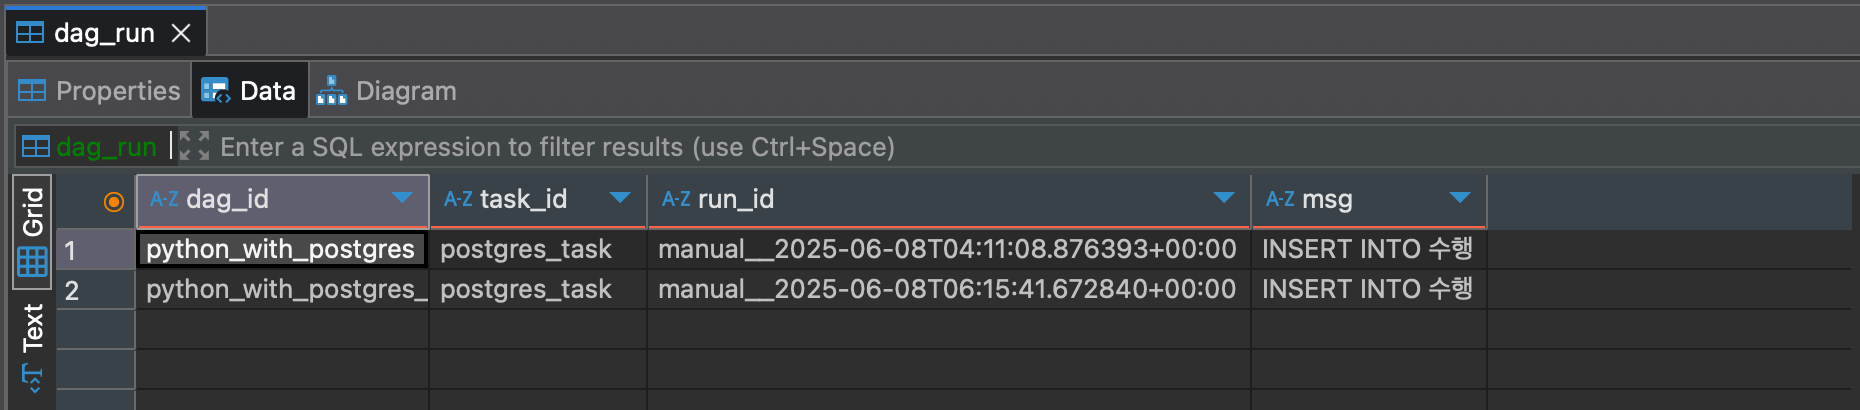
)DAG 실행
- DAG을 실행한 후 DBeaver에서
dag_run테이블 조회 시 아래와 같이 두 번째 행이 추가된 것을 확인
bulk_load
Postgres Provider 문서 보기
- PostgreSQL에 데이터를 업로드하는
bulk_load()메서드에 대해 살펴보기
def bulk_load(self, table: str, tmp_file: str) -> None:
    """Load a tab-delimited file into a database table."""
self.copy_expert(f"COPY {table} FROM STDIN", tmp_file)bulk_load()메서드는 내부적으로copy_expert()메서드를 사용하는데, 해당 소스코드를 조회
def copy_expert(self, sql: str, filename: str) -> None:
    self.log.info("Running copy expert: %s, filename: %s", sql, filename)
    if not os.path.isfile(filename):
        with open(filename, "w"):
            pass

    with open(filename, "r+") as file, closing(self.get_conn()) as conn, closing(conn.cursor()) as cur:
        cur.copy_expert(sql, file)
        file.truncate(file.tell())
conn.commit()-
copy_expert()메서드는get_conn()메서드를 통해 세션 객체를 얻어오고, 세션 객체로부터cursor객체를 만들어서 해당 객체가 가지고 있는copy_expert()메서드를 수행 -
Psycopg 공식 문서에 따르면,
copy_expert()메서드는file객체를 전달받아서COPY TO문법에 대응되는 SQL문을 실행해 테이블에 업로드 수행
The sql statement should be in the form COPY table TO STDOUT to export table to the file object passed as argument or COPY table FROM STDIN to import the content of the file object into table.
copy_expert(sql, file, size=8192)>>> cur.copy_expert("COPY test TO STDOUT WITH CSV HEADER", sys.stdout)
id,num,data
1,100,abc'def
2,,dada
...Postgres 테이블 생성
- 저번에 만든 Custom Operator로 가져온 네이버 쇼핑 검색 결과 shop.csv 파일을 PostgreSQL에 업로드할 계획을 가지고 테이블 구조를 정의
- CSV 파일과 동일한 열을
TEXT타입으로 가지는nshopping.search테이블을 생성
CREATE TABLE nshopping_search(
    rank        text,
    title       text,
    link        text,
    image       text,
    lprice      text,
    hprice      text,
    mallName    text,
    productId   text,
    productType text,
    brand       text,
    maker       text,
    category1   text,
    category2   text,
    category3   text,
    category4   text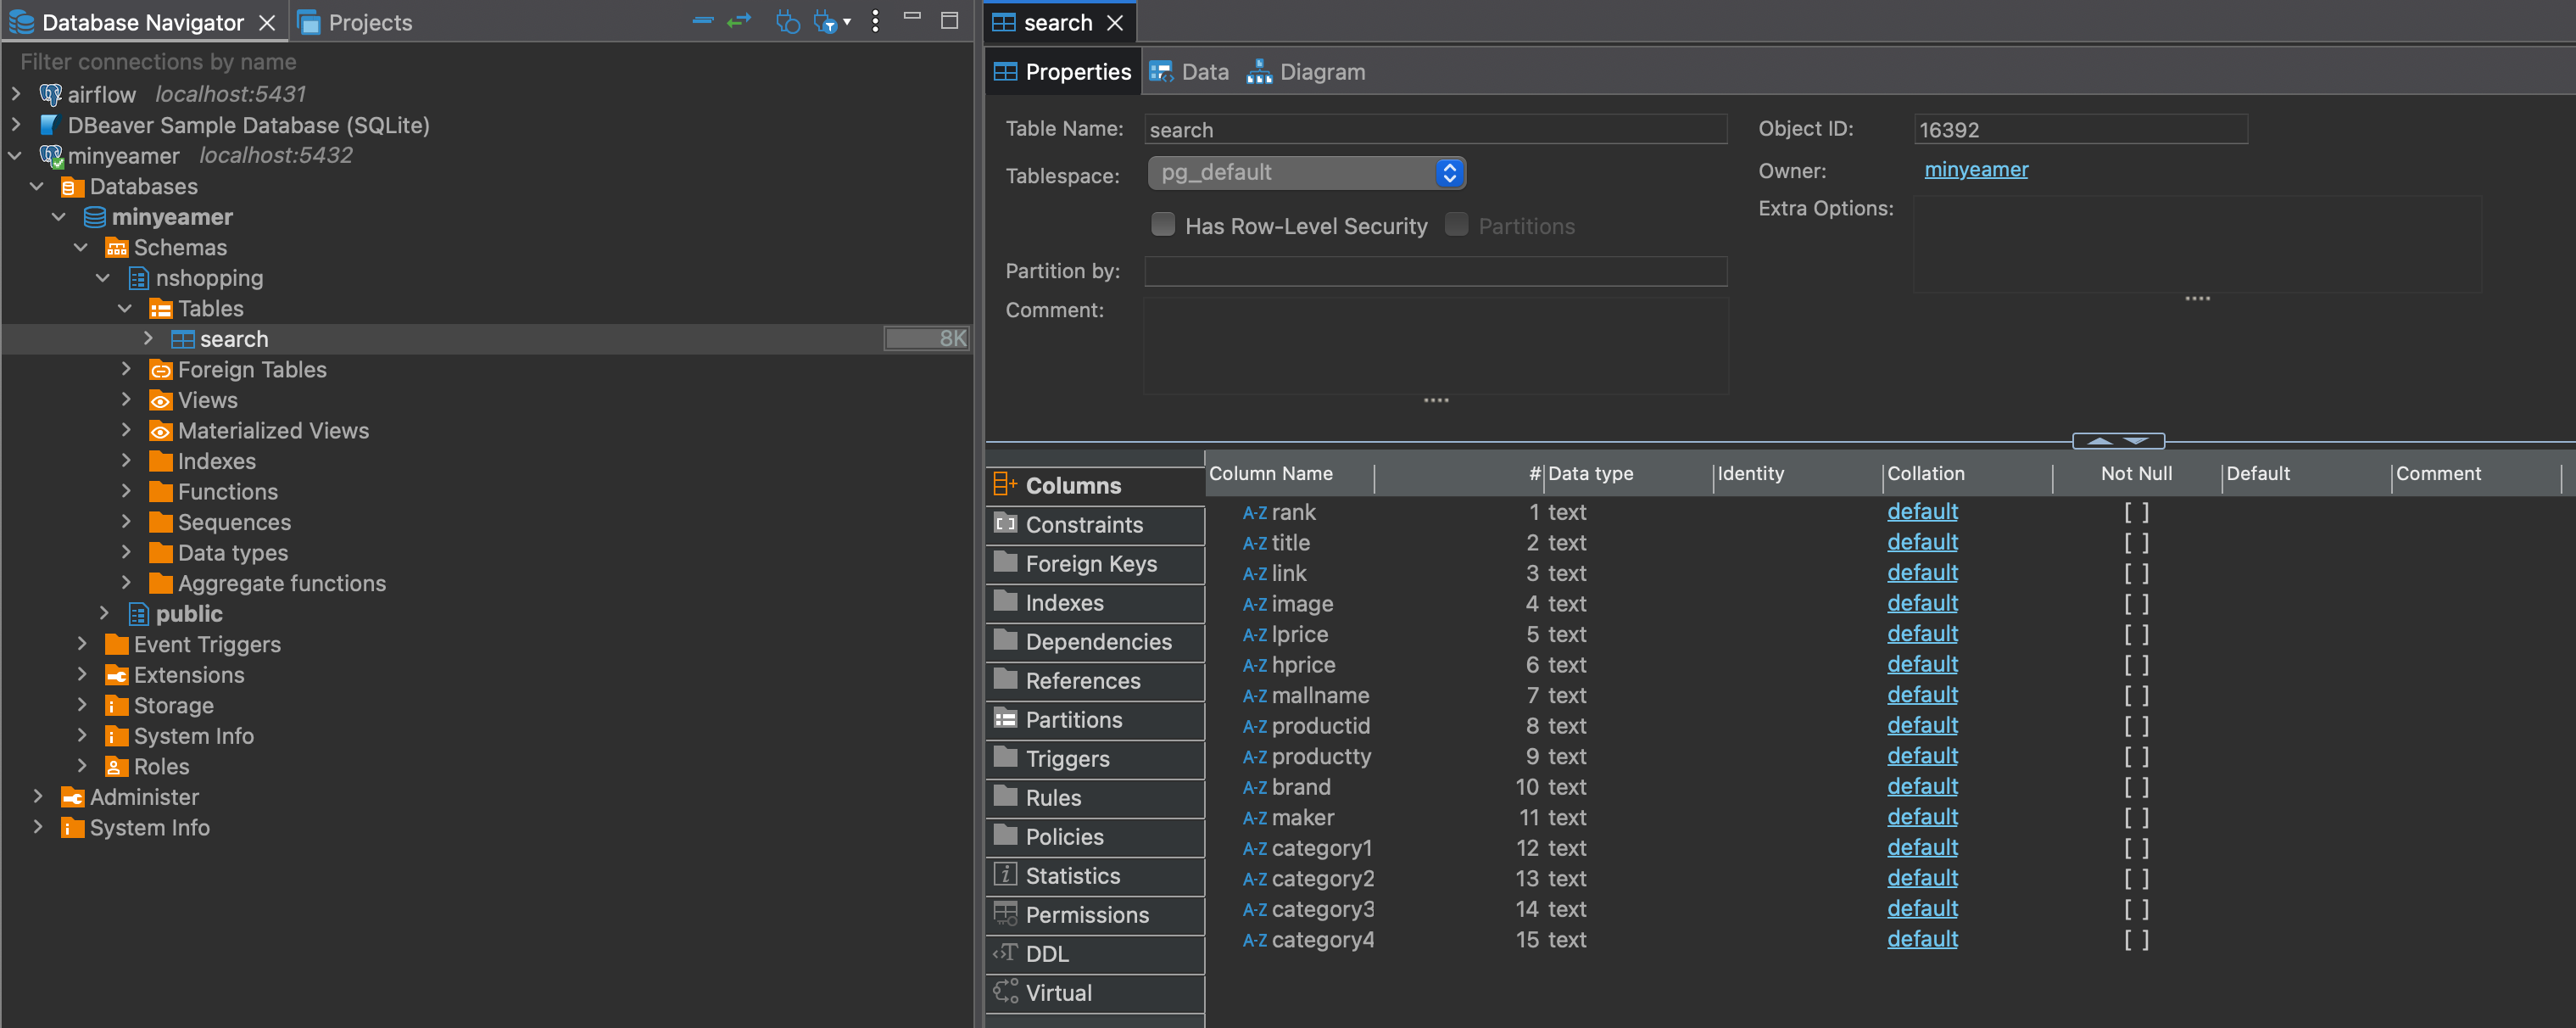
);- DBeaver에서
nshopping스키마를 만들고 SQL문을 수행하면 아래와 같이 테이블 열 목록을 확인 가능
CSV 파일 가공
Load a tab-delimited file into a database table.
- 앞서
bulk_load()메서드의 주석에Tab으로 구분된 파일을 업로드한다고 명시되어 있기 때문에,shop.csv파일을,대신Tab으로 구분한shop_with_tab.csv파일을 같은 위치에 생성- vi 편집기로 파일을 열었다면
%s/,/\t/g명령어를 입력해,를Tab으로 변경 가능
- vi 편집기로 파일을 열었다면
rank	title	link	image	lprice	hprice	mallName	productId	productType	brand	maker	category1	category2	category3	category4
1	삼성 갤럭시북 인강용 사무용 업무용 가성비 윈도우11 저가 싼 태블릿 <b>노트북</b> 추천 기본팩	https://smartstore.naver.com/main/products/10407884292	https://shopping-phinf.pstatic.net/main_8795238/87952389253.11.jpg	428000		삼성공식파트너 코인비엠에스	87952389253	2	갤럭시북	삼성전자	디지털/가전	노트북
2	LG전자 울트라PC 라이젠5 사무용 인강용 저렴한 8GB NVMe256GB LG<b>노트북</b>	https://smartstore.naver.com/main/products/6174236911	https://shopping-phinf.pstatic.net/main_8371873/83718736488.14.jpg	599000		제이 씨앤에스	83718736488	2	LG전자	LG전자	디지털/가전	노트북
3	LG그램 <b>노트북</b> 14그램 Ultra5 16GB 256GB 인텔Arc GPU 인강용	https://smartstore.naver.com/main/products/9091504708	https://shopping-phinf.pstatic.net/main_8663600/86636005031.7.jpg	1149000		온라인총판대리점	86636005031	2	LG그램	LG전자	디지털/가전	노트북
4	삼성전자 갤럭시북4 NT750XGR-A51A 16GB 256GB	https://search.shopping.naver.com/catalog/52631236642	https://shopping-phinf.pstatic.net/main_5263123/52631236642.20250124094900.jpg	799000		네이버	52631236642	1	갤럭시북4	삼성전자	디지털/가전	노트북
5	2025 LG그램 15 Ai 라이젠5 16GB 256GB AMD 포토샵 대학생 인강용 <b>노트북</b>	https://smartstore.naver.com/main/products/10133562287	https://shopping-phinf.pstatic.net/main_8767806/87678065467.4.jpg	1239000		창이로운	87678065467	2	LG그램	LG전자	디지털/가전	노트북
bulk_load 활용
PostgresHook을 사용한 Operator에 이어서bulk_load()메서드를 추가- DAG 실행 날짜에 대응되는 디렉토리 아래의
shop_with_tab.csv파일을 읽어서nshopping.search테이블에 업로드될 것을 기대
from airflow.sdk import DAG
from airflow.providers.standard.operators.python import PythonOperator
import pendulum

with DAG(
    dag_id="python_with_postgres_load",
    schedule=None,
    start_date=pendulum.datetime(2025, 1, 1, tz="Asia/Seoul"),
    catchup=False,
    tags=["example", "hook"],
) as dag:
    def bulk_load_postgres(postgres_conn_id: str, table_name: str, file_path: str, **kwargs):
        from airflow.providers.postgres.hooks.postgres import PostgresHook
        postgres_hook = PostgresHook(postgres_conn_id)
        postgres_hook.bulk_load(table_name, file_path)

    postgres_task = PythonOperator(
        task_id="postgres_task",
        python_callable=bulk_load_postgres,
        op_kwargs={"postgres_conn_id":"conn-db-postgres-custom",
                    "table_name":"nshopping.search",
                    "file_name":"/opt/airflow/files/naverSearch/{{data_interval_end.in_timezone(\"Asia/Seoul\") | ds_nodash }}/shop_with_tab.csv"}
    )
DAG 실행
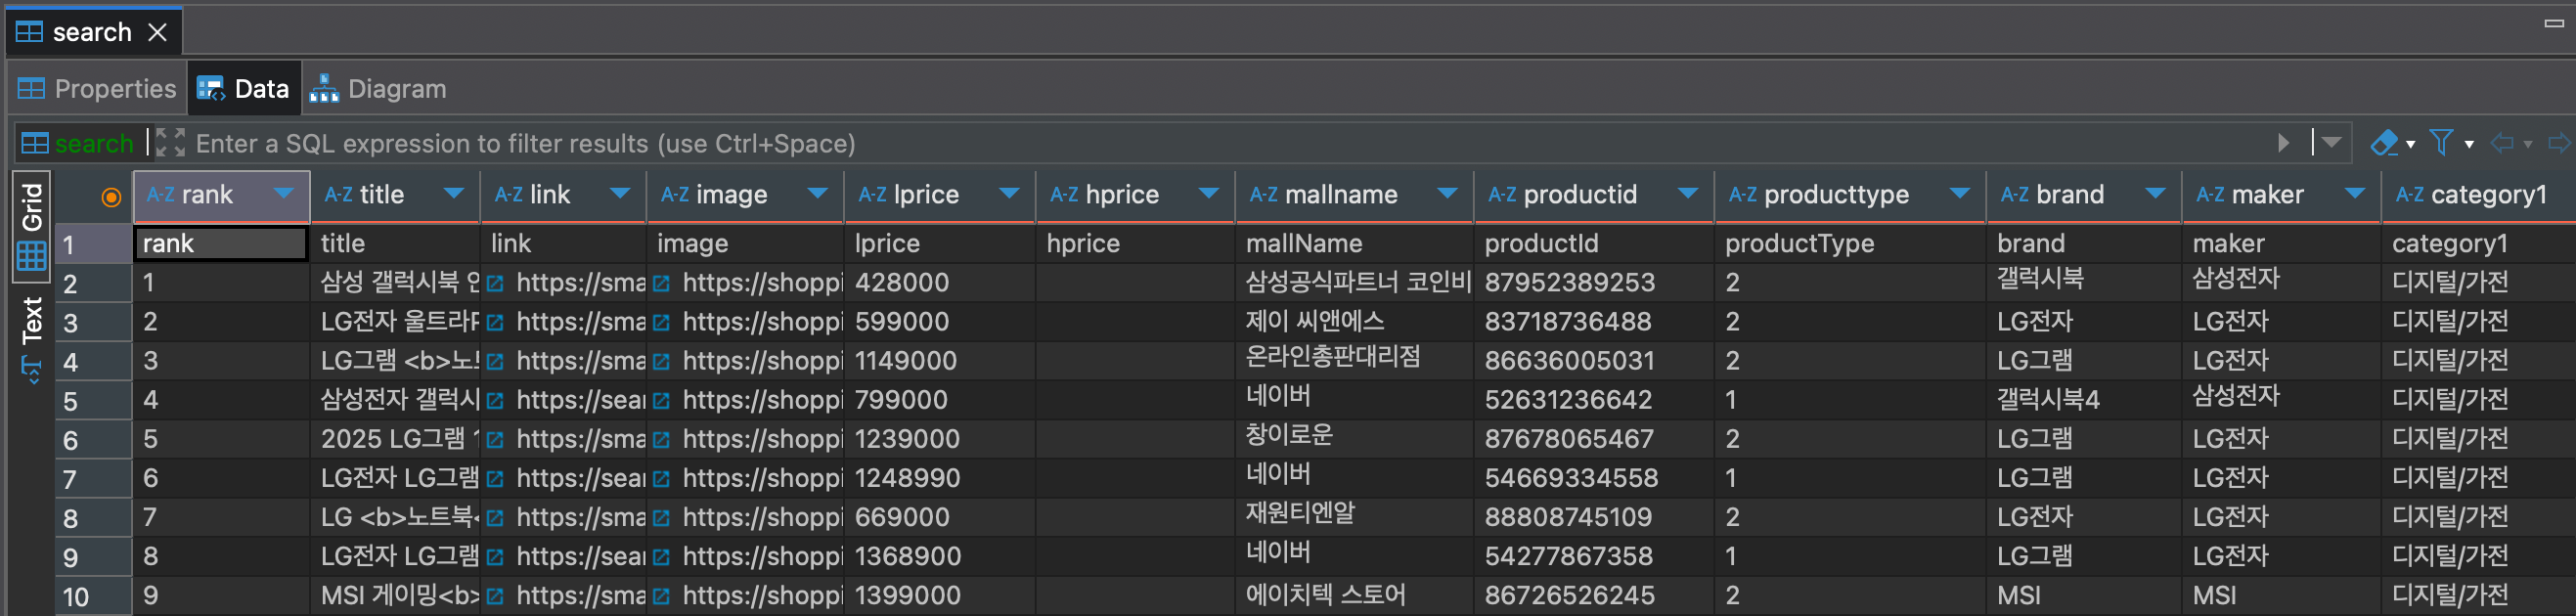
- DAG을 실행하고 DBeaver에서
nshopping.search테이블을 조회하면 아래와 같이 CSV 파일이 그대로 올라온 것을 확인 - 하지만, CSV 헤더가 1행으로 들어가는 문제점이 보임
문제점 및 개선방안
- 문제점 : 구분자가
Tab으로 고정되어 있고, 헤더까지 포함해서 업로드 됨 - 개선방안 : Custom Hook을 만들어서 구분자를 입력받고 헤더 포함 여부를 선택받게 함
- Custom Hook은 다음 게시글에서 구현

데이터의 모든 것을 추구합니다.