이전 글에서 OpenCV 4.12.0을 빌드하고 CamViewerThread 예제로 Qt + OpenCV 카메라 연동을 확인했습니다.
이번 글에서는 CamViewerThread를 기반으로 AiotClient에 Tab7CamOpencv 탭을 추가하는 과정을 정리합니다.
HSV 색상 분류 기능과 소켓 송신 연동을 진행했습니다.
1. AiotClient .pro 파일에 OpenCV 경로 추가
Tab7에서 #include <opencv2/opencv.hpp>를 사용하기 위해 .pro 파일에 OpenCV 경로를 추가합니다.
ubuntu05는 소스 빌드 설치이므로 /usr/local 하위 경로를 사용합니다.
INCLUDEPATH += /usr/local/include/opencv4
LIBS += `pkg-config opencv4 --cflags --libs`
echo 명령으로 추가하는 과정에서 중복 줄이 생길 수 있습니다. vi로 열어서 위 두 줄만 남기고 중복 줄을 제거합니다.
2. 이미지 리소스 준비
Tab7의 초기 화면과 카메라 정지 시 표시할 이미지를 준비합니다.
사용하는 이미지는 아래 GitHub에서 받을 수 있습니다.
github : kyoung-mo / images source
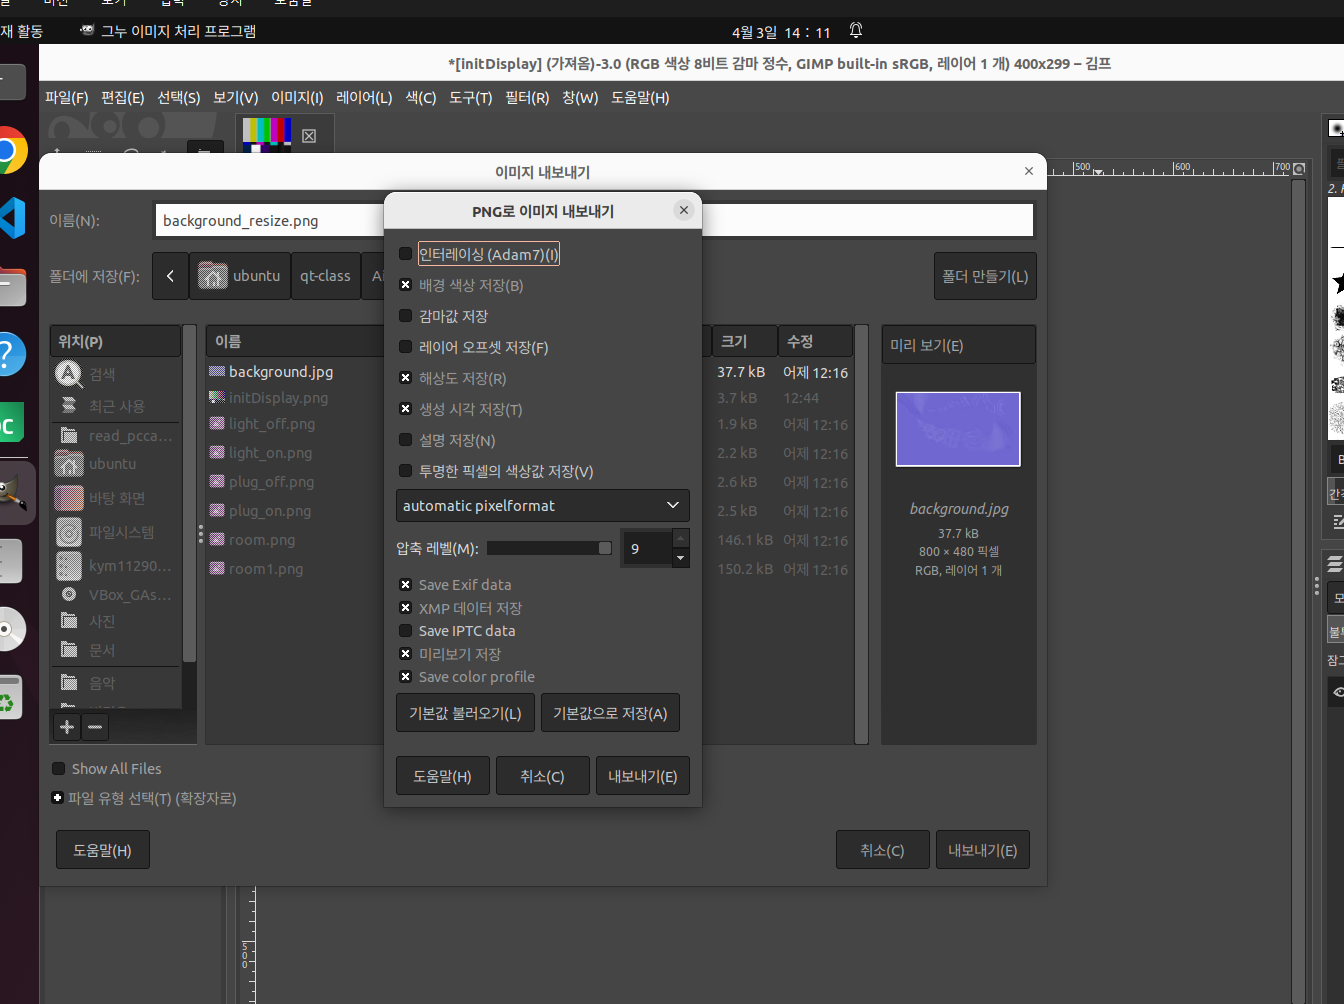
2-1. GIMP로 이미지 리사이즈
background.jpg의 원본 크기가 위젯 크기(400x300)보다 커서 화면에서 이미지가 잘렸습니다.
GIMP를 설치하고 이미지를 리사이즈합니다.
sudo apt install gimpGIMP에서 background.jpg를 열고 이미지 → 크기 조정으로 크기를 줄인 뒤,
파일 → 내보내기로 background_resize.png로 저장합니다.
2-2. 프로젝트 리소스 등록
AiotClient 프로젝트 우클릭 → Add New → Qt → Qt Resource File
리소스 파일에 Images 프리픽스를 추가하고 아래 이미지를 등록합니다.
| 파일 | 용도 |
|---|---|
| background_resize.png | 카메라 정지 시 표시 이미지 |
| initDisplay_1.png | Tab7 초기 표시 이미지 |
3. Tab7CamOpencv 클래스 생성
AiotClient 프로젝트 우클릭 → Add New → Qt → Qt Widgets Designer Form Class → Widget 선택
Class name을 Tab7CamOpencv로 입력하면 아래 파일이 자동 생성됩니다.
tab7camopencv.htab7camopencv.cpptab7camopencv.ui
4. Tab7CamOpencv UI 구성
tab7camopencv.ui를 Qt Designer에서 열고 아래와 같이 위젯을 배치합니다.
======================================
|                                    |
|          plabelCamView             |
|         (초기 이미지 표시)           |
|                                    |
|------------------------------------|
| pPBcamStart | pCBrgb | pPBsnapShot |
======================================
레이아웃 비율은 카메라 뷰 9 : 버튼 영역 1로 설정합니다.
주요 위젯 objectName
| 위젯 | objectName | 역할 |
|---|---|---|
| QLabel | plabelCamView | 카메라 프레임 표시 |
| QPushButton | pPBcamStart | 카메라 시작/정지 (Checkable) |
| QCheckBox | pCBrgb | RGB 분류 ON/OFF |
| QPushButton | pPBsnapShot | 스냅샷 저장 |
plabelCamView의 Property Editor에서pixmap에initDisplay_1.png를 지정하면 초기 화면 이미지가 표시됩니다.
pPBcamStart는 Property Editor에서checkable을 체크해야 토글 버튼으로 동작합니다.
5. WebCamThread 구현
CamViewerThread 예제의 WebCamThread를 AiotClient용으로 확장합니다.
추가된 주요 항목은 다음과 같습니다.
| 항목 | 설명 |
|---|---|
QTimer | RGB 분류 주기 제어 (1초 간격) |
rgbClassifyFlag | 타이머 tick마다 색상 분류 실행 여부 |
strColor, strColorPre | 현재/이전 색상 문자열 (중복 송신 방지) |
frameQt | BGR→RGB 변환된 표시용 프레임 |
qImage | 스냅샷 저장용 멤버 변수 |
socketSendDataSig | 색상 변경 시 소켓 메시지 송신 시그널 |
5-1. webcamthread.h
#ifndef WEBCAMTHREAD_H
#define WEBCAMTHREAD_H

#include <QThread>
#include <QLabel>
#include <QTimer>
#include <opencv2/opencv.hpp>
using namespace cv;
using namespace std;

class WebCamThread : public QThread
{
    Q_OBJECT
    void run();
    int cnt;
    string fname;
    QString strColor, strColorPre;
    Mat frame, frameQt;
    QImage qImage;
    QTimer *pQTimer;
    bool rgbClassifyFlag;
    void put_string(Mat &frame, string text, Point pt, int value = -1);

public:
    WebCamThread(QObject *parent = nullptr);
    bool camViewFlag;
    QLabel *pCamView;
    void snapShot();
    void rgbTimerStart();
    void rgbTimerStop();

private slots:
    void rgbClassifySlot();

signals:
    void socketSendDataSig(QString);
};

#endif // WEBCAMTHREAD_H
5-2. webcamthread.cpp - 생성자
WebCamThread::WebCamThread(QObject *parent)
    : QThread(parent)
{
    cnt = 0;
    strColor = "NONE";
    strColorPre = "";
    camViewFlag = false;
    rgbClassifyFlag = false;
    pQTimer = new QTimer(this);
    connect(pQTimer, SIGNAL(timeout()), this, SLOT(rgbClassifySlot()));
}
5-3. webcamthread.cpp - run()
CamViewerThread와의 주요 차이점은 두 가지입니다.
첫째, cvtColor로 BGR → RGB 변환 후 QImage::Format_RGB888을 사용합니다.
HSV 색상 분류는 원본 frame(BGR) 기준으로 동작하기 때문에 표시용 프레임을 frameQt로 분리합니다.
둘째, 화면 중앙에 십자선과 사각형을 오버레이하여 색상 분류 영역을 시각적으로 표시합니다.
void WebCamThread::run()
{
    VideoCapture capture(0);
    if (!capture.isOpened())
    {
        cout << "카메라가 연결되지 않았습니다." << endl;
        exit(1);
    }
    while(camViewFlag)
    {
        capture.read(frame);
        fname = "cam_" + to_string(cnt++);
        fname += ".jpg";

        cvtColor(frame, frameQt, COLOR_BGR2RGB);

        int x = frameQt.cols / 2;
        int y = frameQt.rows / 2;

        if(rgbClassifyFlag)
        {
            Scalar meanHsv;
            Mat frameRoi, hsvImage;
            frameRoi = frame(Rect((x-32), (y-32), 64, 64));
            cvtColor(frameRoi, hsvImage, COLOR_BGR2HSV);
            meanHsv = mean(hsvImage);

            if(170 <= meanHsv[0] || meanHsv[0] < 10)
                strColor = "RED";
            else if(50 <= meanHsv[0] && meanHsv[0] < 70)
                strColor = "GREEN";
            else if(110 <= meanHsv[0] && meanHsv[0] < 130)
                strColor = "BLUE";
            else
                strColor = "NONE";

            rgbClassifyFlag = false;

            // 색상이 변경된 경우에만 소켓 메시지 송신
            if(strColor != strColorPre)
            {
                emit socketSendDataSig("[KYM_LIN]COLOR@" + strColor);
                strColorPre = strColor;
            }
        }

        put_string(frameQt, strColor.toStdString(), Point(10, 40));
        line(frameQt, Point((x-32), y), Point((x+32), y), Scalar(255, 0, 0), 1);
        line(frameQt, Point(x, y-32), Point(x, y+32), Scalar(255, 0, 0), 1);
        rectangle(frameQt, Point((x-32), (y-32)), Point((x+32), (y+32)), Scalar(0, 255, 0), 2);

        qImage = QImage(frameQt.data, frameQt.cols, frameQt.rows, QImage::Format_RGB888);
        pCamView->setPixmap(QPixmap::fromImage(qImage));
    }
    capture.release();
    pCamView->setPixmap(QPixmap(":/Images/Images/initDisplay.png"));
}
HSV 색상 범위는 OpenCV 기준 H: 0~179입니다. RED는 색상환의 양 끝(170° 이상 또는 10° 미만)에 걸쳐있어 조건이 두 개로 나뉩니다.
5-4. webcamthread.cpp - 나머지 함수
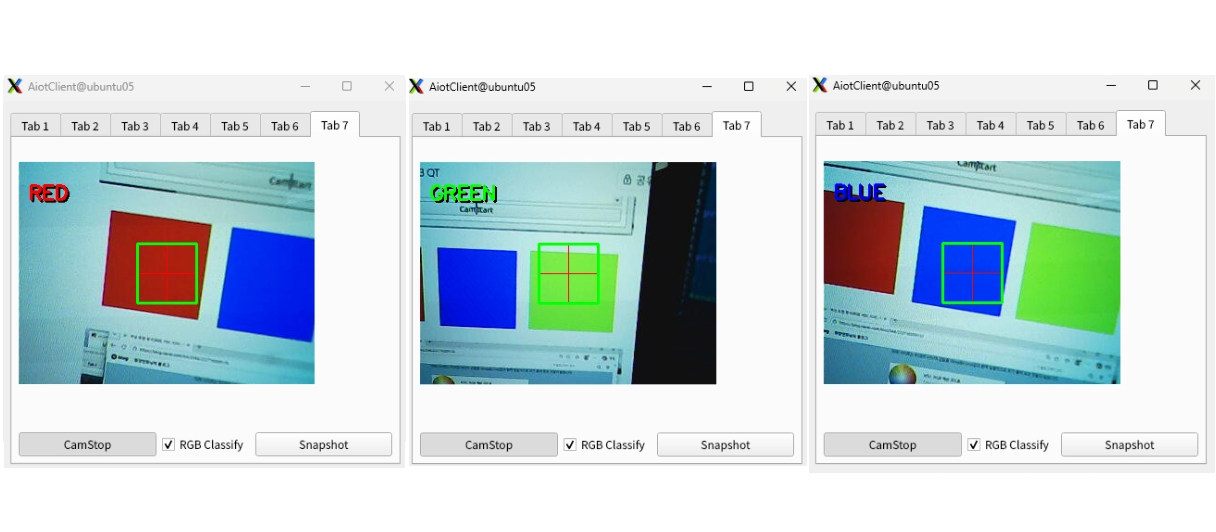
put_string : 색상 이름에 따라 텍스트 색상을 다르게 표시합니다.
void WebCamThread::put_string(Mat &frame, string text, Point pt, int value)
{
    Scalar colorScalar;
    if(value != -1)
        text += to_string(value);
    if(text == "RED")         colorScalar = {255, 0, 0};
    else if(text == "GREEN")  colorScalar = {0, 255, 0};
    else if(text == "BLUE")   colorScalar = {0, 0, 255};
    else                      colorScalar = {128, 128, 128};
    Point shade = pt + Point(2, 2);
    int font = FONT_HERSHEY_SIMPLEX;
    putText(frame, text, shade, font, 0.7, Scalar(0, 0, 0), 2);
    putText(frame, text, pt, font, 0.7, colorScalar, 2);
}
snapShot : imwrite 대신 qImage.save()를 사용하여 RGB 변환된 상태로 저장합니다.
void WebCamThread::snapShot()
{
    qImage.save(QString::fromStdString(fname), "JPG", 80);
}
RGB 타이머 제어 : 1초 간격으로 rgbClassifyFlag를 true로 설정합니다.
run() 루프는 이 플래그를 확인하여 해당 프레임에서만 색상 분류를 수행합니다.
void WebCamThread::rgbTimerStart() { pQTimer->start(1000); }
void WebCamThread::rgbTimerStop()  { if(pQTimer->isActive()) pQTimer->stop(); }
void WebCamThread::rgbClassifySlot() { rgbClassifyFlag = true; }
6. tab7camopencv.h / cpp
tab7camopencv.h
#ifndef TAB7CAMOPENCV_H
#define TAB7CAMOPENCV_H

#include <QWidget>
#include <webcamthread.h>

namespace Ui {
class Tab7CamOpencv;
}

class Tab7CamOpencv : public QWidget
{
    Q_OBJECT

public:
    explicit Tab7CamOpencv(QWidget *parent = nullptr);
    ~Tab7CamOpencv();
    WebCamThread* getpWebCamThread();

private slots:
    void on_pPBsnapShot_clicked();
    void on_pPBcamStart_clicked(bool checked);
    void on_pCBrgb_clicked(bool checked);

private:
    Ui::Tab7CamOpencv *ui;
    WebCamThread *pWebCamThread;
};

#endif // TAB7CAMOPENCV_H
tab7camopencv.cpp - 생성자
초기 상태에서 pPBsnapShot과 pCBrgb는 비활성화합니다.
카메라가 시작된 이후에만 사용할 수 있도록 버튼 활성화를 on_pPBcamStart_clicked에서 제어합니다.
Tab7CamOpencv::Tab7CamOpencv(QWidget *parent)
    : QWidget(parent)
    , ui(new Ui::Tab7CamOpencv)
{
    ui->setupUi(this);
    ui->pPBsnapShot->setEnabled(false);
    ui->pCBrgb->setEnabled(false);
    pWebCamThread = new WebCamThread(this);
    pWebCamThread->pCamView = ui->plabelCamView;
}
tab7camopencv.cpp - 버튼 슬롯
void Tab7CamOpencv::on_pPBcamStart_clicked(bool checked)
{
    if(checked)
    {
        pWebCamThread->camViewFlag = true;
        if(!pWebCamThread->isRunning())
        {
            pWebCamThread->start();
            ui->pPBcamStart->setText("CamStop");
            ui->pPBsnapShot->setEnabled(true);
        }
    }
    else
    {
        pWebCamThread->camViewFlag = false;
        ui->pPBcamStart->setText("CamStart");
        ui->pPBsnapShot->setEnabled(false);
    }
    ui->pCBrgb->setEnabled(checked);
}

void Tab7CamOpencv::on_pPBsnapShot_clicked()
{
    pWebCamThread->snapShot();
}

void Tab7CamOpencv::on_pCBrgb_clicked(bool checked)
{
    if(checked)
        pWebCamThread->rgbTimerStart();
    else
        pWebCamThread->rgbTimerStop();
}

WebCamThread* Tab7CamOpencv::getpWebCamThread()
{
    return pWebCamThread;
}
7. mainwidget에 Tab7 추가 및 소켓 연동
mainwidget.h
#include <tab7camopencv.h>

Tab7CamOpencv *pTab7CamOpencv;
mainwidget.cpp
Tab7CamOpencv 객체를 생성하여 pTab7에 배치하고, WebCamThread의 소켓 시그널을 Tab2와 연결합니다.
pTab7CamOpencv = new Tab7CamOpencv(ui->pTab7);
ui->pTab7->setLayout(pTab7CamOpencv->layout());

connect(pTab7CamOpencv->getpWebCamThread(), SIGNAL(socketSendDataSig(QString)),
        pTab2SocketClient, SLOT(socketWriteDataSlot(QString)));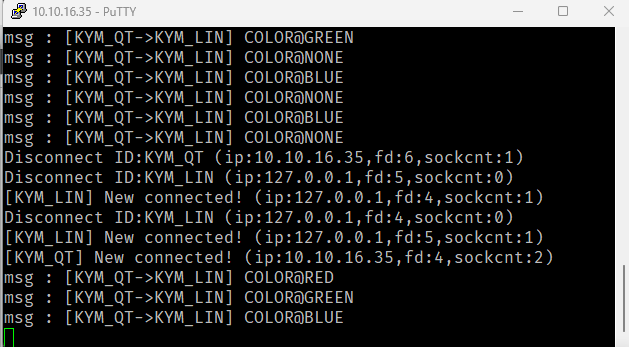
Tab2에서 서버에 접속한 상태에서 RGB Classify를 활성화하면, 색상이 변경될 때마다 아래 형식의 메시지가 서버로 전송됩니다.
[KYM_LIN]COLOR@RED
[KYM_LIN]COLOR@GREEN
[KYM_LIN]COLOR@BLUE
WebCamThread내부에서 직접 소켓을 다루지 않고 시그널만 emit합니다. 실제 송신은 Tab2의socketWriteDataSlot이 담당하므로, Tab2가 서버에 연결된 상태여야 메시지가 전달됩니다.
8. 실행 결과
RGB Classify 체크박스를 활성화하면 1초 간격으로 중앙 영역의 색상을 분석합니다.
인식된 색상은 화면 좌측 상단에 해당 색상으로 표시되고, 색상이 변경될 때만 서버로 메시지를 송신합니다.

전체 흐름 요약
AiotClient .pro에 OpenCV 경로 추가 (INCLUDEPATH, LIBS)
    ↓
background 이미지 GIMP로 리사이즈 → 프로젝트 리소스 등록
    ↓
Tab7CamOpencv 클래스 생성 (Qt Widgets Designer Form Class)
    ↓
UI 구성 (QLabel + QPushButton(Checkable) + QCheckBox + QPushButton)
    ↓
WebCamThread 확장
    ↓
run() : VideoCapture → BGR→RGB 변환 → 오버레이 → QLabel 표시
    ↓
RGB 분류 : QTimer(1초) → HSV 변환 → 색상 판별 → socketSendDataSig emit
    ↓
tab7camopencv.cpp : 버튼 슬롯 구현, getpWebCamThread() 제공
    ↓
mainwidget에 Tab7 추가 및 WebCamThread 소켓 시그널 연결
    ↓
Tab2 서버 연결 상태에서 색상 변경 시 서버로 메시지 송신