개발하는남자_Flutter 인스타그램 클론코딩
본글은 개발하는 남자님의 영상을 보고 공부하며 작성하는 글입니다.
코드는 제가 작성하며 다르게 작성한 부분이 있습니다.
결과
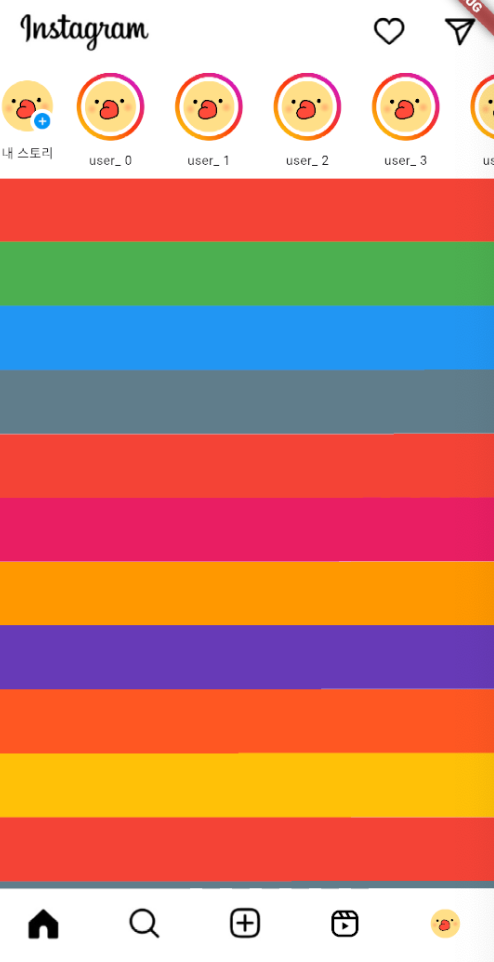
지난번에는 앱바를 만들었으니 바로아래에 스토리영역을 만들어 봅시다.
스토리영역은 좌우로 슬라이드 되야하며 내스토리,다른사람의 스토리로 구분됩니다.
내스토리를 누르면 스토리 생성이 되야하므로 별개의 위젯으로 만들어보려합니다.
스토리
먼저 스토리 위젯을 만들건데 하단바 프로필아이콘에 사용한 ImageAvatar를 재활용해봅시다.
  Widget _storyAvatar() {
    return Container(
        padding: const EdgeInsets.all(3.5),
        decoration: const BoxDecoration(
            shape: BoxShape.circle,
            // 스토리 영역 그라데이션
            gradient: LinearGradient(
                begin: Alignment.bottomLeft,
                end: Alignment.topRight,
                colors: [
                  Color(0xfffce80a),
                  Color(0xfffc3a0a),
                  Color(0xffc80afc),
                ])),
        child: Container(
            padding: const EdgeInsets.all(2.0),
            decoration: const BoxDecoration(
                shape: BoxShape.circle, color: Colors.white),
            child: _basicAvatar()));
  }
스토리 영역의 테두리 색을 만들기위해 그라데이션을 주고 패딩값을 바꿔줍니다.
(지금보니 테두리가 조금 두꺼운거 같기도)
SliverToBoxAdapter
지난번에 앱바를 구현하는 과정에서 SliverAppBar,SliverList 를 사용했기 떄문에 가로스크롤이 되는 스크롤영역을 SliverToBoxAdapter로 감싸주어야합니다.
 Widget _story() {
    return SliverToBoxAdapter(
      child: SingleChildScrollView(
        scrollDirection: Axis.horizontal,
        child: Row(
          children: List.generate(
            10,
            (index) => SizedBox(
              child: Column(
                mainAxisAlignment: MainAxisAlignment.spaceBetween,
                children: [
                  Padding(
                    padding: const EdgeInsets.symmetric(
                        horizontal: 12.0, vertical: 4.0),
                    child: ImageAvatar(
                      imgUrl: ImagePath.profile,
                      size: 80,
                      type: Shape.STORY,
                    ),
                  ),
                  Padding(
                    padding: const EdgeInsets.fromLTRB(0, 4, 0, 7.5),
                    child: Text(
                      'user_ $index',
                      style: const TextStyle(fontSize: 10),
                    ),
                  ),
                ],
              ),
            ),
          ),
        ),
      ),
    );
  }
이미지영역 아래에 유저 이름부분도 넣어줍시다.
Widget build(BuildContext context) {
return SafeArea(
child: Scaffold(
body: CustomScrollView(
slivers: [
_appBar(),
_story(),
_body(),
],
),
),
);
}이제 _story 위젯을 _appbar와 _body사이에 넣어주면 됩니다.

MyStory
  Widget _myStoryAvatar() {
    return GestureDetector(
      onTap: onTap,
      child: Container(
        padding: const EdgeInsets.all(3.5),
        child: Stack(
          children: [
            _basicAvatar(),
            Container(
              padding: const EdgeInsets.all(3.0),
              decoration: const BoxDecoration(
                  shape: BoxShape.circle, color: Colors.white),
              child: ImageData(
                width: 35,
                path: ImagePath.addStory,
              ),
            )
          ],
        ),
      ),
    );
  }
myStory는 테두리없이 +아이콘이 우측하단에 배치되어야합니다.
겹친 UI를 구현하기위해 Stack을 만들고 +아이콘을 추가해줍시다.
밑에 개발한 위젯이 화면상에 위에 표시됩니다.
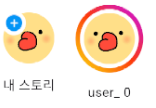
+아이콘 위치를 오른쪽 아래로 바꾸고싶네요(후크선장인줄) 이럴떈 Positioned를 써주면 됩니다.
Widget _myStoryAvatar() {
    return GestureDetector(
      onTap: onTap,
      child: Container(
        padding: const EdgeInsets.all(3.5),
        child: Stack(
          children: [
            _basicAvatar(),
            Positioned(	// 우측,하단으로 배치
              right: 0,
              bottom: 0,
              child: Container(
                padding: const EdgeInsets.all(3.0),
                decoration: const BoxDecoration(
                    shape: BoxShape.circle, color: Colors.white),
                child: ImageData(
                  width: 35,
                  path: ImagePath.addStory,
                ),
              ),
            )
          ],
        ),
      ),
    );
  }
디테일이 살짝 아쉽지만 스토리화면까지 완성되었습니다.
다음엔 드디어 피드를 만들어볼께요.

kotlin 주력 앱개발자
도움이 되었습니다. 감사합니다.