segue를 활용한 화면전환
optional binding
BMI Calculator
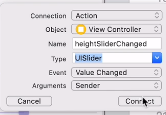
slider
- value 1.5 (시작값)
- Minimum 0
- Maximum 3
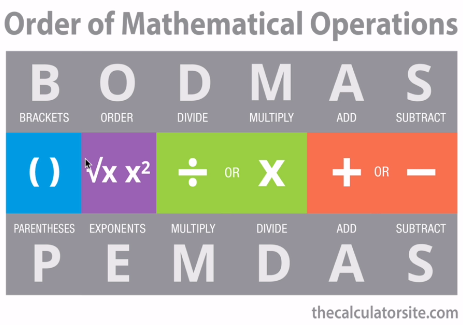
Order of Mathematical Operations
BODMAS
Classes
클래스 프로젝트는 iOS가 아니라 macOS의 커맨트 라인 툴로 만들어서 실습한다
File> New> Project
macOs> Command Line Tool
Product Name: ClassesDemo
프로젝트 우클릭> NewFile> macOS Swift File
Enemy입력
Struct vs Class
- Structure:
- init()을 생성하지 않아도 된다
- immutable하기 때문에 안에 생성되어 있는 변수의 값을 바꾸기 위해서는 mutating해줘야 한다
- 상속이 불가능하다
- Use structures by default
- Class:
- init()을 생성해야 한다
- 참조값을 갖는다
- Object-C와 함께 사용할 때 주로 사용한다
https://docs.swift.org/swift-book/LanguageGuide/ClassesAndStructures.html
https://developer.apple.com/documentation/swift/choosing_between_structures_and_classes
Inheritance 상속
SubClass는 superClass를 상속받아서
superClass에 있는 메서드를 활용할 뿐만 아니라
변경하고(override) 추가할 수 있다.
override func attack() {
	super.attack()
    print("Spits fire")
}
스위프트의 주요 상속 관계
NSObject < UIResponder < UIView < UIControl < UIButton
컨트롤러 이름 바꾸기
- class ViewController: UIViewController {
ViewController 우클릭> Refactor> Rename - 확인하기
컨트롤러 폴더> Show in Finder> 해당폴더로 이동해서 확인
다른 뷰로 값을 전달하는 방법
화면전환의 방법으로 크게
내비게이션 컨트롤러방식과세그웨이방식을 사용할 수 있다.
섹션19 Todoey앱 만들기에서내비게이션 컨트롤러를 사용해 만들었다. 계층적인 뷰를 만들 때 사용하는 것이다.
segue는 스토리보드에서 뷰컨트롤러 사이의 값을 전달하기 위한 객체이다. 세부 방식으로 show, modal 등의 방식이 있다.
-
Main.storyboard에서 object library 중 View Controller를 추가한다
-
Controller폴더 우클릭> New File> Swift File> SecondViewController
import UIKit	//프레임워크
class SecondViewController: UIViewController {
	override func viewDidLoad() {
    	super.viewDidLoad()
}
UIKit는 Foundation을 포함하는 더 큰 프레임워크이다
https://developer.apple.com/documentation/uikit/uiviewcontroller
뷰를 어떻게 연결할 것인가?
1. 뷰 컨트롤러에서 다른 뷰 컨트롤러를 호출하여 화면 전환하기
//ViewController.swift
let secondVC = SecondViewController()
secondVC.bmiValue = String(format: "%.1f", bmi)
self.present(secondVC, animated: true, completion: nil)

// SecondVieWController.swift
import UIKit
class SecondViewController: UIViewController {
	var bmiValue = "0.0"
    override func viewDidLoad() {
    	super.viewDidLoad()

        view.backgroundColor = .red

        let label = UILable()
        label.text = bmiValue
        label.frame = CGRect(x:0, y:0, width:100, heigth: 50)
        view.addSubview(label)
    }

}
UILabel()이 UIView를 상속받았기 때문에
view.addSubview(label)이 가능하다
2. Cocoa Touch Class: Segue 세그웨이
UIKit, UIViewController, viewDidLoad를 이미 포함한 프레임워크
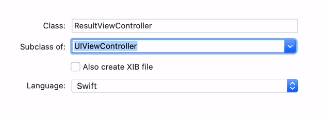
Subclass of: UIViewController
Group: Controllers
Main.storyboard에서 두 번째 화면의 뷰컨트롤러를 선택하고
Custom Class> Class에 ResultViewController 입력하기
Main.storyboard에서
노란색 동그라미 안에 하얀색 네모가 들어있는 아이콘을 클릭하고 control키를 누른 후 드래그 한다 present modally
가운데 파란색 화살표를 클릭하고 Transition속성을 선택할 수 있다
identifier: getToResult
// CalculatorViewController.swift
var bmiValue = "0.0"

self.performSegue(withIdentifier: "goToResult", sender: self)

override func prepare(for segue: UIStoryboardSegue, sender: Any?) {
	if segue.identifier == "goToResult" {
    	let destinationVC = segue.destination as! ResultViewController
        destinationVC.bmiValue = bmiValue
    }
}

// ResultViewController.swift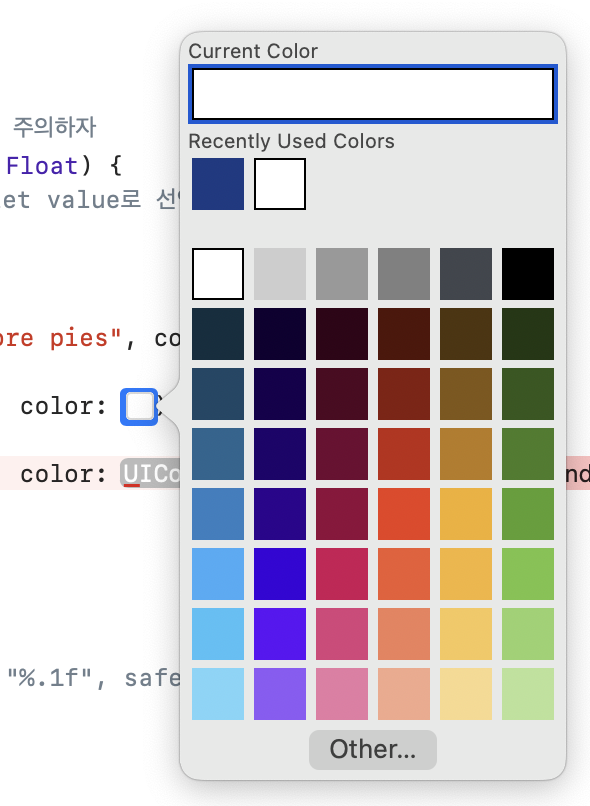
self.dismiss(animated:true, completion: nil) // 이전 화면으로- 색깔 바꾸기
UIColor.red
color literal
Optionals
1. Force Unwrapping
optional!
2. Check for nil value
if myOptional != nil {
    optional!
}
3. Optional Binding (많이 사용)
myOptional이 nil이 아니면 unwrap된 safeOptional을 {} 안에서 바인딩해서 사용한다
safeOptional의 데이터타입은 String
myOptional의 데이터타입은 String?
if let safeOptional = myOptional {
	safeOptional
}
4. Nil Coalescing Operator (추천)
optional ?? defaultValue
struct MyOptional {
	var property = 123
    func method() {
    	print("I am the struct's method")
    }
}
let myOptional: MyOptional?
myOptional = nil
print(myOptional?.property)  //nil
5. Optional Chaining (많이 사용)
optional?.property
oprional?.method()
optional이 nil이 아니면 property에 접근한다
bmi를 계산하면서 옵셔널 사용하기
//ViewController.swift
import UIKit

class ViewController: UIViewController {

    var calculatorBrain = CalculatorBrain()

    @IBAction func calculatePressed(_ sender: UIButton) {
        let height = heightSlder.value
        let weight = weightSlider.value

        calculatorBrain.calculateBMI(height: height, weight: weight)
    }

    override func prepare(for segue: UIStoryboardSegue, sender: Any?) {
        if segue.identifier == "goToResult" {
            let destinationVC = segue.destination as! SecondViewController
            destinationVC.bmiValue = calculatorBrain.getBMIValue()
        }
    }
}
//CalculatorBrain.swift
import Foundation
struct CalculatorBrain {
var bmi: Float?
//💥struct의 bmi를 변화시키기 때문에 mutating을 붙여준 것에 주의하자
mutating func calculateBMI(height: Float, weight: Float) {
bmi = weight / pow(height, 2)
}
func getBMIValue() -> String? {
// if let safeBMI = bmi {
// let bmiTo1DecimalPlace = String(format: "%.1f", safeBMI)
// return bmiTo1DecimalPlace
// } else {
// return "0.0"
// }
//💥옵셔널을 어떻게 축약시켜서 표현하는지 살펴보자
let bmiTo1DecimalPlace = String(format: "%.1f", bmi ?? 0.0)
return bmiTo1DecimalPlace
}
}MVC 패턴으로 만들어보자
BMI가 value와 advice와 color를 갖는 구조이다
//BMI.swift
import UIKit

struct BMI {
    let value: Float
    let advice: String
    let color: UIColor
}
//CalculatorBrain.swift
import UIKit
struct CalculatorBrain {
var bmi: BMI?
//💥struct의 bmi를 변화시키기 때문에 mutating을 붙여준 것에 주의하자
mutating func calculateBMI(height: Float, weight: Float) {
//bmi?.value에 바로 저장하지 않는 것은 BMI struct에 let value로 선언되어있기 때문이다
let bmiValue = weight / pow(height, 2)
if bmiValue < 18.5 {
bmi = BMI(value: bmiValue, advice: "Eat more pies", color: .black)
} else if bmiValue < 24.9 {
bmi = BMI(value: bmiValue, advice: "Fit as a fiddle", color: #colorLiteral(red: 0.2392156869, green: 0.6745098233, blue: 0.9686274529, alpha: 1))
} else {
bmi = BMI(value: bmiValue, advice: "Eat less pies", color: #colorLiteral(red: 0.7450980544, green: 0.1568627506, blue: 0.07450980693, alpha: 1))
}
}
func getBMIValue() -> String? {
let bmiTo1DecimalPlace = String(format: "%.1f", bmi?.value ?? 0.0) //체이닝 bmi?.value
return bmiTo1DecimalPlace
}
func getAdvice() -> String? {
let bmiAdvice = bmi?.advice ?? "No advice"
return bmiAdvice
}
func getColor() -> UIColor? {
return bmi?.color ?? #colorLiteral(red: 1.0, green: 1.0, blue: 1.0, alpha: 1.0)
}
}//ViewController.swift
import UIKit
class ViewController: UIViewController {
var calculatorBrain = CalculatorBrain()
@IBAction func calculatePressed(_ sender: UIButton) {
let height = heightSlder.value
let weight = weightSlider.value
calculatorBrain.calculateBMI(height: height, weight: weight)
self.performSegue(withIdentifier: "goToResult", sender: self)
}
override func prepare(for segue: UIStoryboardSegue, sender: Any?) {
if segue.identifier == "goToResult" {
let destinationVC = segue.destination as! SecondViewController
destinationVC.bmiValue = calculatorBrain.getBMIValue()
destinationVC.advice = calculatorBrain.getAdvice()
destinationVC.color = calculatorBrain.getColor()
}
}
}//SecondViewController
import UIKit
class SecondViewController: UIViewController {
var bmiValue: String?
var advice: String?
var color: UIColor?
@IBOutlet weak var bmiLabel: UILabel!
@IBOutlet weak var adviseLabel: UILabel!
@IBAction func recalculatePressed(_ sender: Any) {
self.dismiss(animated:true, completion: nil) // 이전 화면으로
}
override func viewDidLoad() {
super.viewDidLoad()
bmiLabel.text = bmiValue
adviseLabel.text = advice
//💥SeondViewController가 View에 기본으로 접근할 수 있기 때문이다
view.backgroundColor = color
}
}개발 영단어
- segue: 악장에서 다음 악장으로 끊기지 않고 넘어가는 것
세그웨이, 다음 화면으로 전환을 시작한다
영단어
- conjure up 마법/마술 같은 것에 의해 마음 속에 떠오르게 하다
conjure up how to do things - pull out, retrieve 꺼내다
pull out your knowledge - leverage the code: 코드를 활용하다
- jepg: 제이펙
- whisker: 수염
- Piggyback: 목말, 편승하다
실습하기
dropLast() 마지막값이 없는 배열을 리턴
var arr = [1, 2, 3, 4, 5]
arr.dropLast() // [1, 2, 3, 4]