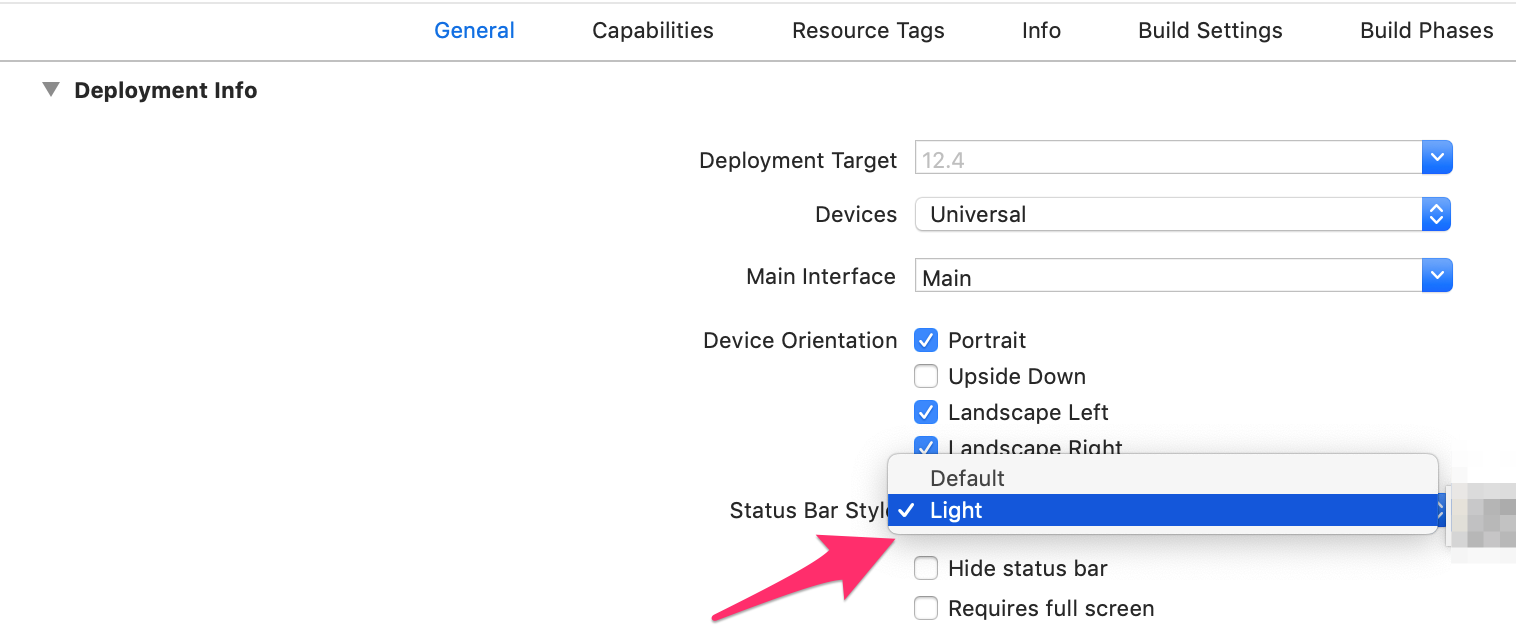
settings
Privacy> Location services> app
시뮬레이터의 위치 확인하는 방법Debug> Location>
여기에서 변경 후에는 앱을 삭제하고 다시 실행시켜야 변경된 값을 확인할 수 있다
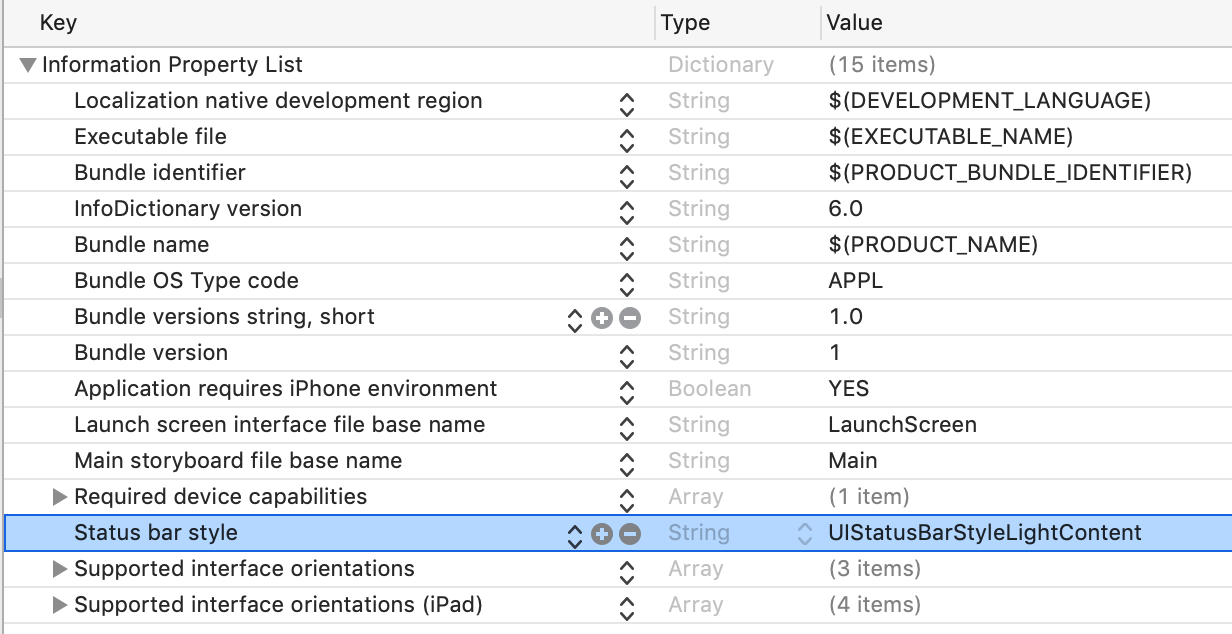
.plist
Property List
모든 Xcode 프로젝트에 자동으로 생성된다
앱이 돌아갈 때의 설정 정보를 담고 있다 (when the app is running)
key-value pair의 형태로 값이 저장되어 있다
key: property name
value: configuration
Setting a property
Change reflected in plist
locationManager 사용 시
권한 사용 요청 메시지 보낼 때 추가해야 함
+ 누르고 Key에 Privacy-Location When In Use Usage Description 선택 후, Value에 설명 써주기
//  ViewController.swift

import CoreLocation

class WeatherViewController: UIViewController {

    let locationManager = CLLocationManager()

    override func viewDidLoad() {
        super.viewDidLoad()

        // 위치 요청 전에 미리 위임해야 한다
        locationManager.delegate = self
        locationManager.requestWhenInUseAuthorization()
        locationManager.requestLocation()   //one-time 한 번만 call
    }

    @IBAction func locationPressed(_ sender: Any) {
        locationManager.requestLocation()
    }
}

//MARK: - CLLocationManagerDelegate
extension WeatherViewController: CLLocationManagerDelegate {
    func locationManager(_ manager: CLLocationManager, didUpdateLocations locations: [CLLocation]) {
        if let location = locations.last {
            locationManager.stopUpdatingLocation()  //로케이션매니저 종료하기
            let lat = location.coordinate.latitude
            let lon = location.coordinate.longitude
            weatherManager.fetchWeather(latitude: lat, longitute: lon)
        }
    }

    // 조건에 따라 에러 메서드(아래)도 반드시 구현해야 한다
    func locationManager(_ manager: CLLocationManager, didFailWithError error: Error) {
        print(error)
    }
}
// WeatherManager.swift
func fetchWeather(latitude: CLLocationDegrees, longitude: CLLocationDegrees) {
let urlString = "\(weatherURL)&lat=\(latitude)&lon=\(longitude)"
performRequest(with: urlString)
}주석달린 전체 코드
//  WeatherViewController.swift

import UIKit
import CoreLocation

class WeatherViewController: UIViewController {

    @IBOutlet weak var conditionImageView: UIImageView!
    @IBOutlet weak var temperatureLabel: UILabel!
    @IBOutlet weak var cityLabel: UILabel!
    @IBOutlet weak var searchTextField: UITextField!
    @IBOutlet weak var currentLocation: UIButton!


    var weatherManager = WeatherManager()
    let locationManager = CLLocationManager()

    override func viewDidLoad() {
        super.viewDidLoad()

        // 위치 요청 전에 미리 위임해야 한다
        locationManager.delegate = self
        locationManager.requestWhenInUseAuthorization()
        locationManager.requestLocation()   //one-time 한 번만
        //locationManager.startUpdatingLocation() //내비게이션처럼 이동하는 정보를 계속 수집

        // WeatherViewController가 weatherManager를 위임한다
        weatherManager.delegate = self
        searchTextField.delegate = self
    }

    @IBAction func locationPressed(_ sender: UIButton) {
        locationManager.requestLocation()
    }

}

//MARK: - UITextFieldDelegate, WeatherManagerDelegate

extension WeatherViewController: UITextFieldDelegate {

    @IBAction func searchPressed(_ sender: UIButton) {
        //키보드 해제
        searchTextField.endEditing(true)
        print(searchTextField.text!)

    }

    // should가 들어가면 bool을 return받아서 행동을 정한다
    // return(Go)를 눌렀을 때
    func textFieldShouldReturn(_ textField: UITextField) -> Bool {
        searchTextField.endEditing(true)
        print(searchTextField.text!)
        return true
    }

    // 유효성 검사
    func textFieldShouldEndEditing(_ textField: UITextField) -> Bool {
        // 아무것도 없으면 멈추고, 아니면 Type something 보여주기
        if textField.text != "" {
            return true
        } else {
            textField.placeholder = "Type something"
            return false
        }
    }

    // 텍스트 필드에 글자 입력 후 return이나 버튼을 눌러 입력한 후
    // 키보드를 해제했을 때 텍스트 필드 공백으로 만들기
    func textFieldDidEndEditing(_ textField: UITextField) {
        if let city = searchTextField.text {
            weatherManager.fetchWeather(cityName: city)
        }

        searchTextField.text = ""
    }
}

//MARK: - WeatherManagerDelegate

extension WeatherViewController: WeatherManagerDelegate {
    // delegate method의 parameter규칙
    // argument(밖에서 호출), parameter(안에서 사용, external과 internal이 있음)
    // delegate method를 생성시킨 data type WeatherManager를 앞에 써주고 external parameter는 생략표시(_) 한다
    func didUpdateWeather(_ weatherManager: WeatherManager, weather: WeatherModel) {
        // 클로저 안에서는 self를 써준다
        DispatchQueue.main.async {
            self.temperatureLabel.text = weather.temperatureString
            self.conditionImageView.image = UIImage(systemName: weather.conditionName)
            self.cityLabel.text = weather.cityName
        }

    }

    func didFailWithError(error: Error) {
        print(error)
    }
}

//MARK: - CLLocationManagerDelegate

extension WeatherViewController: CLLocationManagerDelegate {
    //CL core Location
    func locationManager(_ manager: CLLocationManager, didUpdateLocations locations: [CLLocation]) {
        if let location = locations.last {
            locationManager.stopUpdatingLocation()
            let lat = location.coordinate.latitude
            let lon = location.coordinate.longitude
            weatherManager.fetchWeather(latitude: lat, longitude: lon)
        }
    }

    // 조건에 따라 에러 메서드(아래)도 반드시 구현해야 한다
    func locationManager(_ manager: CLLocationManager, didFailWithError error: Error) {
        print(error)
    }
}
WeatherManager.swift
//
//  WeatherManager.swift
//  Clima
//
//  Created by  Etoday on 2021/02/15.
//  Copyright © 2021 App Brewery. All rights reserved.
//

import Foundation
import CoreLocation

protocol WeatherManagerDelegate {
    func didUpdateWeather(_ weatherManager: WeatherManager, weather: WeatherModel)
    func didFailWithError(error: Error)
}

struct WeatherManager {
    let weatherURL = "https://api.openweathermap.org/data/2.5/weather?appid=42250e4b3738d98ef5dae4a4635b68fd&units=metric"

    var delegate: WeatherManagerDelegate?

    func fetchWeather(cityName: String) {
        let urlString = "\(weatherURL)&q=\(cityName)"
        performRequest(with: urlString)
    }

    func fetchWeather(latitude: CLLocationDegrees, longitude: CLLocationDegrees) {
        let urlString = "\(weatherURL)&lat=\(latitude)&lon=\(longitude)"
        performRequest(with: urlString)
    }

    func performRequest(with urlString: String) {
        //1. Create a URL
        if let url = URL(string: urlString) {
            // 2. Create a URLSession 기본 설정(브라우저)
            let session = URLSession(configuration: .default)

            // 3. Give the session a task
            let task = session.dataTask(with: url) { (data, response, error) in
                // 에러 처리
                if error != nil {
                    self.delegate?.didFailWithError(error: error!)
                    return  // exit
                }
                // parse into JSON format 파싱해서 delegate를 활용해서 WeatherViewController에 띄우기
                if let safeData = data {
                    // 클로저 안에서 메서드를 호출할 때는 self를 써줘야 한다
                    // 파싱이 성공했을 때 delegate가 있으면 didUpdateWeather를 실행시킨다
                    if let weather = self.parseJSON(safeData) {
                        self.delegate?.didUpdateWeather(self, weather: weather)
                    }
                }
            }
            // 4. Start the task
            task.resume()
        }
    }

    func parseJSON(_ weatherData: Data) -> WeatherModel? {
        let decoder = JSONDecoder()
        // input으로 object가 아니라 type을 받는데, .self를 붙여 type object의 참조값을 사용한다
        // WeatherData structure을 사용해 decode를 시도한다
        do {
            let decodedData = try decoder.decode(WeatherData.self, from: weatherData)
            let id = decodedData.weather[0].id
            let temp = decodedData.main.temp
            let name = decodedData.name

            let weather = WeatherModel(conditionId: id, cityName: name, temperature: temp)
            return weather

        } catch {
            delegate?.didFailWithError(error: error)
            return nil
        }
    }


}
WeatherData.swift
//
//  WeatherData.swift
//  Clima
//  여기는 JSON Parsing하기 위한 곳
//  Created by  Etoday on 2021/02/15.
//  Copyright © 2021 App Brewery. All rights reserved.
//

import Foundation

//Decodable+Encodable -> Codable
struct WeatherData: Codable {
    let name: String

//  JSON의 일부분 (예시)
//    main안에는 object{}가 들어있음
//        "main": {
//            "temp": 23.48,
//            "pressure": 1024,
//            "humidity": 40,
//            "temp_min": 21,
//            "temp_max": 25
//        }
    let main: Main

//    weather안에는 [] 배열이 들어있음
//    "weather": [
//        {
//          "id": 803,
//          "main": "Clouds",
//          "description": "broken clouds",
//          "icon": "04n"
//        }
//      ]
    let weather: [Weather]
}

// 변수명이 JSON의 변수명과 정확히 일치해야 한다
struct Main: Codable {
    let temp: Double
}

struct Weather: Codable {
    let description: String
    let id: Int
}
WeatherModel.swift
//
//  WeatherModel.swift
//  Clima
//  여기는 화면에 보여줄 데이터를 계산하기 위한 곳
//  Created by  Etoday on 2021/02/15.
//  Copyright © 2021 App Brewery. All rights reserved.
//

import Foundation

struct WeatherModel {
    //stored property
    public let conditionId: Int
    public let cityName: String
    public let temperature: Double

    public var temperatureString: String {
        return String(format: "%.1f", temperature)
    }

    //computed property (var 사용)
    var conditionName: String {
        switch conditionId {
            case 200...232:
                return "cloud.bolt"
            case 300...321:
                return "cloud.drizzle"
            case 500...531:
                return "cloud.rain"
            case 600...622:
                return "cloud.snow"
            case 701...781:
                return "cloud.fog"
            case 800:
                return "sun.max"
            case 801...804:
                return "cloud.bolt"
            default:
                return "cloud"
        }
    }

}

인생노잼