Library 폴더가 안보일 때
터미널에
$ chflags nohidden ~/Library/
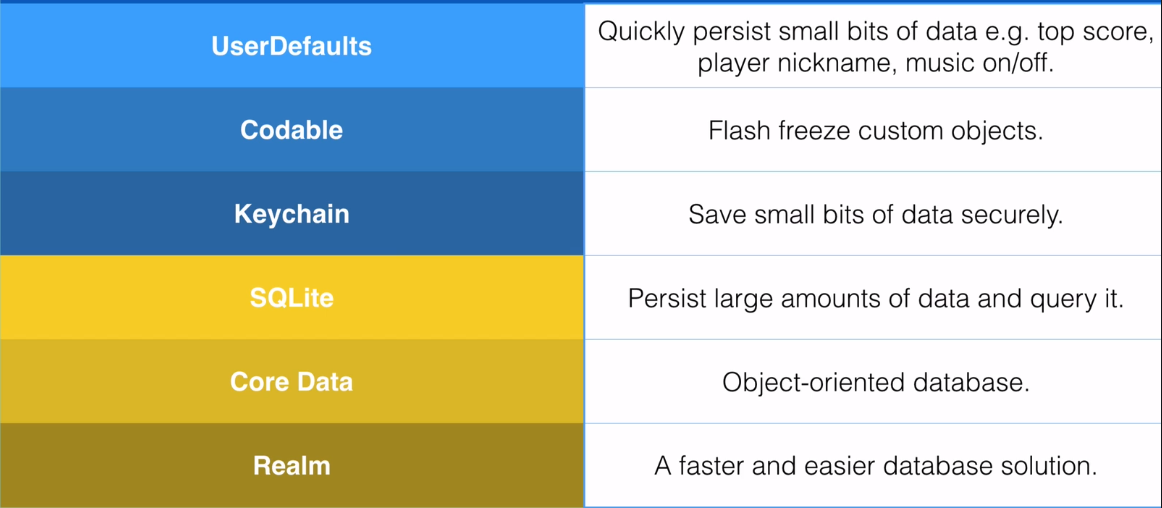
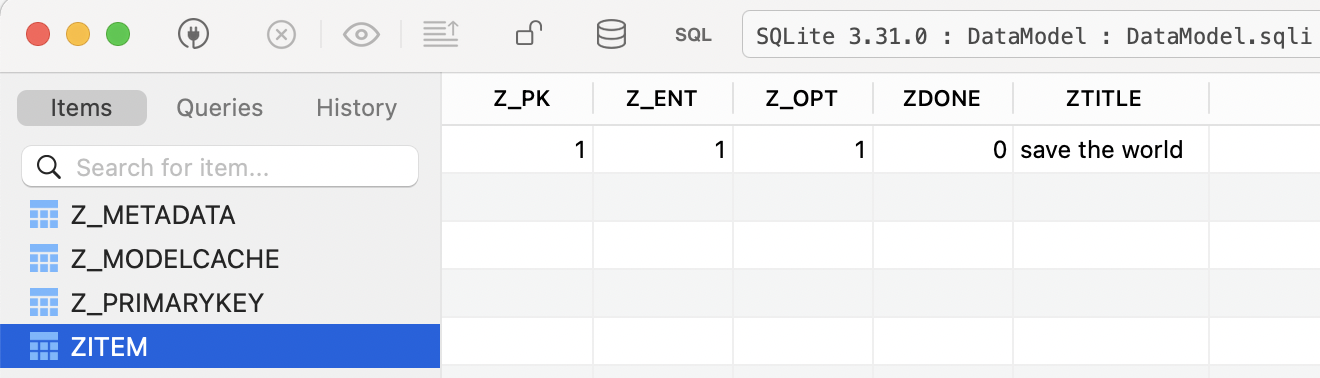
Database
파란색: table
노란색: database
Core Data
- Entity: Class, table과 비슷
- Attributes: Properties, columns와 비슷
- NSManagedObject: row
| OOP | Core Data | Database |
|---|---|---|
| Class | Entity | Table |
| Property | Attribute | Field |
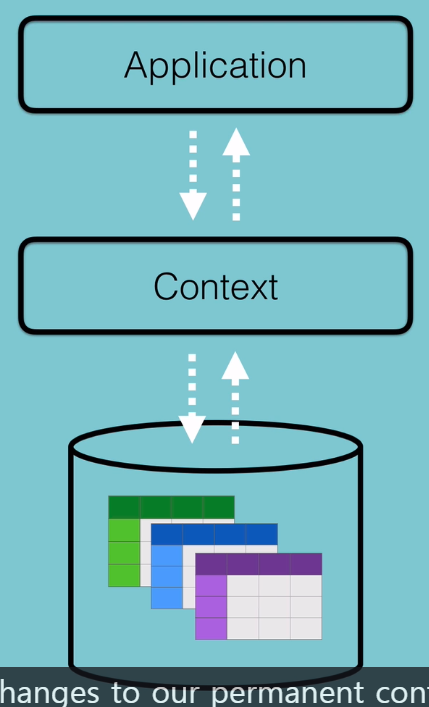
앱과 데이터베이스가 직접적으로 상호작용할 수 없음 -> context를 통해야
SQLite(database)를 persistent container에 넣으려면 context를 사용해야
git add .(staging area와 유사)
생성하기

Module: 글로벌에서 Current Product Module로 변경 (멀티 스레딩을 위해)
attribute의 optional이 체크되지 않으면 required 필수값이 된다
/Users/사용자/Library/Developer/Xcode/DerivedData/Todoey-fcmnileboahuspcojzwoqftpsvzx/Build/Intermediates.noindex/Todoey.build/Debug-iphonesimulator/Todoey.build/DerivedSources/CoreDataGenerated/DataModel/
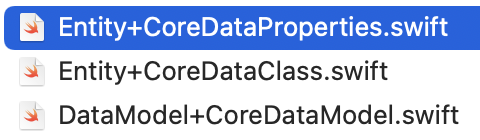
// Codegen: Class Definition
// 클래스 파일: 한 번만 생성되며 새로 생성하거나 삭제하지 않는 이상 변하지 않음
import Foundation
import CoreData

public class Item: NSManagedObject {	// 관리 객체를 상속받음

}
// Codegen: Category/Extension
// 프로퍼티 파일: 커스터마이징 하기 위해 사용
import Foundation
import CoreData
extension Entity {
@nonobjc public class func fetchRequest() -> NSFetchRequest<Entity> {
return NSFetchRequest<Entity>(entityName: "Entity")
}
}
extension Entity : Identifiable {
}// Codegen: Manual/None
import Foundation
import CoreData
// AppDelegate.swift
//엔터티가 정의된 모델 파일을 기반으로 영구 저장소를 연결하고 이를 컨테이너 객체로 만들어 반환합니다
// 지연 멤버 변수로 작성되었기 때문에 변수가 처음 참조될 때 딱 한 번만 실행된 다음, 앱 종료 시까지 이 값이 유지됩니다
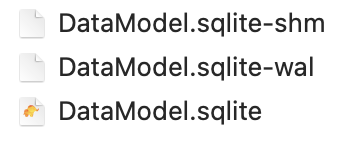
// 데이터베이스의 default는 SQLite이다
lazy var persistentContainer: NSPersistentContainer = {
let container = NSPersistentContainer(name: "DataModel")
}
// 종료할 때 저장하기 위한 곳
func applicationWillTerminate(_ application: UIApplication) {
self.saveContext()
}
// 관리 컨텍스트의 변경사항을 영구 저장소에 반영해줍니다 (undo redo)
func saveContext() {
let context = persistentContainer.viewContext
//staging area와 비슷 (temp area)
if context.hasChanges {
do {
try context.save() // commit 과 비슷
} catch {
}
}
}CRUD의 Create
context를 통해 CRUD가 발생함
sqlite파일 경로
/Users/사용자/Library/Developer/CoreSimulator/Devices/8FF0E5D5-E481-4AD6-822D-C0AC2D9ADA67/data/Containers/Data/Application/1889B280-B3F1-44E3-A06C-6EB02BA769D1/Library/Application\ Support
CRUD의 Read
    func loadItems() {
        // 💥 여기에서는 데이터타입을 명시해줘야 한다
        let request: NSFetchRequest<Item> = Item.fetchRequest()

        do {
            itemArray = try context.fetch(request)
        } catch {
            print("Error fetching data from context \(error)")
        }

    }
CRUD의 Update
CRUD의 Delete
삭제하려면 순서가 중요하다
    override func tableView(_ tableView: UITableView, didSelectRowAt indexPath: IndexPath) {
        // temporary ( 💥순서가 중요하다 )
        context.delete(itemArray[indexPath.row])
        itemArray.remove(at: indexPath.row)

        // itemArray[indexPath.row].done = !itemArray[indexPath.row].done

        // commit context 컨텍스트를 커밋해야 영구 저장소에 반영됨
        saveItems()

        // 셀을 선택하면 회색으로 체크되는 것이 보여진 후, 해제됨
        tableView.deselectRow(at: indexPath, animated: true)
    }
Querying with CoreData & UISearchBar
6분 20초
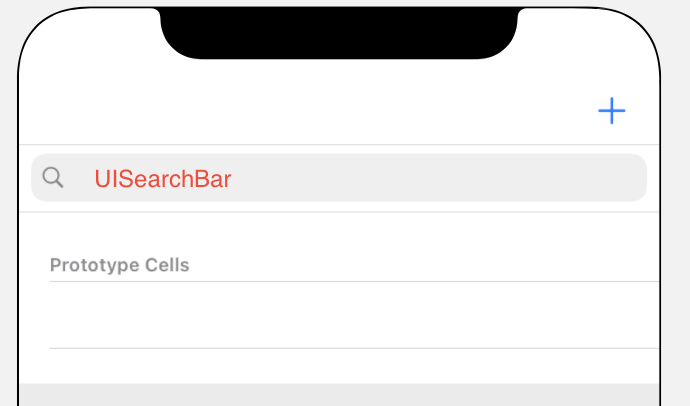
NSPredicate는 foundation class로 쿼리언어다
https://academy.realm.io/posts/nspredicate-cheatsheet/
https://nshipster.com/nspredicate/
DispatchQueue
DispatchQueue.main.async {
	searchBar.resignFirstResponder()
}
Relationship Graphs in Core Data
카테고리 추가하기
Table View Controller 추가하고
Navigation Controller에서 노란 버튼 누르고
Relationship Segue > rootview controller
TableViewController에서 노란버튼 누르고
Manual Segue > Show
Identifier: goToItems
Cocoa Touch Class 추가하기
CatagoryViewController
노란버튼 누르고 Class: CategoryViewController
TableViewCell클릭하고 Identifier: CategoryCell
Bar Button Item 추가하고
System Item: Add
Tint: White Color
Entity 추가
Attribute 추가 데이터 타입 설정하고
relationship 이름 짓기
Type: To One