Firebase
https://console.firebase.google.com/
https://firebase.google.com/docs/ios/setup#available-pods
1. 구글 로그인
2. iOS bundle ID: 프로젝트 클릭 > Targets > Bundle Identifier
3. .plist 구성파일 루트 위치에 추가
4. Firebase SDK 추가
URL에 들어가서 필요한 것만 Podfile에 추가해도 된다
pod 'Firebase/Auth'
pod 'Firebase/Firestore'
$ pod install
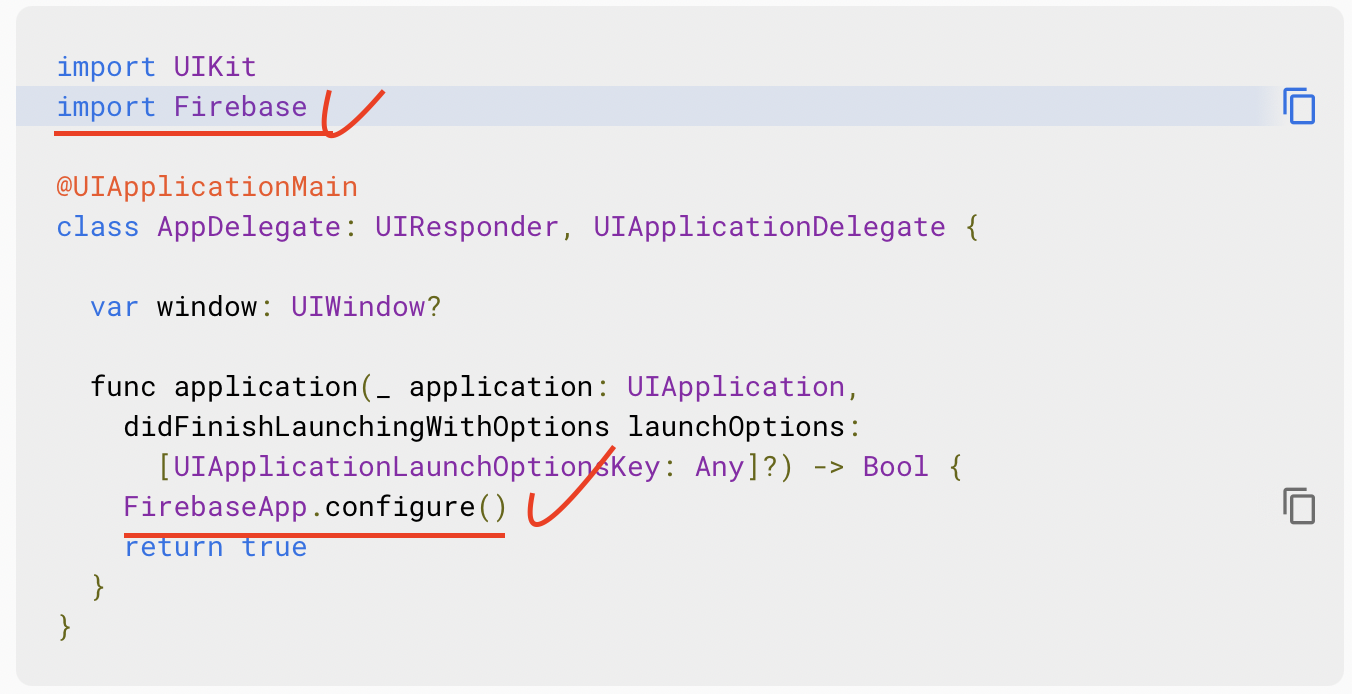
5. 초기화코드 추가
AppDelegate.swift파일에서
import Firebase
FirebaseApp.configure()
pod 'Firebase/Auth'
https://firebase.google.com/docs/auth/ios/password-auth
- Firebase Console에서 인증 섹션을 엽니다.
로그인 방법 탭에서 이메일/비밀번호 로그인 방법을 사용 설정하고 저장을 클릭합니다. - 유저 생성하기
Auth.auth().createUser(withEmail: email, password: password) { authResult, error in
  // ...
}- 이메일 주소와 비밀번호로 사용자 로그인 처리
Auth.auth().signIn(withEmail: email, password: password) { [weak self] authResult, error in
  guard let strongSelf = self else { return }
  // ...
}
[weak self]
self가 클로저 밖에서도 사는 것이 명확하지 않을 때(nil이 되어도 된다 -> 즉,self여기에서는 뷰컨트롤러를 뜻하며 클로저가 실행을 완료하기 전에 뷰컨트롤러가 해제될 수도 있다는 말이다),
[weak self]andguard let self = self else { return }구문을 사용해 객체의 생명주기를 연장시키는 것이[unowned self]를 사용하는 것보다 낫다.
클로저 안에 self를 사용하면 scope's life 동안 self를 strong reference한다.(retain cycle)
[weak self]는 self를 옵셔널로 만들기 때문에
self?. 옵셔널 체이닝으로 사용하거나 guard let을 사용해 일시적으로 클로저의 시작에 self를 strong reference한다.
    @IBAction func loginPressed(_ sender: UIButton) {
        if let email = emailTextfield.text, let password = passwordTextfield.text {
            Auth.auth().signIn(withEmail: email, password: password) { authResult, error in
              guard let self = self else { return }
                if let e = error {
                    print(e.localizedDescription)
                } else {  //로그인 버튼을 눌렀을 때 에러가 없으면 채팅 화면 보여주기
                    self.performSegue(withIdentifier: "LoginToChat", sender: self)
                }
            }
        }

}- 로그아웃하기
    @IBAction func logoutPressed(_ sender: Any) {
        do {
            try Auth.auth().signOut()
            navigationController?.popToRootViewController(animated: true)	//루트뷰컨트롤러로 가기
        } catch let signOutError as NSError {
          print("Error signing out: %@", signOutError)
        }

    }
[weak self]
https://velog.io/@msi753/알고리즘과-자료-구조-기초-ARC
https://velog.io/@msi753/weak-self
https://medium.com/flawless-app-stories/you-dont-always-need-weak-self-a778bec505ef
https://www.quora.com/What-does-weak-self-mean-in-a-Swift-Closure
https://www.avanderlee.com/swift/weak-self/
https://www.youtube.com/watch?v=HQrXM2zUPvY
Cloud firestore
https://firebase.google.com/docs/firestore/quickstart

- Cloud Firestore: querying 최신 (추천)
- Realtime Database: save JSONS in the Cloud
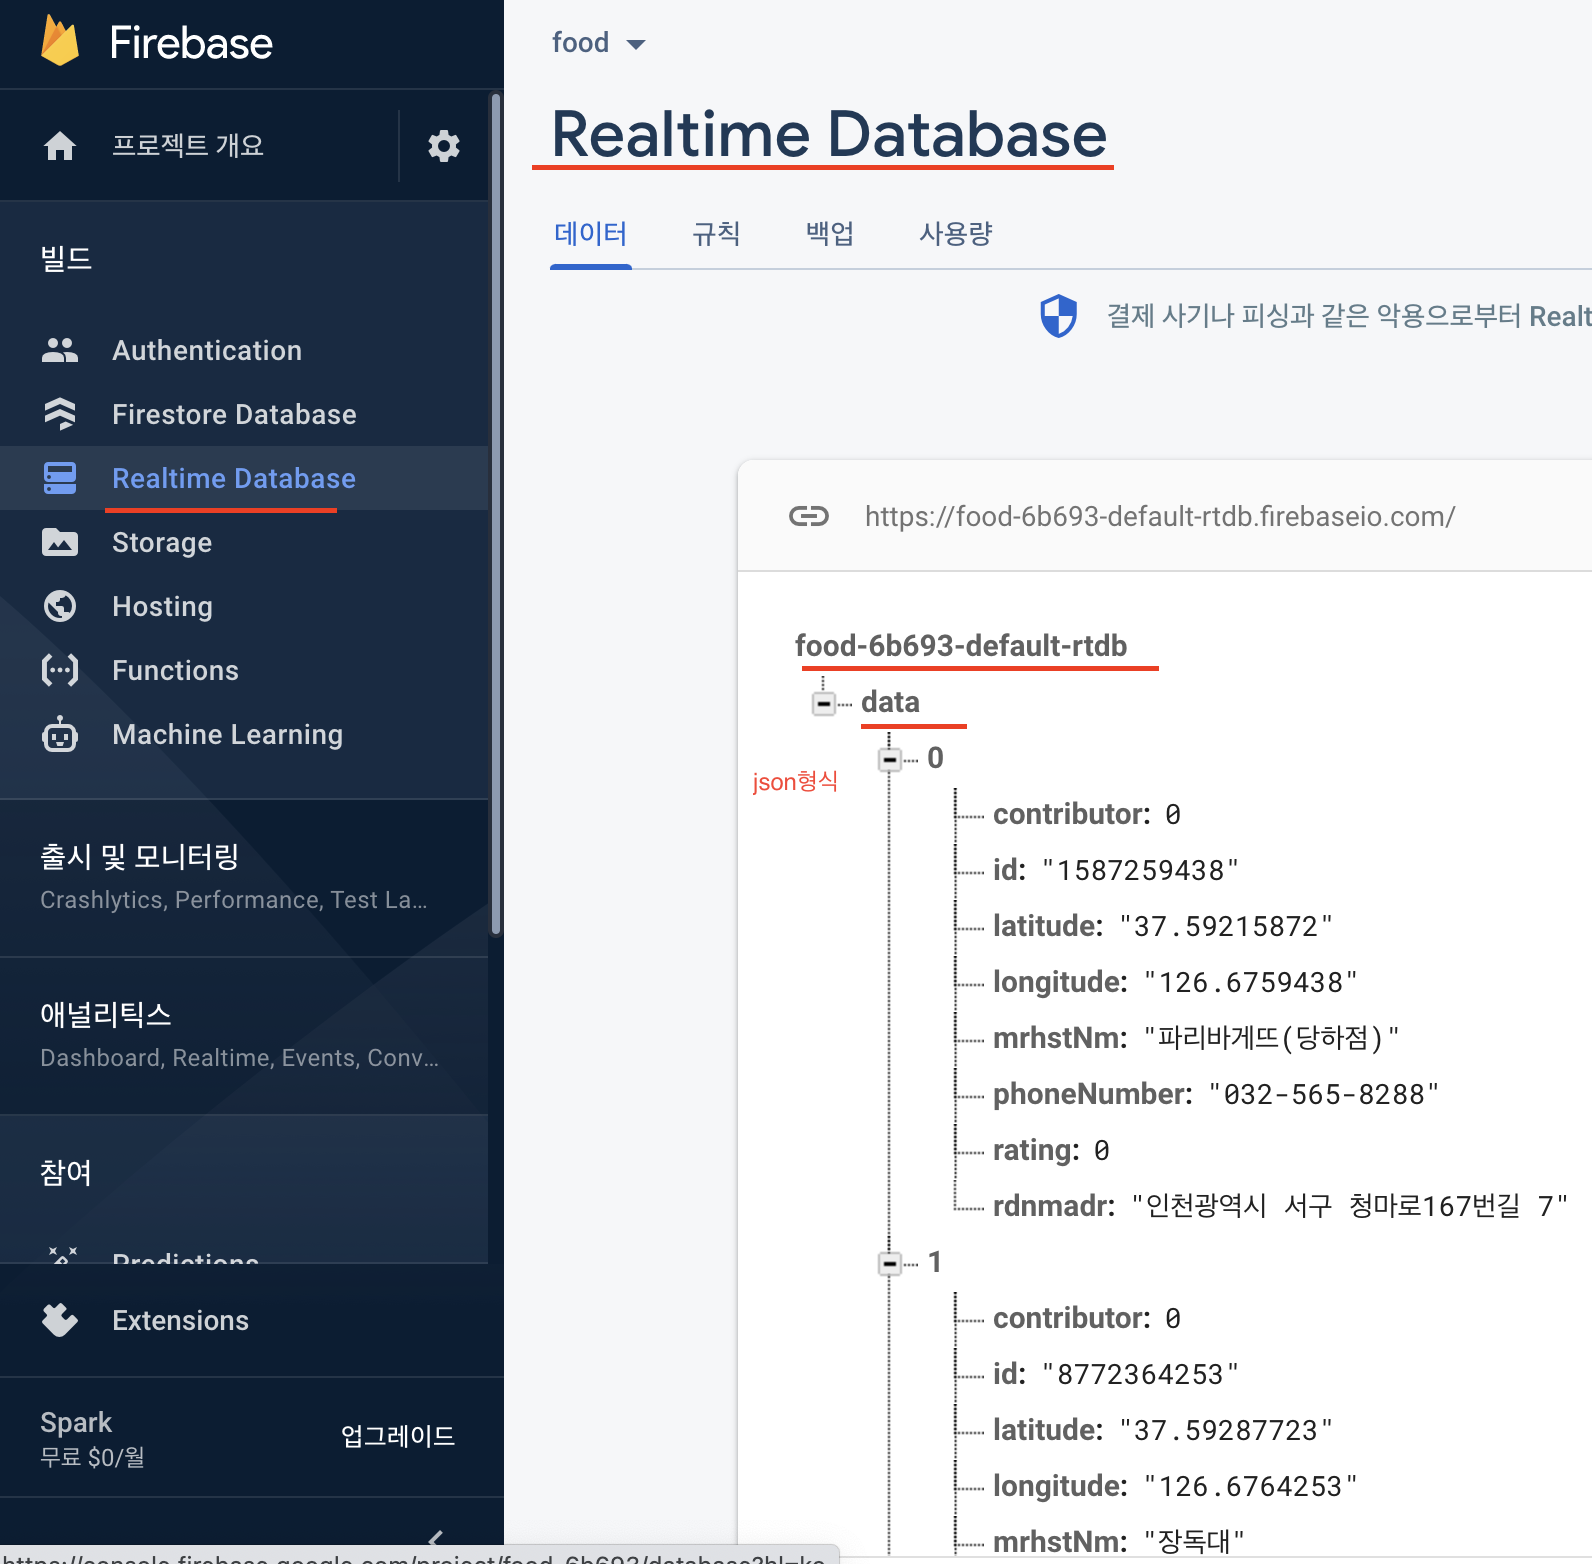
- 테스트 모드
- nam5 (us-central) 기본
유저에게 가까운 데이터베이스는 속도가 빠르다
데이터베이스마다 비용이 다르다 - pod 'Firebase/Firestore' 추가하고 Pods 폴더에 추가되어 있으면 됨
- cloud firestore 초기화
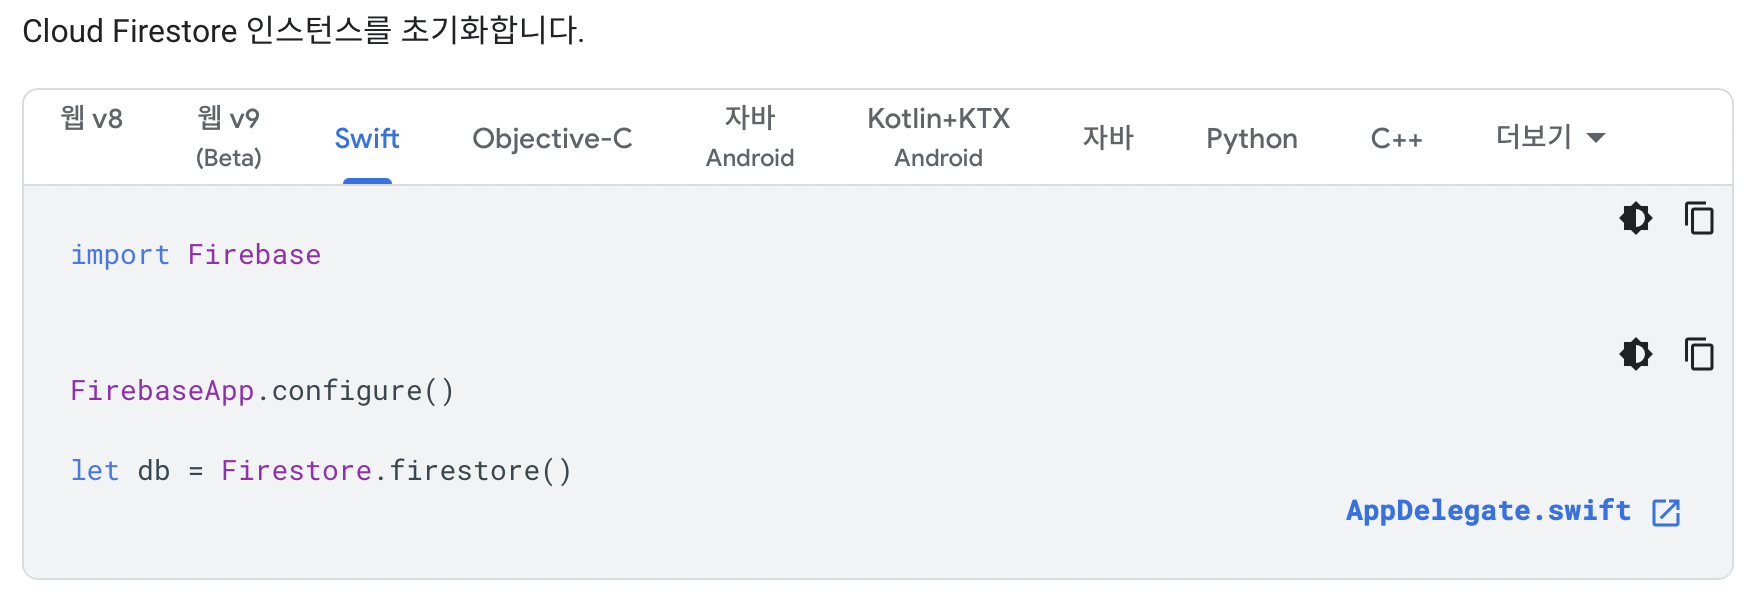
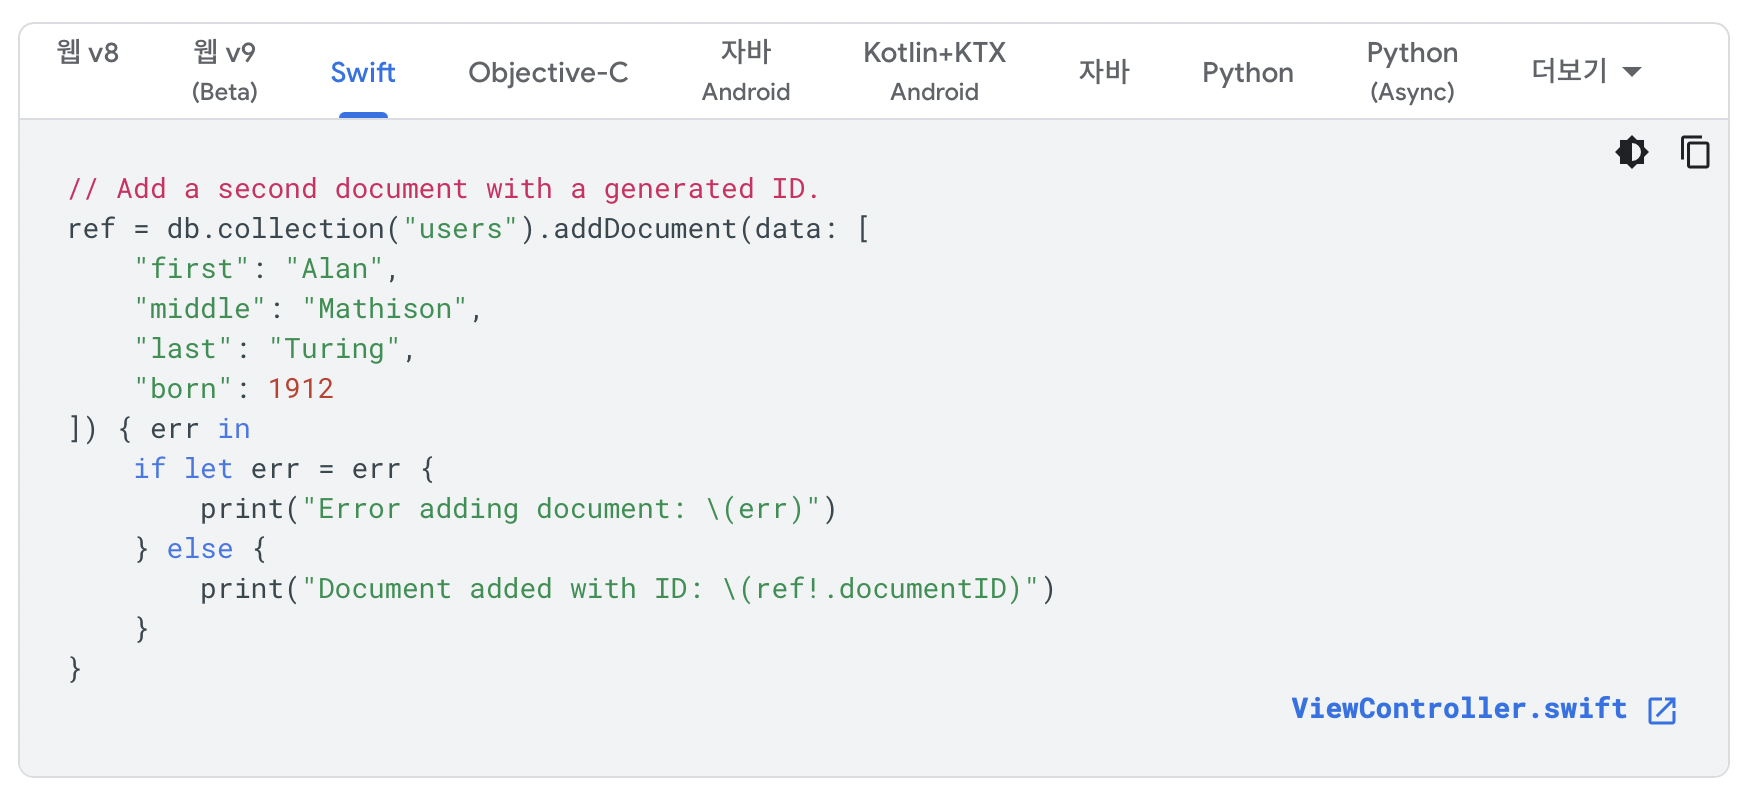
- 데이터 추가
에러
The caller does not have permission
규칙탭에서 보안설정을 바꿔줘야 하는데 임시방편은
//beforerules_version = '2'; service cloud.firestore { match /databases/{database}/documents { match /{document=**} { allow read, write: if request.time < timestamp.date(2021, 3, 21); } } }//after 모두가 볼 수 있게(비권장하는 방법)
rules_version = '2'; service cloud.firestore { match /databases/{database}/documents { match /messages/{anything=**} { allow read, write; } } }
- 데이터 읽기
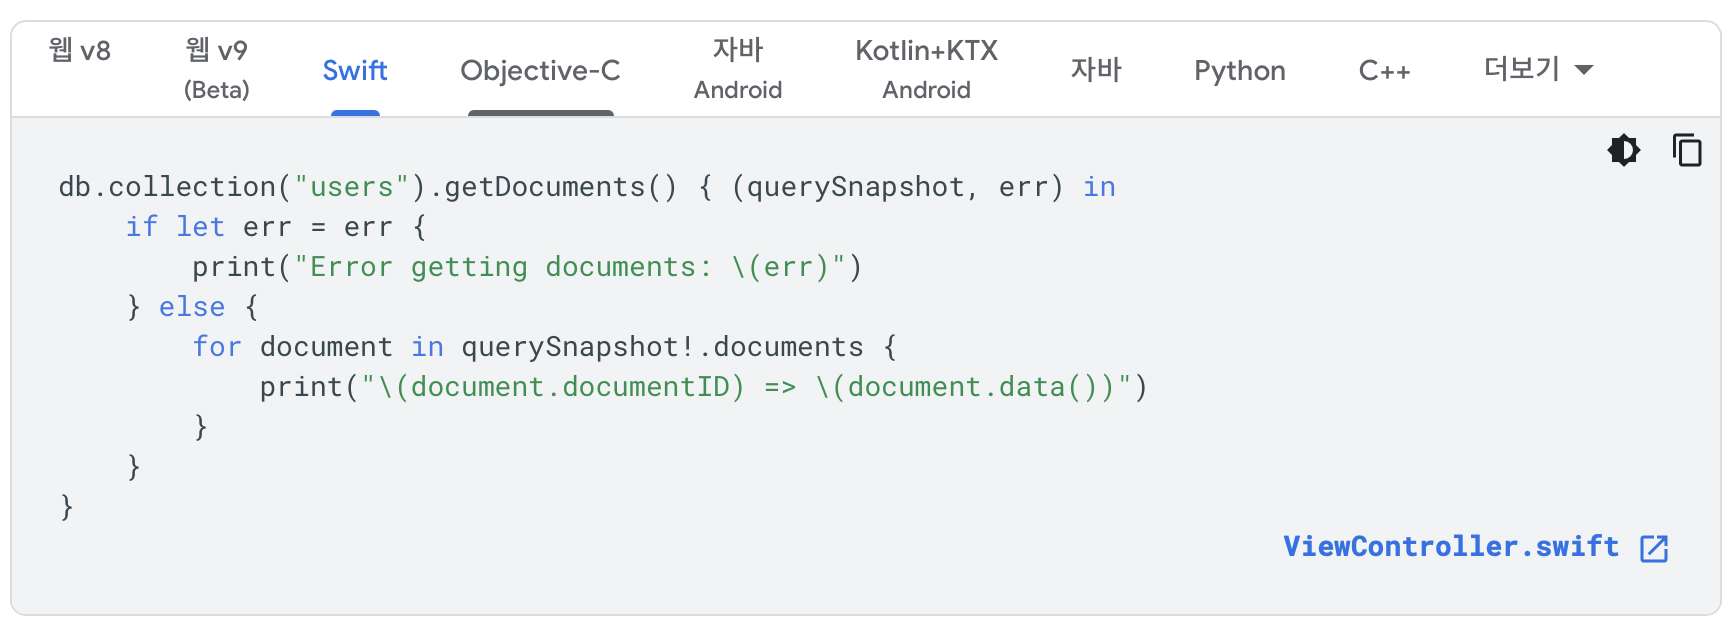
viewDidLoad에서 데이터를 가져오는 메서드를 추가하고 데이터를 읽은 후 reload하는 방식으로 만들었더니
채팅 메시지를 추가하면 화면이 변경되지 않았다 -> 8.실시간 업데이트하기
more about query snapshot
https://firebase.google.com/docs/reference/swift/firebasefirestore/api/reference/Classes/QuerySnapshot
-
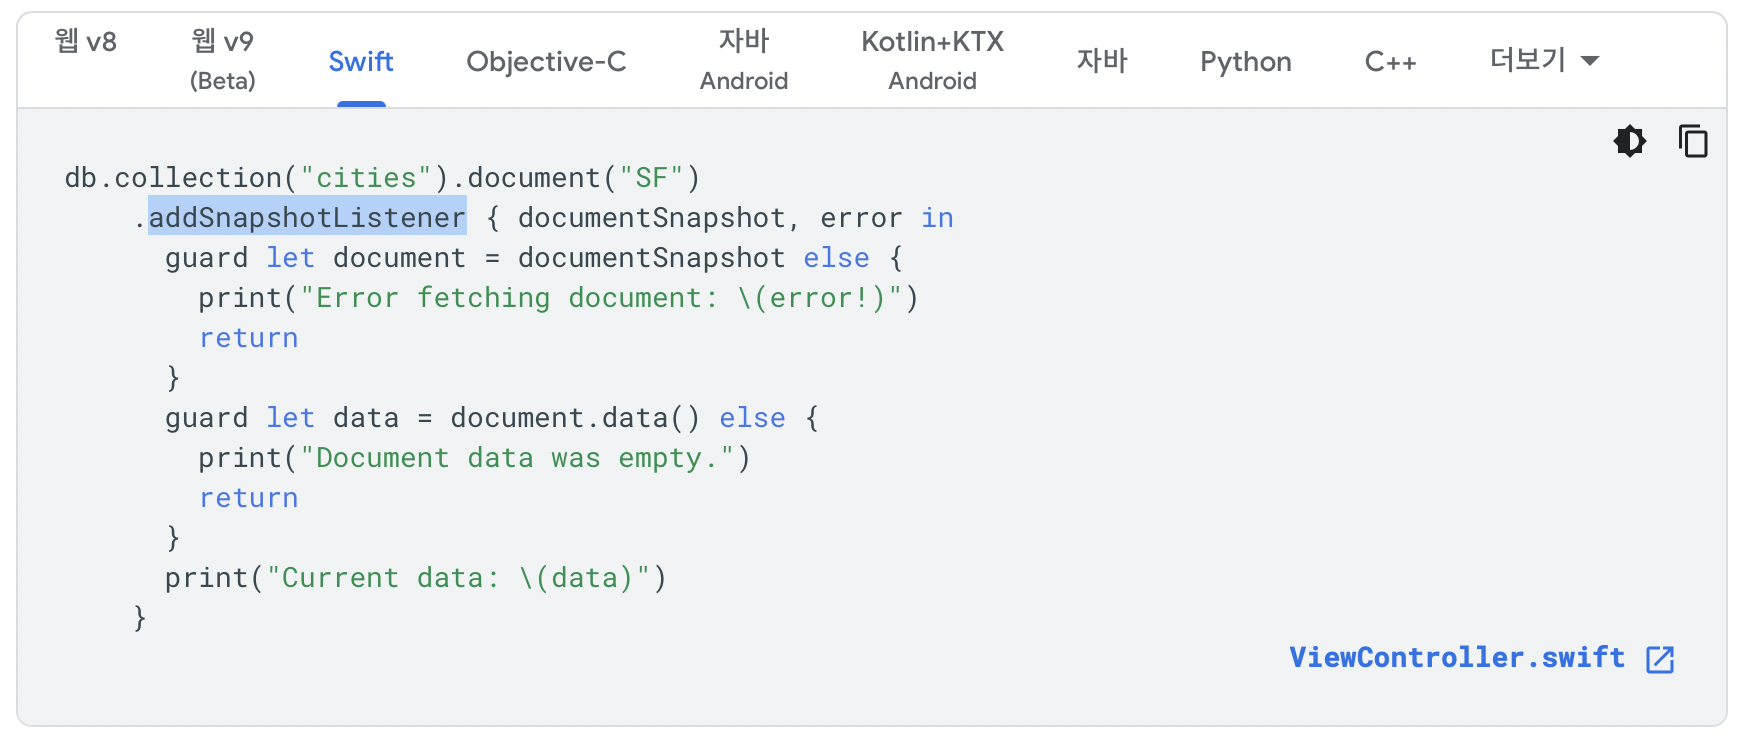
실시간 업데이트 하기 addSnapshotListener
https://firebase.google.com/docs/firestore/query-data/listen
-
데이터 정렬하기
https://firebase.google.com/docs/firestore/query-data/order-limit-data

security
https://firebase.google.com/docs/firestore/security/get-started
rules_version = '2';
service cloud.firestore {
  match /databases/{database}/documents {
    match /{document=**} {
      allow read, write: if
          request.time < timestamp.date(2021, 3, 21);
    }
  }
}firestore 전체 코드
//  ChatViewController.swift

import UIKit
import Firebase

class ChatViewController: UIViewController {
    //db연결
    let db = Firestore.firestore()
    //데이터 저장할 곳
    var messages: [Message] = []

    override func viewDidLoad() {
        loadMessages()
    }

    func loadMessages() {
    	//collectionName은 참고로 messages이다
        //정렬, 실시간 업데이트
        db.collection(K.FStore.collectionName).order(by: K.FStore.dateField).addSnapshotListener { querySnapshot, error in

            //가져올때마다 비우고 다시 가져오기
            self.messages = []

            if let e = error {
                print(e.localizedDescription)
            } else {
                if let snapshotDocuments = querySnapshot?.documents {
                    for doc in snapshotDocuments {
                        let data = doc.data()
                        if let sender = data[K.FStore.senderField] as? String, let messageBody = data[K.FStore.bodyField] as? String {
                            let newMessage = Message(sender: sender, body: messageBody)
                            self.messages.append(newMessage)

                            DispatchQueue.main.async {
                                self.tableView.reloadData()  //테이블 다시 로드하기
                            }
                        }
                    }
                }
            }
        }
    }

    @IBAction func sendPressed(_ sender: UIButton) {
        if let messageBody = messageTextfield.text, let messageSender = Auth.auth().currentUser?.email {
            db.collection(K.FStore.collectionName).addDocument(data: [
            K.FStore.senderField: messageSender,
            K.FStore.bodyField: messageBody,
            K.FStore.dateField: Date().timeIntervalSince1970]) { error in
                if let a = error {
                    print(a.localizedDescription)
                } else {
                    print("Successfully saved data")
                }
            }
        }

    }

}
bar button Item
object library에서 nav기능을 포함한 버튼
Log Out 버튼에서 사용
navigationItem.hidesBackButton = trueConstants.swift
스트링 오타를 막기 위해 상수를 적어놓는 파일
struct K {
	static let registerSegue = "RegisterToChat"
}
registerSegue를 사용하려면 일반적으로
인스턴스를 생성하고 사용해야(instance property) 하지만 K().registerSegue
-> instance property는 K()인스턴스와 연관되어 있지만
static을 붙이면 Constant data type(type property)이 되어 K.registerSegue와 같이 사용할 수 있게 된다.
-> type property는 K struct(타입)과 연관되어 있다.
https://docs.swift.org/swift-book/LanguageGuide/Properties.html
https://docs.swift.org/swift-book/LanguageGuide/TypeCasting.html
프로퍼티 변수 뿐만 아니라
메서드에도 적용되는 개념이다
TableView
UITableViewDelegate, UITableViewDataSource
//Message.swift
import Foundation

struct Message {
    let sender: String  //보낸사람
    let body: String    //내용
}
// ChatViewController.swift
import UIKit
class ChatViewController: UIViewController {
var messages: [Message] = [
Message(sender: "1@2.com", body: "Hey!"),
Message(sender: "1@2.com", body: "How are you!"),
Message(sender: "1@2.com", body: "Heyyy!"),
]
override func viewDidLoad() {
tableView.dataSource = self
tableView.delegate = self
}
}
//MARK: - UITableViewDataSource
extension ChatViewController: UITableViewDataSource {
func tableView(_ tableView: UITableView, numberOfRowsInSection section: Int) -> Int {
return messages.count
}
func tableView(_ tableView: UITableView, cellForRowAt indexPath: IndexPath) -> UITableViewCell {
let cell = tableView.dequeueReusableCell(withIdentifier: K.cellIdentifier, for: indexPath)
cell.textLabel?.text = messages[indexPath.row].body
return cell
}
}
//MARK: - UITableViewDelegate
extension ChatViewController: UITableViewDelegate {
func tableView(_ tableView: UITableView, didSelectRowAt indexPath: IndexPath) {
print(indexPath.row) //몇번째 로우를 선택했는지 알 수 있다
}
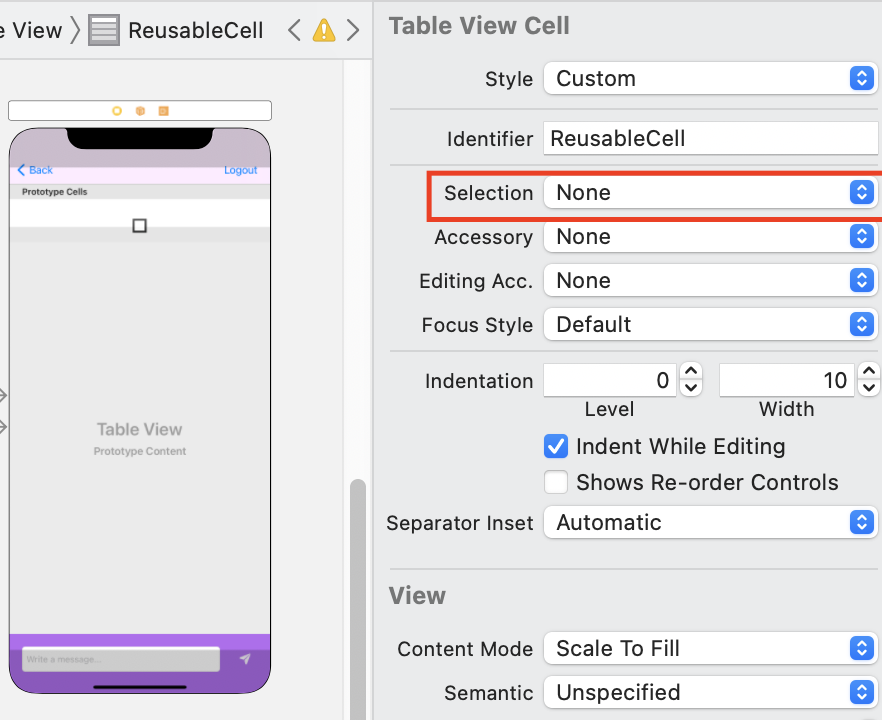
}Selection
None 사용자가 데이터 선택을 해도 아무런 변화가 보이지 않는다 (기본은 회색으로 되어있다)
Seperator
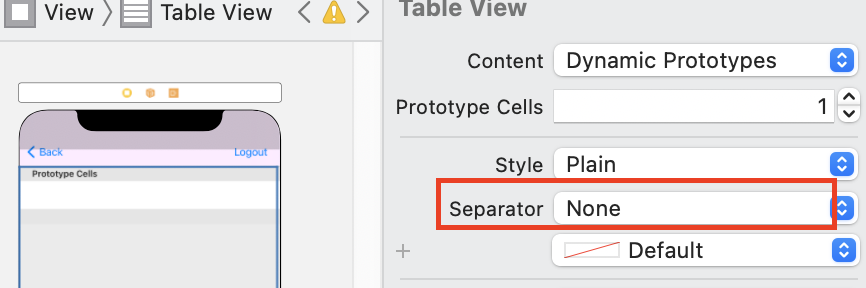
각 행이 분리되어지지 않게 보이도록 설정하기
.xib File 집 파일
셀에 대한 디자인을 앱의 다양한 곳에서 사용하고 싶을 때 생성하면 유용하다
테이블뷰 디자인하기
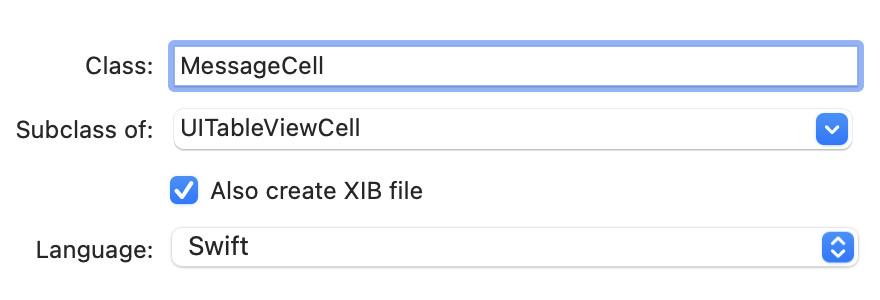
View > New File > Cocoa Touch Class > Subclass of: UITableViewCell, Class: MessageCell, Also create XIB file 체크
Nib닙은 xib집의 옛날 이름
User Interaction Enabled 체크 해제
사용자가 행을 눌렀을 때 selection이 gray로 바뀌는 것을 막아준다
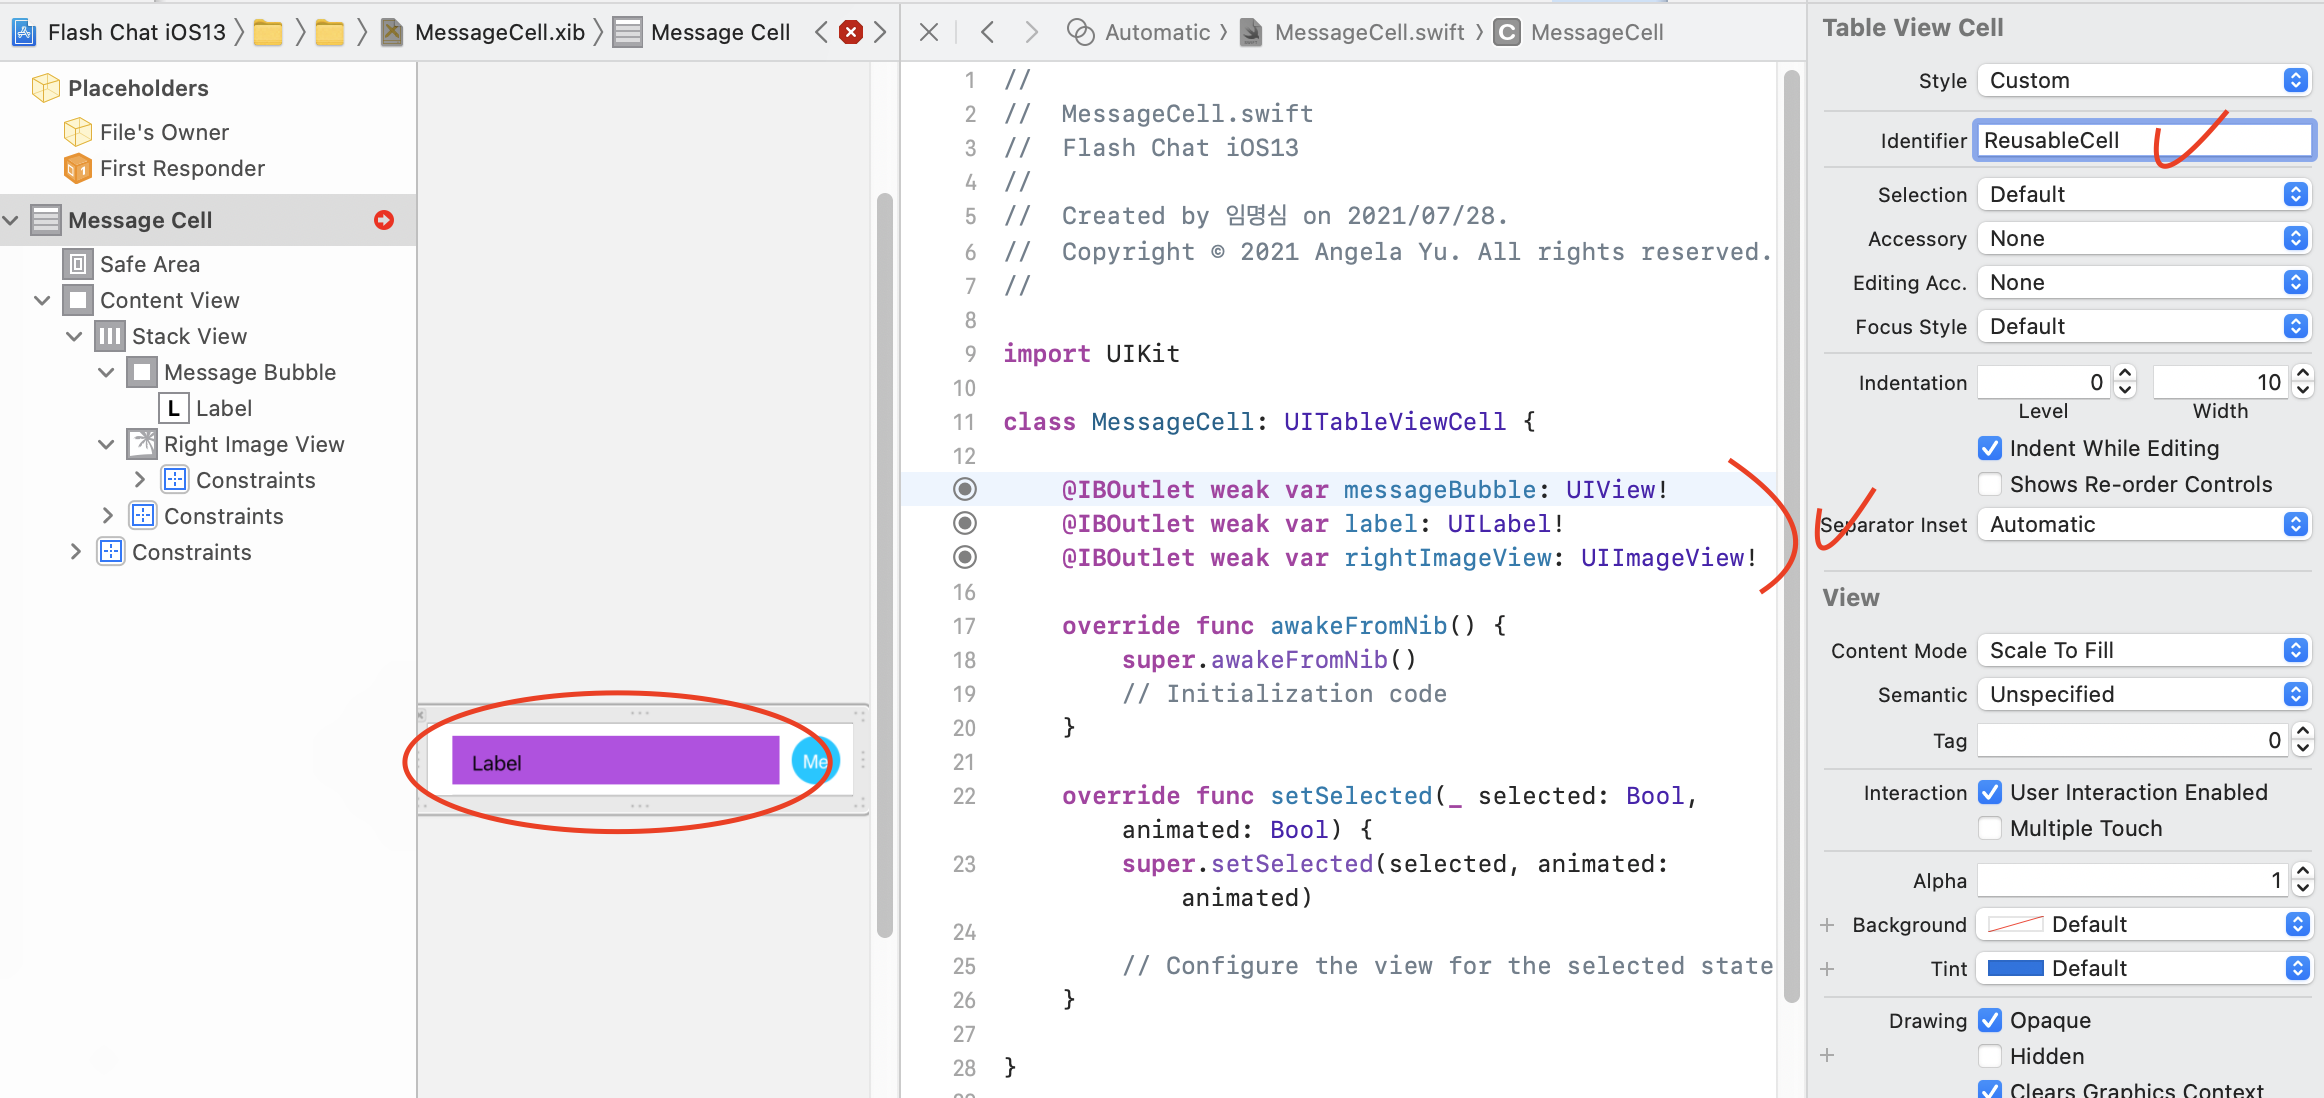
awakeFromNib()에 곡선 추가하기
messageBubble.layer.cornerRadius = messageBubble.frame.size.height / 5
//ChatViewController.swift
//nib파일 등록하기
tableView.register(UINib(nibName: K.cellNibName, bundle: nil), forCellReuseIdentifier: K.cellIdentifier)
// 셀 다운캐스팅
let cell = tableView.dequeueReusableCell(withIdentifier: K.cellIdentifier, for: indexPath) as! MessageCell
메인스토리보드에 있는 셀은 지워주기
as? as! 타입캐스팅
- is (type checking)
let cell = UITableViewCell()
if cell is UITableViewCell {
	print("The types match!")
}-
as!
forced down cast
subclass로 형변환한다let messageCell = cell as! MessageCell -
as?
json으로 데이터를 받았을 때
어떤 데이터가 어떤 데이터에 속해있을 지 알 수 없는 경우에 사용if let messageCell = cell as? MessageCell { //Then can use messageCell's capabilities } -
as
Upcast
raise a object to its superclasses typelet newCell = messageCell as UITableViewCell -
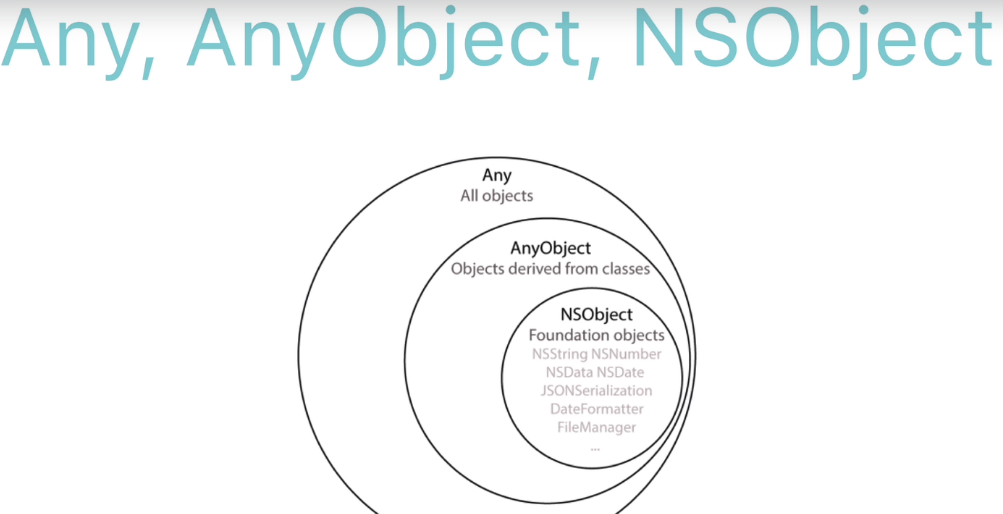
Any > AnyObject > NSObject
-
let number = int(Double) 은 type casting이 아니라 initialization이다
int(Double)은 사실 init에 구현되어 있음
https://docs.swift.org/swift-book/LanguageGuide/TypeCasting.html
super
상속받아 오버라이드할 때는 super를 사용하는 습관을 들이는 것이 좋다
override func viewWillApear(_ animated: Bool) {
super.viewWillAppear(animated)
navigationController?.isNavigationBarHidden = true
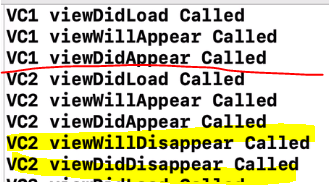
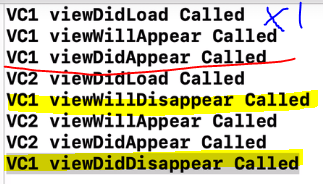
}ViewController Lifecycle
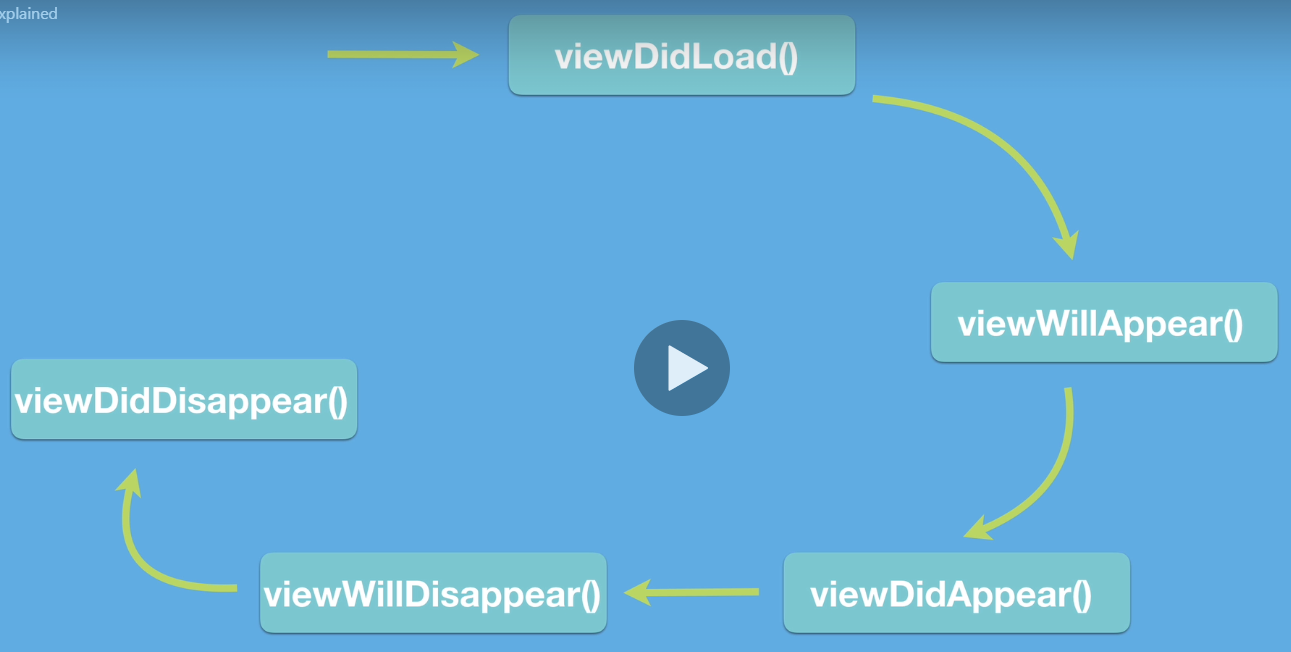
viewDidLoad: UI 같은 거 로딩, 한 번만 실행됨
viewWillAppear: 아직 눈에 안보이는 상태, UI 같은 거 숨길 때 사용
viewDidAppear: 뷰가 보이는 상태, 애니메이션이나 카운트 시작 가능
viewWillDisappear: 카운트 종료 가능, UI 변경
viewDidDisappear: 뷰가 안보이는 상태
- 세그웨이가 show일 때
- 세그웨이가 Present Modally, Full Screen일 때
https://developer.apple.com/library/archive/referencelibrary/GettingStarted/DevelopiOSAppsSwift/WorkWithViewControllers.html#//apple_ref/doc/uid/TP40015214-CH6-SW1
Application Lifecycle
App Launched -> App Visible -> App Recedes into Background -> Resources Reclaimed
https://developer.apple.com/documentation/uikit/app_and_environment/managing_your_app_s_life_cycle
-
AppDelegate.swift
파이어베이스 구성할 때 사용했었음
그렇게 되면 GoogleService-info.plist를 읽어들임 -
SceneDelegate.swift
갑자기 전화올 때
화면 분할 같은 곳에 쓰임
window 컨트롤
print(#function)
함수 이름을 출력하게 된다
SceneDelegate.swift파일과
ViewController.swift파일에서
메서드 안에 print(#function)를 입력하고 테스트해보면 된다.
application(_:didFinishLaunchingWithOptions:)
scene(_:willConnectTo:options:)
VC1 viewDidLoad Called
VC1 viewWillAppear Called
sceneWillEnterForeground(_:)
sceneDidBecomeActive(_:)
VC1 viewDidAppear Called
엔트리 포인트와 앱의 초기화 과정
main() 함수가 실행된다.
main() 함수는 다시 UIApplicationMain() 함수를 호출한다. (엔트리 포인트)
UIApplicationMain() 함수는 앱의 본체에 해당하는 UIApplication 객체를 생성한다
UIApplication 객체는 Info.plist 파일을 바탕으로 앱에 필요한 데이터와 객체를 로드한다.
AppDelegate 객체를 생성하고 UIApplication 객체와 연결한다. (오직 하나의 인스턴스만 생성된다)
이벤트 루프를 만드는 등 실행에 필요한 준비를 진행한다.
실행 완료 직전, 앱 델리게이트의 application(_:didFinishLaunchingWithOptions:) 메서드를 호출한다.
AppDelegate.swift에서
application(_:didFinishLaunchingWithOptions:) 메서드 안에
FirebaseApp.configure()를 했었는데
이 때 Info.plist를 읽어들인다
Swift Deep Dive
Loops
for, while
for number in 1...5 {
	print(number)
}
// 1
// 2
// 3
// 4
// 5

for _ in 1...3 {
	print("Hello")
}
//Hello
//Hello
//Hello

// print했을 때 배열의 순서를 보장하지 않는다
let fruits: Set = ["Apple", "pear", "Orange"]
for fruit in fruits {
	print(fruit)
}

//dictionary 타입의 배열이라면, key나 value를 사용해 접근한다

// Mark -

import Foundation
var now = Date().timeIntervalSince1970	//유닉스 타임
let oneSecondFromNow = now + 1	// plus one second
while now < oneSecondFromNow {
	now = Data().timeIntervalSince1970
    print("waiting...")
}
https://docs.swift.org/swift-book/LanguageGuide/ControlFlow.html