HTML/CSS를 배워야 하는 이유
컴퓨터에는 사람의 생각을 화면에 시각화 해주는 도구가 굉장히 많다.
많은 시각화 도구 중 가장 빠르고, 간편하면서, 완벽하고, 보편적인 것이 HTML/CSS이다.
3d그래픽 도구를 이용하게 되면 몇날 며칠 어쩌면 몇달이 걸릴지 모른다.
그림을 그려주는 언어를 쓰거나 영상을 제작해주는 도구를 쓰면 노력이 아주 많이 들어간다.
하지만 HTML/CSS는 아주 간단한 문법으로 내 생각과 의도를 굉장히 정확하게 표현해낼 수 있다.
그렇기 때문에 아무리 컴퓨터를 잘 하는 사람이라도 HTML/CSS는 빼놓지 않고 다루고 있다.
HTML/CSS의 장점
-
다른 언어들과 콜라보레이션이 굉장히 잘 된다.
즉, 자바스크립트나 파이썬, 루비 같은 완전히 다른 성격의 언어와도 잘 섞여서 그 언어들이 표현하고 싶은 내용을 대신 표현해주는 아주 좋은 도구이다.
- 따라서, HTML/CSS는 단독으로 동작할 때도 빛이 나지만, 이처럼 다른 도구와 섞여서 있을 때도 빛이 나는 그런 언어이다. -
HTML/CSS의 결과물이 누구나 접속 가능한 웹페이지라는 것이 가장 큰 장점이다.
- 따라서 우리는 언제든지 어디서든 웹 브라우저 사용만 가능하면 HTML/CSS 결과물에 접근할 수 있고 여러 상황에서도 실행을 해 볼 수가 있고, 간편하게 동작을 시켜 볼 수가 있다.
'누구나 접근이 가능하다' 라는 것은 다른 그 어떤 시각화 도구보다도 HTML/CSS를 돋보이게 하는 가장 중요한 포인트이다.
- HTML/CSS는 문법이 아주 간단하고, 로직이 복잡하지 않다.
그렇기에 HTML/CSS는 꼭 한번 배워 놓으시는 것을 강력 추천한다!
HTML/CSS로 나만의 이력서 만들기
직접 HTML/CSS 사용해보기
코드를 작성한다기 보단 문서를 작성한다고 생각하고 해보자.
HTML/CSS를 이용해 문서를 작성하는 것은 Microsoft word와 같은 프로그램으로 작성하는 것과 별반 다를 것이 없다.
그렇지만 왜 HTML/CSS를 사용할까?
word와 같은 프로그램은 다른 python, ruby와 같은 언어와 콜라보하기가 어렵기 때문이다.
이것이 HTML/CSS를 가장 유명한 언어로 만든 강력한 이유다.
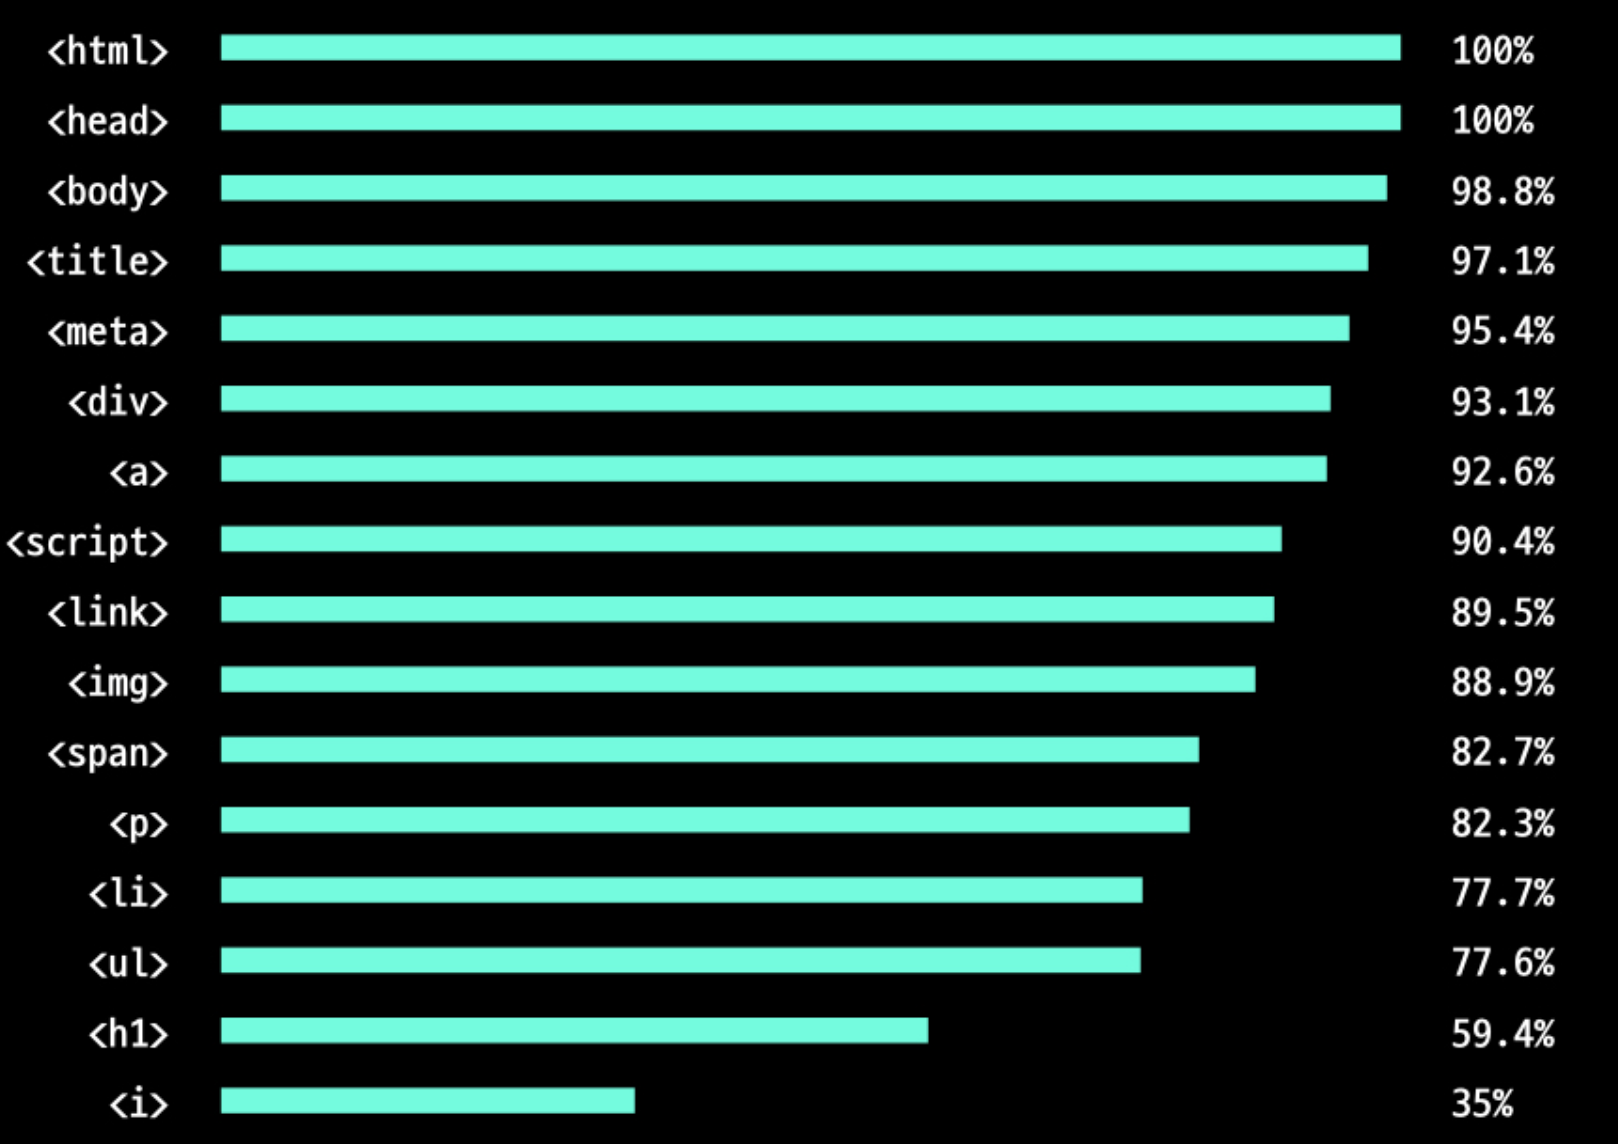
- 이걸 보면 알 수 있듯이 자주 많이 쓰이는 몇개의 태그만 알아두면 문서를 작성하는데 큰 문제가 없다.
- 자주 쓰이는 태그 몇개를 알아보자.
여러가지 태그의 종류와 특징
1. html 태그
- '이 문서는 html 문서다' 가장 많이 쓰이는 태그이다.
- html문서 중 가장 큰 가방이라고 생각하면 된다.
예시
<html></html>- 크롬과 같은 최신 브라우저에서는 이 태그가 없어도 동작을 하는데 문제가 없다.
하지만 뭔지 모를 이유로 대부분의 웹페이지는 없어도 될 이 html 태그를 꼭 써주고 있다.
2. doctype 태그
- 위 html 태그와 쌍으로 묶이는 것이 바로 doctype이다.
예시
<!DOCTYPE html>- 이 태그는 가장 맨 위에 작성.
- 이 태그도 html태그와 마찬가지로 없어도 크롬과 같은 최신 브라우저에서는 동작을 하는데 문제가 없다. 하지만 이 역시도 뭔지 모를 이유로 대부분의 웹페이지는 없어도 될 이 html 태그를 꼭 써주고 있다.
예시 - html태그와 doctype 태그 함께 사용
<!DOCTYPE html>
<html>
</html>- 위 세줄은 어떤 html 문서를 막론하고 꼭 써줘야 한다. 암기!
3. head 태그 & body 태그
-
head 태그에는 contents에 대한 추가 정보가 담겨있다.
-
HTML/CSS에서 표현되는 모든 내용(contents)이 body 태그에 전부 들어가게 된다.
- 이력서를 예로 들면, 경력이나 학력과 같은 내용이 여기에 들어가게 된다.html 문서를 크게 두 부분으로 나누게 되면 부가정보를 담고 있는 head 태그와 contents의 내용을 담고 있는 body 태그로 이루어져 있다.
-
이것을 코드로 작성하면 다음과 같다.
예시
<!DOCTYPE html>
<html>
	<head></head>
    <body></body>
</html>
4. meta 태그
- 한글을 사용하기 위해 필요한 태그이다.
예시
<!DOCTYPE html>
<html>
	<head>
    	<meta charset="UTF-8">
    </head>
    <body></body>
</html>- meta charset="UTF-8 의 의미는 깊게 알 필요가 없다.
그냥 이 코드를 써야 한글을 정상적으로 사용이 가능하다는 것을 알고 있으면 된다.
- 이 문서엔 한글도 있다는 것을 알려주는 것.
5. title 태그
- 페이지 이름을 나타낸다.
예시
<!DOCTYPE html>
<html>
	<head>
    	<meta charset="UTF-8">
        <title>김멋사의 이력서</title>
    </head>
    <body></body>
</html>
6. p 태그 & h1 태그
h1태그
- heading1의 줄임말이다.
- 제목을 정의할 때 사용
- h1은 한 문서에 한개만 사용해야 한다.
- h1~h6까지 있으며, 6가지 단계의 섹션 제목을 나타낸다.
p태그
- paragraph(문단)의 줄임말이다.
- 일반 텍스트를 작성할 때 사용한다.
예시
<!DOCTYPE html>
<html>
<head>
<meta charset="UTF-8">
<title>김멋사의 이력서</title>
</head>
<body>
<h1>김멋사</h1>
<p>HTML/CSS</p>
</body>
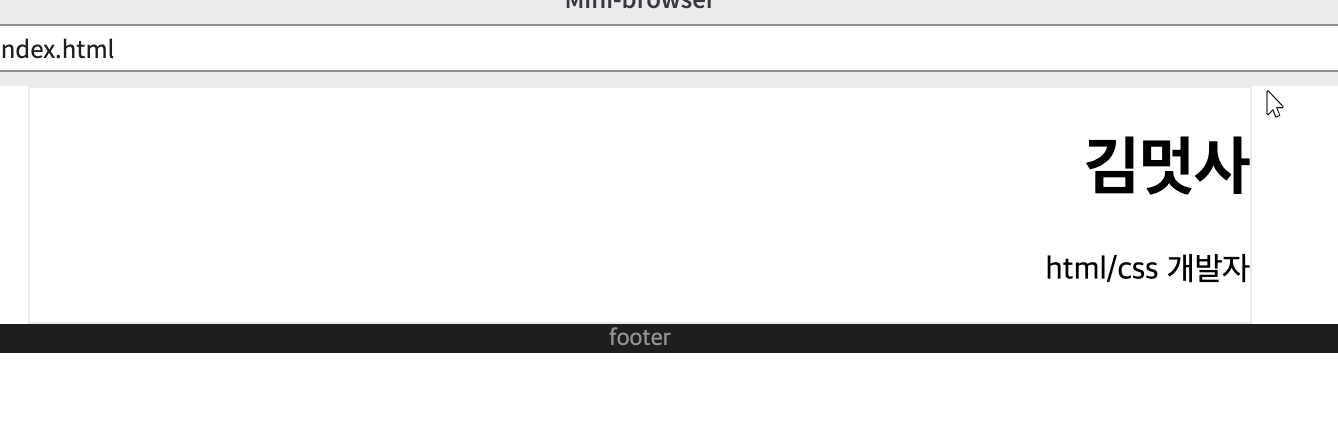
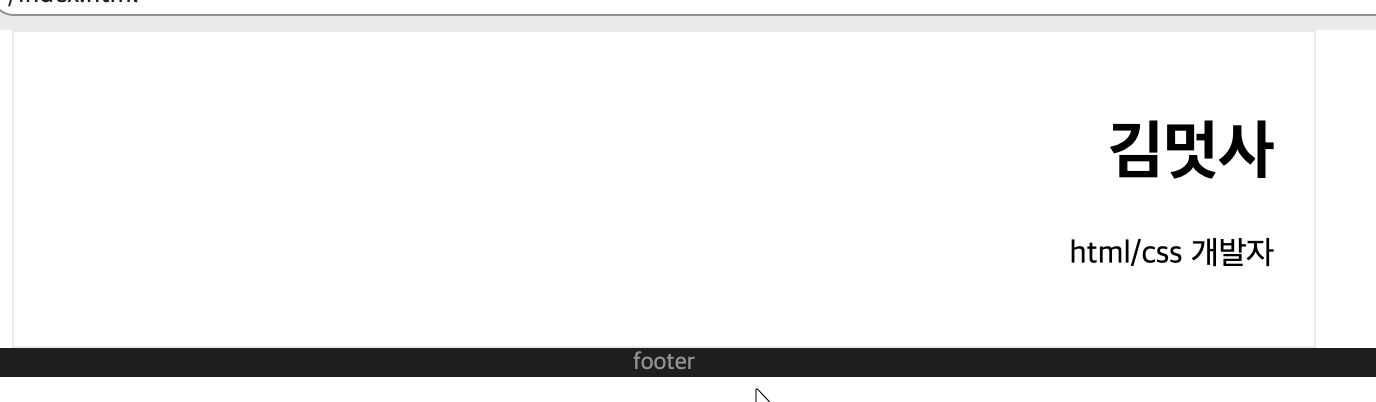
</html>7. footer 태그
footer란?
- 웹 페이지마다 맨 아래에 공통적으로 써 있는 내용이다.
- 쇼핑몰 사이트의 경우 회사 이름과 대표이사 이름 사업자등록번호등이 쓰여 있을 것이고,
- 영화관 사이트의 경우 고객센터 번호등이 적혀 있을 것이다.
- 대부분 웹 사이트의 저작권이 명시가 되어 있다.
- 그냥 p태그를 썼을 때와 글씨체나 크기가 차이가 없다.
예시
<!DOCTYPE html>
<html>
	<head>
    	<meta charset="UTF-8">
        <title>김멋사의 이력서</title>
    </head>
    <body>
    	<h1>김멋사</h1>
        <p>HTML/CSS</p>
        <footer>copyright CODE LION. All rights reserved.</footer>
    </body>
</html>- 우리가 만들 이력서 페이지에는 고객센터 번호도 없고 사업자 등록 번호도 없으니 위와 같이 간단히 저작권만 써놓도록 하겠다.
이쯤에서 css파일을 생성해보자.
- html은 문서의 요소요소를 구분하는 역할을 하고 그 요소요소에 의미를 부여하는 역할을 하고, css는 폰트 설정 및 표현하는 부분을 설정하는 역할을 한다.
- 위와 같이 html파일과 css파일 구분해서 생성
- 보통 index.html 파일을 시작페이지로 많이 쓰기 때문에 위와 같이 파일명 설정한다.
html파일과 css파일을 연결해줄 것이 필요하다.
다시한번 말하지만 body에는 화면에 직접적으로 표현되는 컨텐츠들만 들어가고 컨텐츠 표현을 위한 부수적인 모든 것들은 head에 들어간다.
따라서, html파일과 css파일을 연결하겠다는 내용은 head에 들어가게 된다.
두 파일을 연결하는 태그는 link 태그 이다.
8. link 태그
- meta태그와 동일하게 닫아주는 것이 없는 단일 태그이다.
- css파일과 html파일을 연결해주는 태그이다.
예시
<!DOCTYPE html>
<html>
	<head>
    	<meta charset="UTF-8">
        <title>김멋사의 이력서</title>
        <link rel="stylesheet" href="codelion.css">
    </head>
    <body>
    	<h1>김멋사</h1>
        <p>HTML/CSS</p>
        <footer>copyright CODE LION. All rights reserved.</footer>
    </body>
</html>
예시 - css파일
- 쓰는 순서는 지키지 않아도 된다.
- 중괄호를 사용한다.
footer {
	text-align: center;
    background-color: black;
    color: white;
}- text-align
: 문단 정렬 속성이다.
ex) text-align의 종류
- center: 가운데 정렬
- left: 왼쪽 정렬
- right: 오른쪽 정렬
- justify: 양쪽정렬
- initial: 기본값으로 설정
- inherit: 부모 요소의 속성값을 상속 받음-
color
:글자 색 -
background-color
: 배경 색
보통 footer 태그가 2개일리 없지만 학습목적으로 두개를 써보자!
<!DOCTYPE html>
<html>
<head>
<meta charset="UTF-8">
<title>김멋사의 이력서</title>
<link rel="stylesheet" href="codelion.css">
</head>
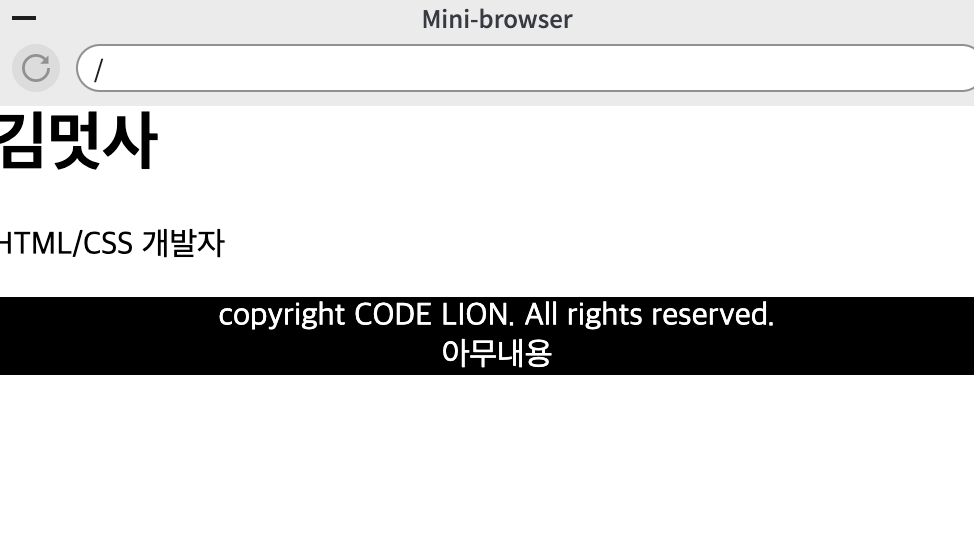
<body>
<h1>김멋사</h1>
<p>HTML/CSS 개발자</p>
<footer>copyright CODE LION. All rights reserved.</footer>
<footer>아무내용</footer>
</body>
</html>결과
예시
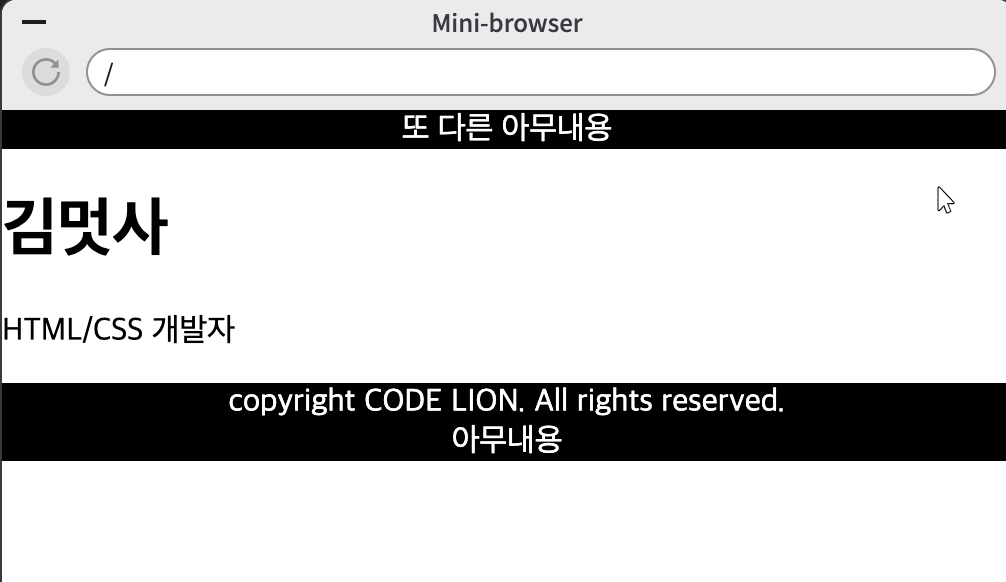
- footer를 다른 위치에 하나 더 써보자.
<!DOCTYPE html>
<html>
	<head>
    	<meta charset="UTF-8">
        <title>김멋사의 이력서</title>
        <link rel="stylesheet" href="codelion.css">
    </head>
    <body>
    	<footer>또 다른 아무내용</footer>
    	<h1>김멋사</h1>
        <p>HTML/CSS 개발자</p>
        <footer>copyright CODE LION. All rights reserved.</footer>
        <footer>아무내용</footer>
    </body>
</html>
결과
- 그 위치에 맞게 footer가 생성된다.
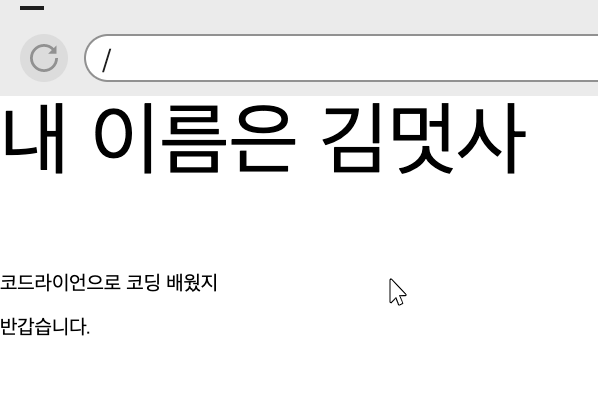
예시 - html파일
<!DOCTYPE html>
<html>
	<head>
    	<meta charset="UTF-8">
        <link rel="stylesheet" href="codelion.css">
    </head>
    <body>
    	<p>내 이름은 김멋사</p>
        <p>코드라이언으로 코딩 배웠지</p>
    </body>
</html>
예시 - css 파일
p {
	font-size: 30px;
}- p태그의 모든 글씨크기를 30픽셀로 설정한다는 의미다!
??부분적인 p태그의 글씨크기만 변경하고 싶다면??
=> class 를 나누자!
예시 - html파일
<!DOCTYPE html>
<html>
	<head>
    	<meta charset="UTF-8">
        <link rel="stylesheet" href="codelion.css">
    </head>
    <body>
    	<p class="big-font">내 이름은 김멋사</p>
        <p class="small-font">코드라이언으로 코딩 배웠지</p>
        <p class="small-font">반갑습니다.</p>
    </body>
</html>
예시 - css파일
p {
	font-size: 30px;
}

.big-font {
	font-size: 40px;
}

.small-font {
	font-size: 10px;
}- 위와 같이 앞에 점을 찍으면 'big-font라는 클래스를 꾸민다'는 의미가 된다.
- class를 나누었다면 점을 잊지말자!
- 점이 없으면 그냥 p태그 내용만 적용된다!
결과
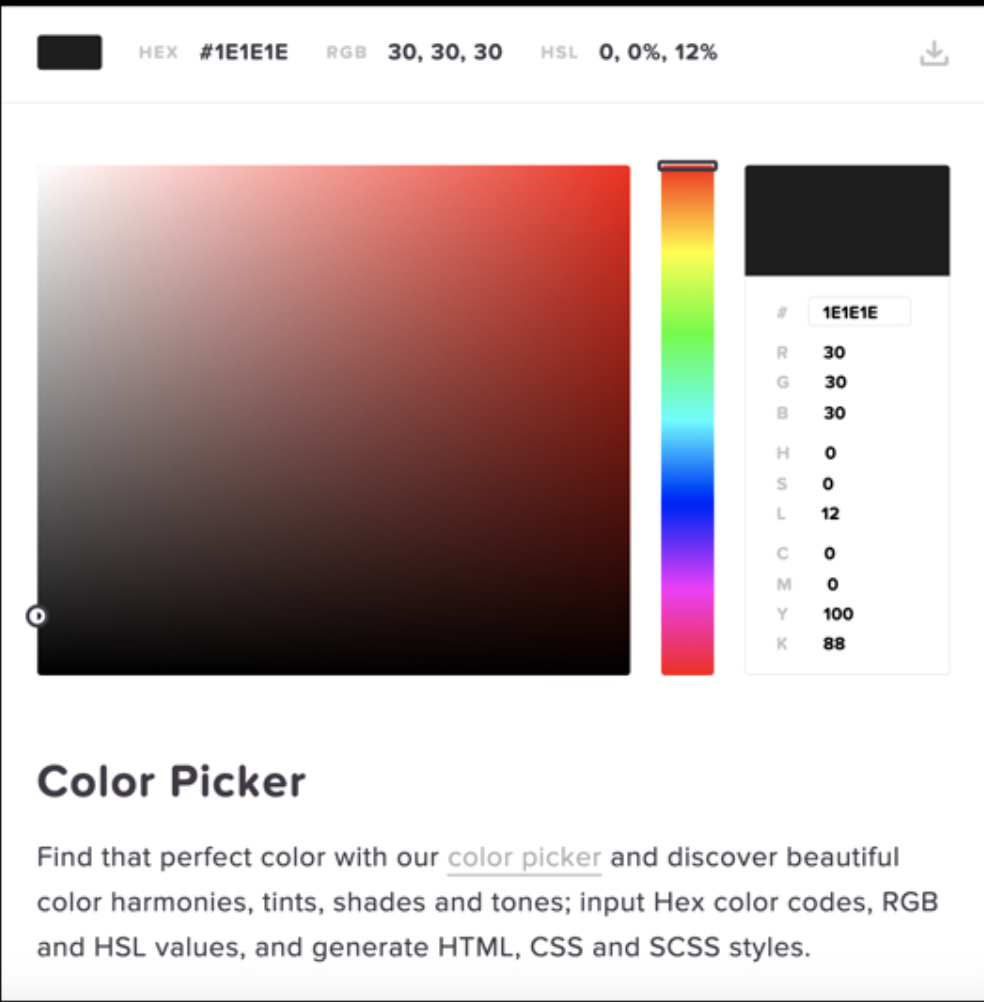
css에서 색을 좀더 다양하게 사용하고 싶다면?
-
google에 'html color code' 라고 검색해보자.
-
그러면 다음과 같은 결과가 나온다.
-
지금은 글자로 white, black 이런식으로 지정을 해주지만 모니터에는 수만가지 색 표현이 가능하다. 이때 필요한 것이 color code이다.
9. div 태그
- division의 줄임말이다.
- 이 태그는 html요소를 묶어서 테두리를 그린다거나, 한꺼번에 묶어서 우측 정렬을 한다거나, 한꺼번에 붂어서 배경색을 바꾼다거나 할 때 쓰인다.

- 위와 같이 영역으로 나눠준 부분을 css로 꾸며주면된다.
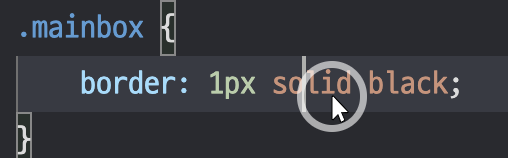
border : 두께 방식 색깔;
ex) border: 5px solid black;예시
div태그의 text-align설정
- center를 설정하면 div박스가 웹페이지 중간에 가는게 아니라 박스안에 내용물들이 박스의 가운데 정렬이 된다.

- 그 어디에도 가운데로 위치하라는 말이 없어보이지만 위 코드가 div박스를 웹페이지의 가운데로 정렬하는 방법이다.
박스 나누기

- 위와 같이 바깥에서부터 Margine, Border, Padding, Content로 나눌 수 있다.
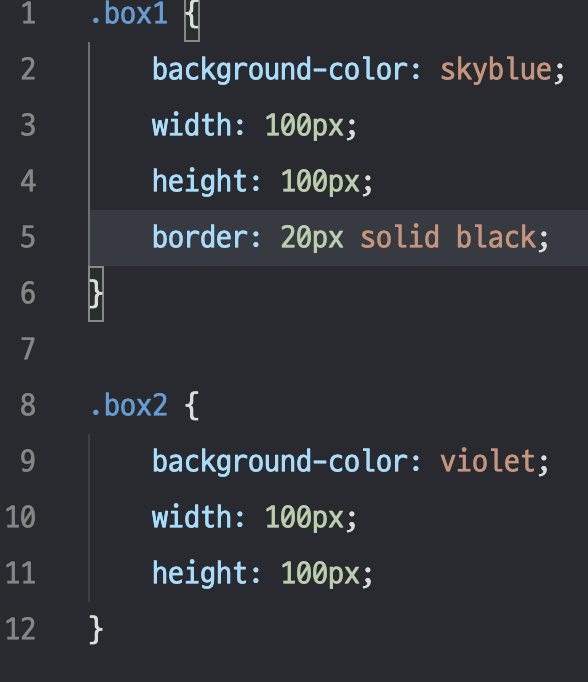
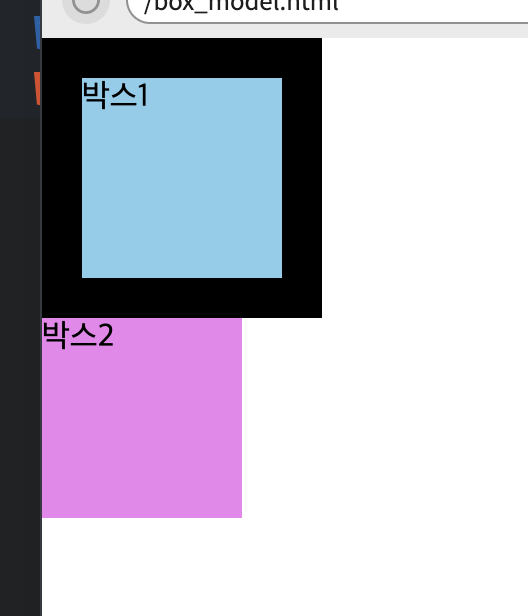
- 박스테두리를 위와 같이 두껍게 해도 박스 내부 크기는 변하지 않는다.
??전체 박스 크기를 원래 크기로 유지한 채 박스 테두리를 치려면 어떻게 해야할까??
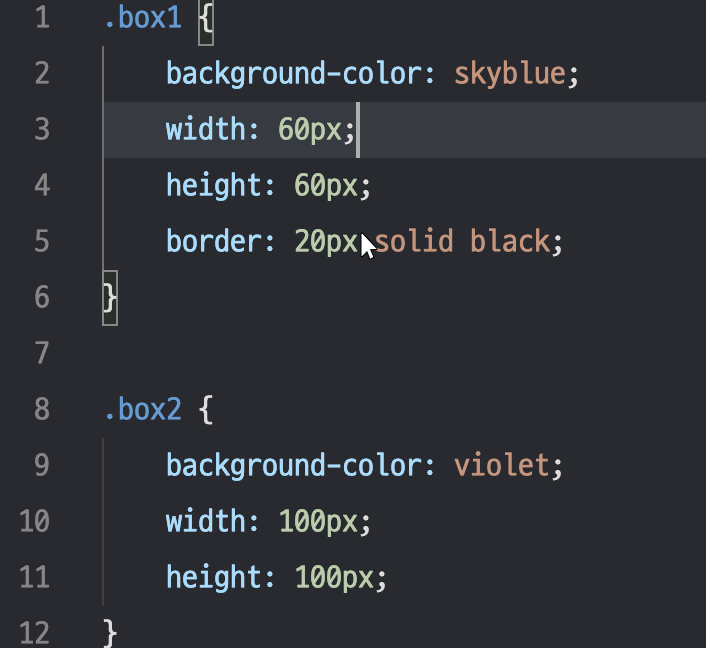
- 위와 같이 width와 height pixel값을 조절해서 맞추면 된다.
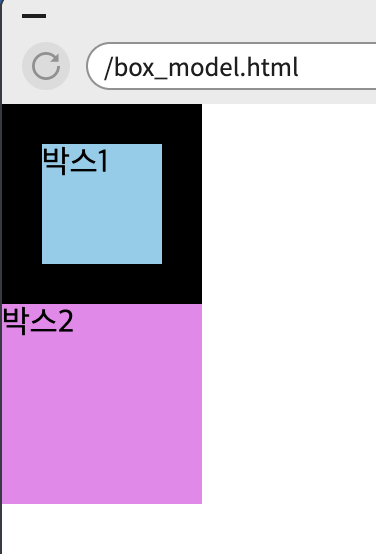
- 위 결과를 보면 박스 전체사이즈는 아래와 같은걸 알 수 있다.
가로 = width + 2*border-width
세로 = height + 2*border-width
padding
- text-align : right를 통해 위와 같이 오른쪽 정렬을 하면 글씨가 너무 오른쪽에 붙게된다.
- 해결법: padding을 넣어주면 띄울 수 있다!
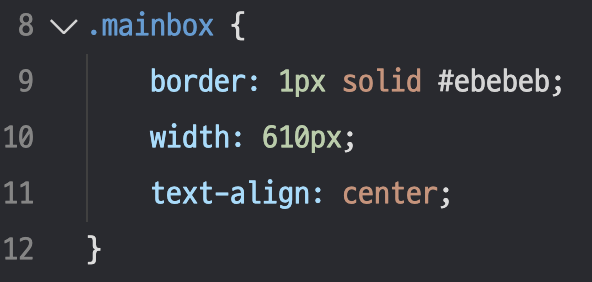
.mainbox{
      width:610px;
      margin-right: auto;
      margin-left: auto;
      border: 1px solid #ebebeb;
      text-align: right;
      padding: 20px;
}
결과
그림자 표현하기
.name-text {
    font-size: 17px;
    color: #7c7c7c;
    font-weight: bold;
}- font-weight의 종류
- bold: 두껍게
- ligher: 얇게
- normal: 기본
그림자 생성 css 코드
.mainbox {
    width: 610px;
    padding: 30px;
    margin: 30px;
    margin-right: auto;
    margin-left: auto;
    border: 1px solid #ebebeb;
    box-shadow: 0 1px 20px 0 rgba(0,0,0,0.1);
}- 0: x축으로 그림자가 얼마나 뻗어가는지
- 음수면 왼쪽으로 뻗어나간다.- 양수면 오른쪽으로 뻗어나간다.
- 0은 나오지 않는다.
- 1px: y축 그림자가 얼마나 뻗어가는지
- 20px: 그림자의 흐림정도
- 0: 그림자의 퍼짐정도
- rgba(0,0,0,0.1): 그림자의 색을 나타낸다.
- 마지막 0.1자리는 투명도를 나타내는 숫자다.- 0이 가장 투명한 색이다.
구글 웹 폰트 사용하기
@import url('https://fonts.googleapis.com/css?family=Montserrat:100,200,300,400,500,600,700,800&display=swap');- 구글에 검색하면 나오는 코드로 외울필요 없다.
- 위 폰트는 Montserrat라는 폰트이다.
- @import url() 이 괄호 안에 검색한 것을 넣으면 된다.
* {
    font-family: 'Montserrat';
}- 몬세라트 폰트를 사용한다는 뜻이다.
- 앞에 별이 의미하는 것은 모든 문서에 적용된다는 뜻이다.
브라우저별로 margin과 padding의 기본값이 다를 수 있다.
-> 그러면 같은 태그라도 서로 다르게 보여지는 상황이 발생한다.
- 그래서 다음과 같이 0px로 전부 초기화시켜준다.
body,h1,h2 {
    margin: 0px;
    padding: 0px;
}
section 태그
-
section태그는 사실 div 태그와 똑같은 태그이다.
-
단지, 약간의 의미를 부여하기 위해 section이라는 다른이름을 쓸 뿐 html요소들을 꾸미기 위해서 묶는 태그이다.
-
div태그와 section태그 같은 것들이 가장 많이 쓰이는 태그일지 모른다.
-
우리는 같은 정보라도 보이는 형태에 따라서 컨텐츠의 무게가 달라지는 세상에 살고 있다. 따라서 이렇게 html을 꾸미는 div는 날이 갈수록 그 역할이 커지고 있다.
-
html문서가 조금만 복잡해져도 div안에 또 div가 있고 또...있고..굉장한 div 파티 문서가 생긴다.
-> div만으로 구성을 하면 너무 난잡해져서 section과 div를 적당히 섞어 사용하는 것이 좋다.
article 태그
- div태그와 동일하지만 겉모습만 다른것이다.
예시 - div, section, article을 적절히 섞어쓴 경우
   <section>
            <div>
                <div>
                    <article>
                        content1
                    </article>
                    <article>
                        content2
                    </article>
                </div>
                <article>
                    content3
                </article>
            </div>
            <article>
                content4
            </article>
        </div>
</section>- content를 직접 감싸고 있는 부분은 article 태그를 사용하고, 전체는 section 태그로 감싸고 나머지는 div 태그를 사용했다.
- 각각의 의미로 조금은 나누어져 있어 보기 편하다.
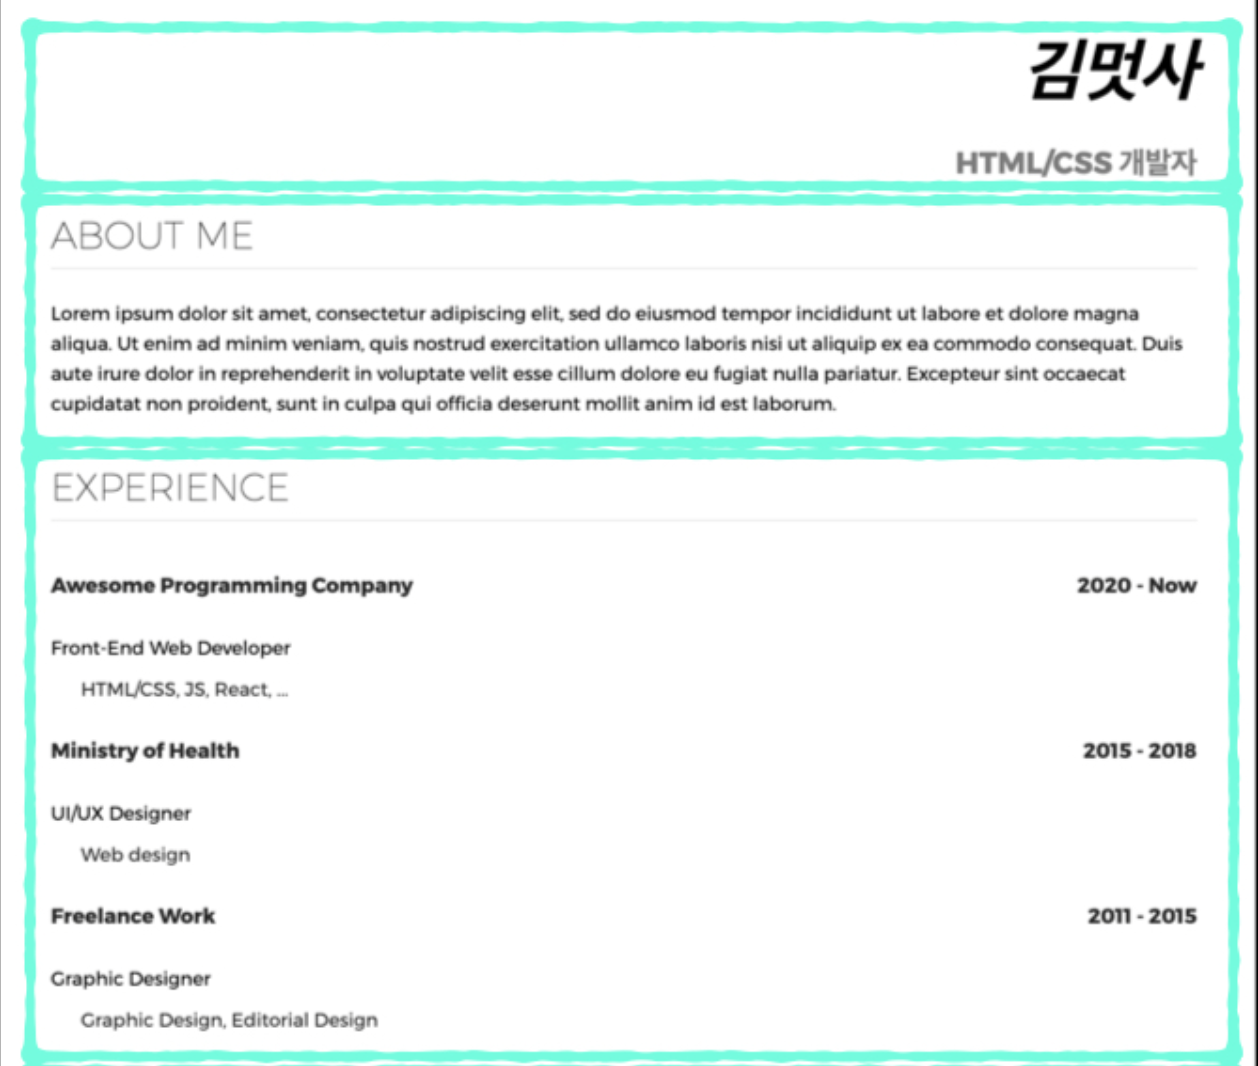
About Me 제작하기
lorem ipsum
lorem ipsum이란?
: 그래픽 요소나 시각적 연출을 보여줄 때 사용하는 표준 채우기 텍스트로, 최종 결과물에 들어가는 실제적인 문장 내용이 채워지기 전에 시각 디자인 프로젝트 모형의 채움 글로도 이용된다.
ex) Lorem Ipsum is simply dummy text of the printing and typesetting industry. Lorem Ipsum has been the industry's standard dummy text ever since the 1500s, when an unknown printer took a galley of type and scrambled it to make a type specimen book. It has survived not only five centuries, but also the leap into electronic typesetting, remaining essentially unchanged. It was popularised in the 1960s with the release of Letraset sheets containing Lorem Ipsum passages, and more recently with desktop publishing software like Aldus PageMaker including versions of Lorem Ipsum.html파일
<section>
      <h2>ABOUT ME</h2>
      <p class="about-me-text">
      Lorem ipsum dolor sit amet, consectetur adipiscing elit, sed do eiusmod tempor incididunt ut labore et dolore magna aliqua. Ut enim ad minim veniam, quis nostrud exercitation ullamco laboris nisi ut aliquip ex ea commodo consequat. Duis aute irure dolor in reprehenderit in voluptate velit esse cillum dolore eu fugiat nulla pariatur. Excepteur sint occaecat cupidatat non proident, sunt in culpa qui officia deserunt mollit anim id est laborum.
      </p>
</section>
css파일
.about-me-text {
    font-size: 10px;
    line-height: 16px;
}- line-height는 줄간 간격을 나타낸다.
결과

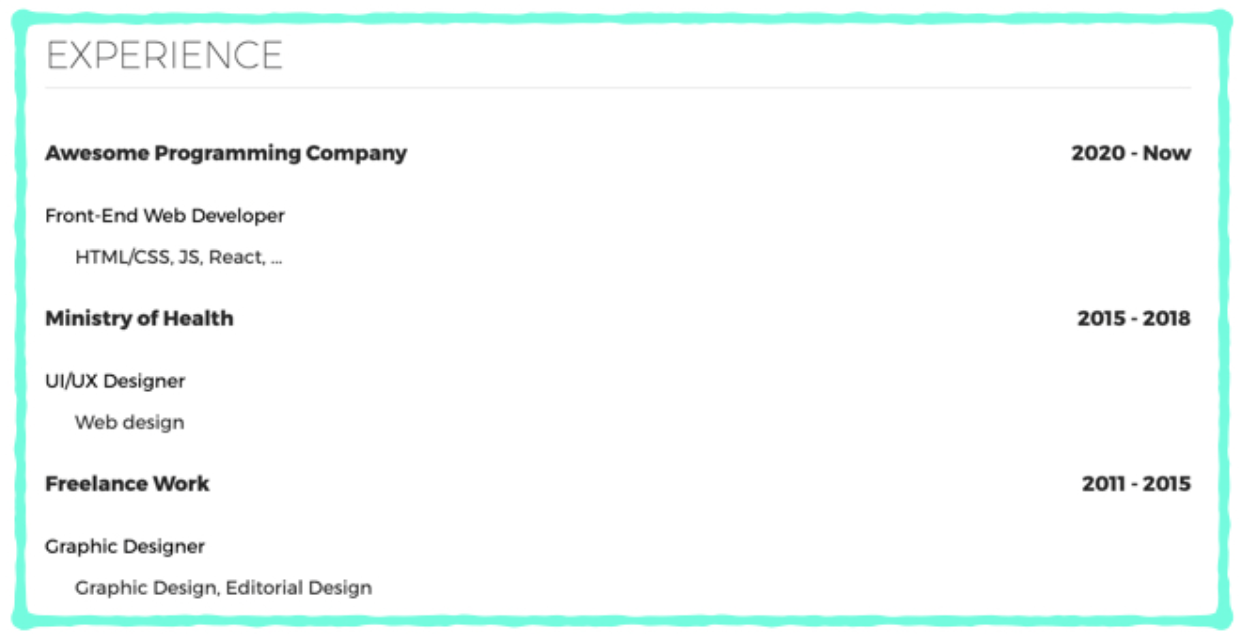
Experience 제작하기
.title-text {
    font-size: 11px;
    font-weight: bold;
    color: #282828;
    text-align: left;
}

.year-text {
    font-size: 11px;
    font-weight: bold;
    color: #282828;
    text-align: right;
}- 이렇게 하면 다음과 같이 결과가 조금 이상하게 나온다.
결과

- 왼쪽 정렬, 오른쪽 정렬은 올바르게 되었지만 같은 줄에 있지 않다.
따라서, 아래와 같이 수정을 해보자.
.title-text {
    font-size: 11px;
    font-weight: bold;
    color: #282828;
    float: left;
}

.year-text {
    font-size: 11px;
    font-weight: bold;
    color: #282828;
    float: right;
}- float이란?
: 여기서 float는 '둥둥 떠다니다'라는 뜻을 가지고 있다. - 따라서 folat: left는 '왼쪽으로 붙어서 둥둥떠다녀라'라는 뜻이고, float: right는 '오른쪽으로 붙어서 둥둥떠다녀라'라는 뜻이다.
결과

이어서 p태그를 사용해 글씨를 추가하게 되면 아래와 같은 결과가 나온다.

- 글씨가 겹쳐나온다!
- 그 이유는 float 때문이다. 둥둥 떠다니기 때문에 다른 요소들(글이나 그림)과 겹칠 수 있다.
그래서 겹치지 않게 가두리를 만들어 줘야 한다.(div사용)
html파일
      <div class="float-wrap">
        <p class="title-text">Awesome Programming Company</p>
        <p class="year-text">2020 - Now</p>
      </div>
css파일
.float-wrap {
    overflow: hidden;
}- overflow: hidden는 float로 띄워져 있는 요소들을 다 묶어주고 다음에 오는 html요소들이 float의 영향을 받지 않도록 해준다.
- 왜 float를 묶어주는 이름이 overflow: hidden인지는 정말 추론하기 어렵다.
- css의 이런 성질들 때문에 배우기가 참 난해하다.
결과
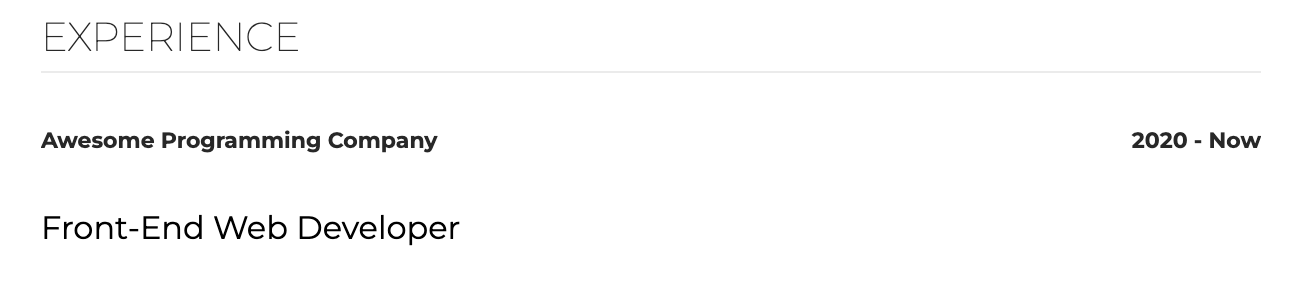
image 삽입하기
img 태그
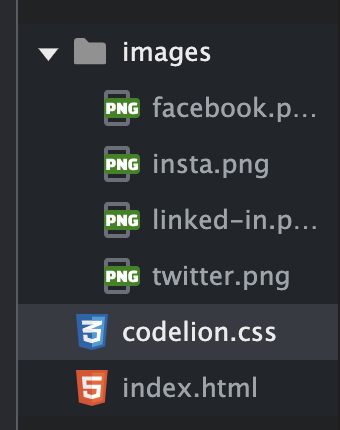
- 위와 같이 images폴더에 이미지를 4개 넣어 두었다.
<img class="sns-img" src="images/facebook.png">
<img class="sns-img" src="images/twitter.png">
<img class="sns-img" src="images/linked-in.png">
<img class="sns-img" src="images/insta.png">- 모두 동일한 클래스로 지정해서 동일한 설정을 주자.
.sns-img {
    width: 12px;
    height: 12px;
}
사이즈를 줄이고,
<div class="sns-wrap">
        <img class="sns-img" src="images/facebook.png">
        <img class="sns-img" src="images/twitter.png">
        <img class="sns-img" src="images/linked-in.png">
        <img class="sns-img" src="images/insta.png">
</div>
하나의 division으로 묶어서
.sns-wrap {
    text-align: right;
}
우측 정렬을 한다.
결과

이제 사진에 링크를 걸어보자.
a태그를 사용하면 된다.
<a href="http://facebook.com"><img class="sns-img" src="images/facebook.png"></a>- 이렇게 지정을 하면 이제 사진에 어느 부분을 눌러도 링크로 가게 된다.
최종문서
HTML문서
<!DOCTYPE html>
<html>
<head>
  <meta charset="UTF-8">
  <title>김멋사의 이력서</title>
  <link rel="stylesheet" href="codelion.css">
</head>
<body>
  <div class="mainbox">
    <div class="title-box">
      <h1>김멋사</h1>
      <p class="name-text">HTML/CSS 개발자</p>
    </div>
    <section>
      <h2>ABOUT ME</h2>
      <p class="about-me-text">
      Lorem ipsum dolor sit amet, consectetur adipiscing elit, sed do eiusmod tempor incididunt ut labore et dolore magna aliqua. Ut enim ad minim veniam, quis nostrud exercitation ullamco laboris nisi ut aliquip ex ea commodo consequat. Duis aute irure dolor in reprehenderit in voluptate velit esse cillum dolore eu fugiat nulla pariatur. Excepteur sint occaecat cupidatat non proident, sunt in culpa qui officia deserunt mollit anim id est laborum.
      </p>
    </section>
    <section>
        <h2>EXPERIENCE</h2>
        <div class="float-wrap">
          <p class="title-text">Awesome Programming Company</p>
          <p class="year-text">2020 - Now</p>
        </div>
        <p class="desc-text">Front-End Web Developer</p>
        <p class="desc-subtext">HTML/CSS, JS, React, ...</p>
        <div class="float-wrap">
          <p class="title-text">Ministry of Health</p>
          <p class="year-text">2015 - 2018</p>
        </div>
        <p class="desc-text">UI/UX Designer</p>
        <p class="desc-subtext">Web design</p>
        <div class="float-wrap">
            <p class="title-text">Freelance Work</p>
            <p class="year-text">2011 - 2015</p>
        </div>
        <p class="desc-text">Graphic Designer</p>
        <p class="desc-subtext">Graphic Design, Editorial Design</p>
      </section>

      <section>
        <h2>ACTIVITIES</h2>
        <div class="float-wrap">
          <p class="title-text">Front-End Web Developer Forum Volunteer</p>
          <p class="year-text">2019 - 2020</p>
        </div>
        <p class="desc-text">Application Page Development</p>
        <p class="desc-subtext">Lorem ipsum dolor sit amet.</p>
        <div class="float-wrap">
          <p class="title-text">LIKELION SEOUL</p>
          <p class="year-text">2017 - 2018</p>
        </div>
        <p class="desc-text">Teacher in Mutsa University</p>
        <p class="desc-subtext">Lorem ipsum dolor sit amet.</p>
        <div class="float-wrap">
          <p class="title-text">Open Source Committer</p>
          <p class="year-text">2011 - 2013</p>
        </div>
        <p class="desc-text">Angular JS</p>
        <p class="desc-subtext">Lorem ipsum dolor sit amet.</p>
    </section>

    <section>
        <h2>EDUCATION</h2>
        <div class="float-wrap">
            <p class="title-text">Mutsa University</p>
            <p class="year-text">2008 - 2012</p>
        </div>
        <p class="desc-text">Computer Science and Engineering</p>
        <div class="float-wrap">
            <p class="title-text">Mutsa High school</p>
            <p class="year-text">2006 - 2008</p>
        </div>
        <p class="desc-text">Visual Communication Design</p>
        <div class="float-wrap">
            <p class="title-text">Online Programming Academy</p>
            <p class="year-text">2006 - 2007</p>
        </div>
        <p class="desc-text">Python Course</p>
    </section>

    <section>
      <h2>AWARDS</h2>
      <div class="float-wrap">
        <p class="title-text">LIKELION SEOUL</p>
        <p class="year-text">2018</p>
      </div>
      <p class="desc-text">Best Developer Award</p>
    </section>

    <div class="sns-wrap">
      <a href="http://facebook.com"><img class="sns-img" src="images/facebook.png"></a>
      <img class="sns-img" src="images/twitter.png">
      <img class="sns-img" src="images/linked-in.png">
      <img class="sns-img" src="images/insta.png">
    </div>
  </div>
  <footer>
      <p>Copyright CODE LION All rights reserved. </p>
  </footer>
</body>
</html>
CSS 문서
@import url('https://fonts.googleapis.com/css?family=Montserrat:100,200,300,400,500,600,700,800&display=swap');

* {
    font-family: 'Montserrat';
}

body,h1,h2 {
    margin:0px;
    padding:0px;
}


body {
    min-width: fit-content;
}

h1 {
    font-size:36px;
    font-weight: bold;
    font-style: italic;
}


h2 {
    font-size:20px;
    color:#282828;
    font-weight: lighter;
    margin-bottom: 16px;
    border-bottom: 1px solid #ebebeb;
    padding-bottom: 5px;
}

.name-text {
    font-size:16px;
    color:#7c7c7c;
    font-weight: bold;
}

.about-me-text {
    font-size:10px;
    line-height: 16px;
}

.mainbox {
    width: 610px;
    padding: 30px;
    margin: 30px;
    margin-right: auto;
    margin-left: auto;
    border: 1px solid #ebebeb;
    box-shadow: 0 1px 20px 0 rgba(0, 0, 0, 0.1);
}

.title-box {
    text-align: right;
}

section {
    margin-bottom:24px;
}

.float-wrap {
    overflow: hidden;
}

.title-text {
    font-size:11px;
    font-weight: bold;
    color: #282828;
    float: left;
}

.year-text{
    font-size:11px;
    font-weight: bold;
    color: #282828;
    float: right;
}

.desc-text {
    font-size: 9px;
}

.desc-subtext {
    font-size: 9px;
    color:#282828;
    padding-left:16px;
}

.sns-img {
    width:12px;
    height:12px;
}

.sns-wrap {
    text-align:right;
}

footer {
    text-align: center;
    background-color: #1e1e1e;
    padding: 20px;
    font-size: 12px;
    color: #919191;
}
