
본 내용은 내일배움캠프에서 활동한 내용을 기록한 글입니다.
💻 TIL(Today I Learned)
📌 Today I Done
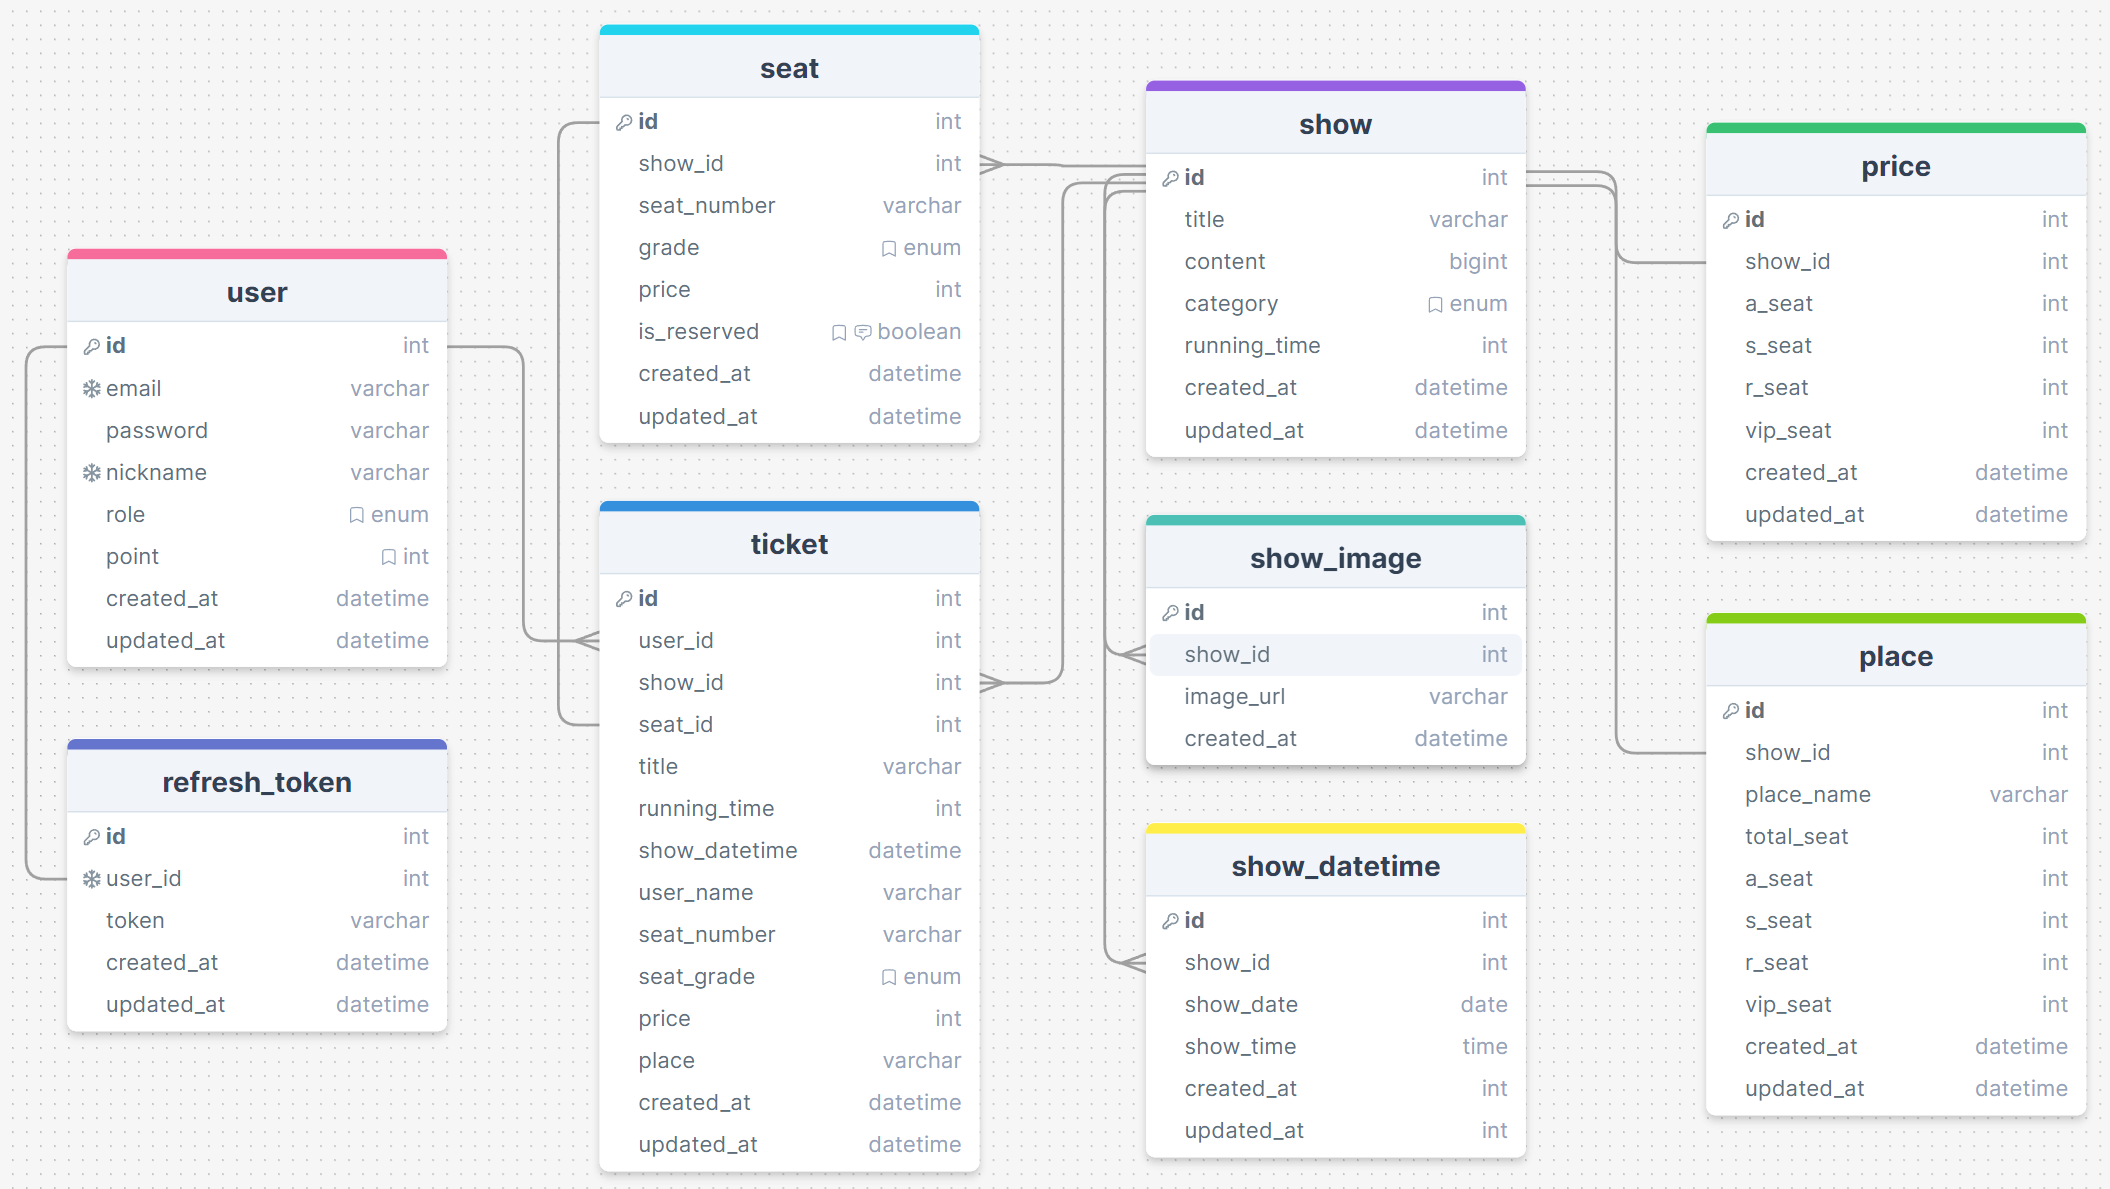
✏️ ERD 설계
-
이번 개인 과제의 주제는 공연 예매 서비스임
-
그래서 크게는 사용자, 티켓(예매), 공연으로 나눠져 있음
-
하지만 나는 보너스 과제를 생각해서 ERD 설계에 조금 더 시간을 사용함
-
다른 테이블은 괜찮지만 좌석(seat) 관련 테이블이 생각해야 할 게 많았음
✏️ API 명세서 설계
-
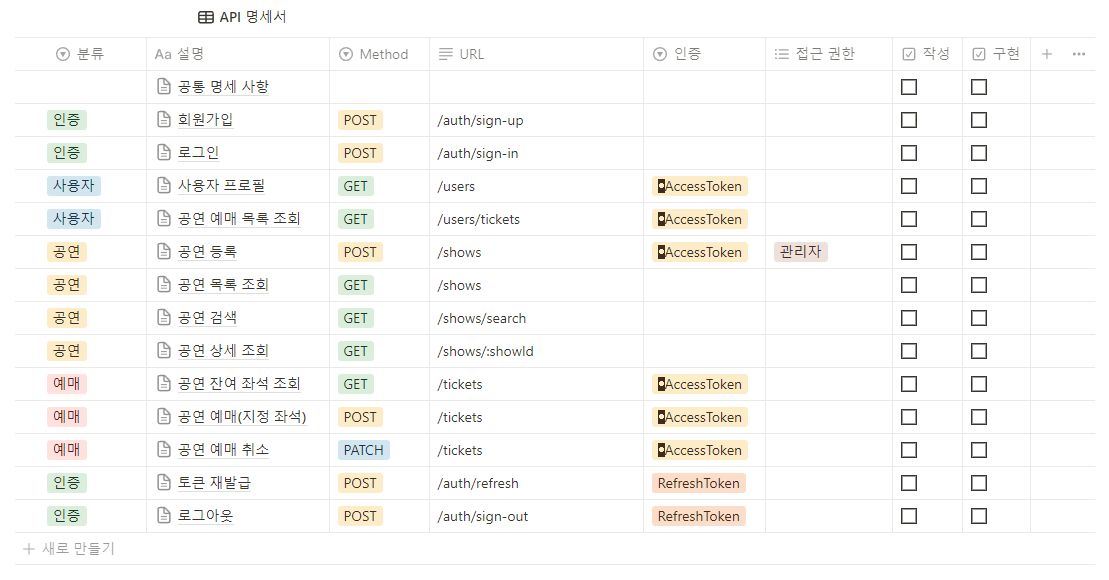
API 명세서의 세부 내용보다는 API의 종류와 URL 주소를 생각해서 설계함
-
아직까지는 API의 수가 많지는 않지만 아마 지정 좌석 예매하는 API에서 시간이 오래 걸릴 것으로 예상
-
API 명세서의 세부 내용은 코드를 구현하면서 수정 작업을 진행할 예정
✏️ App 모듈에서 사용할 모듈 설정
-
원래는 기본적인 세팅까지가 1일차 과제 내용이지만 생각보다 빨리 끝났기 때문에 이어서 API 구현에 들어감
-
우선 기초가 되는 app.module.ts 코드를 작성함
const typeOrmModuleOptions = {
  // useFactory는 동적 모듈의 속성을 설정하기 위해 사용
  // useFactory에서 ConfigService를 주입받아 환경변수(.env)로부터
  // 데이터베이스 설정값을 가져와서 TypeOrmModuleOptions 객체를 반환함
  // eslint-disable-next-line prettier/prettier
  useFactory: async (configService: ConfigService): Promise<TypeOrmModuleOptions> => ({
    namingStrategy: new SnakeNamingStrategy(),
    type: 'mysql',
    username: configService.get('DB_USERNAME'),
    password: configService.get('DB_PASSWORD'),
    host: configService.get('DB_HOST'),
    port: configService.get('DB_PORT'),
    database: configService.get('DB_NAME'),
    entities: [User, RefreshToken],
    synchronize: configService.get('DB_SYNC'),
    logging: true,
  }),
  inject: [ConfigService],
};

@Module({
  imports: [
    // forRoot는 ConfigModule의 정적인(하드코딩된) 기초 설정을 위해 사용
    // 여기서는 Joi를 통한 유효성 검사 설정
    ConfigModule.forRoot({
      isGlobal: true,
      validationSchema: Joi.object({
        DB_USERNAME: Joi.string().required(),
        DB_PASSWORD: Joi.string().required(),
        DB_HOST: Joi.string().required(),
        DB_PORT: Joi.number().required(),
        DB_NAME: Joi.string().required(),
        DB_SYNC: Joi.boolean().required(),
        JWT_SECRET_KEY: Joi.string().required(),
      }),
    }),
    // forRootAsync는 TypeOrmModule의 동적인 기초 설정을 위해 사용 (환경변수나 데이터베이스)
    TypeOrmModule.forRootAsync(typeOrmModuleOptions),
    AuthModule,
    UserModule,
  ],
  controllers: [AppController],
  providers: [AppService],
})
export class AppModule {}
✏️ 회원가입 API 구현
-
먼저 회원가입 API를 구현함
-
아직 Nest.js의 구조가 많이 헷갈려서 강의 예제를 보고 기능들을 구현함
-
강의 예제와 다른 점은 강의에서는 user 폴더에 로그인, 회원가입 기능들을 넣었지만, 나는 지금까지의 과제에서 로그인과 회원가입을 Auth 폴더에서 작업했기에 강의 예제를 약간 변형해서 구현함
-
auth.module.ts (auth 모듈에서 필요한 모듈 설정)
@Module({
  imports: [
    // Passport 모듈을 다른 auth 모듈에서 사용하기 위한 코드
    PassportModule.register({ defaultStrategy: 'jwt', session: false }),
    // JwtModule이라는 동적 모듈을 설정하고 다른 auth 모듈에서 사용하기 위한 코드
    JwtModule.registerAsync({
      useFactory: (config: ConfigService) => ({
        secret: config.get<string>('JWT_SECRET_KEY'),
      }),
      inject: [ConfigService],
    }),
    TypeOrmModule.forFeature([User, RefreshToken]),
    UserModule,
  ],
  providers: [JwtStrategy, AuthService, UserService],
  controllers: [AuthController],
})
export class AuthModule {}- auth.controller.ts (DTO를 통해 사용의 입력을 받음)
@Controller('auth')
export class AuthController {
  // eslint-disable-next-line prettier/prettier
  constructor(private readonly authService: AuthService) {}

  // 회원가입
  @Post('sign-up')
  async register(@Body() signUpDto: SignUpDto) {
    return await this.authService.signUp(
      signUpDto.email,
      signUpDto.password,
      signUpDto.passwordCheck,
      signUpDto.nickname,
    );
  }
}- auth.service.ts (실제 비즈니스 로직 구현과 Repository 연결)
@Injectable()
export class AuthService {
  constructor(
    // eslint-disable-next-line prettier/prettier
    @InjectRepository(User)
    private userRepository: Repository<User>,
    private userService: UserService,

    @InjectRepository(RefreshToken)
    private refreshTokenRepository: Repository<RefreshToken>,
    private jwtService: JwtService,
  ) {}

  // 회원가입
  async signUp(email: string, password: string, passwordCheck: string, nickname: string) {
    if (password !== passwordCheck) {
      throw new BadRequestException('비밀번호 확인과 일치하지 않습니다.');
    }

    // 이메일 중복 체크
    let existedUser = await this.userService.findByEmail(email);
    if (existedUser) {
      throw new ConflictException('이미 해당 이메일로 가입된 사용자가 있습니다.');
    }

    // 닉네임 중복 체크
    existedUser = await this.userService.findByNickname(nickname);
    if (existedUser) {
      throw new ConflictException('이미 해당 닉네임으로 가입된 사용자가 있습니다.');
    }

    // 비밀번호 암호화
    const hashedPassword = await hash(password, 10);

    // 사용자 데이터베이스에 저장
    const user = await this.userRepository.save({
      email,
      password: hashedPassword,
      nickname,
    });

    // 비밀번호 제외하고 반환
    user.password = undefined;
    return user;
  }
}
✏️ 로그인 API 구현
-
로그인 API는 사용자에게 이메일과 비밀번호를 받아서 데이터베이스의 데이터와 조회 후 Access Token과 Refresh Token를 발급함
-
JWT의 Payload에는 사용자의 ID가 들어감
-
회원가입과 똑같이 Auth에서 구현하기 때문에 Auth 모듈의 내용은 동일함
-
auth.controller.ts (DTO를 통해 사용의 입력을 받음)
@Controller('auth')
export class AuthController {
  // eslint-disable-next-line prettier/prettier
  constructor(private readonly authService: AuthService) {}

  ...

  // 로그인
  @Post('sign-in')
  async login(@Body() signInDto: SignInDto) {
    return await this.authService.signIn(signInDto.email, signInDto.password);
  }
}- auth.service.ts (실제 비즈니스 로직 구현과 Repository 연결)
@Injectable()
export class AuthService {
  constructor(
    // eslint-disable-next-line prettier/prettier
    @InjectRepository(User)
    private userRepository: Repository<User>,
    private userService: UserService,

    @InjectRepository(RefreshToken)
    private refreshTokenRepository: Repository<RefreshToken>,
    private jwtService: JwtService,
  ) {}

  ...

  // 로그인
  async signIn(email: string, password: string) {
    // 이메일로 사용자 조회 (비밀번호 있는 데이터 가져오기)
    const user = await this.userService.findByEmail(email, true);
    if (_.isNil(user)) {
      throw new UnauthorizedException('일치하는 사용자가 없습니다.');
    }

    // 암호화된 비밀번호 일치 검사
    const isComparePassword = await compare(password, user.password);
    if (!isComparePassword) {
      throw new UnauthorizedException('비밀번호가 틀렸습니다.');
    }

    // 토큰 발급
    const accessToken = this.jwtService.sign({ id: user.id });
    const refreshToken = this.jwtService.sign({ id: user.id });

    // Refresh Token 저장
    await this.refreshTokenRepository.upsert(
      {
        userId: user.id,
        token: refreshToken,
      },
      ['token'],
    );

    return { accessToken, refreshToken };
  }
}
✏️ 사용자 프로필 API 구현
-
사용자 프로필 API는 로그인한 사용자의 정보를 조회하는 API
-
위 기능은 User 폴더에서 구현함
-
로그인/회원가입 API와는 다르게 로그인 후 발급되는 Access Token이 헤더를 통해서 전달되어 인가 과정을 거침
-
Express에서는 간단하게 Access Token 인증 미들웨어를 통해서 req.user에 사용자의 정보를 넣어서 사용했는데
-
Nest.js에서는 조금 다르게 req.user에 사용자 정보를 넣음
-
우선 user.module.ts 코드에서 JWT 모듈에 대한 설정을 진행함
@Module({
  imports: [
    // JwtModule이라는 동적 모듈을 설정하고 다른 auth 모듈에서 사용하기 위한 코드
    JwtModule.registerAsync({
      useFactory: (config: ConfigService) => ({
        secret: config.get<string>('JWT_SECRET_KEY'),
      }),
      inject: [ConfigService],
    }),
    TypeOrmModule.forFeature([User]),
  ],
  providers: [UserService],
  controllers: [UserController],
  exports: [UserService],
})
export class UserModule {}- 그 다음 사용자가 사용자 프로필 API의 주소에 접속하면 user.controller.ts 코드가 동작함
// 여기서의 가드는 역할을 따지지 않고 로그인했는지만 확인함
@UseGuards(AuthGuard('jwt'))
@Controller('users')
export class UserController {
  // eslint-disable-next-line prettier/prettier
  constructor(private readonly userService: UserService) {}

  // 사용자 프로필 조회
  @Get()
  async getUserInfo(@UserInfo() user: User) {
    return await this.userService.findByUserId(user.id);
  }
}-
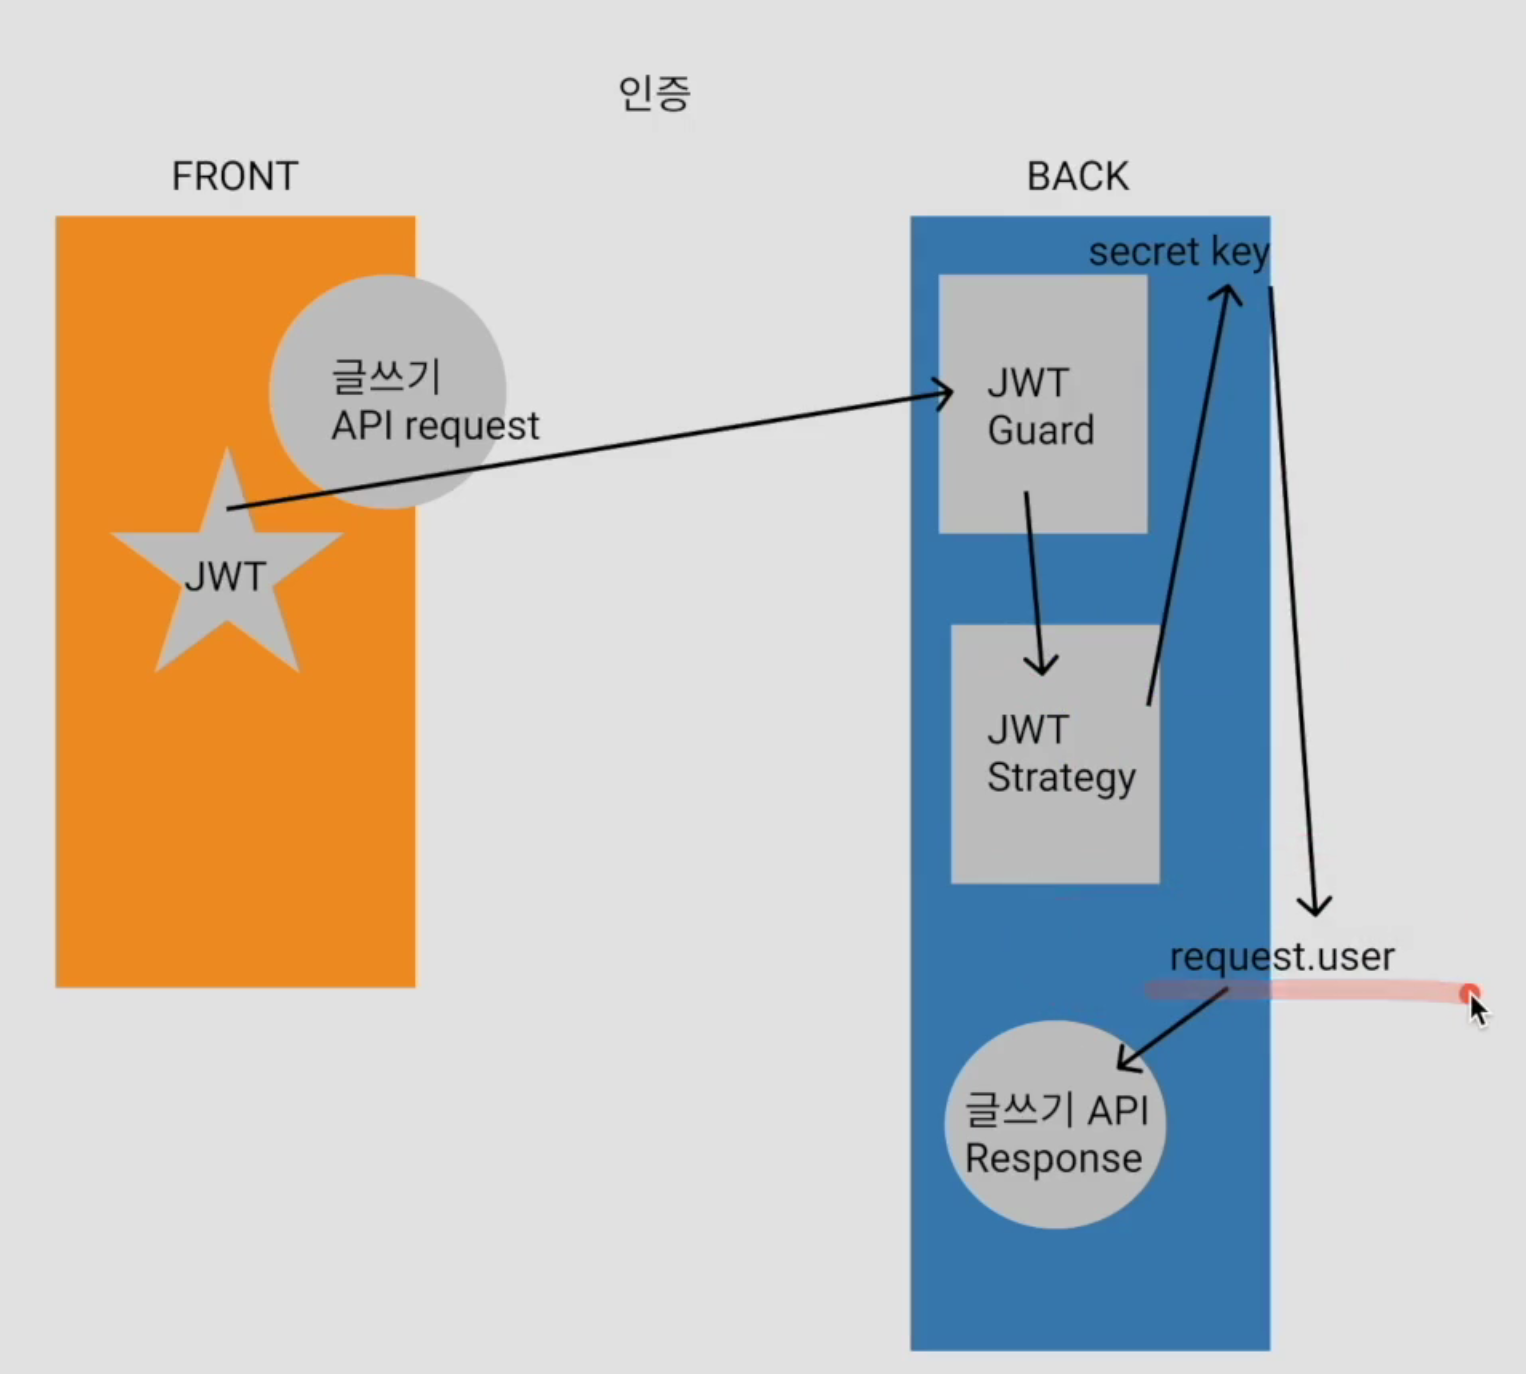
제일 먼저 AuthGuard('jwt') 가드를 통해서 jwt.strategy.ts 코드가 동작함
-
여기서 JWT 토큰의 Payload에 들어있는 사용자 ID로 사용자가 존재하는 지 검사함
@Injectable()
export class JwtStrategy extends PassportStrategy(Strategy) {
  // eslint-disable-next-line prettier/prettier
  constructor(
    // eslint-disable-next-line prettier/prettier
    private readonly configService: ConfigService,
    private readonly userService: UserService,
  ) {
    super({
      jwtFromRequest: ExtractJwt.fromAuthHeaderAsBearerToken(),
      ignoreExpiration: false,
      secretOrKey: configService.get('JWT_SECRET_KEY'),
    });
  }

  async validate(payload: any) {
    const user = await this.userService.findByUserId(payload.id);
    if (_.isNil(user) || user.id !== payload.id) {
      throw new NotFoundException('해당하는 사용자를 찾을 수 없습니다.');
    }

    return user;
  }
}-
User 모듈에 있는 @UserInfo 데코레이터가 동작해서 커스텀 데코레이터인 userInfo.decorator.ts 코드가 동작함
-
여기서 req.user 값을 설정함
import { createParamDecorator, ExecutionContext } from '@nestjs/common';

// eslint-disable-next-line prettier/prettier
export const UserInfo = createParamDecorator(
  (data: unknown, ctx: ExecutionContext) => {
    const request = ctx.switchToHttp().getRequest();
    return request.user ? request.user : null;
  },
);- JWT 인가 과정
📌 Tomorrow's Goal
✏️ 개인과제 공연 등록, 조회 관련 코드 구현
-
내일은 공연 등록, 조회와 관련된 API들을 구현할 예정
-
단순하게 공연 데이터에 대한 Create, Read만 구현되기 때문에 시간 소요는 많이 없을 것으로 예상
-
하지만 중간에 검색 기능에서 로직 때문에 어떻게 될지 잘 모르겠음
📌 Today's Goal I Done
✔️ 개인과제 기본 설계 및 코드 구현
-
오늘은 기본적인 ERD, API 명세서 설계부터 기본이 되는 인증과 인가에 대한 코드를 구현함
-
강의 예제와는 다르게 구현할려고 이것 저것 테스트하다 보니 생각보다 시간이 오래 걸림
-
무엇보다 아직까지도 Nest.js의 구조나 모듈, 메서드, 데코레이터 등 모르는 게 너무 많기 때문에 계속 구현하면서 친해질 수 있도록 해야 함
-
그렇기에 내일 구현할 내용도 예제를 따라 치는 것이 아닌 고민하면서 구현할 계획임
📌 ⚠️ 구현 시 발생한 문제
✔️ 컨트롤러에서의 화살표 함수 사용
-
지난주부터 계속 TypeScript와 Nest.js를 배우고 코드를 치면서 문득 이런 생각이 들었음
-
근데 왜 Nest.js에서는 화살표 함수를 거의 못 본거 같지? -
실제로 각 계층 클래스의 메서드는 화살표 함수가 아니라 일반 함수 형태의 메서드였음
-
그래서 테스트 해보니 Service 계층에서는 일반 함수 형태의 메서드나 화살표 함수 형태의 메서드나 똑같은 this값을 가지고 똑같은 결과를 나타냄
-
그렇다면 Controller 계층은?
import { Controller, Get } from '@nestjs/common';
import { AppService } from './app.service';

@Controller()
export class AppController {
  // eslint-disable-next-line prettier/prettier
  constructor(private readonly appService: AppService) {}

  // @Get()
  // getHello(): string {
  //   return this.appService.getHello();
  // }
  @Get()
  getHello = (): string => {
    return this.appService.getHello();
  }
}-
위 코드는 연결 테스트를 위한 app.controller.ts 코드임
-
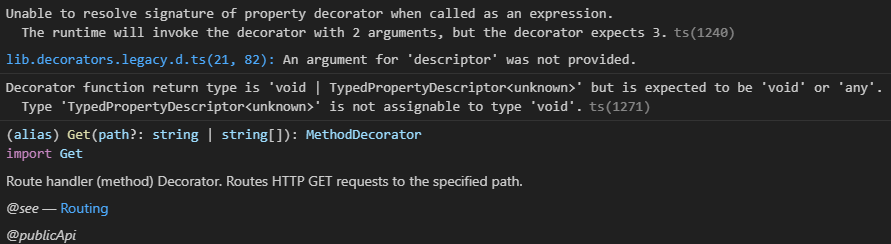
혹시나 해서 테스트 해보니 다음과 같은 에러가 발생함
-
이게 도대체 무슨 말인지 도저히 알 수가 없어서 결국 튜터님께 도움을 요청함
-
튜터님께서 처음보는 내용이었지만 끝내 관련 내용을 찾아주셨음
-
결과적으로 말하면, TypeScript의 형태에 맞지 않아서 그렇다고 함
-
https://stackoverflow.com/questions/32605074/typescript-decorators-and-arrow-function
-
튜터님께서 주신 자료인데 여기서는 데코레이터의 실행 인자로 데코레이터의 다음에 있는 데이터를 사용한다고 함
-
이 때, 화살표 함수 형태는 메서드가 아닌 일종의 변수나 다른 형태의 값으로 인식한다는 것임
-
사실 완벽히 이해한 것은 아니지만 Controller에서 사용하는 데코레이터 다음에는 함수 형태의 메서드를 사용해야 데코레이터가 그 메서드를 인자로서 사용한다는 사실을 기억하면 될것 같음
