Static (정적)
- 이미 작성이 완료돼 변하지 않는 파일들
(ex) html, css, js ,image
Dynamic (동적)
- webpage : 서버에서 html 문서의 내용을 데이터에 따라 다르게 작성해 제공되는 이미지
- 다양하게 변형되어 나타내는 웹 페이지
JSP, Thymeleaf
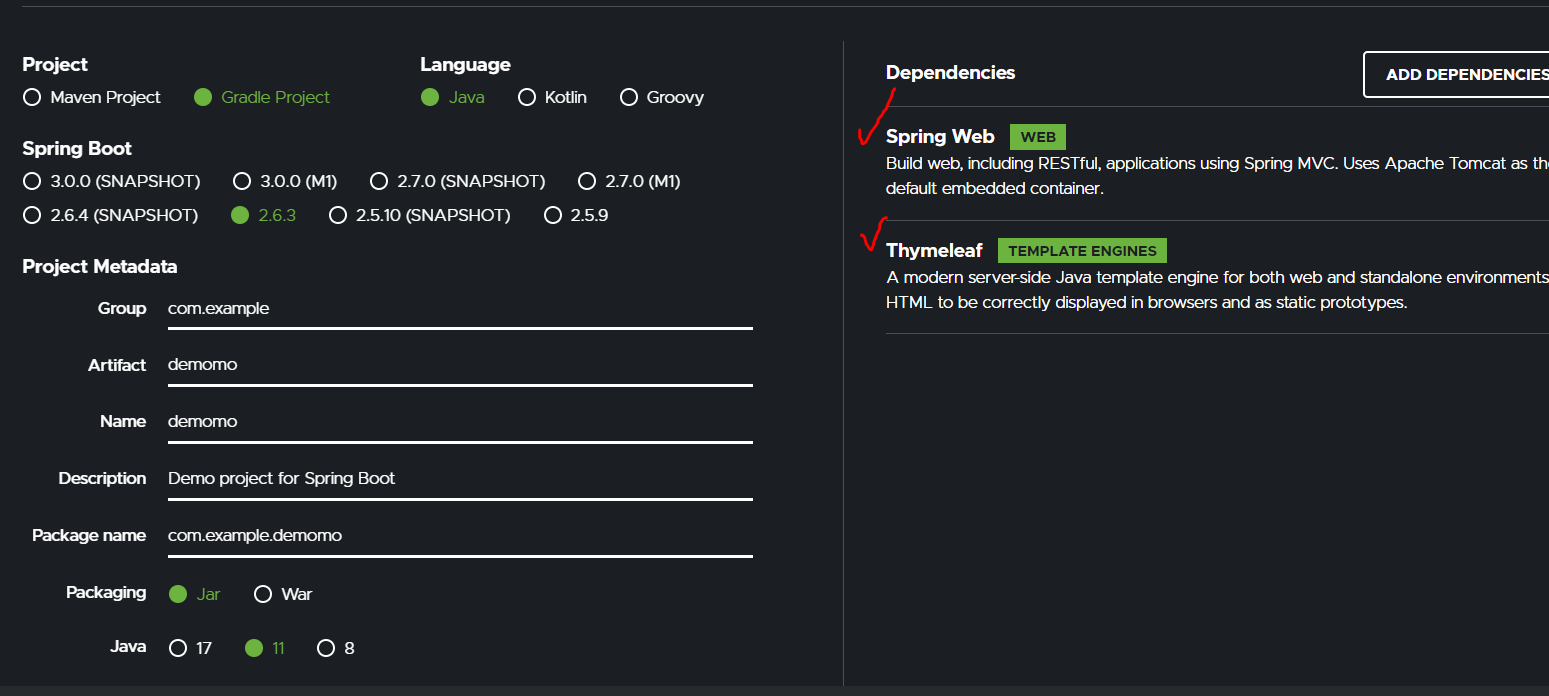
1) built.gradle Spring boot에서 JSP 사용하기 위해..
- jsp 사용 설명 참고 블로그
- https://mvnrepository.com/artifact/org.springframework.boot/spring-boot-starter-thymeleaf/2.5.8
dependencies {
	implementation 'org.springframework.boot:spring-boot-starter-web'
	implementation 'org.springframework.boot:spring-boot-starter-thymeleaf'//추가
	//implementation 'org.apache.tomcat.embed:tomcat.embed:tomcat-embed-jasper'//추가
	implementation 'javax.servlet:jstl'//추가
	testImplementation 'org.springframework.boot:spring-boot-starter-test'
}
=>
dependencies {
	implementation 'org.springframework.boot:spring-boot-starter-web'
	implementation 'org.apache.tomcat.embed:tomcat-embed-jasper:9.0.58'
	implementation 'javax.servlet:jstl'
	testImplementation 'org.springframework.boot:spring-boot-starter-test'
}- implementation 'org.springframework.boot:spring-boot-starter-thymeleaf'
- implementation 'org.apache.tomcat.embed:tomcat.embed:tomcat-embed-jasper'
=> 위에 두개 중 하나만 사용한다
	implementation 'org.apache.tomcat.embed:tomcat.embed:tomcat-embed-jasper' //JASPER
implementation 'javax.servlet:jstl' // JSTL- 일케 두개는 jsp 사용을 위해 추가하는 것
디펜던시 추가한 이유?
설명 출처 블로그
1. 스프링 부트에서는 기본적으로 JSP를 지원하지 않음
2. 스프링 부트에 내장된 tomcat에는 컴파일하는 jsp 관련 엔진이 포함되지 않음
- dependencies 부분에 JSP 사용 시 필요한 jstl 추가
- JSP 엔진 역할을 하는 tomcat-embed-jasper library 추가 (보통 thymeleaf나 jasper 중에 하나만 쓴다, 둘다는 안씀)
2) main에 webapp 이라는 directory 추가
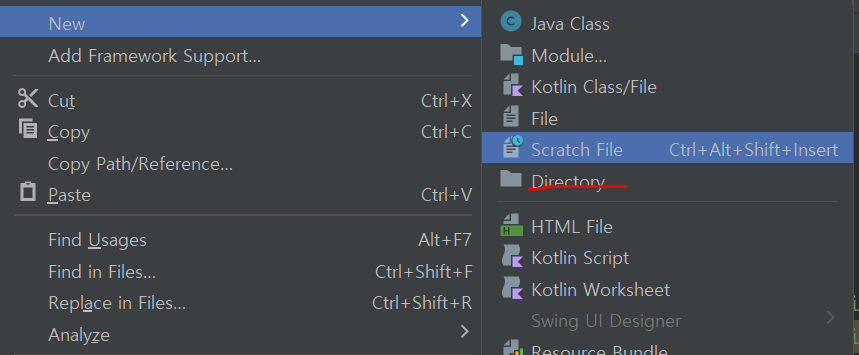
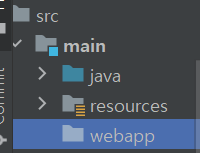
3) 그 안에 jsp 라는 디렉토리 추가
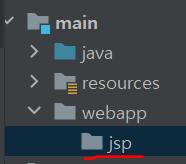
4) vscode - view-jsp.jsp 파일 생성
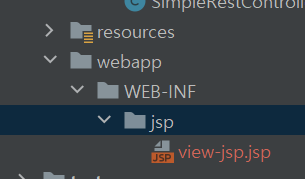
<%@ page contentType="text/html;charset=UTF-8" language="java" %>
- 빨간 부분이 존재하긴 하는데, 저 부분은
지금 우리가 java로 여기 작성하고 있는데 나중에 html로 변환 부탁이라는 의미를 지닌다
<%@ page contentType="text/html;charset=UTF-8" language="java" %>
<%@ taglib prefix ="c" uri = "http://java.sun.com/jsp/jstl/core" %>
<html>
    <head>
    </head>
        <body>
            <table>
                <thead>
                    <tr>
                        <th>Name</th>
                        <th>Age</th>
                        <th>Occupation</th>
                    </tr>
                    <tbody>
                        <c:forEach items="${profiles}" var="profile">
                            <tr>
                                <td>${profile.name}</td>
                                <td>${profile.age}</td>
                                <td>${profile.occupation}</td>
                            </tr>
                        </c:forEach>
                    </tbody>
                </thead>
            </table>
        </body>
</html>
5) application properties
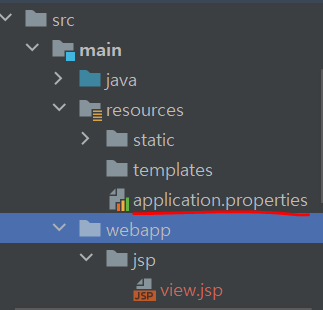
- 스프링에서 더이상 jsp 지원 안해줌, 따라서 지원해달라고 해야함
spring.mvc.view.prefix : /WEB-INF/jsp/
spring.mvc.view.suffix : .jsp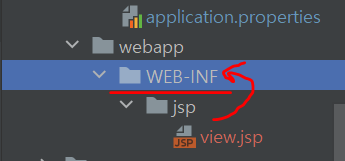
- WEB-INF라는 디렉토리 추가 생성 후 그 아래 webapp을 위치시키기
- prefix: 경로지정, suffix: 파일 확장자를 찾아줌
6) Controller 작성
package com.example.demo;

import org.slf4j.Logger;
import org.slf4j.LoggerFactory;
import org.springframework.stereotype.Controller;
import org.springframework.web.bind.annotation.*;

@Controller
@RequestMapping("view")
public class SimpleController {
    private static final Logger logger
            = LoggerFactory.getLogger(SimpleController.class);

    @GetMapping("/simple-jsp")
    public String simpleJsp(){
        logger.info("in simple jsp");
        return "view-jsp";
    }
}
- public String simpleJsp()
=> 이런 식의 String은 return 해줄 뷰를 찾는다
=> 만약 이 함수가 serving 해줄 뷰가 존재하지 않게 된다면 해당하는 return 값의 경로로 보내게 된다
=> 이때 우리가 application.properties에 jsp관련해서 정의해놓은게 있기 때문에 이를 토대로 찾아주세용~ 하는 것

=> run 해보니 잘 뜬다
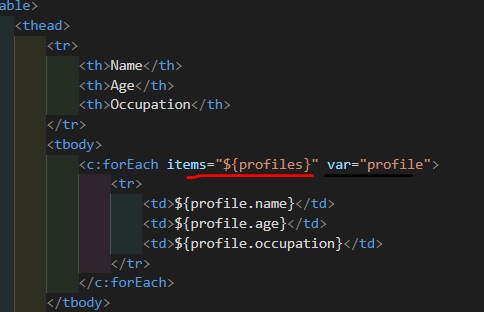
아이템 전달 - jsp
1) list import
import java.util.List;2)
    @GetMapping("/simple-jsp")
    public String simpleJsp(){
        logger.info("in simple jsp");
        List<SimplePayload> profile = new ArrayList<>();
        profile.add(new SimplePayload("custard", 23, "developer"));
        profile.add(new SimplePayload("happy", 22, "teacher"));
        profile.add(new SimplePayload("luckyHappyPretty", 20, "student"));
        return "view-jsp";
    }
List<SimplePayload> profile = new ArrayList<>();
3) Model model이라는 데이터 전달용 매개변수 추가
- model에다가 우리가 만든 profile 이라는 아이를 "profiles"라는 이름으로 전달할 것
model.addAttribute("profiles", profile);
    @GetMapping("/simple-jsp")
    public String simpleJsp(Model model){ //model이라는 데이터 추가
        logger.info("in simple jsp");
        //profile arraylist 에 요소들 추가
        List<SimplePayload> profile = new ArrayList<>();
        profile.add(new SimplePayload("custard", 23, "developer"));
        profile.add(new SimplePayload("happy", 22, "teacher"));
        profile.add(new SimplePayload("luckyHappyPretty", 20, "student"));

        model.addAttribute("profiles", profile); //전달 요소를 모델에 추가

        return "view-jsp";
    }
4) 결과
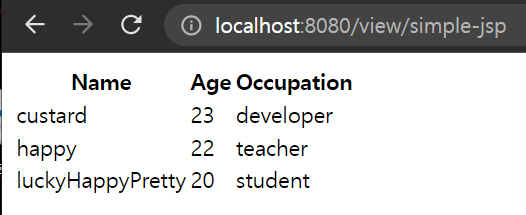
- 위 방법말고도 Model and View로도가능
아이템 전달 - thyme
1) dependency 수정
dependencies {
	implementation 'org.springframework.boot:spring-boot-starter-web'
	implementation 'org.springframework.boot:spring-boot-starter-thymeleaf'//추가
	//implementation 'org.apache.tomcat.embed:tomcat-embed-jasper:9.0.58'
	//implementation 'javax.servlet:jstl'
	testImplementation 'org.springframework.boot:spring-boot-starter-test'
}
2) Controller - ModelandView 방식으로
@GetMapping("/simple-thyme")
        public ModelAndView simpleThyme(){
            ModelAndView mandv = new ModelAndView();
            logger.info("in simple thyme");
            List<SimplePayload> profile = new ArrayList<>();
            profile.add(new SimplePayload("custard", 23, "developer"));
            profile.add(new SimplePayload("happy", 22, "teacher"));
            profile.add(new SimplePayload("luckyHappyPretty", 20, "student"));

            mandv.addObject("profiles",profile);
            mandv.setViewName("view-thyme");
            return mandv;
        }
}-
함수의 자료형을 ModelandView로 선언해서 return 값을 이 자료형으로 설정
-
ModelandView로 인스턴스를 만들고, 해당 인스턴스 안에 만들었던 데이터를 addObject로 담아주고, 돌려줄(보여줄) View이름을 setViewName으로 알려주면
=> 해당 뷰에 담은 object를 똑같이 돌려주는 것 -
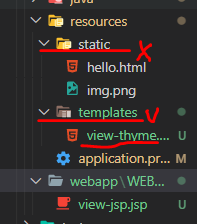
다만 thyme 방식으로 가게 되면 static이 아닌 templates 자리에 뷰 파일(html) 생성해주기
<!DOCTYPE html>
<html xmlns="http://www.w3.org/1999/xhtml" xmlns:th="http://www.thymeleaf.org">
<head>
    <meta charset="UTF-8">
    <meta http-equiv="X-UA-Compatible" content="IE=edge">
    <meta name="viewport" content="width=device-width, initial-scale=1.0">
    <title>Document</title>
</head>
<body>
    <table>
        <thead>
            <tr>
                <th>Name</th>
                <th>Age</th>
                <th>Occupation</th>
            </tr>
            <tbody>
                <tr th:each="profile: ${profiles}">
                    <td th:text="${profile.name}" >
                    <td th:text="${profile.age}" >
                    <td th:text="${profile.occupation}" >
                </tr>
            </tbody>
        </thead>
    </table>
</body>
</html>- jsp, thyme 따라서 템플릿 작성도 달라진다
                <!-- <c:forEach items="${profiles}" var="profile">
                    <tr>
                        <td>${profile.name}</td>
                        <td>${profile.age}</td>
                        <td>${profile.occupation}</td>
                    </tr>
                </c:forEach> -->
> 참고 :
[https://www.thymeleaf.org/doc/tutorials/2.1/usingthymeleaf.html](https://www.thymeleaf.org/doc/tutorials/2.1/usingthymeleaf.html)
`/WEB-INF/templates/home.html`
```java
<!DOCTYPE html SYSTEM "http://www.thymeleaf.org/dtd/xhtml1-strict-thymeleaf-4.dtd">

<html xmlns="http://www.w3.org/1999/xhtml"
      xmlns:th="http://www.thymeleaf.org">
(+) JAVA
1) List 와 ArrayList 차이
- List = 인터페이스
- ArrayList = 클래스
List는 interface다. interface는 공통되는 메소드를 추출해 놓은 클래스로 생각하면 된다.
즉 범위로 생각하면 List 안에 ArrayList, LinkenList...등이 포함
ArrayList<Object> list = new ArrayList<>();
List<Object> list = new ArrayList<>();

`출처: https://yoon-dailylife.tistory.com/7 [알면 쓸모있는 개발 지식]`
-> 위는 그냥 구현체 클래스로 구현
-> 아래는 ArrayList를 업캐스팅해서 사용
-> 같은 결과 but List를 사용해 ArrayList를 생성하는 것은 유연성에서 효과d
-
매개변수뿐 아니라 반환값, 변수, 필드를 전부 인터페이스 타입으로 선언하라.
-
적합한 인터페이스가 없다면 클래스의 계층구조 중 가장 상위의 클래스를 사용하라.
-
Arraylist
◆ ArrayList : resizable array
리스트에 저장되는 데이터의 수가 늘어나면 자동으로 증가함
에러 발생 & 해결
1) Could not find org.apache.tomcat.embed:tomcat.embed:tomcat-embed-jasper.
1차시도 : 
- 버전 명시, 그럼에도 apache를 찾을 수 없다고 뜸 -> tomcat 미설치 문제로 추측
해결법
https://tomcat.apache.org/
-> 각자 컴퓨터 운영체제 맞게 톰캣 9.0 zip으로 다운로드
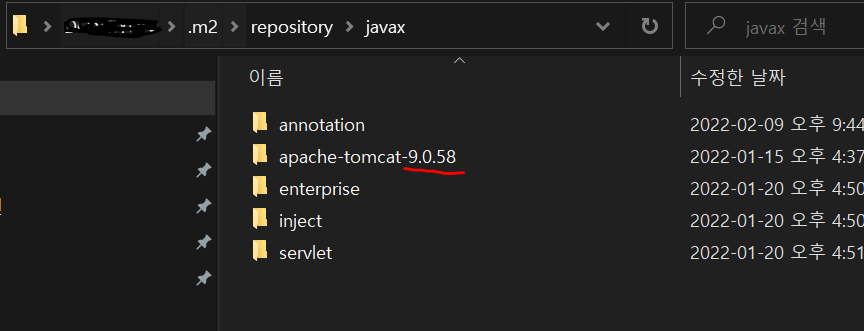
- 해당 파일을
servlet폴더가 있는 곳에 복붙하기
나의 경우 => C:\Users\사용자명.m2\repository\javax

음 ~ 잘 되네!!!

