2025.04.21 ~ 04.23
React
Redux
상태 관리 라이브러리
- 애플리케이션의 전체 상태를 단일 스토어(store)에 저장
- 상태 트리를 변경하는 유일한 방법은 action 객체를 dispatch()하는 것
- action에 따라 상태를 어떻게 변경할지는 reducer라는 순수 함수로 정의
리덕스의 3가지 원칙
- Single source of truth(단일 진실의 출처) : 애플리케이션의 모든 상태는 하나의 store에 저장됨 → 데이터 무결성 및 추적 용이
- State is read-only(상태는 읽기 전용) : 상태를 직접 수정할 수 없음, 상태를 변경하려면 반드시 action → dispatch → reducer 흐름을 따라야 한다
- Changes are made with pure function(순수 함수로만 상태 변경) : 동일 출력을 보장하는 순수 함수여야 하기때문에 동일 입력인 reducer를 이용, 외부 영향을 받지 않는다.(API 호출, 시간 등)
React Hooks과 비교
React Hooks
- useState , useReducer , useContext / useEffect
- 컴포넌트 단위 / 제한된 범위의 상태를 관리
- setState, dispatch , context 를 사용하여 상태를 직접 변경
- Context 를 사용하게 된다면 Provider 하위 컴포넌트를 전체 리렌더링
Redux
- action → dispatch → reducer 형태로 상태를 변경
- 앱 전체의 전역 상태 관리(전역 공유)
- 초기 세팅은 복잡할 수 있으나, 유지보수의 용이성 , 대규모 프로젝트에 적합
Redux 동작원리
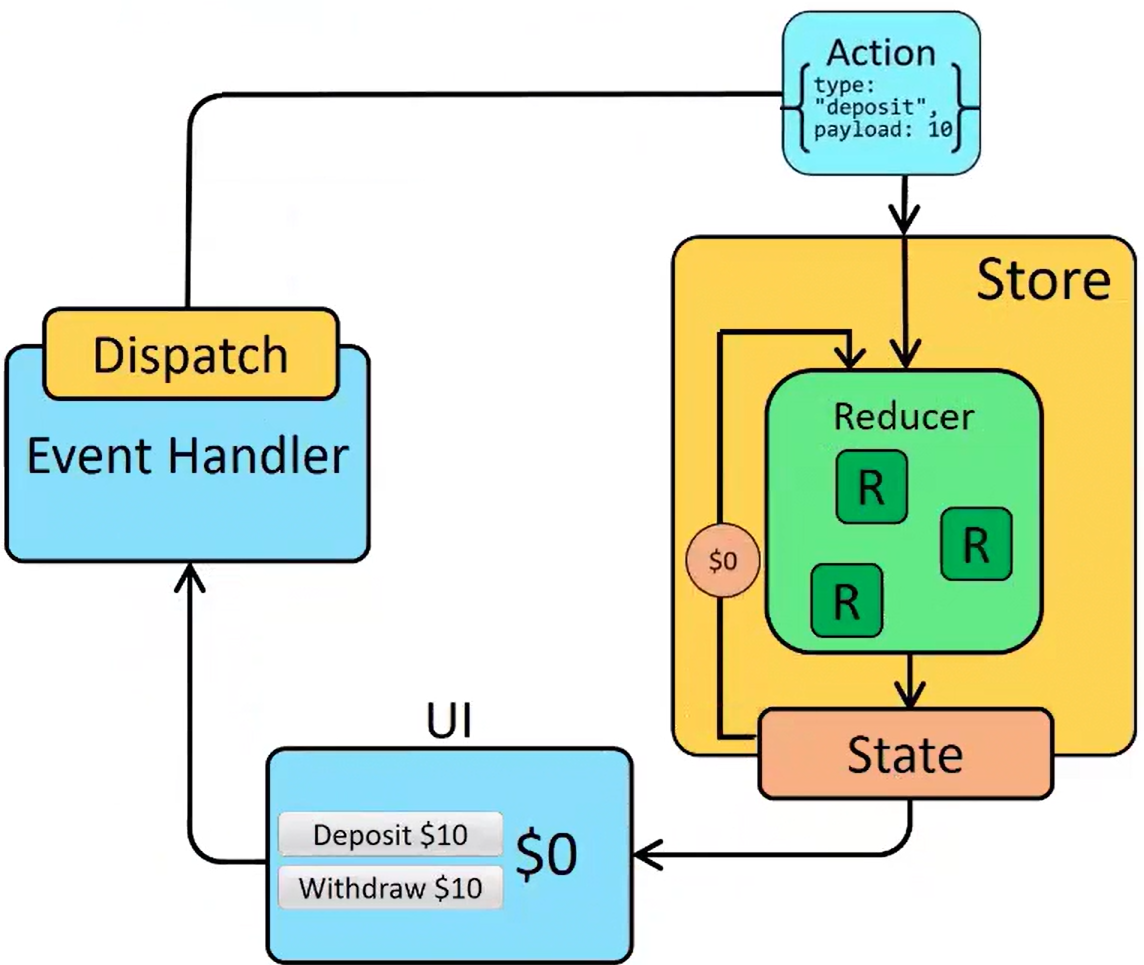
- UI에서는 action이 발생하면 초기값을 정의하지 않고 dispatch(action) 실행
- action 객체는 type과 payload로 구성
- store는 현재 상태와 action을 reducer에 전달
- reducer는 새 상태를 계산해 반환
- store는 반환된 새 상태를 저장하고, 변경된 상태를 구독 중인 컴포넌트에 전달
- 새로운 state를 화면 상에 노출
Intro
Redux 단독 사용
CDN 링크 설정
<script crossorigin src="https://unpkg.com/redux@4.2.0/dist/redux.js"></script><script>
// 하나의 저장소 설정, Redux에서 createStore 가져오기
const{ createStore } = Redux;
// 스토어 안에 등록할 리듀서 함수
// 리듀서 안에 state 초기값, action으로 해야할 일을 전달 받는다.
function reducer(state = 0, action){
switch(action.type){
case 'INCREMENT' :
return state + 1;
case 'DECREMENT' :
return state - 1;
default :
return state;
}
}
// 리덕스 저장소 만들기
// reducer 함수를 전달 해준다.
// 스토어의 핵심 요소 : subscribe, dispatch, getState API 가 있다.
const store = createStore(reducer);
// 스토어 구독 후 스토어가 관리하는 상태값 출력하는 구문 작성
store.subscribe(() => console.log(store.getState()));
// dispatch 내부에 액션을 type 키로 전달, 상태를 변경하는 액션
store.dispatch({type : 'INCREMENT'});
store.dispatch({type : 'INCREMENT'});
store.dispatch({type : 'INCREMENT'});
store.dispatch({type : 'DECREMENT'});
</script>React 환경에서 Redux 사용
CDN 링크 설정
<script crossorigin src="https://unpkg.com/react-redux@8.0.4/dist/react-redux.js"></script><script type="text/babel">
// react-redux 에서 제공하는 기능
// 1. Provider
// - Redux의 store를 React 앱 전체에 공급하는 컴포넌트
// - Provider 하위에 있는 모든 컴포넌트는 store에 접근 가능해진다 (context 역할)
// 2. useDispatch
// - store에 action을 보내기 위한 Hook
// - dispatch(action)을 호출하여 상태 변경을 트리거한다 - 리듀서 추적
// 3. useSelector
// - store의 state 중에서 원하는 값만 선택해서 가져올 수 있는 Hook
// - 컴포넌트가 특정 state만 구독하도록 하여 불필요한 리렌더링 방지
const {Provider, useSelector, useDispatch} = ReactRedux;
const {createStore} = Redux;
// 관리 할 상태의 초기값 선언
const initState = 0;
// reducer 함수 정의
// action 구조분해 할당 -> {type, payload} === action
function reducer(state = initState , {type, payload}){
// action.type으로 전달할 필요없다
switch(type){
case 'INCREMENT' :
return state + payload.incrementValue;
case 'DECREMENT' :
return state - payload.decrementValue;
default :
return state;
}
}
// store 생성
const store = createStore(reducer);
// 컴포넌트
function App(){
/*
useSelector 훅을 사용해서 store가 관리하는 state 사용하기!
반드시 인자로 state 를 매개변수 하는 함수를 전달 받는다.
*/
const count = useSelector(state => state);
const dispatch = useDispatch();
const increase = () =>{
dispatch({
type : 'INCREMENT',
payload : { incrementValue : 2 }
});
}
const decrease = () =>{
dispatch({
type : 'DECREMENT',
payload : { decrementValue : 2 }
});
}
return(
<>
<h1>Count : {count}</h1>
<button onClick={increase}>+ 2</button>
<button onClick={decrease}>- 2</button>
</>
)
}
// 렌더링
ReactDOM.createRoot(document.getElementById('root'))
.render(
<Provider store = {store}>
<App/>
</Provider>
);
</script>여러 개의 Reducer 결합 - combineReducers
reducer 함수가 여러개 있어도 store는 생성 시에 reducer 단 한 개만 등록 가능
- 상태 단위로 나눈 여러 reducer를 combineReducers로 묶어 하나의 rootReducer로 통합 후 등록
<div id="root"></div>

<script type="text/babel">

    const { Provider , useSelector , useDispatch } = ReactRedux;
    // 각각의 state 를 관리하는 reducer 함수를 합쳐주는 combineReducers
    const { createStore, combineReducers } = Redux;

    // 관리 할 상태 초기값 선언
    const countState = { countInit : 10 };

    const isActiveState = { isActiveInit : false };

    const userState = {
        name : '',
        email : '',
        phone : ''
     };

     // reducer 함수
     const rootReducer = combineReducers({
        countReducer : (state = countState, {type, payload}) => {
            console.log('카운트 리듀서 호출됨...')
            switch(type){
                case 'INCREMENT' :
                    return {
                        countInit : state.countInit + payload.increaseValue
                    }
                case 'DECREMENT' :
                    return {
                        countInit : state.countInit - payload.decreaseValue
                    }
                default :
                    return state;
            }
        },
        activeReducer : (state = isActiveState, {type, payload}) => {
            console.log('액티브 리듀서 호출됨...')
            switch(type){
                case 'TOGGLE' :
                    return {
                        isActiveInit : !state.isActiveInit
                    }
                default :
                    return state;
            }
        },
        userReducer : (state = userState, {type, payload}) => {
            console.log('유저 리듀서 호출됨...')
            switch(type){
                case 'INPUT' :
                    return {
                        ...state,
                        [payload.name] : payload.value
                    }
                default :
                    return state;
            }
        }
     })

     // store 는 생성 시에 reducer 단 한 개만 사용할 수 있다.
     // 따라서 combineReducers 로 묶어준 rootReducer 를 store 에 등록한다.
     const store = createStore(
        rootReducer
     );

    function App() {

        console.log('관리 상태들 ', useSelector(state => state));
        const{countInit} = useSelector(state => state.countReducer);
        const{isActiveInit} = useSelector(state => state.activeReducer);
        const{name, email, phone} = useSelector(state => state.userReducer);
        const dispatch = useDispatch();

        const increaseCount = () => {
            dispatch({
                type: 'INCREMENT',
                payload : {increaseValue : 1}
            })
        }
        const decreaseCount = () => {
            dispatch({
                type: 'DECREMENT',
                payload : {decreaseValue : 1}
            })
        }
        const toggleActive = () => {
            dispatch({
                type: 'TOGGLE'
            })
        }
        const onChangeHandler = (e) => {
            dispatch({
                type: 'INPUT',
                payload : {
                    name : e.target.name,
                    value : e.target.value
                }
            })
        }

        return(
            <>
                <h1>Count : {countInit}</h1>
                <button onClick={increaseCount}>+1</button>
                <button onClick={decreaseCount}>-1</button>
                <hr/>
                <h1>isActive : {isActiveInit.toString()}</h1>
                <button onClick={toggleActive}>토글하기</button>
                <hr/>
                <h3>input 타입</h3>
                <label>이름 : </label>
                <input type="text" name="name" value={name} onChange={onChangeHandler}/>
                <br/>
                <label>이메일 : </label>
                <input type="text" name="email" value={email} onChange={onChangeHandler}/>
                <br/>
                <label>핸드폰 : </label>
                <input type="text" name="phone" value={phone} onChange={onChangeHandler}/>
                <br/>
                <h3>name : {name}</h3>
                <h3>email : {email}</h3>
                <h3>phone : {phone}</h3>
            </>
        )
    }

    ReactDOM.createRoot(document.getElementById('root'))
    .render(
        <Provider store = {store}>
            <App/>
        </Provider>
    )
</script>
Ducks 패턴 + Redux DevTools 연동
Ducks 패턴
- 초기값, 액션, 리듀서 를 관련있는 state 별로 하나의 modules 폴더로 구성해 관리하는 패턴
<div id="root"></div>

<script type="text/babel">

    const { Provider , useSelector , useDispatch } = ReactRedux;
    const { createStore } = Redux;

    /* ------------------CountModule.js------------------*/

    /* 초기값 */
    const initState = 0;

    /* 액션 */
    /*
        액션은 함수 형태로 재사용할 수 있도록 작성하며
        dispatch 호출 시 인자로 전달할 값을 반환하는
        함수를 만들어 둔다.
    */
    const INCREMENT = "count/INCREASE";
    const DECREMENT = "count/DECREASE";

    const increase = () => (
        {
            type : INCREMENT,
            payload : { incrementValue : 1 }
        }
    )

    const decrease = () => (
        {
            type : DECREMENT,
            payload : { decrementValue : 1 }
        }
    )

    /* 리듀서 */
    function reducer(state = initState , action){
        switch(action.type){
            case INCREMENT :
                return state + action.payload.incrementValue;
            case DECREMENT :
                return state + action.payload.decrementValue;
            default :
                return state;
        }
    }

    /* --------------------------------------------------*/

    /* -----------------------UI-------------------------*/

    function App() {

        const count = useSelector(state => state);
        const dispatch = useDispatch();

        const increaseCount = () =>{
            dispatch(increase());
        }
        const decreaseCount = () =>{
            dispatch(decrease());
        }

        return(
            <>
                <h1>Count {count}: </h1>
                <button onClick={increaseCount}>+ 1</button>
                <button onClick={decreaseCount}>- 1</button>
            </>
        )
    }

    /* --------------------------------------------------*/

    /* --------------------Store.js----------------------*/
    const store = createStore(
        reducer,
        window.__REDUX_DEVTOOLS_EXTENSION__ && window.__REDUX_DEVTOOLS_EXTENSION__()
    );

    /* --------------------------------------------------*/

    /* index.js */
    ReactDOM.createRoot(document.getElementById('root'))
    .render(
        <Provider store = {store}>
            <App/>
        </Provider>
    )

</script>window.REDUX_DEVTOOLS_EXTENSTION && window.REDUX_DEVTOOLS_EXTENSTION()
- redux devtools 검색
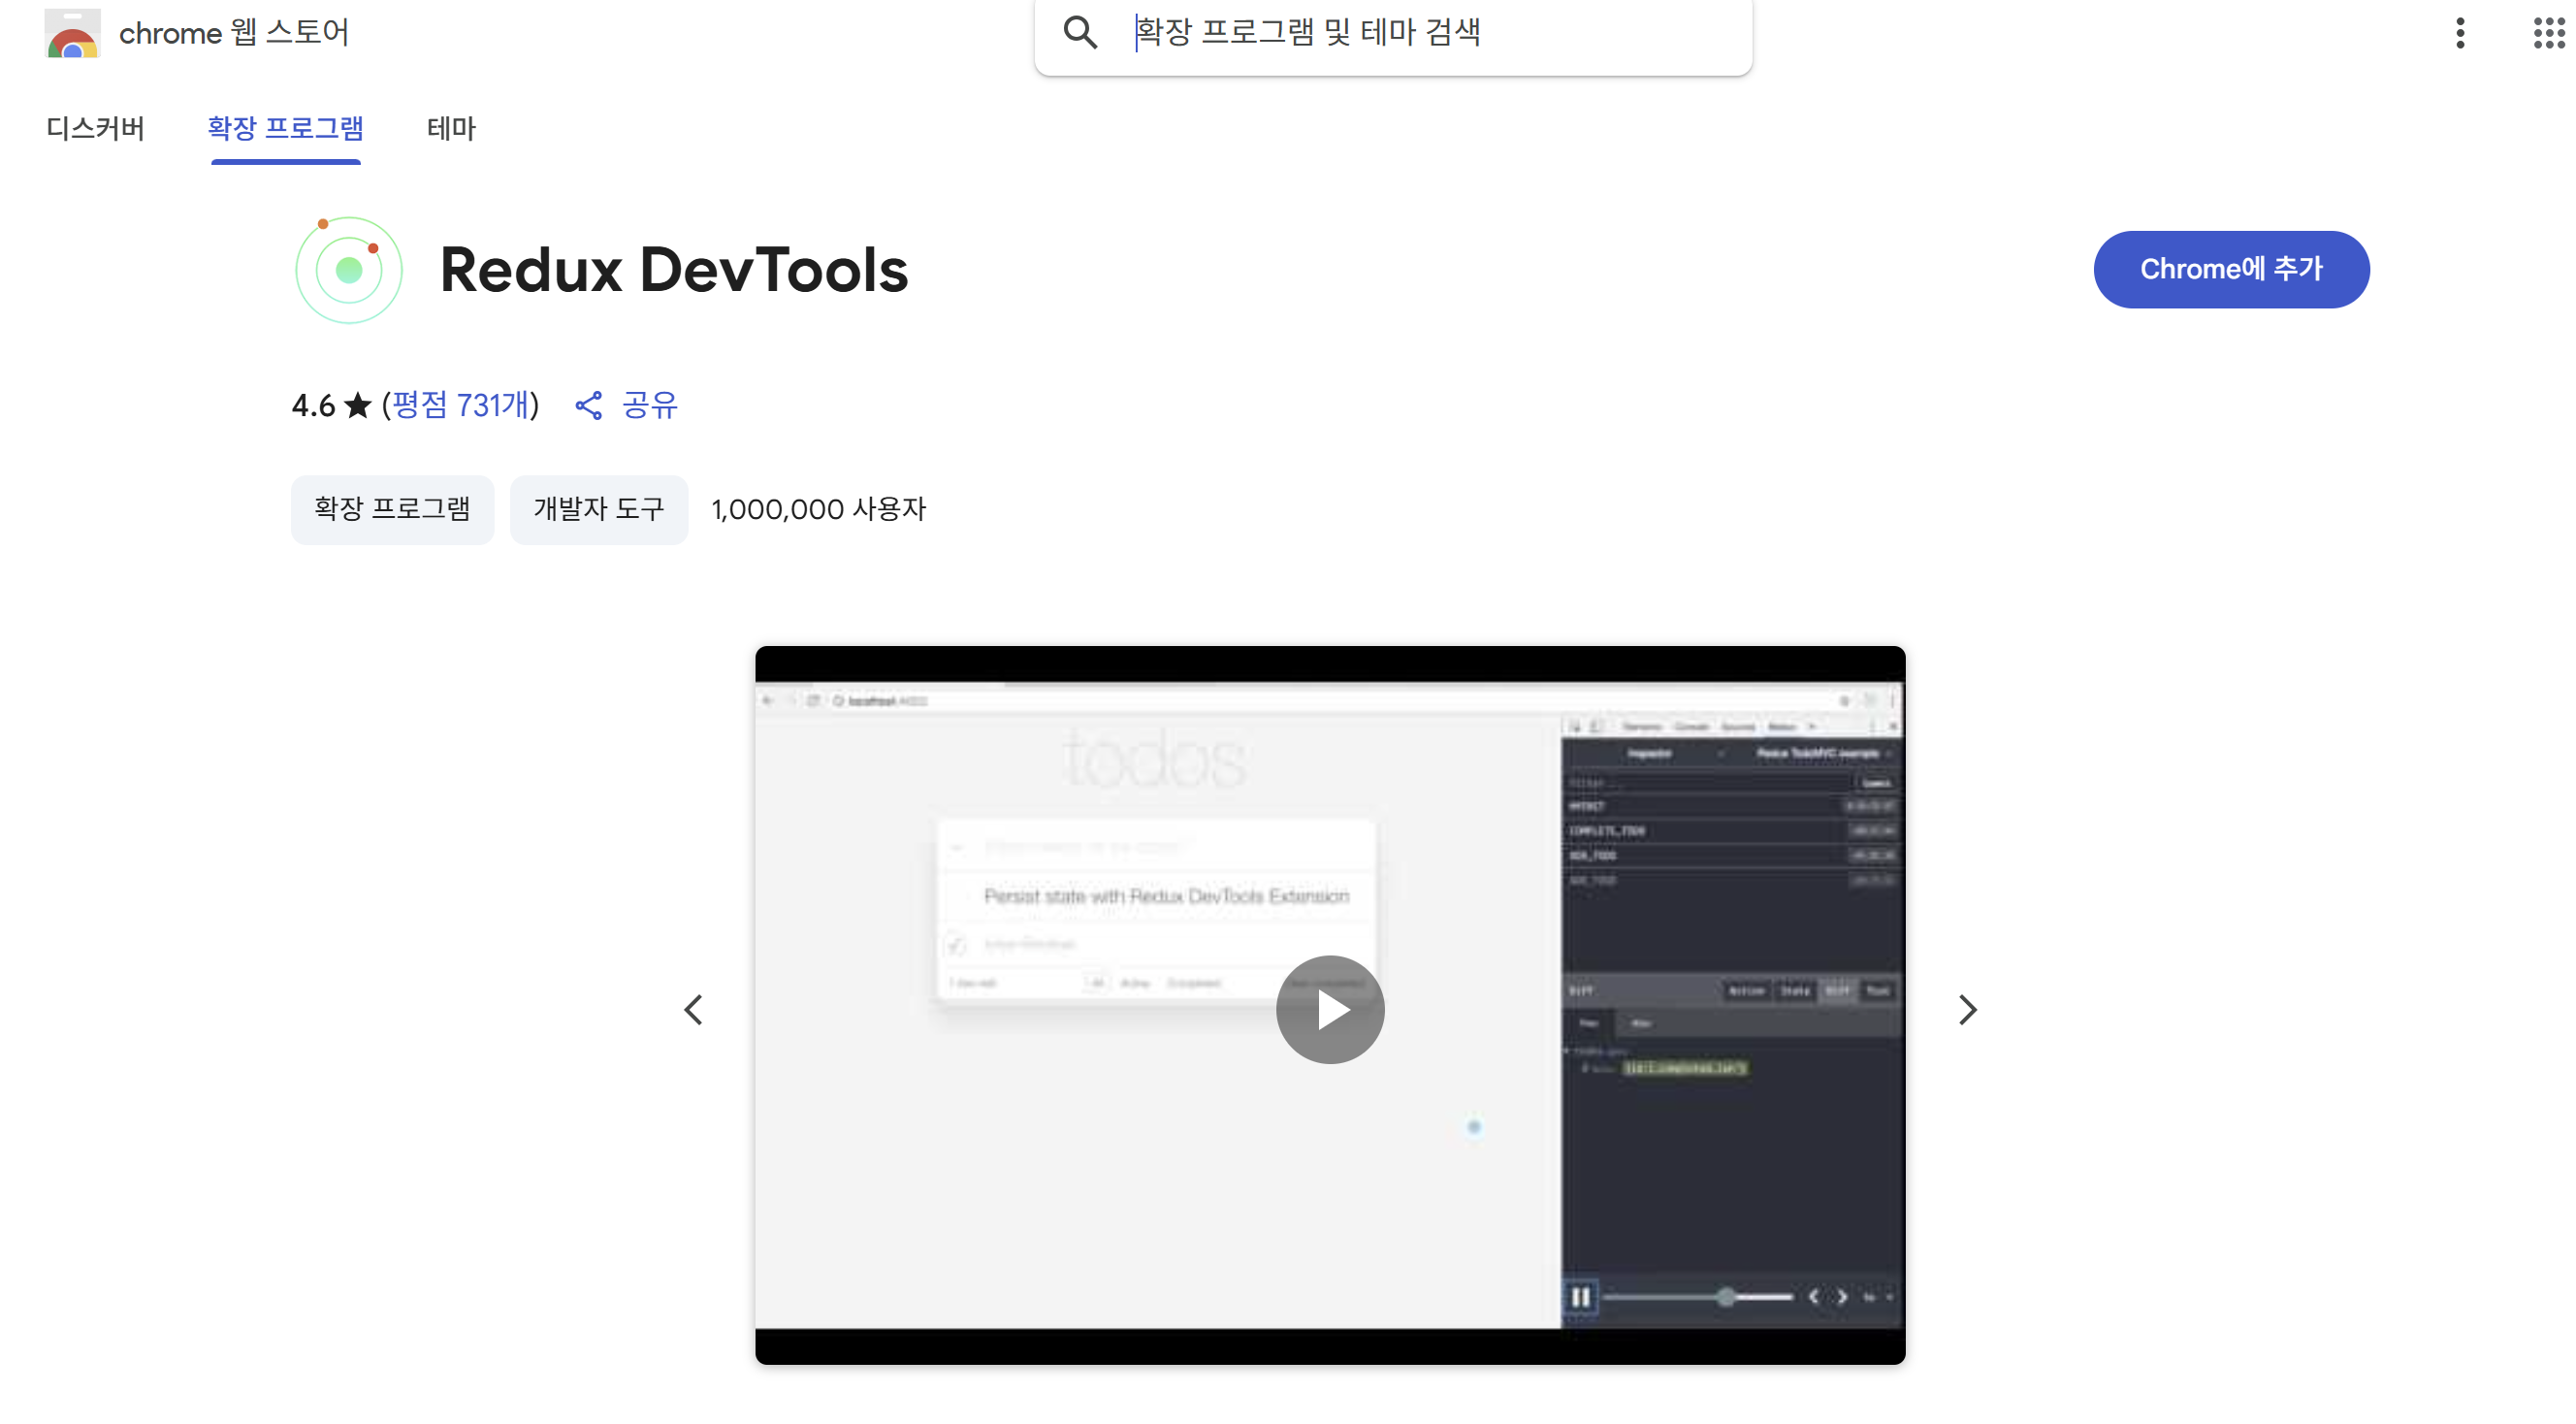
- 크롬에 추가하기 누르기
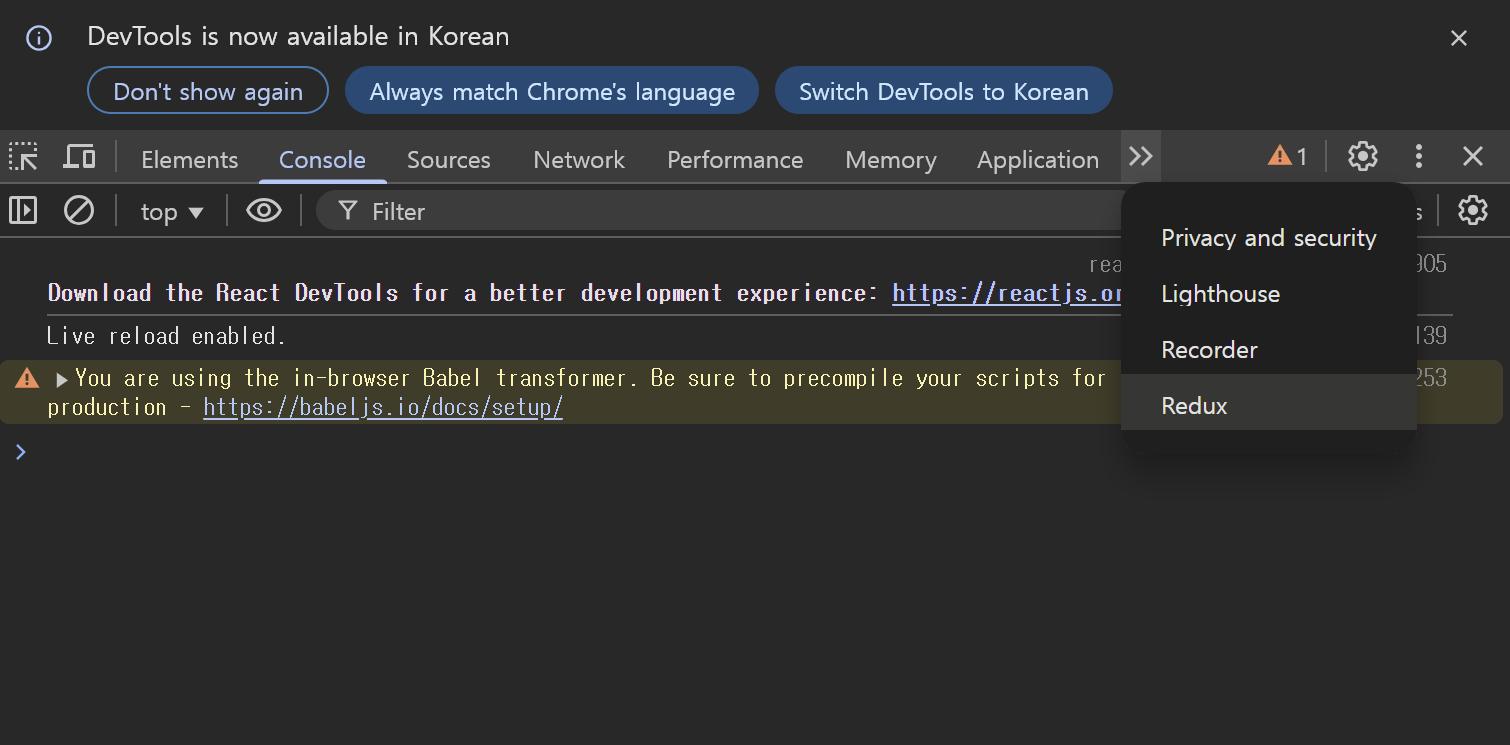
- 콘솔 창에서 redux 누르기
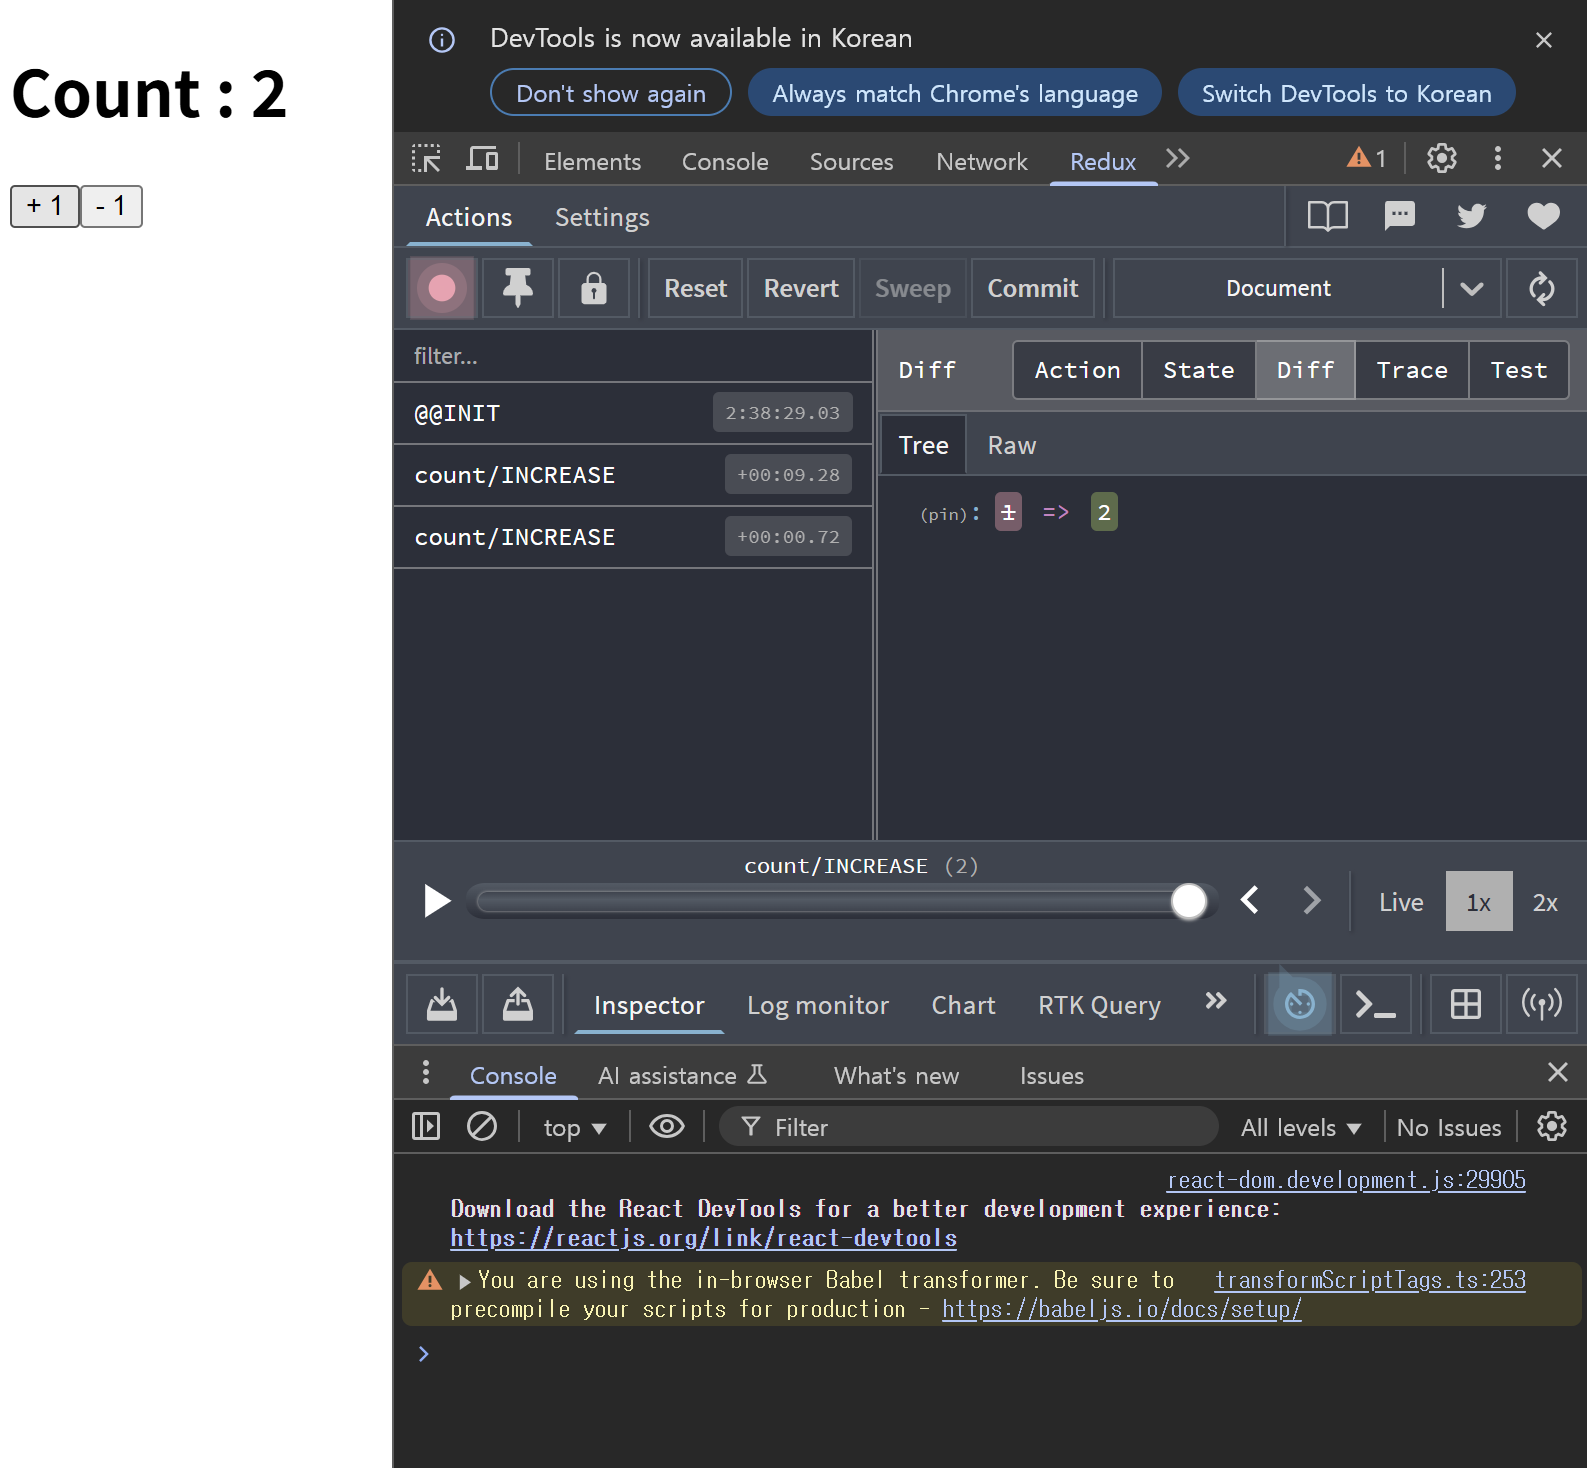
- Diff 알고리즘이 변경 감지
- Action, State 등도 확인해 볼 수 있다.
Redux Actions (redux-actions)
CDN 링크 추가
<script crossorigin src="https://unpkg.com/redux-actions@2.6.5/dist/redux-actions.js"></script><div id="root"></div>
<script type="text/babel">
const { Provider , useSelector , useDispatch } = ReactRedux;
const { createStore } = Redux;
// console.log(ReduxActions);
const {createAction, createActions, handleActions} = ReduxActions;
// 모듈
/* --------------------------------------------------*/
// 초기값
const initState = 0;
// 액션
/*
액션(주문서)은 함수형태로 재사용 할 수 있도록 작성하여 dispatch 호출 시에
인자로 전달할 값을 반환하는 함수를 만드는 것이 관례적이다.
type(형태) , payload(옵션)
*/
// 액션의 타입은 단 하나의 형태로 식별 가능한 상수임을 명확하게 나타내기 위해서 대문자로 작성하는 것이 관례
const INCREMENT = 'count/INCREASE';
const DECREMENT = 'count/DECREASE';
/* 1. createAction 을 사용한 액션 함수 생성 */
// action 은 type , payload 로 구성
// 함수를 {}로 작성하지 않고 ({})으로 작성한 이유는 해당함수는 하나의 객체로 반환하겠다는 의미미
// const increase = createAction(INCREMENT, (amount = 1) => ({increaseValue : amount}))
// const decrease = createAction(DECREMENT, (amount = 1) => ({decreaseValue : amount}))
// console.log(increase());
// console.log(decrease());
/* 2. createActions 을 사용한 액션 함수 생성 */
// const actions = createActions({
// [INCREMENT] : (amount = 1) => ({increaseValue : amount}),
// [DECREMENT] : (amount = 1) => ({decreaseValue : amount})
// });
// console.log(actions);
// const {count} = createActions({
// [INCREMENT] : (amount = 1) => ({increaseValue : amount}),
// [DECREMENT] : (amount = 1) => ({decreaseValue : amount})
// });
// console.log(count);
// 중첩 구조분해 할당으로 count 사용 대신 decrease, increase 사용
const {count : {increase, decrease}} = createActions({
[INCREMENT] : (amount = 1) => ({increaseValue : amount}),
[DECREMENT] : (amount = 1) => ({decreaseValue : amount})
});
console.log(increase());
/* 리듀서 생성 */
/* 3. handleActions
- switch 문을 사용하지 않고 action 에 따라서 state 를
처리하는 리듀서 함수를 생성하게 해준다.
*/
const reducer = handleActions(
{
[INCREMENT] : (state, {payload : {increaseValue}}) => {
return state + increaseValue;
},
[DECREMENT] : (state, {payload : {decreaseValue}}) => {
return state - decreaseValue;
}
},
initState
)
/* --------------------------------------------------*/
function App() {
const count = useSelector(state => state);
const dispatch = useDispatch();
const increaseCount = () =>{
dispatch(increase());
}
const decreaseCount = () =>{
dispatch(decrease());
}
return(
<>
<h1>Count : {count}</h1>
<button onClick={increaseCount}>1 증가</button>
<button onClick={decreaseCount}>1 감소</button>
</>
)
}
/* --------------------------------------------------*/
/* --------------------Store.js----------------------*/
const store = createStore(
reducer,
window.__REDUX_DEVTOOLS_EXTENSION__ && window.__REDUX_DEVTOOLS_EXTENSION__()
);
/* --------------------------------------------------*/
/* index.js */
ReactDOM.createRoot(document.getElementById('root'))
.render(
<Provider store = {store}>
<App/>
</Provider>
)
</script>Redux Middleware
리듀서가 실행되기 전에 액션을 가로채서 추가 작업을 할 수 있다.
- action -> middleware -> reducer -> store 순서로 동작
- 특정한 조건에 따라 액션을 무시하거나, 추가작업, 수정, 로깅, 트리거 함수 호출 등을 수행
- next(action)을 호출(리듀서로 액션 전달) 해야 다음 단계로 넘어갈 수 있다.
- 비동기 관련 처리를 미들웨어의 도움을 받을 수 있다
- 미들웨어 라이브러리 : redux-thunk(함수형 액션을 사용해 비동기 로직) , redux-saga(Generator를 이용해 복잡한 비동기 흐름 제어)
- AOP 와 미들웨어 비교해서 분석해보기
const middleware = store => next => action =>{
    // 미들웨어 수행 구문
}

<!-- 위 식과 동일 -->
function middleware(store) {
    return function(next){
        return function(action){
            // 미들웨어 수행 구문
        }
    }
}
Middleware
<div id="root"></div>

<script type="text/babel">

    const { Provider , useSelector , useDispatch } = ReactRedux;
    const { createStore } = Redux;
    const {createAction, createActions, handleActions} = ReduxActions;

    /* --------------------------------------------------*/

    const loggingMiddleware = store => next => action => {
        console.log('action', action); // 액션 출력 로깅
        const result = next(action); // 다음 미들웨어 혹은 리듀서에게 액션 전달

        return result; // next 의 반환값(state 결과값) 반환
    }

     /* --------------------------------------------------*/

     const initState = 0;

     const INCREMENT = 'count/INCREASE';
     const DECREMENT = 'count/DECREASE';


     const {count : {increase, decrease}} = createActions({
         [INCREMENT] : (amount = 1) => ({increaseValue : amount}),
         [DECREMENT] : (amount = 1) => ({decreaseValue : amount})
     });

     console.log(increase());

     const reducer = handleActions(
         {
             [INCREMENT] : (state, {payload : {increaseValue}}) => {
                 console.log('리듀서 HI');
                 return state + increaseValue;
             },
             [DECREMENT] : (state, {payload : {decreaseValue}}) => {
                 return state - decreaseValue;
             }
         },
         initState
     )

     /* --------------------------------------------------*/

     function App() {

         const count = useSelector(state => state);
         const dispatch = useDispatch();

         const increaseCount = () =>{
             dispatch(increase());
         }
         const decreaseCount = () =>{
             dispatch(decrease());
         }

         return(
             <>
                 <h1>Count : {count}</h1>
                 <button onClick={increaseCount}>1 증가</button>
                 <button onClick={decreaseCount}>1 감소</button>
             </>
         )
     }

     /* --------------------------------------------------*/

     // 생성한 미들웨어를 store 에 등록하기 위한 applyMiddleware
     const {applyMiddleware} = Redux;

     /* 스토어 */
     const store = createStore(
         reducer, applyMiddleware(loggingMiddleware)
     );

     /* --------------------------------------------------*/

     /* index.js */
     ReactDOM.createRoot(document.getElementById('root'))
     .render(
         <Provider store = {store}>
             <App/>
         </Provider>
     );
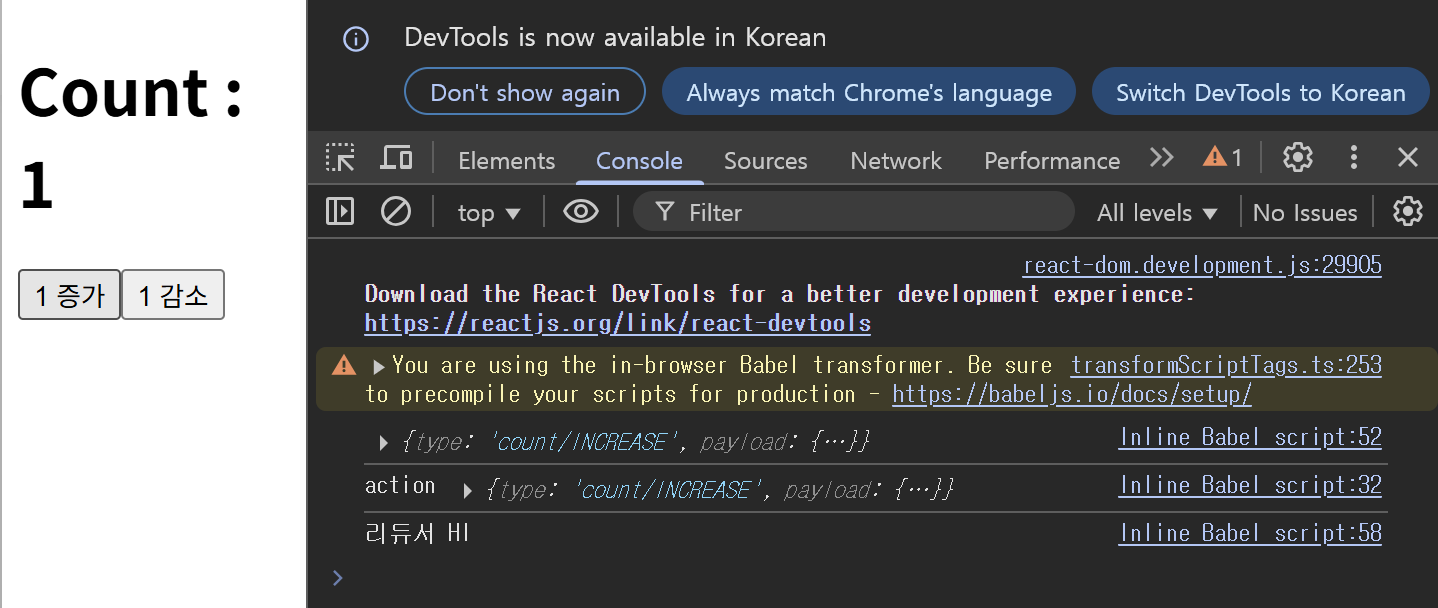
</script>- 리듀서가 실행되기 전에 action이 실행되는 것을 알 수 있다.
Redux Logger
Redux의 상태 변화 추적을 돕는 개발용 미들웨어
- Redux에서 여러 미들웨어를 함께 적용, redux-logger는 그중 하나로 포함
- 로깅 관련 미들웨어로 가장 많이 사용되는 redux-logger
- 미들웨어 중에서 가장 마지막으로 동작을 하도록 설정
- 일반적으로 가장 마지막에 위치시켜야 상태 변화 전후를 정확히 로깅할 수 있다.
- prev : 액션이 실행되기 이전 상태
- prev 와 next 사이에 다른 미들웨어가 상태를 변경한 내용이 포함될 수 있다.
- next : 액션이 적용된 후 상태
CND 링크 추가
<script src="https://unpkg.com/redux-logger@3.0.6/dist/redux-logger.js"></script>
<div id="root"></div>

<script type="text/babel">

    const { Provider , useSelector , useDispatch } = ReactRedux;
    const { createStore } = Redux;
    const {createAction, createActions, handleActions} = ReduxActions;
    /* --------------------------------------------------*/

    /* 리덕스 로거
        로깅 관련 미들웨어로 가장 많이 사용되는 redux-logger

     	미리 만들어져 있는 미들웨어 사용 및 여러 개의 미들웨어 동시 사용하기
    */

    // 직접 미들웨어 만들기
    const consoleMiddleware = store => next => action => {
        console.log('action' , action);
        const result = next(action); // 다음 미들웨어 혹은 리두서에게 action 전달

        return result;
    }

    // redux-logger 미들웨어
    const logger = reduxLogger.createLogger();

    /* --------------------------------------------------*/

    const initState = 0;

    const INCREMENT = 'count/INCREASE';
    const DECREMENT = 'count/DECREASE';


    const {count : {increase, decrease}} = createActions({
        [INCREMENT] : (amount = 1) => ({increaseValue : amount}),
        [DECREMENT] : (amount = 1) => ({decreaseValue : amount})
    });

    console.log(increase());


    const reducer = handleActions(
        {
            [INCREMENT] : (state, {payload : {increaseValue}}) => {
                console.log('리듀서 HI');
                return state + increaseValue;
            },
            [DECREMENT] : (state, {payload : {decreaseValue}}) => {
                return state - decreaseValue;
            }
        },
        initState
    )

    /* --------------------------------------------------*/

    function App() {

        const count = useSelector(state => state);
        const dispatch = useDispatch();

        const increaseCount = () =>{
            dispatch(increase());
        }
        const decreaseCount = () =>{
            dispatch(decrease());
        }


        return(
            <>
                <h1>Count : {count}</h1>
                <button onClick={increaseCount}>1 증가</button>
                <button onClick={decreaseCount}>1 감소</button>
            </>
        )
    }

    /* --------------------------------------------------*/

    // 생성한 미들웨어를 store 에 등록하기 위한 applyMiddleware
    const {applyMiddleware} = Redux;

    /* 스토어 */
    // 여러 개의 미들웨어를 순차적으로 연결
    const store = createStore(
        reducer, applyMiddleware(consoleMiddleware , logger)
    );

    /* --------------------------------------------------*/

    /* index.js */
    ReactDOM.createRoot(document.getElementById('root'))
    .render(
        <Provider store = {store}>
            <App/>
        </Provider>
    );

</script>- 커스텀 미들웨어 -> 리듀서 -> redux-logger 미들웨어 순으로 동작하는 것을 볼 수 있다.
Redux Fetch Problem
Redux에서 비동기 액션 함수 문제 정리
- Redux의 액션 함수에서 async를 사용하면 해당 함수는 항상 Promise 객체를 반환
- await를 사용하더라도, 액션 함수의 return은 비동기 작업이 끝나기 전에 실행되어 Promise만 리듀서로 전달
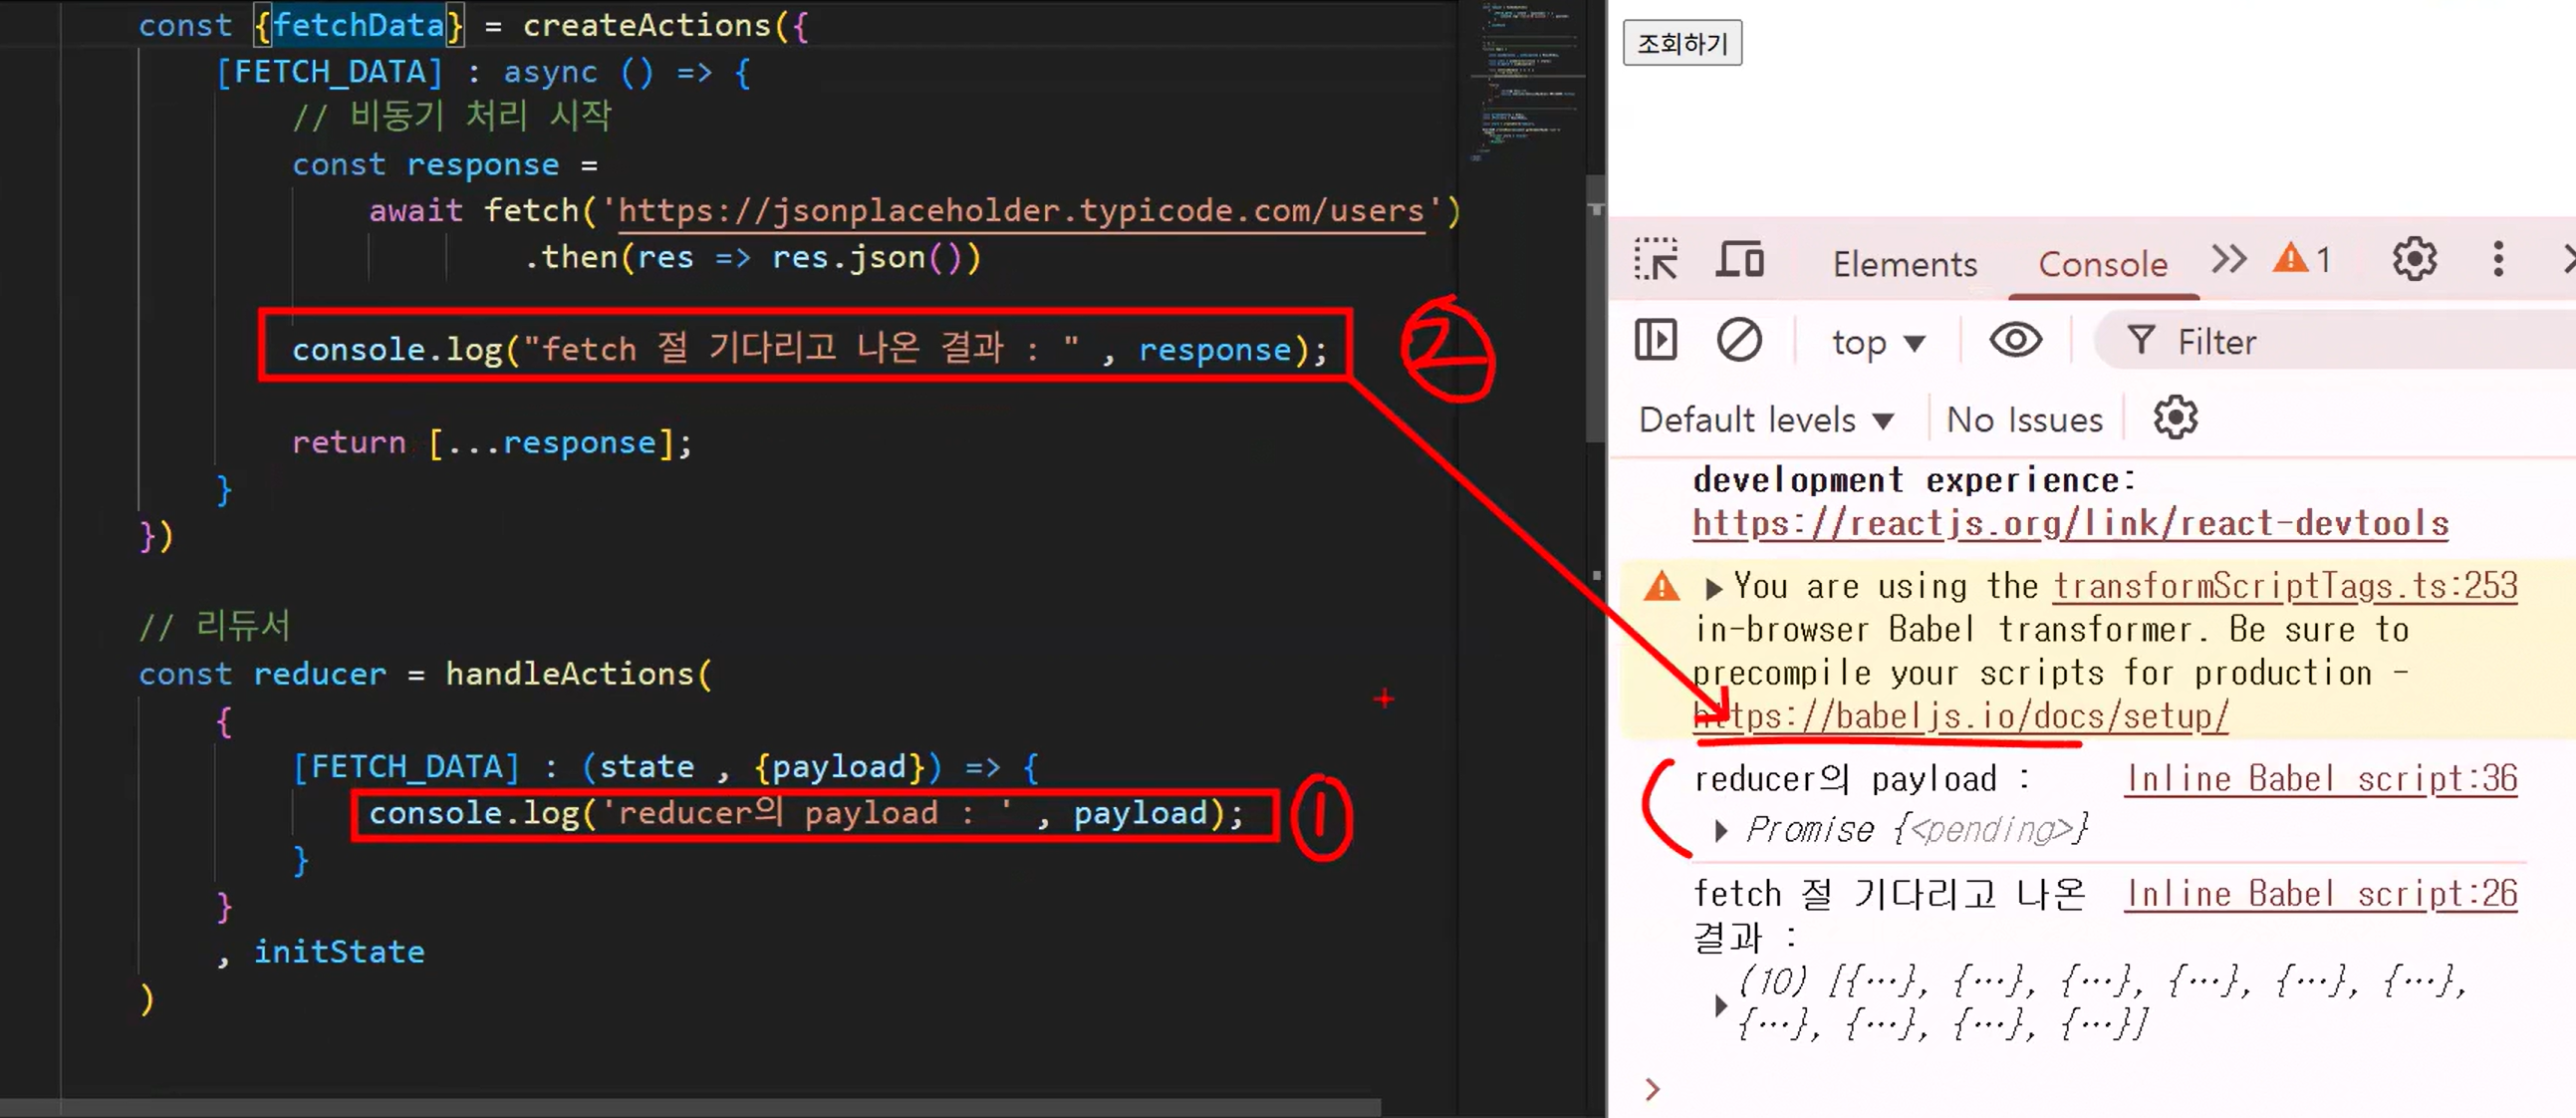
- 결국, fetch, async/await, .then()을 아무리 써도 액션 함수 내부에서 return한 값은 비동기 흐름이 끝난 결과가 아니다
- 리듀서에서 payload로 받는 값은 우리가 기대한 데이터가 아닌 Promise 객체 그 자체가 된다.
- 이러한 문제를 해결하려면 redux-thunk 같은 비동기 미들웨어가 필요
<div id="root"></div>
<script type="text/babel">

    /* MemberModule.js*/
    /*-------------------------------------------------------------*/
    const {createActions , handleActions } = ReduxActions;

    // 회원 초기값
    const initState = [];

    // 액션 타입
    /* 액션의 타입이 언더스코어(_)로 연결이 된 단어는
        카멜케이스(낙타봉 표기법) 으로 치환되어 함수 이름이 설정된다.
        count/INCREASE -> count.increase
        FETCH_DATA -> fetchData
    */
    const FETCH_DATA = 'FETCH_DATA';

    // 액션 함수
    const {fetchData} = createActions({
        [FETCH_DATA] : async () => {

            const response =
                await fetch('https://jsonplaceholder.typicode.com/users')
                        .then(res => res.json())

            console.log("fetch 절 기다리고 나온 결과 : " , response);

            return[...response];
        }
    })

    // 리듀서
    const reducer = handleActions(
        {
            [FETCH_DATA] : (state, {payload}) => {
                console.log('reducer의 payload : ', payload);
            }
        }
        , initState
    )

    /*-------------------------------------------------------------*/

    /* UI */
    function App() {

        const { useSelector , useDispatch } = ReactRedux;

        const users = useSelector(state => state);
        const dispatch = useDispatch();

        const onClickHandler = () => {
            // 액션 함수 호출
            dispatch(fetchData());
        }

        return(
            <>
                <h1>회원 목록 </h1>
                <button onClick={onClickHandler}>조회하기</button>
            </>
        )
    }

    /*-------------------------------------------------------------*/

    const {createStore} = Redux;
    const {Provider} = ReactRedux;

    const store = createStore(reducer);

    ReactDOM.createRoot(document.getElementById('root'))
    .render(
        <Provider store = {store}>
            <App/>
        </Provider>
    )

</script>
Redux Fetch Resolve
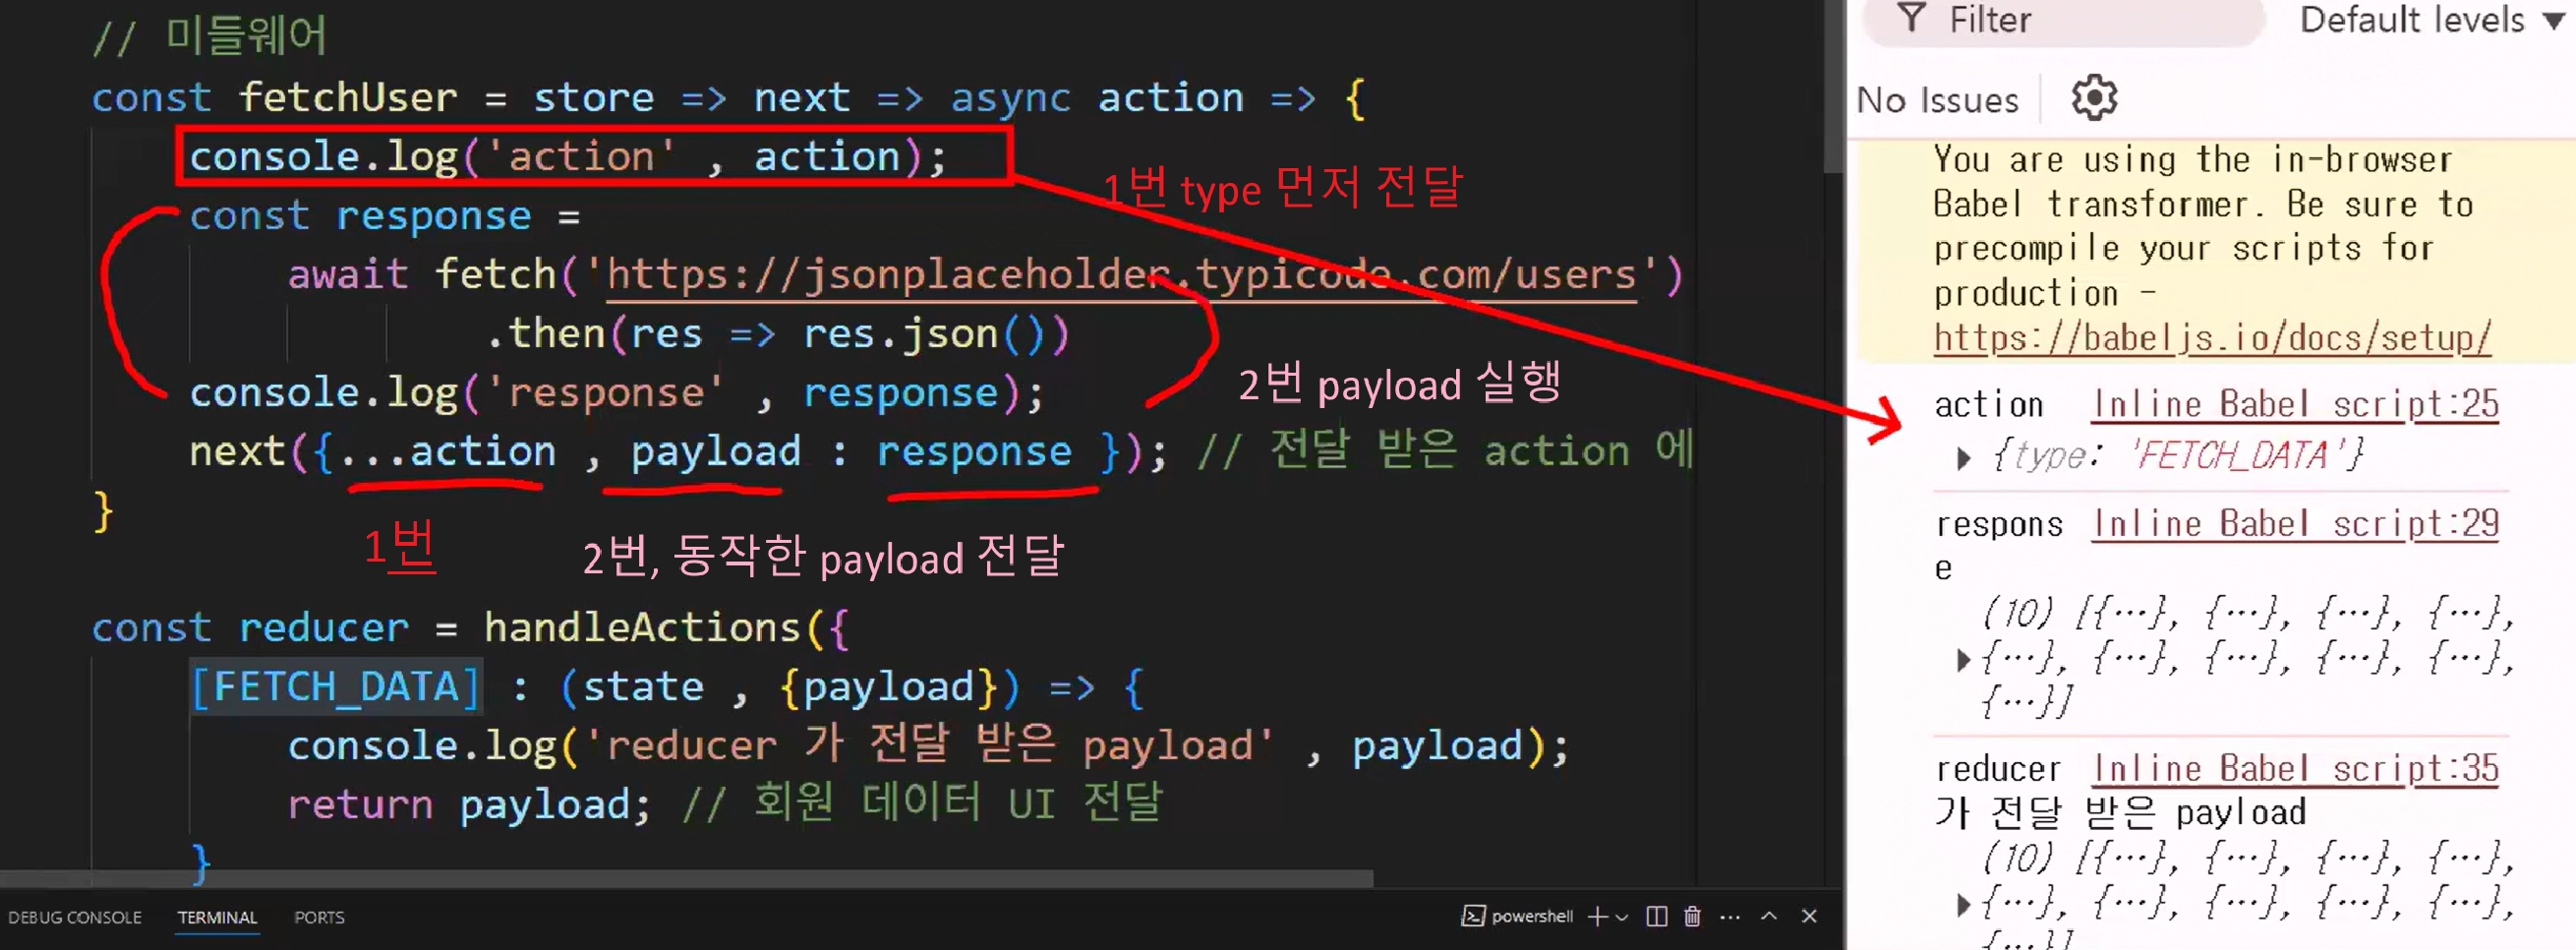
- 액션 함수에서는 type만 포함된 액션 객체를 미들웨어에 전달한다
- 미들웨어는 해당 액션을 받아 비동기 작업을 수행 하고, 그 결과를 payload로 만들어 추가
- 이후 next() 함수를 이용해 type과 payload가 결합된 완성된 액션 객체를 리듀서로 전달
<div id="root"></div>

<script type="text/babel">

    /* MemberModule.js*/
    /*-------------------------------------------------------------*/
    const {createActions , handleActions } = ReduxActions;

    // 회원 초기값
    const initState = [];

    // 액션 타입
    const FETCH_DATA = 'FETCH_DATA';

    // 액션 함수 생성
    const {fetchData} = createActions({
        [FETCH_DATA] : () => {} // payload 가 없는 액션 함수 생성
    })

    // 미들웨어
    const fetchUser = store => next => async action =>{
        console.log('action' , action);
        const response =
            await fetch('https://jsonplaceholder.typicode.com/users')
                    .then(res => res.json())
        console.log('response' , response);
        next({...action , payload : response }); // 전달 받은 action 에 payload 추가

    }

    const reducer = handleActions({
        [FETCH_DATA] : (state , {payload}) => {
            console.log('reducer 가 전달 받은 payload', payload);
            return payload; // 회원 데이터 UI 전달
        }
    }, initState)

    /*-------------------------------------------------------------*/

    /* UI */
    function App() {

        const { useSelector , useDispatch } = ReactRedux;

        const users = useSelector(state => state);
        const dispatch = useDispatch();

        const onClickHandler = () => {
            // 액션 함수 호출
            dispatch(fetchData());
        }

        return(
            <>
                <h1>회원 목록 </h1>
                <button onClick={onClickHandler}>조회하기</button>
            </>
        )
    }

    /*-------------------------------------------------------------*/

    const {createStore, applyMiddleware} = Redux;
    const {Provider} = ReactRedux;

    const store = createStore(reducer, applyMiddleware(fetchUser));

    ReactDOM.createRoot(document.getElementById('root'))
    .render(
        <Provider store = {store}>
            <App/>
        </Provider>
    )

</script>
Redux Thunk
Redux에서 미들웨어는 액션이 디스패치되기 전에 가로채서 로직을 삽입할 수 있도록 해준다.
미들웨어만으로 비동기 로직을 처리하려 하면 구조가 복잡해지고 관리가 어려워지는 한계점이 있다.
redux-thunk 미들웨어
- 액션 생성 함수 안에서 비동기 함수 자체(dispatch 함수)를 반환
- 비동기 처리 로직을 한 곳에 응집시키고 간결하게 구성할 수 있다.
먼저 redux thunk를 직접 보여주지 않고 내부적으로 어떻게 돌아가는지 확인
<div id="root"></div>

<script type="text/babel">

    /* MemberModule.js*/
    /*-------------------------------------------------------------*/
    const {handleActions} = ReduxActions;

    // 회원 초기값
    const initState = [];

    // 액션 타입
    const FETCH_DATA = 'FETCH_DATA';

    // 미들웨어 생성
    // store가 제공하는 API는 subscribe, dispatch, getState가 있다.
    // 구조분해 할당으로 store 내부의 dispatch, getState 꺼내기

    // 2. 두 번째로 실행, dispatch 절을 미들웨어가 낚아챈다. 1번 째 dispatch 때
    // 5. 5번 째로 수행된다.  2번 째 dispatch 때
    const thunkMiddleware = ({dispatch, getState}) => next => action => {

        // 액션이 함수 형태인지 확인
        if(typeof action === 'function'){
            // 3. 3번 째로 수행되며 fetchUser(dispatch , getState) 가 수행
            return action(dispatch, getState);
        }

        // 6. 6번째로 수행된다. 액션이 함수형에서 객체형태로 변형되었다
        // next()는 다음 미들웨어 혹은 미들웨어가 없으면 리듀서로 전달
        return next(action);
    }

    /*
        createActions 대신 비동기 통신을 하는 async function 생성
        콜백으로 사용할 비동기 함수
        - 서브 루틴에 추가적인 연산을 삽입할 때 사용되는 서브루틴
        - 특정 작업을 나중에 하도록 미루기 위해서 함수 형태로 감싼 것
    */

    // 4. 4번 째로 수행된다. fetchUser는 액션으로 함수형으로 작성되어 있음
    const fetchUser = async(dispatch , getState) => {
        const response = await fetch('https://jsonplaceholder.typicode.com/users')
                                .then(res => res.json());
        console.log('response' , response);
        // dispatch(액션)
        // 5-1. 함수가 아닌 객체 형식으로 다시 담았다
        dispatch({type : FETCH_DATA , payload : response});
    }

    // 7. 7번째로 동작, 액션{type : FETCH_DATA , payload : response}를 전달 받음
    const reducer = handleActions(
        {
            [FETCH_DATA] : (state , {payload}) => {
                console.log('payload' , payload);
                return payload;
            }

        }
        ,
        initState
    )

    /*-------------------------------------------------------------*/
    /* UI */
    function App() {

        const { useSelector , useDispatch } = ReactRedux;

        const users = useSelector(state => state);
        const dispatch = useDispatch();

        const onClickHandler = () => {
            // 1. 가장 먼저 발생
            // 액션 함수 참조
            dispatch(fetchUser);
        }

        return(
            <>
                <h1>회원 목록 </h1>
                <button onClick={onClickHandler}>조회하기</button>
            </>
        )
    }

    /*-------------------------------------------------------------*/

    const {createStore, applyMiddleware} = Redux;
    const {Provider} = ReactRedux;

    const store = createStore(reducer, applyMiddleware(thunkMiddleware));

    ReactDOM.createRoot(document.getElementById('root'))
    .render(
        <Provider store = {store}>
            <App/>
        </Provider>
    )

</script>
Redux Middleware 여러 개 사용
<div id="root"></div>

<script type="text/babel">

    /* 리덕스 미들웨어 여러 개 사용 시 우선순위 테스트 */

    /*-------------------------------------------*/

    const firstMiddleware = store => next => action => {
        console.log('첫번째 미들웨어 동작 ...')
        const result = next(action);
        return result;
    }
    const secondMiddleware = store => next => action => {
        console.log('두번째 미들웨어 동작 ...')
        const result = next(action);
        return result;
    }
    const thirdMiddleware = store => next => action => {
        console.log('세번째 미들웨어 동작 ...')
        const result = next(action);
        return result;
    }

    /*-------------------------------------------*/
    const { createActions, handleActions } = ReduxActions;

    const initState = 0;

    const INCREMENT = 'count/INCREASE';
    const DECREMENT = 'count/DECREASE';

    const {count : {increase , decrease}} = createActions({
        [INCREMENT] : (amount = 1) => ({incrementValue : amount}),
        [DECREMENT] : (amount = 1) => ({decrementValue : amount})
    });

    const reducer = handleActions(
        {
            [INCREMENT] : (state , {payload : {incrementValue}}) => {
                return state + incrementValue;
            },
            [DECREMENT] : (state , {payload : {decrementValue}}) => {
                return state - decrementValue;
            }
        },
        initState
    );


    /*-------------------------------------------*/
    const { useSelector , useDispatch } = ReactRedux;

    function App(){

        const count = useSelector(state => state);
        const dispatch = useDispatch();

        const increaseCount = () => {
            dispatch(increase());
        }
        const decreaseCount = () => {
            dispatch(decrease());
        }


        return(
            <>
                <h1>Count : {count}</h1>
                <button onClick={increaseCount}>+ 1</button>
                <button onClick={decreaseCount}>- 1</button>
            </>
        )
    }

    /*-------------------------------------------*/
    const { createStore , applyMiddleware } = Redux;

	// 실제 실행 순서는 third → first → second
    // 미들웨어는 등록한 순서대로 출력을 하게 된다.
    const store = createStore(reducer,
        applyMiddleware(
            secondMiddleware,
            firstMiddleware,
            thirdMiddleware
        )
    );

    /*-------------------------------------------*/
    const {Provider} = ReactRedux;

    ReactDOM.createRoot(document.getElementById('root'))
    .render(
        <Provider store = {store}>
            <App/>
        </Provider>
    );
</script>
Redux application 환경
액션-리듀서-스토어-컴포넌트
main.jsx
Redux store와 App 연결
import { createRoot } from 'react-dom/client'
import App from './App.jsx'
import { Provider } from 'react-redux'
import store from './pages/Store.js'

createRoot(document.getElementById('root')).render(
  <Provider store={store}>
    <App />
  </Provider>
)
Store.js
스토어와 미들웨어 설정
import rootReducer from "../modules";
import {createStore, applyMiddleware } from 'redux';
import { thunk } from 'redux-thunk';
import { composeWithDevTools } from '@redux-devtools/extension';

const store = createStore(
    rootReducer,
    composeWithDevTools(applyMiddleware(thunk))
)

export default store;
index.js
modules/index.js: 루트 리듀서 설정
import { combineReducers } from "redux";
import pokemonReducer from './PokemonModule';

const rootReducer = combineReducers({
    pokemonReducer
})

export default rootReducer;
PokemonModule.js
액션/리듀서 정의
- 액션과 리듀서를 같은 파일에 두면 모듈화 관리가 편하다.
import {createActions, handleActions } from 'redux-actions';

// 초기값
const initState = [
    {
    id : 0,
    name : ''
    }
]

// 액션 타입
export const GET_POKEMONS = 'pokemons/GET_POKEMONS';

// 액션 함수
const action = createActions({
    [GET_POKEMONS] : () => {}
})

// 리듀서

const pokemonReducer = handleActions(
    {
        [GET_POKEMONS] : (state, {payload}) => {
            console.log('payload', payload);
            return payload;
        }
    },
    initState
)

export default pokemonReducer;
API.js
redux-thunk를 활용한 비동기 API 처리
import { GET_POKEMONS } from "../modules/PokemonModule";

export function getPokemonsAPI(url, params) {
    const requestURL = url || 'https://pokeapi.co/api/v2/pokemon';

    return async function getPokemons(dispatch , getState) {
        const result = await fetch(requestURL).then(res => res.json());
        console.log('result' , result);
        dispatch({type : GET_POKEMONS, payload : result})
    }
}
App.jsx
npm install 목록
react-router-dom
redux
react-redux
redux-actions
redux-thunk
redux-logger
@redux-devtools/extension
- npm install --save @redux-devtools/extension
라우팅 설정
import { BrowserRouter , Route , Routes } from "react-router-dom"
import Layout from "./layouts/Layout"
import Main from "./pages/Main"
import Pokemons from "./pages/Pokemons"

function App() {

  return (
    <BrowserRouter>
      <Routes>
        <Route path="/" element={<Layout/>}>
          <Route index element={<Main/>}></Route>
          <Route path="pokemons" element={<Pokemons/>}></Route>
        </Route>
      </Routes>
    </BrowserRouter>
  )
}

export default App
outlet 컴포넌트
PokemonList.jsx
- API 호출 + 상태 조회 + 렌더링
import { useEffect } from "react";
import {useSelector , useDispatch } from 'react-redux';
import { getPokemonsAPI } from "../../apis/PokemonsAPI";
import PokemonItem from "../../../../../06_redux/03_redux-sample-project/src/components/items/PokemonItem";

function PokemonList(){

    const result = useSelector(state => state.pokemonReducer);

    console.log('poke result : ' , result);

    const pokemons = result.results;

    const dispatch = useDispatch();

    useEffect(() => {
        dispatch(getPokemonsAPI());
    } , []);

    return(
        pokemons && (
            <div>
                <h3>총 포켓몬 수 : {result.count}</h3>
                <button onClick={() => {dispatch(getPokemonsAPI(result.previous))}}>이전 페이지</button>
                <button onClick={() => {dispatch(getPokemonsAPI(result.next))}}>다음 페이지</button>
                {
                /*
                    포켓몬 데이터 표출 시에 PokemonItem 컴포넌트를 생성해서 포켓몬 관련 정보를 넘긴 후
                    배열의 map 메소드를 활용해서 20마리의 포켓몬 데이터 화면에 표출하기
                */
                }
                {pokemons.map(pokemon => <PokemonItem key={pokemon.url} pokemon={pokemon}/>)}
            </div>
        )
    );
}

export default PokemonList;
PokemonItem.jsx
- 개별 포켓몬 렌더링
function PokemonItem({pokemon}){

    return(
        <div>
            <h3>포켓몬 이름 : {pokemon.name }</h3>
            <p><a href={pokemon.url}>상세보기 url : {pokemon.url}</a></p>
        </div>
    );
}

export default PokemonItem;
참고
기본 Redux 모듈
- 초기값, 액션 타입, 액션 함수, 리듀서로 구성
- 역할(기능) 중심으로 파일을 분리하여 관리
- 액션/타입/리듀서가 서로 다른 파일에 나뉘어 있어 import가 많아질 수 있다
Ducks 패턴
- 초기값, 액션, 리듀서 를 하나의 파일 또는 modules 폴더 안에서 함께 관리
- Redux 코드를 도메인(상태) 단위로 모듈화하여 응집력 있게 구성
- 상태(state) 중심
- 하나의 파일에 액션, 타입, 리듀서 관련 코드 모두 포함

잔디 속 새싹 하나