Redux (2)
🤓 시작하기
html 구조에서 redux를 사용할거라 우선 cdn으로 라이브러리를 가져와준다.
<script src="https://cdnjs.cloudflare.com/ajax/libs/redux/4.2.0/redux.min.js"></script>😊 store 생성
function reducer(state, action) {
  if (state === undefined) {
    return {color:'yellow'}
  }
}
var store = Redux.createStore(reducer);
console.log(store.getState());
우선 reducer 를 생성해주는데,
reducer는 이전 state값과 호출되는 action 값을 받아서 새로운 state 값을 return 해주기때문에
인자값으로 state 와 action 을 사용한다.
첫 호출에는 state가 정의되지 않았기때문에 초기값(color: 'yellow')을 지정해준다.
그리고 store를 생성한뒤 getState로 state를 가져오는데, log로 찍어보면
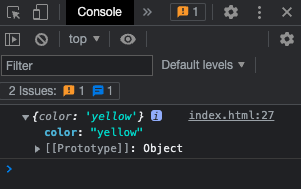
🔹 state 값이 나오는것을 확인할 수 있다.
🥸 store 변경
먼저, 어떠한 action이 생성된 경우에 dispatch 에서 자동으로 reducer 를 호출하게된다.
    <button onclick="
        store.dispatch({type: 'CHAGNE_COLOR', color: 'red'})
    ">change_color</button>
(dispatch 에서는 type 속성이 필수다 !!)
dispatch 함수에 action 과 state 에 필요한값을 속성으로 넣어 reducer를 호출한다.
reducer 함수내에 log 를 찍어보면
function reducer(state, action) {
  console.log(state, action);
  if (state === undefined) {
    return {color: 'yellow'}
  }
  return {color: 'red'}
}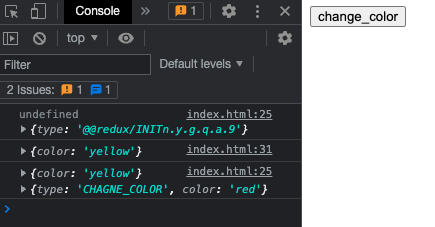
🔹 버튼 클릭시 이전 state 값인 {color: 'yellow'} 와 새로운 action인 {type: 'CHAGNE_COLOR', color: 'red'} 이 출력된다.
state 복제해서 return 하기
state가 변경될때 기존 state 를 복제하고 그 복제본을 업데이트해서 return 하는 방식으로 redux를 사용해야 redux의 기능들을 사용하기에 적합하다.
🔹 객체 복사에는 Object.assign() 함수를 사용하는데 간단한 예시코드를 보자.

assign 함수에서 첫번째 인자는 복사될 곳(빈 객체 필수), 두번째 세번째 인자는 복사될 데이터들이다.
실행하면 아래처럼 복사되어 새로운 배열이 생성된다.
이를 코드에 적용해보자.
<button onclick="
store.dispatch({type: 'CHANGE_COLOR', color: 'red'})
">change_color</button>

<script>
  function reducer(state, action) {
  console.log(state, action);

  if (state === undefined) {
    return {color: 'yellow'}
  }

  var newState;

  if (action.type === 'CHANGE_COLOR') {
    newState = Object.assign({}, state, {color: 'red'});
  }

  return newState
}
var store = Redux.createStore(reducer)
console.log(store.getState());

</script>
버튼 클릭시 dispatch가 속성값을 가지고 reducer를 호출한다.
=> CHANGE_COLOR if문으로 들어간다.
=> assign 함수로 기존 state 를 복제하고, {color: 'red'} 객체를 덮어씌운다.
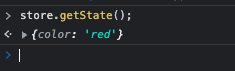
🔹 state 를 확인해보면 업데이트된 값으로 잘 출력된다.
🥳 render로 UI 변경
subscribe 에 등록해놓은 함수들은 state 가 바뀔때마다 dispatch 에 의해 실행된다.
UI 변경 기능을 위해 코드를 수정했다.
(버튼을 백그라운드 컬러가 있는 div 내부로 넣고, background-color 값으로 state 를 사용했다)
<body>
    <style>
        .container {
            border: 5px solid black;
            padding: 10px;
        }
    </style>

    <div id="red"></div>

    <script>
        function reducer(state, action) {
            console.log(state, action);

            if (state === undefined) {
                return {color: 'yellow'}
            }

            var newState;

            if (action.type === 'CHANGE_COLOR') {
                newState = Object.assign({}, state, {color: 'red'});
            }

            return newState
        }
        var store = Redux.createStore(reducer);

        function red() {
            var state = store.getState();
            document.querySelector('#red').innerHTML = `
                <div class="container" id="component_red" style="background-color:${state.color}">
                    <h1>red</h1>
                    <input type="button" value="fire" />
                </div>
            `;
        }
        red();

    </script>
</body>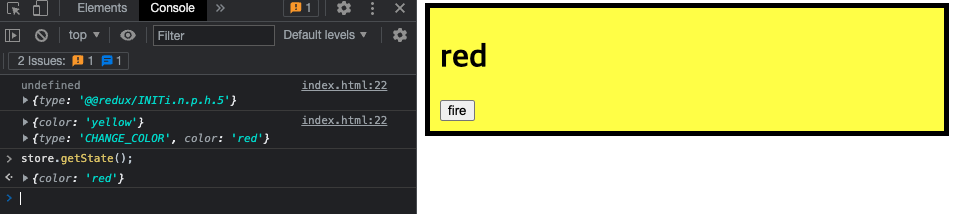
기능은 동일하다.
버튼을 클릭시 state 값이 변경되지만 UI가 변경되지않는데,
이때 해당 함수를 subscribe에 등록한다.
function red() {
  var state = store.getState();
  document.querySelector('#red').innerHTML = `
  <div class="container" id="component_red" style="background-color:${state.color}">
  <h1>red</h1>
  <input type="button" value="fire" />
  </div>
  `;
  }
store.subscribe(red); // 요기에 등록됨 !!
red();
비교적 간단하당 ^^
그렇다면 blue 박스도 생성해보자.
<div id="red"></div>
<div id="blue"></div> /* blue 박스를 생성한다 */

<script>
function reducer(state, action) {
  console.log(state, action);

  if (state === undefined) {
    return {color: 'yellow'}
  }

  var newState;

  if (action.type === 'CHANGE_COLOR') {
    // 하드코딩되어있던 color 인자를 action의 color 값으로 넣어준다
    newState = Object.assign({}, state, {color: action.color});
  }

  return newState
}

var store = Redux.createStore(reducer);

function red() {
  var state = store.getState();
  document.querySelector('#red').innerHTML = `
  <div class="container" id="component_red" style="background-color:${state.color}">
  <h1>red</h1>
  <input type="button" value="fire" />
  </div>
  `;
}
store.subscribe(red);
red();

// red 함수와 동일하게 blue 함수를 생성하되 dispatch 인자로 blue를 보낸다
function blue() {
  var state = store.getState();
  document.querySelector('#blue').innerHTML = `
  <div class="container" id="component_blue" style="background-color:${state.color}">
  <h1>blue</h1>
  <input type="button" value="fire" />
  </div>
  `;
}
store.subscribe(blue); // blue 함수도 등록
blue();

</script>
휴 🥹