자료구조 & 알고리즘
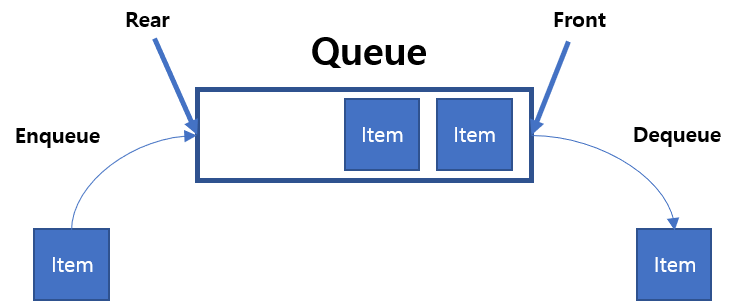
큐
- First In First Out 개념을 가진 선형 자료구조
- 맨 앞을
Front, 맨 뒤를Rear - 큐에 요소 추가는
EnQueue, 요소 빼기는DeQueue - 종류로는 Linear Queue와 Circular Queue가 존재한다.
Linear Queue
- Array로 표현해보기
- JS 특성 상 프론트와 리어가 무한정 커질 수도 있다.
class Queue{
  constructor(){
    this.queue = [];
    this.front = 0;
    this.rear = 0;
  }

  enqueue(value){
    this.queue[this.rear++] = value; //rear 영역에 값을 넣고 rear인덱스를 하나 증가
  }

  dequeue(){
    const value = this.queue[this.front];
    delete this.queue[this.front];
    this.front++;
    return value;
  }

  peek(){ //큐의 가장 앞에 있는 값 알아내기
    return this.queue[this.front];
  }

  size(){ //큐의 길이는 끝 - 처음
    return this.rear - this.front;
  }
}

const q = new Queue();- Linked List로 구현(코테에서는 배열 추천!)
class Node{
  constructor(value){
    this.value = value;
    this.next = null;
  }
}

class Queue{
  constructor(){
    this.head = null;
    this.tail = null;
    this.size = 0;
  }

  enqueue(newValue){
    const newNode = new Node(newValue);
    if(this.head === null){
      this.head = this.tail = newNode; //이렇게 써도 된다..
    }else{
      this.tail.next = newNode;
      this.tail = newNode;
    }
    this.size++;
  }

  dequeue(){
    const value = this.head.value;
    this.head = this.head.next;
    this.size--;
    return value;
  }

  peek(){
    return this.head.value;
  }
}

const q = new Queue();
🤐 shift 함수는 쓰지 말자!
shift는 O(n)의 시간이 걸리기 때문에 큐의 기능을 정확히 수행하지 못한다.
Circular Queue
- Front와 Rear가 이어져있는 Queue
- 잘 사용하진 않으니 알아만 두자!
class Queue{
  constructor(maxSize){
    this.maxSize = maxSize; //큐의 크기 제한
    //리어나 프론트가 크기를 벗어나면 다시 0번 인덱스부터(원형)
    this.queue = [];
    this.front = 0;
    this.rear = 0;
    this.size = 0;
  }

  enqueue(value){
    if(this.isFull()){
      console.log("꽉 찼다.");
      return;
    }
    this.queue[this.rear] = value;
    this.rear = (this.rear + 1) % this.maxSize;
    this.size++;
  }

  dequeue(){
    const value = this.queue[this.front];
    delete this.queue[this.front];
    this.front = (this.front + 1) % this.maxSize;
    this.front++;
    return value;
  }

  isFull(){ //큐가 꽉 찼는지 확인하는 함수
    return this.size === this.maxSize;
  }

  peek(){ //큐의 가장 앞에 있는 값 알아내기
    return this.queue[this.front];
  }

  size(){ //큐의 길이는 끝 - 처음
    return this.rear - this.front;
  }
}

const q = new Queue(3);
해시 테이블
- 한정된 배열 공간에 key를 index로 변환하여 값들을 넣는다.
- 키와 값을 받아 키를 해싱하여 나온 index에 값을 저장하는 선형 자료구조
- 삽입은 O(1)이며 키를 알고 있다면 삭제, 탐색도 O(1)이다.
index는 어떻게 구할까?
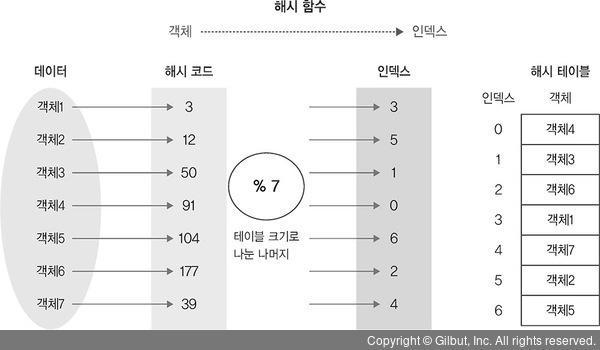
해시 함수
- 입력받은 값을 특정 범위 내 숫자로 변경하는 함수(마음대로 구현)
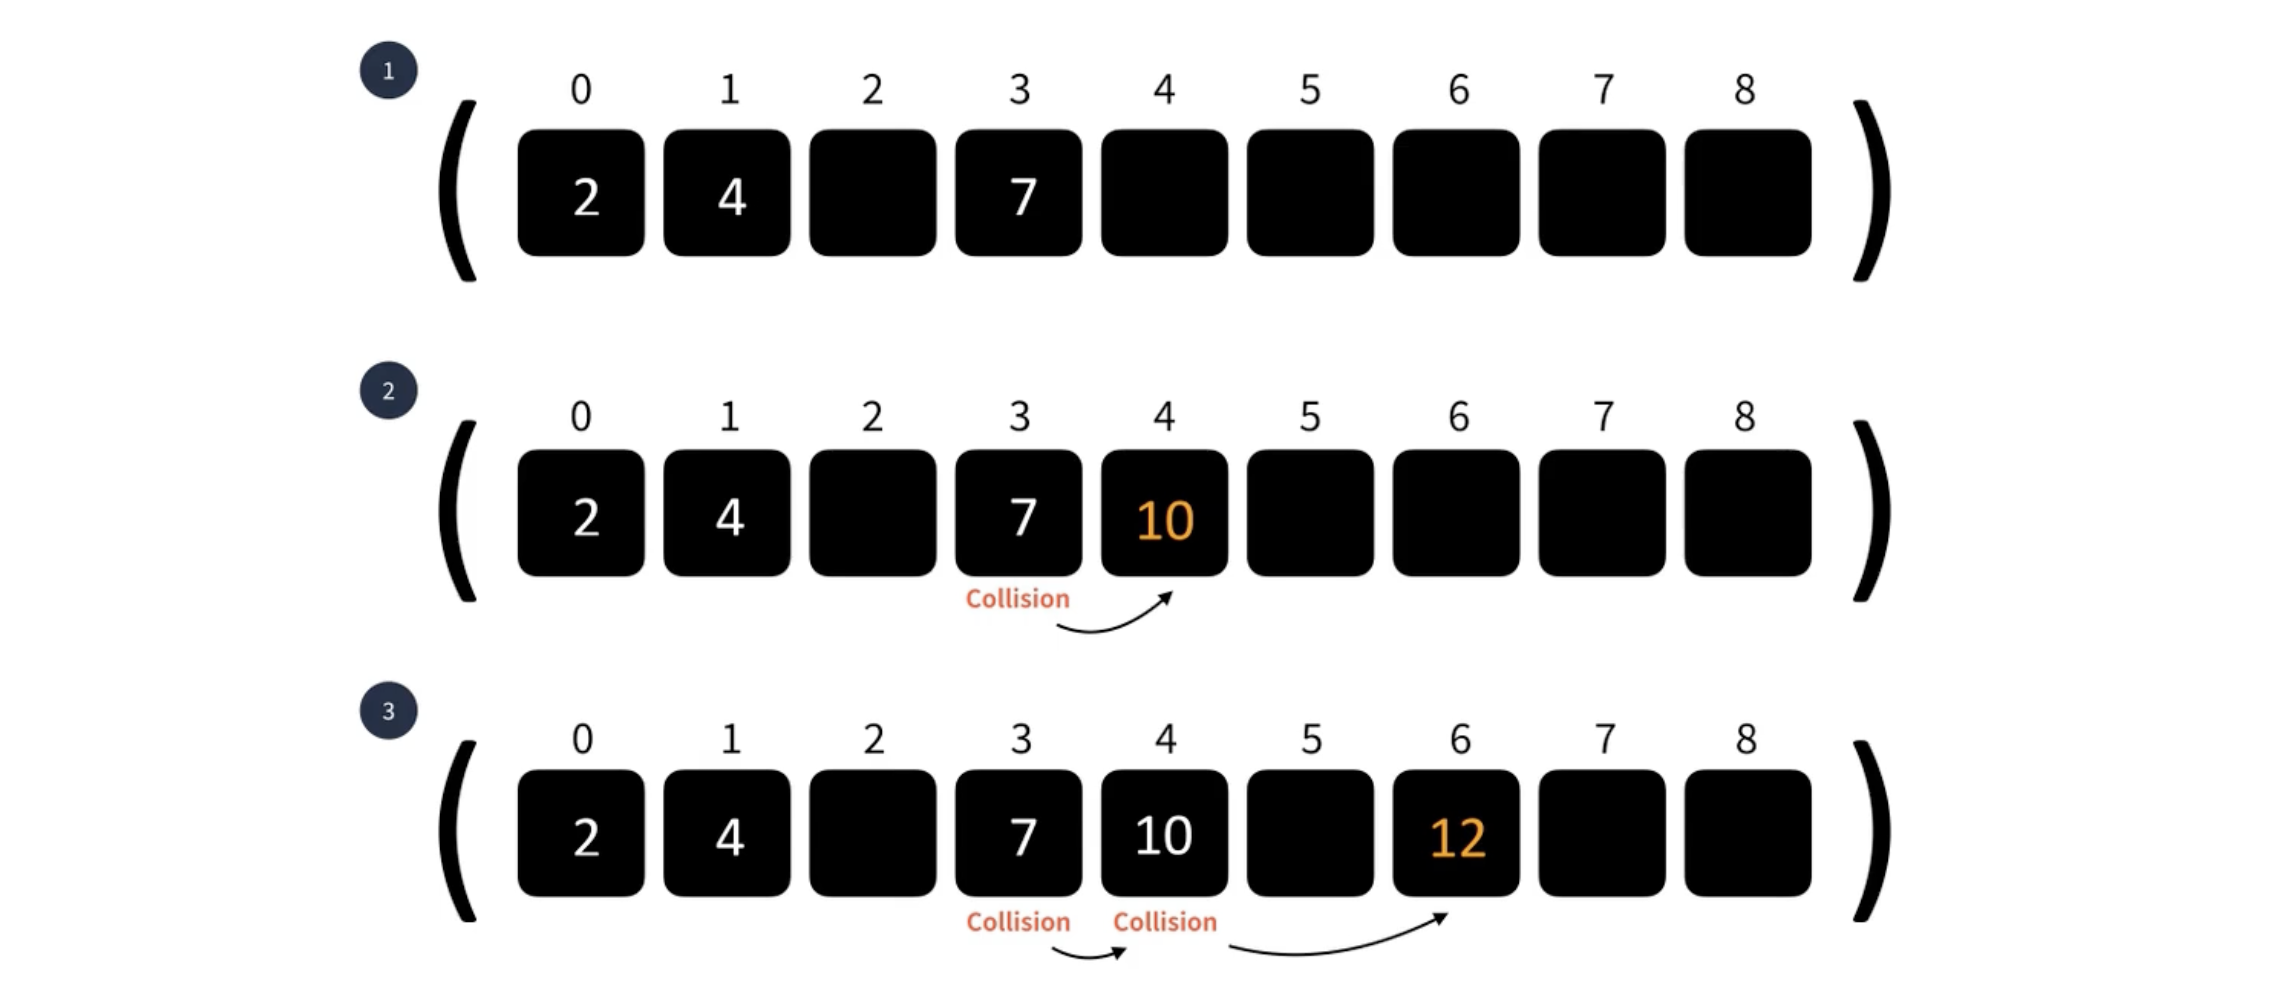
- 만약 해시 함수의 결과가 동일해서 중첩된다면? (해시 충돌)
충돌 해결법 - 선형 탐사법
- 충돌 발생 시 인덱스를 옆으로 한 칸 이동한다.
- 단순하지만 특정 영역에 데이터가 모일 수 있다.
- 이동할 때 옆이 비어있지 않다면 충돌이 발생하지 않을 때까지 이동
- 최악의 경우 탐색에 선형시간이 걸릴 수 있다.
충돌 해결법 - 제곱 탐사법
- 충돌 발생 시 충돌이 발생한 횟수의 제곱만큼 옆으로 이동
충돌 해결법 - 이중 해싱
- 충돌 발생 시 다른 해시 함수를 사용한다.
- 충돌이 발생하지 않을 때 까지 다른 해시 함수로 인덱스를 쪼갬
충돌 해결법 - 분리 연결법
- 버킷의 값을 연결 리스트로 사용하여 충돌 발생 시 리스트에 값을 추가
- 최악의 경우 하나의 버킷이 무한정 늘어날 수도 있다.
어디에 사용할까?
- 출석부를 예로 들어보자
- 연결리스트 사용 시 학생을 추가하거나 삭제하는 데는 빠르지만 학생 정보가 알고 싶을 땐 O(n)이 걸린다.
- 배열 또한 인덱스를 모른다면 학생 정보를 찾는데 O(n)이 걸린다.
😀 해시 테이블을 사용한다면?
이름을 키로 사용하여 O(1)만에 찾을 수 있다. - 즉, 빠르게 값을 찾아야 하는 경우 해시 테이블을 사용하는 것이 좋다.
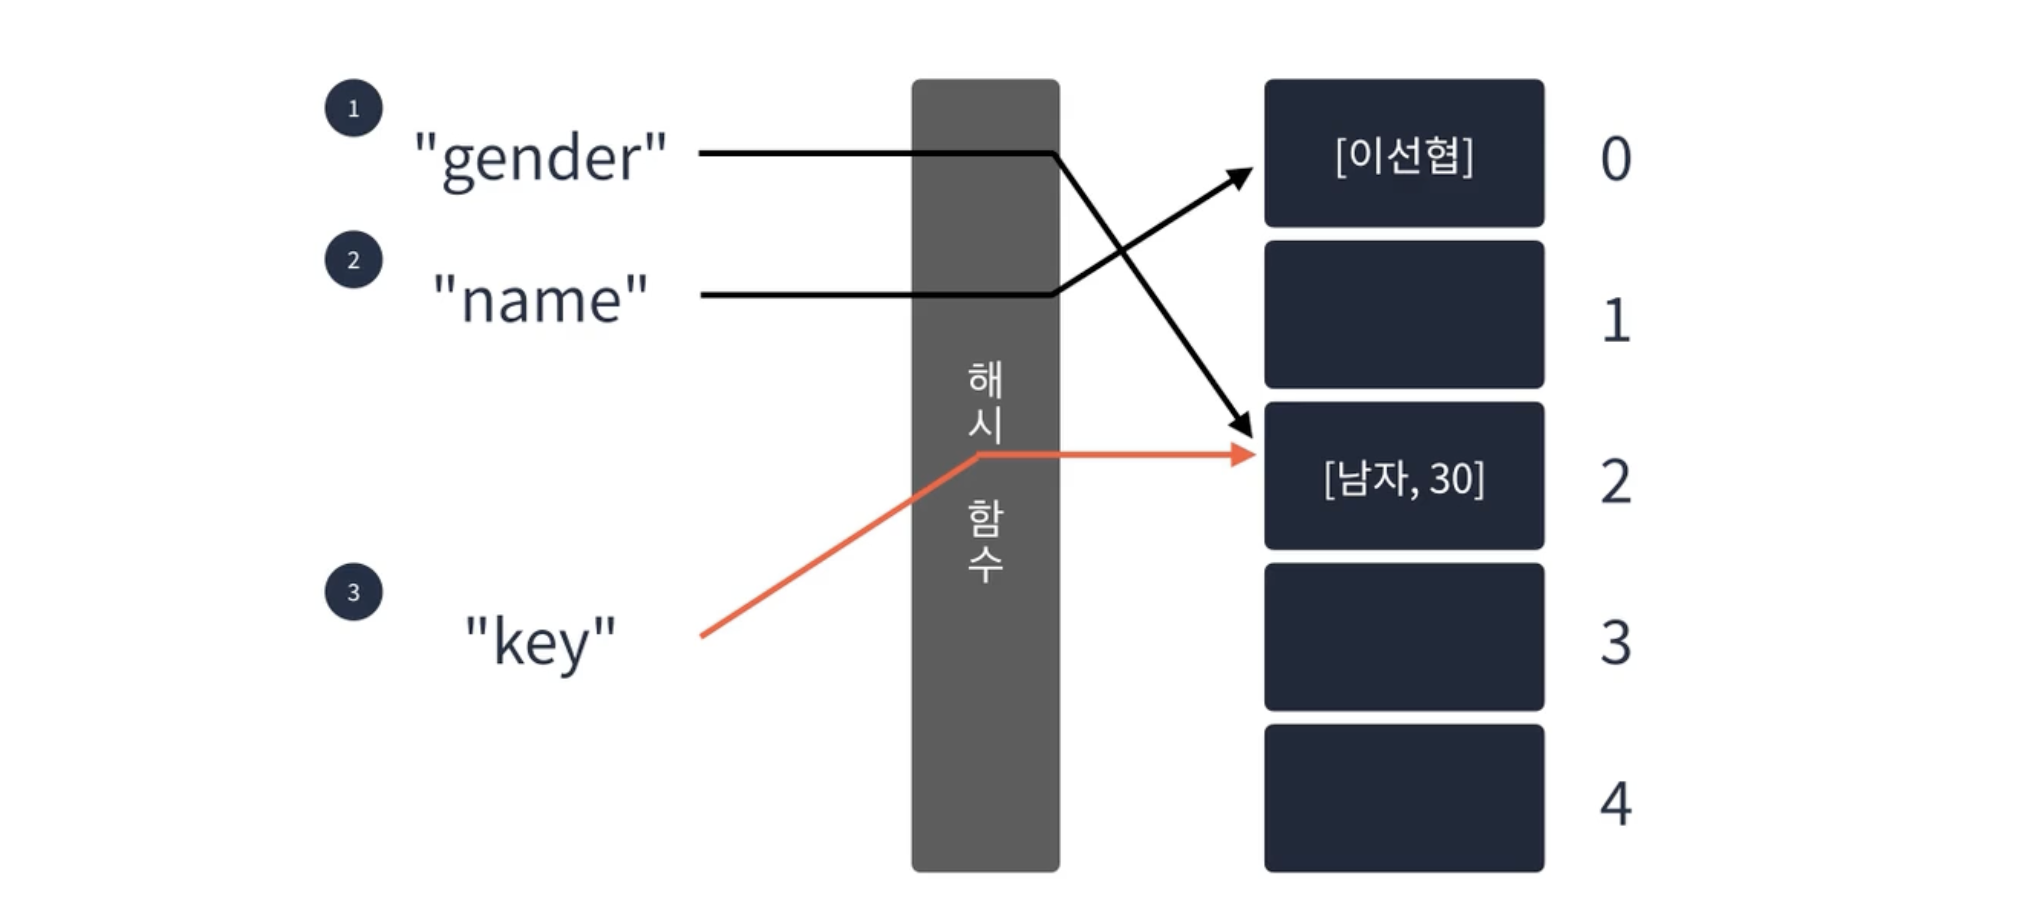
JS에서의 Array = Hash Table
- 배열 이용 - 올바른 방법은 아니다!!!
const hash = [];

hash["key"] = 1;
hash["key1"] = 2;

console.log(hash["key1"]); // 2

hash["key1"] = 100;
console.log(hash["key1"]); //100

delete hash["key1"];
console.log(hash["key1"]); //undefined- 객체 이용 - 제일 정석적?
const hash = {};

hash["key"] = 1;
hash["key1"] = 2;

console.log(hash["key1"]); // 2

hash["key1"] = 100;
console.log(hash["key1"]); //100

delete hash["key1"];
console.log(hash["key1"]); //undefined- Map 이용
- 배열이나 객체도 키 값으로 사용할 수 있다.
- 여러 편한 메소드를 제공하고 순회를 편하게 할 수 있다.
const hash = new Map();

hash.set("key",1);
hash.set("key1",2);

console.log(hash.get("key1")); // 2

const obj = { a:1 };
hash.set(obj,"AAA");

console.log(hash.get(obj)); // AAA
console.log(hash.keys()); // { 'key', 'key1', { a: 1 } }
console.log(hash.values()); // { 1, 2, 'AAA' }

hash.clear();
console.log(hash); //{}- Set 이용
- 중복된 값을 자동으로 제거(집합)
const hash = new Set();

hash.add("key",1);
hash.add("key1",2);

console.log(hash.has("key1")); //true 이 키 값을 가지고 있는지
console.log(hash.has("key2")); //false

hash.delete("key");
console.log(hash.has("key")); //false
console.log(hash.size); // 1
그래프
정점(Node)과 정점 사이를 연결하는간선(Edge)으로 이루어진 비선형 자료구조 Ex) 드라마 - 인물관계도, 지하철 노선도
그래프의 특징
- 정점은 여러 개의 간선을 가질 수 있다.(여러 개의 요소 배치)
- 방향 그래프와 무방향 그래프 (간선의 방향 존재 유무)
- 간선은 가중치를 가질 수 있다. (최단 거리 알고리즘 등에 이용)
- 사이클이 발생할 수 있다. (무한루프에 빠지지 않도록 주의하자!)
무방향 그래프
- 간선으로 이어진 정점끼리 양방향으로 이동이 가능하다. (A,B) == (B,A)
방향 그래프
- 간선에 방향성이 존재 (A,B) != (B,A)
연결 그래프
- 모든 정점이 서로 이동 가능한 상태인 그래프
비연결 그래프
- 특정 정점쌍 사이에 간선이 존재하지 않는 그래프
완전 그래프
- 모든 정점끼리 연결된 상태인 그래프
- 한 정점의 간선 수 == 모든 정점 - 1
- 모든 간선 수 == (모든 정점 - 1) * 모든 정점 수
사이클
- 그래프의 정점과 간선의 부분 집합에서 순환이 되는 부분
그래프의 구현 방법
- 인접 행렬(2차원 배열), 인접 리스트(연결 리스트)
인접 행렬
const graph = Array.from(Array(5), () => Array(5).fill(false));

// [
//   [ false, false, false, false, false ],
//   [ false, false, false, false, false ],
//   [ false, false, false, false, false ],
//   [ false, false, false, false, false ],
//   [ false, false, false, false, false ]
// ]

graph[0][1] = 1;
graph[0][3] = 1;
graph[1][2] = 1;
graph[2][1] = 1;
graph[3][4] = 1;
graph[4][4] = 1;


//[
//   [ false, 1, false, 1, false ],
//   [ false, false, 1, false, false ],
//   [ false, 1, false, false, false ],
//   [ false, false, false, false, 1 ],
//   [ false, false, false, false, 1 ]
// ]
인접 리스트
- 정점의 수만큼 배열 만든 후 연결할 정점을 배열에 추가한다.
const graph = Array.from(Array(5), () => []);

graph[0].push(1);
graph[0].push(3);
graph[1].push(1);
graph[1].push(5);
graph[2].push(10);
graph[3].push(11);
graph[3].push(12);
graph[4].push(0);

console.log(graph); // [ [ 1, 3 ], [ 1, 5 ], [ 10 ], [ 11, 12 ], [ 0 ] ]
주니어 프론트엔드 개발자가 되고 싶습니다!