✍🏻 요구사항 분석
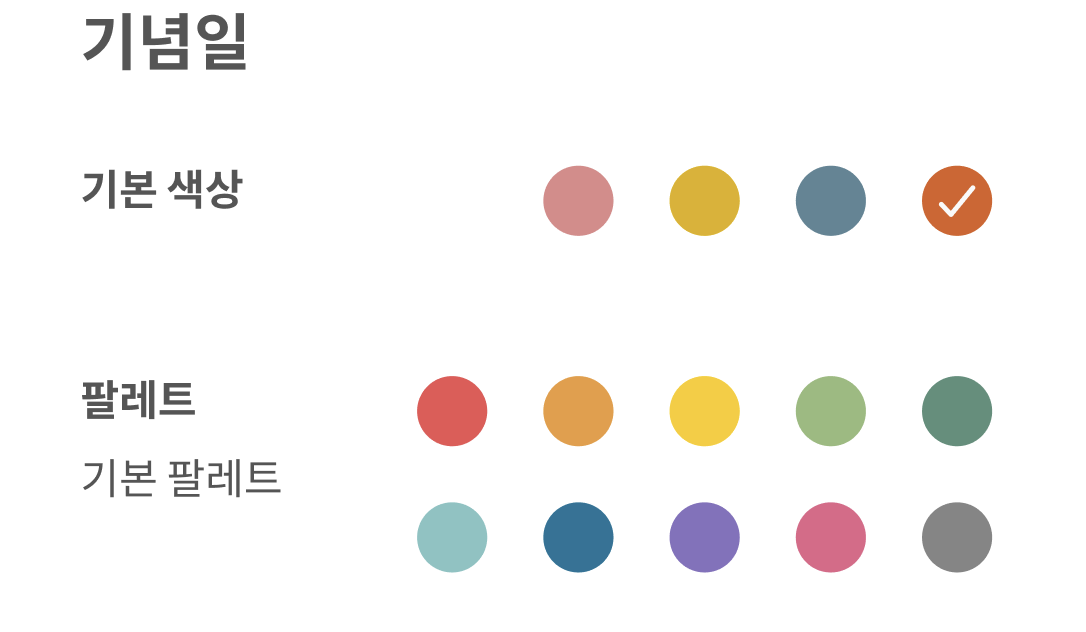
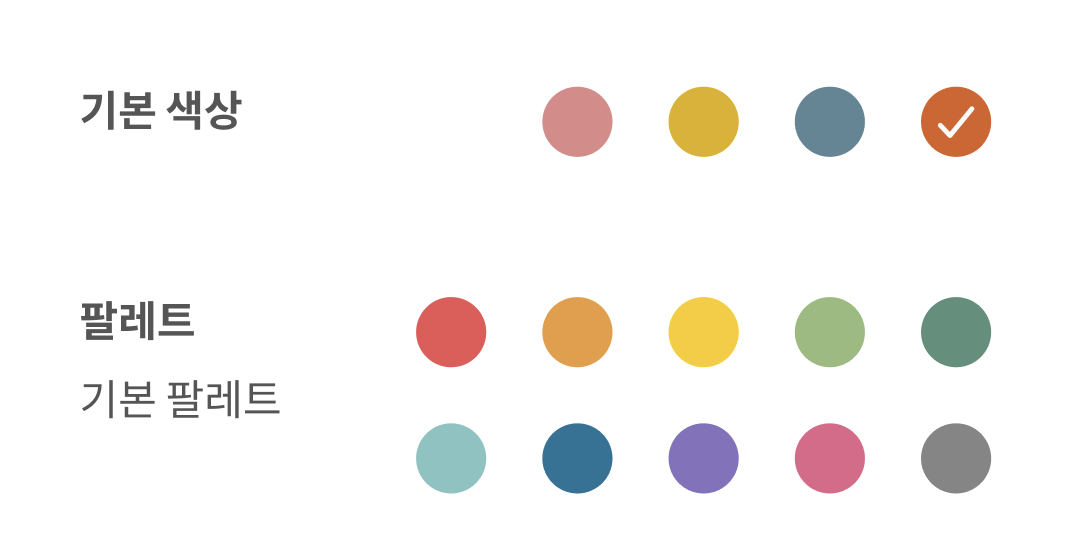
위와 같이 기본 색상과 팔레트 색상이 구분되어있는 것에 대해, 체크 표시는 전체에서 하나밖에 가능하지 않아 이를 구분해주어야 됐다.
사실 위의 기본 색상 4개와 팔레트 색상 10개는 모두 수가 고정되어있긴 해서 둘 다 그냥 하나의 위젯으로 구성해도 됐을 거 같지만.,, 팔레트의 경우 다양한 색상 팔레트를 쓸 수 있기에
기본 색상은 LinearLayout 안에 하나하나로, 팔레트 색상은 리사이클러뷰 + 그리드 레이아웃 메니저로 구현해 주었다.
💻 코드 작성
1️⃣ 화면 구현하기
앞서
<?xml version="1.0" encoding="utf-8"?>
<layout xmlns:android="http://schemas.android.com/apk/res/android"
    xmlns:tools="http://schemas.android.com/tools"
    xmlns:app="http://schemas.android.com/apk/res-auto">

    <androidx.constraintlayout.widget.ConstraintLayout
        android:layout_width="match_parent"
        android:layout_height="match_parent">

        <!--플로팅 캘린더 카테고리 색상 설정 화면-->
        <androidx.constraintlayout.widget.ConstraintLayout
            android:layout_width="match_parent"
            android:layout_height="match_parent"
            android:background="@drawable/border_round_top"
            android:elevation="@dimen/cardview_default_elevation"
            app:layout_constraintTop_toTopOf="parent"
            app:layout_constraintStart_toStartOf="parent">

            ...
           <androidx.constraintlayout.widget.ConstraintLayout
                android:id="@+id/category_detail_calender_ll"
                android:layout_width="match_parent"
                android:layout_height="wrap_content"
                android:orientation="vertical"
                android:layout_marginTop="20dp"
                android:layout_marginStart="30dp"
                android:layout_marginEnd="30dp"
                app:layout_constraintStart_toStartOf="parent"
                app:layout_constraintTop_toBottomOf="@id/category_detail_back_iv">

                <LinearLayout
                    android:layout_width="wrap_content"
                    android:layout_height="wrap_content"
                    app:layout_constraintTop_toTopOf="@id/category_detail_defalut_color_tv"
                    app:layout_constraintBottom_toBottomOf="@id/category_detail_defalut_color_tv"
                    app:layout_constraintEnd_toEndOf="parent">
                    <androidx.cardview.widget.CardView
                        android:id="@+id/schedule_color_cv"
                        app:cardBackgroundColor="@color/schedule"
                        style="@style/category_cv">
                        <ImageView
                            android:id="@+id/schedule_color_select_iv"
                            style="@style/img_category_check"/>
                    </androidx.cardview.widget.CardView>
                    <androidx.cardview.widget.CardView
                        android:id="@+id/schedule_plan_color_cv"
                        android:layout_marginStart="20dp"
                        app:cardBackgroundColor="@color/schedule_plan"
                        style="@style/category_cv">
                        <ImageView
                            android:id="@+id/schedule_plan_color_select_iv"
                            style="@style/img_category_check"/>
                    </androidx.cardview.widget.CardView>
                    <androidx.cardview.widget.CardView
                        android:id="@+id/schedule_parttime_color_cv"
                        android:layout_marginStart="20dp"
                        app:cardBackgroundColor="@color/schedule_parttime"
                        style="@style/category_cv">
                        <ImageView
                            android:id="@+id/schedule_parttime_color_select_iv"
                            style="@style/img_category_check"/>
                    </androidx.cardview.widget.CardView>
                    <androidx.cardview.widget.CardView
                        android:id="@+id/schedule_group_color_cv"
                        android:layout_marginStart="20dp"
                        app:cardBackgroundColor="@color/schedule_group"
                        style="@style/category_cv">
                        <ImageView
                            android:id="@+id/schedule_group_color_select_iv"
                            style="@style/img_category_check"/>
                    </androidx.cardview.widget.CardView>

                </LinearLayout>

                <TextView
                    android:id="@+id/category_palette_title_tv"
                    android:layout_marginTop="55dp"
                    android:text="@string/category_palette"
                    app:layout_constraintTop_toBottomOf="@id/category_detail_defalut_color_tv"
                    app:layout_constraintStart_toStartOf="parent"
                    style="@style/category_setting_tv"/>

                <TextView
                    android:id="@+id/category_paletted_name_tv"
                    android:layout_width="wrap_content"
                    android:layout_height="wrap_content"
                    android:text="@string/palette_normal"
                    android:textColor="@color/textGray"
                    android:background="@null"
                    android:textSize="15sp"
                    android:layout_marginTop="8dp"
                    app:layout_constraintTop_toBottomOf="@id/category_palette_title_tv"
                    app:layout_constraintStart_toStartOf="parent"/>

                <androidx.recyclerview.widget.RecyclerView
                    android:id="@+id/category_palette_rv"
                    android:layout_width="wrap_content"
                    android:layout_height="wrap_content"
                    android:layout_marginTop="-15dp"
                    app:layoutManager="androidx.recyclerview.widget.GridLayoutManager"
                    app:spanCount="5"
                    tools:listitem="@layout/item_palette_color"
                    app:layout_constraintTop_toTopOf="@id/category_palette_title_tv"
                    app:layout_constraintEnd_toEndOf="parent"/>

                ...

            </androidx.constraintlayout.widget.ConstraintLayout>
        </androidx.constraintlayout.widget.ConstraintLayout>
    </androidx.constraintlayout.widget.ConstraintLayout>

</layout>
기본 색상은 LinearLayout로 묶어주고, 팔레트 색상은 리사이클러뷰로 묶어줌. 원형의 카테고리 색 안에 체크 표시가 있는 형식인데, 스타일은 이렇게 된다.
<style name="img_category_check">
        <item name="android:layout_width">13dp</item>
        <item name="android:layout_height">12dp</item>
        <item name="android:layout_gravity">center</item>
        <item name="android:scaleType">fitCenter</item>
        <item name="android:src">@drawable/ic_category_selected</item>
        <item name="android:visibility">gone</item>
</style>

<style name="category_cv">
        <item name="android:layout_width">25dp</item>
        <item name="android:layout_height">25dp</item>
        <item name="cardCornerRadius">25dp</item>
        <item name="cardElevation">0dp</item>
        <item name="cardBackgroundColor">@color/schedule</item>
</style>
리사이클러뷰 아이템 또한 동일하게 구성되었다. CardView로 만든 동그라미 안에 체크 표시가 있는 식이다.
<?xml version="1.0" encoding="utf-8"?>
<androidx.constraintlayout.widget.ConstraintLayout xmlns:android="http://schemas.android.com/apk/res/android"
    android:layout_width="wrap_content"
    android:layout_height="wrap_content"
    xmlns:app="http://schemas.android.com/apk/res-auto">

    <androidx.cardview.widget.CardView
        android:id="@+id/item_palette_color_cv"
        android:layout_marginStart="15dp"
        android:layout_marginTop="15dp"
        android:layout_marginBottom="1dp"
        app:cardBackgroundColor="@color/categoryGray"
        app:layout_constraintTop_toTopOf="parent"
        app:layout_constraintStart_toStartOf="parent"
        style="@style/category_cv">
        <ImageView
            android:id="@+id/item_palette_select_iv"
            style="@style/img_category_check"/>
    </androidx.cardview.widget.CardView>


</androidx.constraintlayout.widget.ConstraintLayout>
2️⃣ 색상 정의
<!--  Color Array  -->
    <array name="categoryColorArr">
        <item>@color/schedule</item>
        <item>@color/schedule_plan</item>
        <item>@color/schedule_parttime</item>
        <item>@color/schedule_group</item>
        <item>@color/palette1</item>
        <item>@color/palette2</item>
        <item>@color/palette3</item>
        <item>@color/palette4</item>
        <item>@color/palette5</item>
        <item>@color/palette6</item>
        <item>@color/palette7</item>
        <item>@color/palette8</item>
        <item>@color/palette9</item>
        <item>@color/palette10</item>
    </array>
기본 색상과 팔레트 색상을 한 데 묶어서 정의해 준다. 0~3번 item까지는 기본 색상이고, 4~13번 item까지는 팔레트 색상이다.
안드로이드에서 리소스 배열을 사용하는 방법은
https://velog.io/@nahy-512/AndroidKotlin-%EB%A6%AC%EC%86%8C%EC%8A%A4color-string-drawable-array-%EC%82%AC%EC%9A%A9
해당 글에 더 자세히 정리되어 있다.
사용하고자 하는 프래그먼트에서는,
class CategoryDetailFragment(private val isEditMode: Boolean) : Fragment(), {

    private lateinit var paletteAdapter: CategoryPaletteRVAdapter
    private lateinit var categoryColorArray : IntArray

    private lateinit var categoryList : List<CardView>
    private lateinit var checkList : List<ImageView>

    override fun onCreateView(
        inflater: LayoutInflater,
        container: ViewGroup?,
        savedInstanceState: Bundle?
    ): View? {

        ...

        categoryColorArray = resources.getIntArray(R.array.categoryColorArr)

        clickCategoryItem()
        initPaletteColorRv(color)
        ...
    }

    private fun initBasicColor() {
        // 기본 색상 관련 리스트 설정
        with (binding) {
            categoryList = listOf(
                scheduleColorCv, schedulePlanColorCv, scheduleParttimeColorCv, scheduleGroupColorCv
            )
            checkList = listOf(
                scheduleColorSelectIv, schedulePlanColorSelectIv, scheduleParttimeColorSelectIv, scheduleGroupColorSelectIv
            )
        }
    }

    private fun initPaletteColorRv(initColor: Int) {

        // 더미데이터 냅다 집어 넣기
        val paletteDatas = arrayListOf(
            categoryColorArray[4], categoryColorArray[5], categoryColorArray[6], categoryColorArray[7], categoryColorArray[8],
            categoryColorArray[9], categoryColorArray[10], categoryColorArray[11], categoryColorArray[12], categoryColorArray[13]
        )
        ...
    }
이런 식으로 기본 색상 LinearLayout과, 팔레트 색상 리사이클러뷰 어댑터 안에 넣어줄 paletteDatas를 지정해주면 된다.
3️⃣ 팔레트 색상 선택하기 (리사이클러뷰 단일 선택)
* 어댑터 구성
class CategoryPaletteRVAdapter(
    val context: Context,
    private val colorList: ArrayList<Int>,
    initColor: Int,
    selectedPalettePosition: Int
    ): RecyclerView.Adapter<CategoryPaletteRVAdapter.ViewHolder>() {

    interface MyItemClickListener {
        fun onItemClick(position: Int, selectedColor: Int)
    }

    private lateinit var mItemClickListener: MyItemClickListener
    private var curSelectPosition = if (colorList[selectedPalettePosition] == initColor) selectedPalettePosition else -1
    private var prevSelectPosition = curSelectPosition

    fun setColorClickListener(itemClickListener: MyItemClickListener) {
        mItemClickListener = itemClickListener
    }

    override fun onCreateViewHolder(viewGroup: ViewGroup, viewType: Int): ViewHolder {
        val binding: ItemPaletteColorBinding = ItemPaletteColorBinding.inflate(
            LayoutInflater.from(viewGroup.context), viewGroup, false)

//        Log.d("CategoryPaletteRVA", "최초 initColor: $currentSelectPosition")

        return ViewHolder(binding)
    }

    override fun onBindViewHolder(holder: ViewHolder, position: Int) {
        holder.bind(colorList[position])
        holder.apply {

            itemView.setOnClickListener {
                curSelectPosition = position.toInt()
                // 팔레트 색상 내에서 단일 선택
                if (prevSelectPosition != -1) {
//                    Log.d("CategoryPaletteRVA", "curPosition: ${currentSelectPosition}, prevPosition: $prevSelectPosition")
                    holder.bind(colorList[position])
                    notifyItemChanged(prevSelectPosition)
                }

                // 클릭한 아이템 체크 표시
                binding.itemPaletteSelectIv.visibility = View.VISIBLE
                mItemClickListener.onItemClick(position, colorList[position])

                prevSelectPosition = curSelectPosition
//                Log.d("CategoryPaletteRVA", "selectedPosition: $position")
            }
        }
    }

    override fun getItemCount(): Int = colorList.size

    inner class ViewHolder(val binding: ItemPaletteColorBinding): RecyclerView.ViewHolder(binding.root) {
        val selectIv = binding.itemPaletteSelectIv

        fun bind(color : Int) {
            // 카테고리 색 확인
//            Log.d("PaletteColor", "position = ${absoluteAdapterPosition} color = $color")
            // 카드뷰에 색 넣어주기
            binding.itemPaletteColorCv.background.setTint(color)
            // 체크 표시 초기화
            if (adapterPosition == curSelectPosition) selectIv.visibility = View.VISIBLE
            else selectIv.visibility = View.GONE
        }
    }
}
전역 변수로 현재 선택중인curSelectPosition, 이전에 선택한 prevSelectPosition(최초에는 cur과 동일)를 선언한 다음, 아이템이 클릭되었을 때 cur를 업데이트하고, prev의 선택을 취소한 다음 prev의 값을 cur로 업데이트 해준다. 이렇게 되면 다른 값들이 선택될 때마다 이전에 선택했던 체크 표시가 지워진다. notifyDataSetChange()는 별로 권장되지 않는 방법이라고 해서, notifyItemChanged(prevSelectPosition)으로, 이전에 선택한 포지션에서 변경되었음을 업데이트 해주었다.
* 어댑터 연결
class CategoryDetailFragment(private val isEditMode: Boolean) : Fragment(), CategoryDetailView {
    ...

    private lateinit var paletteAdapter: CategoryPaletteRVAdapte

    private lateinit var category: Category

    // 카테고리에 들어갈 데이터
    var categoryId : Long = -1
    var color: Int = 0

    var selectedPalettePosition: Int? = null // 팔레트 -> 기본 색상 선택 시 사용될 변수

    private fun initPaletteColorRv(initColor: Int) {

        // 더미데이터 냅다 집어 넣기
        val paletteDatas = arrayListOf(
            ...
        )

        for (i: Int in paletteDatas.indices) {
            if (paletteDatas[i] == color) {
                selectedPalettePosition = i
                paletteId = i + 5
            }
        }

        if (selectedPalettePosition == null) selectedPalettePosition = 0

        // 어댑터 연결
        paletteAdapter = CategoryPaletteRVAdapter(requireContext(), paletteDatas, initColor, selectedPalettePosition!!)
        binding.categoryPaletteRv.apply {
            adapter = paletteAdapter
            layoutManager = GridLayoutManager(context, 5)
        }
        // 아이템 클릭
        paletteAdapter.setColorClickListener(object: CategoryPaletteRVAdapter.MyItemClickListener {
            override fun onItemClick(position: Int, selectedColor: Int) {
                // 팔레트의 색상을 선택했다면 기본 색상의 체크 상태는 초기화
                for (j: Int in categoryList.indices) {
                    checkList[j].visibility = View.GONE
                }
                // 색상값 세팅
                this@CategoryDetailFragment.color = selectedColor
                paletteId = position + 5 // 팔레트는 paletteId 5번부터 시작
                // notifyItemChanged()에서 인자로 넘겨주기 위함. 기본 색상을 클릭했다면 이전에 선택된 팔레트 색상의 체크 표시는 해제
                selectedPalettePosition = position
            }
        })
    }
카테고리 색을 선택하면 그 색을 저장해서 받아오는데, 최초 색이 있다면 이를 가져와 selectedPalettePosition으로 넣어준다. paletteDatas 안의 색상은 팔레트 색상인 4~13번 까지이니, 이 범위 내에서 찾지 못했다면 기본 색상이 선택된 것이므로, 팔레트 색상의 체크 표시가 있으면 안된다. 이 부분을
if (selectedPalettePosition == null) selectedPalettePosition = 0으로 나타내 주었다.
아이템을 클릭했을 때, position과 selectedColor를 받아서 팔레트의 색상을 선택했다면 기본 색상의 산택은 초기화해 주어야 한다. 이 또한 checkList로 기본 색상의 체크들을 저장한 것의 visibility 다 GONE으로 바꿔주면 된다. 그리고 리사이클러뷰 아이템 클릭으로 받아온 색상은 color 전역 변수 안에 selecctedColor를 넣어놓는 것으로 저장하고, paletteId와 selectedPalettePosition도 클릭한 값을 이용해 업데이트 해준다.
4️⃣ 기본 색상 선택하기
팔레트 색상 선택 동작을 다뤘으니, 기본 색상을 선택했을 때의 동작도 지정해준다.
앞서 전역 변수로 지정해줬던
var selectedPalettePosition: Int? = null가 중요하게 쓰이는 부분이다.
팔레트 -> 기본 색상 선택 시 사용될 변수이다.
private fun clickCategoryItem() {
        for (i: Int in categoryList.indices) {
            categoryList[i].setOnClickListener {
                // 다른 모든 기본 색상 선택 해제
                for (j: Int in categoryList.indices) {
                    checkList[j].visibility = View.GONE
                }
                // 팔레트 내의 색상도 모두 선택 해제
                initPaletteColorRv(-1)
                if (selectedPalettePosition != null) {
                    paletteAdapter.notifyItemChanged(selectedPalettePosition!!)
                }
                // 선택한 카테고리 표시
                checkList[i].visibility = View.VISIBLE
                color = categoryColorArray[i]
                paletteId = i + 1 // 기본 색상은 paletteId 1번부터 시작
                // 이제 팔레트가 아니라 기본 색상에서 설정한 색임
                selectedPalettePosition = null
            }
        }
    }
categoryList(기본 색상)에서 선택된 게 있다면, 다른 모든 기본 색상의 선택은 해제하고 팔레트 색상 중 선택한 것도 해제해야한다. 기본 색상 선택 해제는 그냥 chekList의 visibility를 GONE으로 해주면 된다.
팔레트 색상 해제의 경우에는 initColor 인자를 -1로 넘겨주고, 이전에 팔레트에서 선택했던 selectedPalettePosition이 있다면 선택 해제를 알려주는 notifyItemChanged()를 호출해주면 된다.
기본 색상은 id가 1부터 시작하므로(서버에서) 이 또한 반영해서 넣어준다. 또한, 팔레트에서 선택한 색상이 아니므로 selectedPalettePosition은 null로 넣어주면 된다.
😀 후기
팔레트의 아이템 개수가 그렇게 크지 않은 10개로 고정되어 있고, 기본 색상 또한 4개로 (얘는 색까지) 고정되어 있는 것을 반영해 더 나은 방법이 있었을 거 같지만.. 이를 테면 굳이 재사용 필요가 없으니 리사이클러뷰 대신 리스트뷰를 사용한다던가.. 하지만 그냥 익숙한 리사이클러뷰를 활용해 위와 같이 구현했다. 꽤 필을 받아서 새벽까지 졸린지도 모르고 구현했던 주제였다. 내 코드에서는 리사이클러뷰 외에 기본 색상을 선택하는 부분도 있어서, 리사뷰 단일 선택만 확인하기는 어렵지만, 이럴 필요가 없다면 3️⃣ 팔레트 색상 선택하기 (리사이클러뷰 단일 선택)만 확인해도 괜찮을 거 같다.