
✍🏻 요구사항 분석
나는 여태까지 한 번도 리사이클러뷰에 StaggeredGridLayout을 쓴 적이 없었는데, 해커톤에서 마주한 화면은 이를 사용해서 만들어야 했다. 해커톤이 사실 시간에 쫓기기도 했고, 계속 구현해본 코드만 가져다가 쓰다가 처음 하려니까 걱정도 많이 됐다. 내가 걱정하는 것을 보고 디자이너 분께서 다른 디자인을 만들어주시기도 했다. 하지만 나도 격자 무늬가 더 예쁘다는 생각이었고, 꼭 한 번 해보고 싶었다.
 StaggeredGridLayoutManager 버전 StaggeredGridLayoutManager 버전 | 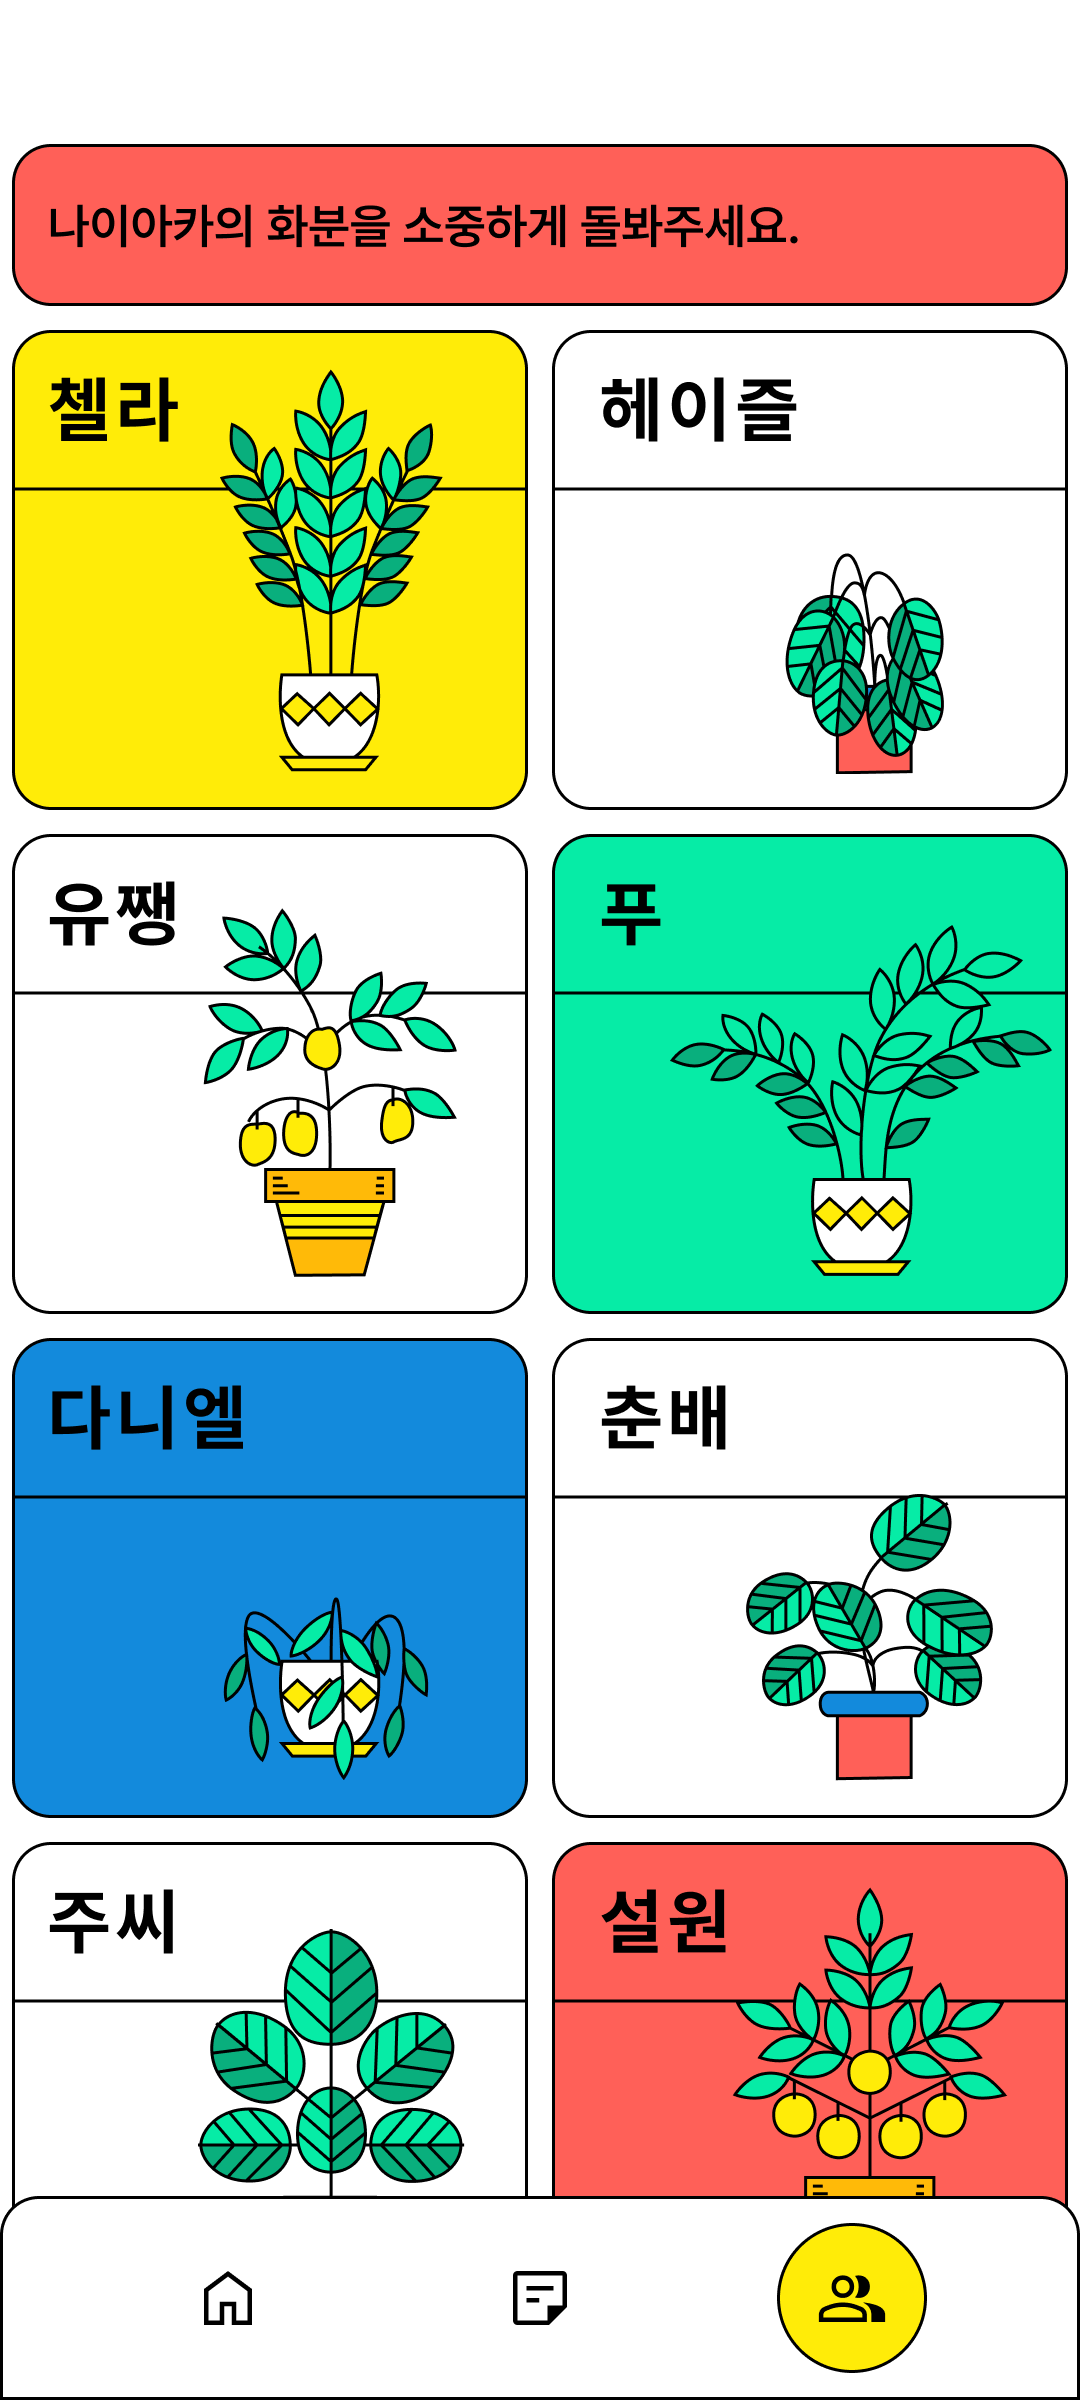 GridLayoutManager 버전 GridLayoutManager 버전 |
|---|
셀에 색이랑 화분(랜덤)도 넣어야했고, 맨 위 오른쪽 아이템의 크기도 작게 해야했다.
💻 구현 코드
1. 리사이클러뷰 아이템 xml 코드 작성
<?xml version="1.0" encoding="utf-8"?>
<layout xmlns:android="http://schemas.android.com/apk/res/android"
    xmlns:tools="http://schemas.android.com/tools"
    xmlns:app="http://schemas.android.com/apk/res-auto">

    <androidx.constraintlayout.widget.ConstraintLayout
        android:layout_width="match_parent"
        android:layout_height="wrap_content"
        android:layout_marginVertical="@dimen/margin_4"
        app:layout_constraintStart_toStartOf="parent"
        app:layout_constraintTop_toTopOf="parent">

        <androidx.constraintlayout.widget.ConstraintLayout
            android:id="@+id/item_fg_friends_rv_list_cl"
            android:layout_width="wrap_content"
            android:layout_height="0dp"
            app:layout_constraintTop_toTopOf="parent"
            app:layout_constraintStart_toStartOf="parent"
            app:layout_constraintEnd_toEndOf="parent">

            <androidx.cardview.widget.CardView
                android:id="@+id/item_fg_friends_rv_list_cv"
                android:layout_width="wrap_content"
                android:layout_height="0dp"
                app:cardCornerRadius="13dp"
                app:cardBackgroundColor="@color/main_blue"
                app:layout_constraintDimensionRatio="1:1"
                app:layout_constraintTop_toTopOf="parent"
                app:layout_constraintStart_toStartOf="parent"
                app:layout_constraintEnd_toEndOf="parent">
                <ImageView
                    android:id="@+id/item_fg_friends_rv_list_iv_color"
                    android:layout_width="match_parent"
                    android:layout_height="match_parent"
                    android:scaleType="fitXY"
                    android:src="@drawable/bg_friend"/>
            </androidx.cardview.widget.CardView>

        </androidx.constraintlayout.widget.ConstraintLayout>

        <TextView
            android:id="@+id/item_fg_friends_rv_list_tv_name"
            android:layout_width="wrap_content"
            android:layout_height="wrap_content"
            android:textSize="24sp"
            android:textStyle="bold"
            android:textColor="@color/black"
            android:fontFamily="@font/pretendard_bold"
            android:layout_marginStart="16dp"
            android:layout_marginTop="16dp"
            app:layout_constraintTop_toTopOf="@id/item_fg_friends_rv_list_cl"
            app:layout_constraintStart_toStartOf="@id/item_fg_friends_rv_list_cl"
            tools:text="코코아"/>

        <ImageView
            android:id="@+id/item_fg_friends_rv_list_iv_images"
            android:layout_width="wrap_content"
            android:layout_height="match_parent"
            android:scaleType="centerCrop"
            android:adjustViewBounds="true"
            android:src="@drawable/ic_plant2_l"
            android:layout_marginBottom="11dp"
            app:layout_constraintBottom_toBottomOf="@id/item_fg_friends_rv_list_cl"
            app:layout_constraintEnd_toEndOf="@id/item_fg_friends_rv_list_cl"/>

        <TextView
            android:id="@+id/item_fg_friends_rv_list_tv_content"
            android:layout_width="match_parent"
            android:layout_height="75dp"
            android:gravity="center_vertical"
            android:layout_marginHorizontal="@dimen/margin_4"
            android:paddingHorizontal="12dp"
            android:paddingVertical="16dp"
            android:text="나이아카의 화분을\n소중하게 돌봐주세요."
            android:textSize="16sp"
            android:textStyle="bold"
            android:textColor="@color/black"
            android:fontFamily="@font/pretendard_bold"
            android:src="@drawable/bg_friend_list"
            android:background="@drawable/bg_friend_list"
            android:visibility="gone"
            app:layout_constraintTop_toTopOf="parent"
            app:layout_constraintStart_toStartOf="parent"
            app:layout_constraintEnd_toEndOf="parent"/>

    </androidx.constraintlayout.widget.ConstraintLayout>
</layout>
배경도 꽤 까다롭고, 화분 사진도 넣어야하고, 또 화분이 없는 버전용으로 TextView를 하나 더 넣어주었다.
결국 배경을 CardView로 만들긴 했지만 배경색이 완전히 딱 맞게 들어가지는 못해서 살짝 더러운데.. 최선이었다고 생각한다.
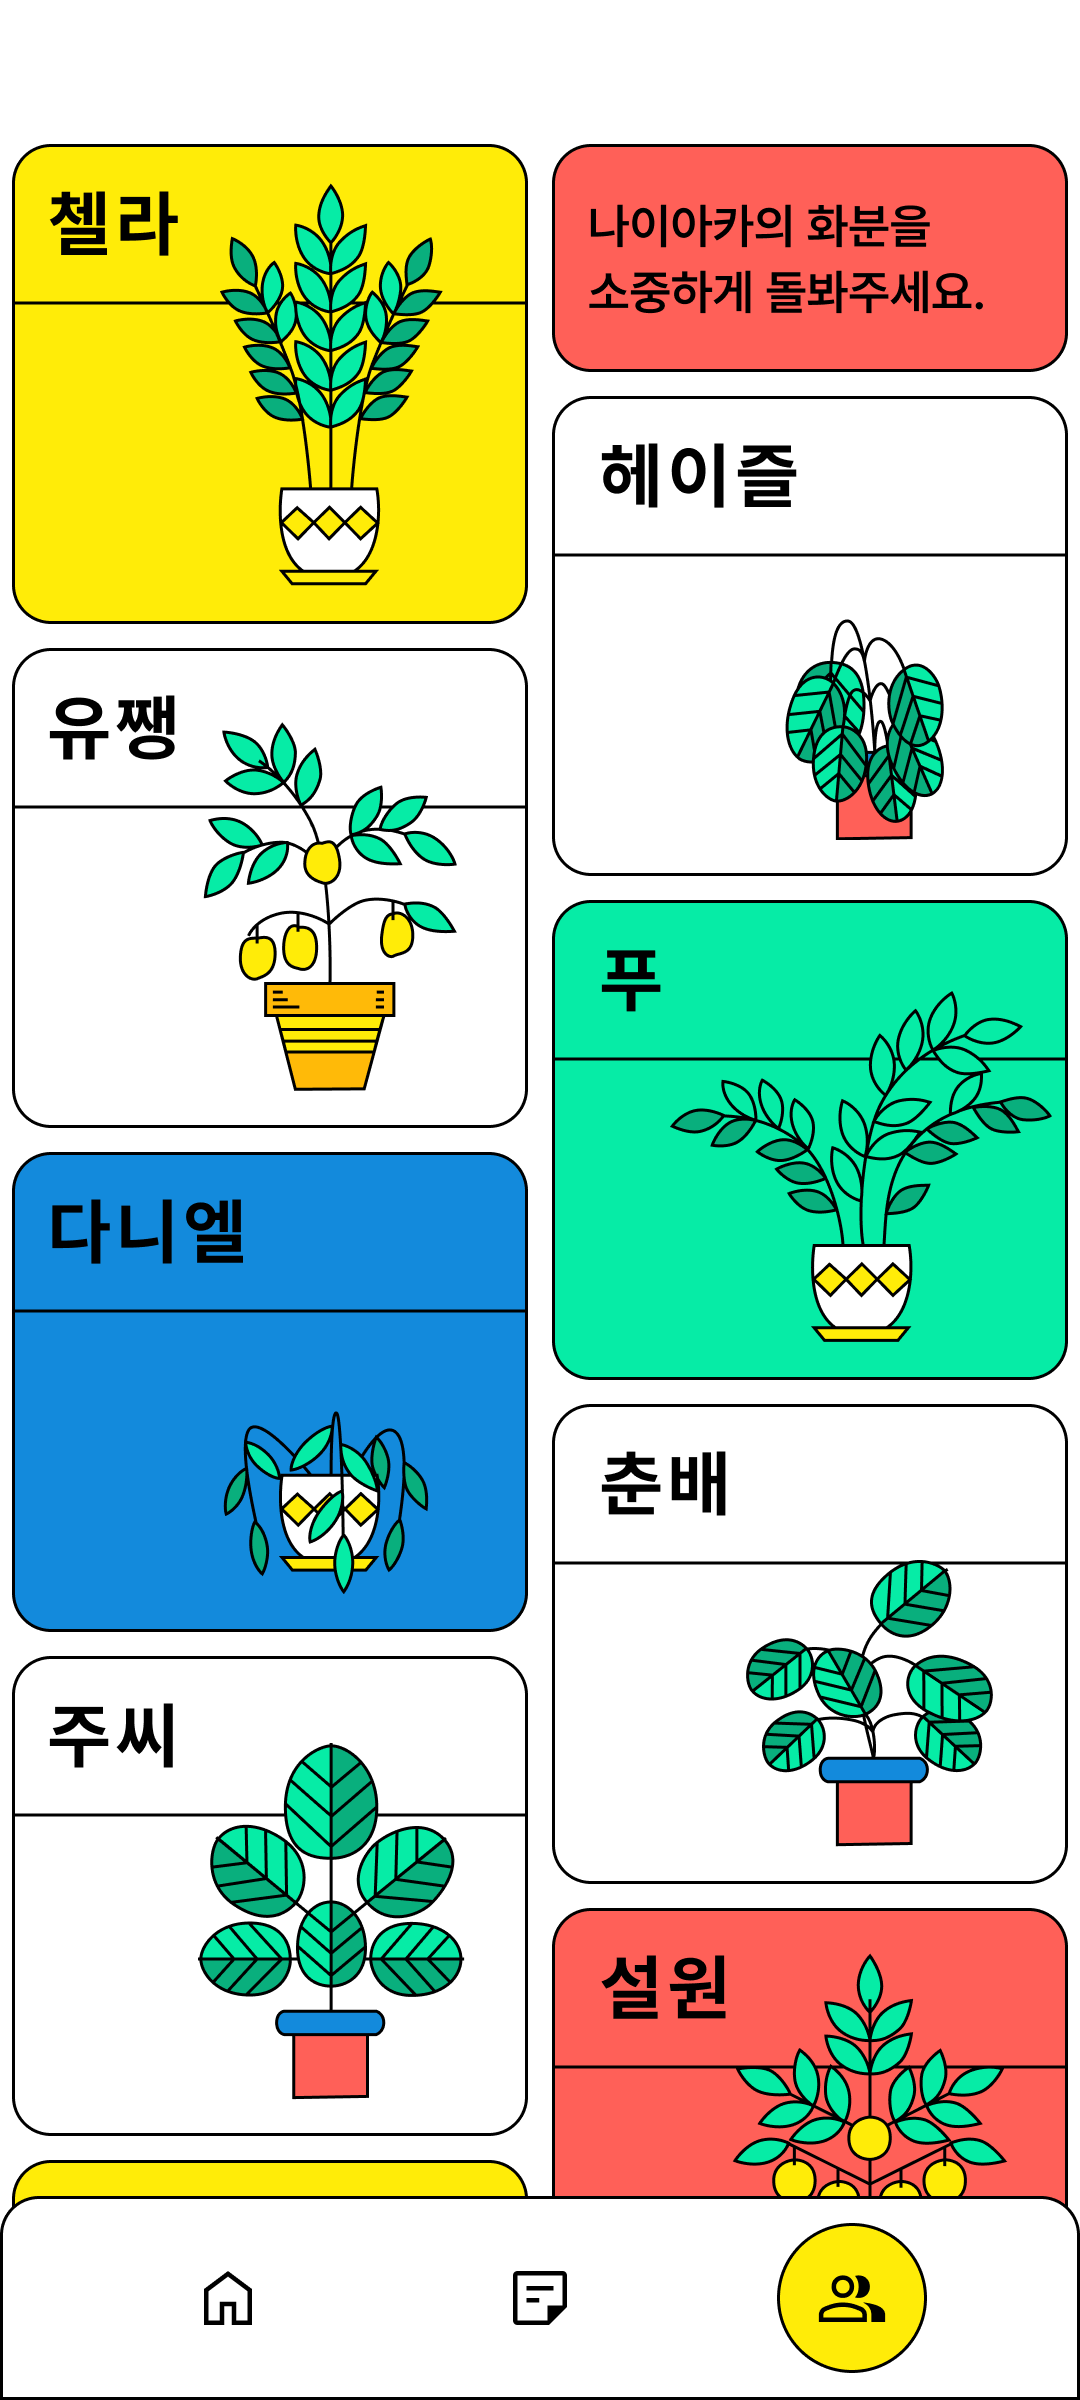
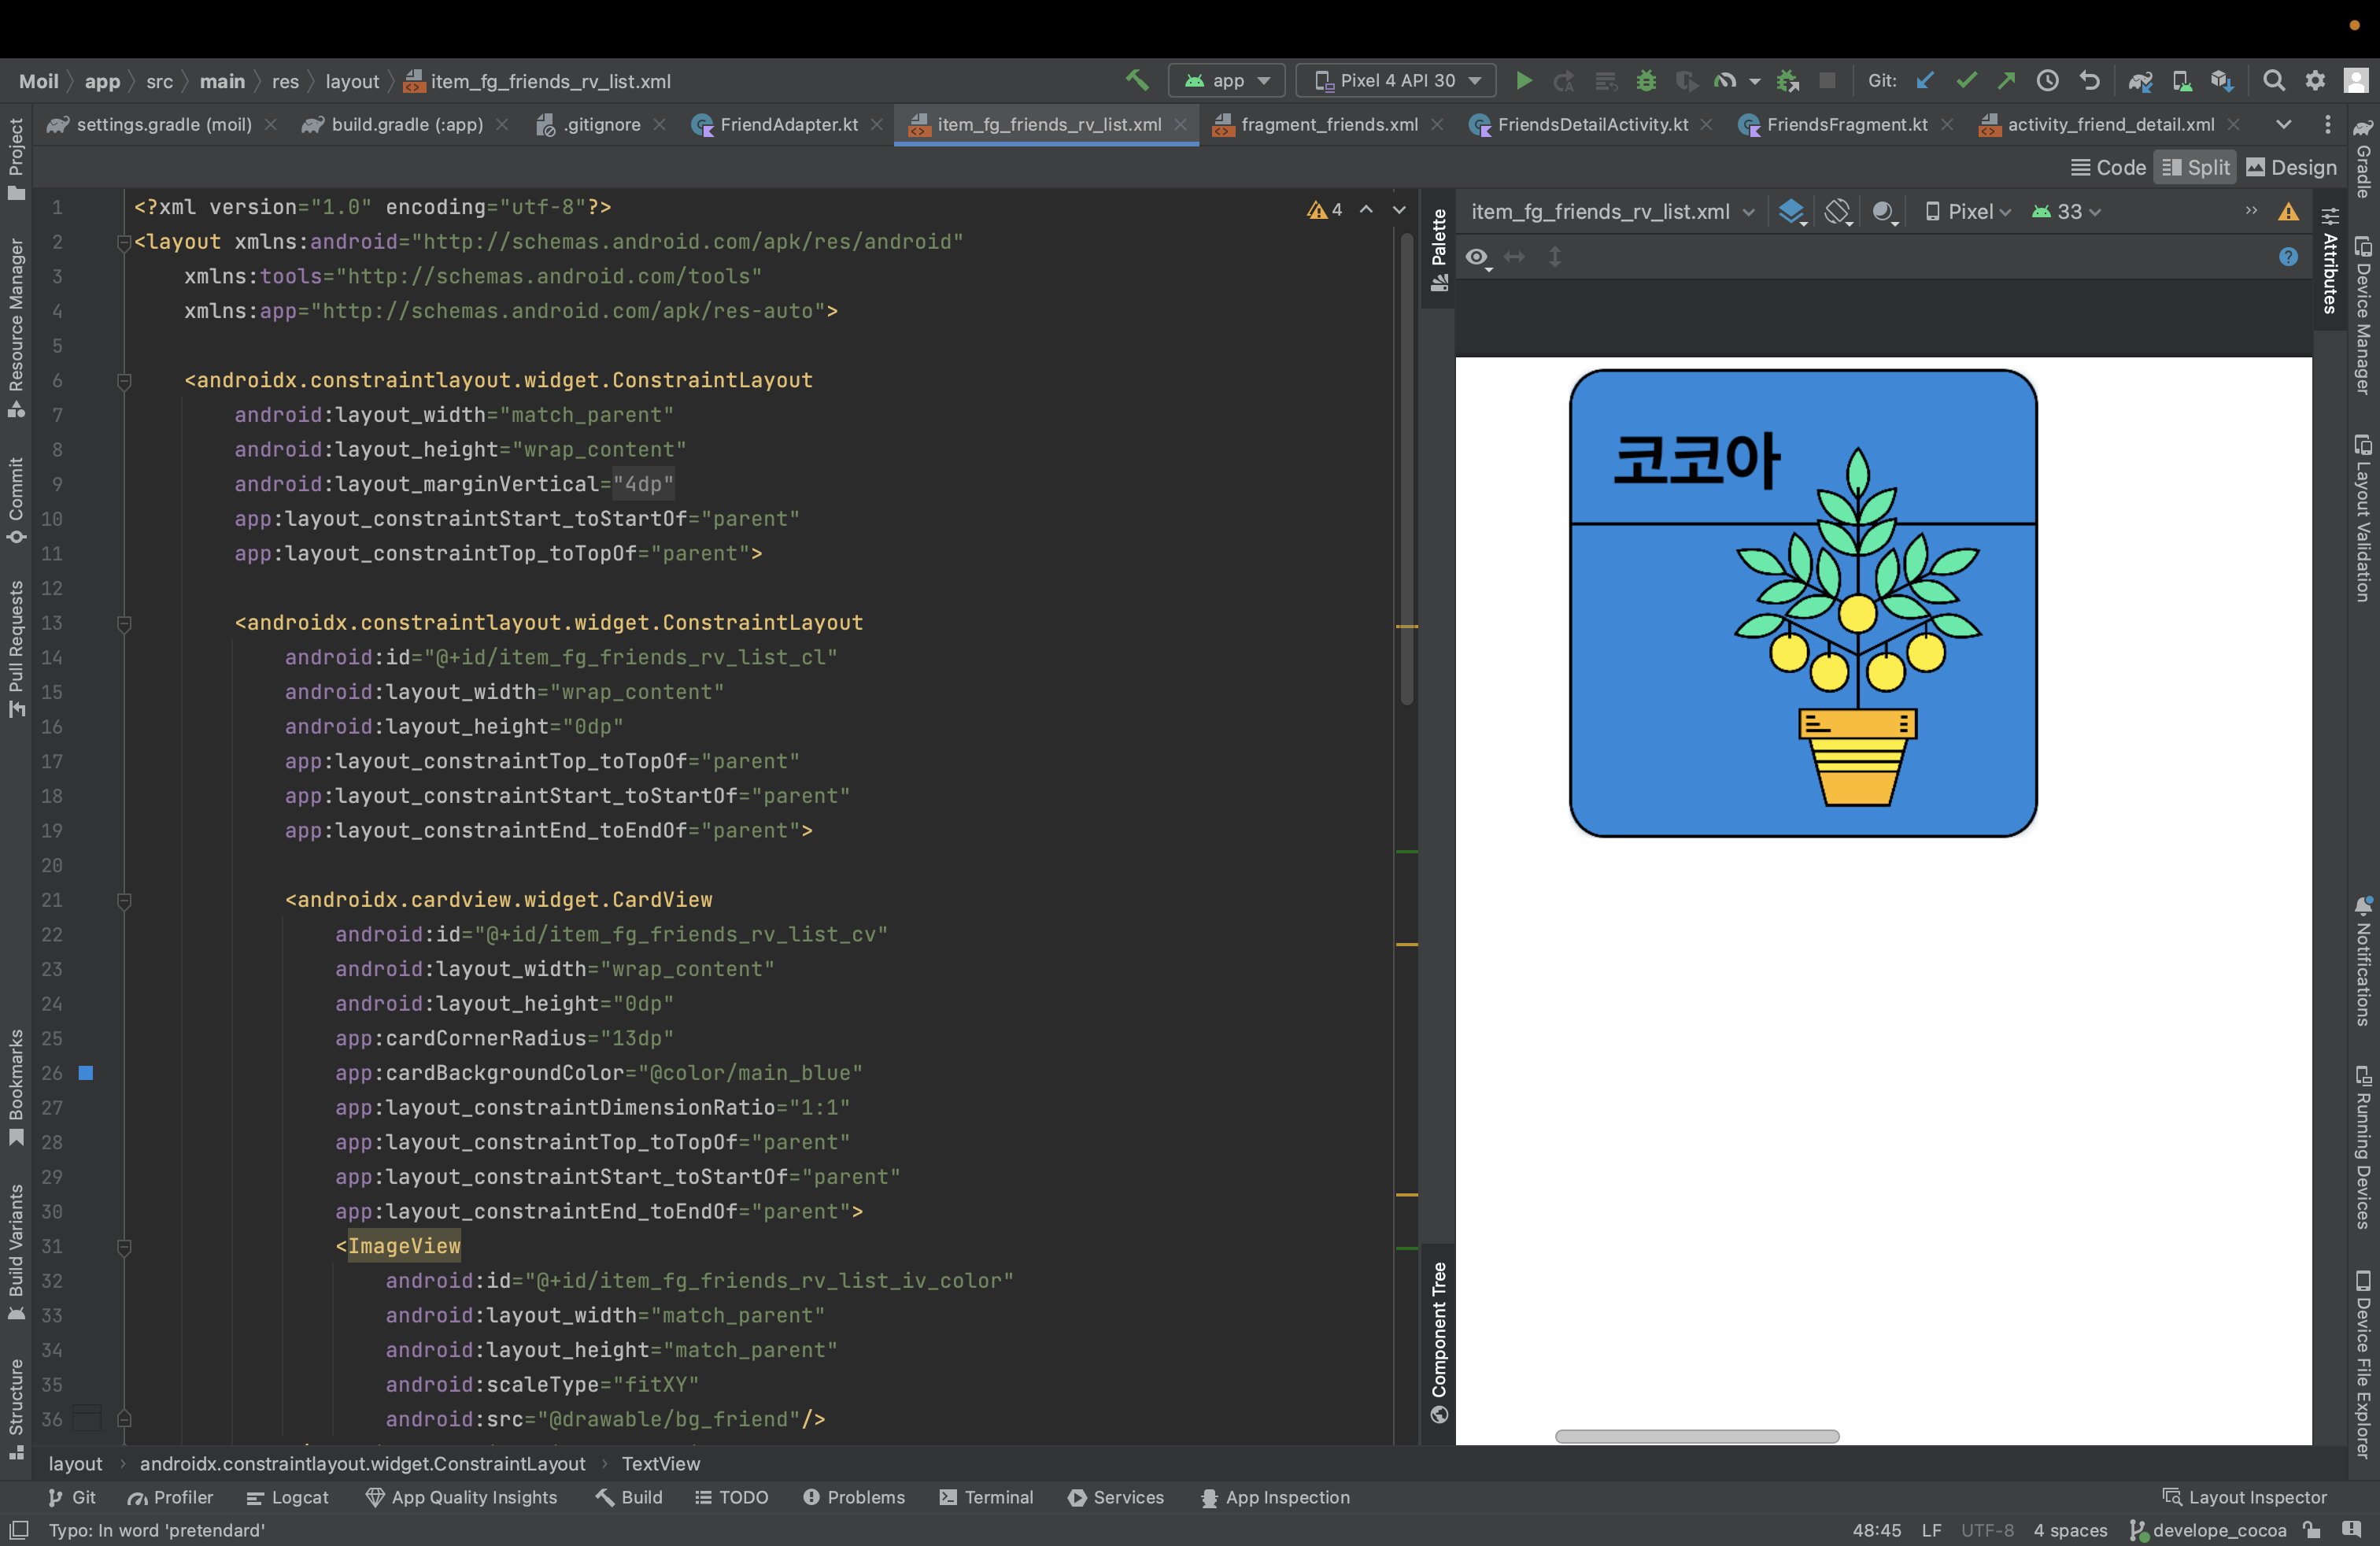 이런 모습이다.
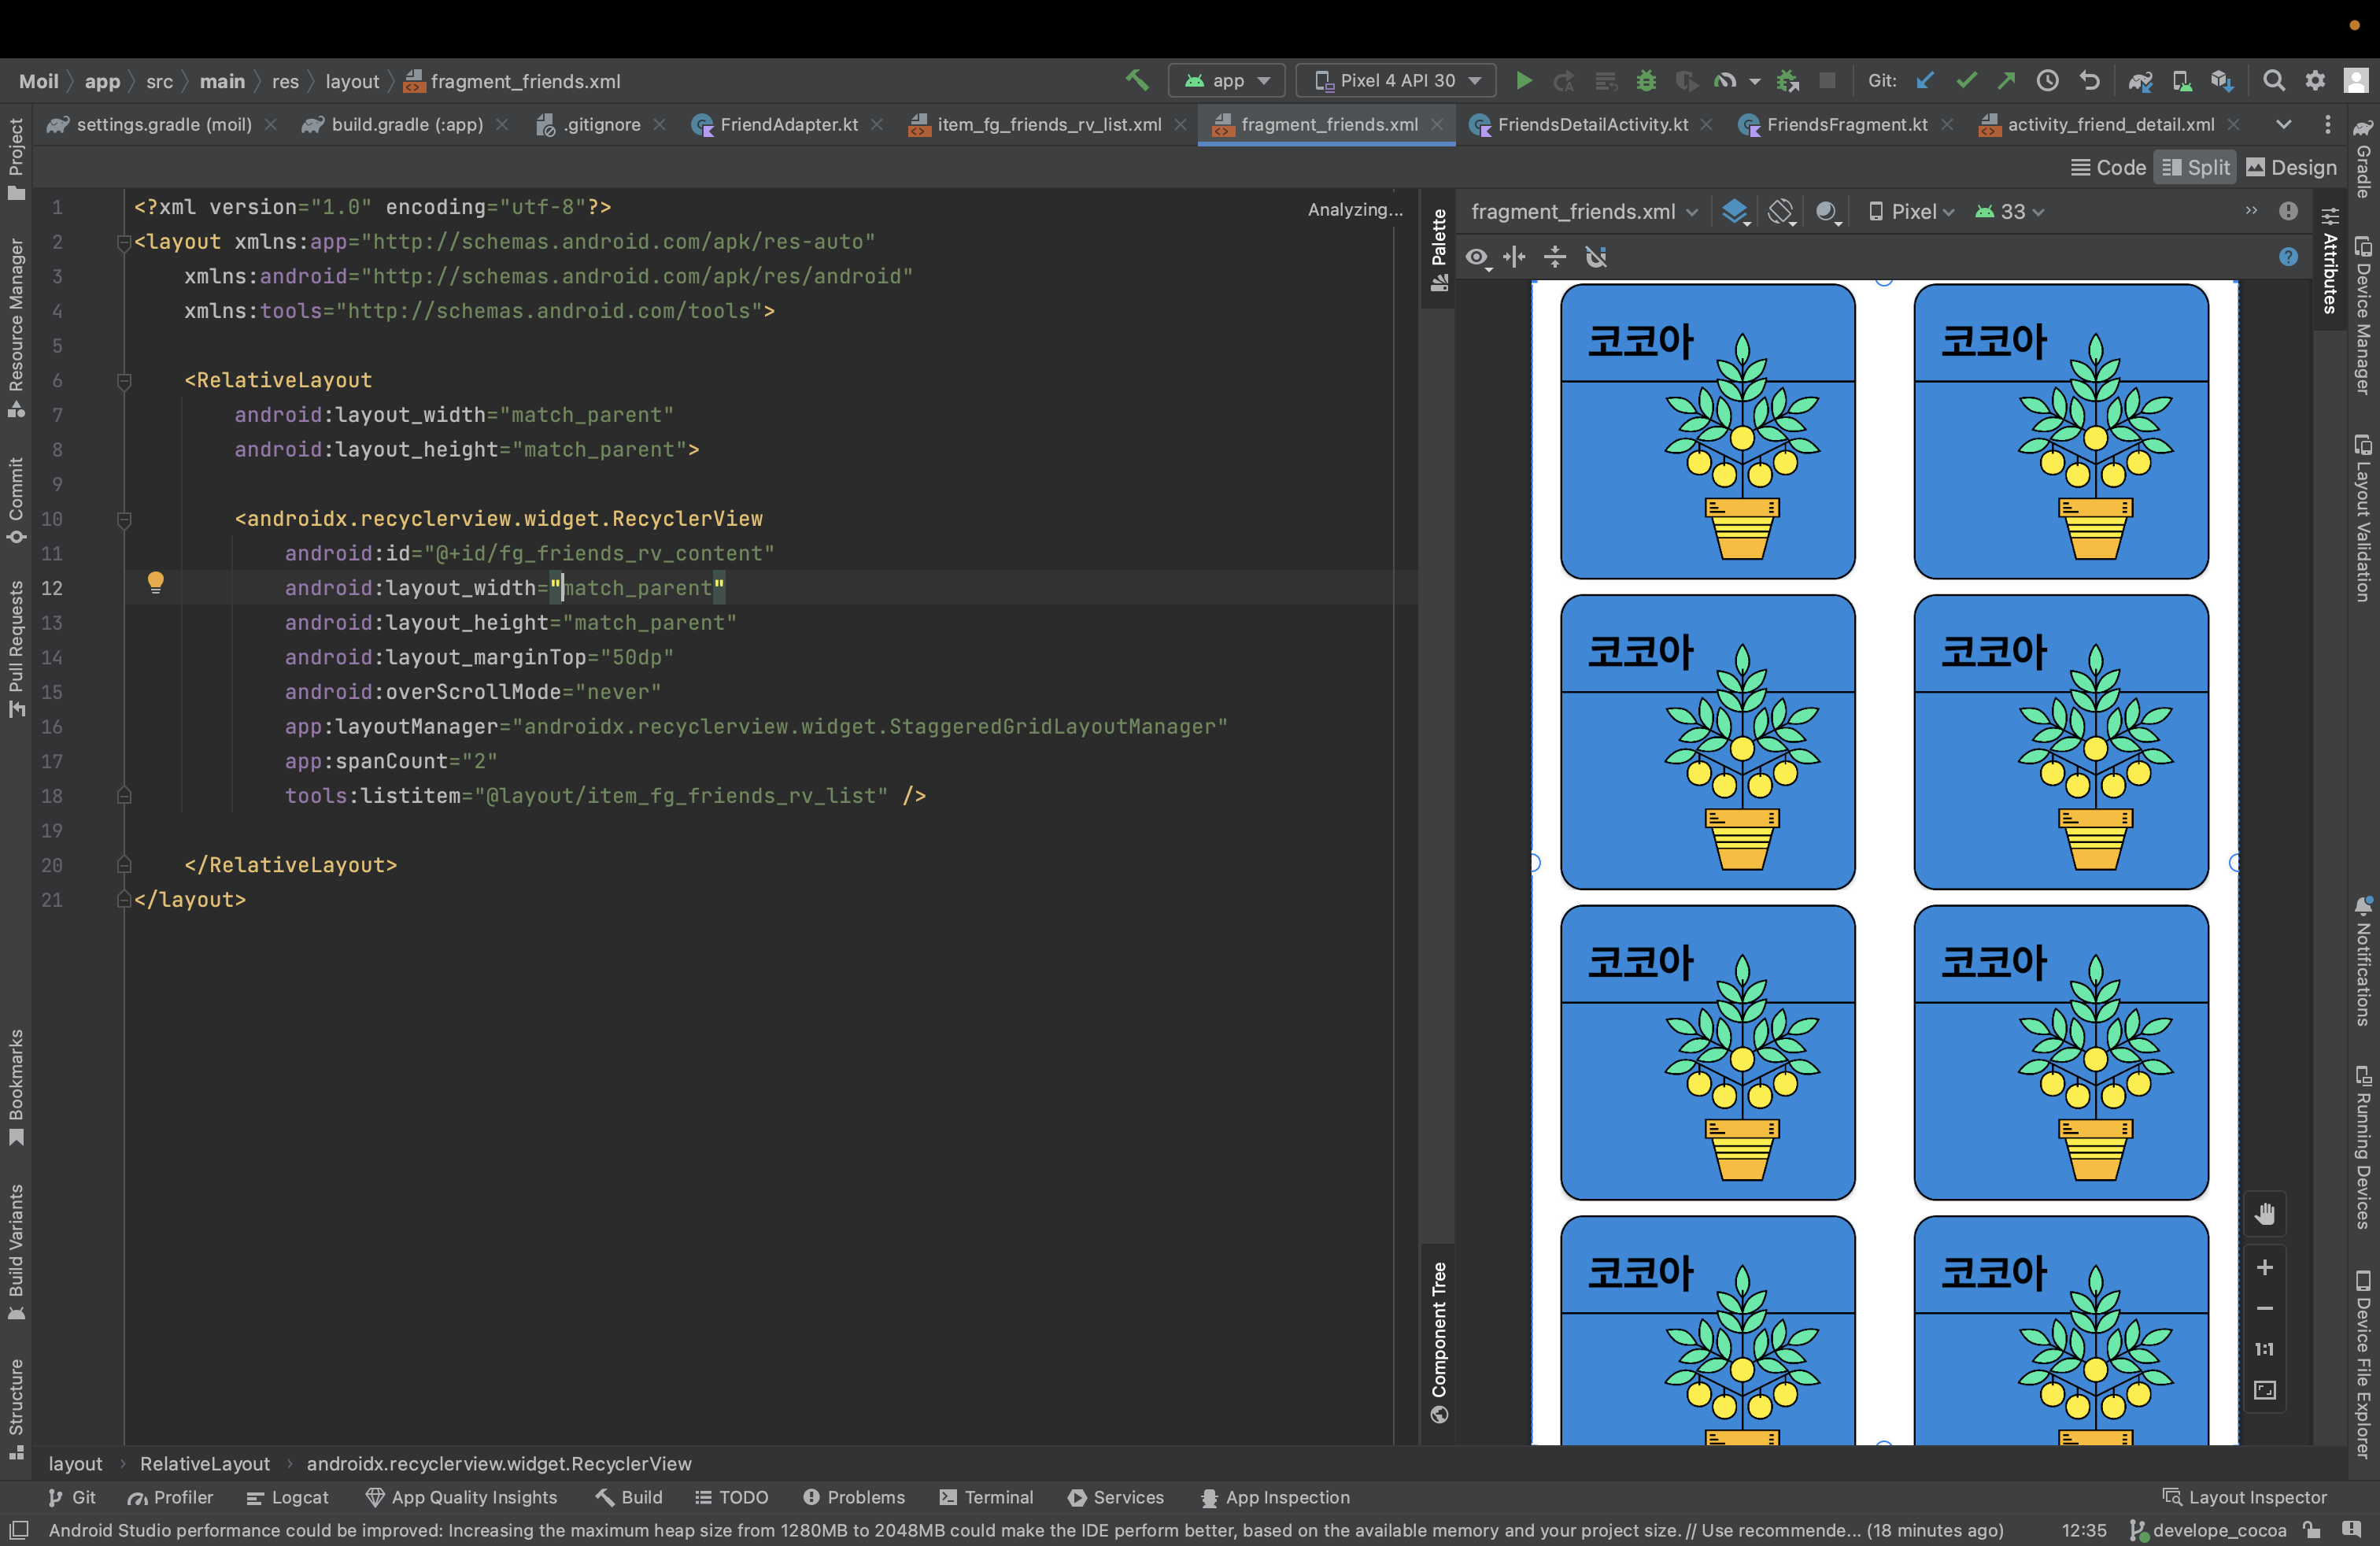
2. Fragment xml 작성
<?xml version="1.0" encoding="utf-8"?>
<layout xmlns:app="http://schemas.android.com/apk/res-auto"
    xmlns:android="http://schemas.android.com/apk/res/android"
    xmlns:tools="http://schemas.android.com/tools">

    <RelativeLayout
        android:layout_width="match_parent"
        android:layout_height="match_parent">

        <androidx.recyclerview.widget.RecyclerView
            android:id="@+id/fg_friends_rv_content"
            android:layout_width="match_parent"
            android:layout_height="match_parent"
            android:layout_marginTop="50dp"
            android:overScrollMode="never"
            app:layoutManager="androidx.recyclerview.widget.StaggeredGridLayoutManager"
            app:spanCount="2"
            tools:listitem="@layout/item_fg_friends_rv_list" />

    </RelativeLayout>
</layout>
디자인 화면으로 보면 이런 모습이다.
3. 어댑터 코드 작성
class FriendAdapter(private val onClick : (Int) -> Unit, private val nicknameList: ArrayList<String>) : RecyclerView.Adapter<FriendAdapter.FriendViewHolder>() {
    interface MyItemClickListener {
        fun onItemClick(nickname: String, image: Int)
    }
    private val plantList = listOf(
        R.drawable.ic_plant1_s, R.drawable.ic_plant1_m, R.drawable.ic_plan1_l,
        R.drawable.ic_plant2_s, R.drawable.ic_plant2_m, R.drawable.ic_plant2_l,
        R.drawable.ic_plant3_s, R.drawable.ic_plant3_m, R.drawable.ic_plant3_l
    )
    private var matchImage = MutableList<Int>(nicknameList.size) { 0 }

    private var rand = -1

    private lateinit var mItemClickListener: MyItemClickListener
    fun setMyItemClickListener(itemClickListener: MyItemClickListener) {
        mItemClickListener = itemClickListener
    }

    inner class FriendViewHolder(private val binding: ItemFgFriendsRvListBinding) : RecyclerView.ViewHolder(binding.root) {
        private val containerView = binding.itemFgFriendsRvListCl
        private val defaultTextView = binding.itemFgFriendsRvListTvContent

        fun bind(item : String, position: Int) {
            binding.root.setOnClickListener { onClick.invoke(position) }

            // 화분 주인 더비
            binding.itemFgFriendsRvListTvName.setText(item)

            // 화분 랜덤 할당
            val range = (plantList.indices)
            rand = range.random()

            binding.itemFgFriendsRvListIvImages.setImageResource(plantList[rand])
            matchImage[position] = plantList[rand]

            // 아이템 배경색
            if (position == 1) { // 나이아카의 화분
                containerView.visibility = View.GONE
                defaultTextView.visibility = View.VISIBLE
                binding.itemFgFriendsRvListIvImages.visibility = View.GONE
                binding.itemFgFriendsRvListTvName.visibility = View.GONE
            } else {
                containerView.visibility = View.VISIBLE
                defaultTextView.visibility = View.GONE

				// 높이를 다르게 해주기 위함
                val params: ViewGroup.LayoutParams? = containerView.layoutParams
                params?.height = params?.width
                containerView.layoutParams = params

                val color: String

                when(position % 4) {
                    0,1 -> { // 색이 있는
                        color = when (position % 6) {
                            2 -> "#FF6058" // main_red
                            4 -> "#06ECA6" // main_green
                            5 -> "#138ADC" // main_blue
                            else -> {
                                "#FFEC08" // main_yellow
                            }
                        }
                    } else -> {
                        color = "#FFFFFF"
                    }
                }
                binding.itemFgFriendsRvListCv.setCardBackgroundColor(Color.parseColor(color))
            }
        }
    }

    override fun onCreateViewHolder(parent: ViewGroup, viewType: Int): FriendViewHolder {
        return FriendViewHolder(ItemFgFriendsRvListBinding.inflate(LayoutInflater.from(parent.context), parent, false))
    }

    override fun getItemCount(): Int = nicknameList.size

    override fun onBindViewHolder(holder: FriendViewHolder, position: Int) {
        holder.bind(nicknameList[position], position)
        holder.itemView.setOnClickListener {
            mItemClickListener.onItemClick(nicknameList[position], matchImage[position])
        }
    }
}
아이템의 포지션이 1일 경우에는 배경뷰 및 화분과 사람 이름을 없애고, 해당 내용이 적혀있는 TextView를 나타나게 했다. 뷰의 높이를 다르게 해주기 위함이다.
화분은 랜덤으로 넣어주었고, 색은 규칙이 있었기에 when문을 써서 이를 넣어주었다. 안드로이드 color 파일에 자주 쓰이는 색을 넣어두었지만, 시간이 많이 부족해 Hex 코드로 그대로 넣었었다.
Int 색상을 어떻게 넣을 수 있을지 궁금하다면
👉🏻 [Android/Kotlin] 코틀린 파일에서 색상 다루는 법 - String, Int
참고
4. Fragment 코드 작성
class FriendsFragment : Fragment() {
    private lateinit var binding: FragmentFriendsBinding

    // adding values to arrayList
    private val nicknameList : ArrayList<String> = arrayListOf(
        "첼라", "나이아카", "주씨", "춘배", "코코아", "푸", "다니엘", "헤이즐", "에릭", "아크"
    )

    override fun onCreateView(
        inflater: LayoutInflater,
        container: ViewGroup?,
        savedInstanceState: Bundle?
    ): View? {
        binding = DataBindingUtil.inflate(inflater, R.layout.fragment_friends, container, false)

        initFriend()

        return binding.root
    }

    private fun initFriend() {
        val rv = binding.fgFriendsRvContent
        rv.adapter = friendAdapter
        rv.layoutManager = StaggeredGridLayoutManager(2, StaggeredGridLayoutManager.VERTICAL)

        // itemClick
        friendAdapter.setMyItemClickListener(object : FriendAdapter.MyItemClickListener {
            override fun onItemClick(nickname: String, plant: Int) {
                val intent = Intent(activity, FriendsDetailActivity::class.java)

                // 데이터 넣기
                intent.apply {
                    this.putExtra("nickname", nickname)
                    this.putExtra("image", plant)
                }
                // 화면 이동
                startActivity(intent, Bundle())
            }
        })
    }
}
이름 리스트를 전역 변수로 저장해서 넘겨주었다.
클릭하면 다음 화면으로 가도록 해주었다.
🥳 완성된 모습
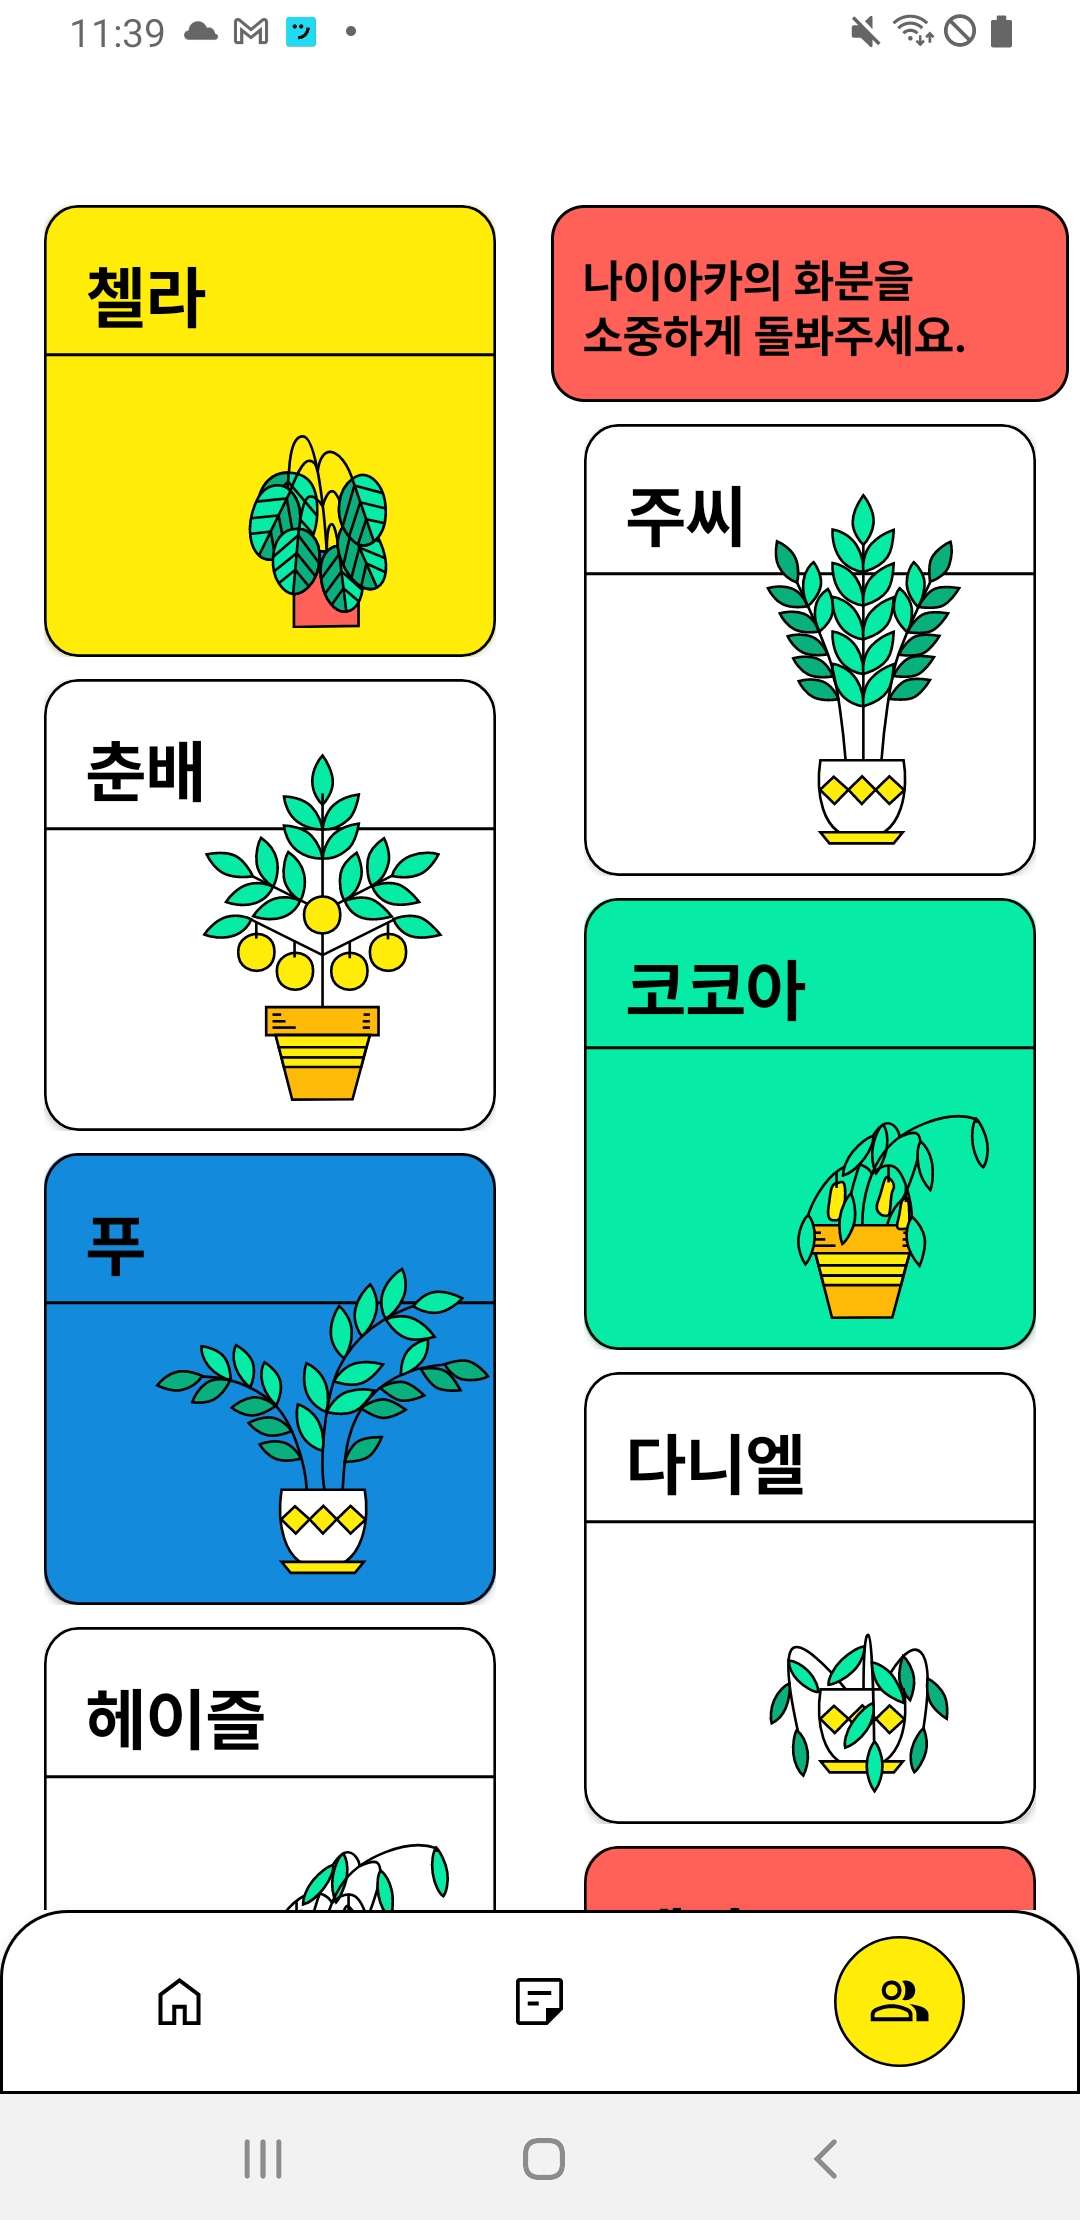
실제로 구현한 화면 모습이다!
무슨 문제인지는 모르지만 첫 번째 아이템만 너비가 살짝 넓고, 카드뷰의 배경이 살짝 지저분한 것만 빼면 잘 구현된 것을 확인할 수 있다.

나이아카의 화분은 이쁘게 자랐나요? ㅋㅋㅋㅋㅋ