✍🏻 요구사항 분석
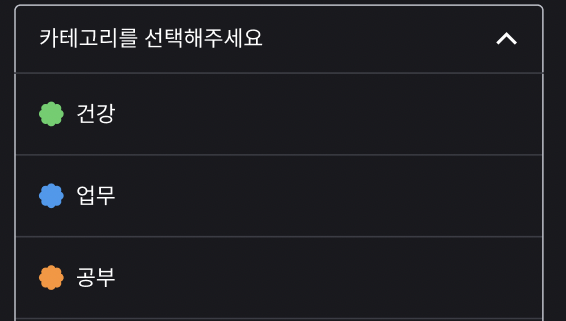
아래와 같이 카테고리 란을 클릭할 때, 각 카테고리가 펼쳐지는 드롭다운 형태의 뷰를 구현해야했다.
 안 펼쳤을 때 안 펼쳤을 때 | 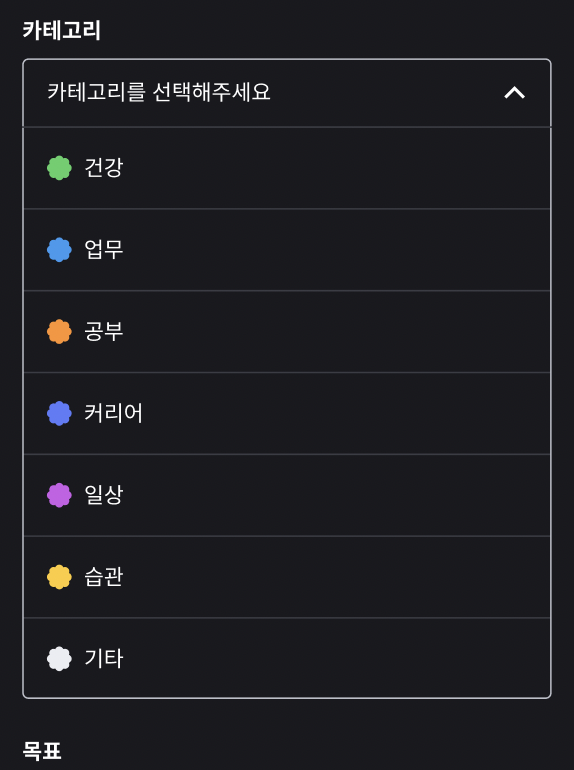 펼쳤을 때 펼쳤을 때 |
|---|
드롭다운 자체를 써 본 적이 없지만, 특히 이런 경우에는 어떻게 구현해야할지 감이 잘 오지 않았다.
결국 나는 ListView에 데이터를 넣어서, 클릭했을 때 접었다 펴는 방법을 생각해보았다. 항상 리사이클러뷰 쓴다고 리스트뷰도 한 번도 쓴 적이 없었는데, 이번에는 아이템(카테고리)의 개수가 정해져 있었기에 굳이 재사용이 필요 없겠다 싶어 한 번 써보려고 했다. 하지만 막상 구현한 리스트뷰는 뷰가 내가 생각했던 대로 화면이 나오지 않았고, 결국 같은 아이템을 가지고 이를 리사이클러뷰로 구현했다.
💻 구현 코드
1️⃣ 아이템 xml 코드 작성 (item_category_dropdown.xml)
왼쪽 카테고리 이미지를 넣어줄 ImageView와, 카테고리 이름을 표시해줄 TextView로 구성됐다.
<?xml version="1.0" encoding="utf-8"?>
<androidx.constraintlayout.widget.ConstraintLayout xmlns:android="http://schemas.android.com/apk/res/android"
    android:layout_width="match_parent"
    android:layout_height="52dp"
    xmlns:app="http://schemas.android.com/apk/res-auto">

    <LinearLayout
        android:id="@+id/item_category_ll"
        android:layout_width="wrap_content"
        android:layout_height="wrap_content"
        android:paddingHorizontal="16dp"
        android:orientation="horizontal"
        android:gravity="center"
        app:layout_constraintStart_toStartOf="parent"
        app:layout_constraintTop_toTopOf="parent"
        app:layout_constraintBottom_toBottomOf="parent">

        <ImageView
            android:id="@+id/item_category_iv"
            android:layout_width="wrap_content"
            android:layout_height="wrap_content"
            android:src="@drawable/ic_category_health"/>
        <TextView
            android:id="@+id/item_category_name_tv"
            android:layout_width="wrap_content"
            android:layout_height="wrap_content"
            android:layout_marginStart="8dp"
            android:text="@string/category_health"
            android:textColor="@color/white"
            android:textSize="14sp"/>
    </LinearLayout>
    <View
        style="@style/default_underline"
        app:layout_constraintStart_toStartOf="parent"
        app:layout_constraintBottom_toBottomOf="parent"/>

</androidx.constraintlayout.widget.ConstraintLayout>
2️⃣ 레이아웃 xml 코드 작성
<?xml version="1.0" encoding="utf-8"?>
<androidx.constraintlayout.widget.ConstraintLayout xmlns:android="http://schemas.android.com/apk/res/android"
    xmlns:app="http://schemas.android.com/apk/res-auto"
    xmlns:tools="http://schemas.android.com/tools"
    android:layout_width="match_parent"
    android:layout_height="match_parent"
    android:background="@color/fragment_bg"
    android:fitsSystemWindows="true">

  	<!-- title bar -->
	(생략)

  	<androidx.core.widget.NestedScrollView
        android:layout_width="match_parent"
        android:layout_height="0dp"
        android:layout_marginTop="10dp"
        android:orientation="vertical"
        android:overScrollMode="never"
        app:layout_constraintStart_toStartOf="parent"
        app:layout_constraintTop_toBottomOf="@id/add_my_template_title_tv"
        app:layout_constraintBottom_toTopOf="@id/add_my_template_register_bg">

        <androidx.constraintlayout.widget.ConstraintLayout
            android:layout_width="match_parent"
            android:layout_height="match_parent">

            <!-- content -->
            <LinearLayout
                android:layout_width="match_parent"
                android:layout_height="match_parent"
                android:orientation="vertical"
                android:paddingHorizontal="15dp"
                android:layout_marginTop="30dp"
                android:layout_marginBottom="40dp"
                app:layout_constraintTop_toTopOf="parent"
                app:layout_constraintStart_toStartOf="parent"
                app:layout_constraintBottom_toBottomOf="parent">

                <TextView
                    android:id="@+id/add_my_template_category_title_tv"
                    android:text="@string/template_my_category"
                    style="@style/template_my_title_tv" />
                <androidx.appcompat.widget.AppCompatEditText
                    android:id="@+id/add_my_template_category_et"
                    android:hint="카테고리를 선택해주세요"
                    android:focusableInTouchMode="false"
                    android:drawablePadding="8dp"
                    android:cursorVisible="false"
                    android:drawableEnd="@drawable/ic_arrow_down"
                    style="@style/template_my_et"/>
                <androidx.recyclerview.widget.RecyclerView
                    android:id="@+id/add_my_template_category_rv"
                    android:layout_width="match_parent"
                    android:layout_height="wrap_content"
                    android:layout_marginTop="-1dp"
                    android:background="@drawable/style_dropbox"
                    android:overScrollMode="never"
                    android:nestedScrollingEnabled="false"
                    android:visibility="gone"
                    tools:itemCount="7"
                    tools:listitem="@layout/item_category_dropdown"/>

                <TextView
                    android:id="@+id/add_my_template_goal_title_tv"
                    android:layout_marginTop="24dp"
                    android:text="@string/template_my_goal"
                    style="@style/template_my_title_tv" />
                <androidx.appcompat.widget.AppCompatEditText
                    android:id="@+id/add_my_template_goal_et"
                    android:hint="목표를 입력해 주세요. (최대 20자)"
                    android:maxLength="20"
                    style="@style/template_my_et"/>

                (생략)

            </LinearLayout>

        </androidx.constraintlayout.widget.ConstraintLayout>
    </androidx.core.widget.NestedScrollView>
</androidx.constraintlayout.widget.ConstraintLayout>
3️⃣ 넣어줄 카테고리 데이터 클래스 작성
data class CategoryList(
    val id: Int = 0,
    val name: String,
    val image: Int,
)
id는 서버에 등록할 때 쓰는 카테고리 id값이고,
name과 image는 리사이클러뷰에 표시되는 데이터이다.
4️⃣ 어댑터 작성
class CategoryDropdownAdapter(private val categoryList: ArrayList<CategoryList>): RecyclerView.Adapter<CategoryDropdownAdapter.ViewHolder>() {
    interface MyCategoryClickListener {
        fun onItemClick(category: CategoryList)
    }

    private lateinit var mCategoryClickListener: MyCategoryClickListener

    fun setMyItemClickListener(itemClickListener: MyCategoryClickListener) {
        mCategoryClickListener = itemClickListener
    }

    override fun onCreateViewHolder(viewGroup: ViewGroup, viewType: Int): CategoryDropdownAdapter.ViewHolder {
        val binding: ItemCategoryDropdownBinding = ItemCategoryDropdownBinding.inflate(LayoutInflater.from(viewGroup.context), viewGroup, false)

        return ViewHolder(binding)
    }

    override fun onBindViewHolder(holder: CategoryDropdownAdapter.ViewHolder, position: Int) {
        holder.bind(categoryList[position])
        holder.itemView.setOnClickListener {
            mCategoryClickListener.onItemClick(categoryList[position])
        }
    }

    override fun getItemCount(): Int = categoryList.size

    inner class ViewHolder(val binding: ItemCategoryDropdownBinding): RecyclerView.ViewHolder(binding.root) {
        fun bind(item: CategoryList) {
            binding.itemCategoryIv.setImageResource(item.image)
            binding.itemCategoryNameTv.text = item.name
        }
    }
5️⃣ 액티비티 작성
class AddMyTemplateActivity : BaseActivity<ActivityAddMyTemplateBinding>(ActivityAddMyTemplateBinding::inflate),
AddMyTemplateFragmentView, ConfirmDialogInterface, PeriodPickerDialogInterface {

    private var isCategoryShow: Boolean = false

    private var categoryId: Int = 0

    private var categoryList = ArrayList<CategoryList>()
    private var categoryImgList = listOf(R.drawable.ic_category_business, R.drawable.ic_category_health, R.drawable.ic_category_study, R.drawable.ic_category_career, R.drawable.ic_category_daylife, R.drawable.ic_category_habit, R.drawable.ic_category_etc)
    private var categoryNameList = listOf("업무", "건강", "공부", "커리어", "일상", "습관", "기타")

    override fun onCreate(savedInstanceState: Bundle?) {
        super.onCreate(savedInstanceState)

        // 카테고리 선택
        onClickCategoryDropdown()
        initCategoryRv()
    }

    private fun onClickCategoryDropdown() {
        with(binding) {
            addMyTemplateCategoryEt.setOnClickListener {
                Log.d("CategoryEt", "click!")
                showCategoryRv(isCategoryShow)
            }
        }
    }

    private fun initCategoryRv() {
        // 카테고리 데이터
        categoryList.apply {
            for (categoryId: Int in categoryNameList.indices) {
                add(CategoryList(categoryId, categoryNameList[categoryId], categoryImgList[categoryId]))
            }
        }

        // 어댑터 연결
        val adapter = CategoryDropdownAdapter(categoryList)
        binding.addMyTemplateCategoryRv.adapter = adapter
        binding.addMyTemplateCategoryRv.layoutManager = LinearLayoutManager(this, LinearLayoutManager.VERTICAL, false)

        // itemClick
        adapter.setMyItemClickListener(object : CategoryDropdownAdapter.MyCategoryClickListener {
            override fun onItemClick(category: CategoryList) {
                categoryId = category.id
                // 선택하면 드롭다운 내려가게
                showCategoryRv(true)
                // 선택한 카테고리 보여주기
                val categoryEt = binding.addMyTemplateCategoryEt
                categoryEt.setCompoundDrawablesWithIntrinsicBounds(category.image, 0, R.drawable.ic_arrow_down, 0)
                categoryEt.setText(category.name)
            }
        })
    }

    private fun showCategoryRv(hide: Boolean) {
        val rv = binding.addMyTemplateCategoryRv
        val categoryEt = binding.addMyTemplateCategoryEt
        var hasCategory = 0
        if (hide) {
            rv.visibility = View.GONE
            if (categoryId != 0) {
                hasCategory = categoryImgList[categoryId]
            }
            categoryEt.setCompoundDrawablesWithIntrinsicBounds(hasCategory, 0, R.drawable.ic_arrow_down, 0)
        } else {
            rv.visibility = View.VISIBLE
            if (categoryId != 0) {
                hasCategory = categoryImgList[categoryId]
            }
            categoryEt.setCompoundDrawablesWithIntrinsicBounds(hasCategory, 0, R.drawable.ic_arrow_up, 0)
        }
        isCategoryShow = !hide
}AppCompatEditText에는 이미지를 삽입할 수 있는데, 이를 활용하여 showCategoryRV() 함수에서 드롭다운을 보여주는 상태면 리사이클러뷰 표시 + 오른쪽 화살표가 위를 향하게,
드롭다운을 보여주지 않는 상태면 그 반대로 나오도록 했다.
setCompoundDrawablesWithIntrinsicBounds(left, top, right, bottom)가 그것이다.
또한 리사이클러뷰의 카테고리 아이템을 클릭했다면, 위에서 사용한 setCompoundDrawablesWithIntrinsicBounds를 이용해 EditText의 왼쪽에 해당 카테고리의 이미지를 넣고, 텍스트에 카테고리 이름을 보여주도록 했다.
📚 참고 자료

정리가 잘 된 글이네요. 도움이 됐습니다.