스키마 VS 모델
- 스키마
필드의 형식을 정의하는 객체 - 모델
DB에서 실제 작업을 처리할 수 있는 함수들을 지니고 있는 객체
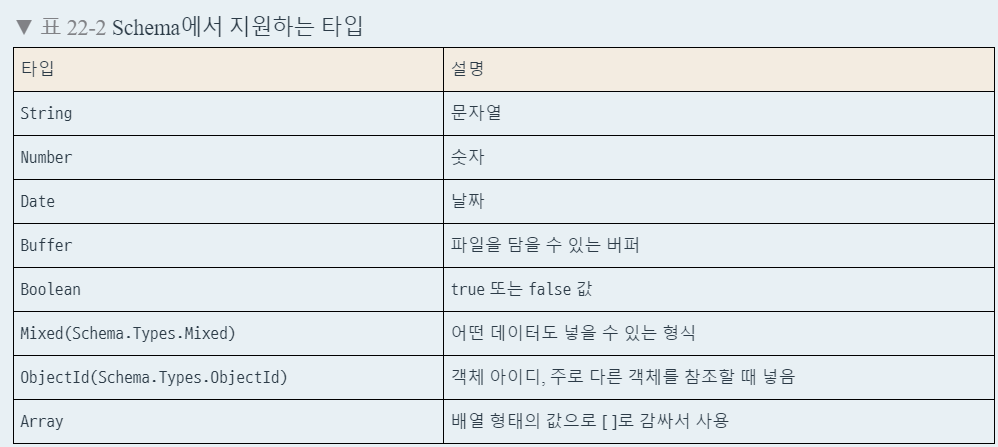
스키마의 타입
- [스키마] : 스키마로 이뤄진 배열을 의미함
컬렉션 이름 컨벤션
- 구분자를 사용하지 않고 복수 형태로 사용하는 것.
데이터 생성과 조회
- api/posts/posts.ctrl.js 생성 코드
import Post from '../../models/post';

/*
post/api/posts
{
    title: '제목,
    body: '내용',
    tags: ['태그1', '태그2']
}
*/
export const write = async ctx=>{
    const {title, body, tags}=ctx.request.body;
    const post = new Post ({
        title,
        body,
        tags,
    });
    try {
        await post.save();
        ctx.body=post;
    } catch(e){
        ctx.throw(500,e)
    }
    }

export const list = ctx=>{};
export const read=ctx=>{}
export const remove = ctx=>{}
export const update = ctx=>{}
- 몽고디비 메서드
.save(): 저장하다
.findById(): id로 찾다
.exec(): 몽고db 버전 3까지 promise의 then 대체품. 4 이후로는 then 지원하나 그래도 붙이는 걸 추천
.remove(): 특정 조건을 만족하는 데이터를 모두 지움
.findByIdAndRemove(): id를 찾아서 지운다
.findOneAndRemove(): 특정 조건을 만족하는 데이터 하나를 찾아서 제거함
견고하게 만들기 - 요청검증
((미들웨어 추가로 검증하기 ))
- ObjectId 검증
- posts/posts.ctrl.js
import Post from '../../models/post';
import mongoose from 'mongoose';

const {ObjectId} = mongoose.Types;

//id 체크하기
export const checkObjectId =(ctx, next)=>{
    const {id} = ctx.params;
    if(!ObjectId.isValid(id)) {
        ctx.status = 400; //bad request
        return ;
    }
    return next();
}

//데이터 저장
/*
post/api/posts
{
    title: '제목,
    body: '내용',
    tags: ['태그1', '태그2']
}
*/
export const write = async ctx=>{
    const {title, body, tags}=ctx.request.body;
    const post = new Post ({
        title,
        body,
        tags,
    });
    try {
        await post.save();
        ctx.body=post;
    } catch(e){
        ctx.throw(500,e)
    }
    }

//데이터 조회
/*
 GET/api/posts
*/
export const list = async ctx=>{
    try{
        const posts = await Post.find().exec();
        ctx.body= posts;
    } catch(e) {
        ctx.throw(500, e)
    }
};

//특정 데이터 조회
/*
GET/api/posts/:id
 */
export const read= async ctx=>{
    const {id} = ctx.params;
    try {
        const post = await Post.findById(id).exec();
        if(!post) {
            ctx.status = 404 ;
            return
        }
        ctx.body = post;
    } catch(e) {
        ctx.throw(500, e);
    }
}

//특정 데이터 제거
/*
DELETE /api/posts/:id
*/
export const remove = async ctx=>{
    const {id} = ctx.params;
    try{
        await Post.findByIdAndRemove(id).exec();
        ctx.status=204;
    } catch(e){
        ctx.throw(500, e);
    }
}

//데이터 수정
/*
PATCH /api/posts/:id

{
    title: '수정',
    body: '수정내용',
    tags: ['수정', '태그']
}
*/
export const update = async ctx=>{
    const { id } = ctx.params;
    try {
        const post = await Post.findByIdAndUpdate(id, ctx.request.body, {
            new: true, //이 값을 설정하면 업데이트된 데이터를 반환함
            //false일 때는 업데이트 되기 전의 데이터를 반환
        }).exec();
        if (!post){
            ctx.status = 404;
            return;
        }
        ctx.body = post;
    } catch(e){
        ctx.throw(500, e);
    }
}

// 데이터 삭제
/*
r
*/- posts/index.js
import Router from 'koa-router';
import * as postsCtrl from './posts.ctrl';
const posts = new Router () ;

posts.get('/', postsCtrl.list);
posts.post('/', postsCtrl.write );
posts.get('/:id', postsCtrl.checkObjectId, postsCtrl.read);
posts.delete('/:id', postsCtrl.checkObjectId, postsCtrl.remove);
posts.patch('/:id', postsCtrl.checkObjectId, postsCtrl.update);

export default posts-
Request body 검증
-
목적:
- 포스트 작성시 서버는 title, body, tags 값을 모두 전달받아야 함
- 클라이언트가 값을 빼먹었을 때는 400 오류가 발생해야 함. (..html 단에서 그냥 검증하면 안되는고야??)
-
방법: if 문으로 비교하기
-
(추천) joi 라이브러리 사용하기
- 설치: yarn add joi
- posts/posts.ctrl.js 코드
import Post from '../../models/post';
import mongoose from 'mongoose';
import Joi from 'joi';

const {ObjectId} = mongoose.Types;

export const checkObjectId =(ctx, next)=>{
    const {id} = ctx.params;
    if(!ObjectId.isValid(id)) {
        ctx.status = 400; //bad request
        return ;
    }
    return next();
}

//데이터 저장
/*
post/api/posts
{
    title: '제목,
    body: '내용',
    tags: ['태그1', '태그2']
}


기존
export const write = async ctx=>{
    const {title, body, tags}=ctx.request.body;
    const post = new Post ({
        title,
        body,
        tags,
    });
    try {
        await post.save();
        ctx.body=post;
    } catch(e){
        ctx.throw(500,e)
    }
    }
*/

export const write = async ctx=>{
    //Joi로 검증

    const schema = Joi.object().keys({
        //객체가 다음 필드를 가지고 있음을 검증
        title: Joi.string().required(),
        body: Joi.string().required(),
        tags: Joi.array()
        .items(Joi.string())
        .required(), //문자열로 이루어진 배열
    });
    //검증하고 나서 검증 실패인 경우 에러 처리
    const result = schema.validate(ctx.request.body);
    if(result.error){
        ctx.status = 400;
        ctx.body = result.error;
        return ;
    }
    //기존 코드 그대로

    const {title, body, tags}=ctx.request.body;
    const post = new Post ({
        title,
        body,
        tags,
    });
    try {
        await post.save();
        ctx.body=post;
    } catch(e){
        ctx.throw(500,e)
    }
}


//데이터 조회
/*
 GET/api/posts
*/
export const list = async ctx=>{
    try{
        const posts = await Post.find().exec();
        ctx.body= posts;
    } catch(e) {
        ctx.throw(500, e)
    }
};

//특정 데이터 조회
/*
GET/api/posts/:id
 */
export const read= async ctx=>{
    const {id} = ctx.params;
    try {
        const post = await Post.findById(id).exec();
        if(!post) {
            ctx.status = 404 ;
            return
        }
        ctx.body = post;
    } catch(e) {
        ctx.throw(500, e);
    }
}

//특정 데이터 제거
/*
DELETE /api/posts/:id
*/
export const remove = async ctx=>{
    const {id} = ctx.params;
    try{
        await Post.findByIdAndRemove(id).exec();
        ctx.status=204;
    } catch(e){
        ctx.throw(500, e);
    }
}

//데이터 수정
/*
PATCH /api/posts/:id

{
    title: '수정',
    body: '수정내용',
    tags: ['수정', '태그']
}
*/
export const update = async ctx=>{
    const { id } = ctx.params;
    //required()가 없음
    const schema = Joi.object().keys({
        title: Joi.string(),
        body: Joi.string(),
        tags: Joi.array().items(Joi.string()),
    });
    const result = schema.validate(ctx.request.body);
    if(result.error) {
        ctx.status = 400;
        ctx.body = result.error;
        return;
    }
    try {
        const post = await Post.findByIdAndUpdate(id, ctx.request.body, {
            new: true, //이 값을 설정하면 업데이트된 데이터를 반환함
            //false일 때는 업데이트 되기 전의 데이터를 반환
        }).exec();
        if (!post){
            ctx.status = 404;
            return;
        }
        ctx.body = post;
    } catch(e){
        ctx.throw(500, e);
    }
}

// 데이터 삭제
- 타입 검증에 너무나 유용함. 대박이네.
페이지네이션 구현
- 정의
- 페이지네이션 : 일부 페이지만 보여주기
- 방법: list API로 구현한다.
- 가짜 데이터 생성하기
- src/createFakeData
import Post from './models/post';

export default function createFakeData(){
    const posts = [...Array(40).keys()].map(i=>({
        title: `포스트 #${i}`,
        body:
        'Lorem Ipsum is simply dummy text of the printing and typesetting industry. Lorem Ipsum has been the industrys standard dummy text ever since the 1500swhen an unknown printer took a galley of type and scrambled it to make a type specimen book. It has survived not only five centuries, but also the leap into electronic typesetting, remaining essentially unchanged. It was popularised in the 1960s with the release of Letraset sheets containing Lorem Ipsum passages, and more recently with desktop publishing software like Aldus PageMaker including versions of Lorem Ipsum.Lorem Ipsum is simply dummy text of the printing and typesetting industry. Lorem Ipsum has been the industrys standard dummy text ever since the 1500s, when an unknown printer took a galley of type and scrambled it to make a type specimen book. It has survived not only five centuries, but also the leap into electronic typesetting, remaining essentially unchanged. It was popularised in the 1960s with the release of Letraset sheets containing Lorem Ipsum passages, and more recently with desktop publishing software like Aldus PageM',
        tags:['가짜', '데이터'],
    }));
    Post.insertMany(posts, (err, docs)=>{
        console.log(docs);
    });
}
포스트를 역순으로 불러오기
- list controller 에서 exec() 직전에 sort() 구문 넣기
- sort 메서드 안에 {_id: -1}을 넣으면 역순 정렬(가장 마지막으로 등록된 포스트부터 정렬) 이 된다.
- src/api/posts/posts.ctrl.js
//데이터 조회
/*
 GET/api/posts
*/
export const list = async ctx=>{
    try{
        const posts = await Post.find().sort({_id:-1}).exec();
        ctx.body= posts;
    } catch(e) {
        ctx.throw(500, e)
    }
};
보이는 개수 제한하기
- limit(제한할 숫자) 로 구현하기
//데이터 조회
/*
 GET/api/posts
*/
export const list = async ctx=>{
    try{
        const posts = await Post.find().sort({_id:-1}).limit(10).exec();
        ctx.body= posts;
    } catch(e) {
        ctx.throw(500, e)
    }
};
페이지 기능 구현 + 내용 길이 제한
- 페이지 기능 구현
skip(skip할 숫자) 로 구현하기 - 내용 길이 제한
json 형식으로 변환 뒤(toJson)
각 데이터가 200자 이상인지 확인하기.
//데이터 조회
/*
 GET/api/posts
*/
export const list = async ctx=>{
    //값이 주어지지 않았다면 1을 기본으로 사용
    //parseInt(1, 10) : 1을 10진수로 나타라는 의미
    const page = parseInt(ctx.query.page || '1', 10)
    if (page<1) {
        ctx.status = 400;
        return;
    }

    try{
        const posts = await Post.find()
        .sort({_id:-1})
        .limit(10)
        .skip((page-1)*10)
        .exec();
        const postCount = await Post.countDocuments().exec();
        //커스텀 헤더 세팅하는 함수
        ctx.set('Last-Page', Math.ceil(postCount/10));
        ctx.body= posts
        .map(post=>post.toJSON())
        .map(post=>({
            ...post,
            body:
            //20글자 제한
            post.body.length<200?post.body:`${post.body.slice(0, 200)}...`,

        }));
    } catch(e) {
        ctx.throw(500, e)
    }
};
-
데이터 조회하는 또다른 방법
-
Post 체인 skip() 뒤에 lean()함수 사용하기

개발자지망생