JSX
JSX는 객체 생성과 함수 호출을 위한 문법적 편의를 제공하기 위해 만들어진 확장 기능이다
하나의 부모
// App.js

import { StatusBar } from 'expo-status-bar';
import { StyleSheet, Text, View } from 'react-native';

export default function App() {
  return (
    <View style={styles.container}>
      <Text>Open up App.js to start working on your app!</Text>
      <StatusBar style="auto" />
    </View>
  );
}

const styles = StyleSheet.create({
  container: {
    flex: 1,
    backgroundColor: '#fff',
    alignItems: 'center',
    justifyContent: 'center',
  },
});
여러 개의 요소를 표현할 경우에 반드시 하나의 부모로 감싸야 한다 App.js에서도 View로 감싼 것을 확인할 수 있다
만약 하나의 부모로 감싸지 않으면? SyntaxError
View는 웹 프로그래밍에서 <div>와 비슷한 역할을 하는 컴포넌트이다
특정 역할을 하는 컴포넌트로 감싸지 않고 여러 개의 컴포넌트를 반환하고 싶다면 Fragment 컴포넌트를 사용한다
import { StatusBar } from 'expo-status-bar';
import { StyleSheet, Text, View } from 'react-native';

export default function App() {
  return (
    <Fragment>
      <Text>Open up App.js to start working on your app!</Text>
      <StatusBar style="auto" />
    </Fragment>
  );
}
단축 문법을 사용하면 아래처럼 표현할 수도 있다
import { StatusBar } from 'expo-status-bar';
import { StyleSheet, Text, View } from 'react-native';

export default function App() {
  return (
    <>
      <Text>Open up App.js to start working on your app!</Text>
      <StatusBar style="auto" />
    </>
  );
}
자바스크립트 변수
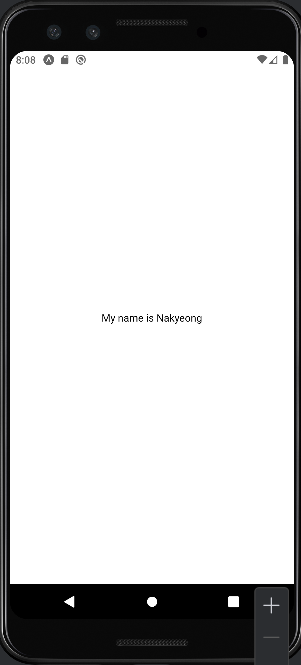
JSX 내부에서 자바스크립트 변수를 전달해서 사용할 수 있다
import { StatusBar } from 'expo-status-bar';
import { StyleSheet, Text, View } from 'react-native';

export default function App() {
  const name = 'Nakyeong';
  return (
    <View style={styles.container}>
      <Text>My name is {name}</Text>
      <StatusBar style="auto" />
    </View>
  );
}

const styles = StyleSheet.create({
  container: {
    flex: 1,
    backgroundColor: '#fff',
    alignItems: 'center',
    justifyContent: 'center',
  },
});
자바스크립트 조건문
if 조건문
JSX 내부에서 if문을 사용할 때는 반드시 즉시실행함수 형태로 적성해야 한다
즉시실행함수란? 함수 정의와 동시에 즉시 호출되며 단 한 번만 호출되는 함수
<View style={styles.container}>
  <Text>
    {(()=> {
      if (name === 'Nakyeong') return 'My name is Nakyeong';
      else if (name === 'Kyeong') return 'My name is Kyeong';
      else return 'My name is React Native';
    })()}
  </Text>
</View>
삼항 연산자
<View style={styles.container}>
  <Text style={styles.text}>
    My name is {name === 'Nakyeong' ? 'Nakyeong Yoon ': 'React Native'}
  </Text>
</View>
AND 연산자와 OR 연산자
JSX에서는 false는 렌더링되지 않는다
- AND 연산자: 조건이 참일 때 뒤의 내용이 나타남
- OR 연산자: 조건이 거짓일 때 내용이 나타남
<View>
  {name === 'Nakyeong' && (
    <Text>My name is Nakyeong</Text>
  )}
  {name !== 'Nakyeong' && (
    <Text>My name is not Nakyeong</Text>
  )}
</View>
null과 undefined
조건에 따라 출력하다 보면 컴포넌트가 null이나 undefined를 반환하는 경우가 있다 null은 가능하지만 undefined는 오류를 유발한다
주석
JSX의 주석은 {/* */}이다
단, 태그 안에서 주석을 사용할 때는 자바스크립트처럼 //나 /* */ 주석을 사용한다
스타일링
- HTML과 달리 style에 문자열로 입력하는 것이 아니라 객체 형태로 입력한다
- background-color처럼 하이픈(-)으로 연결된 이름은 하이픈을 제거하고 카멜 표기법으로 작성한다(ex. backgroundColor)
<View style={{
  flex: 1,
  backgroundColor: '#fff',
  alignItems: 'center',
  justifyContent: 'center',
}}>
  <Text>0pen up App.js to start working on your app!</Text>
  <StatusBar style="auto" />
</View>
컴포넌트
컴포넌트란 재사용이 가능한 조립 블록으로 하면에 나타나는 UI 요소이다
단순히 UI 역할만 수행x
부모로부터 받은 속성이나 자신의 상태에 따라 표현이 달라지고 다양한 기능을 수행한다
내장 컴포넌트
리액트 네이티브에서는 다양한 내장 컴포넌트를 제공해준다 대표적으로 App 컴포넌트에 있는 View 컴포넌트와 Text 컴포넌트가 있다
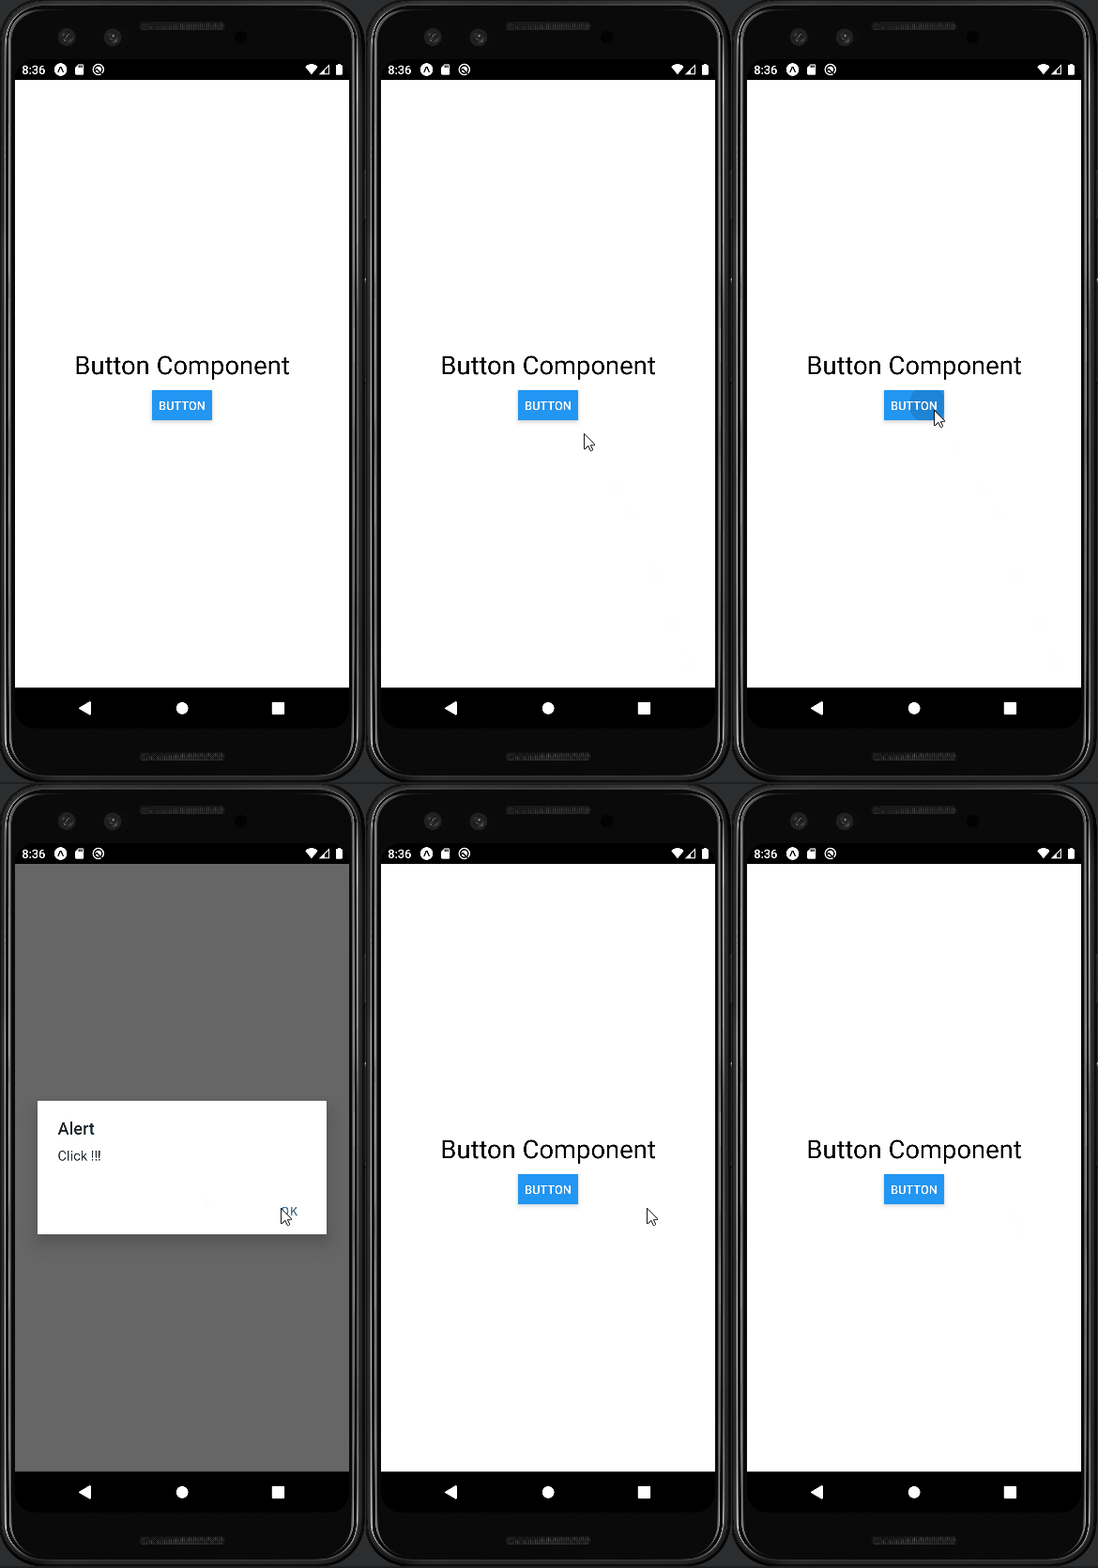
아래의 코드는 Button 컴포넌트를 사용했다
import { Button, Text, View } from 'react-native';

export default function App() {
  const name = 'Nakyeong';
  return (
    <View style={{
      flex: 1,
      backgroundColor: '#fff',
      alignItems: 'center',
      justifyContent: 'center',
    }}>
      <Text style={{fontSize: 30, marginBottom: 10}}>Button Component</Text>
      <Button title="Button" onPress={() => alert('Click !!!')} />
    </View>
  );
}
주의) Button 컴포넌트의 color 속성은 iOS에서는 텍스트 색을 나타내지만 안드로이드에서는 버튼의 바탕색을 의미한다
커스텀 컴포넌트
Button 컴포넌트처럼 iOS와 안드로이드에서 다른 모습으로 렌더링되는 단점을 보안하기 위해 TouchableOpacity 컴포넌트와 Text 컴포넌트를 이로 MyButton 컴포넌트를 만든다
import React from 'react'; // 리액트를 불러온다
import { TouchableOpacity, Text } from 'react-native';

const MyButton = () => {
    return (
        <TouchableOpacity
            style={{
                backgroundColor: '#3498db',
                padding: 16,
                margin: 10,
                borderRadius: 8,
            }}
            onPress={() => alert('Click !!1')}
        >
            <Text style={{fontSize: 24}}>My Button</Text>
        </TouchableOpacity>
    )
}

export default MyButton
import React from 'react';
import { Text, View } from 'react-native';
import MyButton from './components/MyButton';

const App = () => {
    return (
        <View
            style={{
                flex: 1,
                backgroundColor: '#fff',
                alignItems: 'center',
                justifyContent: 'center',
            }}
        >
            <Text
                style={{
                    fontSize: 30,
                    marginBottom: 10,
                }}
            >
                My Button Component
            </Text>
            <MyButton />
        </View>
    )
}

export default App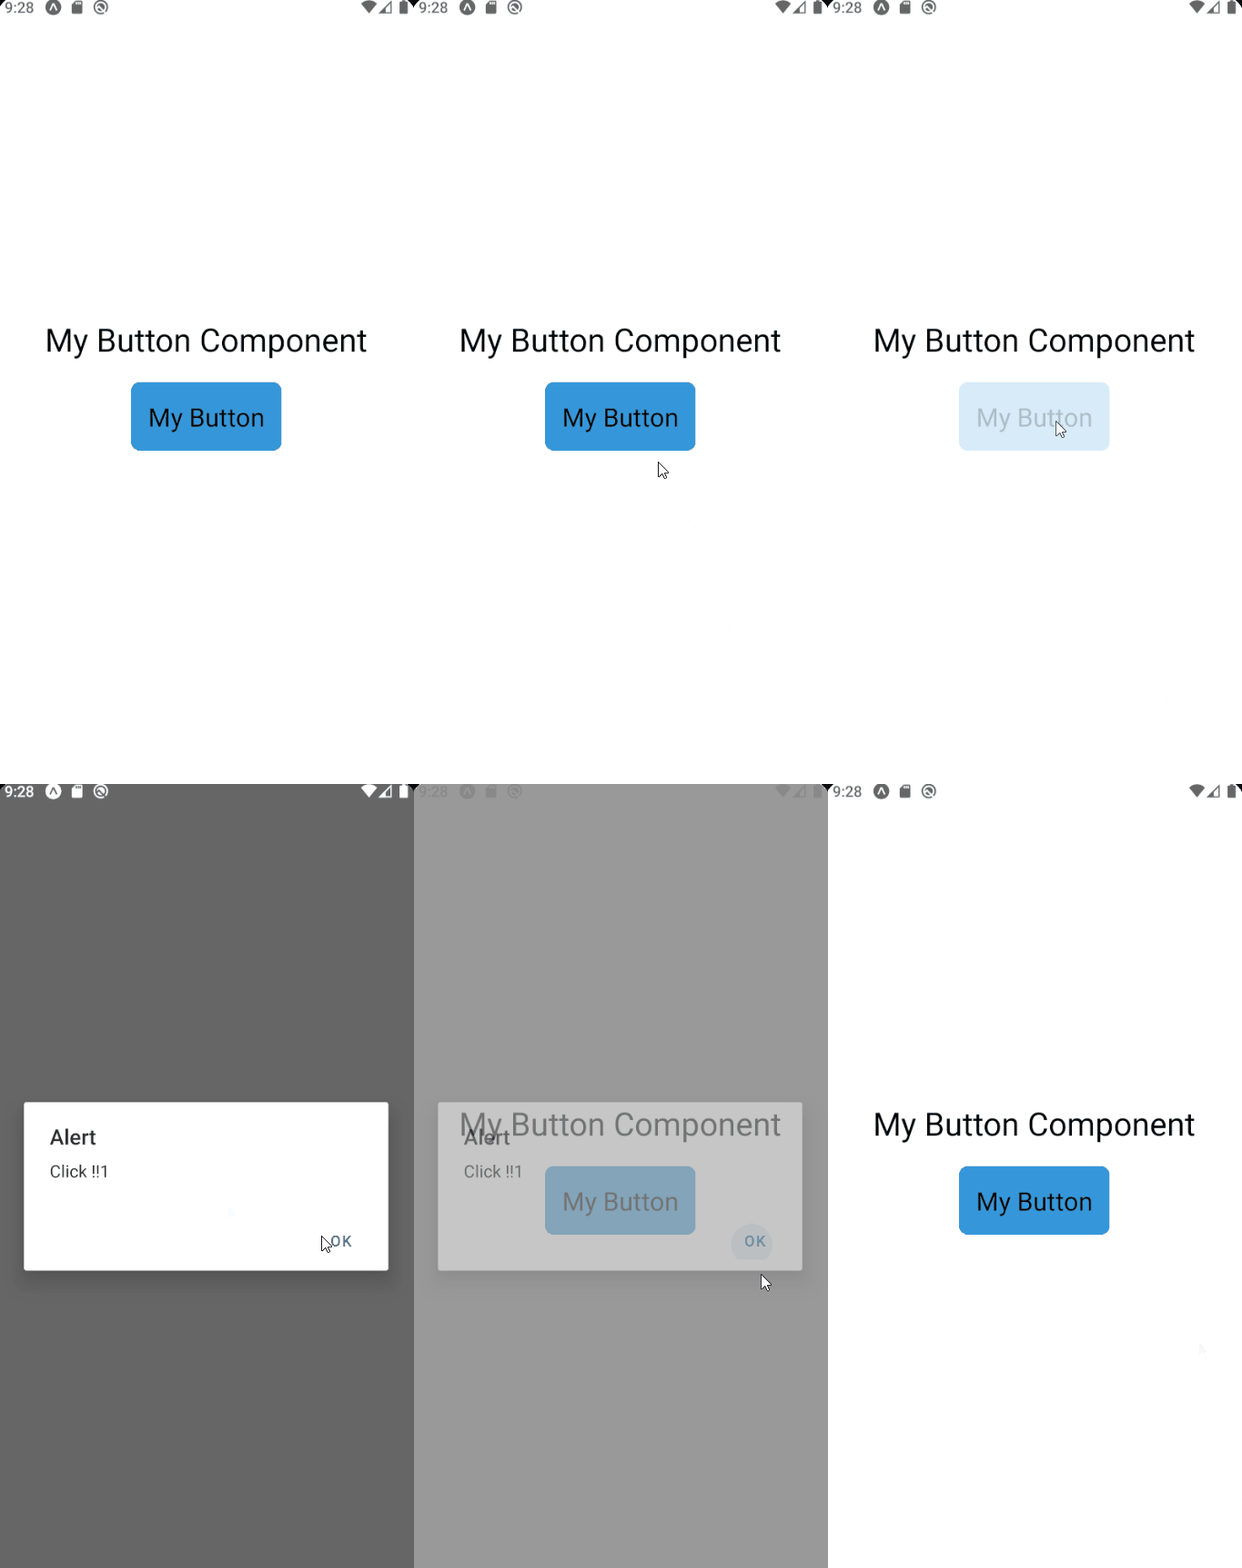
props와 state
props
properties를 줄인 표현으로, 부모 컴포넌트로부터 전달된 속성값 혹은 상속받은 속성값을 의미한다
이때 props를 자식 컴포넌트에서는 props를 변경할 수 없고, 변경이 필요한 경우에는 부모 컴포넌트에서 변경해야한다
import React from 'react';
import { Text, View } from 'react-native';
import MyButton from './components/MyButton';

const App = () => {
    return (
        <View
            style={{
                flex: 1,
                backgroundColor: '#fff',
                alignItems: 'center',
                justifyContent: 'center',
            }}
        >
            <Text
                style={{
                    fontSize: 30,
                    marginBottom: 10,
                }}
            >
                My Button Component
            </Text>
            <MyButton title='Button'/>
        </View>
    )
}

export default App
// MyButton.js

import React from 'react';
import { TouchableOpacity, Text } from 'react-native';

const MyButton = props => {
    console.log(props)
    return (
        <TouchableOpacity
            style={{
                backgroundColor: '#3498db',
                padding: 16,
                margin: 10,
                borderRadius: 8,
            }}
            onPress={() => alert('Click !!1')}
        >
            <Text style={{fontSize: 24}}>My Button</Text>
        </TouchableOpacity>
    )
}

export default MyButton
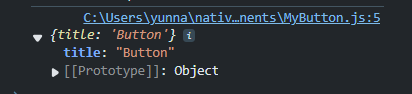
title이 콘솔에 출력된 것을 확인할 수 있다
import React from 'react';
import { Text, View } from 'react-native';
import MyButton from './components/MyButton';

const App = () => {
    return (
        <View
            style={{
                flex: 1,
                backgroundColor: '#fff',
                alignItems: 'center',
                justifyContent: 'center',
            }}
        >
            <Text
                style={{
                    fontSize: 30,
                    marginBottom: 10,
                }}
            >
                Props
            </Text>
            <MyButton title='Button'/>
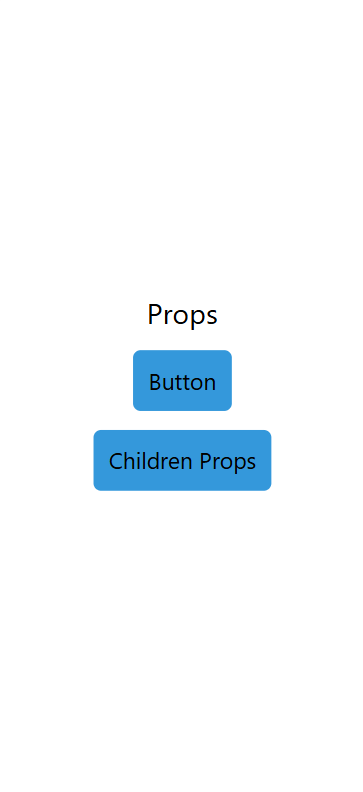
            <MyButton title='Button'>Children Props</MyButton>
        </View>
    )
}

export default App
import React from 'react';
import { TouchableOpacity, Text } from 'react-native';

const MyButton = props => {
    console.log(props);
    return (
        <TouchableOpacity
            style={{
                backgroundColor: '#3498db',
                padding: 16,
                margin: 10,
                borderRadius: 8,
            }}
            onPress={() => alert('Click !!')}
        >
            <Text style={{fontSize: 24}}>{props.children || props.title}</Text>
        </TouchableOpacity>
    )
}

export default MyButton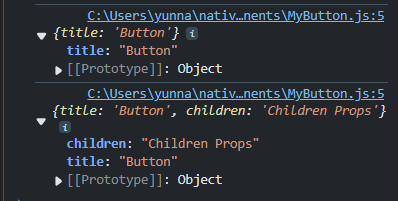
defaultProps
props를 전달하지 않았을 때 사용할 기본값을 defaultProps로 지정하는 것을 추천한다
defaultProps가 없으면 빈 값으로 나타나게 된다
import React from 'react';
import { TouchableOpacity, Text } from 'react-native';

const MyButton = props => {
    return (
        <TouchableOpacity
            style={{
                backgroundColor: '#3498db',
                padding: 16,
                margin: 10,
                borderRadius: 8,
            }}
            onPress={() => alert('Click !!')}
        >
            <Text style={{fontSize: 24}}>{props.children || props.title}</Text>
        </TouchableOpacity>
    )
}

MyButton.defaultProps = {
    title:'Button',
}

export default MyButton
propTypes
props를 전달할 때 잘못된 타입을 전달하거나, 필수로 전달해야 하는 값을 전달하지 않을 때 경고 메시지를 통해 알릴 수 있다
prop-types 라이브러리 설치 코드
npm install prop-typesMyButton.propTypes = {
title: PropTypes.string,
};propTypes를 이용하면 isRequired를 통해 필수 여부를 지정할 수 있다
MyButton.propTypes = {
    title: PropTypes.string.isRequired,
    name: PropTypes.string.isRequired,
};
만약 isRequired 때문에 필수로 전달해야 하지만 defaultProps로 기본값을 설정했다면 값을 전달하지 않더라도 에러 발생x
state
state는 컴포넌트 내부에서 생성되고 값을 변경할 수 있으며 이를 이용해서 컴포넌트 상태를 관리한다
상태가 변하면 리렌더링 된다
원래 클래스형 컴포넌트에서만 상태 관리가 가능했는데, 리액트 네이티브 0.59부터는 Hooks을 통해 함수형 컴포넌트에서도 상태 관리가 가능하다
useState
useState는 상태를 관리하는 변수와 그 변수를 변경할 수 있는 세터 함수를 배열로 반환한다 상태 변수를 직접 변경하지 않고 useState 함수에서 반환한 세터 함수를 이용한다
import React, { useState } from 'react';
import { View, Text } from 'react-native';
import MyButton from './MyButton';

const Counter = () => {
    const [count, setCount] = useState(0);
    return (
        <View style={{alignItems: 'center'}}>
            <Text style={{fontSize: 30, margin: 10}}>{count}</Text>
            <MyButton title="+1" onPress={() => setCount(count+1)}/>
            <MyButton title="-1" onPress={() => setCount(count-1)}/>
        </View>
    )
}

export default Counter
여러 개의 useState를 사용하는 것도 가능하다
이벤트
press 이벤트
웹 프로그래밍에서 onClick 이벤트와 비슷하다
- onPressIn: 터치가 시작될 떄 항상 호출
- onPressOut: 터치가 해제될 때 항상 호출
- onPress: 터치가 해제될 때 onPressOut 이후 호출
- onLongPress: 터치가 일정 시간 이상 지속되면 호출
import React from 'react'
import { TouchableOpacity, Text } from 'react-native';

const EventButton = () => {
    const _onPressIn = () => console.log('Press In !!!\n');
    const _onPressOut = () => console.log('Press Out !!!\n');
    const _onPress = () => console.log('Press !!!\n');
    const _onLongPress = () => console.log('Long Press !!!\n');

    return (
        <TouchableOpacity
            style={{
                backgroundColor: '#f1c40f',
                padding: 16,
                margin: 10,
                borderRadius: 8,
            }}
            onPressIn={_onPressIn}
            onLongPress={_onLongPress}
            onPressOut={_onPressOut}
            onPress={_onPress}
        >
            <Text style={{color: 'white', fontSize: 24}}></Text>
        </TouchableOpacity>
    )
}

export default EventButton
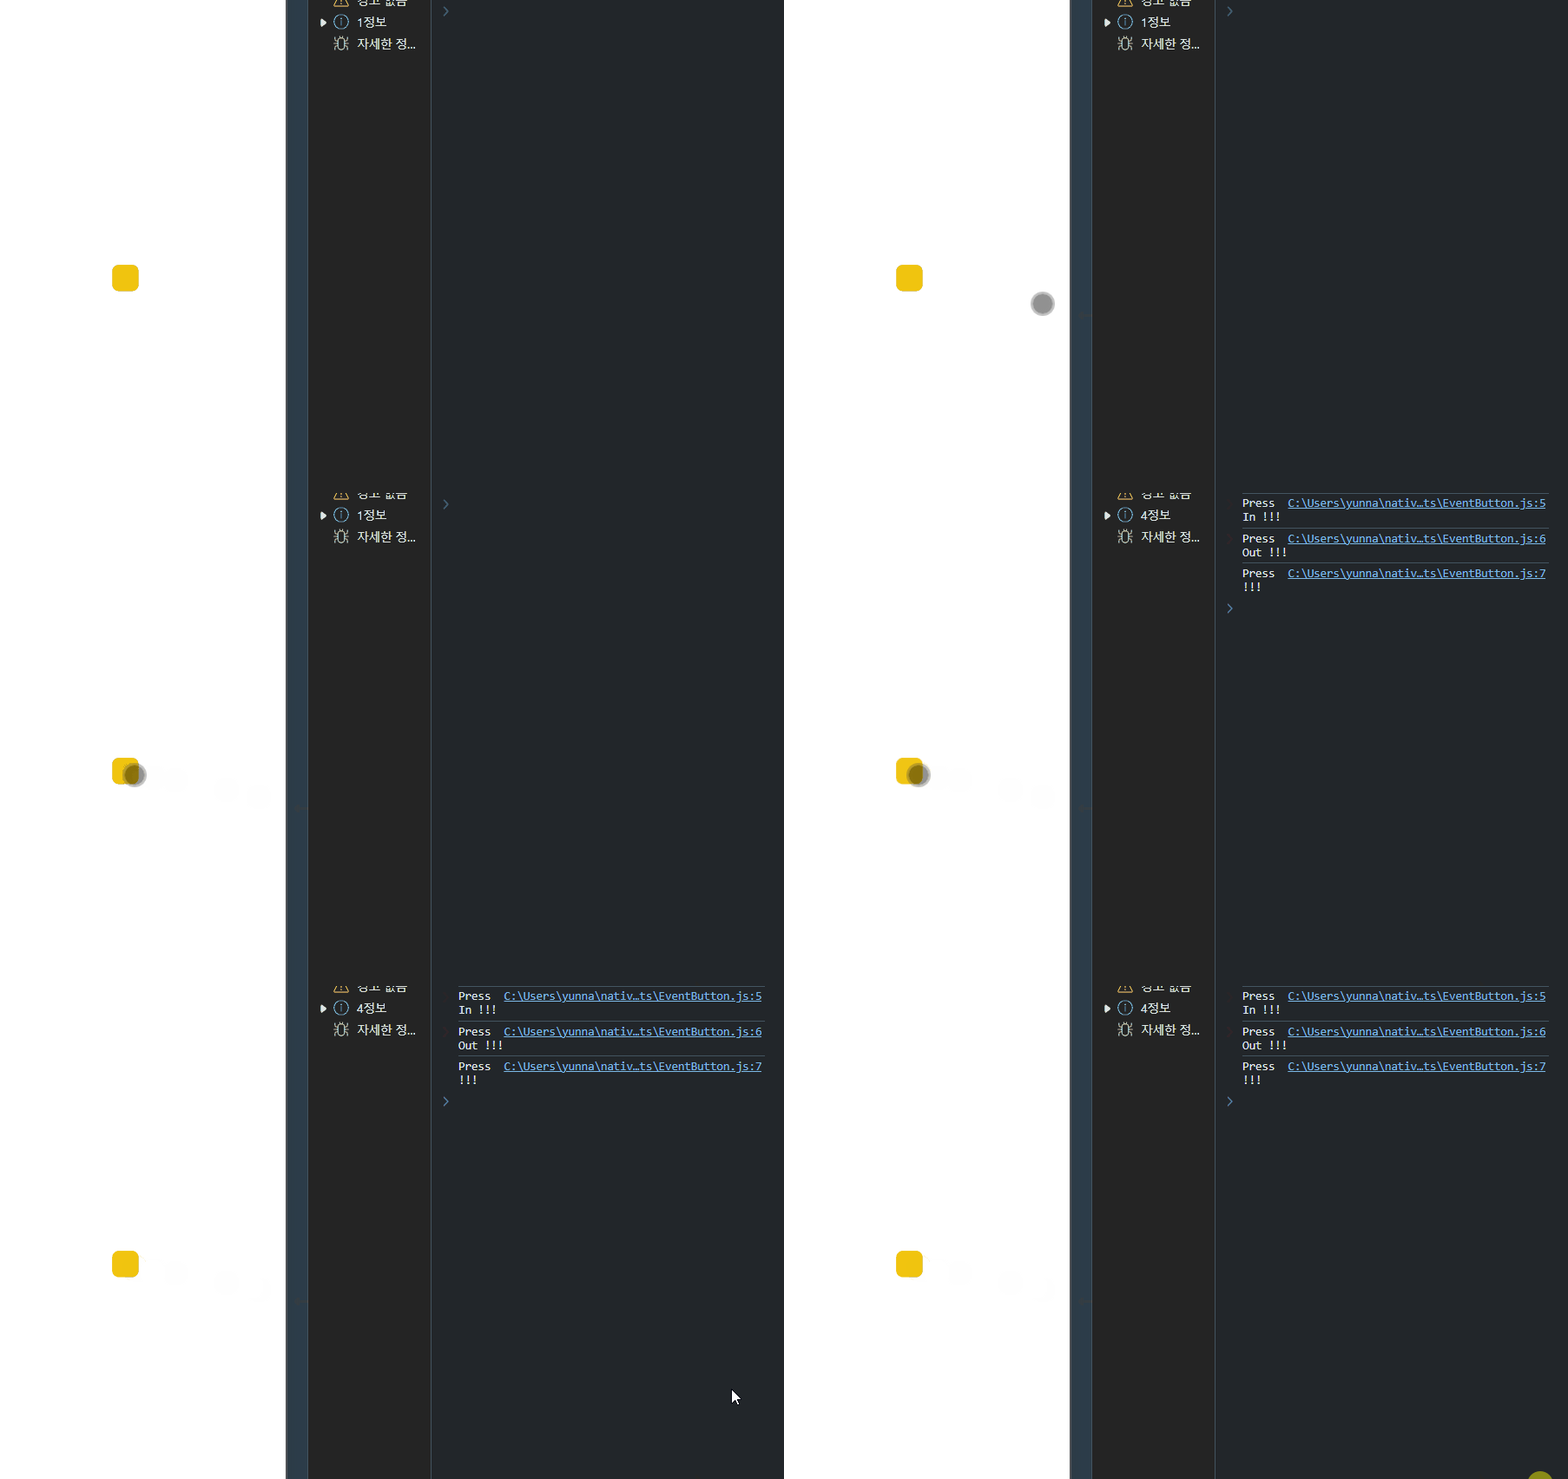
짧게 누른 경우: onPressIn -> onPressOut -> onPress
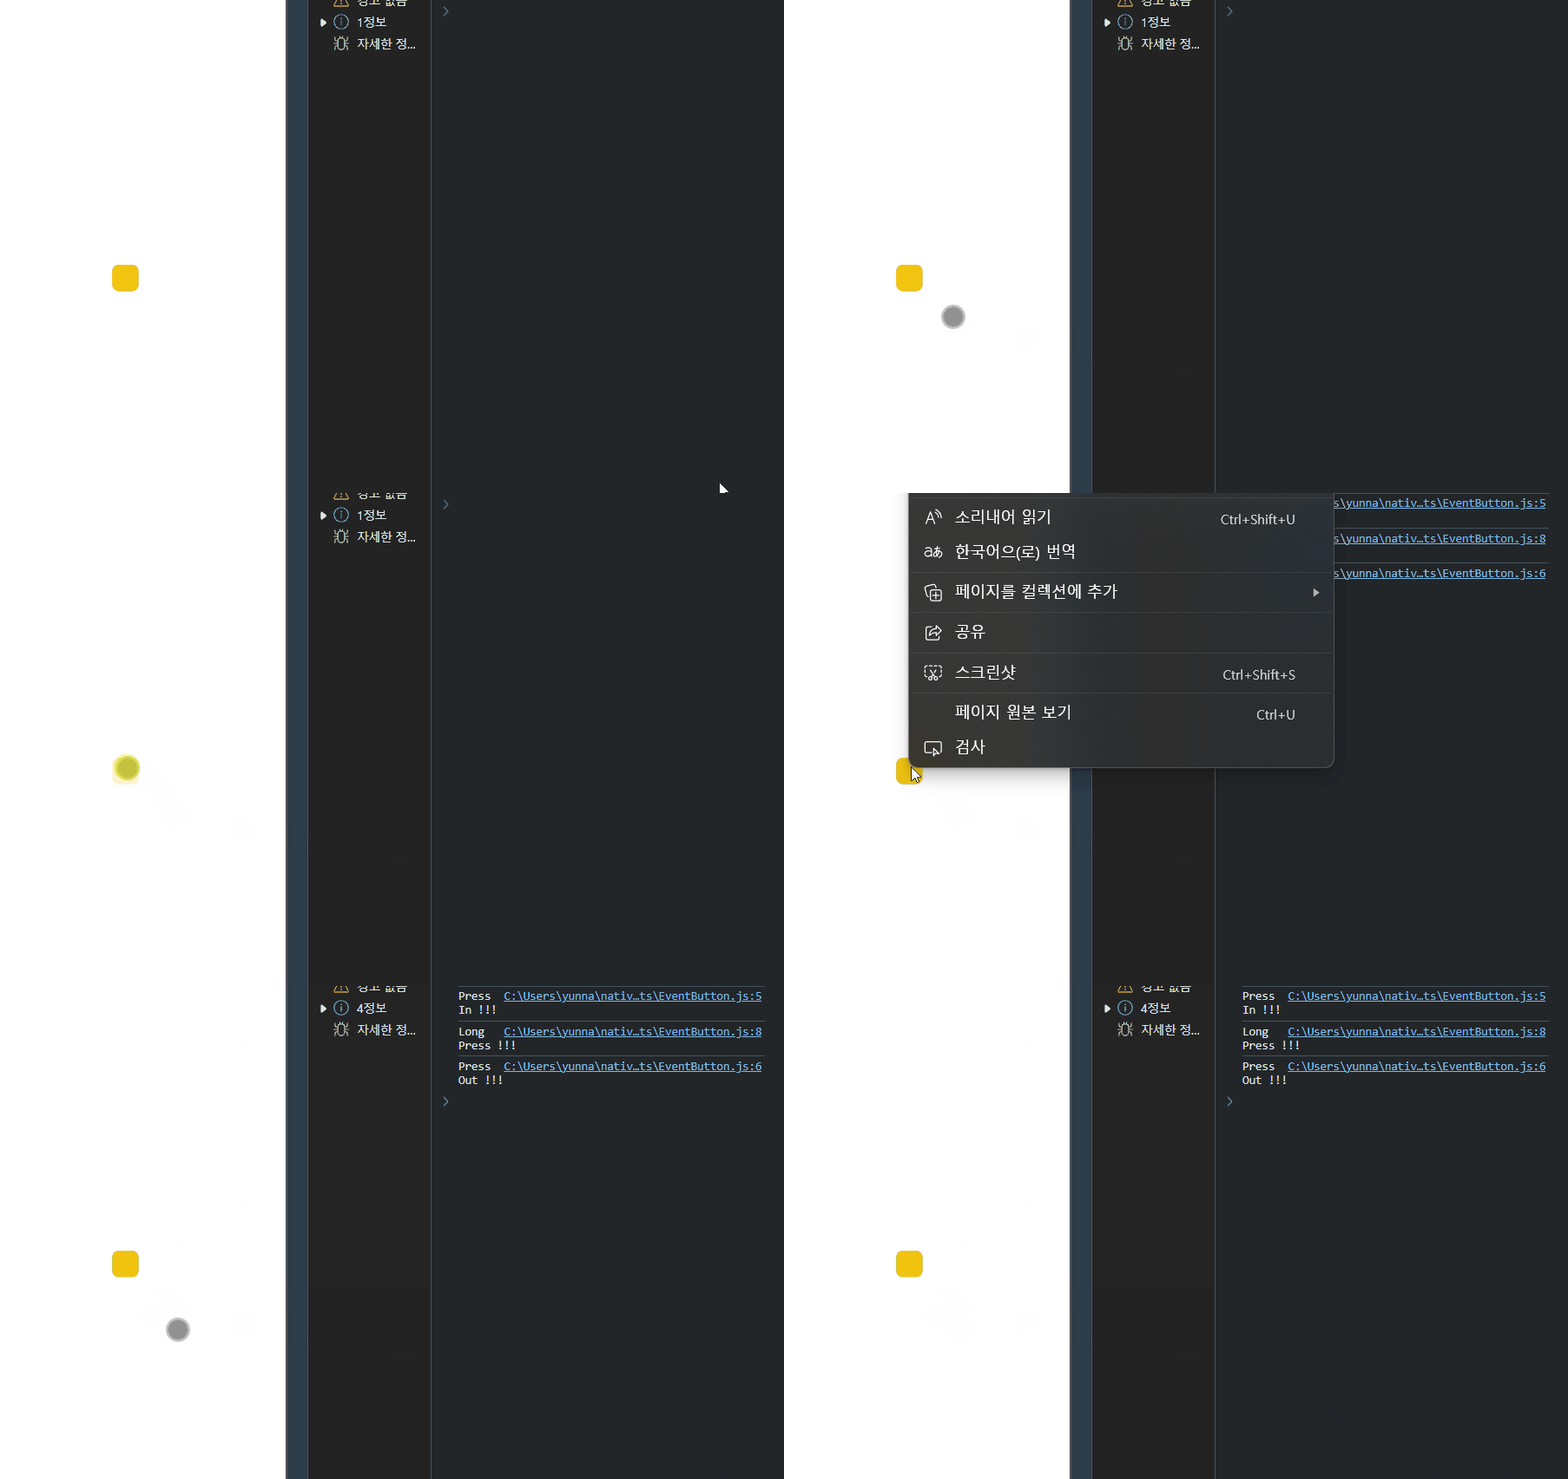
길게 누른 경우: onPressIn -> onLongPress -> onPressOut
- 항상 호출: onPressIn, onPressOut
- 클릭 시간에 따라 호출: onPress(짧게), onLongPress(길게)
만약 onLongPress의 호출 시간을 조절하고 싶다면 delayLongPress를 사용하면 된다
<TouchableOpacity
    onPressIn={_onPressIn}
    onLongPress={_onLongPress}
    onPressOut={_onPressOut}
    onPress={_onPress}
    delayLongPress={5000} //시간 조절
>
</TouchableOpacity>
-> 5초 동안 클릭하고 있어야 onLongPress가 호출된다
change 이벤트
change 이벤트는 변화를 감지한다
값을 입력하는 TextInput 컴포넌트에서 많이 사용한다
import React, { useState } from 'react'
import { View, Text, TextInput } from 'react-native-web';

const EventInput = () => {
    const [text, setText] = useState('');
    const _onChange = event => setText(event.nativeEvent.text);
    return (
        <View>
            <Text style={{margin: 10, fontSize: 30}}>text: {text}</Text>
            <TextInput
                style={{borderWidth: 1, paddign: 10, fontSize: 20}}
                placeholder='Enter a text...'
                onChange={_onChange}
            />
        </View>
    )
}

export default EventInput- 화살표 함수
- event: TextInput에서 발생한 이벤트 정보를 담는객체
- nativeEvent: 네이티브 이벤트 속성인데 실제 입력된 텍스트를 포함
- event.nativeEvent.text: 사용자가 입력한 텍스트 값

Pressable 컴포넌트
TouchableOpacity 컴포넌트를 대체하는 컴포넌트이다
Pressable 컴포넌트에저는 HitRect와 PressRect를 지원한다
- HitRect: 버튼보다 약간 떨어진 부분까지 이벤트가 발생할 수 있도록 한다
- PressRect: 버튼을 누른 상태에서 벗어날 수 있는 범위
import React from 'react';
import { Pressable, View, Text } from 'react-native';

const Button = (props) => {
    return (
        <Pressable
            style={{padding: 10, backgroundColor: '#1abc9c'}}
            onPressIn={() => console.log('Press In')}
            onPressOut={() => console.log('Press Out')}
            pressRetentionOffset={{bottom:50, left:50, right:50, top:50}} // 누른 상태에서 벗어날 수 있는 범위
            hitSlop={50} // 50픽셀 떨어진 곳도 이벤트 발생하도록
        >
            <Text style={{padding: 10, fontSize: 30}}>{props.title}</Text>
        </Pressable>
    )
}

const App = () => {
    return (
        <View
            style={{
                flex: 1,
                backgroundColor: '#fff',
                alignItems: 'center',
                justifyContent: 'center',
            }}
        >
            <Button title='Pressable' />
        </View>
    )
}

export default App
참고
처음 배우는 리액트 네이티브