메시지 브로커는 데이터(메시지)를 송신자(프로듀서)로부터 수신자(컨슈머)에게 전달하는 중간 매개체 역할
RabbitMQ는 이러한 메시지를 큐(queue)에 저장하고, 필요할 때 적절한 수신자에게 전달
RabbitMQ의 역할
- 비동기 처리: 데이터를 비동기적으로 처리하여 시스템의 응답성을 향상
- 부하 분산: 여러 소비자에게 메시지를 분산시켜 시스템의 부하를 균형 있게 분산
- 내결함성: 메시지를 안전하게 저장하여 시스템 장애 시 데이터 손실을 방지
장단점
장점
- 신뢰성(Reliability)
- 메시지 지속성: RabbitMQ는 메시지를 디스크에 저장하여 시스템 장애 발생 시에도 메시지 손실 방지
- 확인 메커니즘: 메시지가 성공적으로 소비자에게 전달되었는지 확인
- 유연성(Flexibility)
- 다양한 메시지 패턴: RabbitMQ는 여러 가지 메시지 전달 패턴(단일 소비자, 다중 소비자, 라운드 로빈, 팬아웃, 주제 기반 등)을 지원
- 프로토콜 지원: 기본적으로 AMQP(Advanced Message Queuing Protocol)를 사용하지만, STOMP, MQTT 등 다양한 프로토콜도 지원
- 확장성(Scalability)
- 클러스터링: RabbitMQ는 클러스터링을 통해 여러 노드로 구성된 환경에서 높은 가용성과 부하 분산을 제공
- 분산 아키텍처: 페더레이션(Federation) 등을 사용하여 여러 RabbitMQ 인스턴스 간에 메시지를 전달함으로써 분산된 메시징 시스템을 구축
- 관리 및 모니터링(Manageability and Monitoring)
- 관리 인터페이스: 웹 기반 관리 인터페이스를 통해 큐, 익스체인지, 바인딩 등을 쉽게 관리
- 플러그인 시스템: 다양한 플러그인을 통해 기능을 확장(예: 관리 플러그인, 모니터링 플러그인 등).
- 성능(Performance)
- 높은 처리량: 적절히 구성된 RabbitMQ는 높은 메시지 처리량을 제공하여 대규모 애플리케이션에서도 효과적으로 사용
단점
- 설정 및 운영 복잡성(Setup and Operational Complexity)
- 복잡한 설정: RabbitMQ의 초기 설정이 다소 복잡할 수 있으며, 클러스터링 및 분산 환경에서는 더욱 많은 설정이 필요
- 운영 관리: 대규모 환경에서 RabbitMQ를 운영하고 관리하는 데 있어서 추가적인 노력이 필요
- 성능 문제(Performance Issues)
- 메시지 브로커 오버헤드: RabbitMQ는 모든 메시지를 중앙 브로커를 통해 전달하기 때문에, 높은 트래픽 상황에서는 브로커의 오버헤드가 발생
- 대규모 메시지 처리: 매우 대규모의 메시지를 처리할 때 성능 저하가 발생할 수 있으며, 이러한 경우에는 적절한 클러스터링 및 최적화가 필요
- 운영 비용(Operational Costs)
- 리소스 소비: RabbitMQ는 메모리와 CPU 자원을 많이 소비할 수 있어, 충분한 리소스를 제공해야 원활하게 운영
- 모니터링 및 유지보수: 지속적인 모니터링과 유지보수가 필요하며, 이를 위해 추가적인 인력과 비용이 발생
- 제한된 메시지 크기(Limited Message Size)
- 메시지 크기 제한: RabbitMQ는 매우 큰 메시지 처리에 제한이 있을 수 있으며, 대용량 파일 전송에는 부적합 할 수 있음
- 러닝 커브(Learning Curve)
- 학습 필요성: RabbitMQ의 개념과 설정을 이해하는 데 시간 소요
기본 구성 요소
메시지(Message)
- 메시지는 RabbitMQ를 통해 전달되는 데이터 단위
- 예를 들어, 사용자 등록 정보나 주문 내역이 메시지
프로듀서(Producer)
- 메시지를 생성하고 RabbitMQ에 보내는 역할
- 예를 들어, 웹 애플리케이션이 사용자 등록 정보를 RabbitMQ에 보내는 경우 프로듀서
큐(Queue)
- 메시지를 저장하는 장소
- 메시지는 큐에 저장되었다가 소비자에게 전달
- 큐는 FIFO(First In, First Out) 방식으로 메시지를 처리
컨슈머(Consumer)
- 큐에서 메시지를 가져와 처리하는 역할
- 예를 들어, 이메일 발송 서비스가 큐에서 사용자 등록 정보를 가져와 환영 이메일을 보내는 경우 컨슈머
익스체인지(Exchange)
- 메시지를 적절한 큐로 라우팅하는 역할
- 프로듀서는 메시지를 직접 큐에 보내지 않고, 익스체인지에 보내며, 익스체인지는 메시지를 적절한 큐로 전달
RabbitMQ와 AMQP
- RabbitMQ는 AMQP(Advanced Message Queuing Protocol)를 사용
- AMQP는 메시지 브로커를 위한 프로토콜로, 메시지의 생성, 전송, 큐잉, 라우팅 등을 표준화하여 메시지 브로커가 상호 운용될 수 있게 한다.
- 여기서 프로토콜(Protocol)은 컴퓨터 네트워크에서 데이터를 주고받기 위한 일련의 규칙과 절차 쉽게 말해, 컴퓨터나 장치들이 서로 통신할 때 어떻게 소통해야 하는지를 정해 놓은 약속
AMQP의 주요 개념
- 메시지(Message): 전송되는 데이터 단위
- 큐(Queue): 메시지를 저장하고 전달하는 구조
- 익스체인지(Exchange): 메시지를 큐로 라우팅하는 역할
- 바인딩(Binding): 익스체인지와 큐를 연결하는 설정, 바인딩을 통해 메시지가 어느 큐로 전달될지 정의
익스체인지 유형
- 메시지 브로커가 메시지를 교환기에서 큐로 라우팅하는 방식
- 익스체인지는 다양한 방식으로 메시지를 라우팅할 수 있으며, 주로 메시지의 라우팅 키와 바인딩 키 또는 패턴을 기반으로 작동 1) Direct Exchange
-
라우팅 키가 정확히 일치하는 큐로 메시지를 전달
-
예를 들어, 라우팅 키가 error인 메시지는 error라는 바인딩 키를 가진 큐로 전달
2) Topic Exchange
-
라우팅 키의 패턴을 사용하여 메시지를 라우팅. 패턴에는 와일드카드 * (단어 하나)와 # (0개 이상의 단어)가 사용.
-
예를 들어, 라우팅 키가 quick.orange.rabbit인 메시지는 바인딩 키가 .orange.인 큐로 전달
3) Fanout Exchange
-
라우팅 키를 무시하고 교환기에 바인딩된 모든 큐로 메시지를 브로드캐스트
-
모든 바인딩된 큐로 메시지가 전달
4) Headers Exchange
-
라우팅 키 대신 메시지의 헤더를 기반으로 메시지를 라우팅
-
헤더 값과 바인딩된 헤더 값이 일치하는 큐로 메시지를 전달합니다.
-
실습
RabbitMQ
도커를 사용하여 RabbitMQ를 설치합니다.
**docker run -d --name rabbitmq -p5672:5672 -p 15672:15672 --restart=unless-stopped rabbitmq:management**
localhost:15672에 접속하면 로그인 페이지가 보입니다. guest/guest를 입력하여 접속하면 대시보드를 볼 수 있습니다.
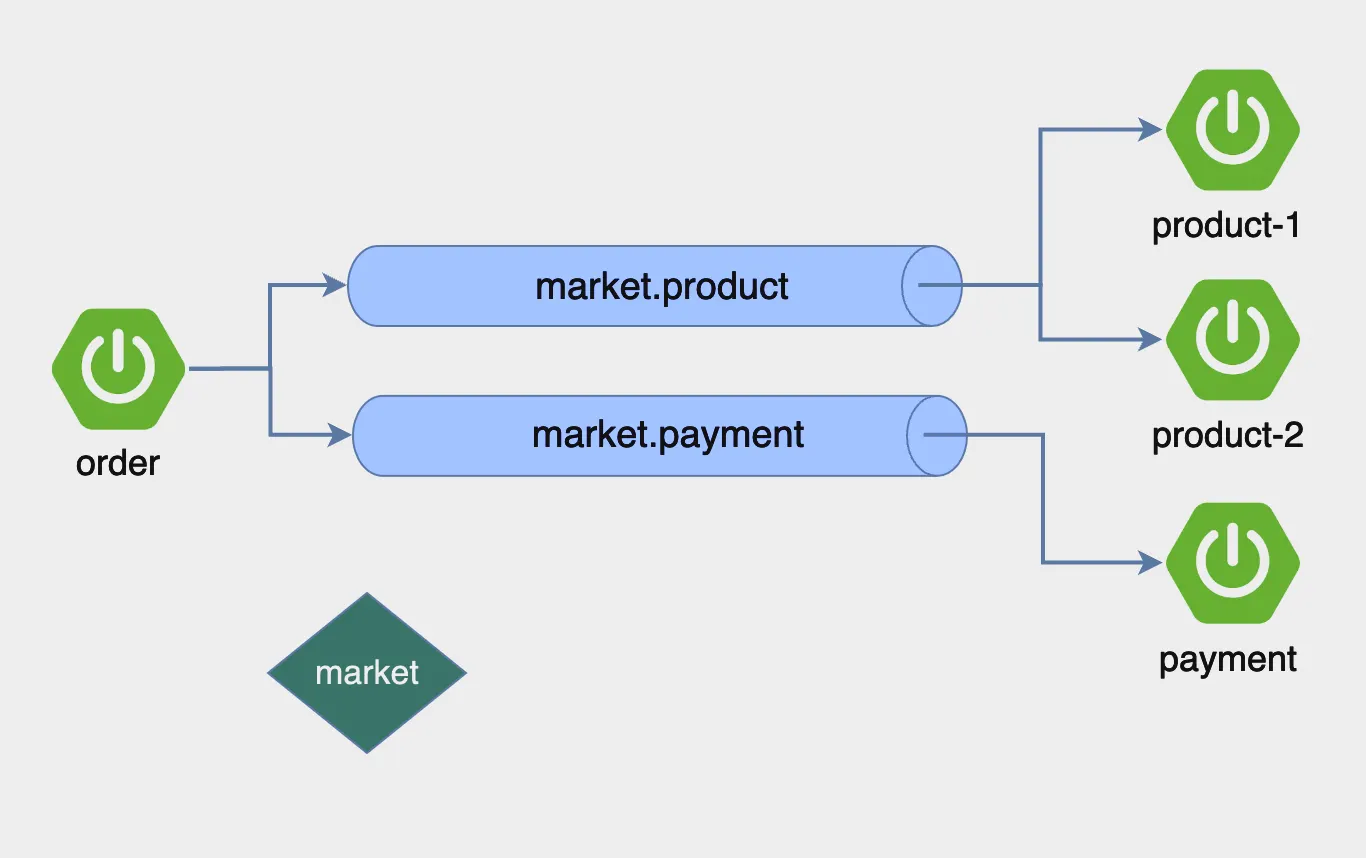
Order Application
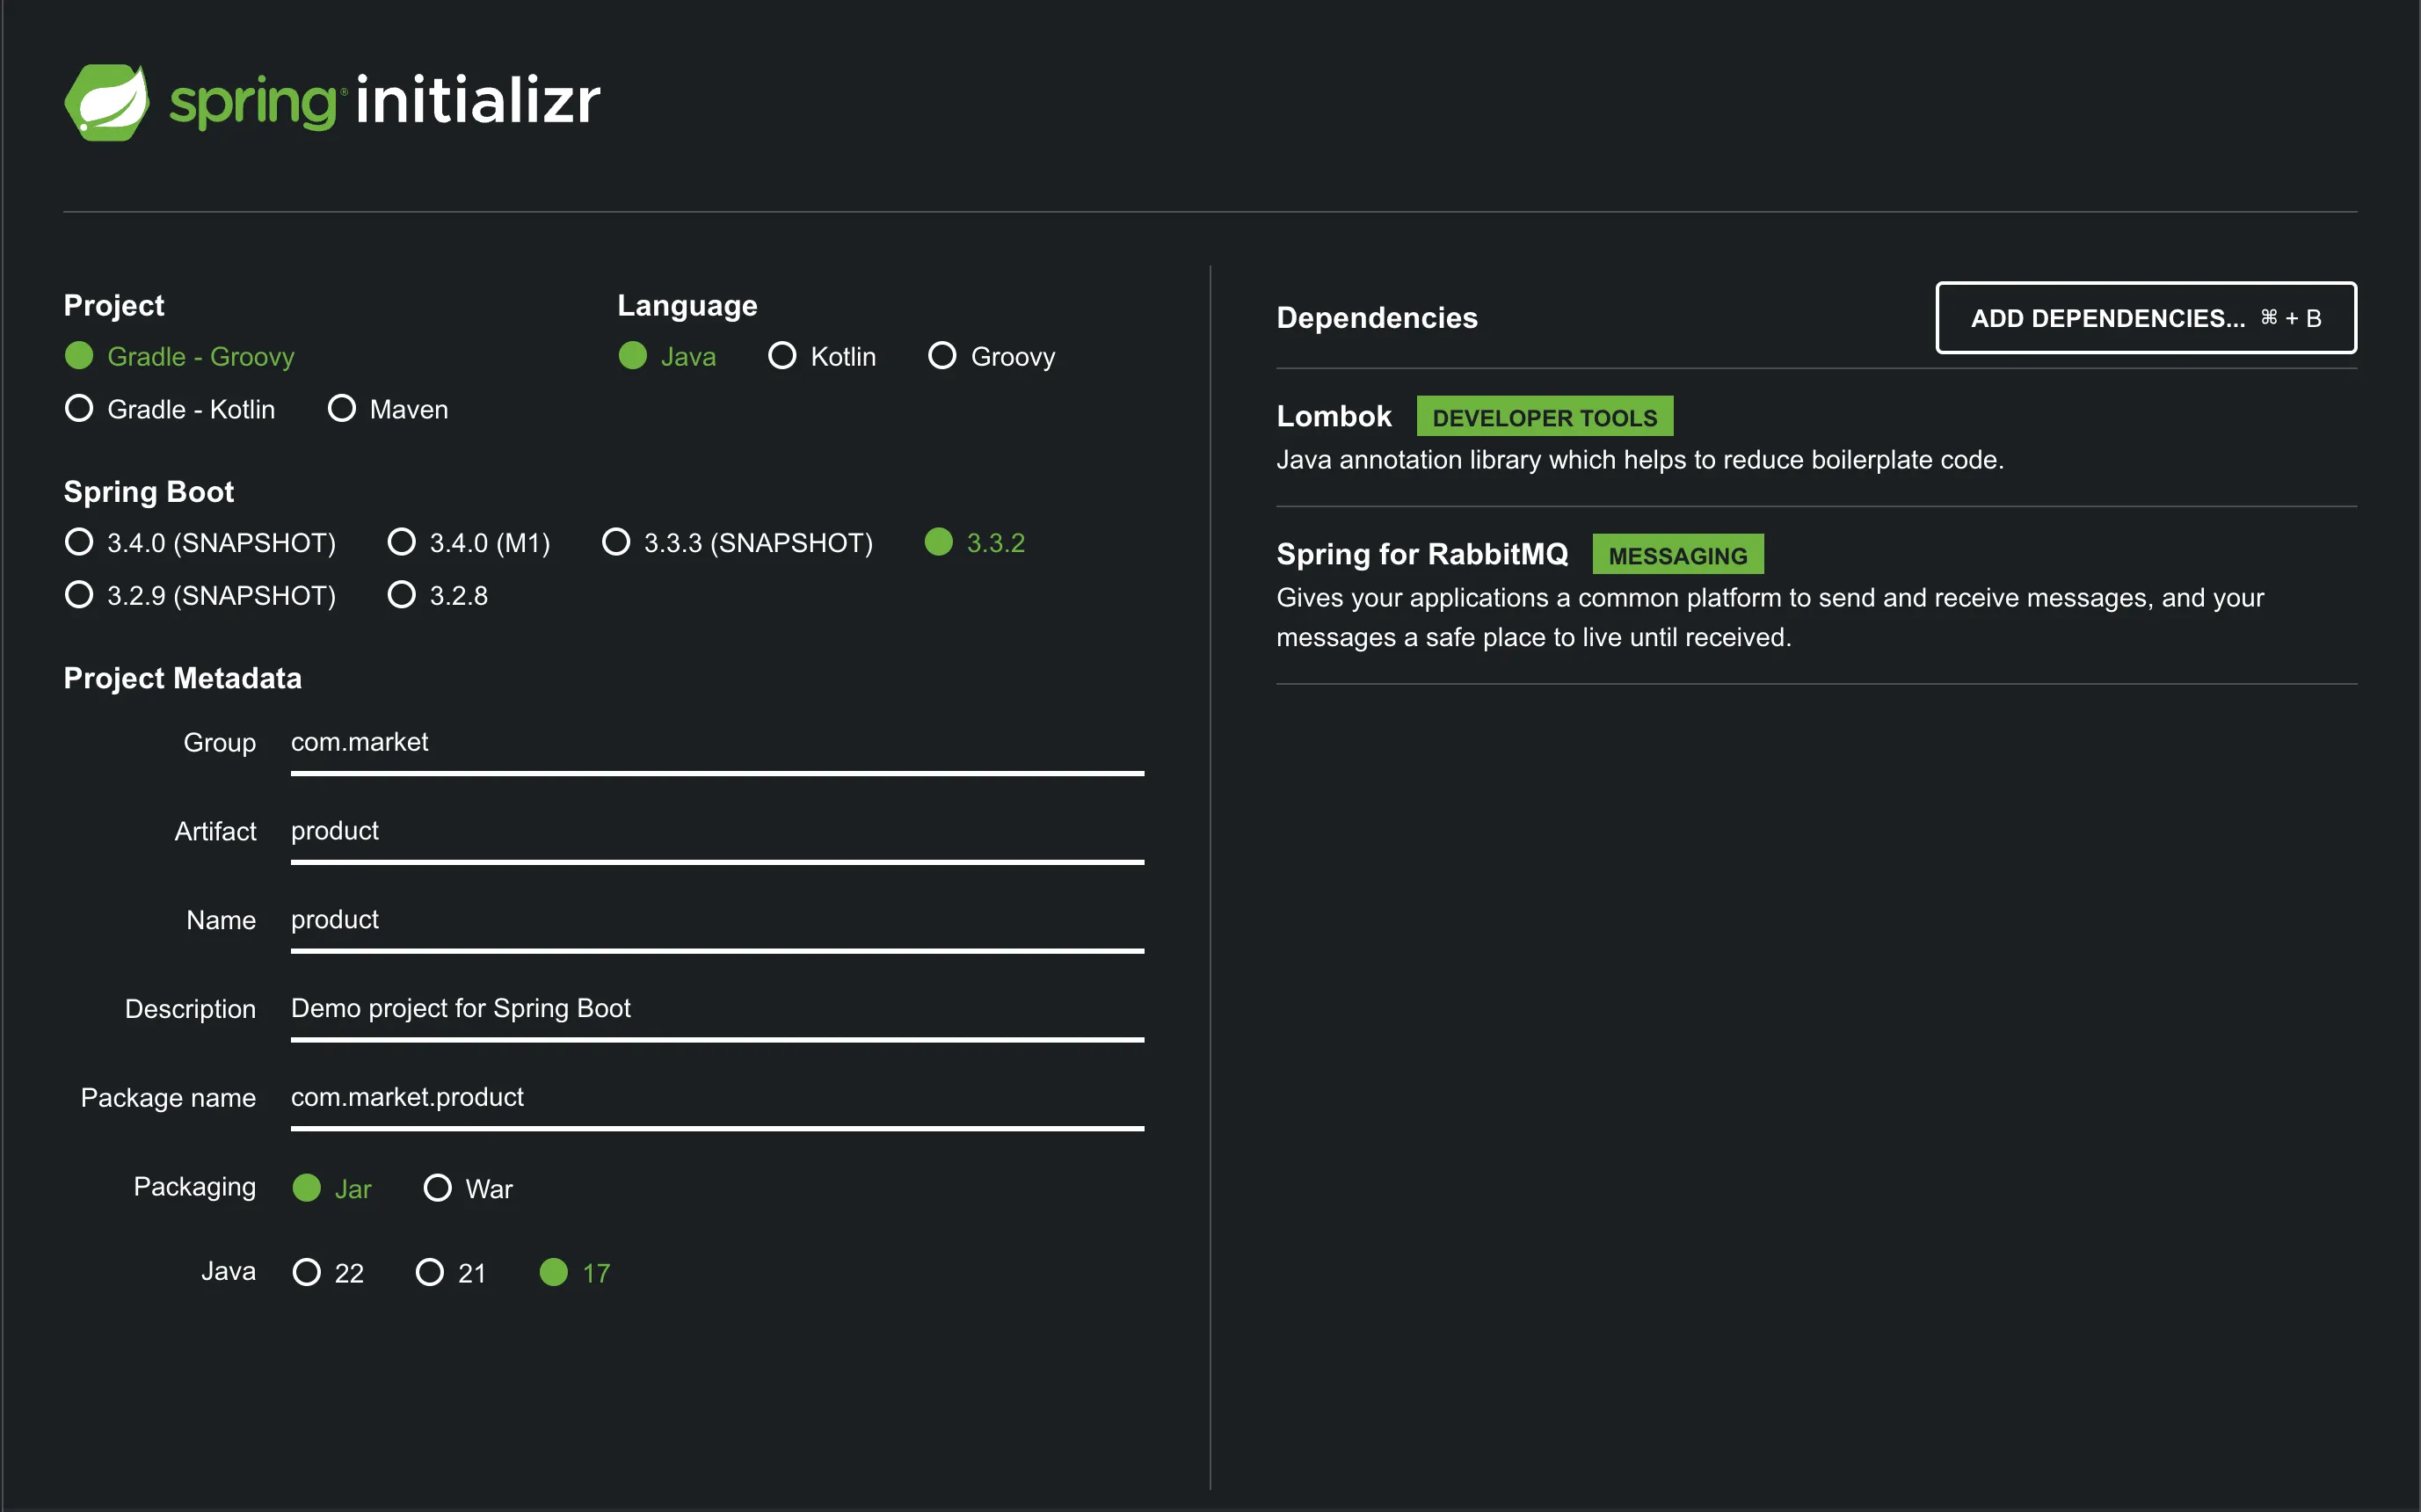
start.spring.io 에 접속하여 프로젝트를 생성합니다.
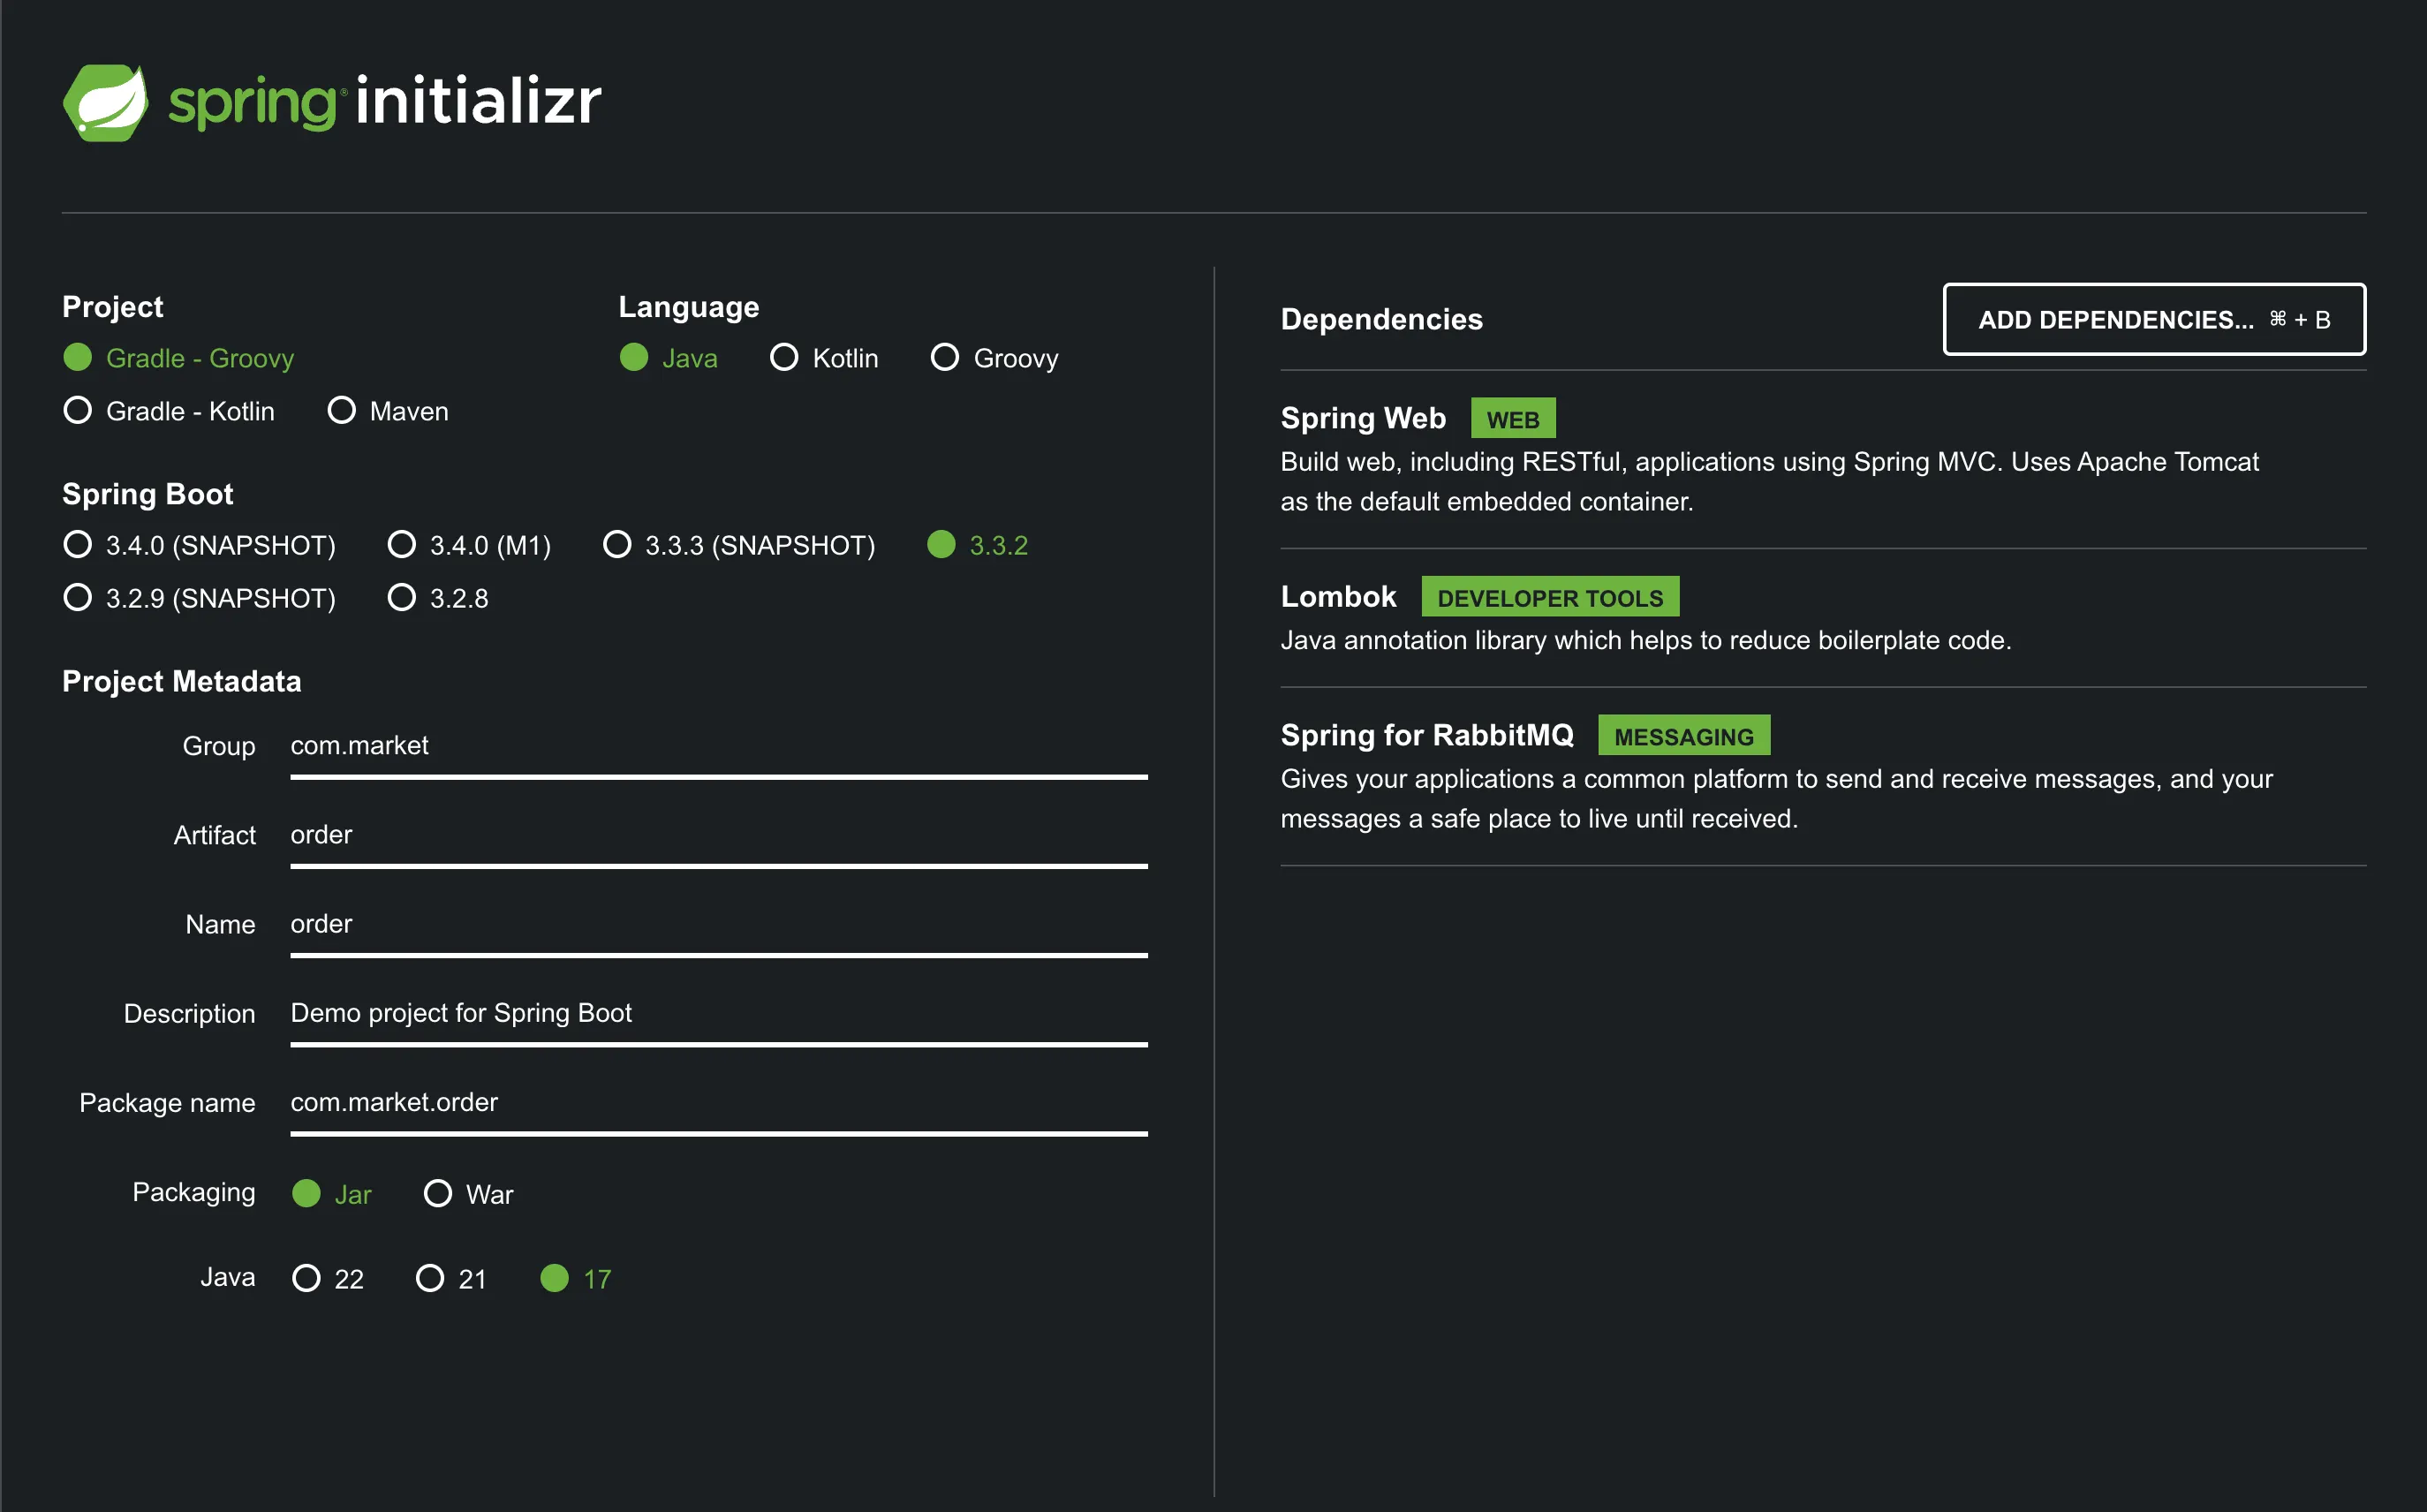
프로젝트를 생성하면 build.gradle의 디펜던시는 아래와 같습니다.
dependencies {
	implementation 'org.springframework.boot:spring-boot-starter-amqp'
	implementation 'org.springframework.boot:spring-boot-starter-web'
	compileOnly 'org.projectlombok:lombok'
	annotationProcessor 'org.projectlombok:lombok'
	testImplementation 'org.springframework.boot:spring-boot-starter-test'
	testImplementation 'org.springframework.amqp:spring-rabbit-test'
	testRuntimeOnly 'org.junit.platform:junit-platform-launcher'
}
application.properties
spring.application.name=order

message.exchange=market
message.queue.product=market.product
message.queue.payment=market.payment

spring.rabbitmq.host=localhost
spring.rabbitmq.port=5672
spring.rabbitmq.username=guest
OrderApplicationQueueConfig.java
import org.springframework.amqp.core.Binding;
import org.springframework.amqp.core.BindingBuilder;
import org.springframework.amqp.core.Queue;
import org.springframework.amqp.core.TopicExchange;
import org.springframework.beans.factory.annotation.Value;
import org.springframework.context.annotation.Bean;
import org.springframework.context.annotation.Configuration;

@Configuration
public class OrderApplicationQueueConfig {

    @Value("${message.exchange}")
    private String exchange;

    @Value("${message.queue.product}")
    private String queueProduct;

    @Value("${message.queue.payment}")
    private String queuePayment;

    @Bean public TopicExchange exchange() { return new TopicExchange(exchange); }

    @Bean public Queue queueProduct() { return new Queue(queueProduct); }
    @Bean public Queue queuePayment() { return new Queue(queuePayment); }

    @Bean public Binding bindingProduct() { return BindingBuilder.bind(queueProduct()).to(exchange()).with(queueProduct); }
    @Bean public Binding bindingPayment() { return BindingBuilder.bind(queuePayment()).to(exchange()).with(queuePayment); }
}
OrderController.java
import lombok.RequiredArgsConstructor;
import org.springframework.web.bind.annotation.GetMapping;
import org.springframework.web.bind.annotation.PathVariable;
import org.springframework.web.bind.annotation.RestController;

@RestController
@RequiredArgsConstructor
public class OrderController {

    private final OrderService orderService;

    @GetMapping("/order/{id}")
    public String order(@PathVariable String id) {
        orderService.createOrder(id);
        return "Order complete";
    }
}
OrderService.java
import lombok.RequiredArgsConstructor;
import org.springframework.amqp.rabbit.core.RabbitTemplate;
import org.springframework.beans.factory.annotation.Value;
import org.springframework.stereotype.Service;

@Service
@RequiredArgsConstructor
public class OrderService {

    @Value("${message.queue.product}")
    private String productQueue;

    @Value("${message.queue.payment}")
    private String paymentQueue;

    private final RabbitTemplate rabbitTemplate;

    public void createOrder(String orderId) {
        rabbitTemplate.convertAndSend(productQueue, orderId);
        rabbitTemplate.convertAndSend(paymentQueue, orderId);
    }

}
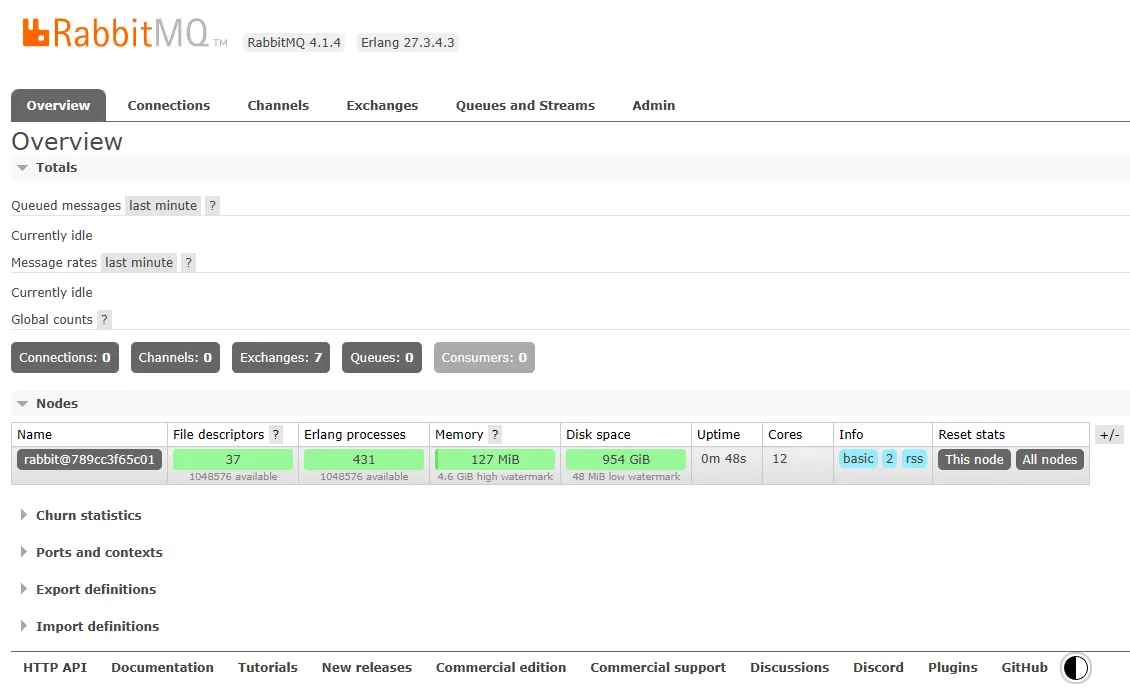
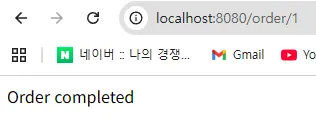
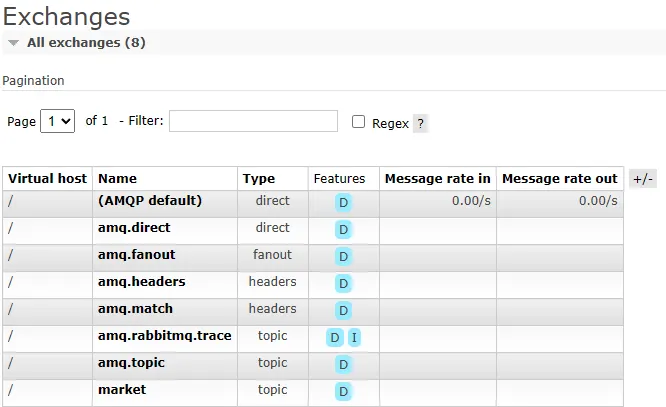
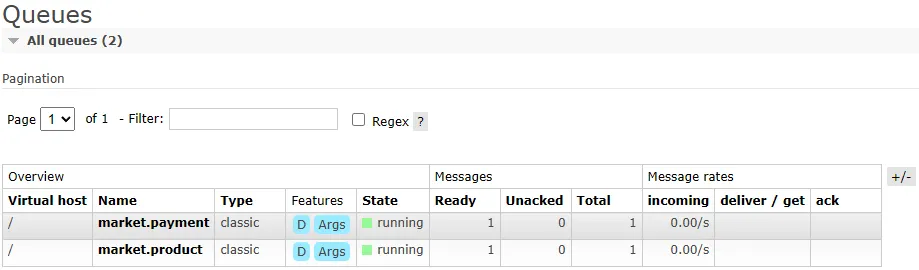
애플리케이션을 런하여 /order/1 로 요청을 보냅니다. 그후 http://localhost:15672로 접속하여 RabbitMQ의 Exchange와 Queue 를 확인 할 수 있습니다.
또한 Queue 에서는 현재 발행된 메시지가 Total 에 쌓여 있는것을 확인 할 수 있습니다.
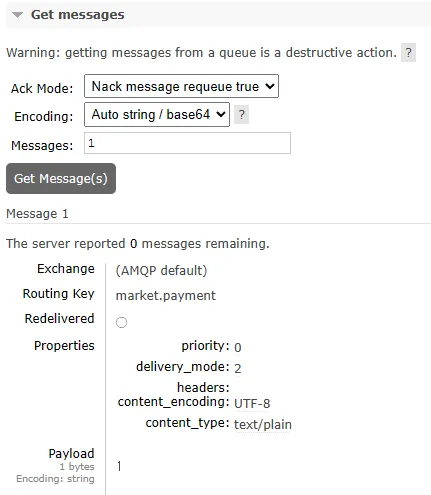
Queue and Stream 페이지에서 큐 이름을 클릭하여 상세페이지로 이동한 후 스크롤하여 Get Messages섹션으로 가서 Get Message를 클릭하면 현재 큐에 쌓여있는 메시지를 조회 할 수 있습니다.
Payment Consumer 만들기
start.spring.io 에 접속하여 프로젝트를 생성합니다.

프로젝트를 생성하면 build.gradle의 디펜던시는 아래와 같습니다.
dependencies {
	implementation 'org.springframework.boot:spring-boot-starter-amqp'
	compileOnly 'org.projectlombok:lombok'
	annotationProcessor 'org.projectlombok:lombok'
	testImplementation 'org.springframework.boot:spring-boot-starter-test'
	testImplementation 'org.springframework.amqp:spring-rabbit-test'
	testRuntimeOnly 'org.junit.platform:junit-platform-launcher'
}
application.properties
spring.application.name=payment
server.port=8081

message.queue.payment=market.payment

spring.rabbitmq.host=localhost
spring.rabbitmq.port=5672
spring.rabbitmq.username=guest
spring.rabbitmq.password=guest
PaymentEndpoint.java
import lombok.extern.slf4j.Slf4j;
import org.springframework.amqp.rabbit.annotation.RabbitListener;
import org.springframework.beans.factory.annotation.Value;
import org.springframework.stereotype.Component;

@Slf4j
@Component
public class PaymentEndpoint {

    @Value("${spring.application.name}")
    private String appName;

    @RabbitListener(queues = "${message.queue.payment}")
    public void receiveMessage(String orderId) {
        log.info("receive orderId:{}, appName : {}", orderId, appName);
    }
}
애플리케이션을 실행하면 receiveMessage 의 로그가 찍히는것을 확인. Order 프로젝트에서 발행한 메시지가 Payment Consumer가 실행되자마자 소모

보면 product는 소모 안되고 payment만 소모된 걸 볼 수 있음

Product Consumer 만들기
start.spring.io 에 접속하여 프로젝트를 생성합니다.
프로젝트를 생성하면 build.gradle의 디펜던시는 아래와 같습니다.
dependencies {
	implementation 'org.springframework.boot:spring-boot-starter-amqp'
	compileOnly 'org.projectlombok:lombok'
	annotationProcessor 'org.projectlombok:lombok'
	testImplementation 'org.springframework.boot:spring-boot-starter-test'
	testImplementation 'org.springframework.amqp:spring-rabbit-test'
	testRuntimeOnly 'org.junit.platform:junit-platform-launcher'
}
application.properties
spring.application.name=product

message.queue.product=market.product

spring.rabbitmq.host=localhost
spring.rabbitmq.port=5672
spring.rabbitmq.username=guest
spring.rabbitmq.password=guest
ProductEndpoint.java
import lombok.extern.slf4j.Slf4j;
import org.springframework.amqp.rabbit.annotation.RabbitListener;
import org.springframework.beans.factory.annotation.Value;
import org.springframework.stereotype.Component;
@Slf4j
@Component
public class ProductEndpoint {
@Value("${spring.application.name}")
private String appName;
@RabbitListener(queues = "${message.queue.product}")
public void receiveMessage(String orderId) {
log.info("receive orderId:{}, appName : {}", orderId, appName);
}
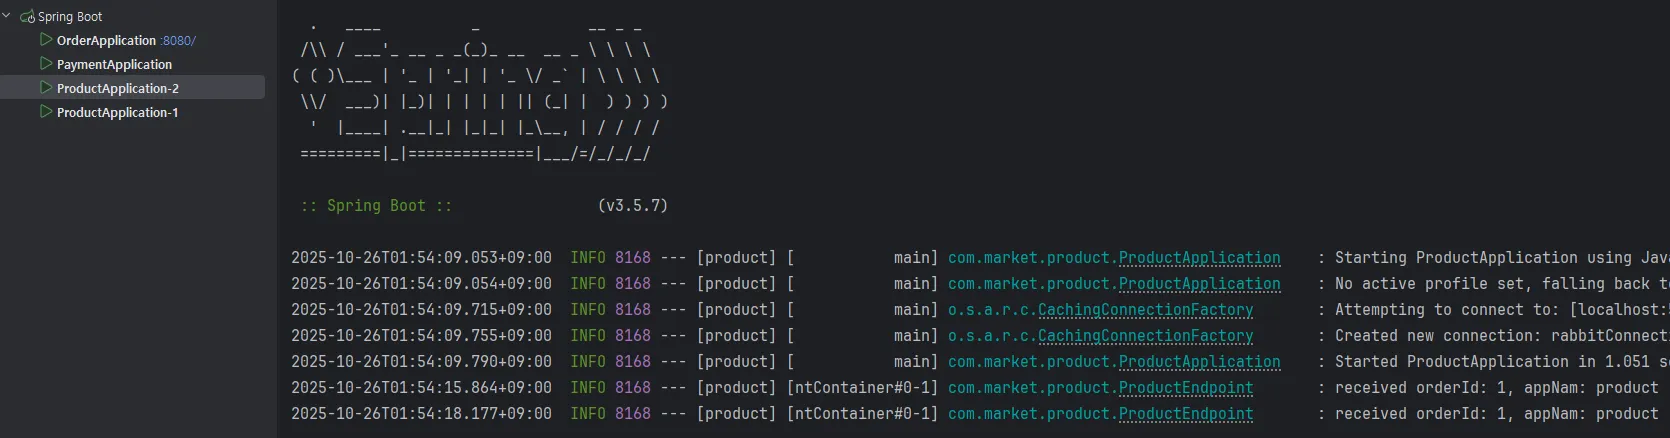
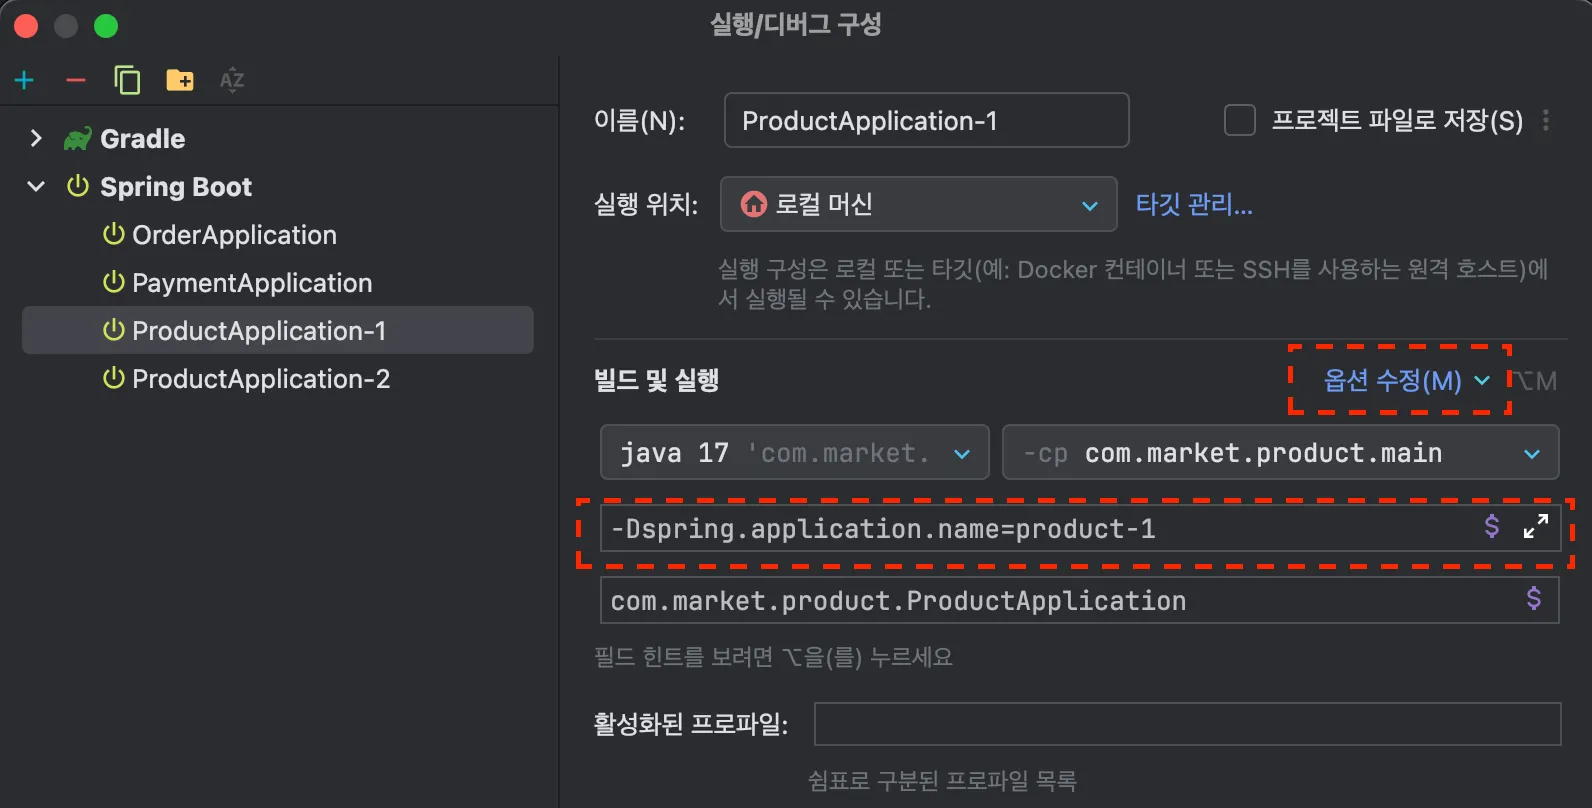
}컨슈머가 라운드로빈으로 메시지를 전달 받는것을 확인해가 위해서 Intellij 에서 구성편집에 들어가 두개의 Product를 생성합니다. application.name 옵션을 통해 2를 구분할 수 있도록 합니다.
VM 옵션 추가 기능을 켜야지 뜸.

order에서 요청 할때마다 Product Application이 번갈아 가면서 메시지를 수신 받는것을 확인 할 수 있습니다.