1. 마스크를 쓴 사람을 인식하는 Open CV를 open source로 구현하시오.
아직 open cv를 이용해 마스크 쓴 사람을 인식하는 프로그램을 만들 능력을 완전히 갖추지 못했기 때문에 다른사람이 만든 것을 보고 따라하며 공부 해보기로 결정!
https://www.youtube.com/watch?v=9twSbkX2AH4 참고함.
영상을 따라하던 중 error가 발생해 해당 문제를 해결하는 과정도 써놓았으니 참고하기!
과정
- 라즈베리 파이를 켜고 터미널 열기
$ pwd로 현재 폴더가 /home/pi 인지 확인!!$ git clone https://github.com/manish-1305/facemask_detection.git
위 영상 속 유튜버가 구현해놓은 open source를 가져옴.$ ls로 facemask_detection 폴더가 있는지 확인하고$ cd facemask_detection로 해당 폴더로 이동.$ ls로 detect.py 파일이 있는지 확인하고python3 detect.py실행하기.
원래라면 5번 python3 detect.py 실행하면 카메라 화면을 읽는 영상이 뜨고 마스크를 쓰고 벗으며 마스크 쓴 사람을 인식하는 지 확인해야 하는데 No module named 'tensorflow'라는 error 가 발생했다. 이걸 해결 하니 또 다른 error가 발생하고... 함께 이 에러를 해결해보자.
error 해결하기
1. No module named 'tensorflow'
해당 에러는 tensorflow 패키지가 설치되지 않아 생긴 문제이다.
위 과정에서 3번 git clone으로 생긴 폴더인 facemask_detection를 보면 requirements.txt, tensorflow installation.txt 파일이 있다. requirements.txt를 보면 필요한 module이 무엇이 있는지 알 수 있는데, 해당 패키지를 pip3 install 모듈이름 혹은 pip install 모듈이름으로 설치해주면 된다. tensorflow 설치는 아래 적어놓은 코드를 참고해 작성하자.
<requirements.txt>

tensorflow>=1.15.2
keras==2.3.1
imutils==0.5.3
numpy==1.18.2
opencv-python==4.2.0.*
matplotlib==3.2.1
scipy==1.4.1<tensorflow_installation.txt>
Tensorflow installation commands for Raspberry pi
# get a fresh start
$ sudo apt-get update
$ sudo apt-get upgrade
# remove old versions, if not placed in a virtual environment (let pip search for them)
$ sudo pip uninstall tensorflow
$ sudo pip3 uninstall tensorflow
# install the dependencies (if not already onboard)
$ sudo apt-get install gfortran
$ sudo apt-get install libhdf5-dev libc-ares-dev libeigen3-dev
$ sudo apt-get install libatlas-base-dev libopenblas-dev libblas-dev
$ sudo apt-get install liblapack-dev cython
$ sudo pip3 install pybind11
$ sudo pip3 install h5py
# upgrade setuptools 40.8.0 -> 49.6.0
$ sudo pip3 install --upgrade setuptools
# install gdown to download from Google drive
$ pip install gdown
# copy binairy
$ sudo cp /home/pi/.local/bin/gdown /usr/local/bin/gdown
# download the wheel
$ gdown https://drive.google.com/uc?id=11mujzVaFqa7R1_lB7q0kVPW22Ol51MPg
# install TensorFlow
$ sudo -H pip3 install tensorflow-2.2.0-cp37-cp37m-linux_armv7l.whl2. Found existing installation: wrapt 1.10.11
마지막 코드인 $ sudo -H pip3 install tensorflow-2.2.0-cp37-cp37m-linux_armv7l.whl를 시행하던 중, 이전에 설치한 wrapt가 있어서 Found existing installation: wrapt 1.10.11라고 뜨며 ERROR: Cannot uninstall 'wrapt'. It is a distutils installed project and thus we cannot accurately determine which files belong to it which would lead to only a partial uninstall. 라는 error가 발생했다.
이 문제는 간단히 해결할 수 있다. 이전에 설치한 wrapt 1.10.11를 지우고 다시 위 코드를 실행하면 된다.
$ sudo rm /usr/lib/python3/dist-packages/wrapt-1.10.11.egg-info # 지우기
$ sudo -H pip3 install tensorflow-2.2.0-cp37-cp37m-linux_armv7l.whl # 재설치
3. No module named 'imutils'
이후 다시 python3 detect.py 실행하면 No module named 'imutils'라는 error코드를 만나게 된다. 이건 내가 사전에 패키지를 설치하지 않아 만나게 된 문제이다. 해당 패키지를 설치하면 간단히 해결된다.
$ pip3 install imutils
4. Can't open "C:\Users\manis\work\facemask_detect\face_detector\deploy.prototxt" in function 'ReadProtoFromTextFile'
이후 다시 python3 detect.py 실행하면 아주 장황한 error 코드를 봉착하게 된다.
Traceback (most recent call last):
File "detect.py", line 77, in
faceNet = cv2.dnn.readNet(prototxtPath, weightsPath)
cv2.error: OpenCV(4.5.3) /tmp/pip-wheel-xjhn4aom/opencv-contrib-python_db9bf2c2b8dd41b592a48d20aac72627/opencv/modules/dnn/src/caffe/caffe_io.cpp:1121: error: (-2:Unspecified error) FAILED: fs.is_open(). Can't open "C:\Users\manis\work\facemask_detect\face_detector\deploy.prototxt" in function 'ReadProtoFromTextFile'
우리가 주목해야 할 부분은 굵게 강조된 부분이다. 작동하고 있는 곳은 라즈베리 파이인데 c드라이브, 즉 윈도우에서 해당 파일을 불러오려고 하니 오류가 날 수 밖에 없는 것. 아래는 python3 detect.py의 코드이다.
python3 detect.py

# import the necessary packages
from tensorflow.keras.applications.mobilenet_v2 import preprocess_input
from tensorflow.keras.preprocessing.image import img_to_array
from tensorflow.keras.models import load_model
from imutils.video import VideoStream
import numpy as np
import imutils
import time
import cv2
import os

def detect_and_predict_mask(frame, faceNet, maskNet):
	# grab the dimensions of the frame and then construct a blob
	# from it
	(h, w) = frame.shape[:2]
	blob = cv2.dnn.blobFromImage(frame, 1.0, (224, 224),
		(104.0, 177.0, 123.0))

	# pass the blob through the network and obtain the face detections
	faceNet.setInput(blob)
	detections = faceNet.forward()
	print(detections.shape)

	# initialize our list of faces, their corresponding locations,
	# and the list of predictions from our face mask network
	faces = []
	locs = []
	preds = []

	# loop over the detections
	for i in range(0, detections.shape[2]):
		# extract the confidence (i.e., probability) associated with
		# the detection
		confidence = detections[0, 0, i, 2]

		# filter out weak detections by ensuring the confidence is
		# greater than the minimum confidence
		if confidence > 0.5:
			# compute the (x, y)-coordinates of the bounding box for
			# the object
			box = detections[0, 0, i, 3:7] * np.array([w, h, w, h])
			(startX, startY, endX, endY) = box.astype("int")

			# ensure the bounding boxes fall within the dimensions of
			# the frame
			(startX, startY) = (max(0, startX), max(0, startY))
			(endX, endY) = (min(w - 1, endX), min(h - 1, endY))

			# extract the face ROI, convert it from BGR to RGB channel
			# ordering, resize it to 224x224, and preprocess it
			face = frame[startY:endY, startX:endX]
			face = cv2.cvtColor(face, cv2.COLOR_BGR2RGB)
			face = cv2.resize(face, (224, 224))
			face = img_to_array(face)
			face = preprocess_input(face)

			# add the face and bounding boxes to their respective
			# lists
			faces.append(face)
			locs.append((startX, startY, endX, endY))

	# only make a predictions if at least one face was detected
	if len(faces) > 0:
		# for faster inference we'll make batch predictions on *all*
		# faces at the same time rather than one-by-one predictions
		# in the above `for` loop
		faces = np.array(faces, dtype="float32")
		preds = maskNet.predict(faces, batch_size=32)

	# return a 2-tuple of the face locations and their corresponding
	# locations
	return (locs, preds)

# load our serialized face detector model from disk
prototxtPath = "/home/pi/facemask_detection/face_detector/deploy.prototxt"
weightsPath = "/home/pi/facemask_detection/face_detector/res10_300x300_ssd_iter_140000.caffemodel"
faceNet = cv2.dnn.readNet(prototxtPath, weightsPath)

# load the face mask detector model from disk
maskNet = load_model("mask_detector.model")

# initialize the video stream
print("[INFO] starting video stream...")
vs = VideoStream(src=0).start()
위 코드에서 # load our serialized face detector model from disk 부분 중
prototxtPath = "/home/pi/facemask_detection/face_detector/deploy.prototxt"
weightsPath = "/home/pi/facemask_detection/face_detector/res10_300x300_ssd_iter_140000.caffemodel"
이 경로가 "C:\ ~"이렇게 설정되어 있을 것이다. 확인해서 위와 같이 바꿔 준 후 실행하면 정상 작동하는 것을 확인할 수 있다.
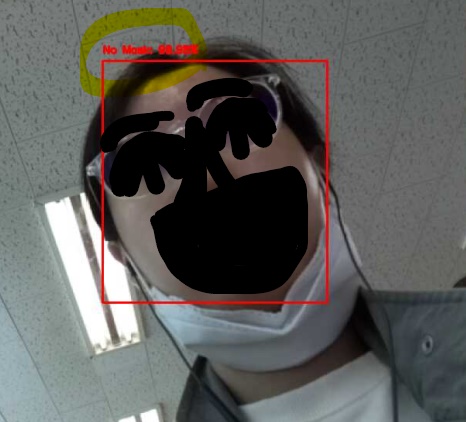
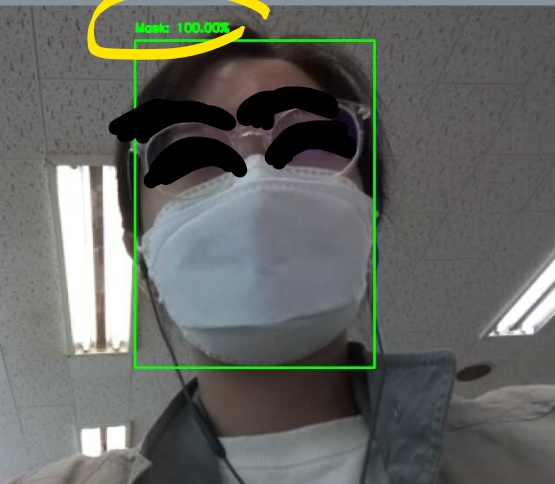
실행 결과
마스크를 벗기 전 인식: Mask 100.00%
마스크를 벗고 난 후 인식: No mask 88.98%