[AWS/PYTHON] Lambda를 이용하여 EC2 stop/run 기능을 가진 Serverless 정적 웹사이트 만들기
0. INTRO
-
EC2 인스턴스를 개인적으로 사용할 때, 항상 켜져있으면 당연히 과금이 발생하게 된다. 따라서 쓰지 않을 때는 stopped 상태로 바꿔놓는 것이 좋은데 일반적으로 사용중인 EC2를 stop 시키기 위해서는
AWS Console에 로그인하여 EC2 서비스로 들어가 running중인 인스턴스를 선택하여 stop 시켜준다. -
또 다른 방법으로는
AWS CLI 명령을 사용하는 방법이 있을 것이다. 주로 사용하는 로컬 서버의 터미널에 aws configure 등록만 해준다면 터미널에서 아래의 명령 한 줄 만으로 인스턴트를 stop/run 시킬 수 있다.# 인스턴트 시작 aws ec2 start-instances --instance-ids 인스턴트ID # 인스턴트 중지 aws ec2 stop-instances --instance-ids 인스턴트ID -
하지만 인터넷이 되는 수단이 스마트폰 뿐인데 AWS 계정에 있는 특정 EC2를 외부에서 켜야한다면? 물론 폰으로 콘솔에 접속해서 할 수도 있겠지만 상당히 귀찮은 과정이 된다.
-
Lambda URL은 Lambda 코드를 API 형태로 쉽게 사용할 수 있도록 도와준다. 아래와 같이 함수가 return하는 JSON 값의 headers > Content-Type 부분 설정을 통해 body에 담긴 string을 읽어 HTML로 보여줄 수도 있다.
return { "statusCode": 200, "headers": { "Content-Type": "text/html", }, "body": html코드 } -
해당 기능을 이용한다면 Lambda 함수 실행시 Python의 boto3 라이브러리를 통해 EC2 인스턴스들의 목록을 받아와 HTML 코드 구성 후 정적 웹사이트를 띄울 수 있다.
-
그 이후 UI상 버튼의 on click 기능을 통해 지정된 Java-Script 함수를 호출하여 그 함수가 Lambda 코드 쪽으로 인자를 전달 후 해당 인자들을 변수로 받아 EC2 조작하는 python 함수가 실행될 수 있는 것이다.
-
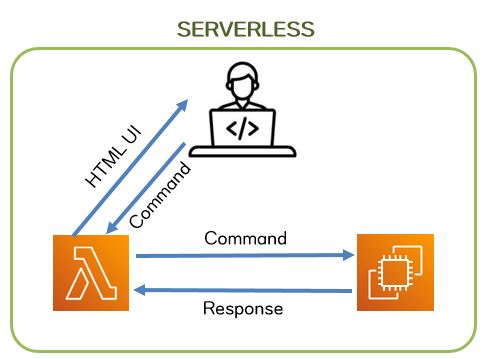
웹페이지의 모습과 및 프로세스 순서는 다음과 같다.
- 사용자가 Lambda URL 접속과 동시에 Lambda 함수에 GET reponse 전송
- Lambda 함수 실행되며 Boto3 EC2 client를 통해 현재 계정의 EC2 instance 정보 획득
- 받아온 정보들을 지정된 HTML 코드에 삽입하여 웹 UI로 사용자 화면에 출력
- 사용자의 start/stop 명령 있을시 Java Script 함수를 거쳐 선택한 EC2 이름 및 희망 상태를 POST 호출과 함께 Lambda에 전송
- 전송된 인자를 받아 Python 함수가 실행되며 instance에 명령 전달.
1. Lambda 함수 생성
-
IAM Role 생성
- 람다 함수가 EC2 리소스에 대하여 접근 권한이 있어야 하므로 아래의 두 Policy를 포함한 Role을 생성한다.
- AmazonEC2FullAccess, AWSLambdaBasicExecutionRole
- 람다 함수가 EC2 리소스에 대하여 접근 권한이 있어야 하므로 아래의 두 Policy를 포함한 Role을 생성한다.
-
URL 주소를 가지는 Python Lambda 함수 생성
-
위와 같이 이름 입력, runtime 선택 후 Permissions의 Execution Role을 위에서 생성한 IAM Role로 선택한다.
-
Advanced settings을 열어 Enable function URL을 선택하고 그 중 NONE 조건을 선택해준다.
-
Lambda URL 종류에는 두 가지가 있는데 이전에 이에 대해 적은 글이 있어 참고하면 좋을 듯 하다. --> LambdaURL 종류
-
-
위처럼 선택이 완료되었다면
Create Function버튼을 눌러 Lambda 함수를 생성해준다.
2. Python 함수 Part
-
현재 등록되어있는 EC2 List 조회 함수
- Lambda 함수가 실행될 때 작동한다.
import boto3 # ec2 client 생성 ec2_client = boto3.client('ec2') def list_ec2(client): # 계정에 등록된 Instance들에 대한 정보 획득 response = client.describe_instances() instances, instance_states = [], [] dividor = "_____" # 필요한 정보 추출 (이름, 서버 크기, 현재 상태) for reservation in response['Reservations']: for instance in reservation['Instances']: instance_type = instance['InstanceType'] state = instance['State']['Name'] instance_states.append(state) name = '' for tag in instance['Tags']: if tag['Key'] == 'Name': name = tag['Value'] instances.append(f"{name}({instance_type}){dividor}{state}") # Instance들의 이름을 기준으로 오름차순 정렬 instances.sort(key=lambda x : (x.split(dividor)[1], x.split(dividor)[0])) return instances, instance_states -
EC2 인스턴트 시작/종료 함수
- User가 웹에서 특정 Instance 선택 후 start/stop 명령을 내렸을 때 실행된다.
import boto3

# ec2 resource 생성
ec2 = boto3.resource('ec2')

def start_stop_ec2(resource, instance_name, command):

    # 변수로 넘겨받은 instance 선택
    instances = resource.instances.filter(Filters=[{'Name': 'tag:Name', 'Values': [instance_name]}])

    # 위에서 특정지어진 instance에 명령 전달.
    for instance in instances:
        if command == 'start': instance.start()
        if command == 'stop' : instance.stop()
        msg = f"Starting EC2 instance with name: {instance_name} (Instance ID: {instance.id})"
        break
    else:
        msg = f"No EC2 instances found with name: {instance_name}"
        print(msg)
3. Lambda 함수 Part
-
아래 함수는 User가 Lambda URL에 접속시 실행되는 함수이다. 크게는 두 가지 기능을 한다.
- 위의 Python 함수들을 호출해 EC2 정보들을 받아와 HTML에 형태를 만들어 웹으로 보여준다.
- 사용자 응답을 받아 그에 맞는 함수 실행하여 EC2에 해당 명령을 전달한다.
import json
from collections import Counter
from script import html_title, html_buttons, html_scripts

def lambda_handler(event, context):
    # 사용자가 보낸 event capture
    events = event["requestContext"]["http"]

    # list_ec2() 함수 호출을 통해 ec2 정보들 받아온다.
    ec2_names, instance_states = list_ec2()

    # ec2 이름들에 대해 dropdown menu 구성되도록 HTML 코드 생성
    dropdown_options = []
    for name in ec2_names:
        dropdown_options.append(f"<option value='{name}'>{name}</option>")
    dropdown_menu = '\n' + '\n'.join(dropdown_options) + '\n'

    # EC2 상태에 따른 숫자를 보여주기 위한 HTML 코드 생성(내림차순)
    pre_options = ""
    counts = Counter(instance_states)
    most_common_elements = counts.most_common()
    for element, count in most_common_elements:
        scr = f"<pre>        {element} : {count} </pre>\n"
        pre_options += scr
    pre_options = "\n" + pre_options

    # script.py에 있는 HTML 뼈대에 위에서 생성시킨 코드 삽입.
    html = html_title \
            + dropdown_menu \
            + html_buttons \
            + pre_options \
            + html_scripts

    # 사용자의 Event에 따라 화면 출력 및 함수 호출
    # 1. GET : EC2 목록과 start, stop 버튼이 있는 기본적인 화면 출력
    # 2. POST : 사용자의 start, stop 명령에 따라 ec2 조작하는 python 함수 실행

    if events["method"] == "GET":
        return {
            "statusCode": 200,
            "headers": {
                "Content-Type": "text/html",
            },
            "body": html,
        }
    elif events["method"] == "POST":
        if events["path"] == "/start-ec2":
            data = json.loads(event["body"])
            name = data.get("instance_name", "")
            start_stop_ec2(name, "start")

        elif events["path"] == "/stop-ec2":
            data = json.loads(event["body"])
            name = data.get("instance_name", "")
            start_stop_ec2(name, "stop")

        return {
            "statusCode": 200,
            "headers": {
                "Content-Type": "text/plain",
            },
            "body": f"POST Request",
        }
4. HTML Part
-
EC2 개수에 따라 가변적으로 변해야하는 부분을 제외한 고정적인 HTML 코드 부분
-
Start EC2/Stop EC2 버튼 On-Click시 그에 해당하는 Java-Script 함수를 호출하여 그 함수가 Lambda 코드 쪽으로 인자를 전달, 인자들을 변수로 받아 EC2 조작하는 python 함수가 실행된다.
html_title = """
<html>
<body>
    <form action="/submit" method="post">
        <label for="name">Instance Name:</label>
        <select id="name" name="name">
"""
html_buttons= """
        </select>
        <input type="submit" value="Start EC2">
        <input type="submit" value="Stop EC2">
    </form>
        """

html_scripts= """
    <script>
    function startEC2(event) {
        event.preventDefault();

        var name = document.getElementById("name").value.split('(')[0];

        fetch('/start-ec2', {
            method: 'POST',
            body: JSON.stringify({ instance_name: name })
        })
        .then(response => {
            if (response.ok) {
                alert("EC2 instance start requested!");
            } else {
                alert("Failed to start EC2 instance!");
            }
        })
        .catch(error => {
            console.error('Error:', error);
            alert("An error occurred while starting the EC2 instance!");
        });
    }

    function stopEC2(event) {
        event.preventDefault();

        var name = document.getElementById("name").value.split('(')[0];

        fetch('/stop-ec2', {
            method: 'POST',
            body: JSON.stringify({ instance_name: name })
        })
        .then(response => {
            if (response.ok) {
                alert("EC2 instance stop requested!");
            } else {
                alert("Failed to stop EC2 instance!");
            }
        })
        .catch(error => {
            console.error('Error:', error);
            alert("An error occurred while stopping the EC2 instance!");
        });
    }
    </script>
</body>
</html>
"""
5. 전체 HTML 코드
-
결국은 아래와 같은 HTML 코드를 동적으로 만들기 위해 위에서 python for loop 및 집계 함수들이 사용되었다.
-
전체적인 HTML 내용을 보면 구현하고자 하는 내용이 어떤 방식으로 작동되는지 조금은 더 쉽게 파악이 가능할 것이다.
<html>

  <body>
    <form action="/submit" method="post">
      <label for="name">Instance Name:</label>
      <select id="name" name="name">

        <option value='blog-server(t2.small)_____running'>blog-server(t2.small)_____running</option>
        <option value='aws-server(t2.medium)_____stopped'>aws-server(t2.medium)_____stopped</option>
        <option value='flet-server(t2.medium)_____stopped'>flet-server(t2.medium)_____stopped</option>
        <option value='WebServer(t2.2xlarge)_____stopped'>WebServer(t2.2xlarge)_____stopped</option>
        <option value='worker-02(t2.small)_____stopped'>worker-02(t2.small)_____stopped</option>
        <option value='worker01(t2.small)_____stopped'>worker01(t2.small)_____stopped</option>

      </select>
      <input type="submit" value="Start EC2" onclick="startEC2(event)">
      <input type="submit" value="Stop EC2" onclick="stopEC2(event)">
    </form>

    <pre>        stopped : 5 </pre>
    <pre>        running : 1 </pre>

    <script>
      function startEC2(event) {
        event.preventDefault(); // Prevent form submission

        var name = document.getElementById("name").value.split('(')[0];

        fetch('/start-ec2', {
            method: 'POST',
            body: JSON.stringify({
              instance_name: name
            })
          })
          .then(response => {
            if (response.ok) {
              alert("EC2 instance start requested!");
            } else {
              alert("Failed to start EC2 instance!");
            }
          })
          .catch(error => {
            console.error('Error:', error);
            alert("An error occurred while starting the EC2 instance!");
          });
      }

      function stopEC2(event) {
        event.preventDefault(); // Prevent form submission

        var name = document.getElementById("name").value.split('(')[0];

        fetch('/stop-ec2', {
            method: 'POST',
            body: JSON.stringify({
              instance_name: name
            })
          })
          .then(response => {
            if (response.ok) {
              alert("EC2 instance stopped successfully!");
            } else {
              alert("Failed to stop EC2 instance!");
            }
          })
          .catch(error => {
            console.error('Error:', error);
            alert("An error occurred while stopping the EC2 instance!");
          });
      }
    </script>
  </body>

</html>
6. 실제 화면 구성 및 실행
-
Dropdown 메뉴에서 EC2 선택 후 오른쪽의 버튼을 누르면 해당 instance의 상태가 바뀐다.
-
버튼 클릭시 팝업 알림으로 해당 명령을 알려준다.
7. 통합 zip file 공유
- 1번에서 생성한 python runtime lambda 함수 메인화면에서 우측에 Upload from > .zip file 선택 후 다운로드 한 Lambda-EC2-Controller.zip 파일을 올려주면 동일한 기능을 가진 함수가 바로 만들어진다.
8. OUTRO
- Lambda URL과 HTML을 통해 EC2에 명령을 내리는 간단한 웹 페이지를 만들어보았다. URL 주소만 있으면 언제 어디서든 핸드폰으로 EC2에 start/stop 명령을 내릴 수 있어 편의성이 확실히 증대되었다. 현재는 두 가지 명령만 내릴 수 있지만 코드를 약간만 수정하면 서버를 통제할 수 있는 다양한 명령들을 붙일 수 있을 것이다.
- Lambda는 주로 단발성의 코드를 serverless하게 작동시키는 경우에만 주로 사용을 했었는데 정적 HTML 웹페이지를 띄워줄 수 있으니 기존에 비해 사용할 수 있는 범위가 더 넓어진 느낌이다. 현재도 EC2 조작 외에 특정 S3 디렉토리에 매일매일 데이터가 잘 저장이 되었는지 확인하는 용도의 Lambda도 사용하고 있어 해당 기능을 잘만 사용한다면 귀찮은 작업을 많이 줄일 수 있을 것이라 생각된다.
- 주의할점은 Lambda URL 구성시
Permission이 NONE이므로 URL만 있으면 누구든 접근이 가능하기 때문에 민감정보들은 절대 웹 UI상에 노출하지 않는 것이 좋다.