0. INTRO
- 이번 글에서 다룰 내용
- eksctl 명령어를 통해 EKS 클러스터 생성
- EKS 클러스터 사용자 인증
- EMR 작업 관련 Role 생성 후 Cluster에 연결
- 인증 정보를 kubeconfig 파일에 저장
- 위의 과정들을 모두 마치고 나면 EKS를 통해 EMR Cluster를 생성할 수 있는 인증 및 권한 관련 설정들을 끝마치게 되고 그 이후에는 EMR 가상 클러스터를 생성할 수 있게된다.
1. EKS 클러스터 생성
0. (Optional) Keypair 생성
-
EC2 Keypair(.pem 파일)가 없다면 CLI를 통해 생성을 하고 있다면 기존 keypair를 사용하면 된다.
aws ec2 create-key-pair --region [Cluster Region] --key-name [Key 이름]
1. Cluster 생성
-
새로운 VPC 인프라 위에 EKS 생성
- 해당 명령을 통해 EKS를 생성하게 되면 VPC, Subnet, NAT Gateway, Security Group, Route Table 등 그에 맞는 새로운 네트워크 인프라들이 같이 자동으로 만들어지게 된다.- 별다른 설정없이 클러스터 구축이 가능해 편하지만 기존에 운영되던 네트워크상에 구축이 되어야 하거나 Elastic IP의 Limit이 모두 차있는 경우에는 VPC를 지정하여 구축해주어야 한다.
eksctl create cluster \ --name [EKS 클러스터 이름] \ --region [Cluster Region] \ --with-oidc \ --ssh-access \ --ssh-public-key [Key 이름] \ --instance-types=[EC2 타입] \ --managed -
기존 VPC 인프라 위에 EKS 생성
- 설정해야할 요소들이 많이 있어 단순 CLI로는 힘들고 YAML 파일을 통해 생성을 한다.create-cluster.yaml
apiVersion: eksctl.io/v1alpha5
kind: ClusterConfig

metadata:
  name: [EKS 클러스터 이름]
  region: [Cluster Region]
  version: "1.24"

vpc:
  subnets:
    private:
      ap-northeast-2a: { id: subnet-xxx }
      ap-northeast-2b: { id: subnet-xxx }
      ap-northeast-2c: { id: subnet-xxx }

# IAM OIDC & Service Account
iam:
  withOIDC: true
  serviceAccounts:
    - metadata:
        name: aws-load-balancer-controller
        namespace: kube-system
      wellKnownPolicies:
        awsLoadBalancerController: true
    - metadata:
        name: cert-manager
        namespace: cert-manager
      wellKnownPolicies:
        certManager: true
    - metadata:
        name: efs-csi-controller-sa
        namespace: kube-system
      wellKnownPolicies:
        efsCSIController: true
    - metadata:
        name: cluster-autoscaler
        namespace: kube-system
      wellKnownPolicies:
        autoScaler: true
    - metadata:
        name: external-dns
        namespace: kube-system
      wellKnownPolicies:
        externalDNS: true

managedNodeGroups:
  - name: [node group name]
    labels: { role: workers }
    tags:
      nodegroup-role: worker
    instanceName: [Instance Name]
    instanceType: [Instance Type]
    minSize: 1
    desiredCapacity: 2
    maxSize: 3
    privateNetworking: true
    availabilityZones: ["ap-northeast-2a", "ap-northeast-2b", "ap-northeast-2c"]
eksctl create cluster -f [create-cluster.yaml 파일 경로]
- 위의 명령을 통해 YAML 파일을 실행하게 되면 AWS Cloudformation에 EKS 생성하는 Stack이 자동으로 등록되게 되고 약 15-20분 정도 시간이 걸려 아래와 같이 EKS 클러스터가 생성된다.

- 위의 명령을 통해 YAML 파일을 실행하게 되면 AWS Cloudformation에 EKS 생성하는 Stack이 자동으로 등록되게 되고 약 15-20분 정도 시간이 걸려 아래와 같이 EKS 클러스터가 생성된다.
2. EKS 클러스터 사용자 인증
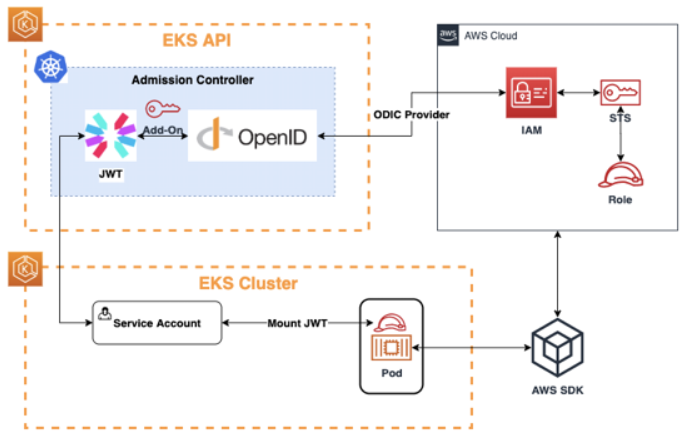
- Kubernetes에서 OIDC(OpenID Connect)는 사용자 인증 및 권한 부여를 위한 표준 인증 프로토콜 중 하나이다.
- AWS에서는 위의 아키텍쳐와 같이 IAM 역할 인증을 통해 OIDC와 연동할 수 있도록 지원을 하고 있다.
-
Namespace 생성
- 리소스 격리를 위해 Spark Job 만을 위한 Namespace를 새로 생성한다.kubectl create namespace [namespace 이름] -
클러스터 사용자 인증
# EKS 클러스터에 IAM 사용자 인증 - 1
eksctl create iamidentitymapping \
    --cluster [EKS Cluster 이름] \
    --namespace [namespace 이름] \
    --service-name "emr-containers"

# EKS 클러스터에 IAM 사용자 인증 - 2
eksctl create iamidentitymapping \
    --cluster [EKS Cluster 이름] \
    --arn "arn:aws:iam::[AWS 계정ID]:role/AWSServiceRoleForAmazonEMRContainers" \
    --username emr-containers \

# OIDC와 IAM 연동
eksctl utils associate-iam-oidc-provider \
    --cluster [EKS Cluster 이름] \
    --approve
3. EMR 작업 관련 Role 생성 후 Cluster에 연결
-
역할(Role) 생성
- json 파일을 통해 'EMRContainers-JobExecutionRole' 역할 생성JobExecutionRole.json
{
  "Version": "2012-10-17",
  "Statement": [
    {
      "Effect": "Allow",
      "Principal": {
        "Service": "elasticmapreduce.amazonaws.com"
      },
      "Action": "sts:AssumeRole"
    }
  ]
}
aws iam create-role \ --role-name EMRContainers-JobExecutionRole \ --assume-role-policy-document file://[emr-trust-policy.json 파일 경로] -
생성한 역할에 'emr-trust-policy' 정책 연결
- json 파일을 통해 'emr-trust-policy' 정책 생성emr-trust-policy.json
{ "Version": "2012-10-17", "Statement": [ { "Effect": "Allow", "Action": [ "s3:PutObject", "s3:GetObject", "s3:ListBucket", "s3:DeleteObject" ], "Resource": "*" }, { "Effect": "Allow", "Action": [ "logs:PutLogEvents", "logs:CreateLogStream", "logs:DescribeLogGroups", "logs:DescribeLogStreams" ], "Resource": [ "arn:aws:logs:*:*:*" ] } ] }- 공식 Docs에는 Action 쪽에 "s3:DeleteObject"가 포함되어있지 않다. 하지만 나중에 spark job 수행시 완성된 dataframe을 특정 경로에 write하는 함수를 사용하게 될 때 spark는 해당 경로에 대해 먼저 delete를 수행한 후 write 하는 것이 원칙이기 때문에 해당 권한이 없으면 작업이 실패하게 된다. 따라서 처음에 생성할 때 "s3:DeleteObject" 권한도 같이 포함시켜서 역할에 넣어준다.
aws iam put-role-policy \ --role-name EMRContainers-JobExecutionRole \ --policy-name EMR-Containers-Job-Execution \ --policy-document file://[EMR-Containers-Job-Execution.json 파일 경로] -
EKS Cluster에 역할 연결(Role Update)
aws emr-containers update-role-trust-policy \ --cluster-name [EKS Cluster 이름] \ --namespace [namespace 이름] \ --role-name EMRContainers-JobExecutionRole -
인증 정보를 kubeconfig 파일에 저장 (Kubeconfig Update)
aws eks \
  --region [Region] update-kubeconfig \
  --name [EKS Cluster 이름]
4. OUTRO
- EKS 클러스터 생성 후 EMR Virtual Cluster 구축을 위한 권한 및 인증 과정을 모두 끝냄으로써 EKS 환경에서 Spark Job 실행을 위한 준비는 다 되었다고 볼 수 있다.
- 다음 글에서는 EMR Virtual Cluster를 생성하고 Spark Job을 실행하기 위해 EKS 클러스터에 Node Group을 추가하는 과정을 다뤄볼 것이다.

데이터 엔지니어의 작업공간 / #PYTHON #CLOUD #SPARK #AWS #GCP #NCLOUD