[K8S] NKS 환경에서 Trino + Hive Metastore + MYSQL 배포 후 Trino로 Naver Object Storage 데이터 조회
DOCKER-KUBERNETES
목록 보기
4/11
0. INTRO
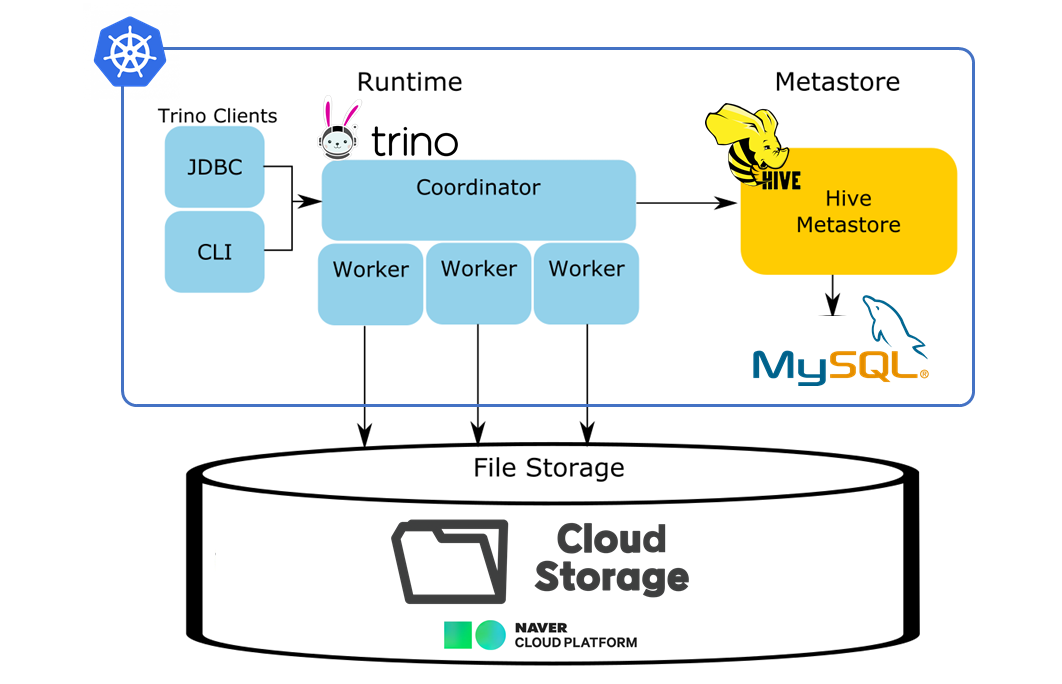
- NKS 환경에서 Trino를 이용하여 Naver Object Storage(이하 NOS)의 특정 버킷 경로에 업로드한 파일의 데이터를 조회하는 것이 목적이다.
- AWS EKS에서 Trino를 이용하여 S3에 저장된 데이터를 조회하는 것 관련된 내용은 감사하게도 이미 몇몇분들이 해보시고 정리를 해둔 문서들이 있었다. 하지만 데이터 원천을 NOS로 하여 동일한 로직으로 조회하는 내용의 글은 찾아봐도 보이지 않았다.
- NOS가 AWS S3와 동일한 CLI와 SDK를 사용하고 있고 네이밍 구조도 비슷했기 때문에 S3를 연동한 방식을 참고해서 NOS도 작업해보면 되지 않을까하는 기대를 안고 시작했고 결과적으로 성공했다.🎉
- 관련된 여러 문서들의 내용을 이리저리 모아모아 작업을 했기 때문에 상세한 과정보다는 일단은 연동된 코드들과 순서 위주로 글을 써볼까한다.
- 아래의 YAML 파일들에 namespace는 따로 언급이 되어있지 않은데
Trino라는 이름의 namespace를 생성하여 해당 ns에서 작업하였다.
1. MYSQL 배포
배포되는 서비스 종류
- Deployment
- Service
- PersistentVolumeClaim
- ConfigMap
- Secret
-
작업할 namespace 생성후 해당 ns로 이동
# namespace 생성 kubectl create namespace trino # 생성한 namespace로 이동 kubectl config set-context --current --namespace trino -
Secret 생성
kubectl create secret generic secret-mysql \ --from-literal MYSQL_PASSWORD=[비밀번호] \ --from-literal MYSQL_ROOT_PASSWORD=[Root 비밀번호] -
나머지 서비스들 배포
- mysql-deploy.yaml
apiVersion: apps/v1
kind: Deployment
metadata:
  name: mysql-deployment
  labels:
    app: mysql
spec:
  replicas: 1
  selector:
    matchLabels:
      app: mysql
  strategy:
    type: Recreate
  template:
    metadata:
      labels:
        app: mysql
    spec:
      containers:
      - name: mysql
        image: mysql:8.0.27
        ports:
        - containerPort: 3306
        volumeMounts:
        - name: mysql-volume
          mountPath: "/var/lib/mysql"
          subPath: "mysql"
        env:
        - name: MYSQL_USER
          valueFrom:
            configMapKeyRef:
              name: configmap-mysql
              key: MYSQL_USER
        - name: MYSQL_PASSWORD
          valueFrom:
            secretKeyRef:
              name: secret-mysql
              key: MYSQL_PASSWORD
        - name: MYSQL_ROOT_HOST
          valueFrom:
            configMapKeyRef:
              name: configmap-mysql
              key: MYSQL_ROOT_HOST
        - name: MYSQL_ROOT_PASSWORD
          valueFrom:
            secretKeyRef:
              name: secret-mysql
              key: MYSQL_ROOT_PASSWORD
        resources:
          requests:
            memory: "2G"
            cpu: 1
      volumes:
      - name: mysql-volume
        persistentVolumeClaim:
          claimName: mysql-pvc
---
apiVersion: v1
kind: Service
metadata:
  name: mysql-service
spec:
  type: NodePort
  selector:
    app: mysql
  ports:
  - protocol: TCP
    port: 3306
    targetPort: 3306
---
apiVersion: v1
kind: PersistentVolumeClaim
metadata:
  name: mysql-pvc
spec:
  accessModes:
    - ReadWriteOnce
  resources:
    requests:
      storage: 3Gi
---
apiVersion: v1
kind: ConfigMap
metadata:
  name: configmap-mysql
data:
  MYSQL_USER: hyunsoo
  MYSQL_ROOT_HOST: '%'
-
YAML 파일 실행 및 확인
> kubectl apply -f mysql-deploy.yaml


> kubectl get all

  NAME                                     READY   STATUS      RESTARTS   AGE
  pod/mysql-deployment-868967bdbb-5k4v8    1/1     Running     0          1d

  NAME                    TYPE        CLUSTER-IP       EXTERNAL-IP   PORT(S)          AGE
  service/mysql-service   NodePort    198.19.242.58    <none>        3306:30576/TCP   1d

  NAME                                READY   UP-TO-DATE   AVAILABLE   AGE
  deployment.apps/mysql-deployment    1/1     1            1           1d

  NAME                                           DESIRED   CURRENT   READY   AGE
replicaset.apps/mysql-deployment-868967bdbb    1         1         1       1d
2. MYSQL내 Hive Schema init
- init-schema.yaml
apiVersion: batch/v1
kind: Job
metadata:
  name: hive-initschema
spec:
  template:
    spec:
      affinity:
        podAntiAffinity:
          requiredDuringSchedulingIgnoredDuringExecution:
            - labelSelector:
                matchExpressions:
                  - key: app
                    operator : In
                    values:
                      - mysql
              topologyKey: kubernetes.io/hostname
      containers:
      - name: hivemeta
        image: mykidong/hivemetastore:v3.0.0
        command: ["/opt/hive-metastore/bin/schematool"]
        args: ["--verbose" ,"-initSchema" , "-dbType", "mysql", "-userName", "root",
          "-passWord", "[MYSQL_ROOT_PASSWORD]", "-url", "jdbc:mysql://mysql-service.trino.svc.cluster.local:3306/metastore_db?createDatabaseIfNotExist=true&connectTimeout=1000"]
      restartPolicy: Never
backoffLimit: 4-
args에 [MYSQL_ROOT_PASSWORD] 칸에는 위에서 secret 만들때 사용한 비밀번호를 넣어준다.
-
args에
jdbc:mysql://mysql-service.trino.svc.cluster.local이 주소는jdbc:mysql://[mysql service 이름].[namespace 이름].svc.cluster.local이렇게 들어가므로 mysql이 배포된 상태에 맞게 이름과 namespace를 넣어주면 된다. -
YAML 파일 실행 및 확인
> kubectl apply -f init-schema.yaml

> kubectl get all

  NAME                                     READY   STATUS      RESTARTS   AGE
  pod/hive-initschema-9r6vz                0/1     Completed   0          1d

  NAME                        COMPLETIONS   DURATION   AGE
  job.batch/hive-initschema   1/1           21s        1d
3. Init schema 결과 확인
- MYSQL Deployment에 접속하여 init schema가 제대로 되었는지 확인한다.
- 마지막 결과와 같이 metastore_db database 안에 73개의 테이블이 조회되면 성공적으로 init이 된 것이다.
# mysql deployment로 접속
> kubectl exec -it deploy/mysql-deployment -- bash

	root@mysql-deployment-868967bdbb-5k4v8:/#


# mysql 로그인
> mysql -u root -p

    root@mysql-deployment-868967bdbb-5k4v8:/# mysql -u root -p
    Enter password:
    Welcome to the MySQL monitor.  Commands end with ; or \g.
    Your MySQL connection id is 3953
    Server version: 8.0.27 MySQL Community Server - GPL

    Copyright (c) 2000, 2021, Oracle and/or its affiliates.

    Oracle is a registered trademark of Oracle Corporation and/or its
    affiliates. Other names may be trademarks of their respective
    owners.

    Type 'help;' or '\h' for help. Type '\c' to clear the current input statement.

    mysql>


# database 확인
> show databases;

    mysql> show databases;
    +--------------------+
    | Database           |
    +--------------------+
    | information_schema |
    | metastore_db       |
    | mysql              |
    | performance_schema |
    | sys                |
    +--------------------+
    5 rows in set (0.01 sec)


# metastore_db 내의 테이블 확인
> use metastore_db;
> show tables;

    .
    .
    .
    | TXN_TO_WRITE_ID           |
    | TYPES                     |
    | TYPE_FIELDS               |
    | VERSION                   |
    | WM_MAPPING                |
    | WM_POOL                   |
    | WM_POOL_TO_TRIGGER        |
    | WM_RESOURCEPLAN           |
    | WM_TRIGGER                |
    | WRITE_SET                 |
    +---------------------------+
    73 rows in set (0.00 sec)
4. Hive-metastore 배포
배포되는 서비스 종류
- Deployment
- Service
- ConfigMap
- Secret
- ConfigMap 배포
- 아래 YAML 파일에서 중괄호로 표시된 곳을 각자 정보에 맞게 채워넣어주면 된다.
- metastore-cfg.yaml
apiVersion: v1 kind: ConfigMap metadata: name: metastore-cfg data: core-site.xml: |- <configuration> <property> <name>fs.s3a.access.key</name> <value>[NCP API KEY ID]</value> </property> <property> <name>fs.s3a.secret.key</name> <value>[NCP API SECRET KEY]</value> </property> <property> <name>fs.s3a.connection.ssl.enabled</name> <value>false</value> </property> <property> <name>fs.s3a.impl</name> <value>org.apache.hadoop.fs.s3a.S3AFileSystem</value> </property> <property> <name>fs.s3a.endpoint</name> <value>http://kr.objectstorage.ncloud.com</value> </property> <property> <name>fs.defaultFS</name> <value>s3a://[NOS 버킷 이름]</value> </property> <property> <name>fs.s3a.path.style.access</name> <value>true</value> </property> <property> <name>fs.s3a.fast.upload</name> <value>true</value> </property> </configuration> metastore-site.xml: |- <configuration> <property> <name>metastore.task.threads.always</name> <value>org.apache.hadoop.hive.metastore.events.EventCleanerTask</value> </property> <property> <name>metastore.expression.proxy</name> <value>org.apache.hadoop.hive.metastore.DefaultPartitionExpressionProxy</value> </property> <property> <name>javax.jdo.option.ConnectionDriverName</name> <value>com.mysql.jdbc.Driver</value> </property> <property> <name>javax.jdo.option.ConnectionURL</name> <value>jdbc:mysql://mysql-service.trino.svc.cluster.local:3306/metastore_db?useSSL=false&allowPublicKeyRetrieval=true</value> </property> <property> <name>javax.jdo.option.ConnectionUserName</name> <value>[MYSQL_USER]</value> </property> <property> <name>javax.jdo.option.ConnectionPassword</name> <value>[MYSQL_PASSWORD]</value> </property> <property> <name>metastore.warehouse.dir</name> <value>s3a://[NOS 버킷 이름]/[내부 경로]/</value> </property> <property> <name>metastore.thrift.port</name> <value>9083</value> </property> </configuration>kubectl apply -f metastore-cfg.yaml
-
Secret 배포
- 아래 YAML 파일에서 중괄호로 표시된 곳을 각자 정보에 맞게 채워넣어주면 된다.
kubectl create secret generic [secret 이름] \ --from-literal=access-key=[NCP API KEY ID] \ --from-literal=secret-key=[NCP API SECRET KEY] -
Deployment, Service 배포
-
metastore.yaml
apiVersion: v1
kind: Service
metadata:
  name: metastore
spec:
  ports:
  - port: 9083
  selector:
    app: metastore
---
apiVersion: apps/v1
kind: Deployment
metadata:
  name: metastore
spec:
  selector:
    matchLabels:
      app: metastore
  strategy:
    type: Recreate
  template:
    metadata:
      labels:
        app: metastore
    spec:
      containers:
      - name: metastore
        image: mykidong/hivemetastore:v3.0.0
        env:
        - name: AWS_ACCESS_KEY_ID
          valueFrom:
            secretKeyRef:
              name: [2에서 만든 secret 이름]
              key: access-key
        - name: AWS_SECRET_ACCESS_KEY
          valueFrom:
            secretKeyRef:
              name: [2에서 만든 secret 이름]
              key: secret-key
        ports:
        - containerPort: 9083
        volumeMounts:
        - name: metastore-cfg-vol
          mountPath: /opt/hive-metastore/conf/metastore-site.xml
          subPath: metastore-site.xml
        - name: metastore-cfg-vol
          mountPath: /opt/hadoop/etc/hadoop/core-site.xml
          subPath: core-site.xml
        command: ["/opt/hive-metastore/bin/start-metastore"]
        args: ["-p", "9083"]
        resources:
          requests:
            memory: "1G"
            cpu: 0.5
        imagePullPolicy: Always
      volumes:
        - name: metastore-cfg-vol
          configMap:
            name: metastore-cfg
> kubectl apply -f metastore.yaml > kubectl get all NAME READY STATUS RESTARTS AGE pod/metastore-5b75d6f46-7wkcl 1/1 Running 0 20h NAME TYPE CLUSTER-IP EXTERNAL-IP PORT(S) AGE service/metastore ClusterIP 198.19.133.234 <none> 9083/TCP 20h NAME READY UP-TO-DATE AVAILABLE AGE deployment.apps/metastore 1/1 1 1 20h NAME DESIRED CURRENT READY AGE replicaset.apps/metastore-5b75d6f46 1 1 1 3d20h
5. Helm으로 Trino 배포
- Trino를 바로 Default 세팅으로 배포하는게 아니라 특정 value들을 overriding하여 배포를 진행할 것이다.
# helm repo add
> helm repo add trino https://trinodb.github.io/charts


# helm pull 후 .tar 파일 압축을 풀어준다.
> helm pull trino/trino


# value.yaml을 my-values.yaml로 복사
> cp values.yaml my-values.yaml


# my-values의 아래 위치들 수정

	1) sevice.type: ClusterIP -> NodePort로 변경

        service:
          type: NodePort
          port: 8080


    2) additionalCatalogs: 부분에 아래와 같이 추가

        additionalCatalogs:
          lakehouse: |-
            connector.name=hive
            hive.metastore.uri=thrift://[metastore service 이름].[metastore ns 이름].svc.cluster.local:9083
            hive.s3.aws-access-key=[NCP API KEY ID]
            hive.s3.aws-secret-key=[NCP API SECRET KEY]
            hive.s3.endpoint=http://kr.objectstorage.ncloud.com
            hive.s3.ssl.enabled=false


# my-values.yaml 파일 overriding하여 trino 설치
> helm install trino -f my-values.yaml .

> kubectl get all

    NAME                                     READY   STATUS      RESTARTS   AGE
    pod/hive-initschema-9r6vz                0/1     Completed   0          4d1h
    pod/metastore-5b75d6f46-7wkcl            1/1     Running     0          3d20h
    pod/mysql-deployment-868967bdbb-5k4v8    1/1     Running     0          4d1h
    pod/trino-coordinator-77999554d7-wh7v8   1/1     Running     0          3d20h
    pod/trino-worker-5c86775b75-pfsjw        1/1     Running     0          3d20h

    NAME                    TYPE        CLUSTER-IP       EXTERNAL-IP   PORT(S)          AGE
    service/metastore       ClusterIP   198.19.133.234   <none>        9083/TCP         3d20h
    service/mysql-service   NodePort    198.19.242.58    <none>        3306:30576/TCP   4d1h
    service/trino           NodePort    198.19.171.169   <none>        8080:31352/TCP   3d20h

    NAME                                READY   UP-TO-DATE   AVAILABLE   AGE
    deployment.apps/metastore           1/1     1            1           3d20h
    deployment.apps/mysql-deployment    1/1     1            1           4d1h
    deployment.apps/trino-coordinator   1/1     1            1           3d20h
    deployment.apps/trino-worker        1/1     1            1           3d20h

    NAME                                           DESIRED   CURRENT   READY   AGE
    replicaset.apps/metastore-5b75d6f46            1         1         1       3d20h
    replicaset.apps/mysql-deployment-868967bdbb    1         1         1       4d1h
    replicaset.apps/trino-coordinator-77999554d7   1         1         1       3d20h
    replicaset.apps/trino-worker-5c86775b75        1         1         1       3d20h

    NAME                                               REFERENCE                 TARGETS         MINPODS   MAXPO
    DS   REPLICAS   AGE
    horizontalpodautoscaler.autoscaling/trino-worker   Deployment/trino-worker   <unknown>/40%   1         3
         1          3d20h
6. Trino CLI 설치 및 ALB를 통한 Trino UI Expose
-
Trino CLI 설치
# openjdk 설치 > apt-get install openjdk-11-jdk # Trino jar 파일 다운로드 > wget https://repo1.maven.org/maven2/io/trino/trino-cli/434/trino-cli-434-executable.jar # 설치 확인 > java -jar trino-cli-434-executable.jar --version [root@data-nks-bastion]# java -jar trino-cli-434-executable.jar --version Trino CLI 434 -
Ingress 적용
-
trino-ingress.yaml
apiVersion: networking.k8s.io/v1
kind: Ingress
metadata:
  name: trino-ingress
  annotations:
    alb.ingress.kubernetes.io/description: 'trino'
    alb.ingress.kubernetes.io/load-balancer-name: 'trino-alb'
  labels:
    app: trino-ingress
spec:
  ingressClassName: alb
  rules:
  - http:
      paths:
      - path: /
        pathType: Prefix
        backend:
          service:
            name: trino
            port:
              number: 8080
> kubectl apply -f trino-ingress.yaml > kubectl get ingress NAME CLASS HOSTS ADDRESS PORTS AGE trino-ingress alb * trino-alb-000000-1234567890.kr.lb.naverncp.com 80 3d20h
7. DBeaver를 통한 Trino 접속 및 NOS 데이터 조회
-
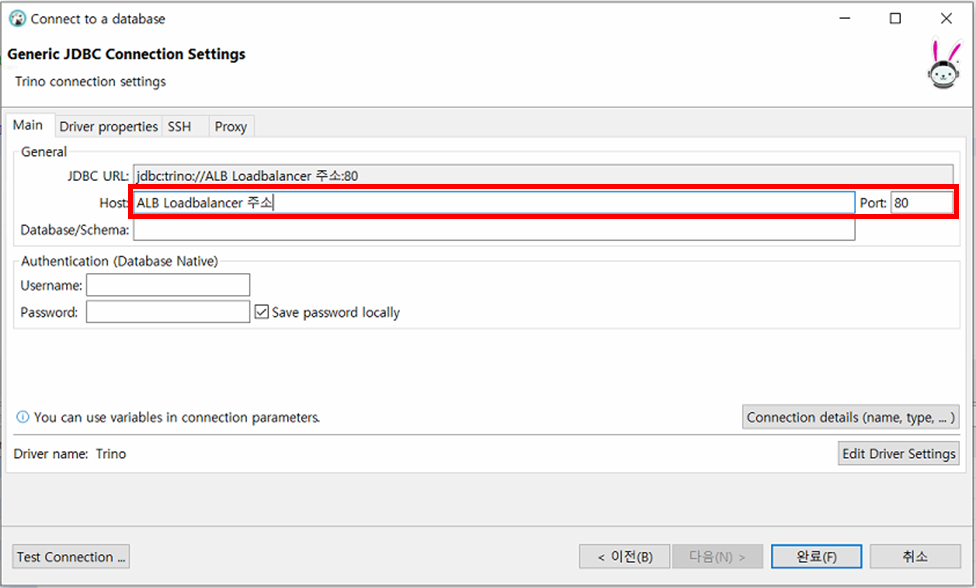
DBeaver에서 Connect할 database로
Trino를 선택한 후 아래와 같이 값들을 넣은 후 연결해준다.- Host : ingress로 생성된 ALB 주소
- Port : 80
-
연결 후 SQL 편집기를 열어 Catalog 조회를 하여 'lakehouse'라는 Catalog가 생성되었는지 확인한다.
SHOW CATALOGS; trino> show catalogs; Catalog ----------- lakehouse system tpcds tpch (4 rows) -
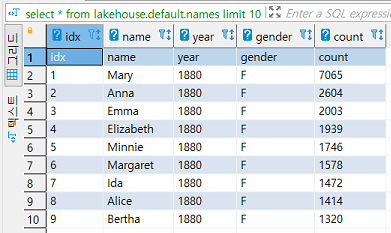
아래와 같이 버킷 내부 경로에 있는 데이터에 맞게 스키마를 생성하고 조회를 해본다.
# 사용할 DB 선택 > USE lakehouse.default; # NOS에 올라간 데이터에 맞게 스키마 생성 > CREATE table lakehouse.default.[테이블 이름]( idx VARCHAR, name VARCHAR, year VARCHAR, gender VARCHAR, count VARCHAR ) WITH ( external_location = 's3a://[NOS 버킷 이름]/[내부 경로]', format = 'CSV' ); # 스키마 생성 후 잘 조회되는지 확인 > SELECT * FROM lakehouse.default.[테이블 이름] LIMIT 10; -
Naver Object Storage에 업로드한 데이터가 잘 조회되는 것을 볼 수 있다. (사용한 dataset -> names.zip)
8. MYSQL에서 Hive Metadata 조회 후 생성 확인
- 위에서 Trino로 생성한 table의 metadata가 MYSQL로 구축한 Hive Metastore에 잘 저장되었는지 확인해본다.
- 우선 mysql deployment 안으로 들어간다.
# mysql deployment로 접속
> kubectl exec -it deploy/mysql-deployment -- bash

	root@mysql-deployment-868967bdbb-5k4v8:/#


# mysql 로그인
> mysql -u root -p

    root@mysql-deployment-868967bdbb-5k4v8:/# mysql -u root -p
    Enter password:
    Welcome to the MySQL monitor.  Commands end with ; or \g.
    Your MySQL connection id is 3953
    Server version: 8.0.27 MySQL Community Server - GPL

    Copyright (c) 2000, 2021, Oracle and/or its affiliates.

    Oracle is a registered trademark of Oracle Corporation and/or its
    affiliates. Other names may be trademarks of their respective
    owners.

    Type 'help;' or '\h' for help. Type '\c' to clear the current input statement.

mysql> - init schema를 통해 생성된 metastore_db 내의
DBS, CTLGS, TLBS테이블들을 각각 확인하여 연동된 metastore 정보들을 볼 수 있다.DBS> DB_LOCATION으로 잡혀있는 NOS 스토리지 위치 및 DB 이름 확인 가능CTLGS> Hive의 Default Catalog 위치 확인 가능TLBS> NOS로부터 External_Table 타입으로 생성된 테이블 목록 확인 가능
> use metastore_db;
> SELECT * FROM DBS;

    mysql> SELECT * FROM DBS;
    +-------+-----------------------+----------------------------------+---------+------------+------------+-----------+
    | DB_ID | DESC                  | DB_LOCATION_URI                  | NAME    | OWNER_NAME | OWNER_TYPE | CTLG_NAME |
    +-------+-----------------------+----------------------------------+---------+------------+------------+-----------+
    |     1 | Default Hive database | s3a://testtesttesttest/hive-meta | default | public     | ROLE       | hive      |
    +-------+-----------------------+----------------------------------+---------+------------+------------+-----------+
    1 row in set (0.00 sec)


> SELECT * FROM CTLGS;

    mysql> SELECT * FROM CTLGS;
    +---------+------+---------------------------+----------------------------------+
    | CTLG_ID | NAME | DESC                      | LOCATION_URI                     |
    +---------+------+---------------------------+----------------------------------+
    |       1 | hive | Default catalog, for Hive | s3a://testtesttesttest/hive-meta |
    +---------+------+---------------------------+----------------------------------+
    1 row in set (0.00 sec)


> SELECT * FROM TBLS;

    mysql> SELECT * FROM TBLS;
    +--------+-------------+-------+------------------+---------+------------+-----------+-------+----------------+----------------+--------------------+--------------------+----------------------------------------+
    | TBL_ID | CREATE_TIME | DB_ID | LAST_ACCESS_TIME | OWNER   | OWNER_TYPE | RETENTION | SD_ID | TBL_NAME       | TBL_TYPE       | VIEW_EXPANDED_TEXT | VIEW_ORIGINAL_TEXT | IS_REWRITE_ENABLED                     |
    +--------+-------------+-------+------------------+---------+------------+-----------+-------+----------------+----------------+--------------------+--------------------+----------------------------------------+
    |      1 |  1702014686 |     1 |                0 | hyunsoo | USER       |         0 |     1 | allstarfull    | EXTERNAL_TABLE | NULL               | NULL               | 0x00                                   |
    |      2 |  1702339649 |     1 |                0 | hyunsoo | USER       |         0 |     2 | names          | EXTERNAL_TABLE | NULL               | NULL               | 0x00                                   |
    |      6 |  1702140288 |     1 |                0 | hyunsoo | USER       |         0 |     6 | national_names | EXTERNAL_TABLE | NULL               | NULL               | 0x00                                   |
    +--------+-------------+-------+------------------+---------+------------+-----------+-------+----------------+----------------+--------------------+--------------------+----------------------------------------+
    3 rows in set (0.00 sec)
9. 참고 문서
- medium___Trino S3 via hive-metastore integration
- medium___Hive-metastore on K8S with S3 external table
- itnext___Hive on Spark in Kubernetes
- github___trino-on-k8s
- tistory___Trino 한번 써보겠습니다
- Trino S3 via hive-metastore Integration
- ncloud-docs___Hive 사용
- tistory___Kubernetes Cluster 에 MySQL 설치하기
- MYSQL을 사용하여 HIVE Metastore를 설치하고 구성하는 방법

데이터 엔지니어의 작업공간 / #PYTHON #CLOUD #SPARK #AWS #GCP #NCLOUD
안녕하세요 맨위 아키텍처 구조에서 hive metastore와 mysql이 필요한 이유가 있나요?
혹시 메타데이터를 관리하기 위해 따로 hive metastore를 두는것인가요?
그리고 mysql을 쓰는 이유는 또 무엇인지 알려주실 수 있나요? dbvear가 있는데 mysql을 굳이 왜 써야하는지 잘 모르겠습니다
hive metastore대신 iceberg를 이용해서 NOS에서 조회, 업로드 하고 생긴 메타데이터도 다시 NOS로 집어넣는 아키택처도 구상가능하겠네요?