
0. 설치 버전
OpenStack 버전은
2023.1 Antelope으로 진행한다.
- 메뉴얼이 버전마다 다르기 때문에, 구글링 등으로 찾은 경우 내용이 다를 수 있으니 주의한다.
- 항상
Antelope에 대한 설명인지, 최신 메뉴얼인지 확인 후 진행한다.
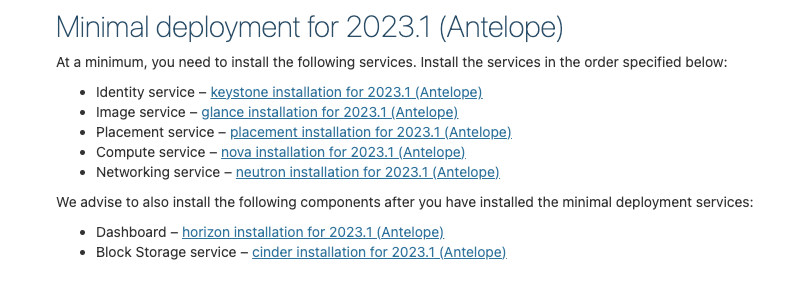
1. Installation Guide
Environment부터 실제 설치 내용이다.- 앞 쪽 부분도 읽어 보는 것이 도움이 된다.
- 특히
Overview: Networking부분
- 가상 머신을 위한 네트워크를 어떻게 구성하는가?
- Provider Network
- 물리 네트워크의 연장으로만 구성하는 방법
- 기존 물리 네트워크에 VM 들이 바로 연결됨
- Self-service Network
- 가상 내부 네트워크를 구성
- 필요에 따라 물리 네트워크의 IP를 사용자가 직접 VM에 할당 할 수도 있는 방법
https://docs.openstack.org/install-guide/openstack-services.html
참고해서 진행할
Antelope설치 가이드이다.
주의사항
- 꼼꼼하게 읽으면서 진행한다.
- Link, Command만 보면서 진행하면 안된다.
- 하이라이트 되지 않은, Plain Text로 된 설명에도 중요한 내용이 많다.
- 무작정 순서대로 진행하지 말고, 과정의 결과 화면을 확인하면서 진행한다.
2. Network Time Protocol (NTP)
https://docs.openstack.org/install-guide/environment-ntp.html
정의
- NTP는 네트워크를 통해 컴퓨터 시스템 간에 시간 정보를 동기화하는 프로토콜
- 정확하고 일관된 시스템 시간을 유지하기 위해 서버와 클라이언트 간에 시간 정보를 전달
주요 특징
- 계층 구조 : 계층화된 시간 서버 구조(스트라텀, Stratum)를 통해 시간 소스의 신뢰도를 계층적으로 관리
- 지속적인 조정 : 시스템 클록의 시간 오차를 지속적으로 조정하여 장기간의 시간 일관성 보장
- 보안 : 인증 및 암호화를 통해 시간 동기화 과정에서의 보안을 강화할 수 있음
OpenStack에서의 역할
- 서비스 동기화 : OpenStack의 다양한 컴포넌트가 정확하게 동작하기 위해 모든 노드의 시간 동기화가 필수
- 로그 일관성 : 분산 환경에서의 로그 타임스탬프를 일관되게 유지하여 문제 해결 및 분석을 용이하게 함
- API 요청 관리 : 시간 동기화를 통해 API 요청 및 응답 간의 시간 일관성을 유지하여 데이터 무결성을 보장
1. con01
apt install chrony

vi /etc/chrony/chrony.conf
allow 10.0.0.0/24

service chrony restart
service chrony status
2. com01
apt install chrony

vi /etc/chrony/chrony.conf
server con01 iburst

service chrony restart
service chrony status

chronyc sources
MS Name/IP address         Stratum Poll Reach LastRx Last sample
===============================================================================
^- alphyn.canonical.com          2   6    17    26  -2808us[-2822us] +/-  122ms
^- prod-ntp-3.ntp1.ps5.cano>     2   6    17    26  +8528us[+8528us] +/-  138ms
^- prod-ntp-5.ntp1.ps5.cano>     2   6    17    27  +9053us[+9038us] +/-  137ms
^- prod-ntp-4.ntp1.ps5.cano>     2   6    17    25  +1311us[+1311us] +/-  130ms
^- 121.174.142.82                3   6    17    27   -383us[ -396us] +/-   34ms
^+ 141.164.43.237.vultruser>     2   6    17    26   -340us[ -356us] +/-   19ms
^- any.time.nl                   2   6    17    27   +211us[ +198us] +/-   60ms
^- 121.174.142.81                3   6    17    28    -84us[ -546us] +/-   34ms
^* con01                         3   6    17    26   +143us[ +126us] +/- 7040us
3. OpenStack packages
https://docs.openstack.org/install-guide/environment-packages.html
1. con01, com01
add-apt-repository cloud-archive:antelope

apt update

apt install python3-openstackclient
4. SQL database
https://docs.openstack.org/install-guide/environment-sql-database.html
1. con01
apt install mariadb-server python3-pymysql

vi /etc/mysql/mariadb.conf.d/99-openstack.cnf
[mysqld]
bind-address = 10.0.0.1

default-storage-engine = innodb
innodb_file_per_table = on
max_connections = 4096
collation-server = utf8_general_ci
character-set-server = utf8

service mysql restart

mysql_secure_installation

# 전부 기본 값으로 (enter)
# 패스워드 : openstack

NOTE: RUNNING ALL PARTS OF THIS SCRIPT IS RECOMMENDED FOR ALL MariaDB
      SERVERS IN PRODUCTION USE!  PLEASE READ EACH STEP CAREFULLY!

In order to log into MariaDB to secure it, we'll need the current
password for the root user. If you've just installed MariaDB, and
haven't set the root password yet, you should just press enter here.

Enter current password for root (enter for none):
OK, successfully used password, moving on...

Setting the root password or using the unix_socket ensures that nobody
can log into the MariaDB root user without the proper authorisation.

You already have your root account protected, so you can safely answer 'n'.

Switch to unix_socket authentication [Y/n]
Enabled successfully!
Reloading privilege tables..
 ... Success!


You already have your root account protected, so you can safely answer 'n'.

Change the root password? [Y/n]
New password:
Re-enter new password:
Password updated successfully!
Reloading privilege tables..
 ... Success!


By default, a MariaDB installation has an anonymous user, allowing anyone
to log into MariaDB without having to have a user account created for
them.  This is intended only for testing, and to make the installation
go a bit smoother.  You should remove them before moving into a
production environment.

Remove anonymous users? [Y/n]
 ... Success!

Normally, root should only be allowed to connect from 'localhost'.  This
ensures that someone cannot guess at the root password from the network.

Disallow root login remotely? [Y/n]
 ... Success!

By default, MariaDB comes with a database named 'test' that anyone can
access.  This is also intended only for testing, and should be removed
before moving into a production environment.

Remove test database and access to it? [Y/n]
 - Dropping test database...
 ... Success!
 - Removing privileges on test database...
 ... Success!

Reloading the privilege tables will ensure that all changes made so far
will take effect immediately.

Reload privilege tables now? [Y/n]
 ... Success!

Cleaning up...

All done!  If you've completed all of the above steps, your MariaDB
installation should now be secure.

Thanks for using MariaDB!
mysql 재시작 후 에러 발생 시
Job for mariadb.service failed because the control process exited with error code.
See "systemctl status mariadb.service" and "journalctl -xeu mariadb.service" for details.


sudo mkdir -p /etc/mysql/conf.d/
sudo mkdir -p /etc/mysql/mariadb.conf.d/
sudo chmod 755 /etc/mysql/conf.d/
sudo chmod 755 /etc/mysql/mariadb.conf.d/

sudo cp /etc/mysql/mariadb.conf.d/50-server.cnf /etc/mysql/conf.d/

sudo rm -rf /var/lib/mysql
sudo mkdir -p /var/lib/mysql
sudo chown -R mysql:mysql /var/lib/mysql

sudo mysql_install_db --user=mysql --ldata=/var/lib/mysql

sudo systemctl restart mariadb

sudo systemctl status mariadb
5. Message queue (RabbitMQ)
https://docs.openstack.org/install-guide/environment-messaging.html
정의
- 오픈 소스 메시지 브로커 소프트웨어로, 메시지를 안전하게 큐에 저장하고 전달하는 역할을 수행
- 분산 시스템 내의 다양한 애플리케이션 컴포넌트 간의 비동기 메시지 통신을 지원
주요 특징
- 메시지 전송 보장 : 메시지를 손실 없이 안전하게 전달 및 처리할 수 있도록 보장
- 로드 밸런싱 : 여러 소비자 간에 메시지를 분산하여 시스템의 부하를 균형있게 분배
- 비동기 처리 : 생산자와 소비자 간의 느슨한 결합을 지원하여 애플리케이션의 성능 및 확장성 향상
- 장애 허용성 : 메시지를 큐에 저장하여 네트워크 또는 시스템 장애 시에도 메시지 손실을 방지
OpenStack에서의 역할
- 오픈스택의 서비스 간 메시지 전달을 관리하여, 서비스 간 통신의 신뢰성과 확장성을 보장
- 네트워크 서비스, 컴퓨팅 서비스, 이미지 서비스 등 다양한 컴포넌트의 협업을 가능하게 함
- 시스템 상태 업데이트, 작업 요청, 상태 알림 등의 메시지를 효율적으로 큐잉하고 전달
1. con01
apt install rabbitmq-server

rabbitmqctl add_user openstack openstack

rabbitmqctl set_permissions openstack ".*" ".*" ".*"
6. Memcached
https://docs.openstack.org/install-guide/environment-memcached.html
정의
- 고성능, 분산 메모리 객체 캐싱 시스템으로, 자주 참조되는 데이터를 메모리에 캐싱함
- 오픈 소스 소프트웨어로, 주로 키-값(Key-Value) 쌍을 저장하여 빠르게 데이터를 조회할 수 있도록 지원
주요 특징
- 데이터베이스 부하 감소 : 자주 요청되는 데이터를 메모리에 캐싱하여 데이터베이스의 부하를 줄임
- 응답 속도 향상 : 캐시된 데이터를 메모리에서 직접 가져와서 애플리케이션의 응답 시간을 크게 단축
- 스케일링 지원 : 분산 아키텍처를 통해 여러 노드에 걸쳐 데이터를 분산 저장, 쉽게 확장 가능
- 효율적인 자원 사용 : 메모리 공간을 효율적으로 활용하여 대규모 데이터 처리 시 성능을 극대화
OpenStack에서의 역할
- 오픈스택의 API 응답 속도를 높이기 위해 자주 사용하는 데이터를 캐싱하여 성능 최적화
- 인증 토큰, 이미지 메타데이터, 네트워크 정보 등 반복적으로 요청되는 데이터를 캐시하여 DB 접근 최소화
- 다양한 오픈스택 서비스 간의 데이터 요청에 대한 부하를 줄이고, 시스템 전반의 효율성 향상
1. con01
apt install memcached python3-memcache

vi /etc/memcached.conf
# 수정
-l 10.0.0.1

service memcached restart
7. ETCD
https://docs.openstack.org/install-guide/environment-etcd-ubuntu.html
정의
- 분산 시스템에서 사용되는 오픈 소스 키-값 저장소
- 클러스터 구성 요소 간의 구성 데이터를 공유하고 일관성을 유지하기 위해 사용됨
- 주로 클러스터 환경에서의 서비스 디스커버리와 설정 관리를 위해 설계됨
주요 특징
- 일관성 보장 : 강력한 일관성을 보장하는 Raft 합의 알고리즘을 사용하여 분산 환경에서 데이터의 일관성을 유지
- 고가용성 : 클러스터링을 통해 데이터의 고가용성을 보장하며, 노드 장애 시에도 데이터를 안정적으로 유지
- 키-값 저장소 : 간단하고 효율적인 키-값 저장소로, 빠르고 신뢰할 수 있는 데이터 접근을 제공
- 워치 기능 : 데이터 변경을 실시간으로 감지하여 관련된 클라이언트에 변경 사항을 통지
- 보안 : TLS를 통해 통신을 암호화하고 인증 기능을 제공하여 보안을 강화
OpenStack에서의 역할
- 서비스 디스커버리 : 오픈스택의 다양한 서비스가 클러스터 환경에서 상호 발견하고 연결할 수 있도록 지원
- 클러스터 관리 : 오픈스택 클러스터의 상태 및 구성 정보를 중앙 집중식으로 관리하여 클러스터의 일관성을 유지
- 구성 저장소 : 각 노드와 서비스의 구성 정보를 안전하게 저장하고, 필요 시 이를 쉽게 업데이트하여 배포
- 리더 선출 : Raft 알고리즘을 통해 분산된 환경에서 리더 노드를 선출하고, 클러스터의 관리 작업을 조율
1. con01
apt install etcd

vi /etc/default/etcd
ETCD_NAME="controller"
ETCD_DATA_DIR="/var/lib/etcd"
ETCD_INITIAL_CLUSTER_STATE="new"
ETCD_INITIAL_CLUSTER_TOKEN="etcd-cluster-01"
ETCD_INITIAL_CLUSTER="controller=http://10.0.0.1:2380"
ETCD_INITIAL_ADVERTISE_PEER_URLS="http://10.0.0.1:2380"
ETCD_ADVERTISE_CLIENT_URLS="http://10.0.0.1:2379"
ETCD_LISTEN_PEER_URLS="http://0.0.0.0:2380"
ETCD_LISTEN_CLIENT_URLS="http://10.0.0.1:2379"

systemctl enable etcd
systemctl restart etcd
8. 서비스 상태 확인
서비스 상태를 확인하며 진행한다.
1. 서비스 전체 상태 확인
systemctl status --all
2. 실패한 서비스 확인
systemctl list-units --failed