React Flow 공식문서 정리 & 한국어 번역 & 궁금한 것 해결
React
Concepts (개념)
Key Features(주요 특징들)
👌 Easy to use: React Flow already comes with many of the features you want out of the box. Dragging nodes around, zooming and panning, selecting multiple nodes and edges, and adding/removing edges are all built-in.
=> 사용하기 쉬움: React Flow는 이미 많은 기능을 기본으로 제공합니다.
노드를 드래그하여 이동하고, 확대/축소 및 이동, 여러 노드 및 엣지를 선택하고,
엣지를 추가/제거하는 등의 기능이 모두 내장되어 있습니다.
🎨 Customizable: React Flow supports custom node types and edge types. Because custom nodes are just React components, you can implement anything you need: you're not locked in to the built-in node types. Custom edges let you add labels, controls, and bespoke logic to node edges.
=> 사용자 정의 가능: React Flow는 사용자 지정 노드 유형 및 엣지 유형을 지원합니다.
 사용자 정의 노드는 React 컴포넌트일 뿐이므로 필요한 모든 것을 구현할 수 있습니다.
 내장된 노드 유형에 국한되지 않습니다.
 사용자 정의 엣지를 사용하면 노드 엣지에 라벨, 컨트롤 및 특별한 로직을 추가할 수 있습니다.
⚡️ Fast rendering: React Flow only renders nodes that have changed, and makes sure only those that are in the viewport are displayed at all.
=> 빠른 렌더링: React Flow는 변경된 노드만 렌더링하고,
화면에 보이는 노드만 표시합니다.
🧩 Built-in plugins: We ship React Flow with a few plugins out of the box: The plugin implements some basic customizable background patterns. The plugin displays a small version of the graph in the corner of the screen. The plugin adds controls to zoom, center, and lock the viewport. The plugin makes it easy to position content on top of the viewport. The plugin lets you render a toolbar attached to a node. The plugin makes it easy to add resize functionality to your nodes.
=> 내장 플러그인: React Flow는 몇 가지 플러그인을 기본으로 제공합니다:
<Background /> 플러그인은 기본 사용자 정의 가능한 배경 패턴을 구현합니다.
<MiniMap /> 플러그인은 화면의 모퉁이에 그래프의 작은 버전을 표시합니다.
<Controls /> 플러그인은 확대, 중앙 정렬 및 뷰포트 잠금을 제어하는 컨트롤을 추가합니다.
<Panel /> 플러그인은 뷰포트 위에 컨텐츠를 쉽게 배치할 수 있습니다.
<NodeToolbar /> 플러그인을 사용하면 노드에 연결된 툴바를 렌더링할 수 있습니다.
<NodeResizer /> 플러그인은 노드에 크기 조정 기능을 쉽게 추가할 수 있습니다.
💪 Reliable: React Flow is entirely written in TypeScript to catch bugs early and make fixes easy. For everything else, we have a robust cypress test suite so you can depend on React Flow with confidence.
=> 신뢰성: 버그를 조기에 찾아내고 수정을 쉽게 하기 위해
React Flow는 완전히 TypeScript로 작성되었습니다.
그 외에도 견고한 cypress 테스트 스위트가 있어서 React Flow를 믿고 사용할 수 있습니다.
Terms and Definitions(용어 및 정의)
Nodes
A node in React Flow is a React component. That means it can render anything you like. Each node has an x- and y-coordinate, which tells it where it is placed in the viewport. By default, a node looks like in the example above. You can find all the options for customizing your nodes in the Node options documentation.
React Flow에서 노드는 React 컴포넌트입니다.
이는 원하는 대로 렌더링할 수 있다는 것을 의미합니다.
각 노드는 뷰포트 내에서 위치를 알려주는 x- 및 y- 좌표를 가지고 있습니다.
기본적으로 노드는 위의 예제와 같이 보입니다.
노드를 사용자 정의하는 모든 옵션은 노드 옵션 문서에서 찾을 수 있습니다.
Custom Nodes
This is where the magic of React Flow happens. You can customize nodes to look and act however you would like. Much of the functionality that you might create is not built-in to React Flow. Some of the things you might do with a custom node are:
- Render form elements
- Visualize data
- Support multiple handles
Please refer to the custom node docs for further information.
React Flow의 마법은 여기에 있습니다.
노드를 원하는 대로 보이고 작동하도록 사용자 정의할 수 있습니다.
만들 수있는 많은 기능 중 많은 기능이 React Flow에 내장되어 있지 않습니다.
사용자 정의 노드를 사용하여 수행할 수 있는 일에는 다음과 같은 것들이 있습니다:
Handles
A handle (also called “port” in other libraries) is the place where an edge attaches to a node. The handle can be placed anywhere, and styled as you like. It’s just a div element. By default, it appears as a grey circle on the top, bottom, left, or right of the node. When creating a custom node, you can have as many handles as you need in your node. More information can be found in the handle docs.
핸들(다른 라이브러리에서 "포트"라고도 함)은 엣지가 노드에 부착되는 위치입니다.
핸들은 어디에나 배치되고 원하는대로 스타일을 지정할 수 있습니다. 이는 단순한 div 요소입니다.
기본적으로 노드의 위, 아래, 왼쪽 또는 오른쪽에 회색 원으로 표시됩니다.
사용자 정의 노드를 생성할 때 노드에 필요한 만큼 많은 핸들을 가질 수 있습니다.
자세한 내용은 핸들 문서에서 확인할 수 있습니다.
Edges
An edge connects two nodes. Every edge needs a target and a source node. React Flow comes with four built-in edges types: default (bezier), smoothstep, step and straight. An edge is SVG path that can be styled with CSS and is completely customizable. If you are using multiple handles, you can reference them individually to create multiple connections for a node.
엣지는 두 개의 노드를 연결합니다.
모든 엣지에는 대상 및 소스 노드가 필요합니다.
React Flow에는 기본적으로 네 가지 타입의 내장 엣지가 있습니다
: 기본 (베지에), 스무스스텝, 스텝 및 스트레이트. 엣지는 CSS로 스타일을 지정할 수있는 SVG 경로이며 완전히 사용자 정의할 수 있습니다.
여러 핸들을 사용하는 경우 각각의 핸들을 개별적으로 참조하여 노드에 여러 연결을 생성할 수 있습니다.
Custom Edges
Like custom nodes, you can also customize edges. Things that people do with custom edges are:
- Add a button to remove an edge
- Custom routing behaviour
- Complex styling or interactions that cannot be solved with just one SVG path
You can find more information on the custom edges api site.
사용자 정의 노드와 마찬가지로 엣지도 사용자 정의할 수 있습니다. 사용자가 사용자 정의 엣지로 수행하는 작업에는 다음과 같은 것들이 있습니다:

엣지 제거 버튼 추가
사용자 지정 라우팅 동작
하나의 SVG 경로로 해결할 수 없는 복잡한 스타일 또는 상호 작용
자세한 내용은 사용자 정의 엣지 API 사이트에서 확인할 수 있습니다.
Connection Line
React Flow has built-in functionality to click-and-drag from one handle to another in order to create a new edge. While dragging, the placeholder edge is called a connection line. The connection line also comes with four types built-in and is customizable. You can find the props for configuring the connection line in the props section.
React Flow에는 새 엣지를 생성하기 위해 하나의 핸들에서 다른 핸들로 클릭하여 드래그하는 내장 기능이 있습니다.
드래그하는 동안 플레이스홀더 엣지를 연결 라인이라고합니다.
연결 라인도 내장된 네 가지 유형이 있으며 사용자 정의할 수 있습니다.
연결 라인을 구성하는 데 사용되는 프로퍼티에 대한 자세한 내용은 프로퍼티 섹션에서 확인할 수 있습니다.
Viewport
All of React Flow exists inside of the viewport. The viewport has a x, y and zoom value. When you drag the pane, you change the x and y coordinates and when you zoom in or out you alter the zoom level.
현재 뷰포트: x: 0.00, y: 0.00, 확대/축소: 1.00
React Flow는 모두 뷰포트 내에 존재합니다.
뷰포트에는 x, y 및 확대/축소 값이 있습니다.
패널을 드래그하면 x 및 y 좌표가 변경되고 확대 또는 축소하면 확대 수준이 변경됩니다.
Core Concepts (핵심 개념)
In the following part we will introduce you to the core concepts of React Flow and explain how to create an interactive flow. A flow consists of nodes and edges (or just nodes). You can pass arrays of nodes and edges as props to the ReactFlow component. Hereby all node and edge ids need to be unique. A node needs a position and a label (this could be different if you are using custom nodes) and an edge needs a source (node id) and a target (node id). You can read more about the options in the Node options and Edge options sections.
다음 부분에서는 React Flow의 핵심 개념을 소개하고 대화형 플로우를 생성하는 방법에 대해 설명합니다.
플로우는 노드와 엣지(또는 노드만)로 구성됩니다.
ReactFlow 컴포넌트에 노드와 엣지의 배열을 props로 전달할 수 있습니다.
여기서 모든 노드 및 엣지 ID는 고유해야합니다.
노드는 위치와 레이블(사용자 정의 노드를 사용하는 경우 다를 수 있음)이 필요하고 엣지는 소스(노드 ID)와 대상(노드 ID)이 필요합니다.
노드 옵션 및 엣지 옵션 섹션에서 옵션에 대해 더 자세히 읽을 수 있습니다.
Controlled or Uncontrolled (제어 또는 비제어)
With React Flow you have two ways to setup a flow. You can either create a controlled or an uncontrolled one. We recommend to use a controlled one but for simpler use cases you can also setup an uncontrolled flow. In the following part we will setup a controlled flow. Let's start by adding some nodes and edges to the ReactFlow component:
React Flow를 사용하여 플로우를 설정하는 두 가지 방법이 있습니다.
제어되는 플로우 또는 비제어 플로우를 생성할 수 있습니다.
제어되는 플로우를 사용하는 것을 권장하지만 더 간단한 사용 사례의 경우 비제어 플로우를 설정할 수도 있습니다.
다음 부분에서는 제어 플로우를 설정합니다.
ReactFlow 컴포넌트에 일부 노드 및 엣지를 추가하여 시작해 보겠습니다:
The dimensions of your React Flow component depend on the parent dimensions. That means that the parent needs a width and height to render React Flow properly.
=> React Flow 컴포넌트의 차원은 부모 차원에 따라 달라집니다. 즉, 부모에는 React Flow를 올바르게 렌더링하기 위한 너비와 높이가 필요합니다.
참고 예제 코드
import { useState } from 'react';
import ReactFlow from 'reactflow';
import 'reactflow/dist/style.css';
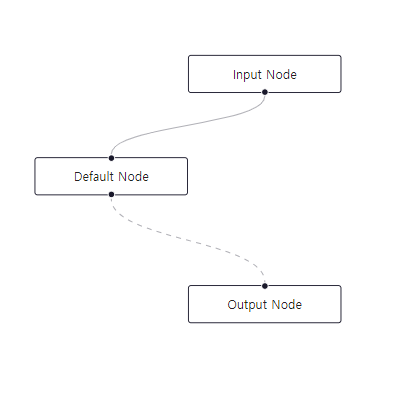
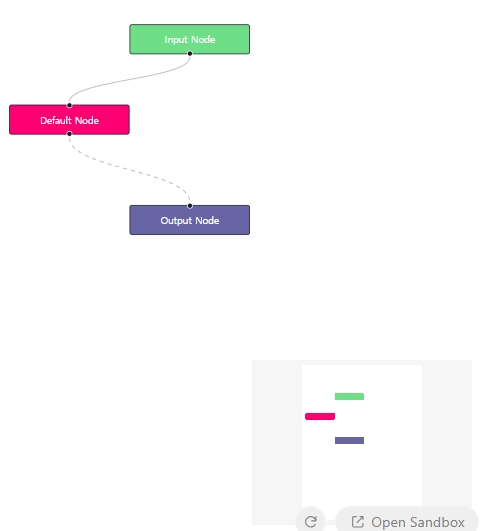
const initialNodes = [
{
id: '1',
type: 'input',
data: { label: 'Input Node' },
position: { x: 250, y: 25 },
},
{
id: '2',
// you can also pass a React component as a label
data: { label: <div>Default Node</div> },
position: { x: 100, y: 125 },
},
{
id: '3',
type: 'output',
data: { label: 'Output Node' },
position: { x: 250, y: 250 },
},
];
const initialEdges = [
{ id: 'e1-2', source: '1', target: '2' },
{ id: 'e2-3', source: '2', target: '3', animated: true },
];
function Flow() {
const [nodes, setNodes] = useState(initialNodes);
const [edges, setEdges] = useState(initialEdges);
return <ReactFlow nodes={nodes} edges={edges} fitView />;
}
export default Flow;참고 예제 코드로 구현된 CodeSandbox 및 캡쳐사진

Basic Functionality (기본 기능)
By default React Flow doesn't do any internal state updates besides handling
the viewport when you setup a controlled flow.
As with an <input /> component you need to pass handlers to apply the changes
that are triggered by React Flow to your nodes and edges.
In order to select, drag and remove nodes and edges
you need to implement an onNodesChange and an onEdgesChange handler:
기본적으로 React Flow는 제어된 플로우를 설정할 때
뷰포트를 처리하는 것 외에는 내부 상태 업데이트를 수행하지 않습니다.
<input /> 컴포넌트와 마찬가지로 React Flow에서 트리거된 변경 사항을
노드와 엣지에 적용하기 위해 핸들러를 전달해야 합니다.
노드 및 엣지를 선택, 드래그 및 제거하려면 onNodesChange 및 onEdgesChange 핸들러를 구현해야합니다.참고 예제 코드
<app.js>

import { useCallback, useState } from 'react';
import ReactFlow, { applyEdgeChanges, applyNodeChanges } from 'reactflow';
import 'reactflow/dist/style.css';

import initialNodes from './nodes.js';
import initialEdges from './edges.js';

function Flow() {
  const [nodes, setNodes] = useState(initialNodes);
  const [edges, setEdges] = useState(initialEdges);

  const onNodesChange = useCallback(
    (changes) => setNodes((nds) => applyNodeChanges(changes, nds)),
    [setNodes]
  );
  const onEdgesChange = useCallback(
    (changes) => setEdges((eds) => applyEdgeChanges(changes, eds)),
    [setEdges]
  );

  return (
    <ReactFlow
      nodes={nodes}
      edges={edges}
      onNodesChange={onNodesChange}
      onEdgesChange={onEdgesChange}
      fitView
    />
  );
}

export default Flow;<nodes.js>
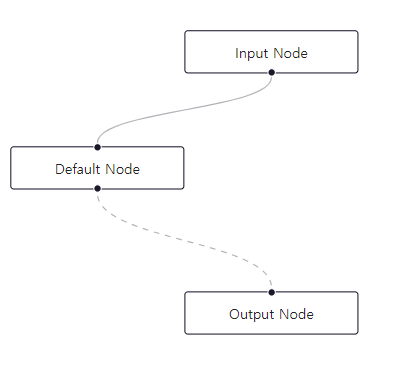
export default [
{
id: '1',
type: 'input',
data: { label: 'Input Node' },
position: { x: 250, y: 25 },
},
{
id: '2',
// you can also pass a React component as a label
data: { label: <div>Default Node</div> },
position: { x: 100, y: 125 },
},
{
id: '3',
type: 'output',
data: { label: 'Output Node' },
position: { x: 250, y: 250 },
},
];<edges.js>
export default [
{ id: 'e1-2', source: '1', target: '2' },
{ id: 'e2-3', source: '2', target: '3', animated: true },
];
참고 예제 코드로 구현된 CodeSandbox 및 캡쳐사진
What is happening here? Whenever React Flow triggers a change (node init, node drag, edge select, etc.),
the onNodesChange handler gets called. We export an applyNodeChanges handler
so that you don't need to handle the changes by yourself.
The applyNodeChanges handler returns an updated array of nodes
that is your new nodes array.
You now have an interactive flow with the following kinds of interactions:이 코드는 React Flow에서 변경 사항이 발생할 때마다 (노드 초기화, 노드 드래그, 엣지 선택 등) onNodesChange 핸들러가 호출됩니다. applyNodeChanges 핸들러를 내보내어 변경 사항을 직접 처리할 필요가 없도록 합니다. applyNodeChanges 핸들러는 새 노드 배열인 업데이트된 노드 배열을 반환합니다. 이제 다음과 같은 유형의 상호 작용이 있는 대화형 플로우가 있습니다.- selectable nodes and edges
- draggable nodes
- removable nodes and edges - (press Backspace to remove a selected node or edge, can be adjusted with the deleteKeyCode prop)
- multi-selection area by pressing Shift (that's the default selectionKeyCode)
- multi-selection by pressing command (that's the default multiSelectionKeyCode)
- 선택 가능한 노드 및 엣지
- 드래그 가능한 노드
- 제거 가능한 노드 및 엣지 - (선택한 노드 또는 엣지를 제거하려면 백스페이스를 누르세요. deleteKeyCode prop으로 조정할 수 있음)
- Shift를 눌러 다중 선택 영역 선택 (기본 selectionKeyCode)
- 명령을 눌러 다중 선택 (기본 multiSelectionKeyCode)For convenience we export the helper hooks useNodesState and useEdgesState that you can use to create the nodes and edges state:
=> 편의를 위해 useNodesState 및 useEdgesState라는 헬퍼 훅을 내보내어 노드 및 엣지 상태를 생성할 수 있습니다.
const [nodes, setNodes, onNodesChange] = useNodesState(initialNodes);
const [edges, setEdges, onEdgesChange] = useEdgesState(initialEdges);Connecting Nodes
The last piece that is missing to get the full interactivity is the onConnect handler. You need to implement it, in order to handle new connections.
=> 완전한 상호 작용을 얻기 위해 누락된 마지막 부분은 onConnect 핸들러입니다. 새로운 연결을 처리하려면 이를 구현해야 합니다.
참고 예제 코드
<App.js>
import { useCallback, useState } from 'react';
import ReactFlow, { addEdge, applyEdgeChanges, applyNodeChanges } from 'reactflow';
import 'reactflow/dist/style.css';
import initialNodes from './nodes.js';
import initialEdges from './edges.js';
function Flow() {
const [nodes, setNodes] = useState(initialNodes);
const [edges, setEdges] = useState(initialEdges);
const onNodesChange = useCallback(
(changes) => setNodes((nds) => applyNodeChanges(changes, nds)),
[setNodes]
);
const onEdgesChange = useCallback(
(changes) => setEdges((eds) => applyEdgeChanges(changes, eds)),
[setEdges]
);
const onConnect = useCallback(
(connection) => setEdges((eds) => addEdge(connection, eds)),
[setEdges]
);
return (
<ReactFlow
nodes={nodes}
edges={edges}
onNodesChange={onNodesChange}
onEdgesChange={onEdgesChange}
onConnect={onConnect}
fitView
/>
);
}
export default Flow;
<node.js>
export default [
{
id: '1',
type: 'input',
data: { label: 'Input Node' },
position: { x: 250, y: 25 },
},
{
id: '2',
// you can also pass a React component as a label
data: { label: <div>Default Node</div> },
position: { x: 100, y: 125 },
},
{
id: '3',
type: 'output',
data: { label: 'Output Node' },
position: { x: 250, y: 250 },
},
];
<edges.js>

export default [
  { id: 'e1-2', source: '1', target: '2' },
  { id: 'e2-3', source: '2', target: '3', animated: true },
];
참고 예제 코드로 구현된 CodeSandbox 및 캡쳐사진
In this example we are using the addEdge handler that returns an array of edges with the newly created one. If you want to set a certain edge option whenever an edge gets created you pass your options like this:
=> 이 예제에서는 새로 생성된 엣지가 포함된 엣지 배열을 반환하는 addEdge 핸들러를 사용하고 있습니다. 엣지가 생성될 때 특정 엣지 옵션을 설정하려면 다음과 같이 옵션을 전달합니다:
const onConnect = useCallback(
(connection) =>
setEdges((eds) => addEdge({ ...connection, animated: true }, eds)),
[setEdges],
);or use the defaultEdgeOptions prop:
=> 또는 defaultEdgeOptions prop을 사용할 수 있습니다:
const defaultEdgeOptions = { animated: true };
...
<ReactFlow
nodes={nodes}
edges={edges}
onNodesChange={onNodesChange}
onEdgesChange={onEdgesChange}
onConnect={onConnect}
defaultEdgeOptions={defaultEdgeOptions}
/>;The Viewport
Panning and Zooming
The default pan and zoom behaviour of React Flow is inspired by slippy maps. You pan by dragging and zoom by scrolling. You can customize this behaviour easily with the provided props:
=> React Flow의 기본 패닝 및 줌 동작은 슬리피 맵에서 영감을 받았습니다. 드래그하여 패닝하고 스크롤하여 줌을 조절할 수 있습니다. 제공된 props를 사용하여 이 동작을 쉽게 사용자 정의할 수 있습니다:
- panOnDrag: default: true
- selectionOnDrag: default: false (available since 11.4.0)
- panOnScroll: default: false (Overwrites zoomOnScroll)
- panOnScrollSpeed: default: 0.5
- panOnScrollMode: default: 'free'. 'free' (all directions), 'vertical' (only vertical) or 'horizontal' (only horizontal)
- zoomOnScroll: default: true
- zoomOnPinch: default: true
- zoomOnDoubleClick: default: true
- preventScrolling: default: true (browser scroll behaviour is prevented)
- zoomActivationKeyCode: default 'Meta'
- panActivationKeyCode: default 'Space' (available since 11.4.0)
panOnDrag: 기본값: true
selectionOnDrag: 기본값: false (11.4.0부터 사용 가능)
panOnScroll: 기본값: false (zoomOnScroll을 덮어씁니다)
panOnScrollSpeed: 기본값: 0.5
panOnScrollMode: 기본값: 'free'. 'free' (모든 방향), 'vertical' (수직으로만), 'horizontal' (수평으로만)
zoomOnScroll: 기본값: true
zoomOnPinch: 기본값: true
zoomOnDoubleClick: 기본값: true
preventScrolling: 기본값: true (브라우저 스크롤 동작이 방지됨)
zoomActivationKeyCode: 기본값 'Meta'
panActivationKeyCode: 기본값 'Space' (11.4.0부터 사용 가능)Default Viewport Controls
As mentioned above, the default controls are:
- pan: drag mouse
- zoom: scroll
- create selection: Shift + drag
위에서 언급한 바와 같이 기본 컨트롤은 다음과 같습니다:
패닝: 마우스 드래그
줌: 스크롤
선택 생성: Shift + 드래그참고 예제 코드
<App.js>
import { useCallback } from 'react';
import ReactFlow, { addEdge, useEdgesState, useNodesState } from 'reactflow';
import 'reactflow/dist/style.css';
import initialNodes from './nodes.js';
import initialEdges from './edges.js';
function Flow() {
const [nodes, setNodes, onNodesChange] = useNodesState(initialNodes);
const [edges, setEdges, onEdgesChange] = useEdgesState(initialEdges);
const onConnect = useCallback(
(connection) => setEdges((eds) => addEdge(connection, eds)),
[setEdges]
);
return (
<ReactFlow
nodes={nodes}
edges={edges}
onNodesChange={onNodesChange}
onEdgesChange={onEdgesChange}
onConnect={onConnect}
/>
);
}
export default Flow;<node.js>
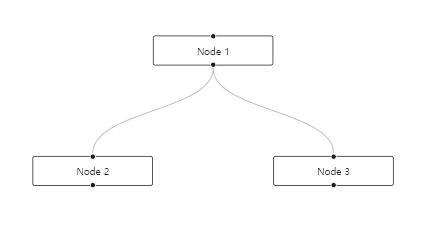
export default [
{
id: '1',
data: { label: 'Node 1' },
position: { x: 150, y: 0 },
},
{
id: '2',
data: { label: 'Node 2' },
position: { x: 0, y: 150 },
},
{
id: '3',
data: { label: 'Node 3' },
position: { x: 300, y: 150 },
},
];
<edges.js>
export default [
{ id: 'e1-2', source: '1', target: '2' },
{ id: 'e1-3', source: '1', target: '3' },
];
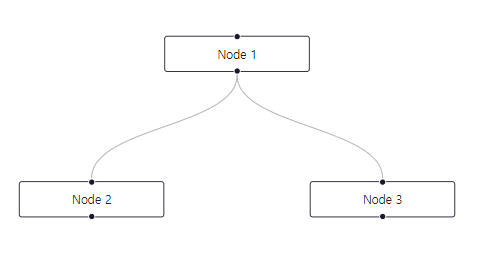
참고 예제 코드로 구현된 CodeSandbox 및 캡쳐사진
Figma-like Viewport Controls
If you prefer figma/sketch/design tool controls you can set panOnScroll={true} and selectionOnDrag={true}:
- pan: Space + drag mouse, scroll, middle or right mouse
- zoom: pitch or cmd + scroll
- create selection: drag mouse
만약 Figma/Sketch/디자인 툴 컨트롤을 선호한다면
panOnScroll={true} 및 selectionOnDrag={true}로 설정할 수 있습니다:
패닝: 스페이스 + 마우스 드래그, 스크롤, 가운데 또는 오른쪽 마우스
줌: 휠 또는 cmd + 스크롤
선택 생성: 마우스 드래그참고 예제 코드
<App.js>
import { useCallback } from 'react';
import ReactFlow, { addEdge, SelectionMode, useEdgesState, useNodesState } from 'reactflow';
import 'reactflow/dist/style.css';
import initialNodes from './nodes.js';
import initialEdges from './edges.js';
const panOnDrag = [1, 2];
function Flow() {
const [nodes, setNodes, onNodesChange] = useNodesState(initialNodes);
const [edges, setEdges, onEdgesChange] = useEdgesState(initialEdges);
const onConnect = useCallback(
(connection) => setEdges((eds) => addEdge(connection, eds)),
[setEdges]
);
return (
<ReactFlow
nodes={nodes}
edges={edges}
onNodesChange={onNodesChange}
onEdgesChange={onEdgesChange}
onConnect={onConnect}
panOnScroll
selectionOnDrag
panOnDrag={panOnDrag}
selectionMode={SelectionMode.Partial}
/>
);
}
export default Flow;
<nodes.js>
export default [
{
id: '1',
data: { label: 'Node 1' },
position: { x: 150, y: 0 },
},
{
id: '2',
data: { label: 'Node 2' },
position: { x: 0, y: 150 },
},
{
id: '3',
data: { label: 'Node 3' },
position: { x: 300, y: 150 },
},
];<edges.js>
export default [
{ id: 'e1-2', source: '1', target: '2' },
{ id: 'e1-3', source: '1', target: '3' },
];
참고 예제 코드로 구현된 CodeSandbox 및 캡쳐사진
In this example we also set selectionMode={SelectionMode.Partial} to be able to add nodes to a selection that are only partially selected.
=> 이 예시에서는 selectionMode={SelectionMode.Partial}를 설정하여 부분적으로 선택된 노드를 선택에 추가할 수 있도록 했습니다.
Plugin Components
React Flow comes with several additional plugin components. In this guide we show you how to use them. We are using our previous example code here.
=> React Flow에는 여러 가지 추가적인 플러그인 컴포넌트가 포함되어 있습니다. 이 가이드에서는 그 사용 방법을 안내합니다. 우리는 여기서 이전 예시 코드를 사용합니다.
MiniMap
If your flow gets bigger, you might want to get an overview quickly. For this we have built the MiniMap component. You can easily add it to your flow by adding it as a children:
=> 만약 플로우가 커지면, 빠르게 개요를 확인하고 싶을 수 있습니다. 이를 위해 MiniMap 컴포넌트를 제공합니다. 이를 사용하려면 children으로 추가하면 됩니다:
<ReactFlow>
{/* other components */}
<MiniMap />
</ReactFlow>참고 예제 코드
<App.js>
import ReactFlow, { MiniMap } from 'reactflow';
import 'reactflow/dist/style.css';
import defaultNodes from './nodes.js';
import defaultEdges from './edges.js';
const nodeColor = (node) => {
switch (node.type) {
case 'input':
return '#6ede87';
case 'output':
return '#6865A5';
default:
return '#ff0072';
}
};
function Flow() {
return (
<ReactFlow defaultNodes={defaultNodes} defaultEdges={defaultEdges} fitView>
<MiniMap nodeColor={nodeColor} nodeStrokeWidth={3} zoomable pannable />
</ReactFlow>
);
}
export default Flow;
node.js
export default [
{
id: '1',
type: 'input',
data: { label: 'Input Node' },
position: { x: 250, y: 25 },
style: { backgroundColor: '#6ede87', color: 'white' },
},
{
id: '2',
// you can also pass a React component as a label
data: { label: <div>Default Node</div> },
position: { x: 100, y: 125 },
style: { backgroundColor: '#ff0072', color: 'white' },
},
{
id: '3',
type: 'output',
data: { label: 'Output Node' },
position: { x: 250, y: 250 },
style: { backgroundColor: '#6865A5', color: 'white' },
},
];
<edges.js>
export default [
{
id: '1',
type: 'input',
data: { label: 'Input Node' },
position: { x: 250, y: 25 },
style: { backgroundColor: '#6ede87', color: 'white' },
},
{
id: '2',
// you can also pass a React component as a label
data: { label: <div>Default Node</div> },
position: { x: 100, y: 125 },
style: { backgroundColor: '#ff0072', color: 'white' },
},
{
id: '3',
type: 'output',
data: { label: 'Output Node' },
position: { x: 250, y: 250 },
style: { backgroundColor: '#6865A5', color: 'white' },
},
];
참고 예제 코드로 구현된 CodeSandbox 및 캡쳐사진
Controls
React Flow comes with a customizable controls bar, that you can use by importing the Controls component
=> React Flow는 사용자 정의 가능한 컨트롤 바를 제공합니다. 이를 사용하려면 다음과 같이 가져와서 사용할 수 있습니다:
import { Controls } from "react-flow";
// Inside your React component
<Controls />
참고 예제 코드
<App.js>
import ReactFlow, { Controls } from 'reactflow';
import 'reactflow/dist/style.css';
import defaultNodes from './nodes.js';
import defaultEdges from './edges.js';
function Flow() {
return (
<ReactFlow defaultNodes={defaultNodes} defaultEdges={defaultEdges} fitView>
<Controls />
</ReactFlow>
);
}
export default Flow;
<node.js>
export default [
  {
    id: '1',
    type: 'input',
    data: { label: 'Input Node' },
    position: { x: 250, y: 25 },
  },

  {
    id: '2',
    // you can also pass a React component as a label
    data: { label: <div>Default Node</div> },
    position: { x: 100, y: 125 },
  },
  {
    id: '3',
    type: 'output',
    data: { label: 'Output Node' },
    position: { x: 250, y: 250 },
  },
];
<edges.js>
export default initialEdges = [
{ id: 'e1-2', source: '1', target: '2' },
{ id: 'e2-3', source: '2', target: '3', animated: true },
];
참고 예제 코드로 구현된 CodeSandbox 및 캡쳐사진

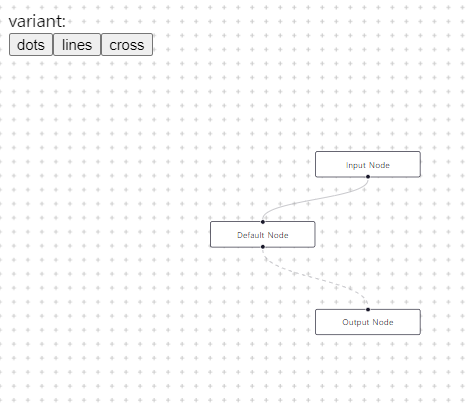
Background
If you want to display the pattern background, you can use the Background component
=> 만약 패턴 배경을 표시하려면 Background 컴포넌트를 사용할 수 있습니다.
import { Background } from "react-flow";
// Inside your React component
<Background />참고 예제 코드
<App.js>
import { useState } from 'react';
import ReactFlow, { Background, Panel } from 'reactflow';
import 'reactflow/dist/style.css';
import defaultNodes from './nodes.js';
import defaultEdges from './edges.js';
function Flow() {
const [variant, setVariant] = useState('cross');
return (
<ReactFlow defaultNodes={defaultNodes} defaultEdges={defaultEdges} fitView>
<Background color="#ccc" variant={variant} />
<Panel>
<div>variant:</div>
<button onClick={() => setVariant('dots')}>dots</button>
<button onClick={() => setVariant('lines')}>lines</button>
<button onClick={() => setVariant('cross')}>cross</button>
</Panel>
</ReactFlow>
);
}
export default Flow;
<node.js>
export default [
  {
    id: '1',
    type: 'input',
    data: { label: 'Input Node' },
    position: { x: 250, y: 25 },
  },

  {
    id: '2',
    // you can also pass a React component as a label
    data: { label: <div>Default Node</div> },
    position: { x: 100, y: 125 },
  },
  {
    id: '3',
    type: 'output',
    data: { label: 'Output Node' },
    position: { x: 250, y: 250 },
  },
];
<edges.js>

export default initialEdges = [
  { id: 'e1-2', source: '1', target: '2' },
  { id: 'e2-3', source: '2', target: '3', animated: true },
];
참고 예제 코드로 구현된 CodeSandbox 및 캡쳐사진
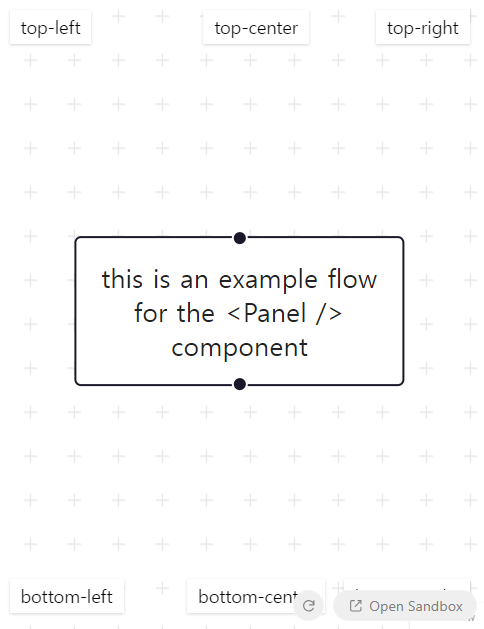
Panel
A helper component to display content on top of the React Flow viewport. Panel component
=> React Flow 뷰포트 위에 컨텐츠를 표시하기 위한 도우미 컴포넌트로 Panel 컴포넌트를 사용할 수 있습니다.
참고 예제 코드
<App.js>

import ReactFlow, { Background, Panel } from 'reactflow';
import 'reactflow/dist/style.css';

import './style.css';

const nodes = [
  {
    id: '1',
    data: { label: 'this is an example flow for the <Panel /> component' },
    position: { x: 0, y: 0 },
  },
];

function Flow() {
  return (
    <ReactFlow nodes={nodes} fitView>
      <Panel position="top-left">top-left</Panel>
      <Panel position="top-center">top-center</Panel>
      <Panel position="top-right">top-right</Panel>
      <Panel position="bottom-left">bottom-left</Panel>
      <Panel position="bottom-center">bottom-center</Panel>
      <Panel position="bottom-right">bottom-right</Panel>
      <Background variant="cross" />
    </ReactFlow>
  );
}

export default Flow;
<style.css>

.react-flow__panel {
  padding: 5px 10px;
  background: white;
  box-shadow: rgba(0, 0, 0, 0.1) 0px 1px 3px 0px, rgba(0, 0, 0, 0.06) 0px 1px 2px 0px;
}
참고 예제 코드로 구현된 CodeSandbox 및 캡쳐사진
Getting Started
Installation
Installation and Requirements
For this set-up we assume you already have node.js and npm, yarn or pnpm already installed. The React Flow package is published under reactflow on npm and installable via:
=> 이 설정을 위해서는 이미 Node.js와 npm, yarn 또는 pnpm이 설치되어 있다고 가정합니다. React Flow 패키지는 npm에서 reactflow로 게시되며 다음과 같이 설치할 수 있습니다.
<npm>

npm install reactflow
또는
<yarn>

yarn add reactflow
또는
<pnpm>

pnpm add reactflow
Now you can import the React Flow component and the styles in your application:
=> 이제 애플리케이션에서 React Flow 컴포넌트와 스타일을 가져올 수 있습니다.
import ReactFlow from 'reactflow';
import 'reactflow/dist/style.css';
Hit the ground running
To get folks building quickly, we have a template repository on GitHub that uses Vite and TypeScript – we use this set up for all our own React Flow work! You can find the template here.
To use it, you can either create a new repository from the template, or use degit to grab the template's files without the git history:
=> 빠르게 개발을 시작하려면 Vite와 TypeScript를 사용하는 GitHub의 템플릿 저장소가 있습니다. 우리는 모든 React Flow 작업에 이 설정을 사용합니다! 템플릿은 여기에서 찾을 수 있습니다.
사용하려면 템플릿에서 새 저장소를 만들거나, degit를 사용하여 템플릿의 파일을 git 히스토리 없이 가져올 수 있습니다.
npx degit xyflow/vite-react-flow-template your-app-namePrior Experience Needed (사전 경험 필요사항)
React Flow is a React library. That means React developers will feel comfortable using it. If basic React terms and concepts like states, props, components, and hooks are unfamiliar to you, you might need to learn more about React before being able to use React Flow fully. If you’ve never used React before, we recommend first getting to start on React through tutorials like Codecademy or Reactjs.org.
=> React Flow는 React 라이브러리입니다. 이는 React 개발자들이 이를 사용하는 데 편안할 것이라는 것을 의미합니다. 상태(states), 속성(props), 컴포넌트(components), 그리고 훅(hooks)과 같은 기본적인 React 용어와 개념이 익숙하지 않다면, React Flow를 완전히 사용하기 전에 React에 대해 더 배워야 할 수 있습니다. React를 이전에 사용해본 적이 없다면, Codecademy나 Reactjs.org와 같은 튜토리얼을 통해 React를 처음 시작하는 것을 권장합니다.
Building a Flow
Building a Flow
In this section we are explaining how to create a controlled flow component. Now that you've installed React Flow into your React project, all files are in place to start using React Flow.
=> 이 섹션에서는 제어된 플로우 컴포넌트를 생성하는 방법을 설명합니다. React 프로젝트에 React Flow를 설치했으므로 이제 React Flow를 사용할 준비가 되었습니다. 모든 파일이 준비되었습니다.
Getting Started
Let's create an empty flow with a controls panel and a background. For this we need to import the components from the reactflow package:
=> 빈 플로우를 만들고 컨트롤 패널과 배경을 추가해 봅시다. 이를 위해 reactflow 패키지에서 컴포넌트를 가져와야 합니다.
import ReactFlow, { Background, Controls } from 'reactflow';참고 예제 코드
import ReactFlow, { Controls, Background } from 'reactflow';
import 'reactflow/dist/style.css';

function Flow() {
  return (
    <div style={{ height: '100%' }}>
      <ReactFlow>
        <Background />
        <Controls />
      </ReactFlow>
    </div>
  );
}

export default Flow;
참고 예제 코드로 구현된 CodeSandbox 및 캡쳐사진

There are three important things to keep in mind here:
- You need to import the styles. Otherwise React Flow won't work.
- The parent container needs a width and a height, because React Flow uses its parent dimensions.
- If you have multiple flows on one page, you need to pass a unique id prop to each component to make React Flow work properly.
=> 여기서 주의해야 할 세 가지 중요한 점이 있습니다:
- 스타일을 import 해야 합니다. 그렇지 않으면 React Flow가 작동하지 않습니다.
- 부모 컨테이너는 너비와 높이가 필요합니다. React Flow는 부모의 크기를 사용합니다.
- 페이지에 여러 개의 플로우가 있는 경우 각 구성 요소에 고유한 id 속성을 전달하여 React Flow가 올바르게 작동하도록 해야 합니다.
Adding Nodes
Now that the flow is set up, let's add some nodes. To do this, you need to create an array with node objects like this:
=> 플로우가 설정되었으니 이제 노드를 추가해 보겠습니다. 이를 위해 다음과 같이 노드 객체 배열을 생성해야 합니다:
const nodes = [
  {
    id: '1', // required
    position: { x: 0, y: 0 }, // required
  },
];
These nodes can now be added to the flow:
=> 이제 이러한 노드들을 플로우에 추가할 수 있습니다:
참고 예제 코드
import ReactFlow, { Controls, Background } from 'reactflow';
import 'reactflow/dist/style.css';

const nodes = [
  {
    id: '1',
    position: { x: 0, y: 0 },
  },
];

function Flow() {
  return (
    <div style={{ height: '100%' }}>
      <ReactFlow nodes={nodes}>
        <Background />
        <Controls />
      </ReactFlow>
    </div>
  );
}

export default Flow;
참고 예제 코드로 구현된 CodeSandbox 및 캡쳐사진

Let's add another node, configure labels and use the node type input for the first node.
= > 다른 노드를 추가하고, 라벨을 구성하고, 첫 번째 노드에 노드 유형 입력을 사용해 봅시다.
const nodes = [
  {
    id: '1',
    position: { x: 0, y: 0 },
    data: { label: 'Hello' },
    type: 'input',
  },
  {
    id: '2',
    position: { x: 100, y: 100 },
    data: { label: 'World' },
  },
];
참고 예제 코드
import ReactFlow, { Controls, Background } from 'reactflow';
import 'reactflow/dist/style.css';

const nodes = [
  {
    id: '1',
    data: { label: 'Hello' },
    position: { x: 0, y: 0 },
    type: 'input',
  },
  {
    id: '2',
    data: { label: 'World' },
    position: { x: 100, y: 100 },
  },
];

function Flow() {
  return (
    <div style={{ height: '100%' }}>
      <ReactFlow nodes={nodes}>
        <Background />
        <Controls />
      </ReactFlow>
    </div>
  );
}

export default Flow;
궁금한 사항: type: 'input', 이 의미하는 바란 무엇인가?
?: type: 'input', 이 의미하는 바란 무엇인가?
!: type: 'input'은 React Flow에서 노드의 유형을 지정하는 것입니다. 여기서 'input'은 노드의 타입을 나타내며, 노드가 입력을 나타내는 것을 의미합니다.
해결:
React Flow에서는 다양한 종류의 노드를 사용할 수 있습니다. 이러한 노드들은 데이터 플로우 그래프에서 다양한 역할을 할 수 있습니다. 각각의 노드는 그래프에서 특정한 작업을 수행하거나 데이터를 표시할 수 있습니다. 이러한 다양한 노드 유형을 정의하여 데이터 플로우를 더 쉽게 이해하고 구성할 수 있습니다.
여기서 'input'은 특정한 종류의 입력 노드를 나타냅니다. 입력 노드는 일반적으로 데이터 플로우 그래프의 시작 부분을 나타내며, 사용자로부터의 입력을 받거나 외부 데이터 소스에서 데이터를 가져오는 역할을 할 수 있습니다.
참고 예제 코드로 구현된 CodeSandbox 및 캡쳐사진

There are plenty of ways to configure nodes. You can see the full list of options on the node option site.
=> 노드를 구성하는 다양한 방법이 있습니다. 노드 옵션 사이트에서 옵션 목록을 확인할 수 있습니다.
This looks good. Let's attach these two nodes.
=> 이렇게 설정된 노드들이 좋아 보입니다. 이제 이 두 노드를 연결해 봅시다.
Adding an Edge
Now that we have two nodes, let's connect them with an edge.
To make an edge, we need to specify two attributes: the source node (where the edge begins) and the target node (where the edge ends). We use the id of the two nodes to specify this (in our example, our two nodes have ids of "1" and "2"):
=> 이제 두 개의 노드를 가지고 있으므로 이들을 엣지로 연결해 보겠습니다.
엣지를 만들려면 두 가지 속성을 지정해야 합니다. 엣지의 시작점인 소스 노드와 엣지의 끝점인 대상 노드입니다. 이를 지정하기 위해 두 노드의 ID를 사용합니다(예: 두 노드의 ID가 각각 "1"과 "2"인 경우):
const edges = [{ id: '1-2', source: '1', target: '2' }];참고 예제 코드
import ReactFlow, { Controls, Background } from 'reactflow';
import 'reactflow/dist/style.css';

const edges = [{ id: '1-2', source: '1', target: '2' }];

const nodes = [
  {
    id: '1',
    data: { label: 'Hello' },
    position: { x: 0, y: 0 },
    type: 'input',
  },
  {
    id: '2',
    data: { label: 'World' },
    position: { x: 100, y: 100 },
  },
];

function Flow() {
  return (
    <div style={{ height: '100%' }}>
      <ReactFlow nodes={nodes} edges={edges}>
        <Background />
        <Controls />
      </ReactFlow>
    </div>
  );
}

export default Flow;
참고 예제 코드로 구현된 CodeSandbox 및 캡쳐사진

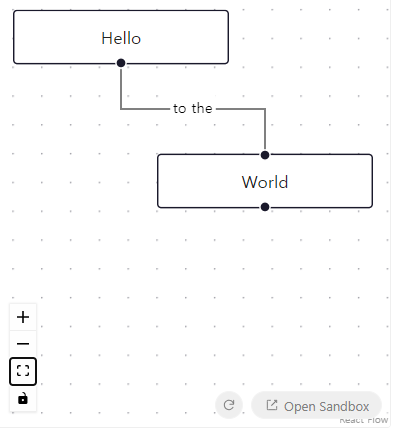
Let's give this edge two properties that are built into React Flow, a label and a different type.
참고 예제 코드
import ReactFlow, { Controls, Background } from 'reactflow';
import 'reactflow/dist/style.css';

const edges = [{ id: '1-2', source: '1', target: '2', label: 'to the', type: 'step' }];

const nodes = [
  {
    id: '1',
    data: { label: 'Hello' },
    position: { x: 0, y: 0 },
    type: 'input',
  },
  {
    id: '2',
    data: { label: 'World' },
    position: { x: 100, y: 100 },
  },
];

function Flow() {
  return (
    <div style={{ height: '100%' }}>
      <ReactFlow nodes={nodes} edges={edges}>
        <Background />
        <Controls />
      </ReactFlow>
    </div>
  );
}

export default Flow;
참고 예제 코드로 구현된 CodeSandbox 및 캡쳐사진
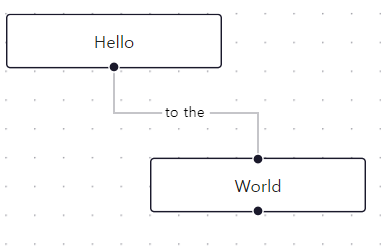
You made your first edge, nice work! You might have realised that you can't drag or select nodes. In the next part you'll learn how to make the flow interactive.
=> 첫 번째 엣지를 만들었습니다. 잘 하셨습니다! 노드를 드래그하거나 선택할 수 없다는 것을 눈치채셨을 것입니다. 다음 섹션에서는 플로우를 인터랙티브하게 만드는 방법을 배우게 됩니다.
Adding Interactivity
Adding Interactivity
Let's make it so we can select, drag, and remove nodes and edges.
In this Getting Started tutorial, we are going to use a "controlled component", which is typically the best and most flexible way to use React Flow in your own applications. You can also use React Flow in an uncontrolled way.
Handle Change Events
First let's import a few things. To manage the changes in React Flow, we'll be using useState and the two helper function applyEdgeChanges and applyNodeChanges from React Flow.
=> 먼저 몇 가지 항목을 가져와보겠습니다. React Flow에서 변경 사항을 관리하기 위해 useState와 React Flow에서 제공하는 두 개의 도우미 함수 applyEdgeChanges 및 applyNodeChanges를 사용할 것입니다.
import React, { useState } from 'react';
import ReactFlow, { applyEdgeChanges, applyNodeChanges } from 'react-flow-renderer';
We're going to set up states for both the nodes and edges:
=> 우리는 노드와 엣지 모두를 위한 상태를 설정할 것입니다.
const [nodes, setNodes] = useState(initialNodes);
const [edges, setEdges] = useState(initialEdges);
Directly beneath that, we'll add these two functions:
=> 그 아래에 두 함수를 추가합니다.
const onNodesChange = useCallback(
  (changes) => setNodes((nds) => applyNodeChanges(changes, nds)),
  [],
);
const onEdgesChange = useCallback(
  (changes) => setEdges((eds) => applyEdgeChanges(changes, eds)),
  [],
);
When you drag or select a node, the onNodeChange handler gets called. With help of the applyNodeChanges function you can then apply those changes to your current node state. Putting everything together, it should look like this:
=> 드래그하거나 노드를 선택할 때 onNodeChange 핸들러가 호출됩니다. applyNodeChanges 함수를 사용하여 이러한 변경 사항을 현재 노드 상태에 적용할 수 있습니다. 모든 것을 함께 넣으면 다음과 같아야 합니다:
참고 예제 코드
import { useState, useCallback } from 'react';
import ReactFlow, {
  Controls,
  Background,
  applyNodeChanges,
  applyEdgeChanges,
} from 'reactflow';
import 'reactflow/dist/style.css';

const initialNodes = [
  {
    id: '1',
    data: { label: 'Hello' },
    position: { x: 0, y: 0 },
    type: 'input',
  },
  {
    id: '2',
    data: { label: 'World' },
    position: { x: 100, y: 100 },
  },
];

const initialEdges = [
  { id: '1-2', source: '1', target: '2', label: 'to the', type: 'step' },
];

function Flow() {
  const [nodes, setNodes] = useState(initialNodes);
  const [edges, setEdges] = useState(initialEdges);

  const onNodesChange = useCallback(
    (changes) => setNodes((nds) => applyNodeChanges(changes, nds)),
    [],
  );
  const onEdgesChange = useCallback(
    (changes) => setEdges((eds) => applyEdgeChanges(changes, eds)),
    [],
  );

  return (
    <div style={{ height: '100%' }}>
      <ReactFlow
        nodes={nodes}
        onNodesChange={onNodesChange}
        edges={edges}
        onEdgesChange={onEdgesChange}
        fitView
      >
        <Background />
        <Controls />
      </ReactFlow>
    </div>
  );
}

export default Flow;
궁금한 사항: useCallback((changes) => setNodes((nds) => applyNodeChanges(changes, nds)), [], 이 로직의 흐름이 어떻게 이루어지는걸까?
? : useCallback((changes) => setNodes((nds) => applyNodeChanges(changes, nds)), [],
이로직의 흐름이 어떻게 이루어지는걸까?
! : useCallback 훅은 React에서 함수를 메모이제이션하고, 의존성 배열의 변화에 따라 새로운 콜백 함수를 생성합니다. 이것은 성능 최적화를 위해 사용됩니다.
useCallback(
  (changes) => setNodes((nds) => applyNodeChanges(changes, nds)),
  []
);
위 코드는 다음을 수행합니다:
- useCallback 훅을 호출합니다. 이 함수는 메모이제이션된 콜백 함수를 생성할 것입니다.
- 첫 번째 매개변수로 전달된 함수는 changes라는 인자를 받습니다. 이 함수는 노드 변경사항이 발생했을 때 호출됩니다.
- 이 함수 내부에서 setNodes 함수를 호출합니다. 이 함수는 React 상태의 노드를 업데이트합니다.
- setNodes 함수 내에서는 이전의 노드 상태를 받아 새로운 노드 상태를 생성하는 함수가 전달됩니다. 이 함수는 applyNodeChanges 함수를 호출하여 노드 변경사항을 적용한 후 새로운 노드 배열을 반환합니다.
- applyNodeChanges 함수는 변경사항을 적용한 후 새로운 노드 배열을 반환합니다. 이 배열은 이전 노드 배열과는 다를 수 있습니다.
- 이 메모이제이션된 콜백 함수는 빈 의존성 배열을 가지고 있습니다. 이것은 의존성이 변하지 않는다는 것을 의미합니다. 따라서 이 콜백 함수는 컴포넌트가 렌더링될 때마다 새로 생성되지 않고, 처음 한 번만 생성됩니다. 이렇게 함으로써 성능을 최적화할 수 있습니다.
따라서 위 코드는 노드 변경사항이 발생할 때마다 호출되는 콜백 함수를 생성하며, 이 함수는 변경사항을 적용하여 새로운 노드 배열을 설정합니다. useCallback 훅은 성능을 향상시키기 위해 사용되며, 의존성이 변하지 않을 때마다 메모이제이션된 함수를 반환합니다.
참고 예제 코드로 구현된 CodeSandbox 및 캡쳐사진
Now if you run your application, you'll be able to click and drag the components, and the UI will update based on those movements.
=> 만약 애플리케이션을 실행하면 컴포넌트를 클릭하고 드래그할 수 있으며, UI가 이동에 따라 업데이트됩니다.
Handle Connections
One last piece is missing: connecting nodes manually.
For this we need to implement an onConnect handler
and pass it to the <ReactFlow /> component as well:
참고 예제 코드
import { useState, useCallback } from 'react';
import ReactFlow, {
  Controls,
  Background,
  applyNodeChanges,
  applyEdgeChanges,
  addEdge,
} from 'reactflow';
import 'reactflow/dist/style.css';

const initialNodes = [
  {
    id: '1',
    data: { label: 'Hello' },
    position: { x: 0, y: 0 },
    type: 'input',
  },
  {
    id: '2',
    data: { label: 'World' },
    position: { x: 100, y: 100 },
  },
];

const initialEdges = [];

function Flow() {
  const [nodes, setNodes] = useState(initialNodes);
  const [edges, setEdges] = useState(initialEdges);

  const onNodesChange = useCallback(
    (changes) => setNodes((nds) => applyNodeChanges(changes, nds)),
    [],
  );
  const onEdgesChange = useCallback(
    (changes) => setEdges((eds) => applyEdgeChanges(changes, eds)),
    [],
  );

  const onConnect = useCallback(
    (params) => setEdges((eds) => addEdge(params, eds)),
    [],
  );

  return (
    <div style={{ height: '100%' }}>
      <ReactFlow
        nodes={nodes}
        onNodesChange={onNodesChange}
        edges={edges}
        onEdgesChange={onEdgesChange}
        onConnect={onConnect}
        fitView
      >
        <Background />
        <Controls />
      </ReactFlow>
    </div>
  );
}

export default Flow;
참고 예제 코드로 구현된 CodeSandbox 및 캡쳐사진

Try to connect the two nodes by dragging from on handle to another one. That's it. You've built a fully interactive flow.
That's it for now :) You made it! If you want to move on, we recommend to check out the "Custom Nodes" guide.
=> 한 핸들에서 다른 핸들로 드래그하여 두 노드를 연결해보세요. 이제 완전히 대화형 플로우를 구축했습니다.
이것으로 모두 끝났습니다 :) 축하합니다! 이제 원한다면 "Custom Nodes" 가이드를 확인하는 것을 추천합니다.
궁금한 사항: onConnect가 의미하고 기능하는 바는?
? : Handle Change Events 와 Handle Connections 의 차이점은 onConnect차이인데 그 차이가 무엇을 만드는가?
! : 두 코드의 차이점은 두 번째 코드에서 onConnect 함수가 추가되었다는 것입니다. 이 함수는 새로운 엣지(Edge)를 추가할 때 호출되는 콜백 함수입니다. 따라서 두 번째 코드에서는 노드 간의 연결을 만들 때 이 함수가 호출되어 새로운 엣지를 추가하게 됩니다.
구체적으로 살펴보면:
첫 번째 코드에서:
const initialEdges = [
  { id: '1-2', source: '1', target: '2', label: 'to the', type: 'step' },
];
처럼 초기 엣지가 이미 정의되어 있습니다. 이것은 초기 렌더링 시에 노드들 간의 연결을 생성하는 데 사용됩니다.
두 번째 코드에서는 초기 엣지가 비어있습니다:
const initialEdges = [];그리고 onConnect 함수가 추가되어 있습니다:
const onConnect = useCallback(
  (params) => setEdges((eds) => addEdge(params, eds)),
  [],
);
이 함수는 노드들 간의 연결을 만들 때 호출됩니다. 여기서 addEdge 함수는 새로운 엣지를 추가하는 함수입니다.
따라서 두 번째 코드에서는 초기에 노드들 간의 연결이 없으며, 사용자가 노드를 연결할 때마다 새로운 엣지가 추가됩니다. 이는 동적으로 노드 간의 관계를 형성할 수 있도록 합니다.
Customizing React Flow
Custom Nodes
Custom Nodes
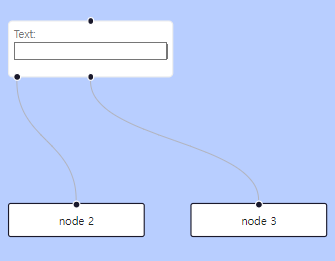
A powerful feature of React Flow is the ability to add custom nodes. Within your custom nodes you can render everything you want. You can define multiple source and target handles and render form inputs or charts for example. In this section we will implement a node with an input field that updates some text in another part of the application.
=> React Flow의 강력한 기능 중 하나는 사용자 정의 노드를 추가할 수 있는 능력입니다. 사용자 정의 노드 내에서는 원하는 모든 것을 렌더링할 수 있습니다. 여러 소스와 타겟 핸들을 정의하고, 예를 들어 폼 입력 또는 차트를 렌더링할 수 있습니다. 이 섹션에서는 다른 부분에서 일부 텍스트를 업데이트하는 입력 필드가 있는 노드를 구현해 보겠습니다.
Implementing the Custom Node
A custom node is a React component that is wrapped to provide basic functionality like selecting or dragging. From the wrapper component we are passing props like the position or the data besides other props. Let's start to implement the TextUpdaterNode. We are using the Handle component to be able to connect our custom node with other nodes and add an input field to the node:
=> 사용자 정의 노드는 선택 또는 드래그와 같은 기본 기능을 제공하기 위해 래핑된 React 컴포넌트입니다. 래퍼 컴포넌트에서 위치나 데이터와 같은 props를 전달합니다. TextUpdaterNode를 구현하는 것부터 시작해 보겠습니다. 우리는 Handle 컴포넌트를 사용하여 사용자 정의 노드를 다른 노드와 연결하고 노드에 입력 필드를 추가합니다:
참고 예제 코드
import { useCallback } from 'react';
import { Handle, Position } from 'reactflow';

const handleStyle = { left: 10 };

function TextUpdaterNode({ data }) {
  const onChange = useCallback((evt) => {
    console.log(evt.target.value);
  }, []);

  return (
    <>
      <Handle type="target" position={Position.Top} />
      <div>
        <label htmlFor="text">Text:</label>
        <input id="text" name="text" onChange={onChange} className="nodrag" />
      </div>
      <Handle type="source" position={Position.Bottom} id="a" />
      <Handle
        type="source"
        position={Position.Bottom}
        id="b"
        style={handleStyle}
      />
    </>
  );
}
As you see we've added the class name "nodrag" to the input. This prevents dragging within the input field and lets us select text for example.
=> 입력 필드 내에서 드래그를 방지하기 위해 input에 "nodrag" 클래스 이름을 추가했습니다. 이렇게 하면 텍스트를 선택할 수 있습니다.
궁금한 사항: React 함수 컴포넌트의 클로저(closure) 개념이란 무엇인가?
? : React 함수 컴포넌트의 클로저(closure) 개념이란 무엇인가요?
! : 클로저는 함수가 자신이 선언된 범위 외부에 있는 변수에 접근할 수 있는 JavaScript의 개념입니다. 이것은 함수가 정의된 시점에서 외부 변수에 대한 참조를 유지하고 있으며, 함수가 반환되거나 다른 범위에서 사용될 때에도 이러한 참조를 유지합니다.
구체적으로 살펴보면 :
함수 내에서 다른 함수가 정의되고, 그 내부 함수에서 외부 함수의 변수에 접근할 때 클로저가 형성됩니다. 이 내부 함수는 외부 함수에서 반환되거나 다른 곳에서 사용될 때에도 외부 변수에 대한 참조를 유지합니다.
function outerFunction() {
  const outerVariable = 'I am outside!';

  function innerFunction() {
    console.log(outerVariable); // outerVariable에 접근
  }

  return innerFunction;
}

const inner = outerFunction(); // innerFunction을 반환
inner(); // 'I am outside!' 출력
위의 코드에서 innerFunction은 outerFunction 내에서 정의되었지만, 외부에서 반환된 후에도 outerVariable에 대한 참조를 유지하고 있습니다.
궁금한 사항: useCallback을 통해 메모이제이션되어 최적화하는 것은 무엇인가?
? : useCallback을 통해 메모이제이션되어 최적화하는 것은 무엇인가요?
! : useCallback 훅은 React에서 함수를 메모이제이션하여 성능을 최적화하는 데 사용됩니다. 이는 함수의 재생성을 방지하여 불필요한 렌더링을 줄이는 데 도움이 됩니다.
구체적으로 살펴보면 :
React 컴포넌트에서 함수를 정의할 때마다 해당 함수는 컴포넌트가 렌더링될 때마다 매번 새로 생성됩니다. 이 때문에 자식 컴포넌트에 함수를 props로 전달할 때마다 자식 컴포넌트가 다시 렌더링될 수 있습니다. 이러한 상황에서 useCallback을 사용하면 함수를 메모이제이션하여 함수가 변경되지 않는 한 이전에 생성된 함수를 재사용할 수 있습니다.
const memoizedCallback = useCallback(
  () => {
    doSomething(a, b);
  },
  [a, b],
);
위의 예시에서 memoizedCallback은 a와 b가 변경될 때만 새로운 함수를 생성하고, 그렇지 않으면 이전에 생성된 함수를 사용합니다.
이를 통해 성능을 최적화하고 불필요한 렌더링을 방지할 수 있습니다.
Adding the Node Type
You can add a new node type to React Flow by adding it to the nodeTypes prop. It's important that the nodeTypes are memoized or defined outside of the component. Otherwise React creates a new object on every render which leads to performance issues and bugs.
=> React Flow에 새로운 노드 유형을 추가하려면 이를 nodeTypes prop에 추가하면 됩니다. nodeTypes는 메모화되거나 컴포넌트 외부에서 정의되어야 합니다. 그렇지 않으면 React가 모든 렌더링마다 새로운 객체를 생성하여 성능 문제와 버그가 발생할 수 있습니다.
const nodeTypes = useMemo(() => ({ textUpdater: TextUpdaterNode }), []);

return <ReactFlow nodeTypes={nodeTypes} />;
After defining your new node type, you can use it by using the type node option:
=> 새로운 노드 유형을 정의한 후에는 해당 유형을 사용할 수 있습니다. 이를 위해 type 노드 옵션을 사용합니다.
const nodes = [
  {
    id: 'node-1',
    type: 'textUpdater',
    position: { x: 0, y: 0 },
    data: { value: 123 },
  },
];
After putting all together and adding some basic styles we get a custom node that prints text to the console:
=> 모든 것을 함께 넣고 기본적인 스타일을 추가하면 콘솔에 텍스트를 출력하는 사용자 정의 노드를 얻을 수 있습니다.
참고 예제 코드
<App.js>

import { useCallback, useState } from 'react';
import ReactFlow, { addEdge, applyEdgeChanges, applyNodeChanges } from 'reactflow';
import 'reactflow/dist/style.css';

import TextUpdaterNode from './TextUpdaterNode.js';

import './text-updater-node.css';

const rfStyle = {
  backgroundColor: '#B8CEFF',
};

const initialNodes = [
  { id: 'node-1', type: 'textUpdater', position: { x: 0, y: 0 }, data: { value: 123 } },
];
// we define the nodeTypes outside of the component to prevent re-renderings
// you could also use useMemo inside the component
const nodeTypes = { textUpdater: TextUpdaterNode };

function Flow() {
  const [nodes, setNodes] = useState(initialNodes);
  const [edges, setEdges] = useState([]);

  const onNodesChange = useCallback(
    (changes) => setNodes((nds) => applyNodeChanges(changes, nds)),
    [setNodes]
  );
  const onEdgesChange = useCallback(
    (changes) => setEdges((eds) => applyEdgeChanges(changes, eds)),
    [setEdges]
  );
  const onConnect = useCallback(
    (connection) => setEdges((eds) => addEdge(connection, eds)),
    [setEdges]
  );

  return (
    <ReactFlow
      nodes={nodes}
      edges={edges}
      onNodesChange={onNodesChange}
      onEdgesChange={onEdgesChange}
      onConnect={onConnect}
      nodeTypes={nodeTypes}
      fitView
      style={rfStyle}
    />
  );
}

export default Flow;<TextUpdaterNode.js>
import { useCallback } from 'react';
import { Handle, Position } from 'reactflow';
const handleStyle = { left: 10 };
function TextUpdaterNode({ data, isConnectable }) {
const onChange = useCallback((evt) => {
console.log(evt.target.value);
}, []);
return (
<div className="text-updater-node">
<Handle type="target" position={Position.Top} isConnectable={isConnectable} />
<div>
<label htmlFor="text">Text:</label>
<input id="text" name="text" onChange={onChange} className="nodrag" />
</div>
<Handle
type="source"
position={Position.Bottom}
id="a"
style={handleStyle}
isConnectable={isConnectable}
/>
<Handle type="source" position={Position.Bottom} id="b" isConnectable={isConnectable} />
</div>
);
}
export default TextUpdaterNode;
<text-updater-node.css>

.text-updater-node {
  height: 50px;
  border: 1px solid #eee;
  padding: 5px;
  border-radius: 5px;
  background: white;
}

.text-updater-node label {
  display: block;
  color: #777;
  font-size: 12px;
}
참고 예제 코드로 구현된 CodeSandbox 및 캡쳐사진

Using Multiple Handles
As you can see we added two source handles to the node so that it has two outputs. If you want to connect other nodes with these specific handles, the node id is not enough but you also need to pass the specific handle id. In this case one handle has the id "a" and the other one "b". Handle specific edges use the sourceHandle or targetHandle options that reference a handle within a node:
=> 여기서 볼 수 있듯이 노드에 두 개의 소스 핸들을 추가하여 두 개의 출력을 갖도록 했습니다. 이러한 특정 핸들과 다른 노드를 연결하려면 노드 ID만으로는 부족하지만 특정 핸들 ID도 전달해야 합니다. 이 경우 한 핸들은 "a"이고 다른 하나는 "b"입니다. 핸들별 엣지를 사용하려면 노드 내의 핸들을 참조하는 sourceHandle 또는 targetHandle 옵션을 사용하세요.
const initialEdges = [
  { id: 'edge-1', source: 'node-1', sourceHandle: 'a', target: 'node-2' },
  { id: 'edge-2', source: 'node-1', sourceHandle: 'b', target: 'node-3' },
];
In this case the source node is node-1 for both handles but the handle ids are different. One comes from handle id "a" and the other one from "b". Both edges also have different target nodes:
=> 이 경우 소스 노드는 두 핸들 모두에 대해 노드-1입니다. 그러나 핸들 ID는 다릅니다. 하나는 핸들 ID "a"에서 오고 다른 하나는 "b"에서 옵니다. 또한 두 엣지 모두 다른 대상 노드를 갖습니다.
참고 예제 코드
<App.js>
import { useCallback, useState } from 'react';
import ReactFlow, { addEdge, applyEdgeChanges, applyNodeChanges } from 'reactflow';
import 'reactflow/dist/style.css';

import TextUpdaterNode from './TextUpdaterNode.js';

import './text-updater-node.css';

const rfStyle = {
  backgroundColor: '#B8CEFF',
};

const initialNodes = [
  { id: 'node-1', type: 'textUpdater', position: { x: 0, y: 0 }, data: { value: 123 } },
  {
    id: 'node-2',
    type: 'output',
    targetPosition: 'top',
    position: { x: 0, y: 200 },
    data: { label: 'node 2' },
  },
  {
    id: 'node-3',
    type: 'output',
    targetPosition: 'top',
    position: { x: 200, y: 200 },
    data: { label: 'node 3' },
  },
];

const initialEdges = [
  { id: 'edge-1', source: 'node-1', target: 'node-2', sourceHandle: 'a' },
  { id: 'edge-2', source: 'node-1', target: 'node-3', sourceHandle: 'b' },
];

// we define the nodeTypes outside of the component to prevent re-renderings
// you could also use useMemo inside the component
const nodeTypes = { textUpdater: TextUpdaterNode };

function Flow() {
  const [nodes, setNodes] = useState(initialNodes);
  const [edges, setEdges] = useState(initialEdges);

  const onNodesChange = useCallback(
    (changes) => setNodes((nds) => applyNodeChanges(changes, nds)),
    [setNodes]
  );
  const onEdgesChange = useCallback(
    (changes) => setEdges((eds) => applyEdgeChanges(changes, eds)),
    [setEdges]
  );
  const onConnect = useCallback(
    (connection) => setEdges((eds) => addEdge(connection, eds)),
    [setEdges]
  );

  return (
    <ReactFlow
      nodes={nodes}
      edges={edges}
      onNodesChange={onNodesChange}
      onEdgesChange={onEdgesChange}
      onConnect={onConnect}
      nodeTypes={nodeTypes}
      fitView
      style={rfStyle}
    />
  );
}

export default Flow;<TextUpdaterNode.js>
import { useCallback } from 'react';
import { Handle, Position } from 'reactflow';
const handleStyle = { left: 10 };
function TextUpdaterNode({ data, isConnectable }) {
const onChange = useCallback((evt) => {
console.log(evt.target.value);
}, []);
return (
<div className="text-updater-node">
<Handle type="target" position={Position.Top} isConnectable={isConnectable} />
<div>
<label htmlFor="text">Text:</label>
<input id="text" name="text" onChange={onChange} className="nodrag" />
</div>
<Handle
type="source"
position={Position.Bottom}
id="a"
style={handleStyle}
isConnectable={isConnectable}
/>
<Handle type="source" position={Position.Bottom} id="b" isConnectable={isConnectable} />
</div>
);
}
export default TextUpdaterNode;
<text-updater-node.css>

.text-updater-node {
  height: 50px;
  border: 1px solid #eee;
  padding: 5px;
  border-radius: 5px;
  background: white;
}

.text-updater-node label {
  display: block;
  color: #777;
  font-size: 12px;
}
참고 예제 코드로 구현된 CodeSandbox 및 캡쳐사진
Note that if you are programmatically changing the position or number of handles in your custom node, you will need to use the useUpdateNodeInternals hook to properly notify ReactFlow of changes. From here you should be able to build your custom nodes. In most cases we recommend to use custom nodes only. The built-in ones are just basic examples. You can find a list of the passed props and more information in the custom node API section.
=> 참고로 사용자 지정 노드에서 핸들의 위치나 수를 프로그래밍적으로 변경하는 경우, 변경 사항을 ReactFlow에 적절하게 알리기 위해 useUpdateNodeInternals 훅을 사용해야 합니다. 여기서부터 사용자 정의 노드를 구축할 수 있어야 합니다. 대부분의 경우 사용자 정의 노드만 사용하는 것이 좋습니다. 내장된 노드는 단순한 예제일 뿐입니다. 전달된 props 목록 및 자세한 정보는 사용자 정의 노드 API 섹션에서 찾을 수 있습니다.
Custom Node Props
Custom Edges
Custom Edges Props
Theming
Theming
React Flow has been built with deep customization in mind. Many of our users fully transform the look and feel of React Flow to match their own brand or design system. This guide will introduce you to the different ways you can customize React Flow's appearance.
=> "리액트 플로우는 심층적인 사용자 정의를 염두에 두고 만들어졌습니다. 많은 사용자들이 리액트 플로우의 모양과 느낌을 완전히 변형하여 자신의 브랜드나 디자인 시스템에 맞추고 있습니다. 이 안내서에서는 리액트 플로우의 모양을 다양한 방법으로 사용자 정의할 수 있는 방법을 소개합니다."
Default styles
React Flow's default styles are enough to get going with the built-in nodes. They provide some sensible defaults for styles like padding, border radius, and animated edges. You can see what they look like below:
=> 리액트 플로우의 기본 스타일은 내장된 노드를 사용하여 시작하는 데 충분합니다. 패딩, 테두리 반경 및 애니메이션된 엣지와 같은 스타일에 대한 합리적인 기본값을 제공합니다. 아래에서 이러한 기본값이 어떻게 보이는지 확인할 수 있습니다:
참고 예제 코드로 구현된 CodeSandbox 및 캡쳐사진

You'll typically load these default styles by importing them in you App.jsx file or other entry point:
=> 일반적으로 이러한 기본 스타일은 App.jsx 파일이나 다른 진입점에서 가져와서 로드합니다:
import 'reactflow/dist/style.css';Without dipping into custom nodes and edges, there are three ways you can style React Flow's basic look:
- Passing inline styles through style props
- Overriding the built-in classes with custom CSS
- Overriding the CSS variables React Flow uses
=>
커스텀 노드 및 엣지를 사용하지 않고 React Flow의 기본적인 외관을 스타일링하는 세 가지 방법이 있습니다:
- style props를 통해 인라인 스타일 전달
- 사용자 정의 CSS로 내장 클래스 덮어쓰기
- React Flow에서 사용하는 CSS 변수 덮어쓰기
Customizing with style props
The easiest way to start customising the look and feel of your flows is to use the style prop found on many of React Flow's components to inline your own CSS.
=> React Flow의 컴포넌트 중 많은 곳에서 찾을 수 있는 style prop을 사용하여 자체 CSS를 인라인으로 추가하는 것이 플로우의 모양과 느낌을 사용자 정의하는 가장 쉬운 방법입니다.
import ReactFlow from 'reactflow'

const styles = {
  background: 'red',
  width: '100%',
  height: 300,
};

export default function Flow() {
  return <ReactFlow style={styles} nodes={[...]} edges={[...]} />
}
Overriding built-in classes
Some consider heavy use of inline styles to be an anti-pattern. In that case, you can override the built-in classes that React Flow uses with your own CSS. There are many classes attached to all sorts of elements in React Flow, but the ones you'll likely want to override are listed below:
=> 일부 사람들은 인라인 스타일의 과도한 사용을 안티 패턴으로 간주합니다. 이 경우 React Flow에서 사용하는 내장 클래스를 자체 CSS로 재정의할 수 있습니다. React Flow의 모든 요소에는 많은 클래스가 붙어 있지만 재정의하려는 클래스는 아래에 나열된 것들입니다:
| Class name | Description |
|---|---|
| .react-flow | The outermost container |
| .react-flow__renderer | The inner container |
| .react-flow__zoompane | Zoom & pan pane |
| .react-flow__selectionpane | Selection pane |
| .react-flow__selection | User selection |
| .react-flow__edges | The element containing all edges in the flow |
| .react-flow__edge | Applied to each Edge in the flow |
| .react-flow__edge.selected | Added to an Edge when selected |
| .react-flow__edge.animated | Added to an Edge when its animated prop is true |
| .react-flow__edge.updating | Added to an Edge while it gets updated via onEdgeUpdate |
| .react-flow__edge-path | The SVG <path /> element of an Edge |
| .react-flow__edge-text | The SVG <text /> element of an Edge label |
| .react-flow__edge-textbg | The SVG <text /> element behind an Edge label |
| .react-flow__nodes | The element containing all nodes in the flow |
| .react-flow__node | Applied to each Node in the flow |
| .react-flow__node.selected | Added to a Node when selected |
| .react-flow__handle | Applied to each <Handle /> component |
| .react-flow__background | Applied to the <Background /> component |
| .react-flow__minimap | Applied to the <MiniMap /> component |
| .react-flow__controls | Applied to the <Controls /> component |
Be careful if you go poking around the source code looking for other classes to override. Some classes are used internally and are required in order for the library to be functional. If you replace them you may end up with unexpected bugs or errors!
소스 코드를 찾아다닐 때 다른 클래스를 재정의하려는 경우 주의하세요. 일부 클래스는 내부적으로 사용되며 라이브러리가 작동하는 데 필요합니다. 이를 대체하면 예상치 못한 버그나 오류가 발생할 수 있습니다!
Third-party solutions
You can choose to opt-out of React Flow's default styling altogether and use a third-party styling solution instead. If you want to do this, you must make sure you still import the base styles.
=> React Flow의 기본 스타일링을 완전히 사용하지 않고 대신 제3자 스타일링 솔루션을 사용할 수도 있습니다. 이렇게 하려면 여전히 기본 스타일을 가져와야 합니다.
import 'reactflow/dist/base.css';These base styles are required for React Flow to function correctly. If you don't import them or you override them with your own styles, some things might not work as expected!
이러한 기본 스타일은 React Flow가 올바르게 작동하기 위해 필요합니다. 이를 가져오지 않거나 자체 스타일로 재정의하면 일부 기능이 예상대로 작동하지 않을 수 있습니다!
참고 예제 코드로 구현된 CodeSandbox 및 캡쳐사진

Styled Components
Many of the components you render directly, such as the MiniMap, accept both className and style props. This means you can use any styling solution you like, such as Styled Components:
=> 많은 컴포넌트들은 className과 style props를 모두 허용합니다. 이는 Styled Components와 같은 원하는 스타일링 솔루션을 사용할 수 있음을 의미합니다:
import { MiniMap } from 'reactflow';

const StyledMiniMap = styled(MiniMap)`
  background-color: ${(props) => props.theme.bg};

  .react-flow__minimap-mask {
    fill: ${(props) => props.theme.minimapMaskBg};
  }

  .react-flow__minimap-node {
    fill: ${(props) => props.theme.nodeBg};
    stroke: none;
  }
`;
For a complete example of using Styled Components with React Flow, check out the example!
=> React Flow와 Styled Components를 함께 사용하는 완전한 예제는 예제를 확인하십시오!
TailwindCSS
Custom nodes and edges are just React components, and you can use any styling solution you'd like to style them. For example, you might want to use Tailwind to style your nodes:
=> 사용자 정의 노드와 엣지는 React 컴포넌트이며, 이러한 요소를 스타일링하는 데 원하는 스타일링 솔루션을 사용할 수 있습니다. 예를 들어, 노드를 스타일링하기 위해 Tailwind를 사용할 수 있습니다:
function CustomNode({ data }) {
  return (
    <div className="px-4 py-2 shadow-md rounded-md bg-white border-2 border-stone-400">
      <div className="flex">
        <div className="rounded-full w-12 h-12 flex justify-center items-center bg-gray-100">
          {data.emoji}
        </div>
        <div className="ml-2">
          <div className="text-lg font-bold">{data.name}</div>
          <div className="text-gray-500">{data.job}</div>
        </div>
      </div>

      <Handle
        type="target"
        position={Position.Top}
        className="w-16 !bg-teal-500"
      />
      <Handle
        type="source"
        position={Position.Bottom}
        className="w-16 !bg-teal-500"
      />
    </div>
  );
}
If you want to overwrite default styles, make sure to import Tailwinds entry point after React Flows base styles
기본 스타일을 덮어쓰고 싶다면, React Flow의 기본 스타일 이후에 Tailwind의 진입점을 가져오는 것이 중요합니다.
import 'reactflow/dist/style.css';
import 'tailwind.css';
For a complete example of using Tailwind with React Flow, check out the example!
=> React Flow와 Tailwind를 함께 사용하는 완전한 예제를 확인하려면 예제를 확인하세요!
Layouting
Layouting Libraries
We regularly get asked how to handle layouting in React Flow. While we could build some basic layouting into React Flow, we believe that you know your app's requirements best and with so many options out there we think it's better you choose the best right tool for the job (not to mention it'd be a whole bunch of work for us).
=>
React Flow에서 레이아웃을 처리하는 방법에 대해 자주 질문을 받습니다. React Flow에 기본적인 레이아웃을 구축할 수도 있지만, 여러 옵션이 있기 때문에 사용자가 자신의 애플리케이션 요구 사항을 가장 잘 알고 있으며 적합한 도구를 선택하는 것이 좋다고 믿습니다. 또한, 우리에게는 많은 작업이 될 것입니다.
That doesn't help very much if you don't know what the options are, so this guide is here to help! We'll split things up into resources for layouting nodes and resources for routing edges.
=> 그러나 옵션이 무엇인지 모른다면 그렇게 큰 도움이 되지 않습니다. 그래서 이 안내서가 여기 있습니다! 우리는 노드 레이아웃 및 엣지 라우팅을 위한 리소스로 분할할 것입니다.
To start let's put together a simple example flow that we can use as a base for testing out the different layouting options.
=>
시작하려면 다양한 레이아웃 옵션을 테스트하는 기본으로 사용할 수 있는 간단한 예제 플로우를 만들어 보겠습니다.
참고 예제 코드
<App.js>
import React, { useCallback } from 'react';
import ReactFlow, {
  ReactFlowProvider,
  useNodesState,
  useEdgesState,
  useReactFlow,
} from 'reactflow';

import { initialNodes, initialEdges } from './nodes-edges.js';
import 'reactflow/dist/style.css';

const getLayoutedElements = (nodes, edges) => {
  return { nodes, edges };
};

const LayoutFlow = () => {
  const { fitView } = useReactFlow();
  const [nodes, setNodes, onNodesChange] = useNodesState(initialNodes);
  const [edges, setEdges, onEdgesChange] = useEdgesState(initialEdges);

  const onLayout = useCallback(() => {
    const layouted = getLayoutedElements(nodes, edges);

    setNodes([...layouted.nodes]);
    setEdges([...layouted.edges]);

    window.requestAnimationFrame(() => {
      fitView();
    });
  }, [nodes, edges]);

  return (
    <ReactFlow
      nodes={nodes}
      edges={edges}
      onNodesChange={onNodesChange}
      onEdgesChange={onEdgesChange}
      fitView
    />
  );
};

export default function () {
  return (
    <ReactFlowProvider>
      <LayoutFlow />
    </ReactFlowProvider>
  );
}
<nodes-edges.js>
export const initialNodes = [
  {
    id: '1',
    type: 'input',
    data: { label: 'input' },
    position: { x: 0, y: 0 },
  },
  {
    id: '2',
    data: { label: 'node 2' },
    position: { x: 0, y: 100 },
  },
  {
    id: '2a',
    data: { label: 'node 2a' },
    position: { x: 0, y: 200 },
  },
  {
    id: '2b',
    data: { label: 'node 2b' },
    position: { x: 0, y: 300 },
  },
  {
    id: '2c',
    data: { label: 'node 2c' },
    position: { x: 0, y: 400 },
  },
  {
    id: '2d',
    data: { label: 'node 2d' },
    position: { x: 0, y: 500 },
  },
  {
    id: '3',
    data: { label: 'node 3' },
    position: { x: 200, y: 100 },
  },
];

export const initialEdges = [
  { id: 'e12', source: '1', target: '2', animated: true },
  { id: 'e13', source: '1', target: '3', animated: true },
  { id: 'e22a', source: '2', target: '2a', animated: true },
  { id: 'e22b', source: '2', target: '2b', animated: true },
  { id: 'e22c', source: '2', target: '2c', animated: true },
  { id: 'e2c2d', source: '2c', target: '2d', animated: true },
];
참고 예제 코드로 구현된 CodeSandbox 및 캡쳐사진
Each of the examples that follow will be built on this empty flow. Where possible we've tried to keep the examples confined to just one index.js file so it's easy for you to compare how they're set up.
=> 각각의 예제는 이 빈 플로우를 기반으로 구축됩니다. 가능한 경우 각 예제를 하나의 index.js 파일에 담아서 설정을 비교하기 쉽도록 하였습니다.
Layouting Nodes
For layouting nodes, there are a few third-party libraries that we think are worth checking out:
=> 노드 레이아웃을 위해 몇 가지 타사 라이브러리를 살펴볼 만한 가치가 있다고 생각됩니다:
| Library | Dynamic node sizes | Sub-flow layouting | Edge routing | Bundle size |
|---|---|---|---|---|
| Dagre | Yes | Yes¹ | No | Bundle size 40kb |
| D3-Hierarchy | No | No | No | Bundle size 15kb |
| D3-Force | Yes | No | No | Bundle size 16kb |
| ELK | Yes | Yes | Yes | Bundle size 1.5mb |
¹ Dagre currently has an open issue that prevents it from laying out sub-flows correctly if any nodes in the sub-flow are connected to nodes outside the sub-flow.
=>
¹ Dagre는 현재 하위 플로우의 레이아웃을 올바르게 설정하지 못하는 문제가 있습니다. 특히 하위 플로우의 노드 중 일부가 하위 플로우 외부의 노드에 연결된 경우입니다.
We've loosely ordered these options from simplest to most complex, where dagre is largely a drop-in solution and elkjs is a full-blown highly configurable layouting engine. Below, we'll take a look at a brief example of how each of these libraries can be used with React Flow. For dagre and elkjs specifically, we have some separate examples you can refer back to here and here.
=> 위의 옵션을 간단하게부터 복잡한 순서대로 정리해 보았는데, dagre는 대부분이 사용하기 쉬운 솔루션으로, elkjs는 완전한 구성 가능한 레이아웃 엔진입니다. 아래에서 각 라이브러리를 React Flow와 함께 사용하는 간단한 예제를 살펴보겠습니다. 특히 dagre와 elkjs에 대해서는 별도의 예제를 여기와 여기에서 참고하실 수 있습니다.
Honourable Mentions
Of course, we can't go through every layouting library out there: we'd never work on anything else! Here are some other libraries we've come across that might be worth taking a look at:
=> 물론, 우리는 모든 레이아웃 라이브러리를 다룰 수는 없습니다. 그렇게 되면 다른 작업을 할 시간이 없겠죠! 여기 몇 가지 우리가 발견한 다른 라이브러리들이 있습니다. 한 번 살펴보실 가치가 있을 것 같습니다:
- If you want to use dagre or d3-hierarchy but need to support nodes with different dimensions, both d3-flextree and entitree-flex look promising.
=> d3-flextree: dagre나 d3-hierarchy를 사용하려는 경우, 다른 차원을 가진 노드를 지원해야 하는 경우 유용할 수 있습니다. entitree-flex: d3-flextree와 유사한 기능을 제공합니다.
- Cola.js looks like a promising option for so-called "constraint-based" layouts. We haven't had time to properly investigate it yet, but it looks like you can achieve results similar to d3-force but with a lot more control.
=> Cola.js: "제약 기반" 레이아웃에 대한 유망한 옵션으로, d3-force와 유사한 결과를 달성할 수 있지만 훨씬 더 많은 제어가 가능해 보입니다.
Routing Edges
If you don't have any requirements for edge routing, you can use one of the layouting libraries above to position nodes and let the edges fall wherever they may. Otherwise, you'll want to look into some libraries and techniques for edge routing.
=> 만약 엣지 라우팅에 대한 특별한 요구사항이 없다면, 위에서 언급한 레이아웃 라이브러리 중 하나를 사용하여 노드를 배치하고 엣지를 어디에 놓을지 그대로 둘 수 있습니다. 그렇지 않으면, 엣지 라우팅을 위한 몇 가지 라이브러리 및 기술을 살펴보아야 할 것입니다.
Your options here are more limited than for node layouting, but here are some resources we thought looked promising:
=>여기서는 노드 레이아웃링보다는 옵션이 더 제한되지만, 유망하게 보이는 몇 가지 리소스를 소개해 드리겠습니다:
- react-flow-smart-edge
- Routing Orthogonal Diagram Connectors in JavaScript
If you do explore some custom edge routing options, consider contributing back to the community by writing a blog post or creating a library!
=> 만약 사용자가 커스텀 엣지 라우팅 옵션을 탐색한다면, 블로그 글을 작성하거나 라이브러리를 만들어 커뮤니티에 기여하는 것을 고려해보세요!
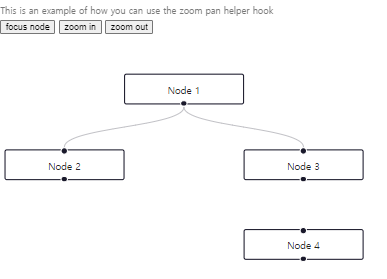
Sub-Flows
A sub flow is a flow inside a node. It can be a separate flow or a flow that is connected with other nodes outside of its parent. This feature can also be used for grouping nodes. In this part of the docs we are going to build a flow with sub flows and show you the child node specific options.
=> 서브 플로우는 노드 내부에 있는 플로우입니다. 이는 별도의 플로우일 수도 있고 부모 외부의 다른 노드들과 연결된 플로우일 수도 있습니다. 이 기능은 노드를 그룹화하는 데에도 사용될 수 있습니다. 이 문서의 이 부분에서는 서브 플로우가 있는 플로우를 구축하고 자식 노드별 옵션을 보여드리겠습니다.
Order of Nodes It's important that your parent nodes appear before their children in the nodes/ defaultNodes array to get processed correctly.
노드의 순서는 부모 노드가 자식 노드보다 먼저 나타나야 올바르게 처리됩니다. 이를 위해 노드/ defaultNodes 배열에서 부모 노드를 자식 노드보다 앞에 배치하는 것이 중요합니다.
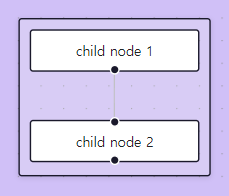
Adding Child Nodes
If you want to add a node as a child of another node you need to use the parentNode option (you can find a list of all options in the node options section). Once we do that, the child node is positioned relative to its parent. A position of { x: 0, y: 0 } is the top left corner of the parent.
=> 다른 노드의 자식으로 노드를 추가하려면 parentNode 옵션을 사용해야 합니다(노드 옵션 섹션에서 모든 옵션 목록을 찾을 수 있습니다). 그렇게 하면 자식 노드가 부모 노드를 기준으로 위치합니다. { x: 0, y: 0 } 위치는 부모의 왼쪽 상단 모서리를 나타냅니다.
In this example we are setting a fixed width and height of the parent node by passing the style option. Additionally, we set the child extent to 'parent' so that we can't move the child nodes out of the parent node.
=> 이 예제에서는 style 옵션을 통해 부모 노드의 고정된 너비와 높이를 설정합니다. 또한, child extent를 'parent'로 설정하여 자식 노드를 부모 노드 바깥으로 이동할 수 없도록 합니다.
참고 예제 코드
<App.js>
import { useCallback, useState } from 'react';
import ReactFlow, { addEdge, applyEdgeChanges, applyNodeChanges, Background } from 'reactflow';
import 'reactflow/dist/style.css';

import initialNodes from './nodes.js';
import initialEdges from './edges.js';

const rfStyle = {
  backgroundColor: '#D0C0F7',
};

function Flow() {
  const [nodes, setNodes] = useState(initialNodes);
  const [edges, setEdges] = useState(initialEdges);

  const onNodesChange = useCallback(
    (changes) => setNodes((nds) => applyNodeChanges(changes, nds)),
    [setNodes]
  );
  const onEdgesChange = useCallback(
    (changes) => setEdges((eds) => applyEdgeChanges(changes, eds)),
    [setEdges]
  );
  const onConnect = useCallback(
    (connection) => setEdges((eds) => addEdge(connection, eds)),
    [setEdges]
  );

  return (
    <ReactFlow
      nodes={nodes}
      edges={edges}
      onNodesChange={onNodesChange}
      onEdgesChange={onEdgesChange}
      onConnect={onConnect}
      fitView
      style={rfStyle}
      attributionPosition="top-right"
    >
      <Background />
    </ReactFlow>
  );
}

export default Flow;
<nodes.js>
const nodes = [
  {
    id: 'A',
    type: 'group',
    data: { label: null },
    position: { x: 0, y: 0 },
    style: {
      width: 170,
      height: 140,
    },
  },
  {
    id: 'B',
    type: 'input',
    data: { label: 'child node 1' },
    position: { x: 10, y: 10 },
    parentNode: 'A',
    extent: 'parent',
  },
  {
    id: 'C',
    data: { label: 'child node 2' },
    position: { x: 10, y: 90 },
    parentNode: 'A',
    extent: 'parent',
  },
];

export default nodes;
<edges.js>
export default [{ id: 'b-c', source: 'B', target: 'C' }];
참고 예제 코드로 구현된 CodeSandbox 및 캡쳐사진
Using Child Specific Options
When you move the parent node you can see that the child nodes move, too. Adding a node to another node with the parentNode option, just does one thing: It positions it relatively to its parent. The child node is not really a child markup-wise. You can drag or position the child outside of its parent (when the extent: 'parent' option is not set) but when you move the parent, the child moves with it.
=> 부모 노드를 이동하면 자식 노드도 함께 이동하는 것을 볼 수 있습니다. parentNode 옵션을 사용하여 다른 노드에 노드를 추가하는 것은 한 가지 일을 합니다. 즉, 그것을 부모에 상대적으로 배치합니다. child 노드는 마크업적으로 실제로 자식이 아닙니다. extent: 'parent' 옵션이 설정되지 않은 경우에는 자식을 부모 외부로 끌거나 배치할 수 있지만, 부모를 이동하면 자식도 함께 이동합니다.
In the example above we are using the group type for the parent node but you can use any other type as well. The group type is just a convenience node type that has no handles attached.
=> 위 예제에서는 부모 노드에 대해 그룹 유형을 사용하지만 다른 유형을 사용할 수도 있습니다. 그룹 유형은 핸들이 없는 편리한 노드 유형일 뿐입니다.
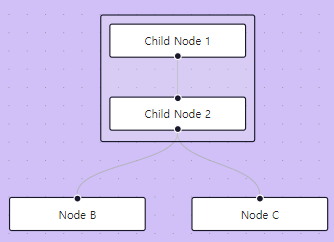
Now we are going to add some more nodes and edges. As you can see, we can connect nodes within a group and create connections that go from a sub flow to an outer node:
=> 이제 몇 개의 추가적인 노드와 엣지를 추가해 보겠습니다. 보시다시피, 그룹 내에서 노드를 연결하고 서브 플로우에서 외부 노드로 연결을 생성할 수 있습니다:
참고 예제 코드
<App.js>
import { useCallback, useState } from 'react';
import ReactFlow, { addEdge, applyEdgeChanges, applyNodeChanges, Background } from 'reactflow';
import 'reactflow/dist/style.css';

import initialNodes from './nodes.js';
import initialEdges from './edges.js';

const rfStyle = {
  backgroundColor: '#D0C0F7',
};

function Flow() {
  const [nodes, setNodes] = useState(initialNodes);
  const [edges, setEdges] = useState(initialEdges);

  const onNodesChange = useCallback(
    (changes) => setNodes((nds) => applyNodeChanges(changes, nds)),
    [setNodes]
  );
  const onEdgesChange = useCallback(
    (changes) => setEdges((eds) => applyEdgeChanges(changes, eds)),
    [setEdges]
  );
  const onConnect = useCallback(
    (connection) => setEdges((eds) => addEdge(connection, eds)),
    [setEdges]
  );

  return (
    <ReactFlow
      nodes={nodes}
      edges={edges}
      onNodesChange={onNodesChange}
      onEdgesChange={onEdgesChange}
      onConnect={onConnect}
      fitView
      style={rfStyle}
      attributionPosition="top-right"
    >
      <Background />
    </ReactFlow>
  );
}

export default Flow;
<nodes.js>
const nodes = [
  {
    id: 'A',
    type: 'group',
    position: { x: 0, y: 0 },
    style: {
      width: 170,
      height: 140,
    },
  },
  {
    id: 'A-1',
    type: 'input',
    data: { label: 'Child Node 1' },
    position: { x: 10, y: 10 },
    parentNode: 'A',
    extent: 'parent',
  },
  {
    id: 'A-2',
    data: { label: 'Child Node 2' },
    position: { x: 10, y: 90 },
    parentNode: 'A',
    extent: 'parent',
  },
  {
    id: 'B',
    type: 'output',
    position: { x: -100, y: 200 },
    data: { label: 'Node B' },
  },
  {
    id: 'C',
    type: 'output',
    position: { x: 100, y: 200 },
    data: { label: 'Node C' },
  },
];

export default nodes;
<edges.js>
export default [
  { id: 'a1-a2', source: 'A-1', target: 'A-2' },
  { id: 'a2-b', source: 'A-2', target: 'B' },
  { id: 'a2-c', source: 'A-2', target: 'C' },
];
참고 예제 코드로 구현된 CodeSandbox 및 캡쳐사진
Using a Default Node Type as a Parent
Let's remove the label of node B and add some child nodes. In this example you can see that you can use one of the default node types as parents, too. We also set the child nodes to draggable: false so that they are not draggable anymore.
=> 라벨을 제거하고 몇 개의 자식 노드를 추가해 보겠습니다. 이 예제에서는 부모로 기본 노드 유형 중 하나를 사용할 수 있음을 볼 수 있습니다. 또한 자식 노드를 draggable: false로 설정하여 더 이상 드래그할 수 없도록 만들었습니다.
참고 예제 코드
<App.js>
import { useCallback, useState } from 'react';
import ReactFlow, { addEdge, applyEdgeChanges, applyNodeChanges, Background } from 'reactflow';
import 'reactflow/dist/style.css';

import initialNodes from './nodes.js';
import initialEdges from './edges.js';

const rfStyle = {
  backgroundColor: '#D0C0F7',
};

function Flow() {
  const [nodes, setNodes] = useState(initialNodes);
  const [edges, setEdges] = useState(initialEdges);

  const onNodesChange = useCallback(
    (changes) => setNodes((nds) => applyNodeChanges(changes, nds)),
    [setNodes]
  );
  const onEdgesChange = useCallback(
    (changes) => setEdges((eds) => applyEdgeChanges(changes, eds)),
    [setEdges]
  );
  const onConnect = useCallback(
    (connection) => setEdges((eds) => addEdge(connection, eds)),
    [setEdges]
  );

  return (
    <ReactFlow
      nodes={nodes}
      edges={edges}
      onNodesChange={onNodesChange}
      onEdgesChange={onEdgesChange}
      onConnect={onConnect}
      fitView
      style={rfStyle}
      attributionPosition="top-right"
    >
      <Background />
    </ReactFlow>
  );
}

export default Flow;
<nodes.js>
const nodes = [
  {
    id: 'A',
    type: 'group',
    position: { x: 0, y: 0 },
    style: {
      width: 170,
      height: 140,
    },
  },
  {
    id: 'A-1',
    type: 'input',
    data: { label: 'Child Node 1' },
    position: { x: 10, y: 10 },
    parentNode: 'A',
    extent: 'parent',
  },
  {
    id: 'A-2',
    data: { label: 'Child Node 2' },
    position: { x: 10, y: 90 },
    parentNode: 'A',
    extent: 'parent',
  },
  {
    id: 'B',
    type: 'output',
    position: { x: -100, y: 200 },
    data: null,
    style: {
      width: 170,
      height: 140,
      backgroundColor: 'rgba(240,240,240,0.25)',
    },
  },
  {
    id: 'B-1',
    data: { label: 'Child 1' },
    position: { x: 50, y: 10 },
    parentNode: 'B',
    extent: 'parent',
    draggable: false,
    style: {
      width: 60,
    },
  },
  {
    id: 'B-2',
    data: { label: 'Child 2' },
    position: { x: 10, y: 90 },
    parentNode: 'B',
    extent: 'parent',
    draggable: false,
    style: {
      width: 60,
    },
  },
  {
    id: 'B-3',
    data: { label: 'Child 3' },
    position: { x: 100, y: 90 },
    parentNode: 'B',
    extent: 'parent',
    draggable: false,
    style: {
      width: 60,
    },
  },
  {
    id: 'C',
    type: 'output',
    position: { x: 100, y: 200 },
    data: { label: 'Node C' },
  },
];

export default nodes;
<edges.js>
export default [
  { id: 'a1-a2', source: 'A-1', target: 'A-2' },
  { id: 'a2-b', source: 'A-2', target: 'B' },
  { id: 'a2-c', source: 'A-2', target: 'C' },
  { id: 'b1-b2', source: 'B-1', target: 'B-2' },
  { id: 'b1-b3', source: 'B-1', target: 'B-3' },
];
참고 예제 코드로 구현된 CodeSandbox 및 캡쳐사진
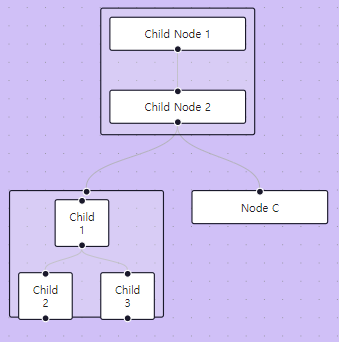
Advanced Use
Accessibility
A flow is accessible with a keyboard and readable by a screenreader. Nodes and edges are focusable, selectable, moveable and deleteable with the keyboard.
=> 키보드로 흐름을 접근하고 스크린 리더에서 읽을 수 있습니다. 노드와 엣지는 키보드로 포커스를 받고, 선택하고, 이동하며, 삭제할 수 있습니다.
Built-in Features
Keyboard Controls
- Nodes and edges are focusable by using the Tab key (tabIndex={0} + role="button")
- Nodes and edges are selectable by using Enter or Space, un-selectable by using Escape
- Nodes are moveable with arrow keys (press Shift for increasing velocity)
- Nodes and Edges get a aria-describedby attribute to describe keyboard controls
=>
- 노드와 엣지는 Tab 키를 사용하여 포커스를 받습니다 (tabIndex={0} + role="button").
- 노드와 엣지는 Enter 또는 Space를 사용하여 선택할 수 있으며, Escape를 사용하여 선택을 해제할 수 있습니다.
- 노드는 화살표 키로 이동할 수 있습니다 (속도를 증가하려면 Shift 키를 누릅니다).
- 노드와 엣지는 키보드 컨트롤을 설명하기 위해 aria-describedby 속성을 받습니다.
You can configure the keyboard controls with the props: nodesFocusable, edgesFocusable and disableKeyboardA11y. nodesFocusable and edgesFocusable (both true by default) need to be true if you want to be able to focus elements with Tab and then select or deselect them with Enter and Escape. If you are setting disableKeyboardA11y={true}, the nodes are not moveable with arrow keys anymore.
=> 키보드 컨트롤을 구성할 수 있는 프로퍼티는 다음과 같습니다: nodesFocusable, edgesFocusable, disableKeyboardA11y입니다. nodesFocusable 및 edgesFocusable (기본값으로 true)을 true로 설정해야 Tab 키로 요소를 포커스하고 Enter 및 Escape로 선택 또는 선택 해제할 수 있습니다. disableKeyboardA11y={true}로 설정하면 더 이상 노드를 화살표 키로 이동할 수 없습니다.
Nodes are only moveable with arrow keys when nodesDraggable and nodesFocusable are true (default behaviour).
노드가 화살표 키로만 이동 가능하도록 설정하려면 nodesDraggable 및 nodesFocusable가 true로 설정되어 있어야 합니다(기본 동작).
WAI-ARIA
Edges: Default aria-label - overwritable with new Edge option ariaLabel
Nodes: ariaLabel option (no default here, because we assume that there might be text inside the node)
Minimap component: aria-describedby + title
Attribution component: aria-label
Controls component: aria-labels for buttons
=>
엣지: 기본 aria-label - 새 Edge 옵션 ariaLabel로 덮어쓸 수 있음
노드: ariaLabel 옵션 (여기에는 기본값이 없습니다. 노드 내부에 텍스트가 있을 수 있다고 가정하기 때문입니다.)
미니맵 컴포넌트: aria-describedby + 제목
어트리뷰션 컴포넌트: aria-label
컨트롤 컴포넌트: 버튼에 대한 aria-label
Better accessible node-based UIs
- When your nodes don't have textual content, you should provide an aria-label via the node options.
- You can improve the default aria-label ('from source.id to target.id') of an edge, when your nodes have names that you could use by passing specific aria-labels to the edges.
- follow best practice WAI-ARIA guides in your application
=>
- 노드에 텍스트 콘텐츠가 없는 경우 노드 옵션을 통해 aria-label을 제공해야합니다.
- 노드에 이름이 있는 경우 특정 aria-label을 엣지에 전달하여 엣지의 기본 aria-label('source.id에서 target.id로')을 개선할 수 있습니다.
- 애플리케이션에서 WAI-ARIA 가이드를 따르는 것이 좋습니다.
Testing
Testing
There are plenty of options to test a React application. If you want to test a React Flow application, we recommend to use Cypress or Playwright. React Flow needs to measure nodes in order to render edges and for that relies on rendering DOM elements.
=> 리액트 애플리케이션을 테스트하는 다양한 옵션이 있습니다. React Flow 애플리케이션을 테스트하려면 Cypress 또는 Playwright를 사용하는 것을 권장합니다. React Flow는 엣지를 렌더링하기 위해 노드를 측정해야 하며, 이를 위해 DOM 요소를 렌더링하는 데 의존합니다.
Using Cypress or Playwright
If you are using Cypress or Playwright no additional setup is needed. You can refer to the getting started guide for Cypress here and for Playwright here.
=> Cypress 또는 Playwright를 사용하는 경우 별도의 설정이 필요하지 않습니다. Cypress의 시작 가이드는 여기에서, Playwright의 시작 가이드는 여기에서 확인할 수 있습니다.
Using Jest
If you are using Jest, you need to mock some features in order to be able to run your tests. You can do that by adding this file to your project. Calling mockReactFlow() in a setupTests file (or inside a beforeEach) will trigger the necessary overrides.
=> Jest를 사용하는 경우 테스트를 실행할 수 있도록 몇 가지 기능을 모의(mock)해야 합니다. 프로젝트에 이 파일을 추가하여 이 작업을 수행할 수 있습니다. setupTests 파일에서 mockReactFlow()를 호출하면 필요한 변경 사항이 트리거됩니다.
// To make sure that the tests are working, it's important that you are using
// this implementation of ResizeObserver and DOMMatrixReadOnly
class ResizeObserver {
  callback: globalThis.ResizeObserverCallback;

  constructor(callback: globalThis.ResizeObserverCallback) {
    this.callback = callback;
  }

  observe(target: Element) {
    this.callback([{ target } as globalThis.ResizeObserverEntry], this);
  }

  unobserve() {}

  disconnect() {}
}

class DOMMatrixReadOnly {
  m22: number;
  constructor(transform: string) {
    const scale = transform?.match(/scale\(([1-9.])\)/)?.[1];
    this.m22 = scale !== undefined ? +scale : 1;
  }
}

// Only run the shim once when requested
let init = false;

export const mockReactFlow = () => {
  if (init) return;
  init = true;

  global.ResizeObserver = ResizeObserver;

  // @ts-ignore
  global.DOMMatrixReadOnly = DOMMatrixReadOnly;

  Object.defineProperties(global.HTMLElement.prototype, {
    offsetHeight: {
      get() {
        return parseFloat(this.style.height) || 1;
      },
    },
    offsetWidth: {
      get() {
        return parseFloat(this.style.width) || 1;
      },
    },
  });

  (global.SVGElement as any).prototype.getBBox = () => ({
    x: 0,
    y: 0,
    width: 0,
    height: 0,
  });
};
User
If you want to test mouse events with jest (for example inside your custom nodes), you need to disable d3-drag as it does not work outside of the browser:
=> jest(예: 사용자 정의 노드 내에서)에서 마우스 이벤트를 테스트하려면 브라우저 외부에서 작동하지 않기 때문에 d3-drag를 비활성화해야 합니다.
<ReactFlow nodesDraggable={false} {...rest} />TypeScript
Usage with TypeScript
React Flow is written in TypeScript, so you don't need to install the types separately. In this section we setup a basic flow with the corresponding types.
=> React Flow는 TypeScript로 작성되었으므로 별도로 유형을 설치할 필요가 없습니다. 이 섹션에서는 해당 유형과 함께 기본 플로우를 설정합니다.
Usage
import { useState, useCallback } from 'react';
import ReactFlow, {
  addEdge,
  FitViewOptions,
  applyNodeChanges,
  applyEdgeChanges,
  Node,
  Edge,
  OnNodesChange,
  OnEdgesChange,
  OnConnect,
  DefaultEdgeOptions,
  NodeTypes
} from 'reactflow';

import CustomNode from './CustomNode';

const initialNodes: Node[] = [
  { id: '1', data: { label: 'Node 1' }, position: { x: 5, y: 5 } },
  { id: '2', data: { label: 'Node 2' }, position: { x: 5, y: 100 } },
];

const initialEdges: Edge[] = [{ id: 'e1-2', source: '1', target: '2' }];

const fitViewOptions: FitViewOptions = {
  padding: 0.2,
};

const defaultEdgeOptions: DefaultEdgeOptions = {
  animated: true,
};

const nodeTypes: NodeTypes = {
  custom: CustomNode,
};

function Flow() {
  const [nodes, setNodes] = useState<Node[]>(initialNodes);
  const [edges, setEdges] = useState<Edge[]>(initialEdges);

  const onNodesChange: OnNodesChange = useCallback(
    (changes) => setNodes((nds) => applyNodeChanges(changes, nds)),
    [setNodes],
  );
  const onEdgesChange: OnEdgesChange = useCallback(
    (changes) => setEdges((eds) => applyEdgeChanges(changes, eds)),
    [setEdges],
  );
  const onConnect: OnConnect = useCallback(
    (connection) => setEdges((eds) => addEdge(connection, eds)),
    [setEdges],
  );

  return (
    <ReactFlow
      nodes={nodes}
      edges={edges}
      onNodesChange={onNodesChange}
      onEdgesChange={onEdgesChange}
      onConnect={onConnect}
      fitView
      fitViewOptions={fitViewOptions}
      defaultEdgeOptions={defaultEdgeOptions}
      nodeTypes={nodeTypes}
    />
  );
}
Custom Nodes
When you are working with custom nodes you can define the data type by passing a parameter:
=> 커스텀 노드를 다룰 때 매개변수를 전달하여 데이터 유형을 정의할 수 있습니다
import { Node, NodeProps } from 'reactflow';

type NodeData = {
  value: number;
};

type CustomNode = Node<NodeData>;

function MyCustomNode({ data }: NodeProps<NodeData>) {
  return <div>A big number: {data.value}</div>;
}
You can also pass your custom node data type to any function or hook that returns nodes, for example the useReactFlow hook:
=> useReactFlow 훅과 같은 함수 또는 훅에 사용자 정의 노드 데이터 유형을 전달할 수도 있습니다.
const { getNodes, getEdges } = useReactFlow<NodeData, EdgeData>();Uncontrolled Flow
There are two ways to use React Flow - controlled or uncontrolled. Controlled means, that you are in control of the state of the nodes and edges. In an uncontrolled flow the state of the nodes and edges is handled by React Flow internally. In this part we will show you how to work with an uncontrolled flow.
=> React Flow를 사용하는 두 가지 방법이 있습니다 - 제어(controlled)된 방식과 비제어(uncontrolled)된 방식입니다. 제어된 방식은 노드와 엣지의 상태를 직접 제어하는 방식입니다. 반면에 비제어된 플로우는 노드와 엣지의 상태를 React Flow가 내부적으로 처리합니다. 이 부분에서는 비제어된 플로우를 다루는 방법을 보여드리겠습니다.
An implementation of an uncontrolled flow is simpler, because you don't need to pass any handlers:
=> 비제어된 플로우의 구현은 간단합니다. 왜냐하면 핸들러를 전달할 필요가 없기 때문입니다:
참고 예제 코드
<App.js>
import ReactFlow from 'reactflow';
import 'reactflow/dist/style.css';

import defaultNodes from './nodes.js';
import defaultEdges from './edges.js';

const edgeOptions = {
  animated: true,
  style: {
    stroke: 'white',
  },
};

const connectionLineStyle = { stroke: 'white' };

export default function Flow() {
  return (
    <ReactFlow
      defaultNodes={defaultNodes}
      defaultEdges={defaultEdges}
      defaultEdgeOptions={edgeOptions}
      fitView
      style={{
        backgroundColor: '#D3D2E5',
      }}
      connectionLineStyle={connectionLineStyle}
    />
  );
}
<nodes.js>
export default [
  {
    id: 'a',
    type: 'input',
    data: { label: 'Node A' },
    position: { x: 250, y: 25 },
  },

  {
    id: 'b',
    data: { label: 'Node B' },
    position: { x: 100, y: 125 },
  },
  {
    id: 'c',
    type: 'output',
    data: { label: 'Node C' },
    position: { x: 250, y: 250 },
  },
];
<edges.js>
export default [{ id: 'ea-b', source: 'a', target: 'b' }];
참고 예제 코드로 구현된 CodeSandbox 및 캡쳐사진

As you can see, we are passing defaultEdgeOptions to define that edges are animated. This is helpful, because you can't use the onConnect handler anymore to pass custom options to a newly created edge. Try to connect "Node B" with "Node C" and you see that the new edge is animated.
=> 보시다시피, 우리는 엣지가 애니메이션되도록 defaultEdgeOptions를 전달했습니다. 이렇게 함으로써 새로운 엣지에 사용자 정의 옵션을 전달하는 것은 더 이상 onConnect 핸들러를 사용할 수 없게 되었습니다. "Node B"를 "Node C"와 연결하려고 해보면 새로운 엣지가 애니메이션되는 것을 볼 수 있습니다.
Updating Nodes and Edges
Since you don't have nodes and edges in your local state, you can't update them directly. To do so, you need to use the React Flow instance that comes with functions for updating the internal state. You can receive the instance via the onInit callback or better by using the useReactFlow hook. Let's create a button that adds a new node at a random position. For this, we are wrapping our flow with the ReactFlowProvider and use the addNodes function.
=> 로컬 상태에 노드와 엣지가 없기 때문에 직접 업데이트할 수 없습니다. 이를 위해 내부 상태를 업데이트하는 데 사용되는 React Flow 인스턴스를 사용해야 합니다. 이 인스턴스는 onInit 콜백을 통해 받거나 useReactFlow 훅을 사용하여 더욱 효율적으로 받을 수 있습니다. 임의의 위치에 새 노드를 추가하는 버튼을 만들어 보겠습니다. 이를 위해 ReactFlowProvider로 플로우를 래핑하고 addNodes 함수를 사용합니다.
The Flow component in this example is wrapped with the ReactFlowProvider to use the useReactFlow hook.
이 예제에서 Flow 컴포넌트는 useReactFlow 훅을 사용하기 위해 ReactFlowProvider로 래핑되어 있습니다.
참고 예제 코드
<App.js>
import { useCallback } from 'react';
import ReactFlow, { ReactFlowProvider, useReactFlow } from 'reactflow';
import 'reactflow/dist/style.css';

import defaultNodes from './nodes.js';
import defaultEdges from './edges.js';

import './button.css';

const edgeOptions = {
  animated: true,
  style: {
    stroke: 'white',
  },
};

const connectionLineStyle = { stroke: 'white' };

let nodeId = 0;

function Flow() {
  const reactFlowInstance = useReactFlow();
  const onClick = useCallback(() => {
    const id = `${++nodeId}`;
    const newNode = {
      id,
      position: {
        x: Math.random() * 500,
        y: Math.random() * 500,
      },
      data: {
        label: `Node ${id}`,
      },
    };
    reactFlowInstance.addNodes(newNode);
  }, []);

  return (
    <>
      <ReactFlow
        defaultNodes={defaultNodes}
        defaultEdges={defaultEdges}
        defaultEdgeOptions={edgeOptions}
        fitView
        style={{
          backgroundColor: '#D3D2E5',
        }}
        connectionLineStyle={connectionLineStyle}
      />
      <button onClick={onClick} className="btn-add">
        add node
      </button>
    </>
  );
}

export default function () {
  return (
    <ReactFlowProvider>
      <Flow />
    </ReactFlowProvider>
  );
}
<nodes.js>
export default [
  {
    id: 'a',
    type: 'input',
    data: { label: 'Node A' },
    position: { x: 250, y: 25 },
  },

  {
    id: 'b',
    data: { label: 'Node B' },
    position: { x: 100, y: 125 },
  },
  {
    id: 'c',
    type: 'output',
    data: { label: 'Node C' },
    position: { x: 250, y: 250 },
  },
];
<edges.js>
export default [{ id: 'ea-b', source: 'a', target: 'b' }];
<button.css>
.btn-add {
  position: absolute;
  z-index: 10;
  top: 10px;
  left: 10px;
}
참고 예제 코드로 구현된 CodeSandbox 및 캡쳐사진
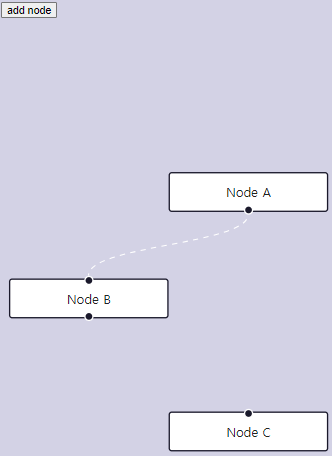
State Management
Using a State Management Library
For this guide we assume that you already know about the core concepts of React Flow and how to implement custom nodes. You should also be familiar with the concepts of state management libraries and how to use them.
이 안내서에서는 이미 React Flow의 핵심 개념과 사용자 지정 노드를 구현하는 방법에 대해 알고 있다고 가정합니다. 또한 상태 관리 라이브러리의 개념과 사용 방법에 대해 알고 있어야 합니다.
In this guide we are explaining how you could use React Flow with the state management library Zustand. We will build a little app where every node has a color chooser that updates its background color. In this guide we are are using Zustand, because we are already using it internally for React Flow, but of course you can use any other library like Redux, Recoil or Jotai as well.
=> 이 가이드에서는 Zustand 상태 관리 라이브러리를 사용하여 React Flow를 어떻게 사용할 수 있는지 설명합니다. 각 노드가 배경 색상을 업데이트하는 색상 선택기를 갖춘 작은 앱을 만들 것입니다. 이 가이드에서는 React Flow 내에서 이미 Zustand를 사용하고 있기 때문에 Zustand를 사용하지만 물론 Redux, Recoil 또는 Jotai와 같은 다른 라이브러리를 사용할 수도 있습니다.
As you might have seen in the previous guides and examples, React Flow can easily be used with a local component state for handling the nodes and edges of your diagram. When your app grows and you want to alter your state from within your nodes for example, things can get more complex. To avoid passing down functions through the node data field, you could use a React context or add a state management library as explained in this guide.
=> 이전 가이드와 예제에서 보았듯이 React Flow는 다이어그램의 노드 및 엣지를 처리하기 위해 로컬 컴포넌트 상태와 함께 쉽게 사용할 수 있습니다. 앱이 커지고 노드 내부에서 상태를 변경하려는 경우 등, 상황이 더 복잡해질 수 있습니다. 노드 데이터 필드를 통해 함수를 전달하는 것을 피하기 위해 React 컨텍스트를 사용하거나 이 가이드에서 설명하는 대로 상태 관리 라이브러리를 추가할 수 있습니다.
Install Zustand
As mentioned above we are using Zustand in this example. Zustand is a bit like Redux: you have a central store with actions to alter your state and hooks to access your state. You can install Zustand via:
=> 위에서 언급한대로 이 예제에서는 Zustand를 사용합니다. Zustand는 Redux와 비슷한데요: 중앙 저장소가 있고 상태를 변경하는 작업과 상태에 액세스하는 훅이 있습니다. Zustand를 설치하려면 다음을 사용할 수 있습니다:
npm install --save zustand
pnpm add zustand
yarn add zustand
우리는 대세이자 여러 방면으로볼때 유용해보이는 Recoil 을 적용할 예정
Tutorials
Web Audio API
Mind Map App
In this tutorial, you will learn to create a simple mind map tool with React Flow that can be used for brainstorming, organizing an idea, or mapping your thoughts in a visual way. To build this app, we'll be using state management, custom nodes and edges, and more.
=> 이 튜토리얼에서는 상태 관리, 사용자 정의 노드 및 엣지 등을 사용하여 React Flow를 사용하여 간단한 마인드 맵 도구를 만드는 방법을 배우게 됩니다. 이 앱을 구축하기 위해 상태 관리, 사용자 정의 노드 및 엣지 등을 사용할 것입니다.
🎬 It's Demo Time!
Before we get our hands dirty, I want to show you the mindmapping tool we'll have by the end of this tutorial:
=> 그럼 이 튜토리얼을 마친 후에 만들게 될 마인드 맵 도구를 먼저 보여드리겠습니다:
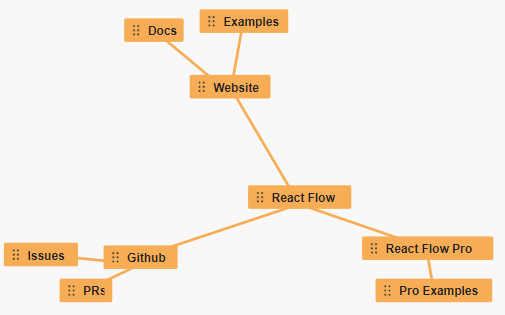
If you'd like to live dangerously and dive right into the code, you can find the source code on Github.
👩🏻💻 Getting started
To do this tutorial you will need some knowledge of React and React Flow (hi, that's us! 😁 it's an open source library for building node-based UIs like workflow tools, ETL pipelines, and more.)
=>
이 튜토리얼을 진행하려면 React와 React Flow에 대한 약간의 지식이 필요합니다. React Flow는 워크플로우 도구, ETL 파이프라인 등과 같은 노드 기반 UI를 구축하기 위한 오픈 소스 라이브러리입니다.
We'll be using Vite to develop our app, but you can also use Create React App or any other tool you like. To scaffold a new React app with Vite you need to do:
=> 우리는 앱을 개발하기 위해 Vite를 사용할 것입니다. 하지만 Create React App 또는 원하는 다른 도구를 사용할 수도 있습니다. Vite를 사용하여 새 React 앱을 생성하려면 다음을 실행하십시오:
npm create vite@latest reactflow-mind-map -- --template reactif you would like to use Typescript:
npm create vite@latest reactflow-mind-map -- --template react-tsAfter the initial setup, you need to install some packages:
npm install reactflow zustand classcat nanoid우리 프로젝트는
npm install reactflow recoil classcat nanoid
We are using Zustand for managing the state of our application. It's a bit like Redux but way smaller and there's less boilerplate code to write. React Flow also uses Zustand, so the installation comes with no additional cost. (For this tutorial we are using Typescript but you can also use plain Javascript.)
To keep it simple we are putting all of our code in the src/App folder. For this you need to create the src/App folder and add an index file with the following content:
=> 우리는 애플리케이션의 상태를 관리하기 위해 Zustand를 사용합니다. 이것은 Redux와 비슷하지만 훨씬 작고 쓸데없는 코드가 적습니다. React Flow도 Zustand를 사용하므로 설치 비용이 추가로 들지 않습니다. (이 튜토리얼에서는 TypeScript를 사용하지만 순수 JavaScript도 사용할 수 있습니다.)
간단하게 유지하기 위해 모든 코드를 src/App 폴더에 넣습니다. 이를 위해 src/App 폴더를 생성하고 다음 내용을 포함한 index 파일을 추가해야 합니다:
src/App/index.tsx


import ReactFlow, { Controls, Panel } from 'reactflow';

// we have to import the React Flow styles for it to work
import 'reactflow/dist/style.css';

function Flow() {
  return (
    <ReactFlow>
      <Controls showInteractive={false} />
      <Panel position="top-left">React Flow Mind Map</Panel>
    </ReactFlow>
  );
}

export default Flow;
This will be our main component for rendering the mind map. There are no nodes or edges yet, but we added the React Flow Controls component and a Panel to display the title of our app.
=> 이것은 마인드 맵을 렌더링하는 주요 컴포넌트가 될 것입니다. 아직 노드나 엣지는 없지만 React Flow Controls 컴포넌트와 앱 제목을 표시할 패널을 추가했습니다.
To be able to use React Flow hooks, we need to wrap the application with the ReactFlowProvider component in our main.tsx (entry file for vite). We are also importing the newly created App/index.tsx and render it inside the ReactFlowProvider. Your main file should look like this:
=> React Flow 훅을 사용하려면 주 파일인 main.tsx(vite의 진입 파일)에서 애플리케이션을 ReactFlowProvider 컴포넌트로 래핑해야 합니다. 또한 새로 생성된 App/index.tsx를 가져와 ReactFlowProvider 내부에서 렌더링합니다. 주 파일은 다음과 같아야 합니다:
src/main.tsx


import React from 'react';
import ReactDOM from 'react-dom/client';
import { ReactFlowProvider } from 'reactflow';

import App from './App';

import './index.css';

ReactDOM.createRoot(document.getElementById('root') as HTMLElement).render(
  <React.StrictMode>
    <ReactFlowProvider>
      <App />
    </ReactFlowProvider>
  </React.StrictMode>,
);
The parent container of the React Flow component needs a width and a height to work properly. Our app is a fullscreen app, so we add these rules to the index.css file:
=> 리액트 플로우 컴포넌트의 부모 컨테이너는 올바르게 작동하려면 너비와 높이가 필요합니다. 우리 앱은 전체 화면 앱이므로 이러한 규칙을 index.css 파일에 추가합니다:
src/index.css
body {
  margin: 0;
}

html,
body,
#root {
  height: 100%;
}
We are adding all styles of our app to the index.css file (you could also use a CSS-in-JS library like Styled Components or Tailwind). Now you can start the development server with npm run dev and you should see the following:
=>
우리는 앱의 모든 스타일을 index.css 파일에 추가하고 있습니다(Styled Components나 Tailwind와 같은 CSS-in-JS 라이브러리를 사용할 수도 있습니다). 이제 npm run dev 명령을 사용하여 개발 서버를 시작할 수 있으며 다음과 같이 나타날 것입니다:
Troubleshooting
Common Errors
Troubleshooting
This guide contains warnings and errors that can occur when using React Flow. We are also adding common questions and pitfalls that we collect from our Discord Server, Github Issues and Github Discussions.
=> 이 가이드에는 React Flow를 사용할 때 발생할 수 있는 경고 및 오류가 포함되어 있습니다. 또한 Discord 서버, Github Issues 및 Github 토론에서 수집한 일반적인 질문과 함정을 추가하고 있습니다.
Warning: Seems like you have not used zustand provider as an ancestor
This usually happens when:
A: You have two different version of @reactflow/core installed.
B: You are trying to access the internal React Flow state outside of the React Flow context
=> 이 문제가 발생하는 주요 이유는 다음과 같습니다:
A: @reactflow/core의 두 가지 다른 버전이 설치되어 있을 경우입니다.
B: React Flow 컨텍스트 외부에서 내부 React Flow 상태에 액세스하려고 시도하는 경우입니다.
Solution for A
Update reactflow and @reactflow/node-resizer (in case you are using it), remove node_modules and package-lock.json and reinstall the dependencies.
=> 해결책 A:
reactflow 및 @reactflow/node-resizer(사용 중인 경우)를 업데이트하고 node_modules 및 package-lock.json을 제거한 후 종속성을 다시 설치하십시오.
Solution for B
A possible solution is to wrap your component with a or move the code that is accessing the state inside a child of your React Flow instance.
=> 해결책 B:
가능한 해결책은 컴포넌트를 로 래핑하거나 상태에 액세스하는 코드를 React Flow 인스턴스의 자식으로 이동하는 것입니다.
This will cause an error:
import ReactFlow from 'reactflow';
import 'reactflow/dist/style.css';
function FlowWithoutProvider(props) {
  // cannot access the state here
  const reactFlowInstance = useReactFlow();
 return <ReactFlow {...props} />;
}
export default FlowWithoutProvider;
This will cause an error, too:
import ReactFlow, { ReactFlowProvider } from 'reactflow';
import 'reactflow/dist/style.css';
function Flow(props) {
  // still cannot access the state here
  // only child components of this component can access the state
  const reactFlowInstance = useReactFlow();
  return (
    <ReactFlowProvider>
      <ReactFlow {...props} />
    </ReactFlowProvider>
  );
}
export default FlowWithProvider;
This works:
As soon as you want to access the internal state of React Flow (for example by using the useReactFlow hook), you need to wrap your component with a . Here the wrapping is done outside of the component:React Flow의 내부 상태에 액세스하려면 useReactFlow 훅을 사용할 때 컴포넌트를 로 래핑해야 합니다. 여기서 래핑은 컴포넌트 바깥에서 수행됩니다.
import ReactFlow, { ReactFlowProvider } from 'reactflow';
import 'reactflow/dist/style.css';

function Flow(props) {
  // you can access the internal state here
  const reactFlowInstance = useReactFlow();

  return <ReactFlow {...props} />;
}

// wrapping with ReactFlowProvider is done outside of the component
function FlowWithProvider(props) {
  return (
    <ReactFlowProvider>
      <Flow {...props} />
    </ReactFlowProvider>
  );
}

export default FlowWithProvider;
It looks like you have created a new nodeTypes or edgeTypes object. If this wasn't
on purpose please define the nodeTypes/edgeTypes outside of the component or memoize them.
This warning appears when the nodeTypes or edgeTypes properties change after the initial render. The nodeTypes or edgeTypes should only be changed dynamically in very rare cases. Usually they are defined once with all the types that you are using in your application. It can happen easily that you are defining the nodeTypes or edgeTypes object inside of your component render function, which will cause React Flow to re-render every time your component re-renders.
=> 목적에 따라 컴포넌트 외부에서 nodeTypes/edgeTypes를 정의하거나 메모이제이션하세요.
이 경고는 초기 렌더링 이후에 nodeTypes 또는 edgeTypes 속성이 변경될 때 나타납니다. nodeTypes 또는 edgeTypes는 매우 드문 경우에만 동적으로 변경되어야 합니다. 일반적으로 이러한 유형은 응용 프로그램에서 사용하는 모든 유형과 함께 한 번 정의됩니다. 컴포넌트 렌더 함수 내에서 nodeTypes 또는 edgeTypes 객체를 정의하는 경우 React Flow가 컴포넌트가 다시 렌더링될 때마다 다시 렌더링될 수 있습니다.
Causes a warning:
import ReactFlow from 'reactflow';
import 'reactflow/dist/style.css';
import MyCustomNode from './MyCustomNode';
function Flow(props) {
  // new object being created on every render
  // causing unneccessary re-renders
  const nodeTypes = {
    myCustomNode: MyCustomNode,
  };
  return <ReactFlow nodeTypes={nodeTypes} />;
}
export default Flow;
Recommended implementation:
import ReactFlow from 'reactflow';
import MyCustomNode from './MyCustomNode';
// defined outside of the component
const nodeTypes = {
  myCustomNode: MyCustomNode,
};
function Flow(props) {
  return <ReactFlow nodeTypes={nodeTypes} />;
}
export default Flow;
Alternative implementation:
You can use this if you want to change your nodeTypes dynamically without causing unneccessary re-renders.
만약 노드 유형을 동적으로 변경하고자 하지만 불필요한 다시 렌더링을 발생시키지 않고 싶다면 다음을 사용할 수 있습니다.
import { useMemo } from 'react';
import ReactFlow from 'reactflow';
import 'reactflow/dist/style.css';

import MyCustomNode from './MyCustomNode';

function Flow(props) {
  const nodeTypes = useMemo(
    () => ({
      myCustomNode: MyCustomNode,
    }),
    [],
  );

  return <ReactFlow nodeTypes={nodeTypes} />;
}

export default Flow;
Node type not found. Using fallback type "default".
This usually happens when you are specifying a custom node type for one of your nodes but not passing the correct nodeTypes property to React Flow. The string for the type option of your custom node needs to be exactly the same as the key of the nodeTypes object.
=> 노드 유형을 찾을 수 없습니다. 대체 유형 "default"를 사용합니다.
일반적으로 사용자 지정 노드 유형을 지정하지만 올바른 nodeTypes 속성을 React Flow에 전달하지 않았을 때 발생합니다. 사용자 지정 노드의 유형 옵션 문자열은 nodeTypes 객체의 키와 정확히 일치해야 합니다.
<X Doesn't work:>

import ReactFlow from 'reactflow';
import 'reactflow/dist/style.css';

import MyCustomNode from './MyCustomNode';

const nodes = [
  {
    id: 'mycustomnode',
    type: 'custom',
    // ...
  },
];

function Flow(props) {
  // nodeTypes property is missing, so React Flow cannot find the custom node component to render
  return <ReactFlow nodes={nodes} />;
}<X Doesn't work either:>
import ReactFlow from 'reactflow';
import 'reactflow/dist/style.css';
import MyCustomNode from './MyCustomNode';
const nodes = [
{
id: 'mycustomnode',
type: 'custom',
// ...
},
];
const nodeTypes = {
Custom: MyCustomNode,
};
function Flow(props) {
// node.type and key in nodeTypes object are not exactly the same (capitalized)
return <ReactFlow nodes={nodes} nodeTypes={nodeTypes} />;
}< O This does work:>
import ReactFlow from 'reactflow';
import 'reactflow/dist/style.css';
import MyCustomNode from './MyCustomNode';
const nodes = [
{
id: 'mycustomnode',
type: 'custom',
// ...
},
];
const nodeTypes = {
custom: MyCustomNode,
};
function Flow(props) {
return <ReactFlow nodes={nodes} nodeTypes={nodeTypes} />;
}The React Flow parent container needs a width and a height to render the graph.
Under the hood, React Flow measures the parent DOM element to adjust the renderer. If you try to render React Flow in a regular div without a height, we cannot display the graph. If you encounter this warning, you need to make sure that your wrapper component has some CSS attached to it so that it gets a fixed height or inherits the height of its parent.
=> React Flow는 내부적으로 부모 DOM 요소를 측정하여 렌더러를 조정합니다. 만약 높이가 없는 일반적인 div에 React Flow를 렌더링하려고 하면 그래프를 표시할 수 없습니다. 이 경고가 발생하면 래퍼 컴포넌트에 CSS가 부착되어 고정된 높이를 가지거나 부모의 높이를 상속받도록 해야 합니다.
<X This will cause the warning:>

import ReactFlow from 'reactflow';
import 'reactflow/dist/style.css';

function Flow(props) {
  return (
    <div>
      <ReactFlow {...props} />
    </div>
  );
}
< O Working example:>
import ReactFlow from 'reactflow';
function Flow(props) {
return (
<div style={{ height: 800 }}>
<ReactFlow {...props} />
</div>
);
}Only child nodes can use a parent extent.
This warning appears when you are trying to add the extent option to a node that does not have a parent node. Depending on what you are trying to do, you can remove the extent option or specify a parentNode.
=> 이 경고는 부모 노드가 없는 노드에 extent 옵션을 추가하려고 할 때 발생합니다. 수행하려는 작업에 따라 extent 옵션을 제거하거나 parentNode를 지정할 수 있습니다.
<X Does show a warning:>

import ReactFlow from 'reactflow';
import 'reactflow/dist/style.css';

const nodes = [
  {
    id: 'mycustomnode',
    extent: 'parent',
    // ...
  },
];

function Flow(props) {
  return <ReactFlow nodes={nodes} />;
}
< O Warning resolved: >
const nodes = [
{
id: 'mycustomnode',
parentNode: 'someothernode',
extent: 'parent',
// ...
},
];
function Flow(props) {
return <ReactFlow nodes={nodes} />;
}Can't create edge. An edge needs a source and a target.
This happens when you do not pass a source and a target option to the edge object. Without the source and target, the edge cannot be rendered.
=> 엣지를 생성할 수 없습니다. 엣지는 소스와 타겟이 필요합니다.
소스와 타겟 옵션을 엣지 객체에 전달하지 않으면 발생합니다. 소스와 타겟이 없으면 엣지를 렌더링할 수 없습니다.
<X Will show a warning:>

import ReactFlow from 'reactflow';
import 'reactflow/dist/style.css';

const nodes = [
  /* ... */
];

const edges = [
  {
    nosource: '1',
    notarget: '2',
  },
];

function Flow(props) {
  return <ReactFlow nodes={nodes} edges={edges} />;
}
< O This works:>
import ReactFlow from 'reactflow';

const nodes = [
  /* ... */
];

const edges = [
  {
    source: '1',
    target: '2',
  },
];

function Flow(props) {
  return <ReactFlow nodes={nodes} edges={edges} />;
}
The old edge with id="some-id" does not exist.
This can happen when you are trying to update an edge but the edge you want to update is already removed from the state. This is a very rare case. Please see the Updatable Edge example for implementation details.
=> "some-id"와 같은 id를 가진 이전 엣지가 존재하지 않습니다.
이는 업데이트하려는 엣지가 이미 상태에서 제거된 경우 발생할 수 있습니다. 이는 매우 드문 경우입니다. 구현 세부 정보는 업데이트 가능한 엣지 예제를 참조하십시오.
Couldn't create edge for source/target handle id: "some-id"; edge id: "some-id".
This can happen if you are working with multiple handles and a handle is not found by its id property. Please see the Custom Node Example for an example of working with multiple handles.
=> 소스/타겟 핸들 id "some-id"에 대한 엣지를 만들 수 없습니다. 엣지 id "some-id".
이는 여러 핸들을 사용하고 핸들이 id 속성에 의해 찾을 수 없는 경우 발생할 수 있습니다. 여러 핸들을 사용하는 예제는 사용자 지정 노드 예제를 참조하십시오.
Marker type doesn't exist.
This warning occurs when you are trying to specify a marker type that is not built into React Flow. The existing marker types are documented here.
=> 마커 유형이 존재하지 않습니다.
이 경고는 React Flow에 내장되지 않은 마커 유형을 지정하려고 할 때 발생합니다. 기존의 마커 유형은 여기서 문서화되어 있습니다.
Handle: No node id found.
This warning occurs when you try to use a Handle component outside of a custom node component.
=>핸들: 노드 id를 찾을 수 없습니다.
이 경고는 사용자 지정 노드 컴포넌트 외부에서 Handle 컴포넌트를 사용하려고 할 때 발생합니다.
I get an error when building my app with webpack 4.
If you're using webpack 4, you'll likely run into an error like this:
=> 웹팩 4로 앱을 빌드하면 다음과 같은 오류가 발생할 수 있습니다:
ERROR in /node_modules/@reactflow/core/dist/esm/index.js 16:19
Module parse failed: Unexpected token (16:19)
You may need an appropriate loader to handle this file type, currently no loaders are configured to process this file. See https://webpack.js.org/concepts#loaders
React Flow is a modern JavaScript code base and makes use of lots of newer JavaScript features. By default, webpack 4 does not transpile your code and it doesn't know how to handle React Flow.
You need to add a number of babel plugins to your webpack config to make it work:
=> React Flow는 최신 JavaScript 기능을 많이 활용하는 현대적인 JavaScript 코드입니다. 기본적으로 웹팩 4는 코드를 변환하지 않으며 React Flow를 처리하는 방법을 알지 못합니다.
작동하도록하려면 웹팩 구성에 여러 babel 플러그인을 추가해야 합니다.
$ npm i --save-dev babel-loader@8.2.5 @babel/preset-env @babel/preset-react @babel/plugin-proposal-optional-chaining @babel/plugin-proposal-nullish-coalescing-operatorand configure the loader like this:
{
  test: /node_modules[\/\\]@?reactflow[\/\\].*.js$/,
  use: {
    loader: 'babel-loader',
    options: {
      presets: ['@babel/preset-env', "@babel/preset-react"],
      plugins: [
        "@babel/plugin-proposal-optional-chaining",
        "@babel/plugin-proposal-nullish-coalescing-operator",
      ]
    }
  }
}
If you're using webpack 5, you don't need to do anything! React Flow will work out of the box.
Mouse events aren't working consistently when my nodes contain a canvas element.
=> 노드에 canvas 요소가 포함되어 있을 때 마우스 이벤트가 일관되게 작동하지 않을 수 있습니다.
If you're using a canvas element inside your custom node, you might run into problems with seemingly-incorrect coordinates in mouse events from the cavnas.
React Flow uses CSS transforms to scale nodes as you zoom in and out. From the DOM's perspective, however, the element is still the same size. This can cause problems if you have event listeners that want to calcuate the mouse position relative to the canvas element.
To remedy this in event handlers you control, you can scale your computed relative position by 1 / zoom where zoom is the current zoom level of the flow. To get the current zoom level, you can use the getZoom method from the useReactFlow hook.
=> 만약 사용자 정의 노드 내부에 canvas 요소를 사용하고 있다면, canvas에서 마우스 이벤트의 상대적인 좌표를 계산할 때 표시되는 좌표가 잘못된 것처럼 보일 수 있습니다.
React Flow는 확대/축소할 때 노드를 CSS 변환을 사용하여 크기를 조정합니다. 그러나 DOM의 관점에서는 요소가 여전히 동일한 크기입니다. 이는 마우스 위치를 canvas 요소에 대해 상대적으로 계산하는 이벤트 리스너가 문제를 일으킬 수 있습니다.
이러한 문제를 해결하기 위해 이벤트 핸들러에서는 현재 확대 수준에 따라 계산된 상대적인 위치를 1/확대율로 조정할 수 있습니다. 확대율은 플로우의 현재 확대 수준입니다. 현재 확대 수준을 얻으려면 useReactFlow 훅의 getZoom 메서드를 사용할 수 있습니다.
Remove Attribution
This example demonstrates how you can remove the React Flow attribution from the renderer.
=> 다음 예제는 렌더러에서 React Flow 속성을 제거하는 방법을 보여줍니다.
If you’re considering removing the attribution, we’d first like to mention:
- If you’re using React Flow at your organization and making money from it, we rely on your support to keep React Flow developed and maintained under an MIT License. Before you remove the attribution, see the ways you can support React Flow to keep it running.
- Are you using React Flow for a personal project? Great! Go ahead and remove the attribution. You can support us by reporting any bugs you find, sending us screenshots of your projects, and starring us on Github. If you start making money using React Flow or use it in an organization in the future, we would ask that you re-add the attribution or sign up for one of our subscriptions.
- Thank you for supporting the React Flow team ✌🏻
- Moritz, Christopher, and John
=> "당신이 조직에서 React Flow를 사용하고 있고 그로부터 수익을 올리고 있다면, React Flow의 개발 및 유지 보수를 지속하기 위해 당신의 지원에 의존하고 있습니다. 저작권은 MIT 라이선스하에 React Flow를 개발 및 유지하기 위해 당신의 지원에 의존합니다. 속성을 제거하기 전에 React Flow를 지원하는 방법을 확인하십시오.
개인 프로젝트에 React Flow를 사용하고 있다면, 좋습니다! 속성을 제거하세요. 버그를 신고하거나 프로젝트 스크린샷을 보내고 GitHub에서 스타를 주시면 저희를 지원할 수 있습니다. 미래에 조직에서 React Flow를 사용하거나 수익을 올리기 시작하면, 속성을 다시 추가하거나 저희의 구독 중 하나에 가입하시기 바랍니다.
React Flow 팀을 지원해 주셔서 감사합니다 ✌🏻 -Moritz, Christopher, 그리고 John"
참고 예제 코드
<App.js>

import React from 'react';
import ReactFlow, { Background } from 'reactflow';
import 'reactflow/dist/style.css';

import { nodes, edges } from './initialElements';

/**
 * This example demonstrates how you can remove the attribution from the React Flow renderer.
 * Please only hide the attribution if you are subscribed to React Flow Pro: https://reactflow.dev/pro
 */
const proOptions = { hideAttribution: true };

function RemoveAttributionExample() {
  return (
    <ReactFlow
      defaultNodes={nodes}
      defaultEdges={edges}
      fitView
      proOptions={proOptions}
      nodesDraggable
    >
      <Background />
    </ReactFlow>
  );
}

export default RemoveAttributionExample;
<initialElements.js>

const nodeStyle = {
  color: '#0041d0',
  borderColor: '#0041d0',
};

export const nodes = [
  {
    type: 'input',
    id: '1',
    data: { label: 'Thanks' },
    position: { x: 100, y: 0 },
    style: nodeStyle,
  },
  {
    id: '2',
    data: { label: 'for' },
    position: { x: 0, y: 100 },
    style: nodeStyle,
  },
  {
    id: '3',
    data: { label: 'using' },
    position: { x: 200, y: 100 },
    style: nodeStyle,
  },
  {
    id: '4',
    data: { label: 'React Flow Pro!' },
    position: { x: 100, y: 200 },
    style: nodeStyle,
  },
];

export const edges = [
  {
    id: '1->2',
    source: '1',
    target: '2',
    animated: true,
  },
  {
    id: '1->3',
    source: '1',
    target: '3',
    animated: true,
  },
  {
    id: '2->4',
    source: '2',
    target: '4',
    animated: true,
  },
  {
    id: '3->4',
    source: '3',
    target: '4',
    animated: true,
  },
];
<index.js>

import React, { StrictMode } from "react";
import { createRoot } from "react-dom/client";
import "./styles.css";

import App from "./App";

const root = createRoot(document.getElementById("root"));
root.render(
  <StrictMode>
    <App />
  </StrictMode>
);
참고 예제 코드로 구현된 CodeSandbox 및 캡쳐사진

Migrate to v11
A lot changed in v11 but this time we've tried to keep the breaking changes small. The biggest change is the new package name reactflow and the new repo structure. React Flow is now managed as a monorepo and separated into multiple packages that can be installed separately. In addition to that, there are some API changes and new APIs introduced in v11. This guide explains the changes in detail and helps you to migrate from v10 to v11.
=> v11에서 많은 변경 사항이 있었지만, 이번에는 중대한 변경 사항을 최소화하려고 노력했습니다. 가장 큰 변경 사항은 새로운 패키지 이름인 reactflow와 새로운 저장소 구조입니다. React Flow는 이제 모노레포로 관리되며 별도로 설치할 수있는 여러 패키지로 분리되어 있습니다. 이에 더해, v11에서는 일부 API 변경 및 새로운 API가 도입되었습니다. 이 가이드는 변경 사항을 자세히 설명하고 v10에서 v11로 마이그레이션하는 데 도움이 됩니다.
React Flow 11 only works with React 17 or greater
New Features
-
Better Accessibility
- Nodes and edges are focusable, selectable, moveable and deleteable with the keyboard.
- aria- default attributes for all elements and controllable via ariaLabel options
- Keyboard controls can be disabled with the new disableKeyboardA11y prop
-
Better selectable edges via new edge option: interactionWidth - renders invisible edge that makes it easier to interact
-
Better routing for smoothstep and step edges: https://twitter.com/reactflowdev/status/1567535405284614145
-
Nicer edge updating behaviour: https://twitter.com/reactflowdev/status/1564966917517021184
-
Node origin: The new nodeOrigin prop lets you control the origin of a node. Useful for layouting.
-
New background pattern: BackgroundVariant.Cross variant
-
useOnViewportChange hook - handle viewport changes within a component
-
use-on-selection-change hook - handle selection changes within a component
-
useNodesInitialized hook - returns true if all nodes are initialized and if there is more than one node
-
Deletable option for Nodes and edges
-
New Event handlers: onPaneMouseEnter, onPaneMouseMove and onPaneMouseLeave
-
Edge pathOptions for smoothstep and default edges
-
Nicer cursor defaults: Cursor is grabbing, while dragging a node or panning
-
Pane moveable with middle mouse button
-
Pan over nodes when they are not draggable (draggable=false or nodesDraggable false)
- you can disable this behaviour by adding the class name nopan to a wrapper of a custom node
-
component that makes it easier to build custom edges
-
Separately installable packages
- @reactflow/core
- @reactflow/background
- @reactflow/controls
- @reactflow/minimap
=>
-
더 나은 접근성
- 노드와 엣지는 키보드로 포커스, 선택, 이동, 삭제가 가능합니다.
- aria- 기본 속성은 모든 요소에 대해 사용되며 ariaLabel 옵션을 통해 제어할 수 있습니다.
- 새로운 disableKeyboardA11y prop으로 키보드 컨트롤을 비활성화할 수 있습니다.
-
새로운 엣지 옵션인 interactionWidth를 통해 선택 가능한 엣지가 개선되었습니다.
-
smoothstep 및 step 엣지의 더 나은 라우팅이 개선되었습니다.
-
더 나은 엣지 업데이트 동작이 구현되었습니다.
-
새로운 nodeOrigin prop을 사용하여 노드의 원점을 제어할 수 있습니다. 레이아웃에 유용합니다.
-
새로운 배경 패턴인 BackgroundVariant.Cross 변형이 추가되었습니다.
-
useOnViewportChange 훅 - 컴포넌트 내에서 뷰포트 변경 처리
-
use-on-selection-change 훅 - 컴포넌트 내에서 선택 변경 처리
-
useNodesInitialized 훅 - 모든 노드가 초기화되었고 노드가 하나 이상 있을 때 true를 반환합니다.
-
노드와 엣지에 대한 삭제 가능 옵션이 추가되었습니다.
-
새로운 이벤트 핸들러: onPaneMouseEnter, onPaneMouseMove 및 onPaneMouseLeave
-
smoothstep 및 기본 엣지를 위한 엣지 pathOptions
-
더 나은 커서 기본값: 노드를 드래그하거나 패닝하는 동안 커서가 그랩 중인 상태입니다.
-
중간 마우스 버튼으로 패인을 이동할 수 있습니다.
-
드래그할 수 없는 노드 위로 패닝할 수 있습니다 (draggable=false 또는 nodesDraggable false)
- 사용자 정의 노드의 래퍼에 nopan 클래스 이름을 추가하여 이 동작을 비활성화할 수 있습니다.
-
사용자 정의 엣지를 쉽게 구축할 수 있게 해주는 컴포넌트
-
별도로 설치 가능한 패키지
- @reactflow/core
- @reactflow/background
- @reactflow/controls
- @reactflow/minimap
Breaking Changes
1. New npm package name
The package react-flow-renderer has been renamed to reactflow.
=> 패키지 react-flow-renderer가 reactflow로 이름이 변경되었습니다.
Old API
// npm install react-flow-renderer
import ReactFlow from 'react-flow-renderer';
New API
// npm install reactflow
import ReactFlow from 'reactflow';
2. Importing CSS is mandatory
We are not injecting CSS anymore. React Flow won't work if you are not loading the styles!
=> CSS를 가져오는 것이 필수입니다.
우리는 더 이상 CSS를 주입하지 않습니다. CSS를 로드하지 않으면 React Flow가 작동하지 않습니다!
// default styling
import 'reactflow/dist/style.css';

// or if you just want basic styles
import 'reactflow/dist/base.css';
2.1. Removal of the nocss entrypoint
This change also means that there is no react-flow-renderer/nocss entry point anymore. If you used that, you need to adjust the CSS entry points as mentioned above.
=> ' nocss' 진입점의 제거
이 변경 사항은 더 이상 react-flow-renderer/nocss 진입점이 없다는 것을 의미합니다. 이를 사용했다면 위에서 언급된대로 CSS 진입점을 조정해야 합니다.
3. defaultPosition and defaultZoom have been merged to defaultViewport
Old API
import ReactFlow from 'react-flow-renderer';

const Flow = () => {
  return <ReactFlow defaultPosition={[10, 15]} defaultZoom={5} />;
};

export default Flow;
New API
import ReactFlow from 'reactflow';

const defaultViewport: Viewport = { x: 10, y: 15, zoom: 5 };

const Flow = () => {
  return <ReactFlow defaultViewport={defaultViewport} />;
};

export default Flow;
4. Removal of getBezierEdgeCenter, getSimpleBezierEdgeCenter and getEdgeCenter
In v10 we had getBezierEdgeCenter, getSimpleBezierEdgeCenter and getEdgeCenter for getting the center of a certain edge type. In v11 we changed the helper function for creating the path, so that it also returns the center / label position of an edge.
Let's say you want to get the path and the center / label position of a bezier edge:
=> v10에서는 특정 엣지 유형의 중심을 가져 오기 위해 getBezierEdgeCenter, getSimpleBezierEdgeCenter 및 getEdgeCenter를 사용했습니다. v11에서는 경로를 생성하는 도우미 함수를 변경하여 엣지의 중심 / 레이블 위치도 반환하도록했습니다.
예를 들어, 베지에 엣지의 경로와 중심 / 레이블 위치를 가져 오려면:
Old API
import { getBezierEdgeCenter, getBezierPath } from 'react-flow-renderer';

const path = getBezierPath(edgeParams);
const [centerX, centerY] = getBezierEdgeCenter(params);
New API
import { getBezierPath } from 'reactflow';

const [path, labelX, labelY] = getBezierPath(edgeParams);
We avoid to call it centerX and centerY anymore, because it's actually the label position and not always the center for every edge type.
=> 더 이상 centerX와 centerY로 호출하지 않도록 피합니다. 왜냐하면 실제로 모든 엣지 유형에 대해 항상 중심이 아니라 레이블 위치이기 때문입니다.
5. Removal of onClickConnectStop and onConnectStop
onConnectEnd and onConnectEnd 로 대체
Old API
import ReactFlow from 'react-flow-renderer';

const Flow = () => {
  const onConnectStop = () => console.log('on connect stop');

  return (
    <ReactFlow
      defaultNodes={defaultNodes}
      defaultEdges={defaultEdges}
      onConnectStop={onConnectStop}
      onClickConnectStop={onConnectStop}
    />
  );
};

export default Flow;
New API
import ReactFlow from 'reactflow';

const Flow = () => {
  const onConnectEnd = () => console.log('on connect stop');

  return (
    <ReactFlow
      defaultNodes={defaultNodes}
      defaultEdges={defaultEdges}
      onConnectEnd={onConnectEnd}
      onClickConnectEnd={onConnectEnd}
    />
  );
};

export default Flow;
6. Pan over nodes
In the previous versions you couldn't pan over nodes even if they were not draggable. In v11, you can pan over nodes when nodesDraggable=false or node option draggable=false. If you want the old behaviour back, you can add the class name nopan to the wrappers of your custom nodes.
=> 노드 위로 패닝하기
이전 버전에서는 드래그할 수 없는 노드라도 노드 위로 패닝할 수 없었습니다. 그러나 v11에서는 노드 Draggable=false 또는 노드 옵션 draggable=false 인 경우에도 노드 위로 패닝할 수 있습니다. 이전 동작을 되돌리려면 사용자 정의 노드의 래퍼에 nopan 클래스 이름을 추가하면 됩니다.
Migrate to v10
=> 전 버젼, 추후 필요하면 정리...
Migrate to v10
주요 React Flow
Components & Hooks & Types & Utils
API Reference
ReactFlow
ReactFlow
The component is the heart of your React Flow application. It renders your nodes and edges, handles user interaction, and can manage its own state if used as an uncontrolled flow.
import ReactFlow from 'reactflow'

export default function Flow() {
  return <ReactFlow
    nodes={...}
    edges={...}
    onNodesChange={...}
    ...
  />
}
This component takes a lot of different props, most of which are optional. We've tried to document them in groups that make sense to help you find your way.
=> 이 컴포넌트는 많은 다양한 프롭스를 사용합니다. 이 중 대부분은 선택적입니다. 우리는 이를 그룹화하여 이해를 돕기 위해 문서화하려고 노력했습니다.
Common props
These are the props you will most commonly use when working with React Flow. If you are working with a controlled flow with custom nodes, you will likely use almost all of these!
=> 이러한 프로퍼티는 React Flow와 작업할 때 가장 일반적으로 사용하는 프로퍼티입니다. 커스텀 노드가 있는 제어 플로우를 사용하는 경우, 거의 모든 프로퍼티를 사용할 것으로 예상됩니다!
Viewport props
Edge props
Event handlers
It's important to remember to define any event handlers outside of your component or using React's useCallback hook. If you don't, this can cause React Flow to enter an infinite re-render loop!
주의해야 할 점은 이벤트 핸들러를 컴포넌트 외부에 정의하거나 React의 useCallback 훅을 사용해야 한다는 것입니다. 그렇지 않으면 React Flow가 무한한 다시 렌더링 루프에 들어갈 수 있습니다!
General Events
Node Events
Edge Events
Connection Events
Pane Events
Selection Events
Interaction props
Connection line props
Keyboard props
Notes
- The props of this component get exported as ReactFlowProps
=> 이 컴포넌트의 props는 ReactFlowProps로 내보내집니다.
ReactFlowProvider
ReactFlowProvider
The component is a context provider that makes it possible to access a flow's internal state outside of the ReactFlow component. Many of the hooks we provide rely on this component to work.
=> ReactFlowProvider 컴포넌트는 ReactFlow 컴포넌트 외부에서 플로우의 내부 상태에 액세스할 수 있도록 하는 컨텍스트 제공자입니다. 우리가 제공하는 많은 훅들은 이 컴포넌트에 의존하여 작동합니다.
import ReactFlow, { ReactFlowProvider, useNodes } from 'reactflow'

export default function Flow() {
  return (
    <ReactFlowProvider>
      <ReactFlow nodes={...} edges={...} />
      <Sidebar />
    </ReactFlowProvider>
  )
}

function Sidebar() {
  // This hook will only work if the component it's used in is a child of a
  // <ReactFlowProvider />.
  const nodes = useNodes()

  return (
    <aside>
      {nodes.map((node) => (
        <div key={node.id}>
          Node {node.id} -
            x: {node.position.x.toFixed(2)},
            y: {node.position.y.toFixed(2)}
        </div>
      ))}
    </aside>
  )
}
Notes
- If you're using a router and want your flow's state to persist across routes, it's vital that you place the ReactFlowProvider component outside of your router.
- If you have multiple flows on the same page you will need to use a separate ReactFlowProvider for each flow.
=>
- 라우터를 사용하고 플로우의 상태를 경로 간에 유지하려는 경우에는 ReactFlowProvider 컴포넌트를 라우터 외부에 배치하는 것이 중요합니다.
- 같은 페이지에 여러 플로우가 있는 경우 각 플로우에 대해 별도의 ReactFlowProvider를 사용해야 합니다.
Components
Background
The Background component makes it convenient to render different types of backgrounds common in node-based UIs. It comes with three variants: lines, dots and cross.
=> Background 컴포넌트는 노드 기반 UI에서 일반적으로 사용되는 다양한 종류의 배경을 렌더링하는 데 편리합니다. 선, 점 및 십자가 세 가지 변형이 있습니다.
import { useState } from 'react';
import ReactFlow, { Background } from 'reactflow';

export default function Flow() {
  return (
    <ReactFlow defaultNodes={[...]} defaultEdges={[...]}>
      <Background color="#ccc" variant="dots" />
    </ReactFlow>
  );
}
Props
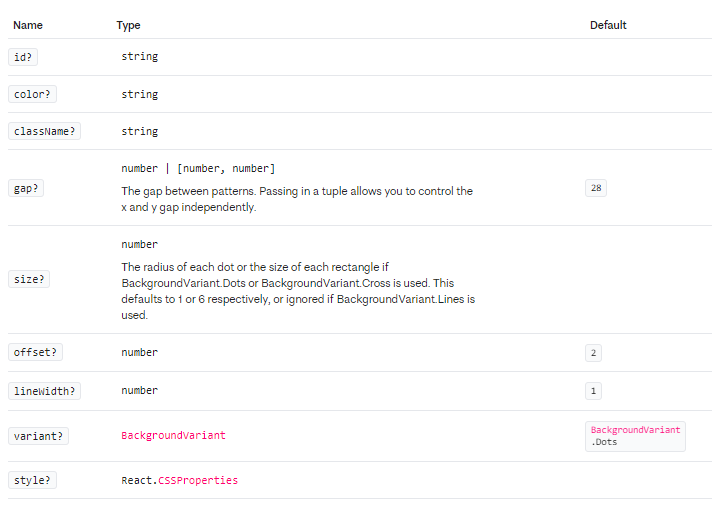
Examples
Combining multiple backgrounds
It is possible to layer multiple components on top of one another to create something more interesting. The following example shows how to render a square grid accented every 10th line.
=> 여러 개의 Background 컴포넌트를 서로 겹쳐서 더 흥미로운 것을 만들 수 있습니다. 다음 예제는 10번째 줄마다 강조된 사각형 그리드를 렌더링하는 방법을 보여줍니다.
import ReactFlow, { Background, BackgroundVariant } from 'reactflow';

import 'reactflow/dist/style.css';

export default function Flow() {
  return (
    <ReactFlow defaultNodes={[...]} defaultEdges={[...]}>
      <Background
        id="1"
        gap={10}
        color="#f1f1f1"
        variant={BackgroundVariant.Lines}
      />

      <Background
        id="2"
        gap={100}
        color="#ccc"
        variant={BackgroundVariant.Lines}
      />
    </ReactFlow>
  );
}
Notes
- When combining multiple components it's important to give each of them a unique id prop!
=> 여러 개의 Background 컴포넌트를 결합할 때 각각에 고유한 id prop을 지정하는 것이 중요합니다!
The component gets used internally for all the edges. It can be used inside a custom edge and handles the invisible helper edge and the edge label for you.
=> BaseEdge 컴포넌트는 내부적으로 모든 엣지에 사용됩니다. 사용자 정의 엣지 내부에서 사용되며, 보이지 않는 도우미 엣지와 엣지 레이블을 처리합니다.
import { BaseEdge } from 'reactflow';

export function CustomEdge({ sourceX, sourceY, targetX, targetY, ...props }) {
  const [edgePath] = getStraightPath({
    sourceX,
    sourceY,
    targetX,
    targetY,
  });

  return <BaseEdge path={edgePath} {...props} />;
}
Props
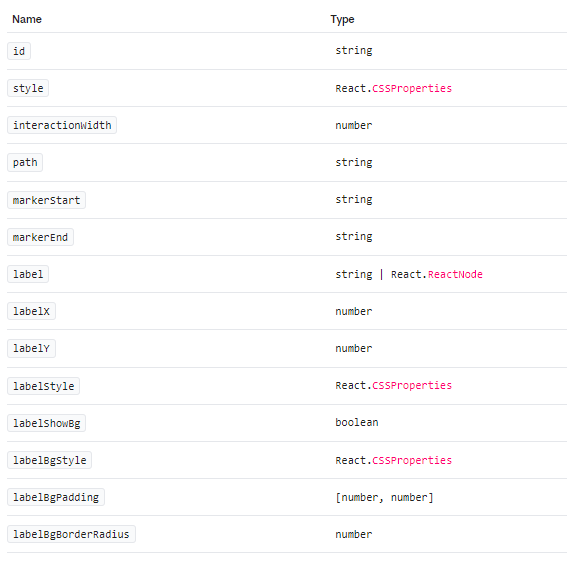
Notes
If you want to use an edge marker with the BaseEdge component, you can pass the markerStart or markerEnd props passed to your custom edge through to the BaseEdge component. You can see all the props passed to a custom edge by looking at the EdgeProps type.
=> CustomEdge 컴포넌트에 markerStart 또는 markerEnd props를 전달하여 엣지 표시기를 사용하려면 이러한 props를 BaseEdge 컴포넌트에 전달하면 됩니다. EdgeProps 타입에서 사용자 정의 엣지에 전달되는 모든 props를 확인할 수 있습니다.
You can add buttons to the control panel by using the ControlButton component and pass it as a child to the Controls component.
=> 제어 패널에 버튼을 추가하려면 ControlButton 컴포넌트를 사용하고 이를 Controls 컴포넌트의 자식으로 전달하면 됩니다.
import { MagicWand } from '@radix-ui/react-icons'
import ReactFlow, { Controls, ControlButton } from 'reactflow'

export default function Flow() {
  return (
    <ReactFlow nodes={[...]} edges={[...]}>
      <Controls>
        <ControlButton onClick={() => alert('Something magical just happened. ✨')}>
          <MagicWand />
        </ControlButton>
      </Controls>
    </ReactFlow>
  )
}
Props
The ControlButton component accepts any prop valid on a HTML button element.
ControlButton 컴포넌트는 HTML button 요소에서 유효한 모든 속성을 허용합니다.
The Controls component renders a small panel that contain convenient buttons to zoom in, zoom out, fit the view, and lock the viewport.
=> Controls 컴포넌트는 확대, 축소, 보기 맞추기 및 뷰포트 잠금에 유용한 버튼이 포함된 작은 패널을 렌더링합니다.
Props
For TypeScript users, the props type for the Controls component is exported as ControlsProps.
=> TypeScript 사용자를 위해, Controls 컴포넌트의 props 유형은 ControlsProps로 내보내집니다.
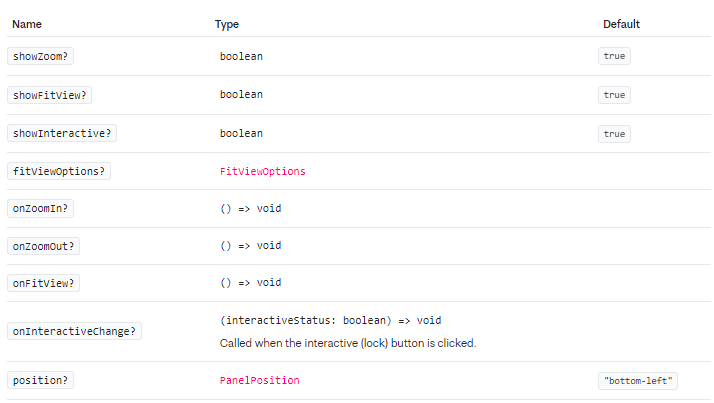
Additionally, the Controls component accepts any prop valid on a div element.
=> 추가적으로, Controls 컴포넌트는 div 요소에 유효한 모든 속성을 전달받습니다.
Notes
- To extend or customise the controls, you can use the ControlButton component
=> Controls를 확장하거나 사용자 정의하려면 ControlButton 구성 요소를 사용할 수 있습니다.
EdgeLabelRenderer
Edges are SVG-based. If you want to render more complex labels you can use the EdgeLabelRenderer component to access a div based renderer. This component is a portal that renders the label in a div that is positioned on top of the edges. You can see an example usage of the component in the edge label renderer example.
=> Edges는 SVG를 기반으로 합니다. 더 복잡한 라벨을 렌더링하려면 EdgeLabelRenderer 구성 요소를 사용하여 div 기반의 렌더러에 액세스할 수 있습니다. 이 구성 요소는 엣지 위에 위치한 div에 라벨을 렌더링하는 포털입니다. EdgeLabelRenderer 구성 요소의 예제 사용법은 엣지 라벨 렌더러 예제에서 확인할 수 있습니다.
The EdgeLabelRenderer component is available in reactflow version 11.2 or higher.
=> EdgeLabelRenderer 구성 요소는 reactflow 버전 11.2 이상에서 사용할 수 있습니다.
import React from 'react';
import { getBezierPath, EdgeLabelRenderer, BaseEdge } from 'reactflow';

const CustomEdge = ({ id, data, ...props }) => {
  const [edgePath, labelX, labelY] = getBezierPath(props);

  return (
    <>
      <BaseEdge id={id} path={edgePath} />
      <EdgeLabelRenderer>
        <div
          style={{
            position: 'absolute',
            transform: `translate(-50%, -50%) translate(${labelX}px,${labelY}px)`,
            background: '#ffcc00',
            padding: 10,
            borderRadius: 5,
            fontSize: 12,
            fontWeight: 700,
          }}
          className="nodrag nopan"
        >
          {data.label}
        </div>
      </EdgeLabelRenderer>
    </>
  );
};

export default CustomEdge;
Props
| Name | Type |
|---|---|
| #children | React.ReactNode |
Notes
The EdgeLabelRenderer has no pointer events by default. If you want to add mouse interactions you need to set the style pointerEvents: all and add the nopan class on the label or the element you want to interact with.
=> EdgeLabelRenderer는 기본적으로 포인터 이벤트가 없습니다. 마우스 상호 작용을 추가하려면 style 속성에 pointerEvents: all을 설정하고 레이블이나 상호 작용할 요소에 nopan 클래스를 추가해야 합니다.
You can use the EdgeText component as a helper component to display text within your custom edges.
=> EdgeText 컴포넌트를 사용하여 사용자 정의 엣지 내에서 텍스트를 표시할 수 있습니다.
import { EdgeText } from 'reactflow';

export function CustomEdgeLabel({ label }) {
  return (
    <EdgeText
      x={100}
      y={100}
      label={label}
      labelStyle={{ fill: 'white' }}
      labelShowBg
      labelBgStyle={{ fill: 'red' }}
      labelBgPadding={[2, 4]}
      labelBgBorderRadius={2}
    />
  );
}
Props
For TypeScript users, the props type for the EdgeText component is exported as EdgeTextProps.
=> TypeScript 사용자를 위해 EdgeText 컴포넌트의 props 타입은 EdgeTextProps로 내보내집니다.
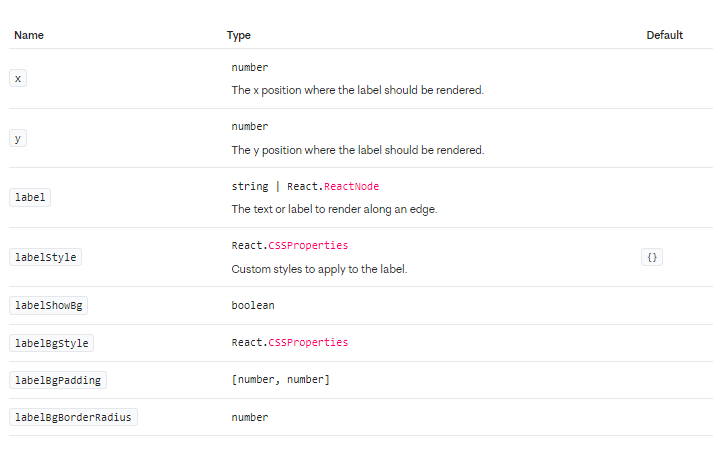
Additionally, you may also pass any standard React HTML attributes such as onClick, className and so on.
=> 추가적으로 onClick, className 등과 같은 표준 React HTML 속성을 전달할 수도 있습니다.
Handle
The Handle component is used in your custom nodes to define connection points.
import { Handle, Position } from 'reactflow';

export CustomNode = ({ data }) => {
  return (
    <>
      <div style={{ padding: '10px 20px' }}>
        {data.label}
      </div>

      <Handle type="target" position={Position.Left} />
      <Handle type="source" position={Position.Right} />
    </>
  );
};
Props
For TypeScript users, the props type for the Handle component is exported as HandleProps.
TypeScript 사용자를 위해 Handle 컴포넌트의 props 타입은 HandleProps 내보내집니다.
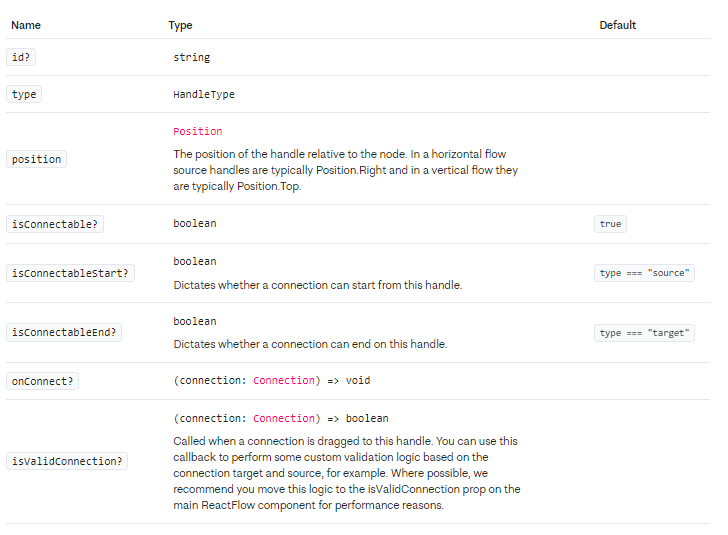
Examples
Custom handle with validation
You can create your own custom handles by wrapping the Handle component. This example shows a custom handle that only allows connections when the connection source matches a given id.
=> Handle 컴포넌트를 래핑하여 사용자 정의 핸들을 만들 수 있습니다. 이 예제는 연결 소스가 지정된 ID와 일치할 때에만 연결을 허용하는 사용자 정의 핸들을 보여줍니다.
import { Handle, Position } from 'reactflow';

export const TargetHandleWithValidation = ({ position, source }) => (
  <Handle
    type="target"
    position={position}
    isValidConnection={(connection) => connection.source === source}
    onConnect={(params) => console.log('handle onConnect', params)}
    style={{ background: '#fff' }}
  />
);
Style handles when connecting
The handle receives the additional class names connecting when the connection line is above the handle and valid if the connection is valid. You can find an example which uses these classes here.
해당 핸들은 연결 라인이 핸들 위에 있을 때 connecting 추가 클래스를 받으며, 연결이 유효한 경우 valid를 받습니다. 이러한 클래스를 사용하는 예제는 여기에서 확인할 수 있습니다.
Multiple handles
If you need multiple source or target handles you can achieve this by creating a custom node. Normally you just use the id of a node for the source or target of an edge. If you have multiple source or target handles you need to pass an id to these handles. These ids can be used by an edge with the sourceHandle and targetHandle options, so that you can connect a specific handle. If you have a node with an id = 1 and a handle with an id = a you can connect this handle by using the node source=1 and the sourceHandle=a.
=> 여러 개의 소스 또는 대상 핸들이 필요한 경우 사용자 정의 노드를 생성하여 이를 달성할 수 있습니다. 일반적으로 엣지의 소스 또는 대상으로 노드의 ID만 사용합니다. 그러나 여러 개의 소스 또는 대상 핸들이 있는 경우 이러한 핸들에 ID를 전달해야 합니다. 이러한 ID는 엣지가 소스Handle 및 대상Handle 옵션으로 사용할 수 있으므로 특정 핸들에 연결할 수 있습니다. 예를 들어 ID가 1인 노드와 ID가 a인 핸들이 있는 경우, 노드 source=1 및 sourceHandle=a를 사용하여 해당 핸들을 연결할 수 있습니다.
Dynamic handles
If you are programmatically changing the position or number of handles in your custom node, you need to update the node internals with the useUpdateNodeInternals hook.
You can find an example of how to implement a custom node with multiple handles in the custom node guide or in the custom node example.
=> 사용자 정의 노드에서 핸들의 위치나 개수를 프로그래밍적으로 변경하는 경우, useUpdateNodeInternals 훅을 사용하여 노드 내부를 업데이트해야 합니다.
다중 핸들이 있는 사용자 정의 노드를 구현하는 예시는 사용자 정의 노드 가이드나 사용자 정의 노드 예시에서 찾을 수 있습니다.
Custom handle styles
Since the handle is a div, you can use CSS to style it or pass a style prop to customize a Handle. You can see this in the Add Node On Edge Drop and Simple Floating Edges examples.
=> 핸들은 div 요소이므로 CSS를 사용하여 스타일을 지정하거나 Handle을 사용자 정의하기 위해 style prop을 전달할 수 있습니다. 이에 대한 예시는 "Add Node On Edge Drop"와 "Simple Floating Edges"를 참고하실 수 있습니다.
Notes
- If you need to hide a handle for some reason, you must use visibility: hidden or opacity: 0 instead of display: none. This is important because React Flow needs to calculate the dimensions of the handle to work properly and using display: none will report a width and height of 0!
=> 만약 어떤 이유로 인해 핸들을 숨겨야 한다면, display: none 대신 visibility: hidden 또는 opacity: 0을 사용해야 합니다. 이것은 React Flow가 제대로 작동하기 위해 핸들의 크기를 계산해야 하기 때문에 중요합니다. display: none을 사용하면 너비와 높이가 0으로 보고됩니다!
NodeResizer
The NodeResizer component can be used to add a resize functionality to your nodes. It renders draggable controls around the node to resize in all directions.
=> NodeResizer 컴포넌트를 사용하여 노드에 리사이즈 기능을 추가할 수 있습니다. 이 컴포넌트는 노드 주변에 드래그 가능한 컨트롤을 렌더링하여 모든 방향으로 리사이즈할 수 있습니다.
import { memo } from 'react';
import { Handle, Position, NodeResizer } from 'reactflow';

const ResizableNode = ({ data }) => {
  return (
    <>
      <NodeResizer minWidth={100} minHeight={30} />
      <Handle type="target" position={Position.Left} />
      <div style={{ padding: 10 }}>{data.label}</div>
      <Handle type="source" position={Position.Right} />
    </>
  );
};

export default memo(ResizableNode);
Props
For TypeScript users, the props type for the NodeResizer component is exported as NodeResizerProps.
=> NodeResizer 컴포넌트의 TypeScript 사용자를 위한 props 유형은 NodeResizerProps로 내보내집니다.
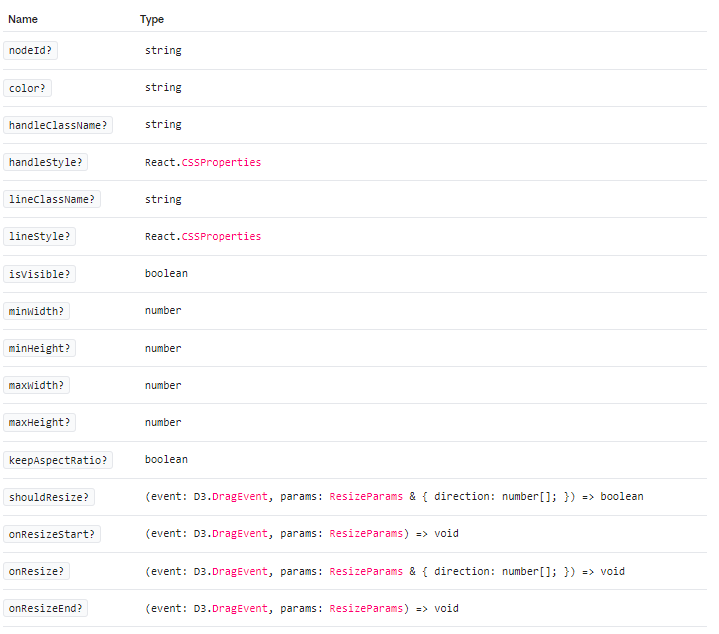
Examples
Head over to the example page to see how this is done.
Custom Resize Controls
To build custom resize controls, you can use the NodeResizeControl component and customize it.
Notes
- Take a look at the docs for the NodeProps type or the guide on custom nodes to see how to implement your own nodes.
NodeResizeControl
To create your own resizing UI, you can use the NodeResizeControl component where you can pass children (such as icons).
=> 자체 크기 조정 UI를 만들려면 아이콘과 같은 자식 요소를 전달할 수 있는 NodeResizeControl 컴포넌트를 사용할 수 있습니다.
Props
For TypeScript users, the props type for the NodeResizeControl component is exported as NodeResizeControlrops.
=> NodeResizeControl 컴포넌트에 대한 TypeScript 사용자용 프로퍼티 타입은 NodeResizeControlProps로 내보내집니다.
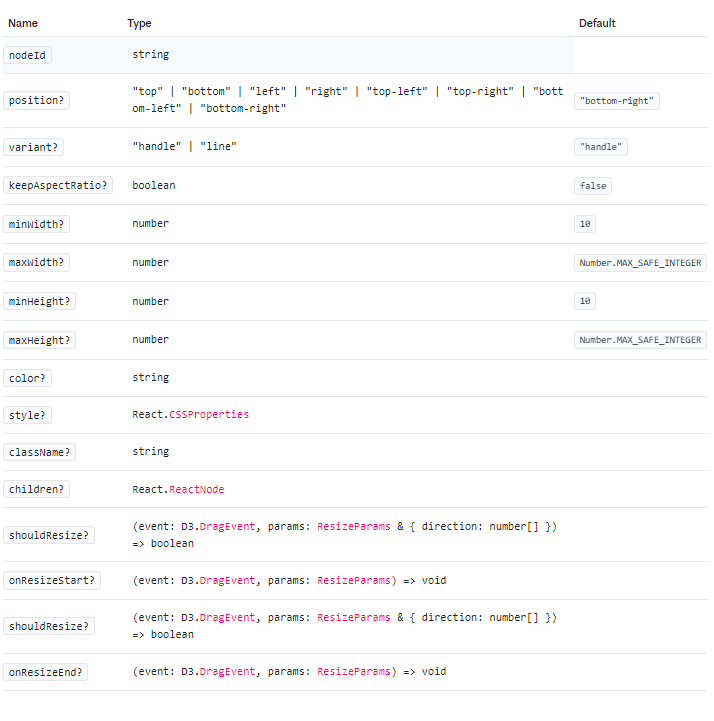
NodeToolbar
This component can render a toolbar or tooltip to one side of a custom node. This toolbar doesn't scale with the viewport so that the content is always visible.
=> 이 컴포넌트는 사용자 정의 노드의 한 쪽에 툴바 또는 툴팁을 렌더링할 수 있습니다. 이 툴바는 뷰포트와 함께 확장되지 않으므로 컨텐츠가 항상 보이게 됩니다.
import { memo } from 'react';
import { Handle, Position, NodeToolbar } from 'reactflow';

export CustomNode = ({ data }) => {
  return (
    <>
      <NodeToolbar isVisible={data.toolbarVisible} position={data.toolbarPosition}>
        <button>delete</button>
        <button>copy</button>
        <button>expand</button>
      </NodeToolbar>

      <div style={{ padding: '10px 20px' }}>
        {data.label}
      </div>

      <Handle type="target" position={Position.Left} />
      <Handle type="source" position={Position.Right} />
    </>
  );
};

export default memo(CustomNode);
Props
For TypeScript users, the props type for the NodeToolbar component is exported as NodeToolbarProps.
=> NodeToolbar 컴포넌트에 대한 TypeScript 사용자용 프로퍼티 타입은 NodeToolbarProps 내보내집니다.
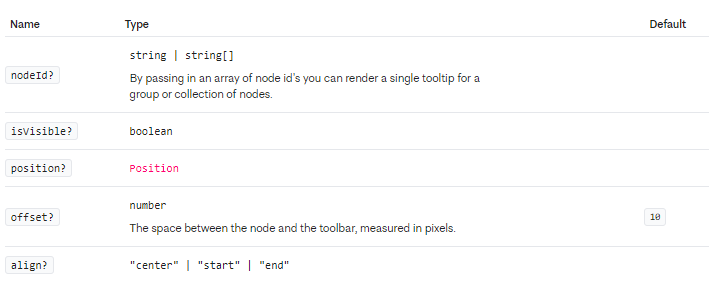
Notes
- By default, the toolbar is only visible when a node is selected. If multiple nodes are selected it will not be visible to prevent overlapping toolbars or clutter. You can override this behavior by setting the isVisible prop to true.
=> 기본적으로 툴바는 노드가 선택될 때만 표시됩니다. 여러 노드가 선택되어 있으면 겹치는 툴바나 혼란스러운 상황을 방지하기 위해 툴바가 표시되지 않습니다. isVisible 속성을 true로 설정하여이 동작을 재정의 할 수 있습니다.
Panel
The Panel component helps you position content above the viewport. It is used internally by the MiniMap and Controls components.
import ReactFlow, { Background, Panel } from 'reactflow';

export default function Flow() {
  return (
    <ReactFlow nodes={[...]} fitView>
      <Panel position="top-left">top-left</Panel>
      <Panel position="top-center">top-center</Panel>
      <Panel position="top-right">top-right</Panel>
      <Panel position="bottom-left">bottom-left</Panel>
      <Panel position="bottom-center">bottom-center</Panel>
      <Panel position="bottom-right">bottom-right</Panel>
    </ReactFlow>
  );
}
Props
For TypeScript users, the props type for the Panel component is exported as PanelProps.
=> Panel 컴포넌트에 대한 TypeScript 사용자용 프로퍼티 타입은 PanelProps 내보내집니다.
| Name | Type |
|---|---|
| #position | PanelPosition |
| #children | React.ReactNode |
Additionally, the Panel component accepts all props of the HTML div element.
=> 또한 Panel 컴포넌트는 HTML div 요소의 모든 속성을 허용합니다.
Hooks
useEdges
This hook returns an array of the current edges. Components that use this hook will re-render whenever any edge changes.
=> 이 훅은 현재 엣지의 배열을 반환합니다. 이 훅을 사용하는 컴포넌트는 엣지가 변경될 때마다 다시 렌더링됩니다.
import { useEdges } from 'reactflow';

export default function () {
  const edges = useEdges();

  return <div>There are currently {edges.length} edges!</div>;
}
Signature
| Name | Type |
|---|---|
| #Returns | Edge[] |
Notes
Relying on useEdges unecessarily can be a common cause of performance issues. Whenever any edge changes, this hook will cause the component to re-render. Often we actually care about something more specific, like when the number of edges changes: where possible try to use useStore instead.
=> useEdges에 지나치게 의존하는 것은 성능 문제의 일반적인 원인이 될 수 있습니다. 어떤 엣지가 변경될 때마다 이 훅은 컴포넌트를 다시 렌더링합니다. 종종 실제로 우리가 신경 써야 할 것은 엣지의 수가 변경될 때와 같은 더 구체적인 상황입니다. 가능한 경우 useStore를 사용하십시오.
useEdgesState
This hook makes it easy to prototype a controlled flow where you manage the state of nodes and edges outside the ReactFlowInstance. You can think of it like React's useState hook with an additional helper callback.
=> 이 훅을 사용하면 ReactFlowInstance 외부에서 노드와 엣지의 상태를 관리하는 제어된 플로우를 쉽게 프로토타이핑할 수 있습니다. 이는 React의 useState 훅과 유사하게 생각할 수 있지만 추가적인 도우미 콜백이 있는 것으로 생각할 수 있습니다.
import ReactFlow, { useNodesState, useEdgesState } from 'reactflow';

const initialNodes = [];
const initialEdges = [];

export default function () {
  const [nodes, setNodes, onNodesChange] = useNodesState(initialNodes);
  const [edges, setEdges, onEdgesChange] = useEdgesState(initialEdges);

  return (
    <ReactFlow
      nodes={nodes}
      edges={edges}
      onNodesChange={onNodesChange}
      onEdgesChange={onEdgesChange}
    />
  );
}
Signature
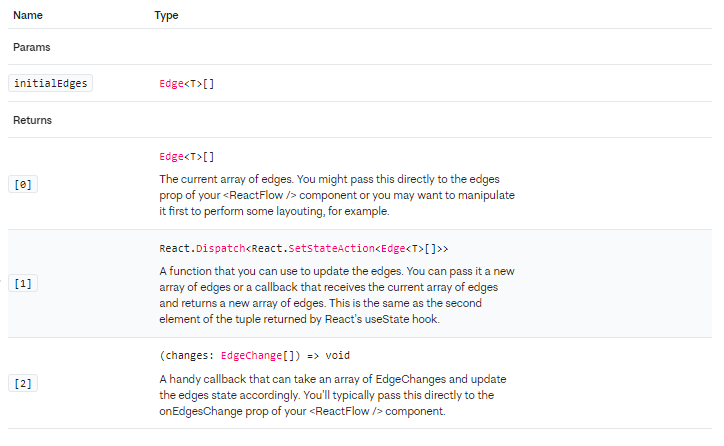
| Name | Type |
|---|---|
| #Params | |
| #initialEdges | Edge[] |
| #Returns | |
| [0] | Edge[] |
| The current array of edges. You might pass this directly to the edges prop of your component or you may want to manipulate it first to perform some layouting, for example. | |
| [1] | React.Dispatch<React.SetStateAction<Edge[]>> |
| A function that you can use to update the edges. You can pass it a new array of edges or a callback that receives the current array of edges and returns a new array of edges. This is the same as the second element of the tuple returned by React's useState hook. | |
| [2] | (changes: EdgeChange[]) => void |
| A handy callback that can take an array of EdgeChanges and update the edges state accordingly. You'll typically pass this directly to the onEdgesChange prop of your component. |
Notes
This hook was created to make prototyping easier and our documentation examples clearer. Although it is OK to use this hook in production, in practice you may want to use a more sophisticated state management solution like Zustand instead.
=> 이 훅은 프로토타이핑을 더 쉽게 하고 문서 예제를 더 명확하게 만들기 위해 만들어졌습니다. 실제로는 Zustand와 같은 더 정교한 상태 관리 솔루션을 사용하는 것이 좋습니다. 하지만 프로덕션 환경에서 이 훅을 사용하는 것은 괜찮습니다.
useKeyPress
This hook lets you listen for specific key codes and tells you whether they are currently pressed or not.
=> 이 훅은 특정 키 코드를 감지하고 해당 키가 현재 눌려 있는지 여부를 알려줍니다.
import { useKeyPress } from 'reactflow';

export default function () {
  const spacePressed = useKeyPress('Space');
  const cmdAndSPressed = useKeyPress(['Meta+s', 'Strg+s']);

  return (
    <div>
      {spacePressed && <p>Space pressed!</p>}
      {cmdAndSPressed && <p>Cmd + S pressed!</p>}
    </div>
  );
}
Signature

Notes
- This hook does not rely on a ReactFlowInstance so you are free to use it anywhere in your app!
=> 이 훅은 ReactFlowInstance에 의존하지 않으므로 앱의 어디에서나 자유롭게 사용할 수 있습니다!
useNodeId
You can use this hook to get the id of the node it is used inside. It is useful if you need the node's id deeper in the render tree but don't want to manually drill down the id as a prop.
=> 이 훅을 사용하면 해당 노드가 포함된 컴포넌트 내에서 노드의 ID를 얻을 수 있습니다. 렌더 트리 내에서 깊게 필요하지만 수동으로 ID를 프롭으로 내려가게 할 필요가 없는 경우 유용합니다.
import { useNodeId } from 'reactflow';

export default function CustomNode() {
  return (
    <div>
      <span>This node has an id of </span>
      <NodeIdDisplay />
    </div>
  );
}

function NodeIdDisplay() {
  const nodeId = useNodeId();

  return <span>{nodeId}</span>;
}
Signature
| Name | Type |
|---|---|
| #Returns | string |
| The id for a node in the flow. |
Notes
- This hook should only be used within a custom node or its children.
=> 이 훅은 사용자 정의 노드나 해당 자식 컴포넌트 내에서만 사용해야 합니다.
useNodes
This hook returns an array of the current nodes. Components that use this hook will re-render whenever any node changes, including when a node is selected or moved.
=> 이 훅은 현재 노드의 배열을 반환합니다. 이 훅을 사용하는 컴포넌트는 선택된 노드가 변경되거나 이동될 때 포함하여 모든 노드가 변경될 때마다 다시 렌더링됩니다.
import { useNodes } from 'reactflow';

export default function () {
  const nodes = useNodes();

  return <div>There are currently {nodes.length} nodes!</div>;
}
Signature
| Name | Type |
|---|---|
| #Returns | Node[] |
| An array of all nodes currently in the flow. |
궁금한 사항:
? : T 는 텍스트를말하는거야?
! : T는 일반적으로 제네릭 타입을 나타냅니다. 제네릭은 함수나 클래스를 정의할 때 사용하는 타입 매개변수로, 다양한 타입의 데이터를 다룰 수 있도록 일반화된 타입을 제공합니다.실제로 T는 사용자가 정의한 노드의 데이터 타입을 의미합니다.
Notes
Relying on useNodes unecessarily can be a common cause of performance issues. Whenever any node changes, this hook will cause the component to re-render. Often we actually care about something more specific, like when the number of nodes changes: where possible try to use useStore instead.
=>
useNodes를 불필요하게 의존하는 것은 성능 문제의 일반적인 원인이 될 수 있습니다. 노드가 변경될 때마다 이 훅은 컴포넌트를 다시 렌더링합니다. 종종 우리가 실제로 관심을 가지는 것은 노드의 수가 변경될 때와 같은 보다 구체적인 경우입니다. 가능하면 useStore를 대신 사용하십시오.
useNodesInitialized
This hook tells you whether all the nodes in a flow have been measured and given a width and height. When you add a node to the flow, this hook will return false and then true again once the node has been measured.
=> 이 훅은 플로우의 모든 노드가 측정되어 너비와 높이가 할당되었는지 여부를 알려줍니다. 노드를 플로우에 추가하면 이 훅은 노드가 측정될 때까지 false를 반환한 다음 노드가 측정된 후에 true를 반환합니다.
import { useReactFlow, useNodesInitialized } from 'reactflow';
import { useEffect, useState } from 'react';

const options = {
  includeHiddenNodes: false,
};

export default function useLayout() {
  const { getNodes } = useReactFlow();
  const nodesInitialized = useNodesInitialized(options);
  const [layoutedNodes, setLayoutedNodes] = useState(getNodes());

  useEffect(() => {
    if (nodesInitialized) {
      setLayoutedNodes(yourLayoutingFunction(getNodes()));
    }
  }, [nodesInitialized]);

  return layoutedNodes;
}
Signature
| Name | Type | Default |
|---|---|---|
| #Params | ||
| #options | object | |
| #options.includeHiddenNodes? | boolean | false |
| #Returns | boolean | |
| Whether or not the nodes have been initialized by the ReactFlow component and given a width and height. | ||
Notes
This hook always returns false if the internal nodes array is empty.
=> 만약 내부 노드 배열이 비어 있다면, 이 훅은 항상 false를 반환합니다.
useNodesState
This hook makes it easy to prototype a controlled flow where you manage the state of nodes and edges outside the ReactFlowInstance. You can think of it like React's useState hook with an additional helper callback.
=> 이 훅은 ReactFlowInstance 외부에서 노드와 엣지의 상태를 관리하는 제어 플로우를 쉽게 프로토타입화할 수 있습니다. 이것은 React의 useState 훅과 비슷한 것으로 생각할 수 있지만 추가적인 도우미 콜백이 있습니다.
import ReactFlow, { useNodesState, useEdgesState } from 'reactflow';

const initialNodes = [];
const initialEdges = [];

export default function () {
  const [nodes, setNodes, onNodesChange] = useNodesState(initialNodes);
  const [edges, setEdges, onEdgesChange] = useEdgesState(initialEdges);

  return (
    <ReactFlow
      nodes={nodes}
      edges={edges}
      onNodesChange={onNodesChange}
      onEdgesChange={onEdgesChange}
    />
  );
}
Signature
| Name | Type |
|---|---|
| #Params | |
| #initialNodes | Node<T>[] |
| #Returns | |
| [0] | Node<T>[] The current array of nodes. You might pass this directly to the nodes prop of your <ReactFlow /> component or you may want to manipulate it first to perform some layouting, for example. |
| [1] | React.Dispatch<React.SetStateAction <Node<T>[ ]>> A function that you can use to update the nodes. You can pass it a new array of nodes or a callback that receives the current array of nodes and returns a new array of nodes. This is the same as the second element of the tuple returned by React's useState hook. |
| [2] | (changes: NodeChange[ ]) => void A handy callback that can take an array of NodeChanges and update the nodes state accordingly. You'll typically pass this directly to the onNodesChange prop of your <ReactFlow /> component. |
Notes
This hook was created to make prototyping easier and our documentation examples clearer. Although it is OK to use this hook in production, in practice you may want to use a more sophisticated state management solution like Zustand instead.
=> 이 훅은 프로토타이핑을 쉽게 하고 문서 예제를 더 명확하게 만들기 위해 만들어졌습니다. 생산 환경에서 이 훅을 사용하는 것은 괜찮지만, 실제로는 Zustand와 같은 더 정교한 상태 관리 솔루션을 사용하는 것이 좋을 수 있습니다.
useOnSelectionChange
This hook lets you listen for changes to both node and edge selection. As the name implies, the callback you provide will be called whenever the selection of either nodes or edges changes.
=> 이 훅을 사용하면 노드 및 엣지 선택에 대한 변경 사항을 감시할 수 있습니다. 이름에서 알 수 있듯이 제공하는 콜백은 노드 또는 엣지 선택이 변경될 때마다 호출됩니다
import { useState } from 'react';
import ReactFlow, { useOnSelectionChange } from 'reactflow';

function SelectionDisplay() {
  const [selectedNodes, setSelectedNodes] = useState([]);
  const [selectedEdges, setSelectedEdges] = useState([]);

  useOnSelectionChange({
    onChange: ({ nodes, edges }) => {
      setSelectedNodes(nodes.map((node) => node.id));
      setSelectedEdges(edges.map((edge) => edge.id));
    },
  });

  return (
    <div>
      <p>Selected nodes: {selectedNodes.join(', ')}</p>
      <p>Selected edges: {selectedEdges.join(', ')}</p>
    </div>
  );
}
Signature
| Name | Type |
|---|---|
| #Params | |
| #options | object |
| #options.onChange | (params: { nodes: Node[ ]; edges: Edge[ ]; }) => void |
| #Returns | |
| void |
useOnViewportChange
The useOnViewportChange hook lets you listen for changes to the viewport such as panning and zooming. You can provide a callback for each phase of a viewport change: onStart, onChange, and onEnd.
=> useOnViewportChange 훅을 사용하면 뷰포트 변경 사항(패닝 및 확대/축소)을 듣을 수 있습니다. onStart, onChange 및 onEnd 각각의 뷰포트 변경 단계에 대해 콜백을 제공할 수 있습니다.
import { useCallback } from 'react';
import { useOnViewportChange } from 'reactflow';

function ViewportChangeLogger() {
  useOnViewportChange({
    onStart: (viewport: Viewport) => console.log('start', viewport),
    onChange: (viewport: Viewport) => console.log('change', viewport),
    onEnd: (viewport: Viewport) => console.log('end', viewport),
  });

  return null;
}
Signature
Notes
-
This hook can only be used in a component that is a child of a ReactFlowProvider or a ReactFlow component.
=> => 이 훅은 ReactFlowProvider 또는 ReactFlow 컴포넌트의 자식으로만 사용할 수 있습니다.
useReactFlow
This hook returns a ReactFlowInstance that can be used to update nodes and edges, manipulate the viewport, or query the current state of the flow.
=> 이 훅은 ReactFlowInstance를 반환하며, 노드 및 엣지를 업데이트하거나 뷰포트를 조작하거나 플로우의 현재 상태를 조회하는 데 사용할 수 있습니다.
import { useCallback, useState } from 'react';
import { useReactFlow } from 'reactflow';

export function NodeCounter() {
const reactFlow = useReactFlow();
const [count, setCount] = useState(0);
const countNodes = useCallback(() => {
  setCount(reactFlow.getNodes().length);
// you need to pass it as a dependency if you are using it with useEffect or useCallback
// because at the first render, it's not initialized yet and some functions might not work.
}, [reactFlow]);

return (
  <div>
    <button onClick={countNodes}>Update count</button>
    <p>There are {count} nodes in the flow.</p>
  </div>
);
}
Signature
| Name | Type |
|---|---|
| #Returns | |
| ReactFlowInstance<T, U> |
? : U는 무엇을의미하는거야?
! : U는 React Flow의 사용자 지정 데이터 타입을 나타냅니다. ReactFlowInstance<T, U>에서 T는 노드 데이터의 타입이고 U는 엣지 데이터의 타입을 나타냅니다. U는 일반적으로 엣지에 대한 추가 정보를 포함하는 사용자 정의 데이터 타입입니다. 이것은 React Flow에서 노드와 엣지를 생성하고 관리할 때 사용되는 데이터의 유형을 지정하는 데 사용됩니다. U의 구체적인 내용은 사용자의 요구 사항과 프로젝트에 따라 달라질 수 있습니다.
Notes
- This hook can only be used in a component that is a child of a ReactFlowProvider or a ReactFlow component.
- Unlike useNodes or useEdges, this hook won't cause your component to re-render when state changes. Instead, you can query the state when you need it by using methods on the ReactFlowInstance this hook returns.
=>
-
이 훅은 ReactFlowProvider 또는 ReactFlow 컴포넌트의 자식 컴포넌트에서만 사용할 수 있습니다.
-
useNodes 또는 useEdges와 달리, 이 훅은 상태가 변경될 때 컴포넌트를 다시 렌더링하지 않습니다. 대신 이 훅이 반환하는 ReactFlowInstance의 메서드를 사용하여 필요할 때 상태를 쿼리할 수 있습니다.
useStore
This hook can be used to subscribe to internal state changes of the React Flow component. The useStore hook is re-exported from the Zustand state management library, so you should check out their docs for more details.
=> 이 훅은 React Flow 컴포넌트의 내부 상태 변경을 구독하는 데 사용될 수 있습니다. useStore 훅은 Zustand 상태 관리 라이브러리에서 다시 내보내지므로 자세한 내용은 해당 문서를 참조하시기 바랍니다.
This hook should only be used if there is no other way to access the internal state. For many of the common use cases, there are dedicated hooks available such as useReactFlow, useViewport, etc.
이 훅은 내부 상태에 접근하는 다른 방법이 없는 경우에만 사용해야 합니다. 일반적인 사용 사례에는 useReactFlow, useViewport 등과 같은 전용 훅이 있습니다.
import ReactFlow, { useStore } from 'reactflow';

const nodesLengthSelector = (state) =>
  Array.from(state.nodeInternals.values()).length || 0;

const NodesLengthDisplay = () => {
  const nodesLength = useStore(nodesLengthSelector);

  return <div>The current number of nodes is: {nodesLength}</div>;
};

function Flow() {
  return (
    <ReactFlow nodes={[...]}>
      <NodesLengthDisplay />
    </ReactFlow>
  );
}
This example computes the number of nodes eagerly. Whenever the number of nodes in the flow changes, the NodesLengthDisplay component will re-render. This is in contrast to the example in the useStoreApi hook that only computes the number of nodes when a button is clicked.
Choosing whether to calculate values on-demand or to subscribe to changes as they happen is a bit of a balancing act. On the one hand, putting too many heavy calculations in an event handler can make your app feel sluggish or unresponsive. On the other hand, computing values eagerly can lead to slow or unnecessary re-renders.
We make both this hook and useStoreApi available so that you can choose the approach that works best for your use-case.
=> 이 예제는 노드 수를 즉시 계산합니다. 플로우의 노드 수가 변경될 때마다 NodesLengthDisplay 컴포넌트가 다시 렌더링됩니다. 이는 useStoreApi 훅의 예제와 대조적입니다. useStoreApi는 버튼을 클릭할 때만 노드 수를 계산합니다.
요청 시 값을 계산할지 또는 변경이 발생할 때 변경 사항을 구독할지 선택하는 것은 조율이 필요합니다. 한편으로는 이벤트 핸들러에 많은 무거운 계산을 넣으면 앱이 느린 느낌이나 반응이 없는 것처럼 느껴질 수 있습니다. 다른 한편으로는 값이 즉시 계산되면 느린 또는 불필요한 다시 렌더링을 유발할 수 있습니다.
우리는 여기에 이 훅과 useStoreApi를 모두 제공하여 사용 사례에 가장 적합한 접근 방식을 선택할 수 있도록 합니다.
Signature
| Name | Type | |
|---|---|---|
| #Params | ||
| #selector | (state: ReactFlowState) => T | |
| #equalityFn | (prev: T, next: T) => boolean | |
| #Returns | ||
| T |
Examples
Triggering store actions
You can manipulate the internal React Flow state by triggering internal actions through the useStore hook. These actions are already used internally throughout the library, but you can also use them to implement custom functionality.
=> useStore 훅을 통해 내부 React Flow 상태를 조작할 수 있습니다. 이러한 액션은 이미 라이브러리 내부에서 사용되지만 사용자 정의 기능을 구현하는 데도 사용할 수 있습니다.
import { useStore } from 'reactflow';

const setMinZoomSelector = (state) => state.setMinZoom;

function MinZoomSetter() {
  const setMinZoom = useStore(setMinZoomSelector);

  return <button onClick={() => setMinZoom(6)}>set min zoom</button>;
}
Notes
- You should define your store selector function outside of the component that uses it, or use React's useCallback hook to memoize the function. Not doing this can incur a slight performance penalty. => your store selector function 는 해당 함수를 사용하는 컴포넌트 외부에서 정의하거나 React의 useCallback 훅을 사용하여 함수를 메모이제이션해야 합니다. 이렇게 하지 않으면 약간의 성능 저하가 발생할 수 있습니다.
useStoreApi
In some cases, you might need to access the store directly. This hook returns the store object which can be used on demand to access the state or dispatch actions.
=> 특정 경우에는 store에 직접 액세스해야 할 수도 있습니다. 이 훅은 저장소 객체를 반환하며 필요할 때 상태에 액세스하거나 액션을 디스패치하는 데 사용할 수 있습니다.
This hook should only be used if there is no other way to access the internal state. For many of the common use cases, there are dedicated hooks available such as useReactFlow, useViewport, etc.
이 훅은 내부 상태에 액세스하는 다른 방법이 없을 때에만 사용해야 합니다. 일반적인 사용 사례에는 useReactFlow, useViewport 등과 같은 전용 훅이 있습니다.
import { useState, useCallback } from 'react';
import ReactFlow, { useStoreApi } from 'reactflow';

const NodesLengthDisplay = () => {
const [nodesLength, setNodesLength] = useState(0);
const store = useStoreApi();

const onClick = useCallback(() => {
  const { nodeInternals } = store.getState();
  const length = Array.from(nodeInternals.values()).length || 0;

  setNodesLength(length);
}, [store]);

return (
  <div>
    <p>The current number of nodes is: {nodesLength}</p>
    <button onClick={onClick}>Update node length.</button>
  </div>
);
};

function Flow() {
return (
  <ReactFlow nodes={nodes}>
    <NodesLengthLogger />
  </ReactFlow>
);
}
This example computes the number of nodes in the flow on-demand. This is in contrast to the example in the useStore hook that re-renders the component whenever the number of nodes changes.
Choosing whether to calculate values on-demand or to subscribe to changes as they happen is a bit of a balancing act. On the one hand, putting too many heavy calculations in an event handler can make your app feel sluggish or unresponsive. On the other hand, computing values eagerly can lead to slow or unnecessary re-renders.
We make both this hook and useStore available so that you can choose the approach that works best for your use-case.
=> 이 예제는 요청 시 플로우 내 노드 수를 계산합니다. 이는 useStore 훅에서 노드 수가 변경될 때마다 컴포넌트가 다시 렌더링되는 예제와 대조됩니다.
값을 요청 시 계산하거나 변경이 발생할 때마다 구독하는 것 중 어느 것을 선택할지는 조절이 필요한 부분입니다. 한편으로는 이벤트 핸들러에 무거운 계산을 넣으면 앱이 느려지거나 응답하지 않는 것처럼 느껴질 수 있습니다. 반면, 값이 즉시 계산되면 느린 또는 불필요한 다시 렌더링이 발생할 수 있습니다.
우리는 이 훅과 useStore를 모두 제공하여 사용 사례에 가장 적합한 접근 방식을 선택할 수 있도록 합니다.
Signature
| Name | Type |
|---|---|
| #Returns | |
| Zustand.StoreApi<ReactFlowState> |
useUpdateNodeInternals
When you programmatically add or remove handles to a node or update a node's handle position, you need to let React Flow know about it using this hook. This will update the internal dimensions of the node and properly reposition handles on the canvas if necessary.
=> 노드에 핸들을 프로그래밍 방식으로 추가하거나 제거하거나 노드의 핸들 위치를 업데이트하는 경우에는 이 훅을 사용하여 React Flow에 알려야 합니다. 이렇게 하면 노드의 내부 크기가 업데이트되고 필요한 경우 캔버스에 핸들이 적절하게 재배치됩니다.
import { useCallback, useState } from 'react';
import { Handle, useUpdateNodeInternals } from 'reactflow';

export default function RandomHandleNode({ id }) {
  const updateNodeInternals = useUpdateNodeInternals();
  const [handleCount, setHandleCount] = useState(0);
  const randomizeHandleCount = useCallback(() => {
    setHandleCount(Math.floor(Math.random() * 10));
    updateNodeInternals(id);
  }, [id, updateNodeInternals]);

  return (
    <>
      {Array.from({ length: handleCount }).map((_, index) => (
        <Handle
          key={index}
          type="target"
          position="left"
          id={`handle-${index}`}
        />
      ))}

      <div>
        <button onClick={randomizeHandleCount}>Randomize handle count</button>
        <p>There are {handleCount} handles on this node.</p>
      </div>
    </>
  );
}
Signature
| Name | Type |
|---|---|
| #Returns | |
| (nodeId: string | string[ ]) => void |
Notes
This hook can only be used in a component that is a child of a ReactFlowProvider or a ReactFlow component.
=> 이 훅은 반드시 ReactFlowProvider 또는 ReactFlow 구성 요소의 하위에서만 사용해야 합니다.
useViewport
The useViewport hook is a convenient way to read the current state of the Viewport in a component. Components that use this hook will re-render whenever the viewport changes.
=> useViewport 훅은 컴포넌트에서 현재 뷰포트 상태를 읽는 편리한 방법입니다. 이 훅을 사용하는 컴포넌트는 뷰포트가 변경될 때마다 다시 렌더링됩니다.
import { useViewport } from 'reactflow';

export default function ViewportDisplay() {
  const { x, y, zoom } = useViewport();

  return (
    <div>
      <p>
        The viewport is currently at ({x}, {y}) and zoomed to {zoom}.
      </p>
    </div>
  );
}
Signature
| Name | Type |
|---|---|
| #Returns | |
| Viewport |
Notes
- This hook can only be used in a component that is a child of a ReactFlowProvider or a ReactFlow component. => 이 훅은 반드시 ReactFlowProvider 또는 ReactFlow 구성 요소의 하위에서만 사용해야 합니다.
Types
BackgroundVariant
The three variants are exported as an enum for convenience. You can either import the enum and use it like BackgroundVariant.Lines or you can use the raw string value directly.
=> 세 가지 변형은 편의를 위해 enum으로 내보내집니다. BackgroundVariant.Lines와 같이 열거형을 가져와 사용하거나 직접 문자열 값을 사용할 수 있습니다.
export enum BackgroundVariant {
  Lines = 'lines',
  Dots = 'dots',
  Cross = 'cross',
}
Connection
The Connection type is the basic minimal description of an Edge between two nodes. The addEdge util can be used to upgrade a Connection to an Edge.
=> 연결(Connection) 유형은 두 노드 간의 엣지를 기본적으로 최소한으로 설명합니다. addEdge 유틸리티를 사용하여 연결(Connection)을 엣지(Edge)로 업그레이드할 수 있습니다.
export type Connection = {
  source: string | null;
  target: string | null;
  sourceHandle: string | null;
  targetHandle: string | null;
};
Fields
| Name | Type |
|---|---|
| #source | string | null |
| #target | string | null |
| #sourceHandle | string | null |
| #targetHandle | string | null |
ConnectionLineComponentProps
If you want to render a custom component for connection lines, you can set the connectionLineComponent prop on the ReactFlow component. The ConnectionLineComponentProps are passed to your custom component.
=> 연결 선에 사용자 지정 구성 요소를 렌더링하려면 ReactFlow 컴포넌트에 connectionLineComponent prop을 설정하면 됩니다. ConnectionLineComponentProps는 사용자 지정 컴포넌트에 전달됩니다.
export type ConnectionLineComponentProps = {
  connectionLineStyle?: React.CSSProperties;
  connectionLineType: ConnectionLineType;
  fromNode?: Node;
  fromHandle?: HandleElement;
  fromX: number;
  fromY: number;
  toX: number;
  toY: number;
  fromPosition: Position;
  toPosition: Position;
  connectionStatus: 'valid' | 'invalid' | null;
};
Props
| Name | Type |
|---|---|
| #connectionLineStyle | React.CSSProperties |
| #connectionLineType | ConnectionLineType |
| #fromNode | Node |
| #fromHandle | HandleElement |
| #fromX | number |
| #fromY | number |
| #toX | number |
| #toY | number |
| #fromPosition | Position |
| #toPosition | Position |
| #connectionStatus | "valid" | "invalid" | null |
ConnectionLineType
If you set the connectionLineType prop on your ReactFlow component, it will dictate the style of connection line rendered when creating new edges.
=> ReactFlow 컴포넌트에서 connectionLineType prop을 설정하면 새 엣지를 만들 때 렌더링되는 연결 선의 스타일을 지정할 수 있습니다.
export enum ConnectionLineType {
  Bezier = 'default',
  Straight = 'straight',
  Step = 'step',
  SmoothStep = 'smoothstep',
  SimpleBezier = 'simplebezier',
}
Notes
- If you choose to render a custom connection line component, this value will be passed to your component as part of its ConnectionLineComponentProps.
=> 만약 사용자가 사용자 지정 연결선 구성 요소를 렌더링하기로 선택하면,이 값은 해당 구성 요소로 전달됩니다.
CoordinateExtent
A coordinate extent represents two points in a coordinate system: one in the top left corner and one in the bottom right corner. It is used to represent the bounds of nodes in the flow or the bounds of the viewport.
=> 좌표 범위는 좌표 시스템에서 두 지점을 나타냅니다. 하나는 좌상단에 위치하고 다른 하나는 우하단에 위치합니다. 이는 플로우 내의 노드 경계 또는 뷰포트의 경계를 나타내는 데 사용됩니다.
export type CoordinateExtent = [[number, number], [number, number]];
Notes
Props that expect a CoordinateExtent usually default to [[-∞, -∞], [+∞, +∞]] to represent an unbounded extent.
=> CoordinateExtent를 기대하는 속성은 일반적으로 [-∞, -∞], [+∞, +∞]의 값으로 기본 설정되어 있으며, 이는 경계가 정해지지 않은 범위를 나타냅니다.
DefaultEdgeOptions
Many properties on an Edge are optional. When a new edge is created, the properties that are not provided will be filled in with the default values passed to the defaultEdgeOptions prop of the ReactFlow component.
=> Edge의 많은 속성은 선택적입니다. 새로운 엣지가 생성될 때, 제공되지 않은 속성은 ReactFlow 컴포넌트의 defaultEdgeOptions prop으로 전달된 기본값으로 채워집니다.
export type DefaultEdgeOptions<T> = {
  type?: string;
  animated?: boolean;
  hidden?: boolean;
  deletable?: boolean;
  selectable?: boolean;
  data?: T;
  selected?: boolean;
  markerStart?: string | EdgeMarker;
  markerEnd?: string | EdgeMarker;
  zIndex?: number;
  ariaLabel?: string;
  interactionWidth?: number;
  focusable?: boolean;
};
Fields
| Name | Type |
|---|---|
| #type | string |
| #animated | boolean |
| #hidden | boolean |
| #deletable | boolean |
| #selectable | boolean |
| #data | T |
| #selected | boolean |
| #markerStart | string | EdgeMarker |
| #markerEnd | string | EdgeMarker |
| #zIndex | number |
| #ariaLabel | string |
| #interactionWidth | number |
| #focusable | boolean |
Edge
Where a Connection is the minimal description of an edge between two nodes, an Edge is the complete description with everything React Flow needs to know in order to render it.
=> 연결(Connection)은 두 노드 간 엣지의 최소 설명이며, 엣지(Edge)는 React Flow가 그것을 렌더링하기 위해 알아야 하는 모든 것을 포함한 완전한 설명입니다.
export type Edge<T> =
  | DefaultEdge<T>
  | SmoothStepEdgeType<T>
  | BezierEdgeType<T>;
Variants
DefaultEdge
| Name | Type |
|---|---|
| #id | string |
| #type | string |
| #style | React.CSSProperties |
| #className | string |
| #source | string |
| #target | string |
| #sourceNode | Node |
| #targetNode | Node |
| #sourceHandle | string | null |
| #targetHandle | string | null |
| #data | T |
| #hidden | boolean |
| #animated | boolean |
| #selected | boolean |
| #deletable | boolean |
| #focusable | boolean |
| #updatable | boolean | "source" | "target" |
| #markerStart | string | EdgeMarker |
| #markerEnd | string | EdgeMarker |
| #zIndex | number |
| #interactionWidth | number |
| #ariaLabel | string |
| #label | string | React.ReactNode |
| #labelStyle | React.CSSProperties |
| #labelShowBg | boolean |
| #labelBgStyle | React.CSSProperties |
| #labelBgPadding | [number, number] |
| #labelBgBorderRadius | number |
SmoothStepEdgeType
The SmoothStepEdgeType variant has all the same fields as the DefaultEdge variant, but it also has the following additional fields:
=> SmoothStepEdgeType 변형은 DefaultEdge 변형과 동일한 필드를 모두 가지고 있지만, 다음과 같은 추가 필드도 있습니다:
BezierEdgeType
The BezierEdgeType variant has all the same fields as the DefaultEdge variant, but it also has the following additional fields:
=> BezierEdgeType 변형은 DefaultEdge 변형과 동일한 필드를 모두 가지고 있지만, 다음과 같은 추가 필드도 있습니다:
| Name | Type |
|---|---|
| #type | "default" |
| #pathOptions | object |
| #pathOptions.curvature | number |
Default edge types
You can create any of React Flow's default edges by setting the type property to one of the following values:
=> 다음 값 중 하나를 type 속성으로 설정하여 React Flow의 기본 엣지 중 하나를 만들 수 있습니다:
- "default"
- "straight"
- "step"
- "smoothstep"
- "simplebezier"
If you don't set the type property at all, React Flow will fallback to the "default" bezier curve edge type.
=> type 속성을 설정하지 않으면 React Flow는 "default" 베지어 곡선 엣지 유형으로 되돌아갑니다.
These default edges are available even if you set the edgeTypes prop to something else, unless you override any of these keys directly.
=> 이러한 기본 엣지는 edgeTypes prop을 다른 값으로 설정하더라도 사용할 수 있습니다. 단, 이러한 키를 직접 재정의하지 않는 한입니다.
EdgeChange
The onEdgesChange callback takes an array of EdgeChange objects that you should use to update your flow's state. The EdgeChange type is a union of four different object types that represent that various ways an edge can change in a flow.
=> onEdgesChange 콜백은 흐름의 상태를 업데이트하는 데 사용해야 하는 EdgeChange 객체의 배열을 가져옵니다. EdgeChange 타입은 흐름에서 엣지가 변경될 수 있는 다양한 방법을 나타내는 네 가지 다른 객체 유형의 유니언입니다.
export type EdgeChange =
  | EdgeAddChange
  | EdgeRemoveChange
  | EdgeResetChange
  | EdgeSelectionChange;
Variants
EdgeAddChange
| Name | Type |
|---|---|
| #type | "add" |
| #item | Edge<T> |
EdgeRemoveChange
| Name | Type |
|---|---|
| #type | "remove" |
| #id | string |
EdgeResetChange
| Name | Type |
|---|---|
| #type | "reset" |
| #item | Edge<T> |
EdgeSelectionChange
| Name | Type |
|---|---|
| #type | "select" |
| #id | string |
| #selected | boolean |
EdgeMarker
Edges can optionally have markers at the start and end of an edge. The EdgeMarker type is used to configure those markers! Check the docs for MarkerType for details on what types of edge marker are available.
=> 엣지는 선택적으로 엣지의 시작과 끝에 마커를 가질 수 있습니다. EdgeMarker 타입은 이러한 마커를 구성하는 데 사용됩니다! EdgeMarker에 사용할 수 있는 엣지 마커의 유형에 대한 자세한 내용은 MarkerType 문서를 확인하세요!
export type EdgeMarker = {
  type: MarkerType;
  color?: string;
  width?: number;
  height?: number;
  markerUnits?: string;
  orient?: string;
  strokeWidth?: number;
};
Fields
| Name | Type |
|---|---|
| #type | MarkerType |
| #color | string |
| #width | number |
| #height | number |
| #markerUnits | string |
| #orient | string |
| #strokeWidth | number |
EdgeProps
When you implement a custom edge it is wrapped in a component that enables some basic functionality. Your custom edge component receives the following props:
=> 사용자 정의 엣지를 구현할 때 기본 기능이 활성화된 컴포넌트로 래핑됩니다. 사용자 정의 엣지 컴포넌트는 다음과 같은 속성을 받습니다:
export type EdgeProps<T> = {
  id: string;
  animated: boolean;
  data: T;
  style: React.CSSProperties;
  selected: boolean;
  source: string;
  target: string;
  sourceHandleId?: string | null;
  targetHandleId?: string | null;
  interactionWidth: number;
  sourceX: number;
  sourceY: number;
  targetX: number;
  targetY: number;
  sourcePosition: Position;
  targetPosition: Position;
  label?: string | React.ReactNode;
  labelStyle?: React.CSSProperties;
  labelShowBg?: boolean;
  labelBgStyle?: CSSProperties;
  labelBgPadding?: [number, number];
  labelBgBorderRadius?: number;
  markerStart?: string;
  markerEnd?: string;
  pathOptions?: any;
};
Fields
| Name | Type |
|---|---|
| #id | string |
| #animated | boolean |
| #data | T |
| #style | React.CSSProperties |
| #selected | boolean |
| #source | string |
| #target | string |
| #sourceHandleId | string | null |
| #targetHandleId | string | null |
| #interactionWidth | number |
| #sourceX | number |
| #sourceY | number |
| #targetX | number |
| #targetY | number |
| #sourcePosition | Position |
| #targetPosition | Position |
| #label | string | React.ReactNode |
| #labelStyle | React.CSSProperties |
| #labelShowBg | boolean |
| #labelBgStyle | React.CSSProperties |
| #labelBgPadding | [number, number] |
| #labelBgBorderRadius | number |
| #markerStart | string |
| #markerEnd | string |
| #pathOptions | any |
FitViewOptions
When calling fitView these options can be used to customize the behaviour. For example, the duration option can be used to transform the viewport smoothly over a given amount of time.
=> fitView를 호출할 때 이러한 옵션을 사용하여 동작을 사용자 정의할 수 있습니다. 예를 들어, duration 옵션을 사용하여 지정된 시간 동안 뷰포트를 부드럽게 변환할 수 있습니다.export type FitViewOptions = {
padding?: number;
includeHiddenNodes?: boolean;
minZoom?: number;
maxZoom?: number;
duration?: number;
nodes?: (Partial<Node> & { id: Node['id'] })[];
}; Fields
| Name | Type |
|---|---|
| #padding | number |
| #includeHiddenNodes | boolean |
| #minZoom | number |
| #maxZoom | number |
| #duration | number |
| #nodes | (Partial<Node> & { id: Node['id'] })[] |
MarkerType
Edges may optionally have a marker on either end. The MarkerType type enumerates the options available to you when configuring a given marker.
=> 마커 유형(MarkerType)은 주어진 마커를 구성할 때 사용할 수 있는 옵션을 열거하는 형식입니다.
export enum MarkerType {
  Arrow = 'arrow',
  ArrowClosed = 'arrowclosed',
}
MiniMapNodeProps
export type MiniMapNodeProps = {
  id: string;
  x: number;
  y: number;
  width: number;
  height: number;
  borderRadius: number;
  className: string;
  color: string;
  shapeRendering: string;
  strokeColor: string;
  strokeWidth: number;
  style?: CSSProperties;
  selected: boolean;
  onClick?: (event: MouseEvent, id: string) => void;
};
Fields
| Name | Type |
|---|---|
| #id | string |
| #x | number |
| #y | number |
| #width | number |
| #height | number |
| #borderRadius | number |
| #className | string |
| #color | string |
| #shapeRendering | string |
| #strokeColor | string |
| #strokeWidth | number |
| #style | React.CSSProperties |
| #selected | boolean |
| #onClick | (event: MouseEvent, id: string) => void |
Node<T, U>
The Node type represents everything React Flow needs to know about a given node. Many of these properties can be manipulated both by React Flow or by you, but some such as width and height should be considered read-only.
=> Node 타입은 React Flow가 특정 노드에 대해 알아야 하는 모든 것을 나타냅니다. 이러한 속성 중 많은 것들이 React Flow 또는 사용자에 의해 조작될 수 있지만, 너비(width)와 높이(height)와 같은 일부 속성은 읽기 전용으로 고려해야 합니다.
export type Node<T, U extends string> = {
  id: string;
  position: XYPosition;
  data: T;
  type?: U;
  sourcePosition?: Position;
  targetPosition?: Position;
  hidden?: boolean;
  selected?: boolean;
  dragging?: boolean;
  draggable?: boolean;
  selectable?: boolean;
  connectable?: boolean;
  resizing?: boolean;
  deletable?: boolean;
  dragHandle?: string;
  width?: number | null;
  height?: number | null;
  parentNode?: string;
  zIndex?: number;
  extent?: 'parent' | CoordinateExtent;
  expandParent?: boolean;
  positionAbsolute?: XYPosition;
  ariaLabel?: string;
  focusable?: boolean;
  style?: React.CSSProperties;
  className?: string;
};
Fields
| Name | Type |
|---|---|
| #id | string |
| #position | XYPosition |
| #data | T |
| #type | U |
| #sourcePosition | Position |
| #targetPosition | Position |
| #hidden | boolean |
| #selected | boolean |
| #dragging | boolean |
| #draggable | boolean |
| #selectable | boolean |
| #connectable | boolean |
| #resizing | boolean |
| #deletable | boolean |
| #dragHandle | string |
| #width | number | null |
| #height | number | null |
| #parentNode | string |
| #zIndex | number |
| #extent | "parent" | CoordinateExtent |
| #expandParent | boolean |
| #positionAbsolute | XYPosition |
| #ariaLabel | string |
| #focusable | boolean |
| #style | React.CSSProperties |
| #className | string |
Default node types
You can create any of React Flow's default nodes by setting the type property to one of the following values:
=> 다음 값 중 하나를 type 속성에 설정하여 React Flow의 기본 노드를 생성할 수 있습니다:
- "default"
- "input"
- "output"
- "group"
If you don't set the type property at all, React Flow will fallback to the "default" node with both an input and output port.
These default nodes are available even if you set the nodeTypes prop to something else, unless you override any of these keys directly.
=> type 속성을 전혀 설정하지 않으면 React Flow가 "default" 노드로 되돌아갑니다. 이 노드에는 입력 및 출력 포트가 모두 포함됩니다.
이러한 기본 노드는 nodeTypes prop을 다른 값으로 설정하더라도 직접 이러한 키 중 하나를 재정의하지 않는 한 여전히 사용할 수 있습니다.
Notes
-
You shouldn't try to set the width or height of a node directly. It is calculated internally by React Flow and used when rendering the node in the viewport. To control a node's size you should use the style or className props to apply CSS styles instead.
=> 노드의 너비 또는 높이를 직접 설정하려고 시도해서는 안 됩니다. React Flow에서는 내부적으로 계산되며 노드를 뷰포트에 렌더링할 때 사용됩니다. 노드의 크기를 제어하려면 CSS 스타일을 적용하기 위해 style 또는 className props을 사용해야 합니다.
NodeChange
The onNodesChange callback takes an array of NodeChange objects that you should use to update your flow's state. The NodeChange type is a union of six different object types that represent that various ways an node can change in a flow.
=> onNodesChange 콜백은 노드가 플로우에서 변경될 때 사용할 NodeChange 객체의 배열을 취합니다. NodeChange 유형은 플로우 내에서 노드가 변경될 수 있는 여러 가지 방법을 나타내는 여섯 가지 다른 객체 유형의 유니온입니다.
export type NodeChange =
  | NodeDimensionChange
  | NodePositionChange
  | NodeSelectionChange
  | NodeRemoveChange
  | NodeAddChange
  | NodeResetChange;
Variant types
NodeDimensionChange
| Name | Type |
|---|---|
| #id | string |
| #type | "dimensions" |
| #dimensions | Dimensions |
| #updateStyle | boolean |
| #resizing | boolean |
NodePositionChange
| Name | Type |
|---|---|
| #id | string |
| #type | "position" |
| #position | XYPosition |
| #positionAbsolute | XYPosition |
| #dragging | boolean |
NodeSelectionChange
| Name | Type |
|---|---|
| #id | string |
| #type | "select" |
| #selected | boolean |
NodeRemoveChange
| Name | Type |
|---|---|
| #id | string |
| #type | "remove" |
NodeAddChange<T = any>
| Name | Type |
|---|---|
| #item | Node<T> |
| #type | "add" |
NodeResetChange<T = any>
| Name | Type |
|---|---|
| #item | Node<T> |
| #type | "reset" |
NodeProps
Source on GitHub
When you implement a custom node it is wrapped in a component that enables basic functionality like selection and dragging. Your custom node receives the following props:
=> 사용자 지정 노드를 구현할 때 기본 기능을 활성화하는 구성 요소로 래핑됩니다. 사용자 지정 노드는 다음과 같은 props를 받습니다:
export type NodeProps<T = any> = {
  id: string;
  data: T;
  dragHandle?: boolean;
  type?: string;
  selected?: boolean;
  isConnectable?: boolean;
  zIndex?: number;
  xPos: number;
  yPos: number;
  dragging: boolean;
  targetPosition?: Position;
  sourcePosition?: Position;
};
Usage
import { NodeProps } from 'reactflow';
import { useState } from 'react';

export type CounterData = {
  initialCount?: number;
};

export default function CounterNode(props: NodeProps<CounterData>) {
  const [count, setCount] = useState(props.data?.initialCount ?? 0);

  return (
    <div>
      <p>Count: {count}</p>
      <button className="nodrag" onClick={() => setCount(count + 1)}>
        Increment
      </button>
    </div>
  );
}
Remember to register your custom node by adding it to the nodeTypes prop of your ReactFlow component.
=> 사용자 지정 노드를 등록하려면 ReactFlow 컴포넌트의 nodeTypes prop에 추가하십시오.
import ReactFlow from 'reactflow';
import CounterNode from './CounterNode';

const nodeTypes = {
  counterNode: CounterNode,
};

export default function App() {
  return <ReactFlow nodeTypes={nodeTypes} ... />
}
You can read more in our custom node guide.
Fields
| Name | Type |
|---|---|
| #id | string |
| #data | T |
| #dragHandle | boolean |
| #type | string |
| #selected | boolean |
| #isConnectable | boolean |
| #zIndex | number |
| #xPos | number |
| #yPos | number |
| #dragging | boolean |
| #targetPosition | Position |
| #sourcePosition | Position |
Notes
- If you have controls (like a slider) or other elements inside your custom node that should not drag the node you can add the class nodrag to those elements. This prevents the default drag behaviour as well as the default node selection behvaiour when elements with this class are clicked.
=> 사용자 정의 노드 내부에 제어 요소(예: 슬라이더)나 다른 요소가 있는 경우 해당 요소에 "nodrag" 클래스를 추가할 수 있습니다. 이렇게 하면 해당 요소를 클릭할 때 기본 드래그 동작 및 기본 노드 선택 동작이 방지됩니다.
export default function CustomNode(props: NodeProps) {
  return (
    <div>
      <input className="nodrag" type="range" min={0} max={100} />
    </div>
  );
}-
If you have scroll containers inside your custom node you can add the class nowheel to disable the default canvas pan behaviour when scrolling inside your custom nodes.
=> 사용자 정의 노드 내부에 스크롤 컨테이너가 있는 경우 클래스에 "nowheel"을 추가하여 사용자 정의 노드 내부에서 스크롤할 때 기본 캔버스 패닝 동작을 비활성화할 수 있습니다.
export default function CustomNode(props: NodeProps) {
  return (
    <div className="nowheel" style={{ overflow: 'auto' }}>
      <p>Scrollable content...</p>
    </div>
  );
}- When creating your own custom nodes, you will also need to remember to style them! Custom nodes have no default styles unlike the built-in nodes so you can use any styling method you like such as styled components or tailwind.
=> 사용자 지정 노드를 만들 때 스타일링하는 것도 잊지 마십시오! 내장된 노드와는 달리 사용자 정의 노드에는 기본 스타일이 없으므로 styled components나 tailwind와 같은 원하는 스타일링 방법을 사용할 수 있습니다.
PanelPosition
This type is mostly used to help position things on top of the flow viewport. For example both the MiniMap and Controls components take a position prop of this type.
=> 이 유형은 주로 플로우 뷰포트 위에 요소를 배치하는 데 도움이 됩니다. 예를 들어 MiniMap 및 Controls 컴포넌트는 모두 이 유형의 position prop을 사용합니다.
export type PanelPosition =
  | 'top-left'
  | 'top-center'
  | 'top-right'
  | 'bottom-left'
  | 'bottom-center'
  | 'bottom-right';
Position
While PanelPosition can be used to place a component in the corners of a container, the Position enum is less precise and used primarily in relation to edges and handles.
=> PanelPosition은 컨테이너의 모서리에 컴포넌트를 배치하는 데 사용될 수 있지만 Position 열거형은 덜 정확하며 주로 엣지와 핸들과 관련하여 사용됩니다.
export enum Position {
  Left = 'left',
  Top = 'top',
  Right = 'right',
  Bottom = 'bottom',
}
ProOptions
By default, we render a small attribution in the corner of your flows that links back to the project. Anyone is free to remove this attribution whether they're a Pro subscriber or not but we ask that you take a quick look at our removing attribution guide before doing so.
=> 기본적으로 우리는 프로젝트로 돌아가는 링크가 있는 플로우 모서리에 작은 속성을 렌더링합니다. Pro 구독자이든 아니든 누구나이 속성을 제거할 수 있지만 제거하기 전에 빠른 확인을 위해 속성 제거 가이드를 확인해 주시기 바랍니다.
type ProOptions = {
  hideAttribution?: boolean;
};
ReactFlowInstance<T, U>
The ReactFlowInstance provides a collection of methods to query and manipulate the internal state of your flow. You can get an instance by using the useReactFlow hook or attaching a listener to the onInit event.
=> ReactFlowInstance는 플로우의 내부 상태를 조회하고 조작하는 데 사용되는 메서드 모음을 제공합니다. useReactFlow 훅을 사용하거나 onInit 이벤트에 리스너를 추가하여 인스턴스를 가져올 수 있습니다.
export type ReactFlowInstance<T, U> = {
  // Nodes and Edges
  getNode: (id: string) => Node<T> | undefined;
  getNodes: () => Node<T>[];
  addNodes: (payload: Node<T>[] | Node<T>) => void;
  setNodes: (payload: Node<T>[] | ((nodes: Node<T>[]) => Node<T>[])) => void;

  getEdge: (id: string) => Edge<U> | undefined;
  getEdges: () => Edge<U>[];
  addEdges: (payload: Edge<U>[] | Edge<U>) => void;
  setEdges: (payload: Edge<U>[] | ((edges: Edge<U>[]) => Edge<U>[])) => void;

  toObject: () => ReactFlowJsonObject<T, U>;
  deleteElements: (payload: {
    nodes?: (Partial<Node> & { id: Node['id'] })[];
    edges?: (Partial<Edge> & { id: Edge['id'] })[];
  }) => void;

  // Intersections
  getIntersectingNodes: (
    node: (Partial<Node<T>> & { id: Node['id'] }) | Rect,
    partially?: boolean,
    nodes?: Node<T>[],
  ) => Node<T>[];

  isNodeIntersecting: (
    node: (Partial<Node<T>> & { id: Node['id'] }) | Rect,
    area: Rect,
    partially?: boolean,
  ) => boolean;

  // Viewport
  viewportInitialized: boolean;
  zoomIn: (options?: { duration: number }) => void;
  zoomOut: (options?: { duration: number }) => void;
  zoomTo: (zoomLevel: number, options?: { duration: number }) => void;
  getZoom: () => number;
  setViewport: (viewport: Viewport, options?: { duration: number }) => void;
  getViewport: () => Viewport;
  fitView: (fitViewOptions?: FitViewOptions) => boolean;
  setCenter: (
    x: number,
    y: number,
    options?: { duration: number; zoom: number },
  ) => void;
  fitBounds: (
    bounds: Rect,
    options?: { duration: number; padding: number },
  ) => void;
  // @deprecated Use `screenToFlowPosition`.
  project: (position: { x: number; y: number }) => { x: number; y: number };
  screenToFlowPosition: (position: { x: number; y: number }) => {
    x: number;
    y: number;
  };
  flowToScreenPosition: (position: { x: number; y: number }) => {
    x: number;
    y: number;
  };
};
Fields
Nodes and edges
| Name | Type |
|---|---|
| #getNode | (id: string) => Node<T> | undefined |
| #getNodes | () => Node<T>[] |
| #addNodes | (payload: Node<T>[] | Node<T>) => void |
| #setNodes | (payload: Node<T>[] | ((nodes: Node<T>[]) => Node<T>[])) => void |
| #getEdge | (id: string) => Edge<U> | undefined |
| #getEdges | () => Edge<U>[] |
| #addEdges | (payload: Edge<U>[] | Edge<U>) => void |
| #setEdges | (payload: Edge<U>[] | ((edges: Edge<U>[]) => Edge<U>[])) => void |
| #toObject | () => ReactFlowJsonObject<T, U>
This function returns a JSON representation of your current React Flow graph. |
| #deleteElements | (payload: { nodes?: (Partial<Node> & { id: Node["id"] })[]; edges?: (Partial<Edge> & { id: Edge["id"] })[]; }) => void |
Intersections
| Name | Type |
|---|---|
| #getIntersectingNodes | (node: (Partial<Node<T>> & { id: Node["id"] }) | Rect, partially?: boolean, nodes?: Node<T>[]) => Node<T>[] |
| #isNodeIntersecting | (node: (Partial<Node<T>> & { id: Node["id"] }) | Rect, area: Rect, partially?: boolean) => boolean |
Viewport fields
| Name | Type |
|---|---|
| #viewportInitialized | boolean |
| #zoomIn | (options?: { duration: number; }) => void |
| #zoomOut | (options?: { duration: number; }) => void |
| #zoomTo | (zoomLevel: number, options?: { duration: number; }) => void |
| #getZoom | () => number |
| #setViewport | (viewport: Viewport, options?: { duration: number; }) => void |
| #getViewport | () => Viewport |
| #fitView | (fitViewOptions?: FitViewOptions) => boolean |
| #setCenter | (x: number, y: number, options?: { duration: number, zoom: number; }) => void |
| #fitBounds | (bounds: Rect, options?: { duration: number, padding: number; }) => void |
| #project | (position: { x: number; y: number; }) => { x: number; y: number; } ⚠️ This function is deprecated and will be removed in v12. Please use `screenToFlowPosition` instead. When using `screenToFlowPosition`, you do not need to subtract the react flow bounds anymore. |
| #screenToFlowPosition | (position: { x: number; y: number; }) => { x: number; y: number; } With this function you can translate a screen pixel position to a flow position. It is useful for implemting drag and drop from a sidebar for example. |
| #flowToScreenPosition | (position: { x: number; y: number; }) => { x: number; y: number; } |
ReactFlowJsonObject<T, U>
A JSON-compatible representation of your flow. You can use this to save the flow to a database for example and load it back in later.
export type ReactFlowJsonObject<T, U> = {
  nodes: Node<T>[];
  edges: Edge<U>[];
  viewport: Viewport;
};
Fields
| Name | Type |
|---|---|
| #nodes | Node<T>[] |
| #edges | Edge<U>[] |
| #viewport | Viewport |
ResizeParams
The ResizeParams type is used to type the various events that are emitted by the NodeResizer component. You'll sometimes see this type extended with an additional direction field too.
=> 리사이즈 이벤트를 유형화하는 데 사용되는 ResizeParams 유형입니다. 때로는 이 유형에 추가적인 방향 필드가 있는 것으로 확장되어 사용됩니다.
export type ResizeParams = {
  x: number;
  y: number;
  width: number;
  height: number;
};
Fields
| Name | Type |
|---|---|
| x | number |
| y | number |
| width | number |
| height | number |
Viewport
Internally, React Flow maintains a coordinate system that is independent of the rest of the page. The Viewport type tells you where in that system your flow is currently being display at and how zoomed in or out it is.
=> 내부적으로 React Flow는 페이지의 나머지와 독립적인 좌표 시스템을 유지합니다. 뷰포트 유형은 현재 플로우가 표시되는 좌표 및 확대/축소 상태를 나타냅니다.
export type Viewport = {
  x: number;
  y: number;
  zoom: number;
};
Fields
| Name | Type | Default |
|---|---|---|
| #x | number | |
| #y | number | |
| #zoom | number |
Notes
- A Transform has the same properties as the viewport, but they represent different things. Make sure you don't get them muddled up or things will start to look weird!
=> 변환(Transform)은 뷰포트와 동일한 속성을 갖지만 서로 다른 것을 나타냅니다. 이를 혼동하지 않도록 주의하십시오. 그렇지 않으면 이상한 결과물이 나올 수 있습니다!
NodeOrigin
The origin of a Node determines how it is placed relative to its own coordinates. [0, 0] places it at the top left corner, [0.5, 0.5] right in the center and [1, 1] at the bottom right of its position.
=> 노드의 원점은 해당 좌표에 상대적으로 어떻게 배치되는지를 결정합니다. [0, 0]은 왼쪽 위 모서리에 배치되고, [0.5, 0.5]는 정중앙에 위치하며, [1, 1]은 해당 위치의 오른쪽 아래에 배치됩니다.
export type NodeOrigin = [number, number];XYPosition
All positions are stored in an object with x and y coordinates.
=> 모든 위치는 x와 y 좌표를 가진 객체에 저장됩니다.
export type XYPosition = {
  x: number;
  y: number;
};
Utils
addEdge()
This util is a convenience function to add a new Edge to an array of edges. It also performs some validation to make sure you don't add an invalid edge or duplicate an existing one.
=> 이 유틸은 엣지 배열에 새로운 엣지를 추가하는 편리한 함수입니다. 또한 유효하지 않은 엣지를 추가하지 않도록 몇 가지 유효성 검사를 수행합니다. 또한 기존 엣지를 중복해서 추가하지 않습니다.
import { useCallback } from 'react';
import ReactFlow, { useNodesState, useEdgesState } from 'reactflow';

export default function Flow() {
  const [nodes, setNodes, onNodesChange] = useNodesState([]);
  const [edges, setEdges, onEdgesChange] = useEdgesState([]);
  const onConnect = useCallback(
    (connection) => {
      setEdges((oldEdges) => addEdge(connection, oldEdges));
    },
    [setEdges],
  );

  return <ReactFLow nodes={nodes} edges={edges} onConnect={onConnect} />;
}
Signature
| Name | Type |
|---|---|
| #Params | |
| #edge | Edge | Connection |
| #edges | Edge[] |
| #Returns | |
| Edge[] |
Notes
-
If an edge with the same target and source already exists (and the same targetHandle and sourceHandle if those are set), then this util won't add a new edge even if the id property is different.
=> 만약 동일한 대상과 출발지를 가진 엣지가 이미 존재한다면(그리고 그것들이 설정되어 있다면 동일한 targetHandle과 sourceHandle), 이 유틸은 id 속성이 다르더라도 새로운 엣지를 추가하지 않습니다.
applyEdgeChanges()
Various events on the ReactFlow component can produce an EdgeChange that describes how to update the edges of your flow in some way. If you don't need any custom behaviour, this util can be used to take an array of these changes and apply them to your edges.
=> 여러 이벤트들은 ReactFlow 컴포넌트에서 발생할 수 있으며, 이 이벤트들은 플로우의 엣지를 업데이트하는 방법을 설명하는 EdgeChange를 생성합니다. 사용자 정의 동작이 필요하지 않다면, 이 유틸을 사용하여 이러한 변경 사항을 엣지에 적용할 수 있습니다.
import { useState, useCallback } from 'react';
import ReactFlow, { applyEdgeChanges } from 'reactflow';

export default function Flow() {
  const [nodes, setNodes] = useState([]);
  const [edges, setEdges] = useState([]);
  const onEdgesChange = useCallback(
    (changes) => {
      setEdges((oldEdges) => applyEdgeChanges(changes, oldEdges));
    },
    [setEdges],
  );

  return (
    <ReactFLow nodes={nodes} edges={edges} onEdgesChange={onEdgesChange} />
  );
}
Signature
| Name | Type |
|---|---|
| #Params | |
| #changes | EdgeChange[] |
| #edges | Edge[] |
| #Returns | |
| Edge[] |
Notes
If you don't need any custom behaviour, the useEdgesState hook conviniently wraps this util and React's useState hook for you and might be simpler to use.
=> 사용자 정의 동작이 필요하지 않다면, useEdgesState 훅은 편리하게 이 유틸과 React의 useState 훅을 감싸주며, 더 간단하게 사용할 수 있을 것입니다.
applyNodeChanges()
Various events on the ReactFlow component can produce an NodeChange that describes how to update the edges of your flow in some way. If you don't need any custom behaviour, this util can be used to take an array of these changes and apply them to your edges.
=>"React Flow" 컴포넌트에서 발생하는 여러 이벤트는 노드를 어떤 방식으로 업데이트할지 설명하는 "NodeChange"를 생성할 수 있습니다. 사용자 정의 동작이 필요하지 않은 경우,이 유틸리티를 사용하여 이러한 변경 사항의 배열을 가져와 노드에 적용할 수 있습니다.
import { useState, useCallback } from 'react';
import ReactFlow, { applyNodeChanges } from 'reactflow';

export default function Flow() {
  const [nodes, setNodes] = useState([]);
  const [edges, setEdges] = useState([]);
  const onNodesChange = useCallback(
    (changes) => {
      setNodes((oldNodes) => applyNodeChanges(changes, oldNodes));
    },
    [setNodes],
  );

  return (
    <ReactFLow nodes={nodes} edges={edges} onNodesChange={onNodesChange} />
  );
}
Signature
| Name | Type |
|---|---|
| #Params | |
| #changes | NodeChange[] |
| #nodes | Node[] |
| #Returns | |
| Node[] |
Notes
If you don't need any custom behaviour, the useNodesState hook conviniently wraps this util and React's useState hook for you and might be simpler to use.
=> 사용자 정의 동작이 필요하지 않은 경우 useNodesState 훅이 편리하게도 이 유틸리티와 React의 useState 훅을 감싸서 제공하므로 더 간단하게 사용할 수 있습니다.
getBezierPath()
The getBezierPath util returns everything you need to render a bezier edge between two nodes.
=> getBezierPath 유틸리티는 두 노드 사이에 베지어 엣지를 렌더링하는 데 필요한 모든 정보를 반환합니다.
import { Position, getBezierPath } from 'reactflow';

const source = { x: 0, y: 20 };
const target = { x: 150, y: 100 };

const [path, labelX, labelY, offsetX, offsetY] = getBezierPath({
  sourceX: source.x,
  sourceY: source.y,
  sourcePosition: Position.Right,
  targetX: target.x,
  targetY: target.y,
  targetPosition: Position.Left,
});

console.log(path); //=> "M0,20 C75,20 75,100 150,100"
console.log(labelX, labelY); //=> 75, 60
console.log(offsetX, offsetY); //=> 75, 40
Signature
| Name | Type | Default |
|---|---|---|
| #Params | ||
| #params | object | |
| #params.sourceX | number | |
| #params.sourceY | number | |
| #params.sourcePosition | Position | Position.Bottom |
| #params.targetX | number | |
| #params.targetY | number | |
| #params.targetPosition | Position | Position.Top |
| #params.curvature | number | 0.25 |
| #Returns | ||
| string
The path to use in an SVG path element. |
||
| number The x position you can use to render a label for this edge. |
||
| number The y position you can use to render a label for this edge. |
||
| number The absolute difference between the source x position and the x position of the middle of this path. |
||
| number The absolute difference between the source y position and the y position of the middle of this path. |
Notes
-
This function returns a tuple (aka a fixed-size array) to make it easier to work with multiple edge paths at once.
=> 이 함수는 여러 엣지 경로를 동시에 처리하기 쉽도록 튜플(고정 크기 배열)을 반환합니다.
getConnectedEdges()
Given an array of nodes that may be connected to one another and an array of all your edges, this util gives you an array of edges that connect any of the given nodes together.
=> 주어진 노드 배열이 서로 연결될 수 있는 경우와 모든 엣지의 배열을 고려할 때, 이 유틸리티는 주어진 노드를 서로 연결하는 엣지의 배열을 제공합니다.
import { getConnectedEdges } from 'reactflow';
const nodes = [];
const edges = [];
const connectedEdges = getConnectedEdges(nodes, edges);Signature
| Name | Type |
|---|---|
| #Params | |
| #nodes | Node[] |
| #edges | Edge[] |
| #Returns | |
| Edge[] |
getIncomers()
This util is used to tell you what nodes, if any, are connected to the given node as the source of an edge.
=> 이 유틸리티는 주어진 노드를 엣지의 출발지로 연결하는 노드가 있는지 여부를 알려줍니다.
import { getIncomers } from 'reactflow';
const nodes = [];
const edges = [];
const incomers = getIncomers(
{ id: '1', position: { x: 0, y: 0 }, data: { label: 'node' } },
nodes,
edges,
);Signature
| Name | Type |
|---|---|
| #Params | |
| #node | Node |
| #nodes | Node[] |
| #edges | Edge[] |
| #Returns | |
| Node[] |
getMarkerEnd()
Helper that returns internal marker id or user defined marker id.
=> 이 유틸리티는 내부 마커 ID 또는 사용자가 정의한 마커 ID를 반환합니다.
import { getMarkerEnd } from 'reactflow';
const markerEndId = getMarkerEnd(MarkerType.Arrow);Signature
| Name | Type |
|---|---|
| #Params | |
| #markerType | MarkerType |
| #markerEndId | string |
| #Returns | |
| string |
getNodesBounds()
Returns the bounding box that contains all the given nodes in an array. This can be useful when combined with getViewportForBounds to calculate the correct transform to fit the given nodes in a viewport.
=> 주어진 배열에 있는 모든 노드를 포함하는 바운딩 박스를 반환합니다. 이것은 getViewportForBounds와 결합하여 주어진 노드를 뷰포트에 맞게 변환하는 올바른 변환을 계산할 때 유용할 수 있습니다.
This function was previously called getRectOfNodes, which will be removed in v12.
이 함수는 이전에 getRectOfNodes로 불렸으며, v12에서 제거될 예정입니다.
import { getNodesBounds } from 'reactflow';
const nodes = [
{
id: 'a',
position: { x: 0, y: 0 },
data: { label: 'a' },
width: 50,
height: 25,
},
{
id: 'b',
position: { x: 100, y: 100 },
data: { label: 'b' },
width: 50,
height: 25,
},
];
const bounds = getNodesBounds(nodes);Signature
| Name | Type |
|---|---|
| #Params | |
| #nodes | Node[] |
| #Returns | |
| Rect |
getOutgoers()
This util is used to tell you what nodes, if any, are connected to the given node as a the target of an edge.
=> 이 유틸은 주어진 노드에 대한 엣지의 대상으로 연결된 노드가 있는지 여부를 알려줍니다.
import { getOutgoers } from 'reactflow';
const nodes = [];
const edges = [];
const incomers = getOutgoers(
{ id: '1', position: { x: 0, y: 0 }, data: { label: 'node' } },
nodes,
edges,
);Signature
| Name | Type |
|---|---|
| #Params | |
| #node | Node |
| #nodes | Node[] |
| #edges | Edge[] |
| #Returns | |
| Node[] |
getRectOfNodes()
=> getNodesBounds
This function is deprecated and will be removed in v12. Use getNodesBounds instead.
이 함수는 사용이 중지되었으며 v12에서 제거될 예정입니다. getNodesBounds를 대신 사용하십시오.
Returns the bounding box that contains all the given nodes in an array. This can be useful when combined with getViewportForBounds to calculate the correct transform to fit the given nodes in a viewport.
import { getRectOfNodes } from 'reactflow';
const nodes = [
{
id: 'a',
position: { x: 0, y: 0 },
data: { label: 'a' },
width: 50,
height: 25,
},
{
id: 'b',
position: { x: 100, y: 100 },
data: { label: 'b' },
width: 50,
height: 25,
},
];
const rectOfNodes = getRectOfNodes(nodes);Signature
| Name | Type |
|---|---|
| #Params | |
| #nodes | Node[] |
| #Returns | |
| Rect |
getSimpleBezierPath()
The getSimpleBezierPath util returns everything you need to render a simple bezier edge between two nodes.
=> getSimpleBezierPath 유틸리티는 두 노드 간의 간단한 베지어 엣지를 렌더링하는 데 필요한 모든 것을 반환합니다.
import { Position, getBezierPath } from 'reactflow';
const source = { x: 0, y: 20 };
const target = { x: 150, y: 100 };
const [path, labelX, labelY, offsetX, offsetY] = getSimpleBezierPath({
sourceX: source.x,
sourceY: source.y,
sourcePosition: Position.Right,
targetX: target.x,
targetY: target.y,
targetPosition: Position.Left,
});
console.log(path); //=> "M0,20 C75,20 75,100 150,100"
console.log(labelX, labelY); //=> 75, 60
console.log(offsetX, offsetY); //=> 75, 40Signature
| Name | Type | Default |
|---|---|---|
| #Params | ||
| #params | object | |
| #params.sourceX | number | |
| #params.sourceY | number | |
| #params.sourcePosition | Position | Position.Bottom |
| #params.targetX | number | |
| #params.targetY | number | |
| #params.targetPosition | Position | Position.Top |
| #Returns | ||
| string
The path to use in an SVG path element. |
||
| number
The x position you can use to render a label for this edge. |
||
| number
The y position you can use to render a label for this edge. |
||
| number
The absolute difference between the source x position and the x position of the middle of this path. |
||
| number
The absolute difference between the source y position and the y position of the middle of this path. |
Notes
-
This function returns a tuple (aka a fixed-size array) to make it easier to work with multiple edge paths at once.
=> 이 함수는 여러 개의 엣지 경로를 한 번에 처리하기 쉽도록 튜플(고정 크기 배열)을 반환합니다.
getSmoothStepPath()
The getSmoothStepPath util returns everything you need to render a stepped path between two nodes. The borderRadius property can be used to choose how rounded the corners of those steps are.
=> getSmoothStepPath 유틸리티는 두 노드 사이에 단계적인 경로를 렌더링하는 데 필요한 모든 것을 반환합니다. borderRadius 속성을 사용하여 이러한 단계의 모퉁이가 얼마나 둥근지 선택할 수 있습니다.
import { Position, getSmoothStepPath } from 'reactflow';
const source = { x: 0, y: 20 };
const target = { x: 150, y: 100 };
const [path, labelX, labelY, offsetX, offsetY] = getSmoothStepPath({
sourceX: source.x,
sourceY: source.y,
sourcePosition: Position.Right,
targetX: target.x,
targetY: target.y,
targetPosition: Position.Left,
});
console.log(path); //=> "M0 20L20 20L 70,20Q 75,20 75,25L 75,95Q ..."
console.log(labelX, labelY); //=> 75, 60
console.log(offsetX, offsetY); //=> 75, 40Signature
| Name | Type | Default |
|---|---|---|
| #Params | ||
| #sourceX | number | |
| #sourceY | number | |
| #sourcePosition | Position | Position.Bottom |
| #targetX | number | |
| #targetY | number | |
| #targetPosition | Position | Position.Top |
| #borderRadius | number | 5 |
| #centerX | number | |
| #centerY | number | |
| #offset | number | 20 |
| #Returns | ||
| [0] | string
The path to use in an SVG |
|
| [1] | number
The x position you can use to render a label for this edge. |
|
| [2] | number
The y position you can use to render a label for this edge. |
|
| [3] | number
The absolute difference between the source x position and the x position of the middle of this path. |
|
| [4] | number
The absolute difference between the source y position and the y position of the middle of this path. |
Notes
-
This function returns a tuple (aka a fixed-size array) to make it easier to work with multiple edge paths at once.
-
You can set the borderRadius property to 0 to get a step edge path.
=>
- 이 함수는 여러 가지 엣지 경로를 동시에 처리하기 쉽게하기 위해 튜플(고정 크기 배열)을 반환합니다.
- borderRadius 속성을 0으로 설정하여 단계적인 엣지 경로를 얻을 수 있습니다.
getStraightPath()
Calculates the straight line path between two points.
=> 두 점 사이의 직선 경로를 계산합니다.
import { getStraightPath } from 'reactflow';
const source = { x: 0, y: 20 };
const target = { x: 150, y: 100 };
const [path, labelX, labelY, offsetX, offsetY] = getStraightPath({
sourceX: source.x,
sourceY: source.y,
targetX: target.x,
targetY: target.y,
});
console.log(path); //=> "M 0,20L 150,100"
console.log(labelX, labelY); //=> 75, 60
console.log(offsetX, offsetY); //=> 75, 40Signature
| Name | Type | |
|---|---|---|
| #Params | ||
| #sourceX | number | |
| #sourceY | number | |
| #targetX | number | |
| #targetY | number | |
| #Returns | ||
| [1] | number
The x position you can use to render a label for this edge. |
|
| [2] | number
The y position you can use to render a label for this edge. |
|
| [3] | number
The absolute difference between the source x position and the x position of the middle of this path. |
|
| [4] | number
The absolute difference between the source y position and the y position of the middle of this path. |
Notes
This function returns a tuple (aka a fixed-size array) to make it easier to work with multiple edge paths at once.
=> 이 함수는 여러 개의 엣지 경로를 한 번에 처리하기 쉽도록 튜플(고정 크기 배열)을 반환합니다.
getTransformForBounds()
=> getViewportForBounds
This function is deprecated and will be removed in v12. Use getViewportForBounds instead.
이 함수는 사용이 중단되었으며 v12에서 제거될 예정입니다. 대신 getViewportForBounds를 사용하십시오.
This util tells you what to set the viewport to in order to fit the given bounds. You might use this to pre-calculate the viewport for a given set of nodes on the server or calculate the viewport for the given bounds without changing the viewport directly.
import { getTransformForBounds } from 'reactflow';
const transform = getTransformForBounds(
{
x: 0,
y: 0,
width: 100,
height: 100,
},
1200,
800,
0.5,
2,
);Signature
| Name | Type | Default |
|---|---|---|
| #Params | ||
| #bounds | Rect | |
| #width | number | |
| #height | number | |
| #minZoom | number | |
| #maxZoom | number | |
| #padding | number | 0.1 |
| #Returns | ||
| [0] | number
The x position of the transformed viewport. |
|
| [1] | number
The y position of the transformed viewport |
|
| [2] | number
The zoom level of the transformed viewport. |
Notes
-
This is quite a low-level utility. You might want to look at the fitView or fitBounds methods for a more practical api.
-
This function is called getTransform... for historical reasons. Its return type represents a Viewport in tuple form.
=>
-
이 함수는 상당히 저수준의 유틸리티입니다. 보다 실용적인 API를 위해서는 fitView 또는 fitBounds 메서드를 살펴보는 것이 좋습니다.
-
이 함수는 역사적인 이유로 getTransform...으로 호출됩니다. 반환 형식은 튜플 형태의 뷰포트를 나타냅니다.
getViewportForBounds()
This util returns the viewport for the given bounds. You might use this to pre-calculate the viewport for a given set of nodes on the server or calculate the viewport for the given bounds without changing the viewport directly.
=> 이 유틸리티는 지정된 경계에 대한 뷰포트를 반환합니다. 이것은 서버에서 주어진 노드 세트에 대한 뷰포트를 사전에 계산하거나 뷰포트를 직접 변경하지 않고 주어진 경계에 대한 뷰포트를 계산하는 데 사용할 수 있습니다.
import { getViewportForBounds } from 'reactflow';
const { x, y, zoomn } = getViewportForBounds(
{
x: 0,
y: 0,
width: 100,
height: 100,
},
1200,
800,
0.5,
2,
);Signature
| Name | Type | Default |
|---|---|---|
| #Params | ||
| #bounds | Rect | |
| #width | number | |
| #height | number | |
| #minZoom | number | |
| #maxZoom | number | |
| #padding | number | 0.1 |
| #Returns | ||
| #viewport | Viewport
The transformed viewport (`{ x: number, y: number, zoom: number }`). |
Notes
This is quite a low-level utility. You might want to look at the fitView or fitBounds methods for a more practical api.
=>
이 유틸리티는 꽤 낮은 수준의 도구입니다. 더 실용적인 API를 위해 fitView 또는 fitBounds 메서드를 살펴보는 것이 좋습니다.
isEdge()
Test whether an object is useable as an Edge. In TypeScript this is a type guard that will narrow the type of whatever you pass in to Edge if it returns true.
=> "이 객체가 Edge로 사용될 수 있는지 테스트합니다. TypeScript에서는 true를 반환하면 전달한 것의 유형을 Edge로 좁히는 타입 가드입니다."
import { isEdge } from 'reactflow';
const edge = {
id: 'edge-a',
source: 'a',
target: 'b',
};
if (isEdge(edge)) {
// ..
}Signature
| Name | Type |
|---|---|
| #Params | |
| #item | any |
| #Returns | |
| boolean
Tests if whatever you passed in can be used as an edge. If you're using TypeScript, this function actions as a type guard and will narrow the type of whatever you pass in to an Edge if it returns true. |
isNode()
Test whether an object is useable as an Node. In TypeScript this is a type guard that will narrow the type of whatever you pass in to Node if it returns true.
=>"이 객체가 노드로 사용될 수 있는지를 테스트합니다. TypeScript에서는 true를 반환하면 전달한 객체의 유형을 노드로 좁히는 타입 가드입니다."
import { isNode } from 'reactflow';
const node = {
id: 'node-a',
data: {
label: 'node',
},
position: {
x: 0,
y: 0,
},
};
if (isNode(node)) {
// ..
}Signature
| Name | Type |
|---|---|
| #Params | |
| #item | any |
| #Returns | |
| boolean
Tests if whatever you passed in can be used as an node. If you're using TypeScript, this function actions as a type guard and will narrow the type of whatever you pass in to an Node if it returns true. |
updateEdge()
A handy utility to update an existing Edge with new properties. This searches your edge array for an edge with a matching id and updates its properties with the connection you provide.
=> "기존 엣지를 새로운 속성으로 업데이트하는 편리한 유틸리티입니다. 이 유틸리티는 엣지 배열에서 해당 id를 가진 엣지를 검색하고 제공된 연결로 속성을 업데이트합니다."
const onEdgeUpdate = useCallback(
(oldEdge: Edge, newConnection: Connection) => setEdges((els) => updateEdge(oldEdge, newConnection, els)),
[]
);Signature
| Name | Type |
|---|---|
| #Params | |
| #edge | Edge |
| #connection | Connection |
| #edges | Edge[] |
| #options | object |
| #options.shouldReplaceId | boolean |
| #Returns | |
| Edge[] |
Examples OverView
Feature Overview
This is a very basic example of a React Flow graph. On the bottom left you see the Controls and on the bottom right the MiniMap component. You can see different node types (input, default, output), edge types (bezier, step and smoothstep), edge labels and custom styled edge labels.
=> 이것은 React Flow 그래프의 매우 기본적인 예입니다. 왼쪽 아래에는 컨트롤이 있고 오른쪽 아래에는 MiniMap 구성 요소가 있습니다. 다양한 노드 유형 (input, default, output), 엣지 유형 (bezier, step 및 smoothstep), 엣지 레이블 및 사용자 정의 스타일이 적용된 엣지 레이블을 볼 수 있습니다.
참고 예제 코드
<App.js>
import React, { useCallback } from 'react';
import ReactFlow, {
addEdge,
MiniMap,
Controls,
Background,
useNodesState,
useEdgesState,
} from 'reactflow';
import { nodes as initialNodes, edges as initialEdges } from './initial-elements';
import CustomNode from './CustomNode';
import 'reactflow/dist/style.css';
import './overview.css';
const nodeTypes = {
custom: CustomNode,
};
const minimapStyle = {
height: 120,
};
const onInit = (reactFlowInstance) => console.log('flow loaded:', reactFlowInstance);
const OverviewFlow = () => {
const [nodes, setNodes, onNodesChange] = useNodesState(initialNodes);
const [edges, setEdges, onEdgesChange] = useEdgesState(initialEdges);
const onConnect = useCallback((params) => setEdges((eds) => addEdge(params, eds)), []);
// we are using a bit of a shortcut here to adjust the edge type
// this could also be done with a custom edge for example
const edgesWithUpdatedTypes = edges.map((edge) => {
if (edge.sourceHandle) {
const edgeType = nodes.find((node) => node.type === 'custom').data.selects[edge.sourceHandle];
edge.type = edgeType;
}
return edge;
});
return (
<ReactFlow
nodes={nodes}
edges={edgesWithUpdatedTypes}
onNodesChange={onNodesChange}
onEdgesChange={onEdgesChange}
onConnect={onConnect}
onInit={onInit}
fitView
attributionPosition="top-right"
nodeTypes={nodeTypes}
>
<MiniMap style={minimapStyle} zoomable pannable />
<Controls />
<Background color="#aaa" gap={16} />
</ReactFlow>
);
};
export default OverviewFlow;
<initial-elements.js>
import React from 'react';
import { MarkerType, Position } from 'reactflow';
export const nodes = [
{
id: '1',
type: 'input',
data: {
label: 'Input Node',
},
position: { x: 250, y: 0 },
},
{
id: '2',
data: {
label: 'Default Node',
},
position: { x: 100, y: 100 },
},
{
id: '3',
type: 'output',
data: {
label: 'Output Node',
},
position: { x: 400, y: 100 },
},
{
id: '4',
type: 'custom',
position: { x: 100, y: 200 },
data: {
selects: {
'handle-0': 'smoothstep',
'handle-1': 'smoothstep',
},
},
},
{
id: '5',
type: 'output',
data: {
label: 'custom style',
},
className: 'circle',
style: {
background: '#2B6CB0',
color: 'white',
},
position: { x: 400, y: 200 },
sourcePosition: Position.Right,
targetPosition: Position.Left,
},
{
id: '6',
type: 'output',
style: {
background: '#63B3ED',
color: 'white',
width: 100,
},
data: {
label: 'Node',
},
position: { x: 400, y: 325 },
sourcePosition: Position.Right,
targetPosition: Position.Left,
},
{
id: '7',
type: 'default',
className: 'annotation',
data: {
label: (
<>
On the bottom left you see the <strong>Controls</strong> and the bottom right the{' '}
<strong>MiniMap</strong>. This is also just a node 🥳
</>
),
},
draggable: false,
selectable: false,
position: { x: 150, y: 400 },
},
];
export const edges = [
{ id: 'e1-2', source: '1', target: '2', label: 'this is an edge label' },
{ id: 'e1-3', source: '1', target: '3', animated: true },
{
id: 'e4-5',
source: '4',
target: '5',
type: 'smoothstep',
sourceHandle: 'handle-0',
data: {
selectIndex: 0,
},
markerEnd: {
type: MarkerType.ArrowClosed,
},
},
{
id: 'e4-6',
source: '4',
target: '6',
type: 'smoothstep',
sourceHandle: 'handle-1',
data: {
selectIndex: 1,
},
markerEnd: {
type: MarkerType.ArrowClosed,
},
},
];
<CustomNode.jsx>
import React, { memo } from 'react';
import { Handle, useReactFlow, useStoreApi, Position } from 'reactflow';
const options = [
{
value: 'smoothstep',
label: 'Smoothstep',
},
{
value: 'step',
label: 'Step',
},
{
value: 'default',
label: 'Bezier (default)',
},
{
value: 'straight',
label: 'Straight',
},
];
function Select({ value, handleId, nodeId }) {
const { setNodes } = useReactFlow();
const store = useStoreApi();
const onChange = (evt) => {
const { nodeInternals } = store.getState();
setNodes(
Array.from(nodeInternals.values()).map((node) => {
if (node.id === nodeId) {
node.data = {
...node.data,
selects: {
...node.data.selects,
[handleId]: evt.target.value,
},
};
}
return node;
})
);
};
return (
<div className="custom-node__select">
<div>Edge Type</div>
<select className="nodrag" onChange={onChange} value={value}>
{options.map((option) => (
<option key={option.value} value={option.value}>
{option.label}
</option>
))}
</select>
<Handle type="source" position={Position.Right} id={handleId} />
</div>
);
}
function CustomNode({ id, data }) {
return (
<>
<div className="custom-node__header">
This is a <strong>custom node</strong>
</div>
<div className="custom-node__body">
{Object.keys(data.selects).map((handleId) => (
<Select key={handleId} nodeId={id} value={data.selects[handleId]} handleId={handleId} />
))}
</div>
</>
);
}
export default memo(CustomNode);
<overview.css>
.react-flow__node-custom {
font-size: 10px;
width: 180px;
background: #f5f5f6;
color: #222;
box-shadow: 0 4px 6px -1px rgb(0 0 0 / 15%), 0 2px 4px -1px rgb(0 0 0 / 8%);
border-radius: 2px;
}
.react-flow__node-custom .react-flow__handle {
top: 24px;
right: -15px;
width: 6px;
height: 10px;
border-radius: 2px;
background-color: #778899;
}
.react-flow__node.circle {
border-radius: 50%;
width: 60px;
height: 60px;
display: flex;
justify-content: center;
align-items: center;
font-weight: 700;
}
.react-flow__node.annotation {
border-radius: 0;
text-align: left;
background: white;
border: none;
line-height: 1.4;
width: 225px;
box-shadow: 0 4px 6px -1px rgb(0 0 0 / 15%), 0 2px 4px -1px rgb(0 0 0 / 8%);
}
.react-flow__node.annotation .react-flow__handle {
display: none;
}
.custom-node__header {
padding: 8px 10px;
border-bottom: 1px solid #e2e8f0;
}
.custom-node__body {
padding: 10px;
}
.custom-node__select {
position: relative;
margin-bottom: 10px;
}
.custom-node__select select {
width: 100%;
margin-top: 5px;
font-size: 10px;
}
참고 예제 코드로 구현된 CodeSandbox 및 캡쳐사진
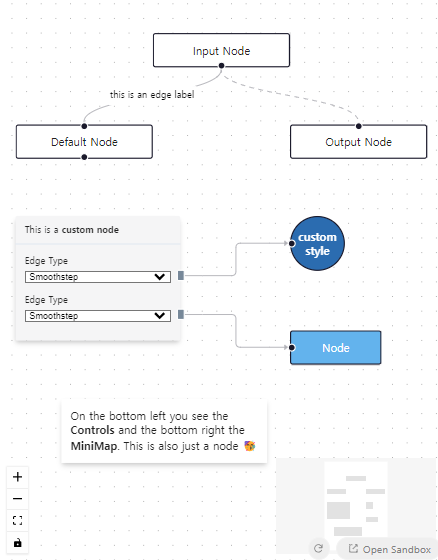
Nodes
Custom Nodes
Creating your own nodes is as easy as creating a regular React component and passing them to nodeTypes. Being just regular components, you can essentially display any content and implement any functionality you like. Inside, you have access to a number of props that let you implement and extend default node behaviour.
=> 자신만의 노드를 생성하는 것은 일반적인 React 컴포넌트를 생성하고 nodeTypes에 전달하는 것만큼 쉽습니다. 일반적인 컴포넌트이기 때문에 원하는 내용을 표시하고 원하는 기능을 구현할 수 있습니다. 내부에서는 기본 노드 동작을 구현하고 확장할 수 있도록 여러 프롭에 액세스할 수 있습니다.
참고 예제 코드
<App.js>
import React, { useState, useEffect, useCallback } from 'react';
import ReactFlow, { useNodesState, useEdgesState, addEdge, MiniMap, Controls } from 'reactflow';
import 'reactflow/dist/style.css';
import ColorSelectorNode from './ColorSelectorNode';
import './index.css';
const initBgColor = '#1A192B';
const connectionLineStyle = { stroke: '#fff' };
const snapGrid = [20, 20];
const nodeTypes = {
selectorNode: ColorSelectorNode,
};
const defaultViewport = { x: 0, y: 0, zoom: 1.5 };
const CustomNodeFlow = () => {
const [nodes, setNodes, onNodesChange] = useNodesState([]);
const [edges, setEdges, onEdgesChange] = useEdgesState([]);
const [bgColor, setBgColor] = useState(initBgColor);
useEffect(() => {
const onChange = (event) => {
setNodes((nds) =>
nds.map((node) => {
if (node.id !== '2') {
return node;
}
const color = event.target.value;
setBgColor(color);
return {
...node,
data: {
...node.data,
color,
},
};
})
);
};
setNodes([
{
id: '1',
type: 'input',
data: { label: 'An input node' },
position: { x: 0, y: 50 },
sourcePosition: 'right',
},
{
id: '2',
type: 'selectorNode',
data: { onChange: onChange, color: initBgColor },
style: { border: '1px solid #777', padding: 10 },
position: { x: 300, y: 50 },
},
{
id: '3',
type: 'output',
data: { label: 'Output A' },
position: { x: 650, y: 25 },
targetPosition: 'left',
},
{
id: '4',
type: 'output',
data: { label: 'Output B' },
position: { x: 650, y: 100 },
targetPosition: 'left',
},
]);
setEdges([
{
id: 'e1-2',
source: '1',
target: '2',
animated: true,
style: { stroke: '#fff' },
},
{
id: 'e2a-3',
source: '2',
target: '3',
sourceHandle: 'a',
animated: true,
style: { stroke: '#fff' },
},
{
id: 'e2b-4',
source: '2',
target: '4',
sourceHandle: 'b',
animated: true,
style: { stroke: '#fff' },
},
]);
}, []);
const onConnect = useCallback(
(params) =>
setEdges((eds) => addEdge({ ...params, animated: true, style: { stroke: '#fff' } }, eds)),
[]
);
return (
<ReactFlow
nodes={nodes}
edges={edges}
onNodesChange={onNodesChange}
onEdgesChange={onEdgesChange}
onConnect={onConnect}
style={{ background: bgColor }}
nodeTypes={nodeTypes}
connectionLineStyle={connectionLineStyle}
snapToGrid={true}
snapGrid={snapGrid}
defaultViewport={defaultViewport}
fitView
attributionPosition="bottom-left"
>
<MiniMap
nodeStrokeColor={(n) => {
if (n.type === 'input') return '#0041d0';
if (n.type === 'selectorNode') return bgColor;
if (n.type === 'output') return '#ff0072';
}}
nodeColor={(n) => {
if (n.type === 'selectorNode') return bgColor;
return '#fff';
}}
/>
<Controls />
</ReactFlow>
);
};
export default CustomNodeFlow;
<ColorSelectorNode.js>
import React, { memo } from 'react';
import { Handle, Position } from 'reactflow';
export default memo(({ data, isConnectable }) => {
return (
<>
<Handle
type="target"
position={Position.Left}
style={{ background: '#555' }}
onConnect={(params) => console.log('handle onConnect', params)}
isConnectable={isConnectable}
/>
<div>
Custom Color Picker Node: <strong>{data.color}</strong>
</div>
<input className="nodrag" type="color" onChange={data.onChange} defaultValue={data.color} />
<Handle
type="source"
position={Position.Right}
id="a"
style={{ top: 10, background: '#555' }}
isConnectable={isConnectable}
/>
<Handle
type="source"
position={Position.Right}
id="b"
style={{ bottom: 10, top: 'auto', background: '#555' }}
isConnectable={isConnectable}
/>
</>
);
});
<index.css>
.react-flow__node-selectorNode {
font-size: 12px;
background: #eee;
border: 1px solid #555;
border-radius: 5px;
text-align: center;
}
참고 예제 코드로 구현된 CodeSandbox 및 캡쳐사진

Updating Nodes
You can update properties of nodes and edges freely as long as you pass a newly created nodes or edges array to ReactFlow.
=> 새로운 노드나 엣지 배열을 ReactFlow에 전달하는 한, 노드와 엣지의 속성을 자유롭게 업데이트할 수 있습니다.
You have to create a new data object on a node to notify React Flow about data changes.
=> React Flow에 데이터 변경을 알리기 위해 노드에 대한 새로운 데이터 객체를 생성해야 합니다.
참고 예제 코드
<App.js>
import React, { useEffect, useState } from 'react';
import ReactFlow, { useNodesState, useEdgesState } from 'reactflow';
import 'reactflow/dist/style.css';
import './updatenode.css';
const initialNodes = [
{ id: '1', data: { label: '-' }, position: { x: 100, y: 100 } },
{ id: '2', data: { label: 'Node 2' }, position: { x: 100, y: 200 } },
];
const initialEdges = [{ id: 'e1-2', source: '1', target: '2' }];
const defaultViewport = { x: 0, y: 0, zoom: 1.5 };
const UpdateNode = () => {
const [nodes, setNodes, onNodesChange] = useNodesState(initialNodes);
const [edges, setEdges, onEdgesChange] = useEdgesState(initialEdges);
const [nodeName, setNodeName] = useState('Node 1');
const [nodeBg, setNodeBg] = useState('#eee');
const [nodeHidden, setNodeHidden] = useState(false);
useEffect(() => {
setNodes((nds) =>
nds.map((node) => {
if (node.id === '1') {
// it's important that you create a new object here
// in order to notify react flow about the change
node.data = {
...node.data,
label: nodeName,
};
}
return node;
})
);
}, [nodeName, setNodes]);
useEffect(() => {
setNodes((nds) =>
nds.map((node) => {
if (node.id === '1') {
// it's important that you create a new object here
// in order to notify react flow about the change
node.style = { ...node.style, backgroundColor: nodeBg };
}
return node;
})
);
}, [nodeBg, setNodes]);
useEffect(() => {
setNodes((nds) =>
nds.map((node) => {
if (node.id === '1') {
// when you update a simple type you can just update the value
node.hidden = nodeHidden;
}
return node;
})
);
setEdges((eds) =>
eds.map((edge) => {
if (edge.id === 'e1-2') {
edge.hidden = nodeHidden;
}
return edge;
})
);
}, [nodeHidden, setNodes, setEdges]);
return (
<ReactFlow
nodes={nodes}
edges={edges}
onNodesChange={onNodesChange}
onEdgesChange={onEdgesChange}
defaultViewport={defaultViewport}
minZoom={0.2}
maxZoom={4}
attributionPosition="bottom-left"
>
<div className="updatenode__controls">
<label>label:</label>
<input value={nodeName} onChange={(evt) => setNodeName(evt.target.value)} />
<label className="updatenode__bglabel">background:</label>
<input value={nodeBg} onChange={(evt) => setNodeBg(evt.target.value)} />
<div className="updatenode__checkboxwrapper">
<label>hidden:</label>
<input
type="checkbox"
checked={nodeHidden}
onChange={(evt) => setNodeHidden(evt.target.checked)}
/>
</div>
</div>
</ReactFlow>
);
};
export default UpdateNode;
<updatenode.css>
.updatenode__controls {
position: absolute;
right: 10px;
top: 10px;
z-index: 4;
font-size: 12px;
}
.updatenode__controls label {
display: block;
}
.updatenode__bglabel {
margin-top: 10px;
}
.updatenode__checkboxwrapper {
margin-top: 10px;
display: flex;
align-items: center;
}
참고 예제 코드로 구현된 CodeSandbox 및 캡쳐사진
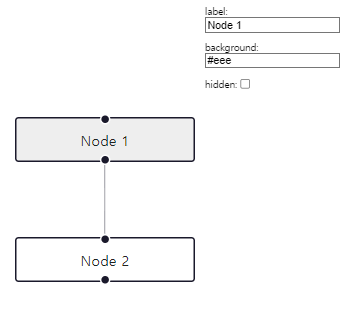
Stress Test
You doubt we can render a lot of nodes and edges? See for yourself.
=> 노드와 엣지를 많이 렌더링할 수 없다고 의심하십니까? 직접 확인해보세요.
참고 예제 코드
<App.js>
import React, { useCallback } from 'react';
import ReactFlow, {
useNodesState,
useEdgesState,
addEdge,
MiniMap,
Controls,
Background,
} from 'reactflow';
import 'reactflow/dist/style.css';
import { createNodesAndEdges } from './utils.js';
const { nodes: initialNodes, edges: initialEdges } = createNodesAndEdges(
15,
30,
);
const StressFlow = () => {
const [nodes, setNodes, onNodesChange] = useNodesState(initialNodes);
const [edges, setEdges, onEdgesChange] = useEdgesState(initialEdges);
const onConnect = useCallback(
(params) => setEdges((els) => addEdge(params, els)),
[],
);
const updatePos = useCallback(() => {
setNodes((nds) => {
return nds.map((node) => {
return {
...node,
position: {
x: Math.random() * 1500,
y: Math.random() * 1500,
},
};
});
});
}, []);
return (
<ReactFlow
nodes={nodes}
edges={edges}
onNodesChange={onNodesChange}
onEdgesChange={onEdgesChange}
onConnect={onConnect}
fitView
minZoom={0}
>
<MiniMap />
<Controls />
<Background />
<button
onClick={updatePos}
style={{ position: 'absolute', right: 10, top: 30, zIndex: 4 }}
>
change pos
</button>
</ReactFlow>
);
};
export default StressFlow;
<utils.js>
export function createNodesAndEdges(xNodes = 10, yNodes = 10) {
const nodes = [];
const edges = [];
let nodeId = 1;
let recentNodeId = null;
for (let y = 0; y < yNodes; y++) {
for (let x = 0; x < xNodes; x++) {
const position = { x: x * 100, y: y * 50 };
const data = { label: `Node ${nodeId}` };
const node = {
id: `stress-${nodeId.toString()}`,
style: { width: 50, fontSize: 11 },
data,
position,
};
nodes.push(node);
if (recentNodeId && nodeId <= xNodes * yNodes) {
edges.push({
id: `${x}-${y}`,
source: `stress-${recentNodeId.toString()}`,
target: `stress-${nodeId.toString()}`,
});
}
recentNodeId = nodeId;
nodeId++;
}
}
return { nodes, edges };
}
참고 예제 코드로 구현된 CodeSandbox 및 캡쳐사진
Hidden
Nodes and edges can be hidden by using the hidden attribute. This can be used for implementing expandable/collapsible diagrams.
=> 노드와 엣지는 hidden 속성을 사용하여 숨길 수 있습니다. 이는 확장 가능하고/축소 가능한 다이어그램을 구현하는 데 사용할 수 있습니다.
참고 예제 코드
import React, { useCallback, useEffect, useState } from 'react';
import ReactFlow, { useNodesState, useEdgesState, addEdge, MiniMap, Controls } from 'reactflow';
import 'reactflow/dist/style.css';
const initialNodes = [
{
id: 'hidden-1',
type: 'input',
data: { label: 'Node 1' },
position: { x: 250, y: 5 },
},
{ id: 'hidden-2', data: { label: 'Node 2' }, position: { x: 100, y: 100 } },
{ id: 'hidden-3', data: { label: 'Node 3' }, position: { x: 400, y: 100 } },
{ id: 'hidden-4', data: { label: 'Node 4' }, position: { x: 400, y: 200 } },
];
const initialEdges = [
{ id: 'hidden-e1-2', source: 'hidden-1', target: 'hidden-2' },
{ id: 'hidden-e1-3', source: 'hidden-1', target: 'hidden-3' },
{ id: 'hidden-e3-4', source: 'hidden-3', target: 'hidden-4' },
];
const hide = (hidden) => (nodeOrEdge) => {
nodeOrEdge.hidden = hidden;
return nodeOrEdge;
};
const HiddenFlow = () => {
const [nodes, setNodes, onNodesChange] = useNodesState(initialNodes);
const [edges, setEdges, onEdgesChange] = useEdgesState(initialEdges);
const [hidden, setHidden] = useState(false);
const onConnect = useCallback((params) => setEdges((els) => addEdge(params, els)), []);
useEffect(() => {
setNodes((nds) => nds.map(hide(hidden)));
setEdges((eds) => eds.map(hide(hidden)));
}, [hidden]);
return (
<ReactFlow
nodes={nodes}
edges={edges}
onNodesChange={onNodesChange}
onEdgesChange={onEdgesChange}
onConnect={onConnect}
>
<MiniMap />
<Controls />
<div style={{ position: 'absolute', left: 10, top: 10, zIndex: 4 }}>
<div>
<label htmlFor="ishidden">
isHidden
<input
id="ishidden"
type="checkbox"
checked={hidden}
onChange={(event) => setHidden(event.target.checked)}
className="react-flow__ishidden"
/>
</label>
</div>
</div>
</ReactFlow>
);
};
export default HiddenFlow;
참고 예제 코드로 구현된 CodeSandbox 및 캡쳐사진
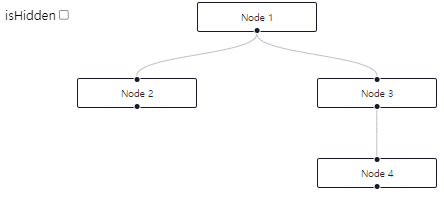
Drag Handle
You can restrict dragging to a specific part of node, by specifiying a class that will act as a dragHandle.
=> 특정 부분의 노드 드래깅을 제한하려면 드래그 핸들로 작동할 클래스를 지정하면 됩니다.
참고 예제 코드
<App.js>
import React from 'react';
import ReactFlow, { useNodesState, useEdgesState, Background } from 'reactflow';
import 'reactflow/dist/style.css';
import DragHandleNode from './DragHandleNode.js';
const nodeTypes = {
dragHandleNode: DragHandleNode,
};
const initialNodes = [
{
id: '2',
type: 'dragHandleNode',
// Specify the custom class acting as a drag handle
dragHandle: '.custom-drag-handle',
style: {
border: '1px solid #ddd',
padding: '20px 40px',
background: 'white',
},
position: { x: 200, y: 200 },
},
];
const DragHandleFlow = () => {
const [nodes, setNodes, onNodesChange] = useNodesState(initialNodes);
const [edges, setEdges, onEdgesChange] = useEdgesState([]);
return (
<ReactFlow
nodes={nodes}
edges={edges}
onNodesChange={onNodesChange}
onEdgesChange={onEdgesChange}
nodeTypes={nodeTypes}
fitView
>
<Background />
</ReactFlow>
);
};
export default DragHandleFlow;
<DragHandleNode.js>
import React, { memo } from 'react';
import { Handle, Position } from 'reactflow';
const labelStyle = {
display: 'flex',
alignItems: 'center',
};
const dragHandleStyle = {
display: 'inline-block',
width: 25,
height: 25,
backgroundColor: 'teal',
marginLeft: 5,
borderRadius: '50%',
};
const onConnect = (params) => console.log('handle onConnect', params);
function DragHandleNode() {
return (
<>
<Handle type="target" position={Position.Left} onConnect={onConnect} />
<div style={labelStyle}>
Only draggable here →
{/* Use the class specified at node.dragHandle here */}
<span className="custom-drag-handle" style={dragHandleStyle} />
</div>
<Handle type="source" position={Position.Right} />
</>
);
}
export default memo(DragHandleNode);
참고 예제 코드로 구현된 CodeSandbox 및 캡쳐사진
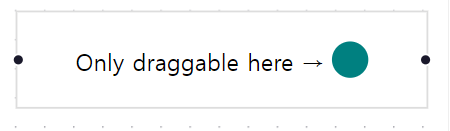
Easy Connect
Fed up with tiny little connection handles? Make your whole node act as one! Keep in mind though that you need to define seperate drag handles in this case to still be able to drag the node.
=> 작은 연결 핸들에 지치셨나요? 노드 전체를 하나로 만드세요! 그러나 노드를 여전히 드래그할 수 있도록 이 경우에는 별도의 드래그 핸들을 정의해야 함을 염두에 두세요.
참고 예제 코드
<App.js>
import React, { useCallback } from 'react';
import ReactFlow, { addEdge, useNodesState, useEdgesState, MarkerType } from 'reactflow';
import CustomNode from './CustomNode';
import FloatingEdge from './FloatingEdge';
import CustomConnectionLine from './CustomConnectionLine';
import 'reactflow/dist/style.css';
import './style.css';
const initialNodes = [
{
id: '1',
type: 'custom',
position: { x: 0, y: 0 },
},
{
id: '2',
type: 'custom',
position: { x: 250, y: 320 },
},
{
id: '3',
type: 'custom',
position: { x: 40, y: 300 },
},
{
id: '4',
type: 'custom',
position: { x: 300, y: 0 },
},
];
const initialEdges = [];
const connectionLineStyle = {
strokeWidth: 3,
stroke: 'black',
};
const nodeTypes = {
custom: CustomNode,
};
const edgeTypes = {
floating: FloatingEdge,
};
const defaultEdgeOptions = {
style: { strokeWidth: 3, stroke: 'black' },
type: 'floating',
markerEnd: {
type: MarkerType.ArrowClosed,
color: 'black',
},
};
const EasyConnectExample = () => {
const [nodes, setNodes, onNodesChange] = useNodesState(initialNodes);
const [edges, setEdges, onEdgesChange] = useEdgesState(initialEdges);
const onConnect = useCallback((params) => setEdges((eds) => addEdge(params, eds)), [setEdges]);
return (
<ReactFlow
nodes={nodes}
edges={edges}
onNodesChange={onNodesChange}
onEdgesChange={onEdgesChange}
onConnect={onConnect}
fitView
nodeTypes={nodeTypes}
edgeTypes={edgeTypes}
defaultEdgeOptions={defaultEdgeOptions}
connectionLineComponent={CustomConnectionLine}
connectionLineStyle={connectionLineStyle}
/>
);
};
export default EasyConnectExample;
<CustomNode.js>
import { Handle, Position, useStore } from 'reactflow';
const connectionNodeIdSelector = (state) => state.connectionNodeId;
export default function CustomNode({ id }) {
const connectionNodeId = useStore(connectionNodeIdSelector);
const isConnecting = !!connectionNodeId;
const isTarget = connectionNodeId && connectionNodeId !== id;
const label = isTarget ? 'Drop here' : 'Drag to connect';
return (
<div className="customNode">
<div
className="customNodeBody"
style={{
borderStyle: isTarget ? 'dashed' : 'solid',
backgroundColor: isTarget ? '#ffcce3' : '#ccd9f6',
}}
>
{/* If handles are conditionally rendered and not present initially, you need to update the node internals https://reactflow.dev/docs/api/hooks/use-update-node-internals/ */}
{/* In this case we don't need to use useUpdateNodeInternals, since !isConnecting is true at the beginning and all handles are rendered initially. */}
{!isConnecting && (
<Handle className="customHandle" position={Position.Right} type="source" />
)}
<Handle
className="customHandle"
position={Position.Left}
type="target"
isConnectableStart={false}
/>
{label}
</div>
</div>
);
}
<FloatingEdge.js>
import { useCallback } from 'react';
import { useStore, getStraightPath } from 'reactflow';
import { getEdgeParams } from './utils.js';
function FloatingEdge({ id, source, target, markerEnd, style }) {
const sourceNode = useStore(useCallback((store) => store.nodeInternals.get(source), [source]));
const targetNode = useStore(useCallback((store) => store.nodeInternals.get(target), [target]));
if (!sourceNode || !targetNode) {
return null;
}
const { sx, sy, tx, ty } = getEdgeParams(sourceNode, targetNode);
const [edgePath] = getStraightPath({
sourceX: sx,
sourceY: sy,
targetX: tx,
targetY: ty,
});
return (
<path
id={id}
className="react-flow__edge-path"
d={edgePath}
markerEnd={markerEnd}
style={style}
/>
);
}
export default FloatingEdge;
<CustomConnectionLine.js>
import React from 'react';
import { getStraightPath } from 'reactflow';
function CustomConnectionLine({ fromX, fromY, toX, toY, connectionLineStyle }) {
const [edgePath] = getStraightPath({
sourceX: fromX,
sourceY: fromY,
targetX: toX,
targetY: toY,
});
return (
<g>
<path style={connectionLineStyle} fill="none" d={edgePath} />
<circle cx={toX} cy={toY} fill="black" r={3} stroke="black" strokeWidth={1.5} />
</g>
);
}
export default CustomConnectionLine;
<utils.js>
import { Position, MarkerType } from 'reactflow';
// this helper function returns the intersection point
// of the line between the center of the intersectionNode and the target node
function getNodeIntersection(intersectionNode, targetNode) {
// https://math.stackexchange.com/questions/1724792/an-algorithm-for-finding-the-intersection-point-between-a-center-of-vision-and-a
const {
width: intersectionNodeWidth,
height: intersectionNodeHeight,
positionAbsolute: intersectionNodePosition,
} = intersectionNode;
const targetPosition = targetNode.positionAbsolute;
const w = intersectionNodeWidth / 2;
const h = intersectionNodeHeight / 2;
const x2 = intersectionNodePosition.x + w;
const y2 = intersectionNodePosition.y + h;
const x1 = targetPosition.x + targetNode.width / 2;
const y1 = targetPosition.y + targetNode.height / 2;
const xx1 = (x1 - x2) / (2 * w) - (y1 - y2) / (2 * h);
const yy1 = (x1 - x2) / (2 * w) + (y1 - y2) / (2 * h);
const a = 1 / (Math.abs(xx1) + Math.abs(yy1));
const xx3 = a * xx1;
const yy3 = a * yy1;
const x = w * (xx3 + yy3) + x2;
const y = h * (-xx3 + yy3) + y2;
return { x, y };
}
// returns the position (top,right,bottom or right) passed node compared to the intersection point
function getEdgePosition(node, intersectionPoint) {
const n = { ...node.positionAbsolute, ...node };
const nx = Math.round(n.x);
const ny = Math.round(n.y);
const px = Math.round(intersectionPoint.x);
const py = Math.round(intersectionPoint.y);
if (px <= nx + 1) {
return Position.Left;
}
if (px >= nx + n.width - 1) {
return Position.Right;
}
if (py <= ny + 1) {
return Position.Top;
}
if (py >= n.y + n.height - 1) {
return Position.Bottom;
}
return Position.Top;
}
// returns the parameters (sx, sy, tx, ty, sourcePos, targetPos) you need to create an edge
export function getEdgeParams(source, target) {
const sourceIntersectionPoint = getNodeIntersection(source, target);
const targetIntersectionPoint = getNodeIntersection(target, source);
const sourcePos = getEdgePosition(source, sourceIntersectionPoint);
const targetPos = getEdgePosition(target, targetIntersectionPoint);
return {
sx: sourceIntersectionPoint.x,
sy: sourceIntersectionPoint.y,
tx: targetIntersectionPoint.x,
ty: targetIntersectionPoint.y,
sourcePos,
targetPos,
};
}
export function createNodesAndEdges() {
const nodes = [];
const edges = [];
const center = { x: window.innerWidth / 2, y: window.innerHeight / 2 };
nodes.push({ id: 'target', data: { label: 'Target' }, position: center });
for (let i = 0; i < 8; i++) {
const degrees = i * (360 / 8);
const radians = degrees * (Math.PI / 180);
const x = 250 * Math.cos(radians) + center.x;
const y = 250 * Math.sin(radians) + center.y;
nodes.push({ id: `${i}`, data: { label: 'Source' }, position: { x, y } });
edges.push({
id: `edge-${i}`,
target: 'target',
source: `${i}`,
type: 'floating',
markerEnd: {
type: MarkerType.Arrow,
},
});
}
return { nodes, edges };
}
<style.css>
.customNodeBody {
width: 150px;
height: 80px;
border: 3px solid black;
position: relative;
overflow: hidden;
border-radius: 10px;
display: flex;
justify-content: center;
align-items: center;
font-weight: bold;
}
.customNode:before {
content: '';
position: absolute;
top: -10px;
left: 50%;
height: 20px;
width: 40px;
transform: translate(-50%, 0);
background: #d6d5e6;
z-index: 1000;
line-height: 1;
border-radius: 4px;
color: #fff;
font-size: 9px;
border: 2px solid #222138;
}
div.customHandle {
width: 100%;
height: 100%;
background: blue;
position: absolute;
top: 0;
left: 0;
border-radius: 0;
transform: none;
border: none;
opacity: 0;
}
참고 예제 코드로 구현된 CodeSandbox 및 캡쳐사진
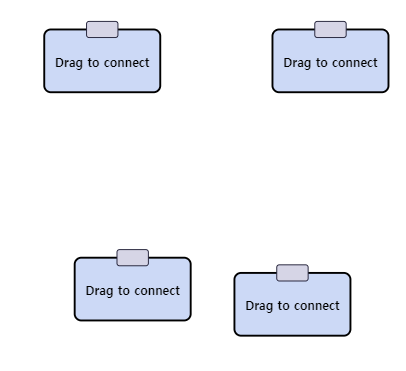
Add Node On Edge Drop
You can create a new node when you drop the connection line on the pane by using the onConnectStart and onConnectEnd handlers.
=> 연결 라인을 패널 위에 드롭할 때 onConnectStart 및 onConnectEnd 핸들러를 사용하여 새로운 노드를 생성할 수 있습니다.
참고 예제 코드
<App.js>
import React, { useCallback, useRef } from 'react';
import ReactFlow, {
useNodesState,
useEdgesState,
addEdge,
useReactFlow,
ReactFlowProvider,
} from 'reactflow';
import 'reactflow/dist/style.css';
import './index.css';
const initialNodes = [
{
id: '0',
type: 'input',
data: { label: 'Node' },
position: { x: 0, y: 50 },
},
];
let id = 1;
const getId = () => `${id++}`;
const AddNodeOnEdgeDrop = () => {
const reactFlowWrapper = useRef(null);
const connectingNodeId = useRef(null);
const [nodes, setNodes, onNodesChange] = useNodesState(initialNodes);
const [edges, setEdges, onEdgesChange] = useEdgesState([]);
const { screenToFlowPosition } = useReactFlow();
const onConnect = useCallback(
(params) => {
// reset the start node on connections
connectingNodeId.current = null;
setEdges((eds) => addEdge(params, eds))
},
[],
);
const onConnectStart = useCallback((_, { nodeId }) => {
connectingNodeId.current = nodeId;
}, []);
const onConnectEnd = useCallback(
(event) => {
if (!connectingNodeId.current) return;
const targetIsPane = event.target.classList.contains('react-flow__pane');
if (targetIsPane) {
// we need to remove the wrapper bounds, in order to get the correct position
const id = getId();
const newNode = {
id,
position: screenToFlowPosition({
x: event.clientX,
y: event.clientY,
}),
data: { label: `Node ${id}` },
origin: [0.5, 0.0],
};
setNodes((nds) => nds.concat(newNode));
setEdges((eds) =>
eds.concat({ id, source: connectingNodeId.current, target: id }),
);
}
},
[screenToFlowPosition],
);
return (
<div className="wrapper" ref={reactFlowWrapper}>
<ReactFlow
nodes={nodes}
edges={edges}
onNodesChange={onNodesChange}
onEdgesChange={onEdgesChange}
onConnect={onConnect}
onConnectStart={onConnectStart}
onConnectEnd={onConnectEnd}
fitView
fitViewOptions={{ padding: 2 }}
nodeOrigin={[0.5, 0]}
/>
</div>
);
};
export default () => (
<ReactFlowProvider>
<AddNodeOnEdgeDrop />
</ReactFlowProvider>
);
<index.css>
.react-flow .react-flow__handle {
width: 30px;
height: 14px;
border-radius: 3px;
background-color: #784be8;
}
.react-flow .react-flow__handle-top {
top: -10px;
}
.react-flow .react-flow__handle-bottom {
bottom: -10px;
}
.react-flow .react-flow__node {
height: 40px;
width: 150px;
justify-content: center;
align-items: center;
display: flex;
border-width: 2px;
font-weight: 700;
}
.react-flow .react-flow__edge path,
.react-flow__connectionline path {
stroke-width: 2;
}
.wrapper {
flex-grow: 1;
height: 100%;
}
참고 예제 코드로 구현된 CodeSandbox 및 캡쳐사진
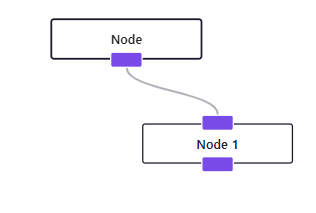
Proximity Connect
This example shows how to automatically create edges when a node is dropped in close proximity to another one. While dragging, a dotted connection line is displayed to show which edge will be created if you drop the node.
=> 근접 연결
이 예제는 노드가 다른 노드와 가까이 놓였을 때 자동으로 엣지를 생성하는 방법을 보여줍니다. 드래그하는 동안 점선으로 표시된 연결 라인이 나타나며, 노드를 놓으면 생성될 엣지를 보여줍니다.
참고 예제 코드
<App.js>
import React, { useCallback } from 'react';
import ReactFlow, {
addEdge,
useNodesState,
useEdgesState,
Background,
BackgroundVariant,
ReactFlowProvider,
useStoreApi,
} from 'reactflow';
import 'reactflow/dist/style.css';
import './style.css';
import { initialEdges, initialNodes } from './nodes-and-edges';
const MIN_DISTANCE = 150;
const Flow = () => {
const store = useStoreApi();
const [nodes, setNodes, onNodesChange] = useNodesState(initialNodes);
const [edges, setEdges, onEdgesChange] = useEdgesState(initialEdges);
const onConnect = useCallback(
(params) => setEdges((eds) => addEdge(params, eds)),
[setEdges],
);
const getClosestEdge = useCallback((node) => {
const { nodeInternals } = store.getState();
const storeNodes = Array.from(nodeInternals.values());
const closestNode = storeNodes.reduce(
(res, n) => {
if (n.id !== node.id) {
const dx = n.positionAbsolute.x - node.positionAbsolute.x;
const dy = n.positionAbsolute.y - node.positionAbsolute.y;
const d = Math.sqrt(dx * dx + dy * dy);
if (d < res.distance && d < MIN_DISTANCE) {
res.distance = d;
res.node = n;
}
}
return res;
},
{
distance: Number.MAX_VALUE,
node: null,
},
);
if (!closestNode.node) {
return null;
}
const closeNodeIsSource =
closestNode.node.positionAbsolute.x < node.positionAbsolute.x;
return {
id: closeNodeIsSource
? `${closestNode.node.id}-${node.id}`
: `${node.id}-${closestNode.node.id}`,
source: closeNodeIsSource ? closestNode.node.id : node.id,
target: closeNodeIsSource ? node.id : closestNode.node.id,
};
}, []);
const onNodeDrag = useCallback(
(_, node) => {
const closeEdge = getClosestEdge(node);
setEdges((es) => {
const nextEdges = es.filter((e) => e.className !== 'temp');
if (
closeEdge &&
!nextEdges.find(
(ne) =>
ne.source === closeEdge.source && ne.target === closeEdge.target,
)
) {
closeEdge.className = 'temp';
nextEdges.push(closeEdge);
}
return nextEdges;
});
},
[getClosestEdge, setEdges],
);
const onNodeDragStop = useCallback(
(_, node) => {
const closeEdge = getClosestEdge(node);
setEdges((es) => {
const nextEdges = es.filter((e) => e.className !== 'temp');
if (
closeEdge &&
!nextEdges.find(
(ne) =>
ne.source === closeEdge.source && ne.target === closeEdge.target,
)
) {
nextEdges.push(closeEdge);
}
return nextEdges;
});
},
[getClosestEdge],
);
return (
<ReactFlow
nodes={nodes}
edges={edges}
onNodesChange={onNodesChange}
onEdgesChange={onEdgesChange}
onNodeDrag={onNodeDrag}
onNodeDragStop={onNodeDragStop}
onConnect={onConnect}
fitView
>
<Background variant={BackgroundVariant.Cross} gap={50} />
</ReactFlow>
);
};
export default () => (
<ReactFlowProvider>
<Flow />
</ReactFlowProvider>
);
<nodes-and-edges.js>
import { Position } from 'reactflow';
const nodeDefaults = {
sourcePosition: Position.Right,
targetPosition: Position.Left,
style: {
borderRadius: '100%',
backgroundColor: '#fff',
width: 50,
height: 50,
display: 'flex',
alignItems: 'center',
justifyContent: 'center',
},
};
const initialNodes = [
{
id: '1',
position: { x: 0, y: 0 },
data: {
label: '⬛️',
},
...nodeDefaults,
},
{
id: '2',
position: { x: 250, y: -100 },
data: {
label: '🟩',
},
...nodeDefaults,
},
{
id: '3',
position: { x: 250, y: 100 },
data: {
label: '🟧',
},
...nodeDefaults,
},
{
id: '4',
position: { x: 500, y: 0 },
data: {
label: '🟦',
},
...nodeDefaults,
},
];
const initialEdges = [
{
id: 'e1-2',
source: '1',
target: '2',
},
{
id: 'e1-3',
source: '1',
target: '3',
},
];
export { initialEdges, initialNodes };
<style.css>
.react-flow__edge-path {
stroke: #333;
stroke-width: 2;
}
.temp .react-flow__edge-path {
stroke: #bbb;
stroke-dasharray: 5 5;
}
참고 예제 코드로 구현된 CodeSandbox 및 캡쳐사진
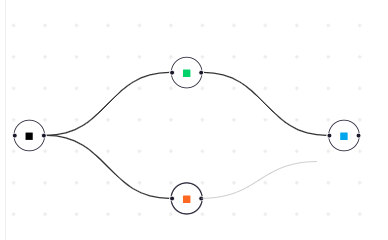
Node Resizer
The NodeResizer component can be used to add a resize UI for a custom node. The reactflow package also exports a NodeResizeControl component for implementing a custom resizing UI as shown in this example.
=> 노드 크기 조절기
NodeResizer 구성 요소는 사용자 정의 노드에 크기 조절 UI를 추가하는 데 사용할 수 있습니다. reactflow 패키지는 또한 이 예제에서 보여진대로 사용자 정의 크기 조절 UI를 구현하는 데 사용되는 NodeResizeControl 구성 요소를 내보냅니다.
참고 예제 코드
<App.js>
import ReactFlow, { MiniMap, Background, BackgroundVariant, Controls } from 'reactflow';
import 'reactflow/dist/style.css';
import ResizableNode from './ResizableNode';
import ResizableNodeSelected from './ResizableNodeSelected';
import CustomResizerNode from './CustomResizerNode';
const nodeTypes = {
ResizableNode,
ResizableNodeSelected,
CustomResizerNode,
};
const initialNodes = [
{
id: '1',
type: 'ResizableNode',
data: { label: 'NodeResizer' },
position: { x: 0, y: 50 },
style: { background: '#fff', border: '1px solid black', borderRadius: 15, fontSize: 12 },
},
{
id: '2',
type: 'ResizableNodeSelected',
data: { label: 'NodeResizer when selected' },
position: { x: 100, y: 300 },
style: { background: '#fff', border: '1px solid black', borderRadius: 15, fontSize: 12 },
},
{
id: '3',
type: 'CustomResizerNode',
data: { label: 'Custom Resize Icon' },
position: { x: 150, y: 150 },
style: {
background: '#fff',
fontSize: 12,
border: '1px solid black',
padding: 5,
borderRadius: 15,
height: 100,
},
},
];
const initialEdges = [];
export default function NodeToolbarExample() {
return (
<ReactFlow
defaultNodes={initialNodes}
defaultEdges={initialEdges}
className="react-flow-node-resizer-example"
minZoom={0.2}
maxZoom={4}
fitView
nodeTypes={nodeTypes}
>
<Background variant={BackgroundVariant.Dots} />
<MiniMap />
<Controls />
</ReactFlow>
);
}
<CustomResizerNode.js>
import { memo } from 'react';
import { Handle, Position, NodeResizeControl } from 'reactflow';
const controlStyle = {
background: 'transparent',
border: 'none',
};
const CustomNode = ({ data }) => {
return (
<>
<NodeResizeControl style={controlStyle} minWidth={100} minHeight={50}>
<ResizeIcon />
</NodeResizeControl>
<Handle type="target" position={Position.Left} />
<div>{data.label}</div>
<Handle type="source" position={Position.Right} />
</>
);
};
function ResizeIcon() {
return (
<svg
xmlns="http://www.w3.org/2000/svg"
width="20"
height="20"
viewBox="0 0 24 24"
strokeWidth="2"
stroke="#ff0071"
fill="none"
strokeLinecap="round"
strokeLinejoin="round"
style={{ position: 'absolute', right: 5, bottom: 5 }}
>
<path stroke="none" d="M0 0h24v24H0z" fill="none" />
<polyline points="16 20 20 20 20 16" />
<line x1="14" y1="14" x2="20" y2="20" />
<polyline points="8 4 4 4 4 8" />
<line x1="4" y1="4" x2="10" y2="10" />
</svg>
);
}
export default memo(CustomNode);
<ResizableNode.js>
import { memo } from 'react';
import { Handle, Position, NodeResizer } from 'reactflow';
const ResizableNode = ({ data }) => {
return (
<>
<NodeResizer minWidth={100} minHeight={30} />
<Handle type="target" position={Position.Left} />
<div style={{ padding: 10 }}>{data.label}</div>
<Handle type="source" position={Position.Right} />
</>
);
};
export default memo(ResizableNode);
<ResizableNodeSelected.js>
import { memo } from 'react';
import { Handle, Position, NodeResizer } from 'reactflow';
const ResizableNodeSelected = ({ data, selected }) => {
return (
<>
<NodeResizer color="#ff0071" isVisible={selected} minWidth={100} minHeight={30} />
<Handle type="target" position={Position.Left} />
<div style={{ padding: 10 }}>{data.label}</div>
<Handle type="source" position={Position.Right} />
</>
);
};
export default memo(ResizableNodeSelected);
참고 예제 코드로 구현된 CodeSandbox 및 캡쳐사진
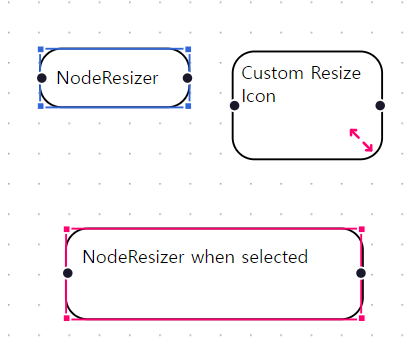
Node Toolbar
For many types of applications, having a toolbar or set of controls appear when a node is selected can be quite useful. It's so useful, in fact, that we've built the NodeToolbar component to make it easy to add this functionality to your custom nodes!
=> 노드 툴바
많은 종류의 응용 프로그램에서는 노드가 선택될 때 툴바나 일련의 컨트롤이 나타나는 것이 매우 유용할 수 있습니다. 실제로 그 정도로 유용하기 때문에 우리는 사용자 정의 노드에 이 기능을 쉽게 추가할 수 있도록 NodeToolbar 컴포넌트를 구축했습니다!
참고 예제 코드
import React, { useCallback, useState } from 'react';
import ReactFlow, {
ReactFlowProvider,
Panel,
NodeToolbar,
Position,
useNodesState,
} from 'reactflow';
import 'reactflow/dist/style.css';
const initialNodes = [
{
id: '1',
position: { x: 0, y: 0 },
type: 'node-with-toolbar',
data: { label: 'Select me to show the toolbar' },
},
];
const nodeTypes = {
'node-with-toolbar': NodeWithToolbar,
};
function NodeWithToolbar({ data }) {
return (
<>
<NodeToolbar
isVisible={data.forceToolbarVisible || undefined}
position={data.toolbarPosition}
>
<button>cut</button>
<button>copy</button>
<button>paste</button>
</NodeToolbar>
<div className="react-flow__node-default">{data?.label}</div>
</>
);
}
function Flow() {
const [nodes, setNodes, onNodesChange] = useNodesState(initialNodes);
const setPosition = useCallback(
(pos) =>
setNodes((nodes) =>
nodes.map((node) => ({
...node,
data: { ...node.data, toolbarPosition: pos },
})),
),
[setNodes],
);
const forceToolbarVisible = useCallback((enabled) =>
setNodes((nodes) =>
nodes.map((node) => ({
...node,
data: { ...node.data, forceToolbarVisible: enabled },
})),
),
);
return (
<ReactFlowProvider>
<ReactFlow
nodes={nodes}
onNodesChange={onNodesChange}
nodeTypes={nodeTypes}
fitView
preventScrolling={false}
>
<Panel>
<h3>Node Toolbar position:</h3>
<button onClick={() => setPosition(Position.Top)}>top</button>
<button onClick={() => setPosition(Position.Right)}>right</button>
<button onClick={() => setPosition(Position.Bottom)}>bottom</button>
<button onClick={() => setPosition(Position.Left)}>left</button>
<h3>Override Node Toolbar visibility</h3>
<label>
<input
type="checkbox"
onChange={(e) => forceToolbarVisible(e.target.checked)}
/>
<span>Always show toolbar</span>
</label>
</Panel>
</ReactFlow>
</ReactFlowProvider>
);
}
export default Flow;
참고 예제 코드로 구현된 CodeSandbox 및 캡쳐사진
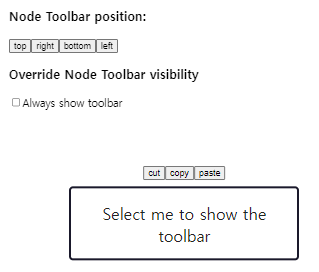
Resize and Rotate
This example shows how to implement a custom node that can be resized and rotated using the NodeResizer. component. It can be used as a starting point for building flow chart editors or diagrams where users can configure the size and rotation of the elements.
=> 크기 조절 및 회전
이 예제는 NodeResizer를 사용하여 크기를 조절하고 회전할 수 있는 사용자 정의 노드를 구현하는 방법을 보여줍니다. 요소의 크기와 회전을 구성할 수 있는 플로 차트 편집기나 다이어그램을 구축하는 데 출발점으로 사용할 수 있습니다.
참고 예제 코드
<App.js>
import React from 'react';
import ReactFlow, { Background } from 'reactflow';
import 'reactflow/dist/style.css';
import ResizeRotateNode from './ResizeRotateNode';
import { nodes, edges } from './nodes-edges';
const nodeTypes = {
resizeRotate: ResizeRotateNode,
};
function Flow() {
return (
<ReactFlow
nodeTypes={nodeTypes}
defaultNodes={nodes}
defaultEdges={edges}
fitView
>
<Background />
</ReactFlow>
);
}
export default Flow;
<ResizeRotateNode.js>
import React, { useEffect, useState, useRef } from 'react';
import {
Handle,
Position,
useUpdateNodeInternals,
NodeResizer,
} from 'reactflow';
import { drag } from 'd3-drag';
import { select } from 'd3-selection';
import styles from './style.module.css';
export default function ResizeRotateNode({
id,
sourcePosition = Position.Left,
targetPosition = Position.Right,
data,
}) {
const rotateControlRef = useRef(null);
const updateNodeInternals = useUpdateNodeInternals();
const [rotation, setRotation] = useState(0);
const [resizable, setResizable] = useState(!!data.resizable);
const [rotatable, setRotatable] = useState(!!data.rotatable);
useEffect(() => {
if (!rotateControlRef.current) {
return;
}
const selection = select(rotateControlRef.current);
const dragHandler = drag().on('drag', (evt) => {
const dx = evt.x - 100;
const dy = evt.y - 100;
const rad = Math.atan2(dx, dy);
const deg = rad * (180 / Math.PI);
setRotation(180 - deg);
updateNodeInternals(id);
});
selection.call(dragHandler);
}, [id, updateNodeInternals]);
return (
<>
<div
style={{
transform: `rotate(${rotation}deg)`,
}}
className={styles.node}
>
<NodeResizer isVisible={resizable} minWidth={180} minHeight={100} />
<div
ref={rotateControlRef}
style={{
display: rotatable ? 'block' : 'none',
}}
className={`nodrag ${styles.rotateHandle}`}
/>
<div>
{data?.label}
<div>
<label>
<input
type="checkbox"
checked={resizable}
onChange={(evt) => setResizable(evt.target.checked)}
/>
resizable
</label>
</div>
<div>
<label>
<input
type="checkbox"
checked={rotatable}
onChange={(evt) => setRotatable(evt.target.checked)}
/>
rotatable
</label>
</div>
</div>
<Handle
style={{ opacity: 0 }}
position={sourcePosition}
type="source"
/>
<Handle
style={{ opacity: 0 }}
position={targetPosition}
type="target"
/>
</div>
</>
);
}
<nodes-edges.js>
import { Position } from 'reactflow';
export const nodes = [
{
id: '1',
position: { x: 0, y: 0 },
data: { label: 'Node 1', resizable: true },
type: 'resizeRotate',
targetPosition: Position.Left,
sourcePosition: Position.Right,
selected: true,
style: { width: 180, height: 100 },
},
{
id: '2',
position: { x: 300, y: 0 },
data: { label: 'Node 2', rotatable: true },
type: 'resizeRotate',
targetPosition: Position.Left,
sourcePosition: Position.Right,
style: { width: 180, height: 100 },
},
];
export const edges = [
{
id: '1->2',
source: '1',
target: '2',
type: 'smoothstep',
},
];
<style.module.css>
.node {
width: 100%;
height: 100%;
border-radius: 15px;
border: 1px solid #000;
background-color: #fff;
padding: 20px;
box-sizing: border-box;
}
.node :global .react-flow__resize-control.handle {
width: 10px;
height: 10px;
border-radius: 100%;
}
.rotateHandle {
position: absolute;
width: 10px;
height: 10px;
background: #3367d9;
left: 50%;
top: -30px;
border-radius: 100%;
transform: translate(-50%, -50%);
cursor: alias;
}
.rotateHandle:after {
content: '';
display: block;
position: absolute;
width: 1px;
height: 30px;
background: #3367d9;
left: 4px;
top: 5px;
}
참고 예제 코드로 구현된 CodeSandbox 및 캡쳐사진
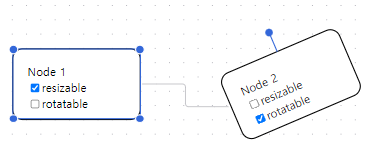
Intersections
The useReactFlow hook exports helpers to check intersections of nodes and areas. In this example you can drag a node and get a visual feedback when it intersects with another node.
=> 교차점
useReactFlow 훅은 노드와 영역의 교차점을 확인하는 도우미를 내보냅니다. 이 예제에서는 노드를 드래그하여 다른 노드와 교차할 때 시각적 피드백을 받을 수 있습니다.
참고 예제 코드
<App.tsx>
import React, { useCallback, MouseEvent } from 'react';
import ReactFlow, {
Background,
Controls,
ReactFlowProvider,
Node,
Edge,
useReactFlow,
useNodesState,
} from 'reactflow';
import 'reactflow/dist/style.css';
import './style.css';
const initialNodes: Node[] = [
{
id: '1',
data: { label: 'Node 1' },
position: { x: 0, y: 0 },
style: {
width: 200,
height: 100,
},
},
{
id: '2',
data: { label: 'Node 2' },
position: { x: 0, y: 150 },
},
{
id: '3',
data: { label: 'Node 3' },
position: { x: 250, y: 0 },
},
{
id: '4',
data: { label: 'Node' },
position: { x: 350, y: 150 },
style: {
width: 50,
height: 50,
},
},
];
const initialEdges: Edge[] = [];
const BasicFlow = () => {
const [nodes, setNodes, onNodesChange] = useNodesState(initialNodes);
const { getIntersectingNodes } = useReactFlow();
const onNodeDrag = useCallback((_: MouseEvent, node: Node) => {
const intersections = getIntersectingNodes(node).map((n) => n.id);
setNodes((ns) =>
ns.map((n) => ({
...n,
className: intersections.includes(n.id) ? 'highlight' : '',
}))
);
}, []);
return (
<ReactFlow
nodes={nodes}
edges={initialEdges}
onNodesChange={onNodesChange}
onNodeDrag={onNodeDrag}
className="intersection-flow"
minZoom={0.2}
maxZoom={4}
fitView
selectNodesOnDrag={false}
>
<Background />
<Controls />
</ReactFlow>
);
};
export default function App() {
return (
<ReactFlowProvider>
<BasicFlow />
</ReactFlowProvider>
);
}
<style.css>
.react-flow__node.highlight {
background-color: #ff0072;
color: white;
}
.intersection-flow .react-flow__node {
display: flex;
justify-content: center;
align-items: center;
font-weight: 700;
border-radius: 1px;
border-width: 2px;
box-shadow: 6px 6px 0 1px rgba(0, 0, 0, 0.7);
}
.intersection-flow .react-flow__node.selected,
.intersection-flow .react-flow__node:hover,
.intersection-flow .react-flow__node:focus {
box-shadow: 6px 6px 0 1px rgba(0, 0, 0, 0.7);
background-color: #eee;
}
.intersection-flow .react-flow__handle {
display: none;
}
참고 예제 코드로 구현된 CodeSandbox 및 캡쳐사진
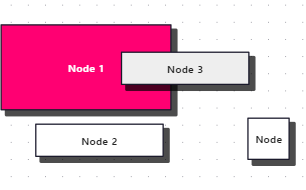
Connection Limit
This is an example of a custom node with a custom handle that can limit the amount of connections a handle can have using the isConnectable prop. You can use a boolean, a number (the number of max. connections the handle should have) or a callback function that returns a boolean as an arg for the isConnectable prop of the CustomHandle component.
=> 연결 제한
isConnectable 속성을 사용하여 연결 핸들이 가질 수있는 연결 수를 제한할 수있는 사용자 지정 핸들이 있는 사용자 정의 노드의 예입니다. isConnectable 속성에는 boolean, 숫자 (핸들이 가져야하는 최대 연결 수) 또는 불리언을 반환하는 콜백 함수를 인수로 사용할 수 있습니다.
참고 예제 코드
<App.js>
import { useCallback } from 'react';
import ReactFlow, { addEdge, Position, useNodesState, useEdgesState } from 'reactflow';
import 'reactflow/dist/style.css';
import CustomNode from './CustomNode';
const nodeTypes = {
custom: CustomNode,
};
const CustomNodeFlow = () => {
const [nodes, setNodes, onNodesChange] = useNodesState([
{
id: '1',
type: 'input',
data: { label: 'Node 1' },
position: { x: 0, y: 25 },
sourcePosition: Position.Right,
},
{
id: '2',
type: 'custom',
data: {},
position: { x: 250, y: 50 },
},
{
id: '3',
type: 'input',
data: { label: 'Node 2' },
position: { x: 0, y: 100 },
sourcePosition: Position.Right,
},
]);
const [edges, setEdges, onEdgesChange] = useEdgesState([]);
const onConnect = useCallback(
(params) => setEdges((eds) => addEdge(params, eds)),
[setEdges]
);
return (
<ReactFlow
nodes={nodes}
edges={edges}
onNodesChange={onNodesChange}
onEdgesChange={onEdgesChange}
onConnect={onConnect}
nodeTypes={nodeTypes}
fitView
/>
);
};
export default CustomNodeFlow;
<CustomNode.js>
import React, { memo } from 'react';
import { Position } from 'reactflow';
import CustomHandle from './CustomHandle';
const CustomNode = () => {
return (
<div style={{ background: 'white', padding: 16, border: '1px solid black' }}>
<CustomHandle type="target" position={Position.Left} isConnectable={1} />
<div>Connection Limit 1</div>
</div>
);
};
export default memo(CustomNode);
<CustomHandle.js>
import React, { useMemo } from 'react';
import { getConnectedEdges, Handle, useNodeId, useStore } from 'reactflow';
const selector = (s) => ({
nodeInternals: s.nodeInternals,
edges: s.edges,
});
const CustomHandle = (props) => {
const { nodeInternals, edges } = useStore(selector);
const nodeId = useNodeId();
const isHandleConnectable = useMemo(() => {
if (typeof props.isConnectable === 'function') {
const node = nodeInternals.get(nodeId);
const connectedEdges = getConnectedEdges([node], edges);
return props.isConnectable({ node, connectedEdges });
}
if (typeof props.isConnectable === 'number') {
const node = nodeInternals.get(nodeId);
const connectedEdges = getConnectedEdges([node], edges);
return connectedEdges.length < props.isConnectable;
}
return props.isConnectable;
}, [nodeInternals, edges, nodeId, props.isConnectable]);
return (
<Handle {...props} isConnectable={isHandleConnectable}></Handle>
);
};
export default CustomHandle;
참고 예제 코드로 구현된 CodeSandbox 및 캡쳐사진

Delete Middle Node
This example shows you how recover deleted edges when you remove a node from the middle of a chain. In other words, if we have three nodes connected in sequence - a->b->c - and we deleted the middle node b, this example shows you how to end up with the graph a->c.
=> 중간 노드 삭제
이 예제는 연결 체인 중간에 있는 노드를 제거할 때 삭제된 엣지를 복구하는 방법을 보여줍니다. 즉, 연속으로 연결된 세 개의 노드 - a->b->c - 가 있다고 가정하고 중간 노드 b를 삭제하면, 이 예제는 그래프 a->c로 끝날 수 있도록 보여줍니다.
To achieve this, we need to make use of a few bits:
- The onNodesDelete callback lets us know when a node is deleted.
- getConnectedEdges gives us all the edges connected to a node, either as source or target.
- getIncomers and getOutgoers give us the nodes connected to a node as source or target.
=> 이를 달성하기 위해 몇 가지 요소를 활용해야 합니다:
-
onNodesDelete 콜백은 노드가 삭제될 때 우리에게 알려줍니다.
-
getConnectedEdges는 노드에 연결된 모든 엣지를 소스 또는 타겟으로 제공합니다.
-
getIncomers 및 getOutgoers는 노드에 연결된 노드를 소스 또는 타겟으로 제공합니다.
This comes together to allow us to take all the nodes connected to the deleted node, and reconnect them to any nodes the deleted node was connected to.
=> 이러한 요소들이 함께 동작하여 삭제된 노드에 연결된 모든 노드를 가져와서 삭제된 노드가 연결된 모든 노드에 다시 연결할 수 있습니다.
참고 예제 코드
import React, { useCallback } from 'react';
import ReactFlow, {
Background,
useNodesState,
useEdgesState,
addEdge,
getIncomers,
getOutgoers,
getConnectedEdges,
} from 'reactflow';
import 'reactflow/dist/style.css';
const initialNodes = [
{ id: '1', type: 'input', data: { label: 'Start here...' }, position: { x: -150, y: 0 } },
{ id: '2', type: 'input', data: { label: '...or here!' }, position: { x: 150, y: 0 } },
{ id: '3', data: { label: 'Delete me.' }, position: { x: 0, y: 100 } },
{ id: '4', data: { label: 'Then me!' }, position: { x: 0, y: 200 } },
{ id: '5', type: 'output', data: { label: 'End here!' }, position: { x: 0, y: 300 } },
];
const initialEdges = [
{ id: '1->3', source: '1', target: '3' },
{ id: '2->3', source: '2', target: '3' },
{ id: '3->4', source: '3', target: '4' },
{ id: '4->5', source: '4', target: '5' },
];
export default function Flow() {
const [nodes, setNodes, onNodesChange] = useNodesState(initialNodes);
const [edges, setEdges, onEdgesChange] = useEdgesState(initialEdges);
const onConnect = useCallback((params) => setEdges(addEdge(params, edges)), [edges]);
const onNodesDelete = useCallback(
(deleted) => {
setEdges(
deleted.reduce((acc, node) => {
const incomers = getIncomers(node, nodes, edges);
const outgoers = getOutgoers(node, nodes, edges);
const connectedEdges = getConnectedEdges([node], edges);
const remainingEdges = acc.filter((edge) => !connectedEdges.includes(edge));
const createdEdges = incomers.flatMap(({ id: source }) =>
outgoers.map(({ id: target }) => ({ id: `${source}->${target}`, source, target }))
);
return [...remainingEdges, ...createdEdges];
}, edges)
);
},
[nodes, edges]
);
return (
<ReactFlow
nodes={nodes}
edges={edges}
onNodesChange={onNodesChange}
onNodesDelete={onNodesDelete}
onEdgesChange={onEdgesChange}
onConnect={onConnect}
fitView
attributionPosition="top-right"
>
<Background variant="dots" gap={12} size={1} />
</ReactFlow>
);
}
참고 예제 코드로 구현된 CodeSandbox 및 캡쳐사진
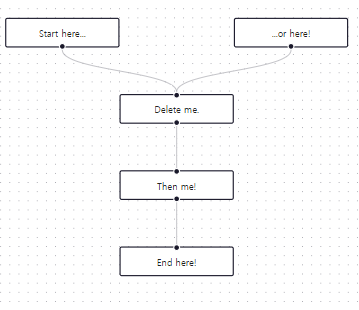
Although this example is less than 20 lines of code there's quite a lot to digest. Let's break some of it down:
=> 이 예제는 20줄 미만의 코드지만 이해해야 할 부분이 상당합니다. 몇 가지 내용을 자세히 살펴보겠습니다:
-
Our onNodesDelete callback is called with one argument - deleted - that is an array of every node that was just deleted. If you select an individual node and press the delete key, deleted will contain just that node, but if you make a selection all the nodes in that selection will be in deleted.
=> onNodesDelete 콜백은 삭제된 모든 노드를 포함하는 배열인 deleted라는 하나의 인수와 함께 호출됩니다. 개별 노드를 선택하고 삭제 키를 누르면 deleted에는 해당 노드만 포함되지만, 선택 영역에 모든 노드가 포함되면 deleted에는 해당 선택 영역의 모든 노드가 포함됩니다.
-
We create a new array of edges - remainingEdges - that contains all the edges in the flow that have nothing to do with the node(s) we just deleted.
=> 우리는 flow에 있는 모든 엣지와 아무 관련이 없는 새로운 엣지 배열 remainingEdges를 만듭니다.
-
We create another array of edges by flatMapping over the array of incomers. These are nodes that were connected to the deleted node as a source. For each of these nodes, we create a new edge that connects to each node in the array of outgoers. These are nodes that were connected to the deleted node as a target.
=> incomers 배열을 flatMap하여 다른 배열로 만듭니다. 이는 삭제된 노드에 소스로 연결된 노드입니다. 이러한 노드 각각에 대해 우리는 outgoers 배열의 각 노드에 연결되는 새로운 엣지를 만듭니다. 이는 삭제된 노드에 타겟으로 연결된 노드입니다.
For brevity, we're using object destructuring while at the same time renaming the variable bound (e.g. ({ id: source }) => ...) destructures the id property of the object and binds it to a new variable called source) but you don't need to do this
간결함을 위해 객체 비구조화를 사용하면서 동시에 변수를 이름을 바꿉니다. (예: ({ id: source }) => ...)는 객체의 id 속성을 비구조화하고 이를 source라는 새 변수에 바인딩합니다) 그러나 이 작업은 필수는 아닙니다.
Quick Reference
Edges
Custom Edges
React Flow comes with four different edge types - default (bezier), straight, step and smoothstep. It's also possible to create a custom edge, if you need a special edge routing or controls at the edge. In this example we are demonstrating how to implement an edge with a button, a bi-directional edge, a self connecting edge. In all examples we are using the BaseEdge component as a helper.
=> React Flow에는 네 가지 다른 엣지 유형이 있습니다. - 기본 (베지에), 직선, 스텝 및 스무스스텝. 특별한 엣지 라우팅이나 엣지에서 컨트롤이 필요한 경우 사용자 정의 엣지를 생성하는 것도 가능합니다. 이 예제에서는 버튼과 양방향 엣지, 자체 연결 엣지를 포함한 엣지를 구현하는 방법을 보여줍니다. 모든 예제에서는 BaseEdge 구성 요소를 도우미로 사용합니다.
참고 예제 코드
<App.tsx>
import React, { useCallback } from 'react';
import ReactFlow, {
useNodesState,
useEdgesState,
addEdge,
MiniMap,
Controls,
Background,
Node,
Edge,
Position,
ConnectionMode,
MarkerType,
} from 'reactflow';
import 'reactflow/dist/style.css';
import ButtonEdge from './ButtonEdge';
import SelfConnectingEdge from './SelfConnectingEdge';
import BiDirectionalEdge from './BiDirectionalEdge';
import BiDirectionalNode from './BiDirectionalNode';
const initialNodes: Node[] = [
{
id: 'button-1',
type: 'input',
data: { label: 'Button Edge 1' },
position: { x: 125, y: 0 },
},
{ id: 'button-2', data: { label: 'Button Edge 2' }, position: { x: 125, y: 200 } },
{
id: 'bi-1',
data: { label: 'Bi Directional 1' },
position: { x: 0, y: 300 },
type: 'bidirectional',
sourcePosition: Position.Right,
targetPosition: Position.Left,
},
{
id: 'bi-2',
data: { label: 'Bi Directional 2' },
position: { x: 250, y: 300 },
type: 'bidirectional',
sourcePosition: Position.Right,
targetPosition: Position.Left,
},
{
id: 'self-1',
data: { label: 'Self Connecting' },
position: { x: 125, y: 500 },
sourcePosition: Position.Right,
targetPosition: Position.Left,
},
];
const initialEdges: Edge[] = [
{
id: 'edge-button',
source: 'button-1',
target: 'button-2',
type: 'buttonedge',
},
{
id: 'edge-bi-1',
source: 'bi-1',
target: 'bi-2',
type: 'bidirectional',
sourceHandle: 'right',
targetHandle: 'left',
markerEnd: { type: MarkerType.ArrowClosed },
},
{
id: 'edge-bi-2',
source: 'bi-2',
target: 'bi-1',
type: 'bidirectional',
sourceHandle: 'left',
targetHandle: 'right',
markerEnd: { type: MarkerType.ArrowClosed },
},
{
id: 'edge-self',
source: 'self-1',
target: 'self-1',
type: 'selfconnecting',
markerEnd: { type: MarkerType.Arrow },
},
];
const edgeTypes = {
bidirectional: BiDirectionalEdge,
selfconnecting: SelfConnectingEdge,
buttonedge: ButtonEdge,
};
const nodeTypes = {
bidirectional: BiDirectionalNode,
};
const EdgesFlow = () => {
const [nodes, , onNodesChange] = useNodesState(initialNodes);
const [edges, setEdges, onEdgesChange] = useEdgesState(initialEdges);
const onConnect = useCallback((params) => setEdges((eds) => addEdge(params, eds)), []);
return (
<ReactFlow
nodes={nodes}
edges={edges}
onNodesChange={onNodesChange}
onEdgesChange={onEdgesChange}
onConnect={onConnect}
snapToGrid={true}
edgeTypes={edgeTypes}
nodeTypes={nodeTypes}
fitView
attributionPosition="top-right"
connectionMode={ConnectionMode.Loose}
>
<Controls />
<Background />
</ReactFlow>
);
};
export default EdgesFlow;
<ButtonEdge.tsx>
import React from 'react';
import {
BaseEdge,
EdgeLabelRenderer,
EdgeProps,
getBezierPath,
useReactFlow,
} from 'reactflow';
import './buttonedge.css';
const onEdgeClick = (evt, id) => {
evt.stopPropagation();
alert(`remove ${id}`);
};
export default function CustomEdge({
id,
sourceX,
sourceY,
targetX,
targetY,
sourcePosition,
targetPosition,
style = {},
markerEnd,
}: EdgeProps) {
const { setEdges } = useReactFlow();
const [edgePath, labelX, labelY] = getBezierPath({
sourceX,
sourceY,
sourcePosition,
targetX,
targetY,
targetPosition,
});
const onEdgeClick = () => {
setEdges((edges) => edges.filter((edge) => edge.id !== id));
};
return (
<>
<BaseEdge path={edgePath} markerEnd={markerEnd} style={style} />
<EdgeLabelRenderer>
<div
style={{
position: 'absolute',
transform: `translate(-50%, -50%) translate(${labelX}px,${labelY}px)`,
fontSize: 12,
// everything inside EdgeLabelRenderer has no pointer events by default
// if you have an interactive element, set pointer-events: all
pointerEvents: 'all',
}}
className="nodrag nopan"
>
<button className="edgebutton" onClick={onEdgeClick}>
×
</button>
</div>
</EdgeLabelRenderer>
</>
);
}
<SelfConnectingEdge.tsx>
import React from 'react';
import { BaseEdge, BezierEdge, EdgeProps } from 'reactflow';
export default function SelfConnecting(props: EdgeProps) {
// we are using the default bezier edge when source and target ids are different
if (props.source !== props.target) {
return <BezierEdge {...props} />;
}
const { sourceX, sourceY, targetX, targetY, id, markerEnd } = props;
const radiusX = (sourceX - targetX) * 0.6;
const radiusY = 50;
const edgePath = `M ${sourceX - 5} ${sourceY} A ${radiusX} ${radiusY} 0 1 0 ${
targetX + 2
} ${targetY}`;
return <BaseEdge path={edgePath} markerEnd={markerEnd} />;
}
<BiDirectionalEdge.tsx>
import React from 'react';
import { getBezierPath, BaseEdge, useStore, EdgeProps, ReactFlowState } from 'reactflow';
export type GetSpecialPathParams = {
sourceX: number;
sourceY: number;
targetX: number;
targetY: number;
};
export const getSpecialPath = (
{ sourceX, sourceY, targetX, targetY }: GetSpecialPathParams,
offset: number
) => {
const centerX = (sourceX + targetX) / 2;
const centerY = (sourceY + targetY) / 2;
return `M ${sourceX} ${sourceY} Q ${centerX} ${centerY + offset} ${targetX} ${targetY}`;
};
export default function CustomEdge({
source,
target,
sourceX,
sourceY,
targetX,
targetY,
sourcePosition,
targetPosition,
markerEnd,
}: EdgeProps) {
const isBiDirectionEdge = useStore((s: ReactFlowState) => {
const edgeExists = s.edges.some(
(e) =>
(e.source === target && e.target === source) || (e.target === source && e.source === target)
);
return edgeExists;
});
const edgePathParams = {
sourceX,
sourceY,
sourcePosition,
targetX,
targetY,
targetPosition,
};
let path = '';
if (isBiDirectionEdge) {
path = getSpecialPath(edgePathParams, sourceX < targetX ? 25 : -25);
} else {
[path] = getBezierPath(edgePathParams);
}
return <BaseEdge path={path} markerEnd={markerEnd} />;
}
<BiDirectionalNode.tsx>
import React, { memo } from 'react';
import { Handle, NodeProps, Position } from 'reactflow';
const style = {
padding: 10,
background: '#fff',
border: '1px solid #ddd',
};
const BiDirectionalNode = ({ data }: NodeProps) => {
return (
<div style={style}>
<Handle <type="source" position={Position.Left} id="left" />
{data?.label}
<Handle type="source" position={Position.Right} id="right" />
</div>
);
};
export default memo(BiDirectionalNode);
<buttonedge.css>
.edgebutton {
width: 20px;
height: 20px;
background: #eee;
border: 1px solid #fff;
cursor: pointer;
border-radius: 50%;
font-size: 12px;
line-height: 1;
}
.edgebutton:hover {
box-shadow: 0 0 6px 2px rgba(0, 0, 0, 0.08);
}
참고 예제 코드로 구현된 CodeSandbox 및 캡쳐사진

Edge Types
You can choose different kinds of edge types in React Flow: default (bezier), straight, step and smoothstep. As you can see, you can define a type for each edge and mix them in one graph.
=> React Flow에서는 다양한 종류의 엣지 유형을 선택할 수 있습니다: 기본 (베지에), 직선, 스텝 및 스무스스텝. 각 엣지에 대해 유형을 정의하고 이를 하나의 그래프에 혼합할 수 있습니다.
참고 예제 코드
<App.js>
import React, { useCallback } from 'react';
import ReactFlow, {
useNodesState,
useEdgesState,
addEdge,
Controls,
Background,
} from 'reactflow';
import 'reactflow/dist/style.css';
const initialNodes = [
{
id: '1',
data: { label: 'choose' },
position: {
x: 0,
y: 0,
},
},
{
id: '2',
data: { label: 'your' },
position: {
x: 100,
y: 100,
},
},
{
id: '3',
data: { label: 'desired' },
position: {
x: 0,
y: 200,
},
},
{
id: '4',
data: { label: 'edge' },
position: {
x: 100,
y: 300,
},
},
{
id: '5',
data: { label: 'type' },
position: {
x: 0,
y: 400,
},
},
];
const initialEdges = [
{
type: 'straight',
source: '1',
target: '2',
id: '1',
label: 'straight',
},
{
type: 'step',
source: '2',
target: '3',
id: '2',
label: 'step',
},
{
type: 'smoothstep',
source: '3',
target: '4',
id: '3',
label: 'smoothstep',
},
{
type: 'bezier',
source: '4',
target: '5',
id: '4',
label: 'bezier',
},
];
const EdgeTypesFlow = () => {
const [nodes, setNodes, onNodesChange] = useNodesState(initialNodes);
const [edges, setEdges, onEdgesChange] = useEdgesState(initialEdges);
const onConnect = useCallback(
(params) => setEdges((eds) => addEdge(params, eds)),
[],
);
return (
<ReactFlow
nodes={nodes}
edges={edges}
onNodesChange={onNodesChange}
onEdgesChange={onEdgesChange}
onConnect={onConnect}
fitView
minZoom={0.2}
>
<Controls />
<Background />
</ReactFlow>
);
};
export default EdgeTypesFlow;
<utils.js>
const nodeWidth = 80;
const nodeGapWidth = nodeWidth * 2;
const nodeStyle = { width: nodeWidth, fontSize: 11, color: 'white' };
const sourceTargetPositions = [
{ source: 'bottom', target: 'top' },
{ source: 'right', target: 'left' },
];
const nodeColors = [
['#1e9e99', '#4cb3ac', '#6ec9c0', '#8ddfd4'],
['#0f4c75', '#1b5d8b', '#276fa1', '#3282b8'],
];
const edgeTypes = ['default', 'step', 'smoothstep', 'straight'];
const offsets = [
{
x: 0,
y: -nodeGapWidth,
},
{
x: nodeGapWidth,
y: -nodeGapWidth,
},
{
x: nodeGapWidth,
y: 0,
},
{
x: nodeGapWidth,
y: nodeGapWidth,
},
{
x: 0,
y: nodeGapWidth,
},
{
x: -nodeGapWidth,
y: nodeGapWidth,
},
{
x: -nodeGapWidth,
y: 0,
},
{
x: -nodeGapWidth,
y: -nodeGapWidth,
},
];
let id = 0;
const getNodeId = () => `edgetypes-${(id++).toString()}`;
export function getNodesAndEdges() {
const nodes = [];
const edges = [];
for (
let sourceTargetIndex = 0;
sourceTargetIndex < sourceTargetPositions.length;
sourceTargetIndex++
) {
const currSourceTargetPos = sourceTargetPositions[sourceTargetIndex];
for (let edgeTypeIndex = 0; edgeTypeIndex < edgeTypes.length; edgeTypeIndex++) {
const currEdgeType = edgeTypes[edgeTypeIndex];
for (let offsetIndex = 0; offsetIndex < offsets.length; offsetIndex++) {
const currOffset = offsets[offsetIndex];
const style = {
...nodeStyle,
background: nodeColors[sourceTargetIndex][edgeTypeIndex],
};
const sourcePosition = {
x: offsetIndex * nodeWidth * 4,
y: edgeTypeIndex * 300 + sourceTargetIndex * edgeTypes.length * 300,
};
const sourceId = getNodeId();
const sourceData = { label: `Source ${sourceId}` };
const sourceNode = {
id: sourceId,
style,
data: sourceData,
position: sourcePosition,
sourcePosition: currSourceTargetPos.source,
targetPosition: currSourceTargetPos.target,
};
const targetId = getNodeId();
const targetData = { label: `Target ${targetId}` };
const targetPosition = {
x: sourcePosition.x + currOffset.x,
y: sourcePosition.y + currOffset.y,
};
const targetNode = {
id: targetId,
style,
data: targetData,
position: targetPosition,
sourcePosition: currSourceTargetPos.source,
targetPosition: currSourceTargetPos.target,
};
nodes.push(sourceNode);
nodes.push(targetNode);
edges.push({
id: `${sourceId}-${targetId}`,
source: sourceId,
target: targetId,
type: currEdgeType,
});
}
}
}
return { nodes, edges };
}
참고 예제 코드로 구현된 CodeSandbox 및 캡쳐사진
Updatable Edge
An edge is updatable by dragging it to another handle if you are using the onEdgeUpdate handler prop. The handler gets called after the edge gets dropped to a new handle. You can use the updateEdge helper function to update your edges state accordingly.
=> 만약 onEdgeUpdate 핸들러 prop를 사용한다면, 엣지를 다른 핸들로 드래그하여 업데이트할 수 있습니다. 이 핸들러는 엣지가 새로운 핸들에 드롭된 후에 호출됩니다. updateEdge 도우미 함수를 사용하여 엣지 상태를 적절하게 업데이트할 수 있습니다.
참고 예제 코드
import React, { useCallback } from 'react';
import ReactFlow, { useNodesState, useEdgesState, Controls, updateEdge, addEdge } from 'reactflow';
import 'reactflow/dist/style.css';
const initialNodes = [
{
id: '1',
type: 'input',
data: {
label: (
<>
Node A
</>
),
},
position: { x: 250, y: 0 },
},
{
id: '2',
data: {
label: (
<>
Node B
</>
),
},
position: { x: 75, y: 0 },
},
{
id: '3',
data: {
label: (
<>
Node C
</>
),
},
position: { x: 400, y: 100 },
style: {
background: '#D6D5E6',
color: '#333',
border: '1px solid #222138',
width: 180,
},
},
{
id: '4',
data: {
label: (
<>
Node D
</>
),
},
position: { x: -75, y: 100 },
},
{
id: '5',
data: {
label: (
<>
Node E
</>
),
},
position: { x: 150, y: 100 },
},
{
id: '6',
data: {
label: (
<>
Node F
</>
),
},
position: { x: 150, y: 250 },
},
];
const initialEdges = [
{
id: 'e1-3',
source: '1',
target: '3',
label: 'This edge can only be updated from source',
updatable: 'source',
},
{
id: 'e2-4',
source: '2',
target: '4',
label: 'This edge can only be updated from target',
updatable: 'target',
},
{ id: 'e5-6', source: '5', target: '6', label: 'This edge can be updated from both sides' },
];
const UpdatableEdge = () => {
const [nodes, setNodes, onNodesChange] = useNodesState(initialNodes);
const [edges, setEdges, onEdgesChange] = useEdgesState(initialEdges);
// gets called after end of edge gets dragged to another source or target
const onEdgeUpdate = useCallback(
(oldEdge, newConnection) => setEdges((els) => updateEdge(oldEdge, newConnection, els)),
[]
);
const onConnect = useCallback((params) => setEdges((els) => addEdge(params, els)), []);
return (
<ReactFlow
nodes={nodes}
edges={edges}
onNodesChange={onNodesChange}
onEdgesChange={onEdgesChange}
snapToGrid
onEdgeUpdate={onEdgeUpdate}
onConnect={onConnect}
fitView
attributionPosition="top-right"
>
<Controls />
</ReactFlow> );
};
export default UpdatableEdge;
참고 예제 코드로 구현된 CodeSandbox 및 캡쳐사진
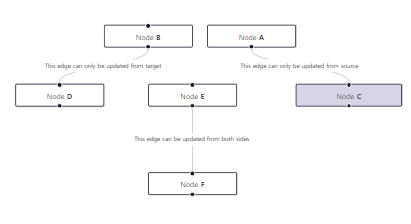
Connection Line
A Connection Line is what you see when you click and drag out from a handle. It represents a possible edge and can snap to valid handles in close proximity. You can implement your own Connection Line by passing a React component rendering the line. You can find the passed props in the custom connection line docs.
=> 연결 선은 핸들에서 클릭하고 드래그할 때 보이는 선입니다. 이는 가능한 엣지를 나타내며 가까운 위치에 있는 유효한 핸들에 스냅할 수 있습니다. 사용자 정의 연결 선을 구현하려면 선을 렌더링하는 React 컴포넌트를 전달하면 됩니다. 전달된 props에 대한 자세한 내용은 사용자 정의 연결 선 문서에서 확인할 수 있습니다.
참고 예제 코드
<App.js>
import React, { useCallback } from 'react';
import ReactFlow, {
useNodesState,
useEdgesState,
addEdge,
Background,
} from 'reactflow';
import 'reactflow/dist/style.css';
import CustomNode from './CustomNode';
import ConnectionLine from './ConnectionLine';
const initialNodes = [
{
id: 'connectionline-1',
type: 'custom',
data: { label: 'Node 1' },
position: { x: 250, y: 5 },
},
];
const nodeTypes = {
custom: CustomNode,
};
const ConnectionLineFlow = () => {
const [nodes, _, onNodesChange] = useNodesState(initialNodes);
const [edges, setEdges, onEdgesChange] = useEdgesState([]);
const onConnect = useCallback(
(params) => setEdges((eds) => addEdge(params, eds)),
[],
);
return (
<ReactFlow
nodes={nodes}
edges={edges}
nodeTypes={nodeTypes}
onNodesChange={onNodesChange}
onEdgesChange={onEdgesChange}
connectionLineComponent={ConnectionLine}
onConnect={onConnect}
fitView
fitViewOptions={{
padding: 0.2,
}}
>
<Background variant="lines" />
</ReactFlow>
);
};
export default ConnectionLineFlow;
<ConnectionLine.js>
import React from 'react';
import { useStore } from 'reactflow';
export default ({ fromX, fromY, toX, toY }) => {
const { connectionHandleId } = useStore();
return (
<g>
<path
fill="none"
stroke={connectionHandleId}
strokeWidth={1.5}
className="animated"
d={`M${fromX},${fromY} C ${fromX} ${toY} ${fromX} ${toY} ${toX},${toY}`}
/>
<circle
cx={toX}
cy={toY}
fill="#fff"
r={3}
stroke={connectionHandleId}
strokeWidth={1.5}
/>
</g>
);
};
<CustomNode.js>
import React, { memo } from 'react';
import { Handle, Position } from 'reactflow';
const DEFAULT_HANDLE_STYLE = {
width: 10,
height: 10,
bottom: -5,
};
export default memo(({ data, isConnectable }) => {
return (
<>
<div
style={{
background: '#DDD',
padding: 25,
}}
>
<div>Node</div>
<Handle
type="source"
id="red"
position={Position.Bottom}
style={{ ...DEFAULT_HANDLE_STYLE, left: '15%', background: 'red' }}
onConnect={(params) => console.log('handle onConnect', params)}
isConnectable={isConnectable}
/>
<Handle
type="source"
position={Position.Bottom}
id="blue"
style={{ ...DEFAULT_HANDLE_STYLE, left: '50%', background: 'blue' }}
isConnectable={isConnectable}
/>
<Handle
type="source"
position={Position.Bottom}
id="orange"
style={{ ...DEFAULT_HANDLE_STYLE, left: '85%', background: 'orange' }}
isConnectable={isConnectable}
/>
</div>
</>
);
});
참고 예제 코드로 구현된 CodeSandbox 및 캡쳐사진
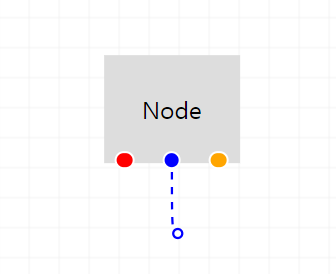
Multi Connection Line
React Flow typically only allows one connection to be created at a time. This example builds on the custom connection line example to show how to draw multiple connection lines from any selected nodes at once.
=> React Flow는 일반적으로 한 번에 하나의 연결만 생성할 수 있습니다. 이 예제는 사용자 정의 연결 선 예제를 기반으로하여 한 번에 선택된 모든 노드에서 여러 연결 선을 그리는 방법을 보여줍니다.
Pay attention to the onConnect handler. If you forget to include this then only one connection will be created even if you have multiple selected nodes!
onConnect 핸들러에 주의하십시오. 이를 포함하지 않으면 여러 선택된 노드가 있더라도 하나의 연결만 생성됩니다!
참고 예제 코드
<App.js>
import React, { useCallback } from 'react';
import ReactFlow, {
useNodesState,
useEdgesState,
addEdge,
Background,
} from 'reactflow';
import 'reactflow/dist/style.css';
import ConnectionLine from './ConnectionLine';
const initialNodes = [
{
id: 'a',
type: 'input',
data: { label: 'Select' },
position: { x: 100, y: -100 },
},
{
id: 'b',
type: 'input',
data: { label: 'these' },
position: { x: 300, y: -50 },
},
{
id: 'c',
type: 'input',
data: { label: 'nodes...' },
position: { x: 150, y: 0 },
},
{
id: 'd',
type: 'output',
data: { label: '...and connect to me!' },
position: { x: 250, y: 200 },
},
];
const ConnectionLineFlow = () => {
const [nodes, _, onNodesChange] = useNodesState(initialNodes);
const [edges, setEdges, onEdgesChange] = useEdgesState([]);
const onConnect = useCallback(
({ source, target }) => {
return setEdges((eds) =>
nodes
.filter((node) => node.id === source || node.selected)
.reduce(
(eds, node) => addEdge({ source: node.id, target }, eds),
eds,
),
);
},
[nodes],
);
return (
<ReactFlow
nodes={nodes}
edges={edges}
onNodesChange={onNodesChange}
onEdgesChange={onEdgesChange}
connectionLineComponent={ConnectionLine}
onConnect={onConnect}
fitView
fitViewOptions={{
padding: 0.2,
}}
/>
);
};
export default ConnectionLineFlow;
<ConnectionLine.js>
import React from 'react';
import { internalsSymbol, getSimpleBezierPath, useNodes } from 'reactflow';
export default ({ fromNode, toX, toY }) => {
const handleBounds = useNodes().flatMap((node) => {
if (
(node.id !== fromNode.id && !node.selected) ||
// we only want to draw a connection line from a source handle
!node[internalsSymbol].handleBounds.source
)
return [];
return node[internalsSymbol].handleBounds.source?.map((bounds) => ({
id: node.id,
positionAbsolute: node.positionAbsolute,
bounds,
}));
});
return handleBounds.map(({ id, positionAbsolute, bounds }) => {
const fromHandleX = bounds.x + bounds.width / 2;
const fromHandleY = bounds.y + bounds.height / 2;
const fromX = positionAbsolute.x + fromHandleX;
const fromY = positionAbsolute.y + fromHandleY;
const [d] = getSimpleBezierPath({
sourceX: fromX,
sourceY: fromY,
targetX: toX,
targetY: toY,
});
return (
<g key={`${id}-${bounds.id}`}>
<path fill="none" strokeWidth={1.5} stroke="black" d={d} />
<circle
cx={toX}
cy={toY}
fill="#fff"
r={3}
stroke="black"
strokeWidth={1.5}
/>
</g>
);
});
};
참고 예제 코드로 구현된 CodeSandbox 및 캡쳐사진
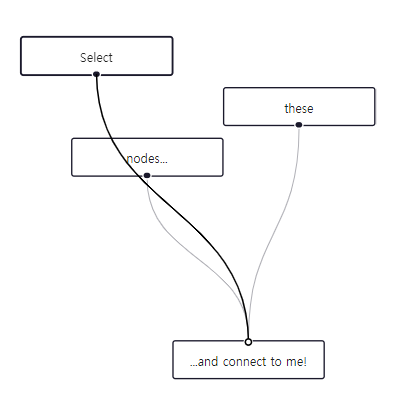
Edge Markers
React Flow has built-in support for different marker types for your edges. It's possible to add your own SVG markers, too.
=> 리엑트 플로우에는 엣지에 대한 다양한 마커 유형을 내장하여 지원합니다. 또한 사용자 정의 SVG 마커를 추가할 수도 있습니다.
참고 예제 코드
import React from 'react';
import ReactFlow, { Background, MarkerType } from 'reactflow';
import 'reactflow/dist/style.css';
const defaultNodes = [
{
id: 'A',
position: { x: 20, y: 20 },
data: { label: 'A' },
},
{
id: 'B',
position: { x: 100, y: 200 },
data: { label: 'B' },
},
{
id: 'C',
position: { x: 300, y: 20 },
data: { label: 'C' },
},
{
id: 'D',
position: { x: 300, y: 170 },
data: { label: 'D' },
},
{
id: 'E',
position: { x: 250, y: 300 },
data: { label: 'E' },
},
{
id: 'F',
position: { x: 250, y: 450 },
data: { label: 'F' },
},
{
id: 'G',
position: { x: 20, y: 450 },
data: { label: 'G' },
},
];
const defaultEdges = [
{
id: 'A->B',
source: 'A',
target: 'B',
markerEnd: {
type: MarkerType.Arrow,
},
label: 'default arrow',
},
{
id: 'C->D',
source: 'C',
target: 'D',
markerEnd: {
type: MarkerType.ArrowClosed,
},
label: 'default closed arrow',
},
{
id: 'D->E',
source: 'D',
target: 'E',
markerEnd: {
type: MarkerType.ArrowClosed,
},
markerStart: {
type: MarkerType.ArrowClosed,
orient: 'auto-start-reverse',
},
label: 'marker start and marker end',
},
{
id: 'E->F',
source: 'E',
target: 'F',
markerEnd: 'logo',
label: 'custom marker',
},
{
id: 'B->G',
source: 'B',
target: 'G',
markerEnd: {
type: MarkerType.ArrowClosed,
width: 20,
height: 20,
color: '#FF0072',
},
label: 'marker size and color',
style: {
strokeWidth: 2,
stroke: '#FF0072',
},
},
];
export default function MarkersExample() {
return (
<>
<svg style={{ position: 'absolute', top: 0, left: 0 }}>
<marker
id="logo"
viewBox="0 0 40 40"
markerHeight={20}
markerWidth={20}
refX={20}
refY={40}
>
<path
d="M35 23H25C23.8954 23 23 23.8954 23 25V35C23 36.1046 23.8954 37 25 37H35C36.1046 37 37 36.1046 37 35V25C37 23.8954 36.1046 23 35 23Z"
stroke="#1A192B"
stroke-width="2"
fill="white"
/>
<path
d="M35 3H25C23.8954 3 23 3.89543 23 5V15C23 16.1046 23.8954 17 25 17H35C36.1046 17 37 16.1046 37 15V5C37 3.89543 36.1046 3 35 3Z"
stroke="#FF0072"
stroke-width="2"
fill="white"
/>
<path
d="M15 23H5C3.89543 23 3 23.8954 3 25V35C3 36.1046 3.89543 37 5 37H15C16.1046 37 17 36.1046 17 35V25C17 23.8954 16.1046 23 15 23Z"
stroke="#1A192B"
stroke-width="2"
fill="white"
/>
<path
d="M15 3H5C3.89543 3 3 3.89543 3 5V15C3 16.1046 3.89543 17 5 17H15C16.1046 17 17 16.1046 17 15V5C17 3.89543 16.1046 3 15 3Z"
stroke="#1A192B"
stroke-width="2"
fill="white"
/>
<path
d="M17 13C18.6569 13 20 11.6569 20 10C20 8.34315 18.6569 7 17 7C15.3431 7 14 8.34315 14 10C14 11.6569 15.3431 13 17 13Z"
fill="white"
/>
<path
d="M23 13C24.6569 13 26 11.6569 26 10C26 8.34315 24.6569 7 23 7C21.3431 7 20 8.34315 20 10C20 11.6569 21.3431 13 23 13Z"
fill="white"
/>
<path
d="M30 20C31.6569 20 33 18.6569 33 17C33 15.3431 31.6569 14 30 14C28.3431 14 27 15.3431 27 17C27 18.6569 28.3431 20 30 20Z"
fill="white"
/>
<path
d="M30 26C31.6569 26 33 24.6569 33 23C33 21.3431 31.6569 20 30 20C28.3431 20 27 21.3431 27 23C27 24.6569 28.3431 26 30 26Z"
fill="white"
/>
<path
d="M17 33C18.6569 33 20 31.6569 20 30C20 28.3431 18.6569 27 17 27C15.3431 27 14 28.3431 14 30C14 31.6569 15.3431 33 17 33Z"
fill="white"
/>
<path
d="M23 33C24.6569 33 26 31.6569 26 30C26 28.3431 24.6569 27 23 27C21.3431 27 20 28.3431 20 30C20 31.6569 21.3431 33 23 33Z"
fill="white"
/>
<path
d="M30 25C31.1046 25 32 24.1046 32 23C32 21.8954 31.1046 21 30 21C28.8954 21 28 21.8954 28 23C28 24.1046 28.8954 25 30 25Z"
fill="#1A192B"
/>
<path
d="M17 32C18.1046 32 19 31.1046 19 30C19 28.8954 18.1046 28 17 28C15.8954 28 15 28.8954 15 30C15 31.1046 15.8954 32 17 32Z"
fill="#1A192B"
/>
<path
d="M23 32C24.1046 32 25 31.1046 25 30C25 28.8954 24.1046 28 23 28C21.8954 28 21 28.8954 21 30C21 31.1046 21.8954 32 23 32Z"
fill="#1A192B"
/>
<path opacity="0.35" d="M22 9.5H18V10.5H22V9.5Z" fill="#1A192B" />
<path opacity="0.35" d="M29.5 17.5V21.5H30.5V17.5H29.5Z" fill="#1A192B" />
<path opacity="0.35" d="M22 29.5H18V30.5H22V29.5Z" fill="#1A192B" />
<path
d="M17 12C18.1046 12 19 11.1046 19 10C19 8.89543 18.1046 8 17 8C15.8954 8 15 8.89543 15 10C15 11.1046 15.8954 12 17 12Z"
fill="#1A192B"
/>
<path
d="M23 12C24.1046 12 25 11.1046 25 10C25 8.89543 24.1046 8 23 8C21.8954 8 21 8.89543 21 10C21 11.1046 21.8954 12 23 12Z"
fill="#FF0072"
/>
<path
d="M30 19C31.1046 19 32 18.1046 32 17C32 15.8954 31.1046 15 30 15C28.8954 15 28 15.8954 28 17C28 18.1046 28.8954 19 30 19Z"
fill="#FF0072"
/>
</marker>
</defs>
</svg>
<ReactFlow defaultNodes={defaultNodes} defaultEdges={defaultEdges}>
<Background />
</ReactFlow>
</> );
}
참고 예제 코드로 구현된 CodeSandbox 및 캡쳐사진

Delete Edge on Drop
In this example we are showing how to delete an edge by using the onEdgeUpdate, onEdgeUpdateStart and onEdgeUpdateEnd handlers. If you drag an existing edge and drop it on the pane, it gets deleted from the edges array.
=> 이 예제에서는 onEdgeUpdate, onEdgeUpdateStart 및 onEdgeUpdateEnd 핸들러를 사용하여 엣지를 삭제하는 방법을 보여줍니다. 기존 엣지를 드래그하여 패널 위에 놓으면 엣지가 엣지 배열에서 삭제됩니다.
참고 예제 코드
import React, { useCallback, useRef } from 'react';
import ReactFlow, { useNodesState, useEdgesState, Controls, updateEdge, addEdge } from 'reactflow';
import 'reactflow/dist/style.css';
const initialNodes = [
{
id: '1',
type: 'input',
data: { label: 'Node A' },
position: { x: 250, y: 0 },
},
{
id: '2',
data: { label: 'Node B' },
position: { x: 100, y: 200 },
},
{
id: '3',
data: { label: 'Node C' },
position: { x: 350, y: 200 },
},
];
const initialEdges = [{ id: 'e1-2', source: '1', target: '2', label: 'updatable edge' }];
const DeleteEdgeDrop = () => {
const edgeUpdateSuccessful = useRef(true);
const [nodes, , onNodesChange] = useNodesState(initialNodes);
const [edges, setEdges, onEdgesChange] = useEdgesState(initialEdges);
const onConnect = useCallback((params) => setEdges((els) => addEdge(params, els)), []);
const onEdgeUpdateStart = useCallback(() => {
edgeUpdateSuccessful.current = false;
}, []);
const onEdgeUpdate = useCallback((oldEdge, newConnection) => {
edgeUpdateSuccessful.current = true;
setEdges((els) => updateEdge(oldEdge, newConnection, els));
}, []);
const onEdgeUpdateEnd = useCallback((_, edge) => {
if (!edgeUpdateSuccessful.current) {
setEdges((eds) => eds.filter((e) => e.id !== edge.id));
}
edgeUpdateSuccessful.current = true;
}, []);
return (
<ReactFlow
nodes={nodes}
edges={edges}
onNodesChange={onNodesChange}
onEdgesChange={onEdgesChange}
snapToGrid
onEdgeUpdate={onEdgeUpdate}
onEdgeUpdateStart={onEdgeUpdateStart}
onEdgeUpdateEnd={onEdgeUpdateEnd}
onConnect={onConnect}
fitView
attributionPosition="top-right"
>
<Controls />
</ReactFlow>
);
};
export default DeleteEdgeDrop;
참고 예제 코드로 구현된 CodeSandbox 및 캡쳐사진
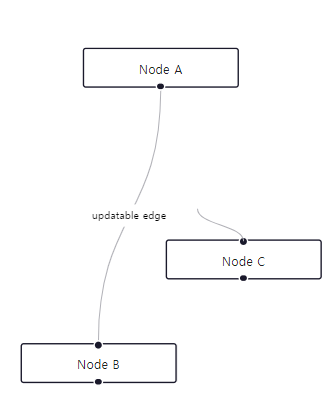
Floating Edges
This is an example implemenation for floating edges. The source and target position of the edges are getting calculated dynamically. You can find the implementation details in the utils.js file.
=> 이것은 부유 엣지에 대한 예제 구현입니다. 엣지의 소스 및 타겟 위치는 동적으로 계산됩니다. 구현 세부 정보는 utils.js 파일에서 찾을 수 있습니다.
참고 예제 코드
<App.js>
import React, { useCallback } from 'react';
import ReactFlow, {
addEdge,
Background,
useNodesState,
useEdgesState,
MarkerType,
} from 'reactflow';
import 'reactflow/dist/style.css';
import FloatingEdge from './FloatingEdge.js';
import FloatingConnectionLine from './FloatingConnectionLine.js';
import { createNodesAndEdges } from './utils.js';
import './index.css';
const { nodes: initialNodes, edges: initialEdges } = createNodesAndEdges();
const edgeTypes = {
floating: FloatingEdge,
};
const NodeAsHandleFlow = () => {
const [nodes, , onNodesChange] = useNodesState(initialNodes);
const [edges, setEdges, onEdgesChange] = useEdgesState(initialEdges);
const onConnect = useCallback(
(params) =>
setEdges((eds) =>
addEdge({ ...params, type: 'floating', markerEnd: { type: MarkerType.Arrow } }, eds)
),
[setEdges]
);
return (
<div className="floatingedges">
<ReactFlow
nodes={nodes}
edges={edges}
onNodesChange={onNodesChange}
onEdgesChange={onEdgesChange}
onConnect={onConnect}
fitView
edgeTypes={edgeTypes}
connectionLineComponent={FloatingConnectionLine}
>
<Background />
</ReactFlow>
</div>
);
};
export default NodeAsHandleFlow;<FloatingEdge.js>
import { useCallback } from 'react';
import { useStore, getBezierPath } from 'reactflow';
import { getEdgeParams } from './utils.js';
function FloatingEdge({ id, source, target, markerEnd, style }) {
const sourceNode = useStore(useCallback((store) => store.nodeInternals.get(source), [source]));
const targetNode = useStore(useCallback((store) => store.nodeInternals.get(target), [target]));
if (!sourceNode || !targetNode) {
return null;
}
const { sx, sy, tx, ty, sourcePos, targetPos } = getEdgeParams(sourceNode, targetNode);
const [edgePath] = getBezierPath({
sourceX: sx,
sourceY: sy,
sourcePosition: sourcePos,
targetPosition: targetPos,
targetX: tx,
targetY: ty,
});
return (
<path
id={id}
className="react-flow__edge-path"
d={edgePath}
markerEnd={markerEnd}
style={style}
/>
);
}
export default FloatingEdge;<FloatingConnectionLine.js>
import React from 'react';
import { getBezierPath } from 'reactflow';
import { getEdgeParams } from './utils.js';
function FloatingConnectionLine({ toX, toY, fromPosition, toPosition, fromNode }) {
if (!fromNode) {
return null;
}
const targetNode = {
id: 'connection-target',
width: 1,
height: 1,
positionAbsolute: { x: toX, y: toY }
};
const { sx, sy } = getEdgeParams(fromNode, targetNode);
const [edgePath] = getBezierPath({
sourceX: sx,
sourceY: sy,
sourcePosition: fromPosition,
targetPosition: toPosition,
targetX: toX,
targetY: toY
});
return (
<g>
<path
fill="none"
stroke="#222"
strokeWidth={1.5}
className="animated"
d={edgePath}
/>
<circle
cx={toX}
cy={toY}
fill="#fff"
r={3}
stroke="#222"
strokeWidth={1.5}
/>
</g>
);
}
export default FloatingConnectionLine;<utils.js>
import { Position, MarkerType } from 'reactflow';
// this helper function returns the intersection point
// of the line between the center of the intersectionNode and the target node
function getNodeIntersection(intersectionNode, targetNode) {
// https://math.stackexchange.com/questions/1724792/an-algorithm-for-finding-the-intersection-point-between-a-center-of-vision-and-a
const {
width: intersectionNodeWidth,
height: intersectionNodeHeight,
positionAbsolute: intersectionNodePosition,
} = intersectionNode;
const targetPosition = targetNode.positionAbsolute;
const w = intersectionNodeWidth / 2;
const h = intersectionNodeHeight / 2;
const x2 = intersectionNodePosition.x + w;
const y2 = intersectionNodePosition.y + h;
const x1 = targetPosition.x + targetNode.width / 2;
const y1 = targetPosition.y + targetNode.height / 2;
const xx1 = (x1 - x2) / (2 * w) - (y1 - y2) / (2 * h);
const yy1 = (x1 - x2) / (2 * w) + (y1 - y2) / (2 * h);
const a = 1 / (Math.abs(xx1) + Math.abs(yy1));
const xx3 = a * xx1;
const yy3 = a * yy1;
const x = w * (xx3 + yy3) + x2;
const y = h * (-xx3 + yy3) + y2;
return { x, y };
}
// returns the position (top,right,bottom or right) passed node compared to the intersection point
function getEdgePosition(node, intersectionPoint) {
const n = { ...node.positionAbsolute, ...node };
const nx = Math.round(n.x);
const ny = Math.round(n.y);
const px = Math.round(intersectionPoint.x);
const py = Math.round(intersectionPoint.y);
if (px <= nx + 1) {
return Position.Left;
}
if (px >= nx + n.width - 1) {
return Position.Right;
}
if (py <= ny + 1) {
return Position.Top;
}
if (py >= n.y + n.height - 1) {
return Position.Bottom;
}
return Position.Top;
}
// returns the parameters (sx, sy, tx, ty, sourcePos, targetPos) you need to create an edge
export function getEdgeParams(source, target) {
const sourceIntersectionPoint = getNodeIntersection(source, target);
const targetIntersectionPoint = getNodeIntersection(target, source);
const sourcePos = getEdgePosition(source, sourceIntersectionPoint);
const targetPos = getEdgePosition(target, targetIntersectionPoint);
return {
sx: sourceIntersectionPoint.x,
sy: sourceIntersectionPoint.y,
tx: targetIntersectionPoint.x,
ty: targetIntersectionPoint.y,
sourcePos,
targetPos,
};
}
export function createNodesAndEdges() {
const nodes = [];
const edges = [];
const center = { x: window.innerWidth / 2, y: window.innerHeight / 2 };
nodes.push({ id: 'target', data: { label: 'Target' }, position: center });
for (let i = 0; i < 8; i++) {
const degrees = i * (360 / 8);
const radians = degrees * (Math.PI / 180);
const x = 250 * Math.cos(radians) + center.x;
const y = 250 * Math.sin(radians) + center.y;
nodes.push({ id: `${i}`, data: { label: 'Source' }, position: { x, y } });
edges.push({
id: `edge-${i}`,
target: 'target',
source: `${i}`,
type: 'floating',
markerEnd: {
type: MarkerType.Arrow,
},
});
}
return { nodes, edges };
}<index.css>
.floatingedges {
flex-direction: column;
display: flex;
flex-grow: 1;
height: 100%;
}
.floatingedges .react-flow__handle {
opacity: 0;
}
참고 예제 코드로 구현된 CodeSandbox 및 캡쳐사진
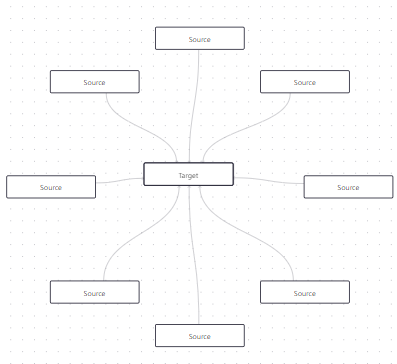
Simple Floating Edges
This is a simplified version of the Floating Edges example. It's not as flexible as the floating edges example, but the edges stick to the top, right, bottom or left side of the nodes. You can find the implementation details in the utils.js file.
=> 이것은 부유 엣지 예제의 간소화된 버전입니다. 부유 엣지 예제만큼 유연하지는 않지만, 엣지는 노드의 상단, 오른쪽, 하단 또는 왼쪽에 따라 붙습니다. 구현 세부 정보는 utils.js 파일에서 찾을 수 있습니다.
참고 예제 코드
<App.js>
import React, { useCallback } from 'react';
import ReactFlow, {
addEdge,
Background,
useNodesState,
useEdgesState,
MarkerType,
ConnectionMode,
} from 'reactflow';
import 'reactflow/dist/style.css';
import SimpleFloatingEdge from './SimpleFloatingEdge';
import CustomNode from './CustomNode';
import './index.css';
const nodeTypes = {
custom: CustomNode,
};
const edgeTypes = {
floating: SimpleFloatingEdge,
};
const initialNodes = [
{
id: '1',
label: '1',
position: { x: 0, y: 0 },
data: { label: 'drag me around 😎' },
type: 'custom',
},
{
id: '2',
label: '2',
position: { x: 0, y: 150 },
data: { label: '...or me' },
type: 'custom',
},
];
const initialEdges = [
{
id: '1-2',
source: '1',
target: '2',
sourceHandle: 'c',
targetHandle: 'a',
type: 'floating',
markerEnd: { type: MarkerType.ArrowClosed },
},
];
const fitViewOptions = { padding: 4 };
const NodeAsHandleFlow = () => {
const [nodes, , onNodesChange] = useNodesState(initialNodes);
const [edges, setEdges, onEdgesChange] = useEdgesState(initialEdges);
const onConnect = useCallback(
(params) =>
setEdges((eds) =>
addEdge({ ...params, type: 'floating', markerEnd: { type: MarkerType.Arrow } }, eds)
),
[]
);
return (
<div className="simple-floatingedges">
<ReactFlow
nodes={nodes}
edges={edges}
onNodesChange={onNodesChange}
onEdgesChange={onEdgesChange}
onConnect={onConnect}
edgeTypes={edgeTypes}
nodeTypes={nodeTypes}
fitView
fitViewOptions={fitViewOptions}
connectionMode={ConnectionMode.Loose}
>
<Background />
</ReactFlow>
</div>
);
};
export default NodeAsHandleFlow;
<SimpleFloatingEdge.js>
import { useCallback } from 'react';
import { useStore, getBezierPath } from 'reactflow';
import { getEdgeParams } from './utils.js';
function SimpleFloatingEdge({ id, source, target, markerEnd, style }) {
const sourceNode = useStore(useCallback((store) => store.nodeInternals.get(source), [source]));
const targetNode = useStore(useCallback((store) => store.nodeInternals.get(target), [target]));
if (!sourceNode || !targetNode) {
return null;
}
const { sx, sy, tx, ty, sourcePos, targetPos } = getEdgeParams(sourceNode, targetNode);
const [edgePath] = getBezierPath({
sourceX: sx,
sourceY: sy,
sourcePosition: sourcePos,
targetPosition: targetPos,
targetX: tx,
targetY: ty,
});
return (
<path
id={id}
className="react-flow__edge-path"
d={edgePath}
strokeWidth={5}
markerEnd={markerEnd}
style={style}
/>
);
}
export default SimpleFloatingEdge;
<CustomNode.js>
import React, { memo } from 'react';
import { Handle, Position } from 'reactflow';
export default memo(({ data }) => {
return (
<>
{data.label}
<Handle type="source" position={Position.Top} id="a" />
<Handle type="source" position={Position.Right} id="b" />
<Handle type="source" position={Position.Bottom} id="c" />
<Handle type="source" position={Position.Left} id="d" />
</>
);
});
<utils.js>
import { Position, internalsSymbol } from 'reactflow';
// returns the position (top,right,bottom or right) passed node compared to
function getParams(nodeA, nodeB) {
const centerA = getNodeCenter(nodeA);
const centerB = getNodeCenter(nodeB);
const horizontalDiff = Math.abs(centerA.x - centerB.x);
const verticalDiff = Math.abs(centerA.y - centerB.y);
let position;
// when the horizontal difference between the nodes is bigger, we use Position.Left or Position.Right for the handle
if (horizontalDiff > verticalDiff) {
position = centerA.x > centerB.x ? Position.Left : Position.Right;
} else {
// here the vertical difference between the nodes is bigger, so we use Position.Top or Position.Bottom for the handle
position = centerA.y > centerB.y ? Position.Top : Position.Bottom;
}
const [x, y] = getHandleCoordsByPosition(nodeA, position);
return [x, y, position];
}
function getHandleCoordsByPosition(node, handlePosition) {
// all handles are from type source, that's why we use handleBounds.source here
const handle = node[internalsSymbol].handleBounds.source.find(
(h) => h.position === handlePosition
);
let offsetX = handle.width / 2;
let offsetY = handle.height / 2;
// this is a tiny detail to make the markerEnd of an edge visible.
// The handle position that gets calculated has the origin top-left, so depending which side we are using, we add a little offset
// when the handlePosition is Position.Right for example, we need to add an offset as big as the handle itself in order to get the correct position
switch (handlePosition) {
case Position.Left:
offsetX = 0;
break;
case Position.Right:
offsetX = handle.width;
break;
case Position.Top:
offsetY = 0;
break;
case Position.Bottom:
offsetY = handle.height;
break;
}
const x = node.positionAbsolute.x + handle.x + offsetX;
const y = node.positionAbsolute.y + handle.y + offsetY;
return [x, y];
}
function getNodeCenter(node) {
return {
x: node.positionAbsolute.x + node.width / 2,
y: node.positionAbsolute.y + node.height / 2,
};
}
// returns the parameters (sx, sy, tx, ty, sourcePos, targetPos) you need to create an edge
export function getEdgeParams(source, target) {
const [sx, sy, sourcePos] = getParams(source, target);
const [tx, ty, targetPos] = getParams(target, source);
return {
sx,
sy,
tx,
ty,
sourcePos,
targetPos,
};
}
<index.css>
.simple-floatingedges {
flex-direction: column;
display: flex;
flex-grow: 1;
height: 100%;
}
.simple-floatingedges .react-flow__handle {
width: 8px;
height: 8px;
background-color: #bbb;
}
.simple-floatingedges .react-flow__handle-top {
top: -15px;
}
.simple-floatingedges .react-flow__handle-bottom {
bottom: -15px;
}
.simple-floatingedges .react-flow__handle-left {
left: -15px;
}
.simple-floatingedges .react-flow__handle-right {
right: -15px;
}
.simple-floatingedges .react-flow__node-custom {
background: #fff;
border: 1px solid #1a192b;
border-radius: 3px;
color: #222;
font-size: 12px;
padding: 10px;
text-align: center;
width: 150px;
}
참고 예제 코드로 구현된 CodeSandbox 및 캡쳐사진

Edge Label Renderer
If you want to escape SVG world within an edge, you can use the EdgeLabelRenderer. It's a portal component that lets you render edge labels as divs on top of the edges. If you want to add mouse interactions you need to set pointer-events: all on the label.
=> SVG 환경을 벗어나 엣지 내에서 렌더링하려는 경우 EdgeLabelRenderer를 사용할 수 있습니다. 이는 엣지 위에 div로 엣지 라벨을 렌더링할 수 있게 해주는 포털 컴포넌트입니다. 마우스 상호 작용을 추가하려면 라벨에 pointer-events: all을 설정해야 합니다.
참고 예제 코드
<App.tsx>
import React, { useCallback } from 'react';
import ReactFlow, {
Controls,
Background,
addEdge,
Connection,
Edge,
EdgeTypes,
Node,
useEdgesState,
useNodesState,
} from 'reactflow';
import 'reactflow/dist/style.css';
import CustomEdge from './CustomEdge';
import CustomEdgeStartEnd from './CustomEdgeStartEnd';
const initialNodes: Node[] = [
{
id: '1',
type: 'input',
data: { label: 'Node 1' },
position: { x: 0, y: 0 },
},
{ id: '2', data: { label: 'Node 2' }, position: { x: 0, y: 400 } },
{ id: '3', data: { label: 'Node 3' }, position: { x: 400, y: 0 } },
{ id: '4', data: { label: 'Node 4' }, position: { x: 400, y: 400 } },
];
const initialEdges: Edge[] = [
{
id: 'e1-2',
source: '1',
target: '2',
data: {
label: 'edge label',
},
type: 'custom',
},
{
id: 'e3-4',
source: '3',
target: '4',
data: {
startLabel: 'start edge label',
endLabel: 'end edge label',
},
type: 'start-end',
},
];
const edgeTypes: EdgeTypes = {
custom: CustomEdge,
'start-end': CustomEdgeStartEnd,
};
const EdgesFlow = () => {
const [nodes, , onNodesChange] = useNodesState(initialNodes);
const [edges, setEdges, onEdgesChange] = useEdgesState(initialEdges);
const onConnect = useCallback(
(params: Connection | Edge) => setEdges((eds) => addEdge(params, eds)),
[setEdges]
);
return (
<ReactFlow
nodes={nodes}
edges={edges}
onNodesChange={onNodesChange}
onEdgesChange={onEdgesChange}
onConnect={onConnect}
edgeTypes={edgeTypes}
>
<Controls />
<Background />
</ReactFlow>
);
};
export default EdgesFlow;
<CustomEdge.tsx>
import React, { FC } from 'react';
import { EdgeProps, getBezierPath, EdgeLabelRenderer, BaseEdge } from 'reactflow';
const CustomEdge: FC<EdgeProps> = ({
id,
sourceX,
sourceY,
targetX,
targetY,
sourcePosition,
targetPosition,
data,
}) => {
const [edgePath, labelX, labelY] = getBezierPath({
sourceX,
sourceY,
sourcePosition,
targetX,
targetY,
targetPosition,
});
return (
<>
<BaseEdge id={id} path={edgePath} />
<EdgeLabelRenderer>
<div
style={{
position: 'absolute',
transform: `translate(-50%, -50%) translate(${labelX}px,${labelY}px)`,
background: '#ffcc00',
padding: 10,
borderRadius: 5,
fontSize: 12,
fontWeight: 700,
}}
className="nodrag nopan"
>
{data.label}
</div>
</EdgeLabelRenderer>
</>
);
};
export default CustomEdge;
<CustomEdgeStartEnd.tsx>
import React, { FC } from 'react';
import { EdgeProps, getBezierPath, EdgeLabelRenderer, BaseEdge } from 'reactflow';
// this is a little helper component to render the actual edge label
function EdgeLabel({ transform, label }: { transform: string; label: string }) {
return (
<div
style={{
position: 'absolute',
background: 'transparent',
padding: 10,
color: '#ff5050',
fontSize: 12,
fontWeight: 700,
transform,
}}
className="nodrag nopan"
>
{label}
</div>
);
}
const CustomEdge: FC<EdgeProps> = ({
id,
sourceX,
sourceY,
targetX,
targetY,
sourcePosition,
targetPosition,
data,
}) => {
const [edgePath] = getBezierPath({
sourceX,
sourceY,
sourcePosition,
targetX,
targetY,
targetPosition,
});
return (
<>
<BaseEdge id={id} path={edgePath} />
<EdgeLabelRenderer>
{data.startLabel && (
<EdgeLabel
transform={`translate(-50%, 0%) translate(${sourceX}px,${sourceY}px)`}
label={data.startLabel}
/>
)}
{data.endLabel && (
<EdgeLabel
transform={`translate(-50%, -100%) translate(${targetX}px,${targetY}px)`}
label={data.endLabel}
/>
)}
</EdgeLabelRenderer>
</>
);
};
export default CustomEdge;
참고 예제 코드로 구현된 CodeSandbox 및 캡쳐사진
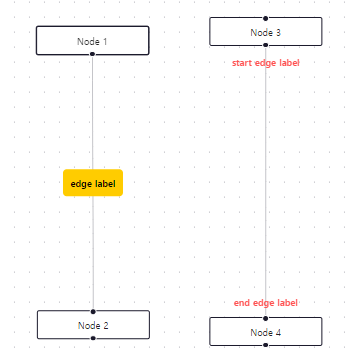
Layout
Sub Flow
React Flow supports rendering nested graphs and grouping of nodes. You can configure the behaviour of the child nodes using extent: 'parent' and render group elements without handles by passing type: 'group' to the node configuration. See our Sub Flow guide for more information.
=> React Flow는 중첩된 그래프 및 노드 그룹화를 지원합니다. extent: 'parent'를 사용하여 자식 노드의 동작을 구성하고 노드 구성에 type: 'group'을 전달하여 핸들 없이 그룹 요소를 렌더링할 수 있습니다. 자세한 정보는 Sub Flow 가이드를 참조하세요.
참고 예제 코드
import { useCallback } from 'react';
import ReactFlow, {
addEdge,
Background,
useNodesState,
useEdgesState,
MiniMap,
Controls,
} from 'reactflow';
import 'reactflow/dist/style.css';
const initialNodes = [
{
id: '1',
type: 'input',
data: { label: 'Node 0' },
position: { x: 250, y: 5 },
className: 'light',
},
{
id: '2',
data: { label: 'Group A' },
position: { x: 100, y: 100 },
className: 'light',
style: { backgroundColor: 'rgba(255, 0, 0, 0.2)', width: 200, height: 200 },
},
{
id: '2a',
data: { label: 'Node A.1' },
position: { x: 10, y: 50 },
parentNode: '2',
},
{
id: '3',
data: { label: 'Node 1' },
position: { x: 320, y: 100 },
className: 'light',
},
{
id: '4',
data: { label: 'Group B' },
position: { x: 320, y: 200 },
className: 'light',
style: { backgroundColor: 'rgba(255, 0, 0, 0.2)', width: 300, height: 300 },
type: 'group',
},
{
id: '4a',
data: { label: 'Node B.1' },
position: { x: 15, y: 65 },
className: 'light',
parentNode: '4',
extent: 'parent',
},
{
id: '4b',
data: { label: 'Group B.A' },
position: { x: 15, y: 120 },
className: 'light',
style: {
backgroundColor: 'rgba(255, 0, 255, 0.2)',
height: 150,
width: 270,
},
parentNode: '4',
},
{
id: '4b1',
data: { label: 'Node B.A.1' },
position: { x: 20, y: 40 },
className: 'light',
parentNode: '4b',
},
{
id: '4b2',
data: { label: 'Node B.A.2' },
position: { x: 100, y: 100 },
className: 'light',
parentNode: '4b',
},
];
const initialEdges = [
{ id: 'e1-2', source: '1', target: '2', animated: true },
{ id: 'e1-3', source: '1', target: '3' },
{ id: 'e2a-4a', source: '2a', target: '4a' },
{ id: 'e3-4b', source: '3', target: '4b' },
{ id: 'e4a-4b1', source: '4a', target: '4b1' },
{ id: 'e4a-4b2', source: '4a', target: '4b2' },
{ id: 'e4b1-4b2', source: '4b1', target: '4b2' },
];
const NestedFlow = () => {
const [nodes, setNodes, onNodesChange] = useNodesState(initialNodes);
const [edges, setEdges, onEdgesChange] = useEdgesState(initialEdges);
const onConnect = useCallback((connection) => {
setEdges((eds) => addEdge(connection, eds));
}, []);
return (
<ReactFlow
nodes={nodes}
edges={edges}
onNodesChange={onNodesChange}
onEdgesChange={onEdgesChange}
onConnect={onConnect}
className="react-flow-subflows-example"
fitView
>
<MiniMap />
<Controls />
<Background />
</ReactFlow>
);
};
export default NestedFlow;
참고 예제 코드로 구현된 CodeSandbox 및 캡쳐사진
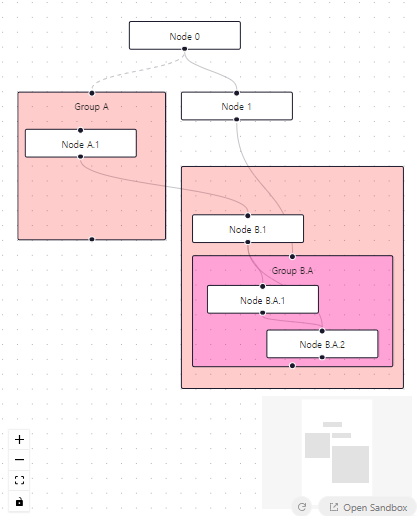
Horizontal Flow
A diagram can go from left to right or from top to bottom, but you can also create mixed ones. For controlling the direction of a diagram you can adjust the handle positions of a node with the sourcePosition and targetPosition props.
참고 예제 코드
import React, { useCallback } from 'react';
import ReactFlow, { useNodesState, useEdgesState, addEdge } from 'reactflow';
import 'reactflow/dist/style.css';
const initialNodes = [
{
id: 'horizontal-1',
sourcePosition: 'right',
type: 'input',
data: { label: 'Input' },
position: { x: 0, y: 80 },
},
{
id: 'horizontal-2',
sourcePosition: 'right',
targetPosition: 'left',
data: { label: 'A Node' },
position: { x: 250, y: 0 },
},
{
id: 'horizontal-3',
sourcePosition: 'right',
targetPosition: 'left',
data: { label: 'Node 3' },
position: { x: 250, y: 160 },
},
{
id: 'horizontal-4',
sourcePosition: 'right',
targetPosition: 'left',
data: { label: 'Node 4' },
position: { x: 500, y: 0 },
},
{
id: 'horizontal-5',
sourcePosition: 'top',
targetPosition: 'bottom',
data: { label: 'Node 5' },
position: { x: 500, y: 100 },
},
{
id: 'horizontal-6',
sourcePosition: 'bottom',
targetPosition: 'top',
data: { label: 'Node 6' },
position: { x: 500, y: 230 },
},
{
id: 'horizontal-7',
sourcePosition: 'right',
targetPosition: 'left',
data: { label: 'Node 7' },
position: { x: 750, y: 50 },
},
{
id: 'horizontal-8',
sourcePosition: 'right',
targetPosition: 'left',
data: { label: 'Node 8' },
position: { x: 750, y: 300 },
},
];
const initialEdges = [
{
id: 'horizontal-e1-2',
source: 'horizontal-1',
type: 'smoothstep',
target: 'horizontal-2',
animated: true,
},
{
id: 'horizontal-e1-3',
source: 'horizontal-1',
type: 'smoothstep',
target: 'horizontal-3',
animated: true,
},
{
id: 'horizontal-e1-4',
source: 'horizontal-2',
type: 'smoothstep',
target: 'horizontal-4',
label: 'edge label',
},
{
id: 'horizontal-e3-5',
source: 'horizontal-3',
type: 'smoothstep',
target: 'horizontal-5',
animated: true,
},
{
id: 'horizontal-e3-6',
source: 'horizontal-3',
type: 'smoothstep',
target: 'horizontal-6',
animated: true,
},
{
id: 'horizontal-e5-7',
source: 'horizontal-5',
type: 'smoothstep',
target: 'horizontal-7',
animated: true,
},
{
id: 'horizontal-e6-8',
source: 'horizontal-6',
type: 'smoothstep',
target: 'horizontal-8',
animated: true,
},
];
const HorizontalFlow = () => {
const [nodes, _, onNodesChange] = useNodesState(initialNodes);
const [edges, setEdges, onEdgesChange] = useEdgesState(initialEdges);
const onConnect = useCallback((params) => setEdges((els) => addEdge(params, els)), []);
return (
<ReactFlow
nodes={nodes}
edges={edges}
onNodesChange={onNodesChange}
onEdgesChange={onEdgesChange}
onConnect={onConnect}
fitView
attributionPosition="bottom-left"
></ReactFlow>
);
};
export default HorizontalFlow;
참고 예제 코드로 구현된 CodeSandbox 및 캡쳐사진
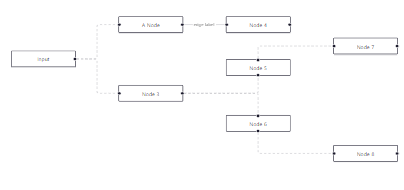
Dagre Tree
This example shows how you can integrate dagre.js with React Flow to create simple tree layouts. Good alternatives to dagre are d3-hierarchy or elkjs if you are looking for a more advanced layouting library.
=> 이 예제는 dagre.js를 React Flow와 통합하여 간단한 트리 레이아웃을 만드는 방법을 보여줍니다. 더 고급 레이아웃 라이브러리를 찾는 경우 대체로는 d3-hierarchy 또는 elkjs가 좋은 대안입니다.
참고 예제 코드
<App.js>
import React, { useCallback } from 'react';
import ReactFlow, {
addEdge,
ConnectionLineType,
Panel,
useNodesState,
useEdgesState,
} from 'reactflow';
import dagre from 'dagre';
import { initialNodes, initialEdges } from './nodes-edges.js';
import 'reactflow/dist/style.css';
const dagreGraph = new dagre.graphlib.Graph();
dagreGraph.setDefaultEdgeLabel(() => ({}));
const nodeWidth = 172;
const nodeHeight = 36;
const getLayoutedElements = (nodes, edges, direction = 'TB') => {
const isHorizontal = direction === 'LR';
dagreGraph.setGraph({ rankdir: direction });
nodes.forEach((node) => {
dagreGraph.setNode(node.id, { width: nodeWidth, height: nodeHeight });
});
edges.forEach((edge) => {
dagreGraph.setEdge(edge.source, edge.target);
});
dagre.layout(dagreGraph);
nodes.forEach((node) => {
const nodeWithPosition = dagreGraph.node(node.id);
node.targetPosition = isHorizontal ? 'left' : 'top';
node.sourcePosition = isHorizontal ? 'right' : 'bottom';
// We are shifting the dagre node position (anchor=center center) to the top left
// so it matches the React Flow node anchor point (top left).
node.position = {
x: nodeWithPosition.x - nodeWidth / 2,
y: nodeWithPosition.y - nodeHeight / 2,
};
return node;
});
return { nodes, edges };
};
const { nodes: layoutedNodes, edges: layoutedEdges } = getLayoutedElements(
initialNodes,
initialEdges
);
const LayoutFlow = () => {
const [nodes, setNodes, onNodesChange] = useNodesState(layoutedNodes);
const [edges, setEdges, onEdgesChange] = useEdgesState(layoutedEdges);
const onConnect = useCallback(
(params) =>
setEdges((eds) =>
addEdge({ ...params, type: ConnectionLineType.SmoothStep, animated: true }, eds)
),
[]
);
const onLayout = useCallback(
(direction) => {
const { nodes: layoutedNodes, edges: layoutedEdges } = getLayoutedElements(
nodes,
edges,
direction
);
setNodes([...layoutedNodes]);
setEdges([...layoutedEdges]);
},
[nodes, edges]
);
return (
<ReactFlow
nodes={nodes}
edges={edges}
onNodesChange={onNodesChange}
onEdgesChange={onEdgesChange}
onConnect={onConnect}
connectionLineType={ConnectionLineType.SmoothStep}
fitView
>
<Panel position="top-right">
<button onClick={() => onLayout('TB')}>vertical layout</button>
<button onClick={() => onLayout('LR')}>horizontal layout</button>
</Panel>
</ReactFlow>
);
};
export default LayoutFlow;
<nodes-edges.js>
const position = { x: 0, y: 0 };
const edgeType = 'smoothstep';
export const initialNodes = [
{
id: '1',
type: 'input',
data: { label: 'input' },
position,
},
{
id: '2',
data: { label: 'node 2' },
position,
},
{
id: '2a',
data: { label: 'node 2a' },
position,
},
{
id: '2b',
data: { label: 'node 2b' },
position,
},
{
id: '2c',
data: { label: 'node 2c' },
position,
},
{
id: '2d',
data: { label: 'node 2d' },
position,
},
{
id: '3',
data: { label: 'node 3' },
position,
},
{
id: '4',
data: { label: 'node 4' },
position,
},
{
id: '5',
data: { label: 'node 5' },
position,
},
{
id: '6',
type: 'output',
data: { label: 'output' },
position,
},
{ id: '7', type: 'output', data: { label: 'output' }, position },
];
export const initialEdges = [
{ id: 'e12', source: '1', target: '2', type: edgeType, animated: true },
{ id: 'e13', source: '1', target: '3', type: edgeType, animated: true },
{ id: 'e22a', source: '2', target: '2a', type: edgeType, animated: true },
{ id: 'e22b', source: '2', target: '2b', type: edgeType, animated: true },
{ id: 'e22c', source: '2', target: '2c', type: edgeType, animated: true },
{ id: 'e2c2d', source: '2c', target: '2d', type: edgeType, animated: true },
{ id: 'e45', source: '4', target: '5', type: edgeType, animated: true },
{ id: 'e56', source: '5', target: '6', type: edgeType, animated: true },
{ id: 'e57', source: '5', target: '7', type: edgeType, animated: true },
];
참고 예제 코드로 구현된 CodeSandbox 및 캡쳐사진
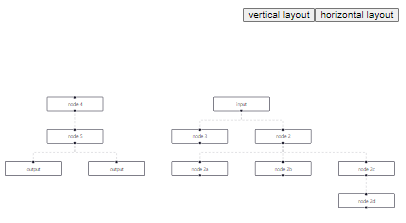
This example is a demonstration of static layouting. If the nodes or edges in the graph change, the layout won't recalculate! It is possible to do dynamic layouting with dagre (and other libraries), though: see the auto layout pro example for an example of this.
=> 이 예제는 정적 레이아웃의 시연입니다. 그래프의 노드나 엣지가 변경되면 레이아웃이 다시 계산되지 않습니다! 그러나 dagre (또는 다른 라이브러리)를 사용하여 동적 레이아웃도 가능합니다. 동적 레이아웃의 예로 자동 레이아웃 프로 예제를 참조하십시오.
Elkjs Tree
Like our dagre example, this example shows how you can integrate elkjs with React Flow for more advanced tree layouts. The code for this example builds a similar tree to the dagre example, but you can look at the reference here to see what you can configure (hint: it's a lot).
=> dagre 예제와 마찬가지로 이 예제는 더 고급 트리 레이아웃을 위해 elkjs를 React Flow와 통합하는 방법을 보여줍니다. 이 예제의 코드는 dagre 예제와 비슷한 트리를 구축하지만 구성할 수 있는 내용을 보려면 여기서 참조할 수 있습니다 (힌트: 많음).
참고 예제 코드
<App.js>
import { initialNodes, initialEdges } from './nodes-edges.js';
import ELK from 'elkjs/lib/elk.bundled.js';
import React, { useCallback, useLayoutEffect } from 'react';
import ReactFlow, {
ReactFlowProvider,
addEdge,
Panel,
useNodesState,
useEdgesState,
useReactFlow,
} from 'reactflow';
import 'reactflow/dist/style.css';
const elk = new ELK();
// Elk has a *huge* amount of options to configure. To see everything you can
// tweak check out:
//
// - https://www.eclipse.org/elk/reference/algorithms.html
// - https://www.eclipse.org/elk/reference/options.html
const elkOptions = {
'elk.algorithm': 'layered',
'elk.layered.spacing.nodeNodeBetweenLayers': '100',
'elk.spacing.nodeNode': '80',
};
const getLayoutedElements = (nodes, edges, options = {}) => {
const isHorizontal = options?.['elk.direction'] === 'RIGHT';
const graph = {
id: 'root',
layoutOptions: options,
children: nodes.map((node) => ({
...node,
// Adjust the target and source handle positions based on the layout
// direction.
targetPosition: isHorizontal ? 'left' : 'top',
sourcePosition: isHorizontal ? 'right' : 'bottom',
// Hardcode a width and height for elk to use when layouting.
width: 150,
height: 50,
})),
edges: edges,
};
return elk
.layout(graph)
.then((layoutedGraph) => ({
nodes: layoutedGraph.children.map((node) => ({
...node,
// React Flow expects a position property on the node instead of `x`
// and `y` fields.
position: { x: node.x, y: node.y },
})),
edges: layoutedGraph.edges,
}))
.catch(console.error);
};
function LayoutFlow() {
const [nodes, setNodes, onNodesChange] = useNodesState([]);
const [edges, setEdges, onEdgesChange] = useEdgesState([]);
const { fitView } = useReactFlow();
const onConnect = useCallback((params) => setEdges((eds) => addEdge(params, eds)), []);
const onLayout = useCallback(
({ direction, useInitialNodes = false }) => {
const opts = { 'elk.direction': direction, ...elkOptions };
const ns = useInitialNodes ? initialNodes : nodes;
const es = useInitialNodes ? initialEdges : edges;
getLayoutedElements(ns, es, opts).then(({ nodes: layoutedNodes, edges: layoutedEdges }) => {
setNodes(layoutedNodes);
setEdges(layoutedEdges);
window.requestAnimationFrame(() => fitView());
});
},
[nodes, edges]
);
// Calculate the initial layout on mount.
useLayoutEffect(() => {
onLayout({ direction: 'DOWN', useInitialNodes: true });
}, []);
return (
<ReactFlow
nodes={nodes}
edges={edges}
onConnect={onConnect}
onNodesChange={onNodesChange}
onEdgesChange={onEdgesChange}
fitView
>
<Panel position="top-right">
<button onClick={() => onLayout({ direction: 'DOWN' })}>vertical layout</button>
<button onClick={() => onLayout({ direction: 'RIGHT' })}>horizontal layout</button>
</Panel>
</ReactFlow>
);
}
export default () => (
<ReactFlowProvider>
<LayoutFlow />
</ReactFlowProvider>
);
<nodes-edges.js>
const position = { x: 0, y: 0 };
export const initialNodes = [
{
id: '1',
type: 'input',
data: { label: 'input' },
position,
},
{
id: '2',
data: { label: 'node 2' },
position,
},
{
id: '2a',
data: { label: 'node 2a' },
position,
},
{
id: '2b',
data: { label: 'node 2b' },
position,
},
{
id: '2c',
data: { label: 'node 2c' },
position,
},
{
id: '2d',
data: { label: 'node 2d' },
position,
},
{
id: '3',
data: { label: 'node 3' },
position,
},
{
id: '4',
data: { label: 'node 4' },
position,
},
{
id: '5',
data: { label: 'node 5' },
position,
},
{
id: '6',
type: 'output',
data: { label: 'output' },
position,
},
{ id: '7', type: 'output', data: { label: 'output' }, position },
];
export const initialEdges = [
{ id: 'e12', source: '1', target: '2', type: 'smoothstep' },
{ id: 'e13', source: '1', target: '3', type: 'smoothstep' },
{ id: 'e22a', source: '2', target: '2a', type: 'smoothstep' },
{ id: 'e22b', source: '2', target: '2b', type: 'smoothstep' },
{ id: 'e22c', source: '2', target: '2c', type: 'smoothstep' },
{ id: 'e2c2d', source: '2c', target: '2d', type: 'smoothstep' },
{ id: 'e45', source: '4', target: '5', type: 'smoothstep' },
{ id: 'e56', source: '5', target: '6', type: 'smoothstep' },
{ id: 'e57', source: '5', target: '7', type: 'smoothstep' },
];
참고 예제 코드로 구현된 CodeSandbox 및 캡쳐사진
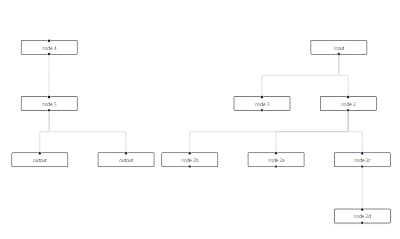
Elkjs Multiple Handles
This example demonstrates how to configure elkjs to use specific handles (called 'ports' in elkjs). This is helpful to reduce edge crossings and have more control over the layout. The important things to configure are unique ids for the handles / ports, the actual ports for elkjs with a correct side property and 'org.eclipse.elk.portConstraints' : 'FIXED_ORDER' for all nodes.
=> 이 예제는 elkjs를 구성하여 특정 핸들 (elkjs에서 '포트'라고 함)을 사용하는 방법을 보여줍니다. 이는 엣지 교차를 줄이고 레이아웃을 더 세밀하게 제어하는 데 도움이 됩니다. 구성해야 할 중요한 사항은 핸들/포트에 대한 고유한 ID, 올바른 측면 속성을 가진 elkjs의 실제 포트, 그리고 모든 노드에 대한 'org.eclipse.elk.portConstraints': 'FIXED_ORDER'입니다.
참고 예제 코드
<App.js>
import ReactFlow, {
Controls,
Background,
MiniMap,
useNodesState,
useEdgesState,
ReactFlowProvider,
} from 'reactflow';
import 'reactflow/dist/style.css';
import './index.css';
import ElkNode from './ElkNode';
import { nodes as initNodes } from './nodes';
import { edges as initEdges } from './edges';
import useLayoutNodes from './useLayoutNodes';
const nodeTypes = {
elk: ElkNode,
};
function App() {
const [nodes, , onNodesChange] = useNodesState(initNodes);
const [edges, , onEdgesChange] = useEdgesState(initEdges);
useLayoutNodes();
return (
<ReactFlow
nodes={nodes}
onNodesChange={onNodesChange}
edges={edges}
onEdgesChange={onEdgesChange}
fitView
nodeTypes={nodeTypes}
>
<Background />
<Controls />
<MiniMap />
</ReactFlow>
);
}
export default () => (
<ReactFlowProvider>
<App />
</ReactFlowProvider>
);
<useLayoutNodes.ts>
import { useEffect } from 'react';
import ELK from 'elkjs/lib/elk.bundled.js';
import { Edge, useNodesInitialized, useReactFlow } from 'reactflow';
import { ElkNode, ElkNodeData } from './nodes';
// elk layouting options can be found here:
// https://www.eclipse.org/elk/reference/algorithms/org-eclipse-elk-layered.html
const layoutOptions = {
'elk.algorithm': 'layered',
'elk.direction': 'RIGHT',
'elk.layered.spacing.edgeNodeBetweenLayers': '40',
'elk.spacing.nodeNode': '40',
'elk.layered.nodePlacement.strategy': 'SIMPLE',
};
const elk = new ELK();
// uses elkjs to give each node a layouted position
export const getLayoutedNodes = async (nodes: ElkNode[], edges: Edge[]) => {
const graph = {
id: 'root',
layoutOptions,
children: nodes.map((n) => {
const targetPorts = n.data.targetHandles.map((t) => ({
id: t.id,
// ⚠️ it's important to let elk know on which side the port is
// in this example targets are on the left (WEST) and sources on the right (EAST)
properties: {
side: 'WEST',
},
}));
const sourcePorts = n.data.sourceHandles.map((s) => ({
id: s.id,
properties: {
side: 'EAST',
},
}));
return {
id: n.id,
width: n.width ?? 150,
height: n.height ?? 50,
// ⚠️ we need to tell elk that the ports are fixed, in order to reduce edge crossings
properties: {
'org.eclipse.elk.portConstraints': 'FIXED_ORDER',
},
// we are also passing the id, so we can also handle edges without a sourceHandle or targetHandle option
ports: [{ id: n.id }, ...targetPorts, ...sourcePorts],
};
}),
edges: edges.map((e) => ({
id: e.id,
sources: [e.sourceHandle || e.source],
targets: [e.targetHandle || e.target],
})),
};
const layoutedGraph = await elk.layout(graph);
const layoutedNodes = nodes.map((node) => {
const layoutedNode = layoutedGraph.children?.find(
(lgNode) => lgNode.id === node.id,
);
return {
...node,
position: {
x: layoutedNode?.x ?? 0,
y: layoutedNode?.y ?? 0,
},
};
});
return layoutedNodes;
};
export default function useLayoutNodes() {
const nodesInitialized = useNodesInitialized();
const { getNodes, getEdges, setNodes, fitView } = useReactFlow<ElkNodeData>();
useEffect(() => {
if (nodesInitialized) {
const layoutNodes = async () => {
const layoutedNodes = await getLayoutedNodes(
getNodes() as ElkNode[],
getEdges(),
);
setNodes(layoutedNodes);
setTimeout(() => fitView(), 0);
};
layoutNodes();
}
}, [nodesInitialized, getNodes, getEdges, setNodes, fitView]);
return null;
}
<nodes.ts>
import { Node } from 'reactflow';
export type ElkNodeData = {
label: string;
sourceHandles: { id: string }[];
targetHandles: { id: string }[];
};
export type ElkNode = Node<ElkNodeData, 'elk'>;
export const nodes: ElkNode[] = [
{
id: 'a',
data: {
label: 'A',
// we need unique ids for the handles (called 'ports' in elkjs) for the layouting
// an id is structured like: nodeid-source/target-id
sourceHandles: [{ id: 'a-s-a' }, { id: 'a-s-b' }, { id: 'a-s-c' }],
targetHandles: [],
},
position: { x: 0, y: 0 },
type: 'elk',
},
{
id: 'b',
data: {
label: 'B',
sourceHandles: [{ id: 'b-s-a' }, { id: 'b-s-b' }],
targetHandles: [{ id: 'b-t-a' }, { id: 'b-t-b' }, { id: 'b-t-c' }],
},
position: { x: 0, y: 0 },
type: 'elk',
},
{
id: 'c',
data: {
label: 'C',
sourceHandles: [{ id: 'c-s-a' }, { id: 'c-s-b' }],
targetHandles: [{ id: 'c-t-a' }, { id: 'c-t-b' }, { id: 'c-t-c' }],
},
position: { x: 0, y: 0 },
type: 'elk',
},
{
id: 'd',
data: {
label: 'D',
sourceHandles: [{ id: 'd-s-a' }],
targetHandles: [{ id: 'd-t-a' }, { id: 'd-t-b' }, { id: 'd-t-c' }],
},
position: { x: 0, y: 0 },
type: 'elk',
},
{
id: 'e',
data: {
label: 'E',
sourceHandles: [{ id: 'e-s-a' }],
targetHandles: [{ id: 'e-t-a' }],
},
position: { x: 0, y: 0 },
type: 'elk',
},
{
id: 'f',
data: {
label: 'F',
sourceHandles: [{ id: 'f-s-a' }],
targetHandles: [{ id: 'f-t-a' }, { id: 'f-t-b' }],
},
position: { x: 0, y: 0 },
type: 'elk',
},
{
id: 'g',
data: {
label: 'G',
sourceHandles: [{ id: 'g-s-a' }],
targetHandles: [{ id: 'g-t-a' }, { id: 'g-t-b' }],
},
position: { x: 0, y: 0 },
type: 'elk',
},
];
<edges.ts>
import { Edge } from 'reactflow';
export const edges: Edge[] = [
{
id: 'a-b',
source: 'a',
sourceHandle: 'a-s-a',
target: 'b',
targetHandle: 'b-t-a',
},
{
id: 'a-c',
source: 'a',
sourceHandle: 'a-s-c',
target: 'c',
targetHandle: 'c-t-c',
},
{
id: 'a-d',
source: 'a',
sourceHandle: 'a-s-b',
target: 'd',
targetHandle: 'd-t-b',
},
{
id: 'b-e',
source: 'b',
sourceHandle: 'b-s-a',
target: 'e',
targetHandle: 'e-t-a',
},
{
id: 'd-e',
source: 'd',
sourceHandle: 'd-s-a',
target: 'e',
targetHandle: 'e-t-a',
},
{
id: 'e-f',
source: 'e',
sourceHandle: 'e-s-a',
target: 'f',
targetHandle: 'f-t-b',
},
{
id: 'e-g',
source: 'e',
sourceHandle: 'e-s-a',
target: 'g',
targetHandle: 'g-t-a',
},
];
<ElkNode.tsx>
import { Handle, NodeProps, Position } from 'reactflow';
import { ElkNodeData } from './nodes';
export default function ElkNode({ data }: NodeProps<ElkNodeData>) {
return (
<>
<div className="handles targets">
{data.targetHandles.map((handle) => (
<Handle
key={handle.id}
id={handle.id}
type="target"
position={Position.Left}
/>
))}
</div>
<div className="label">{data.label}</div>
<div className="handles sources">
{data.sourceHandles.map((handle) => (
<Handle
key={handle.id}
id={handle.id}
type="source"
position={Position.Right}
/>
))}
</div>
</>
);
}
<index.css>
.react-flow__node-elk {
background: #f8f8f8;
border-radius: 4px;
}
.react-flow__handle {
position: relative;
top: auto;
transform: none;
background: #224466;
}
.label {
padding: 10px;
font-size: 12px;
}
.label {
flex-grow: 1;
}
.handles {
display: flex;
flex-direction: column;
justify-content: space-around;
width: 10px;
height: 100%;
position: absolute;
}
.handles.sources {
right: -2px;
top: 0;
}
참고 예제 코드로 구현된 CodeSandbox 및 캡쳐사진
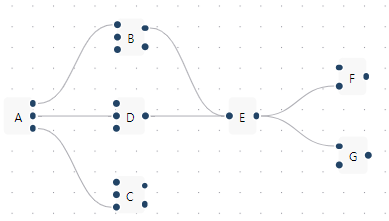
Interaction
Interaction Props
This example shows the different props like nodesDraggable, zoomOnScroll or panOnDrag that control the interactivity of a diagram. You can find a list with all props that can be used to manage the interactivity in the interaction props section.
=> 이 예제는 다양한 프로퍼티인 nodesDraggable, zoomOnScroll, panOnDrag 등이 도표의 상호 작용을 제어하는 방법을 보여줍니다. 상호 작용을 관리하는 데 사용할 수 있는 모든 프로퍼티 목록은 interaction props 섹션에서 찾을 수 있습니다.
참고 예제 코드
import React, { useState, useCallback } from 'react';
import ReactFlow, {
useNodesState,
useEdgesState,
addEdge,
MiniMap,
Controls,
Panel,
} from 'reactflow';
import 'reactflow/dist/style.css';
const initialNodes = [
{
id: 'interaction-1',
type: 'input',
data: { label: 'Node 1' },
position: { x: 250, y: 5 },
},
{
id: 'interaction-2',
data: { label: 'Node 2' },
position: { x: 100, y: 100 },
},
{
id: 'interaction-3',
data: { label: 'Node 3' },
position: { x: 400, y: 100 },
},
{
id: 'interaction-4',
data: { label: 'Node 4' },
position: { x: 400, y: 200 },
},
];
const initialEdges = [
{
id: 'interaction-e1-2',
source: 'interaction-1',
target: 'interaction-2',
animated: true,
},
{ id: 'interaction-e1-3', source: 'interaction-1', target: 'interaction-3' },
];
const onNodeDragStart = (event, node) => console.log('drag start', node);
const onNodeDragStop = (event, node) => console.log('drag stop', node);
const onNodeClick = (event, node) => console.log('click node', node);
const onPaneClick = (event) => console.log('onPaneClick', event);
const onPaneScroll = (event) => console.log('onPaneScroll', event);
const onPaneContextMenu = (event) => console.log('onPaneContextMenu', event);
const InteractionFlow = () => {
const [nodes, setNodes, onNodesChange] = useNodesState(initialNodes);
const [edges, setEdges, onEdgesChange] = useEdgesState(initialEdges);
const onConnect = useCallback((params) => setEdges((els) => addEdge(params, els)), []);
const [isSelectable, setIsSelectable] = useState(false);
const [isDraggable, setIsDraggable] = useState(false);
const [isConnectable, setIsConnectable] = useState(false);
const [zoomOnScroll, setZoomOnScroll] = useState(false);
const [panOnScroll, setPanOnScroll] = useState(false);
const [panOnScrollMode, setPanOnScrollMode] = useState('free');
const [zoomOnDoubleClick, setZoomOnDoubleClick] = useState(false);
const [panOnDrag, setpanOnDrag] = useState(true);
const [captureZoomClick, setCaptureZoomClick] = useState(false);
const [captureZoomScroll, setCaptureZoomScroll] = useState(false);
const [captureElementClick, setCaptureElementClick] = useState(false);
return (
<ReactFlow
nodes={nodes}
edges={edges}
onNodesChange={onNodesChange}
onEdgesChange={onEdgesChange}
elementsSelectable={isSelectable}
nodesConnectable={isConnectable}
nodesDraggable={isDraggable}
zoomOnScroll={zoomOnScroll}
panOnScroll={panOnScroll}
panOnScrollMode={panOnScrollMode}
zoomOnDoubleClick={zoomOnDoubleClick}
onConnect={onConnect}
onNodeClick={captureElementClick ? onNodeClick : undefined}
onNodeDragStart={onNodeDragStart}
onNodeDragStop={onNodeDragStop}
panOnDrag={panOnDrag}
onPaneClick={captureZoomClick ? onPaneClick : undefined}
onPaneScroll={captureZoomScroll ? onPaneScroll : undefined}
onPaneContextMenu={captureZoomClick ? onPaneContextMenu : undefined}
fitView
attributionPosition="top-right"
>
<MiniMap />
<Controls />
<Panel position="topleft">
<div>
<label htmlFor="draggable">
<input
id="draggable"
type="checkbox"
checked={isDraggable}
onChange={(event) => setIsDraggable(event.target.checked)}
className="react-flow__draggable"
/>
nodesDraggable
</label>
</div>
<div>
<label htmlFor="connectable">
<input
id="connectable"
type="checkbox"
checked={isConnectable}
onChange={(event) => setIsConnectable(event.target.checked)}
className="react-flow__connectable"
/>
nodesConnectable
</label>
</div>
<div>
<label htmlFor="selectable">
<input
id="selectable"
type="checkbox"
checked={isSelectable}
onChange={(event) => setIsSelectable(event.target.checked)}
className="react-flow__selectable"
/>
elementsSelectable
</label>
</div>
<div>
<label htmlFor="zoomonscroll">
<input
id="zoomonscroll"
type="checkbox"
checked={zoomOnScroll}
onChange={(event) => setZoomOnScroll(event.target.checked)}
className="react-flow__zoomonscroll"
/>
zoomOnScroll
</label>
</div>
<div>
<label htmlFor="panonscroll">
<input
id="panonscroll"
type="checkbox"
checked={panOnScroll}
onChange={(event) => setPanOnScroll(event.target.checked)}
className="react-flow__panonscroll"
/>
panOnScroll
</label>
</div>
<div>
<label htmlFor="panonscrollmode">
<select
id="panonscrollmode"
value={panOnScrollMode}
onChange={(event) => setPanOnScrollMode(event.target.value)}
className="react-flow__panonscrollmode"
>
<option value="free">free</option>
<option value="horizontal">horizontal</option>
<option value="vertical">vertical</option>
</select>
panOnScrollMode
</label>
</div>
<div>
<label htmlFor="zoomondbl">
<input
id="zoomondbl"
type="checkbox"
checked={zoomOnDoubleClick}
onChange={(event) => setZoomOnDoubleClick(event.target.checked)}
className="react-flow__zoomondbl"
/>
zoomOnDoubleClick
</label>
</div>
<div>
<label htmlFor="panOnDrag">
<input
id="panOnDrag"
type="checkbox"
checked={panOnDrag}
onChange={(event) => setpanOnDrag(event.target.checked)}
className="react-flow__panOnDrag"
/>
panOnDrag
</label>
</div>
<div>
<label htmlFor="capturezoompaneclick">
<input
id="capturezoompaneclick"
type="checkbox"
checked={captureZoomClick}
onChange={(event) => setCaptureZoomClick(event.target.checked)}
className="react-flow__capturezoompaneclick"
/>
capture onPaneClick
</label>
</div>
<div>
<label htmlFor="capturezoompanescroll">
<input
id="capturezoompanescroll"
type="checkbox"
checked={captureZoomScroll}
onChange={(event) => setCaptureZoomScroll(event.target.checked)}
className="react-flow__capturezoompanescroll"
/>
capture onPaneScroll
</label>
</div>
<div>
<label htmlFor="captureelementclick">
<input
id="captureelementclick"
type="checkbox"
checked={captureElementClick}
onChange={(event) => setCaptureElementClick(event.target.checked)}
className="react-flow__captureelementclick"
/>
capture onElementClick
</label>
</div>
</Panel>
</ReactFlow>
);
};
export default InteractionFlow;
참고 예제 코드로 구현된 CodeSandbox 및 캡쳐사진
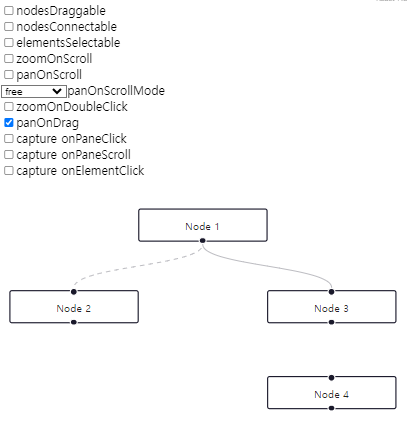
Drag and Drop
A drag and drop user interface is very common for node-based workflow editors. The drag and drop behaviour outside of the React Flow pane is not built in but can be implemented with the native HTML Drag and Drop API (used in this example) or a third party library like react-draggable.
=> 드래그 앤 드롭 사용자 인터페이스는 노드 기반의 워크플로 편집기에서 매우 일반적입니다. React Flow 패널 외부의 드래그 앤 드롭 동작은 내장되어 있지 않지만 네이티브 HTML 드래그 앤 드롭 API (이 예제에서 사용됨) 또는 react-draggable과 같은 써드 파티 라이브러리를 사용하여 구현할 수 있습니다.
참고 예제 코드
<App.js>
import React, { useState, useRef, useCallback } from 'react';
import ReactFlow, {
ReactFlowProvider,
addEdge,
useNodesState,
useEdgesState,
Controls,
} from 'reactflow';
import 'reactflow/dist/style.css';
import Sidebar from './Sidebar';
import './index.css';
const initialNodes = [
{
id: '1',
type: 'input',
data: { label: 'input node' },
position: { x: 250, y: 5 },
},
];
let id = 0;
const getId = () => `dndnode_${id++}`;
const DnDFlow = () => {
const reactFlowWrapper = useRef(null);
const [nodes, setNodes, onNodesChange] = useNodesState(initialNodes);
const [edges, setEdges, onEdgesChange] = useEdgesState([]);
const [reactFlowInstance, setReactFlowInstance] = useState(null);
const onConnect = useCallback(
(params) => setEdges((eds) => addEdge(params, eds)),
[],
);
const onDragOver = useCallback((event) => {
event.preventDefault();
event.dataTransfer.dropEffect = 'move';
}, []);
const onDrop = useCallback(
(event) => {
event.preventDefault();
const type = event.dataTransfer.getData('application/reactflow');
// check if the dropped element is valid
if (typeof type === 'undefined' || !type) {
return;
}
// reactFlowInstance.project was renamed to reactFlowInstance.screenToFlowPosition
// and you don't need to subtract the reactFlowBounds.left/top anymore
// details: https://reactflow.dev/whats-new/2023-11-10
const position = reactFlowInstance.screenToFlowPosition({
x: event.clientX,
y: event.clientY,
});
const newNode = {
id: getId(),
type,
position,
data: { label: `${type} node` },
};
setNodes((nds) => nds.concat(newNode));
},
[reactFlowInstance],
);
return (
<div className="dndflow">
<ReactFlowProvider>
<div className="reactflow-wrapper" ref={reactFlowWrapper}>
<ReactFlow
nodes={nodes}
edges={edges}
onNodesChange={onNodesChange}
onEdgesChange={onEdgesChange}
onConnect={onConnect}
onInit={setReactFlowInstance}
onDrop={onDrop}
onDragOver={onDragOver}
fitView
>
<Controls />
</ReactFlow>
</div>
<Sidebar />
</ReactFlowProvider>
</div>
);
};
export default DnDFlow;
<Sidebar.js>
import React from 'react';
export default () => {
const onDragStart = (event, nodeType) => {
event.dataTransfer.setData('application/reactflow', nodeType);
event.dataTransfer.effectAllowed = 'move';
};
return (
<aside>
<div className="description">You can drag these nodes to the pane on the right.</div>
<div className="dndnode input" onDragStart={(event) => onDragStart(event, 'input')} draggable>
Input Node
</div>
<div className="dndnode" onDragStart={(event) => onDragStart(event, 'default')} draggable>
Default Node
</div>
<div className="dndnode output" onDragStart={(event) => onDragStart(event, 'output')} draggable>
Output Node
</div>
</aside>
);
};
<index.css>
.dndflow {
flex-direction: column;
display: flex;
flex-grow: 1;
height: 100%;
}
.dndflow aside {
border-right: 1px solid #eee;
padding: 15px 10px;
font-size: 12px;
background: #fcfcfc;
}
.dndflow aside .description {
margin-bottom: 10px;
}
.dndflow .dndnode {
height: 20px;
padding: 4px;
border: 1px solid #1a192b;
border-radius: 2px;
margin-bottom: 10px;
display: flex;
justify-content: center;
align-items: center;
cursor: grab;
}
.dndflow .dndnode.input {
border-color: #0041d0;
}
.dndflow .dndnode.output {
border-color: #ff0072;
}
.dndflow .reactflow-wrapper {
flex-grow: 1;
height: 100%;
}
.dndflow .selectall {
margin-top: 10px;
}
@media screen and (min-width: 768px) {
.dndflow {
flex-direction: row;
}
.dndflow aside {
width: 20%;
max-width: 250px;
}
}
참고 예제 코드로 구현된 CodeSandbox 및 캡쳐사진

Validation
Custom nodes need to have at least one Handle component to be connectable. You can pass a validation function isValidConnection to the ReactFlow component in order to check if a new connection is valid and should be added.
=> 검증
사용자 정의 노드는 연결 가능하도록 하려면 적어도 하나의 핸들 구성 요소가 있어야 합니다. 새로운 연결이 유효하고 추가되어야 하는지 확인하려면 isValidConnection 검증 함수를 ReactFlow 컴포넌트에 전달할 수 있습니다.
참고 예제 코드
<App.js>
import React, { useCallback } from 'react';
import ReactFlow, { useNodesState, useEdgesState, addEdge, Handle, Position } from 'reactflow';
import 'reactflow/dist/style.css';
import './index.css';
const initialNodes = [
{ id: '0', type: 'custominput', position: { x: 0, y: 150 } },
{ id: 'A', type: 'customnode', position: { x: 250, y: 0 } },
{ id: 'B', type: 'customnode', position: { x: 250, y: 150 } },
{ id: 'C', type: 'customnode', position: { x: 250, y: 300 } },
];
const isValidConnection = (connection) => connection.target === 'B';
const onConnectStart = (_, { nodeId, handleType }) =>
console.log('on connect start', { nodeId, handleType });
const onConnectEnd = (event) => console.log('on connect end', event);
const CustomInput = () => (
<>
<div>Only connectable with B</div>
<Handle type="source" position={Position.Right} />
</>
);
const CustomNode = ({ id }) => (
<>
<Handle type="target" position={Position.Left} />
<div>{id}</div>
<Handle type="source" position={Position.Right} />
</>
);
const nodeTypes = {
custominput: CustomInput,
customnode: CustomNode,
};
const ValidationFlow = () => {
const [nodes, setNodes, onNodesChange] = useNodesState(initialNodes);
const [edges, setEdges, onEdgesChange] = useEdgesState([]);
const onConnect = useCallback((params) => setEdges((els) => addEdge(params, els)), []);
return (
<ReactFlow
nodes={nodes}
edges={edges}
onNodesChange={onNodesChange}
onEdgesChange={onEdgesChange}
onConnect={onConnect}
isValidConnection={isValidConnection}
selectNodesOnDrag={false}
className="validationflow"
nodeTypes={nodeTypes}
onConnectStart={onConnectStart}
onConnectEnd={onConnectEnd}
fitView
attributionPosition="bottom-left"
/>
);
};
export default ValidationFlow;
<index.css>
.validationflow .react-flow__node {
width: 150px;
border-radius: 5px;
padding: 10px;
color: #555;
border: 1px solid #ddd;
text-align: center;
font-size: 12px;
}
.validationflow .react-flow__node-customnode {
background: #e6e6e9;
border: 1px solid #ddd;
}
.react-flow__node-custominput .react-flow__handle {
background: #e6e6e9;
}
.validationflow .react-flow__node-custominput {
background: #fff;
}
.validationflow .react-flow__handle-connecting {
background: #ff6060;
}
.validationflow .react-flow__handle-valid {
background: #55dd99;
}참고 예제 코드로 구현된 CodeSandbox 및 캡쳐사진
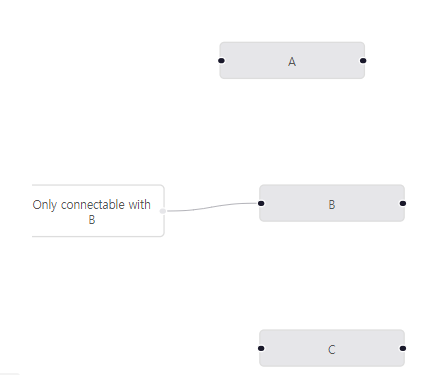
Preventing cycles
In the validation example, we saw how to use the isValidConnection callback to prevent certain connections from being created. This example shows how to use the getOutgoers util to check if a new connection would cause a cycle in the flow.
=> 검증 예제에서는 isValidConnection 콜백을 사용하여 특정 연결을 생성하지 못하게 하는 방법을 살펴보았습니다. 이 예제에서는 getOutgoers 유틸을 사용하여 새로운 연결이 플로우에 순환을 일으키는지 확인하는 방법을 보여줍니다.
참고 예제 코드
<App.js>
import React, { useCallback } from 'react';
import ReactFlow, {
Background,
useNodesState,
useEdgesState,
addEdge,
getOutgoers,
useReactFlow,
ReactFlowProvider,
} from 'reactflow';
import { nodes as initialNodes, edges as initialEdges } from './nodes-edges';
import 'reactflow/dist/style.css';
const Flow = () => {
const [nodes, setNodes, onNodesChange] = useNodesState(initialNodes);
const [edges, setEdges, onEdgesChange] = useEdgesState(initialEdges);
const { getNodes, getEdges } = useReactFlow();
const isValidConnection = useCallback(
(connection) => {
// we are using getNodes and getEdges helpers here
// to make sure we create isValidConnection function only once
const nodes = getNodes();
const edges = getEdges();
const target = nodes.find((node) => node.id === connection.target);
const hasCycle = (node, visited = new Set()) => {
if (visited.has(node.id)) return false;
visited.add(node.id);
for (const outgoer of getOutgoers(node, nodes, edges)) {
if (outgoer.id === connection.source) return true;
if (hasCycle(outgoer, visited)) return true;
}
};
if (target.id === connection.source) return false;
return !hasCycle(target);
},
[getNodes, getEdges],
);
const onConnect = useCallback((params) =>
setEdges((els) => addEdge(params, els)),
);
return (
<ReactFlow
nodes={nodes}
edges={edges}
onNodesChange={onNodesChange}
onEdgesChange={onEdgesChange}
onConnect={onConnect}
isValidConnection={isValidConnection}
fitView
>
<Background />
</ReactFlow>
);
};
export default () => (
<ReactFlowProvider>
<Flow />
</ReactFlowProvider>
);
<nodes-edges.js>
export const nodes = [
{
id: '1',
position: { x: 0, y: 9 },
data: { label: 'A' },
},
{
id: '2',
position: { x: 125, y: 125 },
data: { label: 'B' },
},
{
id: '3',
position: { x: 0, y: 250 },
data: { label: 'C' },
},
{
id: '4',
position: { x: -125, y: 125 },
data: { label: 'C' },
},
];
export const edges = [
{
id: 'e1-2',
source: '1',
target: '2',
},
];
참고 예제 코드로 구현된 CodeSandbox 및 캡쳐사진
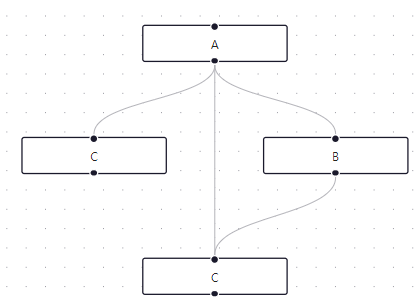
Touch Device
You can connect nodes on a touch device by tapping two handles in a row. In this example we increased the size of the handles so that they are better tappable. You can disable this behavoir by setting the connectOnClick prop to false.
=> 터치 디바이스에서는 두 개의 핸들을 연속으로 탭하여 노드를 연결할 수 있습니다. 이 예제에서는 핸들의 크기를 크게하여 탭하기 더 쉽도록 했습니다. connectOnClick prop을 false로 설정하여 이 동작을 비활성화할 수 있습니다.
참고 예제 코드
<App.js>
import { useCallback } from 'react';
import ReactFlow, { useNodesState, useEdgesState, Position, addEdge } from 'reactflow';
import 'reactflow/dist/style.css';
import './index.css';
const initialNodes = [
{
id: '1',
data: { label: 'Node 1' },
position: { x: 100, y: 100 },
sourcePosition: Position.Right,
targetPosition: Position.Left,
},
{
id: '2',
data: { label: 'Node 2' },
position: { x: 300, y: 100 },
sourcePosition: Position.Right,
targetPosition: Position.Left,
},
];
const initialEdges = [];
const TouchDeviceFlow = () => {
const [nodes, , onNodesChange] = useNodesState(initialNodes);
const [edges, setEdges, onEdgesChange] = useEdgesState(initialEdges);
const onConnect = useCallback((connection) => setEdges((eds) => addEdge(connection, eds)), []);
return (
<ReactFlow
nodes={nodes}
edges={edges}
onConnect={onConnect}
onNodesChange={onNodesChange}
onEdgesChange={onEdgesChange}
className="touchdevice-flow"
fitView
/>
);
};
export default TouchDeviceFlow;
<index.css>
.touchdevice-flow .react-flow__handle {
width: 20px;
height: 20px;
border-radius: 3px;
background-color: #9f7aea;
}
.touchdevice-flow .react-flow__handle.connecting {
animation: bounce 1600ms infinite ease-out;
}
@keyframes bounce {
0% {
transform: translate(0, -50%) scale(1);
}
50% {
transform: translate(0, -50%) scale(1.1);
}
}
참고 예제 코드로 구현된 CodeSandbox 및 캡쳐사진
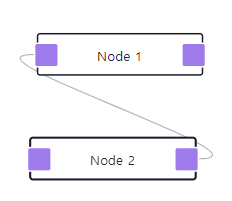
Save and Restore
If you want to save and restore a flow you can use the toObject function of the React Flow instance or your local nodes and edges state. In this example you can move nodes around, add ones and save the diagram. Then reload the page and click restore to restore your diagram.
=> 저장 및 복원
플로우를 저장하고 복원하려면 React Flow 인스턴스의 toObject 함수나 로컬 노드 및 엣지 상태를 사용할 수 있습니다. 이 예제에서는 노드를 이동하고 추가하고 다이어그램을 저장할 수 있습니다. 그런 다음 페이지를 다시로드하고 복원을 클릭하여 다이어그램을 복원할 수 있습니다.
참고 예제 코드
import React, { useState, useCallback } from 'react';
import ReactFlow, {
ReactFlowProvider,
useNodesState,
useEdgesState,
addEdge,
useReactFlow,
Panel,
} from 'reactflow';
import 'reactflow/dist/style.css';
const flowKey = 'example-flow';
const getNodeId = () => `randomnode_${+new Date()}`;
const initialNodes = [
{ id: '1', data: { label: 'Node 1' }, position: { x: 100, y: 100 } },
{ id: '2', data: { label: 'Node 2' }, position: { x: 100, y: 200 } },
];
const initialEdges = [{ id: 'e1-2', source: '1', target: '2' }];
const SaveRestore = () => {
const [nodes, setNodes, onNodesChange] = useNodesState(initialNodes);
const [edges, setEdges, onEdgesChange] = useEdgesState(initialEdges);
const [rfInstance, setRfInstance] = useState(null);
const { setViewport } = useReactFlow();
const onConnect = useCallback((params) => setEdges((eds) => addEdge(params, eds)), [setEdges]);
const onSave = useCallback(() => {
if (rfInstance) {
const flow = rfInstance.toObject();
localStorage.setItem(flowKey, JSON.stringify(flow));
}
}, [rfInstance]);
const onRestore = useCallback(() => {
const restoreFlow = async () => {
const flow = JSON.parse(localStorage.getItem(flowKey));
if (flow) {
const { x = 0, y = 0, zoom = 1 } = flow.viewport;
setNodes(flow.nodes || []);
setEdges(flow.edges || []);
setViewport({ x, y, zoom });
}
};
restoreFlow();
}, [setNodes, setViewport]);
const onAdd = useCallback(() => {
const newNode = {
id: getNodeId(),
data: { label: 'Added node' },
position: {
x: Math.random() * window.innerWidth - 100,
y: Math.random() * window.innerHeight,
},
};
setNodes((nds) => nds.concat(newNode));
}, [setNodes]);
return (
<ReactFlow
nodes={nodes}
edges={edges}
onNodesChange={onNodesChange}
onEdgesChange={onEdgesChange}
onConnect={onConnect}
onInit={setRfInstance}
>
<Panel position="top-right">
<button onClick={onSave}>save</button>
<button onClick={onRestore}>restore</button>
<button onClick={onAdd}>add node</button>
</Panel>
</ReactFlow>
);
};
export default () => (
<ReactFlowProvider>
<SaveRestore />
</ReactFlowProvider>
);
참고 예제 코드로 구현된 CodeSandbox 및 캡쳐사진
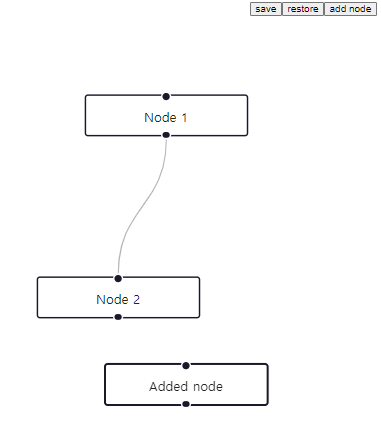
Collision Detection
This example shows a simple method to find out if two nodes overlap each other. It can be useful for interactively grouping or connecting nodes.
=> 충돌 감지
이 예제는 두 개의 노드가 서로 겹치는지 확인하는 간단한 방법을 보여줍니다. 노드를 상호작용적으로 그룹화하거나 연결하는 데 유용할 수 있습니다.
참고 예제 코드
<App.js>
import React, { useEffect, useState, useRef } from 'react';
import ReactFlow, { useNodesState, useEdgesState, Panel } from 'reactflow';
import { nodes as initialNodes, edges as initialEdges } from './initial-elements';
import 'reactflow/dist/style.css';
import './style.css';
const panelStyle = {
fontSize: 12,
color: '#777',
};
const CollisionDetectionFlow = () => {
// this ref stores the current dragged node
const dragRef = useRef(null);
// target is the node that the node is dragged over
const [target, setTarget] = useState(null);
const [nodes, setNodes, onNodesChange] = useNodesState(initialNodes);
const [edges, setEdges, onEdgesChange] = useEdgesState(initialEdges);
const onNodeDragStart = (evt, node) => {
dragRef.current = node;
};
const onNodeDrag = (evt, node) => {
// calculate the center point of the node from position and dimensions
const centerX = node.position.x + node.width / 2;
const centerY = node.position.y + node.height / 2;
// find a node where the center point is inside
const targetNode = nodes.find(
(n) =>
centerX > n.position.x &&
centerX < n.position.x + n.width &&
centerY > n.position.y &&
centerY < n.position.y + n.height &&
n.id !== node.id // this is needed, otherwise we would always find the dragged node
);
setTarget(targetNode);
};
const onNodeDragStop = (evt, node) => {
// on drag stop, we swap the colors of the nodes
const nodeColor = node.data.label;
const targetColor = target?.data.label;
setNodes((nodes) =>
nodes.map((n) => {
if (n.id === target?.id) {
n.data = { ...n.data, color: nodeColor, label: nodeColor };
}
if (n.id === node.id && target) {
n.data = { ...n.data, color: targetColor, label: targetColor };
}
return n;
})
);
setTarget(null);
dragRef.current = null;
};
useEffect(() => {
// whenever the target changes, we swap the colors temporarily
// this is just a placeholder, implement your own logic here
setNodes((nodes) =>
nodes.map((node) => {
if (node.id === target?.id) {
node.style = { ...node.style, backgroundColor: dragRef.current?.data.color };
node.data = { ...node.data, label: dragRef.current?.data.color };
} else if (node.id === dragRef.current?.id && target) {
node.style = { ...node.style, backgroundColor: target.data.color };
node.data = { ...node.data, label: target.data.color };
} else {
node.style = { ...node.style, backgroundColor: node.data.color };
node.data = { ...node.data, label: node.data.color };
}
return node;
})
);
}, [target]);
return (
<div className="container">
<ReactFlow
nodes={nodes}
edges={edges}
onNodesChange={onNodesChange}
onEdgesChange={onEdgesChange}
fitView
onNodeDragStart={onNodeDragStart}
onNodeDrag={onNodeDrag}
onNodeDragStop={onNodeDragStop}
>
<Panel position="top-left" style={panelStyle}>
Drop any node on top of another node to swap their colors
</Panel>
</ReactFlow>
</div>
);
};
export default CollisionDetectionFlow;
<initial-elements.js>
export const nodes = [
{
id: '1',
data: {
label: '#ffc800',
color: '#ffc800',
},
position: { x: 0, y: 0 },
},
{
id: '2',
data: {
label: '#6865A5',
color: '#6865A5',
},
position: { x: 150, y: 0 },
},
{
id: '3',
data: {
label: '#ff6700',
color: '#ff6700',
},
position: { x: 50, y: 100 },
},
{
id: '4',
data: {
label: '#0041d0',
color: '#0041d0',
},
position: { x: 200, y: 100 },
},
{
id: '5',
data: {
label: '#ff0072',
color: '#ff0072',
},
position: { x: 0, y: 200 },
},
{
id: '6',
data: {
label: '#00d7ca',
color: '#00d7ca',
},
position: { x: 150, y: 200 },
},
{
id: '7',
data: {
label: '#6ede87',
color: '#6ede87',
},
position: { x: 50, y: 300 },
},
{
id: '8',
data: {
label: '#9ca8b3',
color: '#9ca8b3',
},
position: { x: 200, y: 300 },
},
];
export const edges = [];
<style.css>
.container {
width: 100%;
height: 100%;
position: relative;
}
.react-flow__handle {
display: none;
}
.react-flow__node {
transition: background-color 0.3s, padding-left 0.3s, padding-right 0.3s;
border-radius: 20px;
padding: 10px 10px;
width: auto;
border-width: 2px;
font-weight: bold;
text-transform: uppercase;
font-family: monospace;
}
.react-flow__node.dragging {
padding: 5px 5px;
}
.react-flow__node.is-dropzone {
border-style: dashed;
}
참고 예제 코드로 구현된 CodeSandbox 및 캡쳐사진
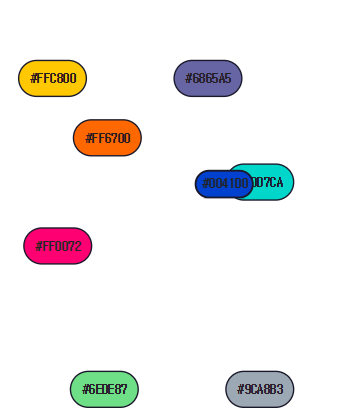
Zoom Transitions
Smooth transitions from one viewport to another are built-in. You can pass a duration option parameter to define the animation duration for every function that alters the viewport (zoomIn, zoomOut, zoomTo, setViewport, fitView, setCenter, fitBounds).
=> 화면 전환 간의 부드러운 전환은 내장되어 있습니다. 뷰포트를 변경하는 모든 함수에 대해 애니메이션 지속 시간을 정의하기 위해 duration 옵션 매개변수를 전달할 수 있습니다(zoomIn, zoomOut, zoomTo, setViewport, fitView, setCenter, fitBounds).
참고 예제 코드
import React, { useCallback } from 'react';
import ReactFlow, {
addEdge,
useNodesState,
useEdgesState,
Background,
ReactFlowProvider,
useReactFlow,
Panel,
} from 'reactflow';
import 'reactflow/dist/style.css';
const initialNodes = [
{
id: '1',
type: 'input',
data: { label: 'Smooth Transition' },
position: { x: 250, y: 5 },
},
{
id: '2',
type: 'output',
data: { label: 'zoom-in' },
position: { x: 100, y: 100 },
},
{ id: '3', data: { label: 'zoom-out' }, position: { x: 400, y: 100 } },
];
const initialEdges = [
{ id: 'e1-2', source: '1', target: '2' },
{ id: 'e1-3', source: '1', target: '3' },
];
const ZoomTransition = () => {
const [nodes, setNodes, onNodesChange] = useNodesState(initialNodes);
const [edges, setEdges, onEdgesChange] = useEdgesState(initialEdges);
const onConnect = useCallback((params) => setEdges((eds) => addEdge(params, eds)), []);
const { setViewport, zoomIn, zoomOut } = useReactFlow();
const handleTransform = useCallback(() => {
setViewport({ x: 0, y: 0, zoom: 1 }, { duration: 800 });
}, [setViewport]);
return (
<ReactFlow
nodes={nodes}
edges={edges}
onNodesChange={onNodesChange}
onEdgesChange={onEdgesChange}
onConnect={onConnect}
fitView
>
<Panel position="top-right">
<button onClick={() => zoomIn({ duration: 800 })}>zoom in</button>
<button onClick={() => zoomOut({ duration: 800 })}>zoom out</button>
<button onClick={handleTransform}>pan to center(0,0,1)</button>
</Panel>
<Background />
</ReactFlow>
);
};
export default () => (
<ReactFlowProvider>
<ZoomTransition />
</ReactFlowProvider>
);
참고 예제 코드로 구현된 CodeSandbox 및 캡쳐사진
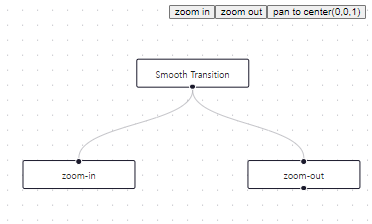
Contextual Zoom
This example shows how the current zoom level can be used by a node to decide which content to show. We are using selecting the zoom via the useStore hook to update our custom node whenever the zoom changes.
=> 컨텍스트별 줌
이 예제는 현재 줌 레벨을 노드가 어떤 콘텐츠를 표시할지 결정하는 데 사용하는 방법을 보여줍니다. 줌 변경 시 커스텀 노드를 업데이트하기 위해 useStore 훅을 통해 줌을 선택합니다.
참고 예제 코드
<App.js>
import React, { useCallback } from 'react';
import ReactFlow, { useNodesState, useEdgesState, addEdge, MiniMap, Controls } from 'reactflow';
import ZoomNode from './ZoomNode.js';
import 'reactflow/dist/style.css';
import './index.css';
const snapGrid = [20, 20];
const nodeTypes = {
zoom: ZoomNode,
};
const initialNodes = [
{
id: '1',
type: 'zoom',
data: {
content: <>Zoom to toggle content and placeholder</>,
},
position: { x: 0, y: 50 },
},
{
id: '2',
type: 'zoom',
data: { content: <>this is a node with some lines of text in it.</> },
position: { x: 300, y: 50 },
},
{
id: '3',
type: 'zoom',
data: { content: <>this is another node with some more text.</> },
position: { x: 650, y: 50 },
},
];
const initialEdges = [
{
id: 'e1-2',
source: '1',
target: '2',
animated: true,
},
{
id: 'e2-3',
source: '2',
target: '3',
animated: true,
},
];
const defaultViewport = { x: 0, y: 0, zoom: 1.5 };
const ContextualZoomFlow = () => {
const [nodes, setNodes, onNodesChange] = useNodesState(initialNodes);
const [edges, setEdges, onEdgesChange] = useEdgesState(initialEdges);
const onConnect = useCallback(
(params) => setEdges((eds) => addEdge({ ...params, animated: true }, eds)),
[]
);
return (
<ReactFlow
nodes={nodes}
edges={edges}
onNodesChange={onNodesChange}
onEdgesChange={onEdgesChange}
onConnect={onConnect}
nodeTypes={nodeTypes}
snapToGrid={true}
snapGrid={snapGrid}
defaultViewport={defaultViewport}
attributionPosition="top-right"
>
<MiniMap />
<Controls />
</ReactFlow>
);
};
export default ContextualZoomFlow;
<ZoomNode.js>
import React, { memo } from 'react';
import { Handle, useStore, Position } from 'reactflow';
const Placeholder = () => (
<div className="placeholder">
<div />
<div />
<div />
</div>
);
const zoomSelector = (s) => s.transform[2] >= 1.5;
export default memo(({ data }) => {
const showContent = useStore(zoomSelector);
return (
<>
<Handle type="target" position={Position.Left} />
{showContent ? data.content : <Placeholder />}
<Handle type="source" position={Position.Right} />
</>
);
});
<index.css>
.react-flow__node-zoom {
font-size: 12px;
background: #fff;
border: 1px solid #555;
border-radius: 5px;
text-align: center;
width: 150px;
padding: 10px;
line-height: 1.2;
}
.react-flow__node-zoom img {
pointer-events: none;
}
.placeholder div {
background: #eee;
width: 100%;
height: 10px;
margin-bottom: 4px;
}
.placeholder div:last-child {
margin-bottom: 0;
}
참고 예제 코드로 구현된 CodeSandbox 및 캡쳐사진
Context Menu
The onNodeContextMenu event can be used to show a custom menu when right-clicking a node. This example shows a simple menu with buttons to duplicate or delete the clicked node.
=> 컨텍스트 메뉴
onNodeContextMenu 이벤트를 사용하여 노드를 마우스 오른쪽 버튼으로 클릭할 때 사용자 정의 메뉴를 표시할 수 있습니다. 이 예제는 클릭한 노드를 복제하거나 삭제하는 버튼이 있는 간단한 메뉴를 보여줍니다.
참고 예제 코드
<App.js>
import React, { useCallback, useRef, useState } from 'react';
import ReactFlow, {
Background,
useNodesState,
useEdgesState,
addEdge,
} from 'reactflow';
import { initialNodes, initialEdges } from './nodes-edges';
import ContextMenu from './ContextMenu';
import 'reactflow/dist/style.css';
import './style.css';
const Flow = () => {
const [nodes, setNodes, onNodesChange] = useNodesState(initialNodes);
const [edges, setEdges, onEdgesChange] = useEdgesState(initialEdges);
const [menu, setMenu] = useState(null);
const ref = useRef(null);
const onConnect = useCallback(
(params) => setEdges((els) => addEdge(params, els)),
[setEdges],
);
const onNodeContextMenu = useCallback(
(event, node) => {
// Prevent native context menu from showing
event.preventDefault();
// Calculate position of the context menu. We want to make sure it
// doesn't get positioned off-screen.
const pane = ref.current.getBoundingClientRect();
setMenu({
id: node.id,
top: event.clientY < pane.height - 200 && event.clientY,
left: event.clientX < pane.width - 200 && event.clientX,
right: event.clientX >= pane.width - 200 && pane.width - event.clientX,
bottom:
event.clientY >= pane.height - 200 && pane.height - event.clientY,
});
},
[setMenu],
);
// Close the context menu if it's open whenever the window is clicked.
const onPaneClick = useCallback(() => setMenu(null), [setMenu]);
return (
<ReactFlow
ref={ref}
nodes={nodes}
edges={edges}
onNodesChange={onNodesChange}
onEdgesChange={onEdgesChange}
onConnect={onConnect}
onPaneClick={onPaneClick}
onNodeContextMenu={onNodeContextMenu}
fitView
>
<Background />
{menu && <ContextMenu onClick={onPaneClick} {...menu} />}
</ReactFlow>
);
};
export default Flow;<ContextMenu.js>
import React, { useCallback } from 'react';
import { useReactFlow } from 'reactflow';
export default function ContextMenu({
id,
top,
left,
right,
bottom,
...props
}) {
const { getNode, setNodes, addNodes, setEdges } = useReactFlow();
const duplicateNode = useCallback(() => {
const node = getNode(id);
const position = {
x: node.position.x + 50,
y: node.position.y + 50,
};
addNodes({
...node,
selected: false,
dragging: false,
id: `${node.id}-copy`,
position,
});
}, [id, getNode, addNodes]);
const deleteNode = useCallback(() => {
setNodes((nodes) => nodes.filter((node) => node.id !== id));
setEdges((edges) => edges.filter((edge) => edge.source !== id));
}, [id, setNodes, setEdges]);
return (
<div
style={{ top, left, right, bottom }}
className="context-menu"
{...props}
>
<p style={{ margin: '0.5em' }}>
<small>node: {id}</small>
</p>
<button onClick={duplicateNode}>duplicate</button>
<button onClick={deleteNode}>delete</button>
</div>
);
}
<nodes-edges.js>
export const initialNodes = [
{ id: '1', position: { x: 175, y: 0 }, data: { label: 'a' } },
{ id: '2', position: { x: 0, y: 250 }, data: { label: 'b' } },
{ id: '3', position: { x: 175, y: 250 }, data: { label: 'c' } },
{ id: '4', position: { x: 350, y: 250 }, data: { label: 'd' } },
];
export const initialEdges = [
{
id: 'e1-2',
source: '1',
target: '2',
},
{
id: 'e1-3',
source: '1',
target: '3',
},
{
id: 'e1-4',
source: '1',
target: '4',
},
];
export default { initialNodes, initialEdges };
<style.css>
.context-menu {
background: white;
border-style: solid;
box-shadow: 10px 19px 20px rgba(0, 0, 0, 10%);
position: absolute;
z-index: 10;
}
.context-menu button {
border: none;
display: block;
padding: 0.5em;
text-align: left;
width: 100%;
}
.context-menu button:hover {
background: white;
}
참고 예제 코드로 구현된 CodeSandbox 및 캡쳐사진
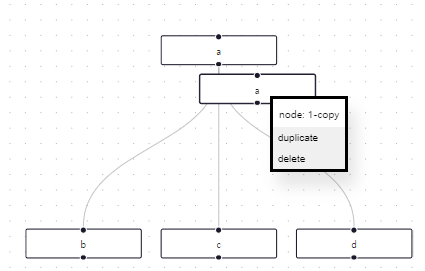
Styling
Styled Components
Styled Components Light + Dark Mode
In this example we are using styled components to show how to implement a dark and light mode.
=> 스타일된 컴포넌트 라이트 + 다크 모드
이 예제에서는 라이트 모드와 다크 모드를 구현하는 방법을 보여주기 위해 styled-components를 사용합니다.
참고 예제 코드
<App.js>
import React, { useCallback, useState } from 'react';
import ReactFlow, {
useNodesState,
useEdgesState,
addEdge,
MiniMap,
Controls,
Panel,
} from 'reactflow';
import styled, { ThemeProvider } from 'styled-components';
import { nodes as initialNodes, edges as initialEdges } from './nodes-edges';
import { darkTheme, lightTheme } from './theme';
import CustomNode from './CustomNode';
import 'reactflow/dist/style.css';
const nodeTypes = {
custom: CustomNode,
};
const ReactFlowStyled = styled(ReactFlow)`
background-color: ${(props) => props.theme.bg};
`;
const MiniMapStyled = styled(MiniMap)`
background-color: ${(props) => props.theme.bg};
.react-flow__minimap-mask {
fill: ${(props) => props.theme.minimapMaskBg};
}
.react-flow__minimap-node {
fill: ${(props) => props.theme.nodeBg};
stroke: none;
}
`;
const ControlsStyled = styled(Controls)`
button {
background-color: ${(props) => props.theme.controlsBg};
color: ${(props) => props.theme.controlsColor};
border-bottom: 1px solid ${(props) => props.theme.controlsBorder};
&:hover {
background-color: ${(props) => props.theme.controlsBgHover};
}
path {
fill: currentColor;
}
}
`;
const Flow = ({ children }) => {
const [nodes, setNodes, onNodesChange] = useNodesState(initialNodes);
const [edges, setEdges, onEdgesChange] = useEdgesState(initialEdges);
const onConnect = useCallback((params) => setEdges((eds) => addEdge(params, eds)), []);
return (
<ReactFlowStyled
nodes={nodes}
edges={edges}
onNodesChange={onNodesChange}
onEdgesChange={onEdgesChange}
onConnect={onConnect}
nodeTypes={nodeTypes}
fitView
>
<MiniMapStyled />
<ControlsStyled />
{children}
</ReactFlowStyled>
);
};
export default () => {
const [mode, setMode] = useState('light');
const theme = mode === 'light' ? lightTheme : darkTheme;
const toggleMode = () => {
setMode((m) => (m === 'light' ? 'dark' : 'light'));
};
return (
<ThemeProvider theme={theme}>
<Flow>
<Panel position="top-left">
<button onClick={toggleMode}>switch mode</button>
</Panel>
</Flow>
</ThemeProvider>
);
};
<CustomNode.js>
import React, { memo } from 'react';
import { Handle, Position } from 'reactflow';
import styled from 'styled-components';
const Node = styled.div`
padding: 10px 20px;
border-radius: 5px;
background: ${(props) => props.theme.nodeBg};
color: ${(props) => props.theme.nodeColor};
border: 1px solid ${(props) => (props.selected ? props.theme.primary : props.theme.nodeBorder)};
.react-flow__handle {
background: ${(props) => props.theme.primary};
width: 8px;
height: 10px;
border-radius: 3px;
}
`;
export default memo(({ data, selected }) => {
return (
<Node selected={selected}>
<Handle type="target" position={Position.Left} />
<div>
<strong>{data.label}</strong>
</div>
<Handle type="source" position={Position.Right} />
</Node>
);
});
<theme.js>
export const lightTheme = {
bg: '#fff',
primary: '#ff0072',
nodeBg: '#f2f2f5',
nodeColor: '#222',
nodeBorder: '#222',
minimapMaskBg: '#f2f2f5',
controlsBg: '#fefefe',
controlsBgHover: '#eee',
controlsColor: '#222',
controlsBorder: '#ddd',
};
export const darkTheme = {
bg: '#000',
primary: '#ff0072',
nodeBg: '#343435',
nodeColor: '#f9f9f9',
nodeBorder: '#888',
minimapMaskBg: '#343435',
controlsBg: '#555',
controlsBgHover: '#676768',
controlsColor: '#dddddd',
controlsBorder: '#676768',
};
<nodes-edges.js>
export const nodes = [
{
id: '1',
type: 'custom',
data: { label: 'Node 1' },
position: { x: 0, y: 0 },
},
{
id: '2',
type: 'custom',
data: { label: 'Node 2' },
position: { x: 200, y: 0 },
},
];
export const edges = [
{
id: 'e1',
source: '1',
target: '2',
},
];
참고 예제 코드로 구현된 CodeSandbox 및 캡쳐사진

Tailwind
In this example we are using Tailwind for styling the flow.
=> 이 예제에서는 Tailwind를 사용하여 플로우를 스타일링합니다.
We are using the Tailwind CDN for this example. Because of a bug with SandPack, opening the sandbox below will not have the script added to the HTML document. To make sure the example works correctly, make sure you add script src="https://cdn.tailwindcss.com" script to the HTML document in public/index.html manually.
If you are copying the example locally, you will likely have Tailwind set up differently, and can ignore this warning.이 예제에서는 Tailwind CDN을 사용합니다. SandPack과 관련된 버그로 인해 아래의 샌드박스를 열면 스크립트가 HTML 문서에 추가되지 않습니다. 예제가 올바르게 작동하도록 하려면 public/index.html의 HTML 문서에 script src="https://cdn.tailwindcss.com" script를 수동으로 추가하십시오.
예제를 로컬로 복사하는 경우 Tailwind를 다르게 설정한 것일 가능성이 높으며 이 경고를 무시할 수 있습니다.
참고 예제 코드
<App.js>
import React, { useCallback } from 'react';
import ReactFlow, { useNodesState, useEdgesState, addEdge, MiniMap, Controls } from 'reactflow';
import 'reactflow/dist/base.css';
import './tailwind-config.js';
import CustomNode from './CustomNode';
const nodeTypes = {
custom: CustomNode,
};
const initNodes = [
{
id: '1',
type: 'custom',
data: { name: 'Jane Doe', job: 'CEO', emoji: '😎' },
position: { x: 0, y: 50 },
},
{
id: '2',
type: 'custom',
data: { name: 'Tyler Weary', job: 'Designer', emoji: '🤓' },
position: { x: -200, y: 200 },
},
{
id: '3',
type: 'custom',
data: { name: 'Kristi Price', job: 'Developer', emoji: '🤩' },
position: { x: 200, y: 200 },
},
];
const initEdges = [
{
id: 'e1-2',
source: '1',
target: '2',
},
{
id: 'e1-3',
source: '1',
target: '3',
},
];
const Flow = () => {
const [nodes, setNodes, onNodesChange] = useNodesState(initNodes);
const [edges, setEdges, onEdgesChange] = useEdgesState(initEdges);
const onConnect = useCallback((params) => setEdges((eds) => addEdge(params, eds)), []);
return (
<ReactFlow
nodes={nodes}
edges={edges}
onNodesChange={onNodesChange}
onEdgesChange={onEdgesChange}
onConnect={onConnect}
nodeTypes={nodeTypes}
fitView
className="bg-teal-50"
>
<MiniMap />
<Controls />
</ReactFlow>
);
};
export default Flow;
<CustomNode.js>
import React, { memo } from 'react';
import { Handle, Position } from 'reactflow';
function CustomNode({ data }) {
return (
<div className="px-4 py-2 shadow-md rounded-md bg-white border-2 border-stone-400">
<div className="flex">
<div className="rounded-full w-12 h-12 flex justify-center items-center bg-gray-100">
{data.emoji}
</div>
<div className="ml-2">
<div className="text-lg font-bold">{data.name}</div>
<div className="text-gray-500">{data.job}</div>
</div>
</div>
<Handle type="target" position={Position.Top} className="w-16 !bg-teal-500" />
<Handle type="source" position={Position.Bottom} className="w-16 !bg-teal-500" />
</div>
);
}
export default memo(CustomNode);
<tailwind-config.js>
tailwind.config = {
important: true,
};
참고 예제 코드로 구현된 CodeSandbox 및 캡쳐사진
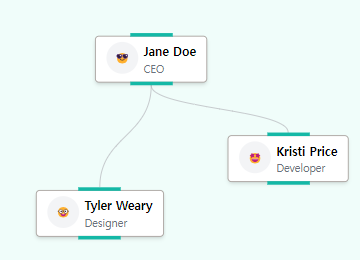
Turbo Flow
Every part of the React Flow UI is customizable. As the name implies the look is taken from the beautiful turbo.build website. You can find more information about custom styles in the theming guide. (React Flow uses Turborepo and we love it 💜)
=> 터보 플로우
React Flow UI의 모든 부분은 사용자 정의할 수 있습니다. 이름에서 알 수 있듯이 외관은 아름다운 turbo.build 웹사이트에서 가져왔습니다. 사용자 정의 스타일에 대한 자세한 정보는 테마 가이드에서 찾을 수 있습니다. (React Flow는 Turborepo를 사용하고 우리는 그것을 사랑합니다 💜)
참고 예제 코드
<App.tsx>
import React, { useCallback } from 'react';
import ReactFlow, { Controls, useNodesState, useEdgesState, addEdge, Node, Edge } from 'reactflow';
import { FiFile } from 'react-icons/fi';
import 'reactflow/dist/base.css';
import './index.css';
import TurboNode, { TurboNodeData } from './TurboNode';
import TurboEdge from './TurboEdge';
import FunctionIcon from './FunctionIcon';
const initialNodes: Node<TurboNodeData>[] = [
{
id: '1',
position: { x: 0, y: 0 },
data: { icon: <FunctionIcon />, title: 'readFile', subline: 'api.ts' },
type: 'turbo',
},
{
id: '2',
position: { x: 250, y: 0 },
data: { icon: <FunctionIcon />, title: 'bundle', subline: 'apiContents' },
type: 'turbo',
},
{
id: '3',
position: { x: 0, y: 250 },
data: { icon: <FunctionIcon />, title: 'readFile', subline: 'sdk.ts' },
type: 'turbo',
},
{
id: '4',
position: { x: 250, y: 250 },
data: { icon: <FunctionIcon />, title: 'bundle', subline: 'sdkContents' },
type: 'turbo',
},
{
id: '5',
position: { x: 500, y: 125 },
data: { icon: <FunctionIcon />, title: 'concat', subline: 'api, sdk' },
type: 'turbo',
},
{
id: '6',
position: { x: 750, y: 125 },
data: { icon: <FiFile />, title: 'fullBundle' },
type: 'turbo',
},
];
const initialEdges: Edge[] = [
{
id: 'e1-2',
source: '1',
target: '2',
},
{
id: 'e3-4',
source: '3',
target: '4',
},
{
id: 'e2-5',
source: '2',
target: '5',
},
{
id: 'e4-5',
source: '4',
target: '5',
},
{
id: 'e5-6',
source: '5',
target: '6',
},
];
const nodeTypes = {
turbo: TurboNode,
};
const edgeTypes = {
turbo: TurboEdge,
};
const defaultEdgeOptions = {
type: 'turbo',
markerEnd: 'edge-circle',
};
const Flow = () => {
const [nodes, setNodes, onNodesChange] = useNodesState(initialNodes);
const [edges, setEdges, onEdgesChange] = useEdgesState(initialEdges);
const onConnect = useCallback((params) => setEdges((els) => addEdge(params, els)), []);
return (
<ReactFlow
nodes={nodes}
edges={edges}
onNodesChange={onNodesChange}
onEdgesChange={onEdgesChange}
onConnect={onConnect}
fitView
nodeTypes={nodeTypes}
edgeTypes={edgeTypes}
defaultEdgeOptions={defaultEdgeOptions}
>
<Controls showInteractive={false} />
<svg>
<defs>
<linearGradient id="edge-gradient">
<stop offset="0%" stopColor="#ae53ba" />
<stop offset="100%" stopColor="#2a8af6" />
</linearGradient>
<marker
id="edge-circle"
viewBox="-5 -5 10 10"
refX="0"
refY="0"
markerUnits="strokeWidth"
markerWidth="10"
markerHeight="10"
orient="auto"
>
<circle stroke="#2a8af6" strokeOpacity="0.75" r="2" cx="0" cy="0" />
</marker>
</defs>
</svg>
</ReactFlow>
);
};
export default Flow;
<index.css>
.react-flow {
--bg-color: rgb(17, 17, 17);
--text-color: rgb(243, 244, 246);
--node-border-radius: 10px;
--node-box-shadow: 10px 0 15px rgba(42, 138, 246, 0.3), -10px 0 15px rgba(233, 42, 103, 0.3);
background-color: var(--bg-color);
color: var(--text-color);
}
.react-flow__node-turbo {
border-radius: var(--node-border-radius);
display: flex;
height: 70px;
min-width: 150px;
font-family: 'Fira Mono', Monospace;
font-weight: 500;
letter-spacing: -0.2px;
box-shadow: var(--node-box-shadow);
}
.react-flow__node-turbo .wrapper {
overflow: hidden;
display: flex;
padding: 2px;
position: relative;
border-radius: var(--node-border-radius);
flex-grow: 1;
}
.gradient:before {
content: '';
position: absolute;
padding-bottom: calc(100% * 1.41421356237);
width: calc(100% * 1.41421356237);
background: conic-gradient(
from -160deg at 50% 50%,
#e92a67 0deg,
#a853ba 120deg,
#2a8af6 240deg,
#e92a67 360deg
);
left: 50%;
top: 50%;
transform: translate(-50%, -50%);
border-radius: 100%;
}
.react-flow__node-turbo.selected .wrapper.gradient:before {
content: '';
background: conic-gradient(
from -160deg at 50% 50%,
#e92a67 0deg,
#a853ba 120deg,
#2a8af6 240deg,
rgba(42, 138, 246, 0) 360deg
);
animation: spinner 4s linear infinite;
transform: translate(-50%, -50%) rotate(0deg);
z-index: -1;
}
@keyframes spinner {
100% {
transform: translate(-50%, -50%) rotate(-360deg);
}
}
.react-flow__node-turbo .inner {
background: var(--bg-color);
padding: 16px 20px;
border-radius: var(--node-border-radius);
display: flex;
flex-direction: column;
justify-content: center;
flex-grow: 1;
position: relative;
}
.react-flow__node-turbo .icon {
margin-right: 8px;
}
.react-flow__node-turbo .body {
display: flex;
}
.react-flow__node-turbo .title {
font-size: 16px;
margin-bottom: 2px;
line-height: 1;
}
.react-flow__node-turbo .subline {
font-size: 12px;
color: #777;
}
.react-flow__node-turbo .cloud {
border-radius: 100%;
width: 30px;
height: 30px;
right: 0;
position: absolute;
top: 0;
transform: translate(50%, -50%);
display: flex;
transform-origin: center center;
padding: 2px;
overflow: hidden;
box-shadow: var(--node-box-shadow);
z-index: 1;
}
.react-flow__node-turbo .cloud div {
background-color: var(--bg-color);
flex-grow: 1;
border-radius: 100%;
display: flex;
justify-content: center;
align-items: center;
position: relative;
}
.react-flow__handle {
opacity: 0;
}
.react-flow__handle.source {
right: -10px;
}
.react-flow__handle.target {
left: -10px;
}
.react-flow__node:focus {
outline: none;
}
.react-flow__edge .react-flow__edge-path {
stroke: url(#edge-gradient);
stroke-width: 2;
stroke-opacity: 0.75;
}
.react-flow__controls button {
background-color: var(--bg-color);
color: var(--text-color);
border: 1px solid #95679e;
border-bottom: none;
}
.react-flow__controls button:hover {
background-color: rgb(37, 37, 37);
}
.react-flow__controls button:first-child {
border-radius: 5px 5px 0 0;
}
.react-flow__controls button:last-child {
border-bottom: 1px solid #95679e;
border-radius: 0 0 5px 5px;
}
.react-flow__controls button path {
fill: var(--text-color);
}
.react-flow__attribution {
background: rgba(200, 200, 200, 0.2);
}
.react-flow__attribution a {
color: #95679e;
}
<TurboNode.tsx>
import React, { memo, ReactNode } from 'react';
import { Handle, NodeProps, Position } from 'reactflow';
import { FiCloud } from 'react-icons/fi';
export type TurboNodeData = {
title: string;
icon?: ReactNode;
subline?: string;
};
export default memo(({ data }: NodeProps<TurboNodeData>) => {
return (
<>
<div className="cloud gradient">
<div>
<FiCloud />
</div>
</div>
<div className="wrapper gradient">
<div className="inner">
<div className="body">
{data.icon && <div className="icon">{data.icon}</div>}
<div>
<div className="title">{data.title}</div>
{data.subline && <div className="subline">{data.subline}</div>}
</div>
</div>
<Handle type="target" position={Position.Left} />
<Handle type="source" position={Position.Right} />
</div>
</div>
</>
);
});
<TurboEdge.tsx>
import React from 'react';
import { EdgeProps, getBezierPath } from 'reactflow';
export default function CustomEdge({
id,
sourceX,
sourceY,
targetX,
targetY,
sourcePosition,
targetPosition,
style = {},
markerEnd,
}: EdgeProps) {
const xEqual = sourceX === targetX;
const yEqual = sourceY === targetY;
const [edgePath] = getBezierPath({
// we need this little hack in order to display the gradient for a straight line
sourceX: xEqual ? sourceX + 0.0001 : sourceX,
sourceY: yEqual ? sourceY + 0.0001 : sourceY,
sourcePosition,
targetX,
targetY,
targetPosition,
});
return (
<>
<path
id={id}
style={style}
className="react-flow__edge-path"
d={edgePath}
markerEnd={markerEnd}
/>
</>
);
}
<FunctionIcon.tsx>
import React from 'react';
function Icon() {
return (
<svg width="14" viewBox="0 0 75 100" xmlns="http://www.w3.org/2000/svg">
<rect x="2" y="3" width="71" height="94" rx="10" fill="#F9F9F9" />
<path
d="M22 50H52"
stroke="rgb(17, 17, 17)"
strokeWidth="6"
strokeLinecap="round"
strokeLinejoin="round"
fill="none"
/>
<path
d="M17 77H23.9528C26.2429 76.9949 30.242 75.9738 32 74.5C33.758 73.0262 35.164 71.1925 35.5778 68.9307L39.4222 31.0693C39.836 28.8075 41.242 26.9738 43 25.5C44.758 24.0262 47.7571 23.0051 50.0472 23H57"
stroke="rgb(17, 17, 17)"
strokeWidth="6"
strokeLinecap="round"
strokeLinejoin="round"
fill="none"
/>
</svg>
);
}
export default Icon;
참고 예제 코드로 구현된 CodeSandbox 및 캡쳐사진
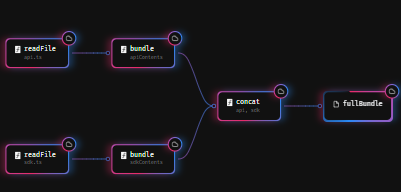
Base Style
React Flow comes with a default style and a base style. This example shows how the base style looks. The base style is mandatory for every flow to work. You can find more information in the theming guide.
=> React Flow는 기본 스타일과 기본 스타일이 함께 제공됩니다. 이 예제는 기본 스타일이 어떻게 보이는지 보여줍니다. 기본 스타일은 모든 플로우에서 필수적입니다. 테마 가이드에서 자세한 정보를 찾을 수 있습니다.
참고 예제 코드
import React, { useCallback } from 'react';
import ReactFlow, {
Background,
Controls,
MiniMap,
useNodesState,
useEdgesState,
addEdge,
Position,
} from 'reactflow';
import 'reactflow/dist/base.css';
const nodeDefaults = {
sourcePosition: Position.Right,
targetPosition: Position.Left,
};
const initialNodes = [
{
id: '1',
position: { x: 0, y: 150 },
data: { label: 'base style 1' },
...nodeDefaults,
},
{ id: '2', position: { x: 250, y: 0 }, data: { label: 'base style 2' }, ...nodeDefaults },
{ id: '3', position: { x: 250, y: 150 }, data: { label: 'base style 3' }, ...nodeDefaults },
{ id: '4', position: { x: 250, y: 300 }, data: { label: 'base style 4' }, ...nodeDefaults },
];
const initialEdges = [
{
id: 'e1-2',
source: '1',
target: '2',
},
{
id: 'e1-3',
source: '1',
target: '3',
},
{
id: 'e1-4',
source: '1',
target: '4',
},
];
const Flow = () => {
const [nodes, setNodes, onNodesChange] = useNodesState(initialNodes);
const [edges, setEdges, onEdgesChange] = useEdgesState(initialEdges);
const onConnect = useCallback((params) => setEdges((els) => addEdge(params, els)), []);
return (
<ReactFlow
nodes={nodes}
edges={edges}
onNodesChange={onNodesChange}
onEdgesChange={onEdgesChange}
onConnect={onConnect}
fitView
>
<Background />
<Controls />
<MiniMap />
</ReactFlow>
);
};
export default Flow;
참고 예제 코드로 구현된 CodeSandbox 및 캡쳐사진
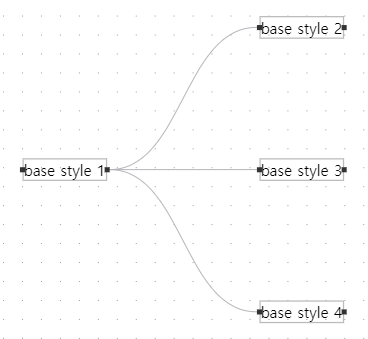
Misc
Download Image
This example shows how to download a flow as an image with html-to-image.
참고 예제 코드
<App.js>
import React, { useCallback } from 'react';
import ReactFlow, {
useNodesState,
useEdgesState,
addEdge,
Controls,
Background,
} from 'reactflow';
import DownloadButton from './DownloadButton';
import CustomNode from './CustomNode';
import { initialNodes, initialEdges } from './nodes-edges';
import 'reactflow/dist/style.css';
// @todo how to handle this?
// import './index.css';
const connectionLineStyle = { stroke: '#ffff' };
const snapGrid = [25, 25];
const nodeTypes = {
custom: CustomNode,
};
const defaultEdgeOptions = {
animated: true,
type: 'smoothstep',
};
const defaultViewport = { x: 0, y: 0, zoom: 1.5 };
const DownloadImageFlow = () => {
const [nodes, setNodes, onNodesChange] = useNodesState(initialNodes);
const [edges, setEdges, onEdgesChange] = useEdgesState(initialEdges);
const onConnect = useCallback(
(params) => setEdges((eds) => addEdge(params, eds)),
[]
);
return (
<ReactFlow
nodes={nodes}
edges={edges}
onNodesChange={onNodesChange}
onEdgesChange={onEdgesChange}
onConnect={onConnect}
nodeTypes={nodeTypes}
connectionLineStyle={connectionLineStyle}
connectionLineType="smoothstep"
snapToGrid={true}
snapGrid={snapGrid}
defaultViewport={defaultViewport}
fitView
attributionPosition="bottom-left"
defaultEdgeOptions={defaultEdgeOptions}
className="download-image"
>
<Controls />
<Background gap={25} />
<DownloadButton />
</ReactFlow>
);
};
export default DownloadImageFlow;
<CustomNode.js>
import React, { memo } from 'react';
import { Handle, Position } from 'reactflow';
export default memo(({ data, isConnectable }) => {
return (
<>
<Handle
type="target"
position={Position.Left}
onConnect={(params) => console.log('handle onConnect', params)}
isConnectable={isConnectable}
/>
<div>▼</div>
<Handle
type="source"
position={Position.Right}
id="a"
style={{ top: 5 }}
isConnectable={isConnectable}
/>
<Handle
type="source"
position={Position.Right}
id="b"
style={{ bottom: 5, top: 'auto' }}
isConnectable={isConnectable}
/>
</>
);
});
<nodes-edges.js>
export const initialNodes = [
{
id: '1',
type: 'input',
data: { label: '▲' },
position: { x: 0, y: 50 },
sourcePosition: 'right',
style: {
backgroundColor: '#BEE3F8',
},
},
{
id: '2',
type: 'custom',
data: {},
position: { x: 200, y: 50 },
style: {
backgroundColor: '#90CDF4',
},
},
{
id: '3',
data: { label: '▲' },
position: { x: 400, y: 0 },
targetPosition: 'left',
sourcePosition: 'right',
style: {
backgroundColor: '#63B3ED',
},
},
{
id: '4',
data: { label: '▲' },
position: { x: 400, y: 100 },
targetPosition: 'left',
sourcePosition: 'right',
style: {
backgroundColor: '#63B3ED',
},
},
{
id: '5',
type: 'output',
data: { label: '▲' },
position: { x: 600, y: 0 },
targetPosition: 'left',
style: {
backgroundColor: '#4299E1',
},
},
{
id: '6',
type: 'output',
data: { label: '▲' },
position: { x: 600, y: 100 },
targetPosition: 'left',
style: {
backgroundColor: '#4299E1',
},
},
];
export const initialEdges = [
{
id: 'e1-2',
source: '1',
target: '2',
},
{
id: 'e2a-3',
source: '2',
target: '3',
sourceHandle: 'a',
},
{
id: 'e2b-4',
source: '2',
target: '4',
sourceHandle: 'b',
},
{
id: 'e3a-5',
source: '3',
target: '5',
},
{
id: 'e4b-6',
source: '4',
target: '6',
},
];
<DownloadButton.js>
import React from 'react';
import { Panel, useReactFlow, getRectOfNodes, getTransformForBounds } from 'reactflow';
import { toPng } from 'html-to-image';
function downloadImage(dataUrl) {
const a = document.createElement('a');
a.setAttribute('download', 'reactflow.png');
a.setAttribute('href', dataUrl);
a.click();
}
const imageWidth = 1024;
const imageHeight = 768;
function DownloadButton() {
const { getNodes } = useReactFlow();
const onClick = () => {
// we calculate a transform for the nodes so that all nodes are visible
// we then overwrite the transform of the `.react-flow__viewport` element
// with the style option of the html-to-image library
const nodesBounds = getRectOfNodes(getNodes());
const transform = getTransformForBounds(nodesBounds, imageWidth, imageHeight, 0.5, 2);
toPng(document.querySelector('.react-flow__viewport'), {
backgroundColor: '#1a365d',
width: imageWidth,
height: imageHeight,
style: {
width: imageWidth,
height: imageHeight,
transform: `translate(${transform[0]}px, ${transform[1]}px) scale(${transform[2]})`,
},
}).then(downloadImage);
};
return (
<Panel position="top-right">
<button className="download-btn" onClick={onClick}>
Download Image
</button>
</Panel>
);
}
export default DownloadButton;
<index.css>
.download-image.react-flow {
background: #1a365d;
}
.download-image .react-flow__node {
width: 50px;
height: 50px;
color: white;
font-weight: 700;
display: flex;
justify-content: center;
align-items: center;
border-color: white;
}
.download-image .react-flow__node-custom {
font-size: 12px;
background: #eee;
border: 1px solid #555;
border-radius: 5px;
text-align: center;
padding: 10px;
}
.download-image .react-flow__node-custom .react-flow__handle-right {
transform: none;
}
.download-image .download-btn {
border: 1px solid #eee;
background: #ebf8ff;
padding: 10px 20px;
border-radius: 5px;
font-weight: 700;
cursor: pointer;
}
.download-image .download-btn:hover {
opacity: 0.9;
}
참고 예제 코드로 구현된 CodeSandbox 및 캡쳐사진
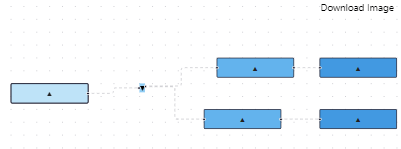
ReactFlowProvider
If you are working with multiple flows on a page or if you are using a client side router you need to wrap each flow with a ReactFlowProvider so that every flow has its own store instance. Using a ReactFlowProvider is also mandatory if you want to access the internal state outside of the ReactFlow component.
=> 한 페이지에서 여러 개의 플로우를 사용하거나 클라이언트 측 라우터를 사용하는 경우 각 플로우를 ReactFlowProvider로 래핑하여 각 플로우에 자체 스토어 인스턴스가 있도록 해야 합니다. ReactFlow 컴포넌트 외부에서 내부 상태에 액세스하려면 ReactFlowProvider를 사용하는 것도 필수적입니다.
참고 예제 코드
<App.js>
import React, { useCallback } from 'react';
import ReactFlow, {
ReactFlowProvider,
useNodesState,
useEdgesState,
addEdge,
Controls,
} from 'reactflow';
import 'reactflow/dist/style.css';
import Sidebar from './Sidebar.js';
import './index.css';
const initialNodes = [
{
id: 'provider-1',
type: 'input',
data: { label: 'Node 1' },
position: { x: 250, y: 5 },
},
{ id: 'provider-2', data: { label: 'Node 2' }, position: { x: 100, y: 100 } },
{ id: 'provider-3', data: { label: 'Node 3' }, position: { x: 400, y: 100 } },
{ id: 'provider-4', data: { label: 'Node 4' }, position: { x: 400, y: 200 } },
];
const initialEdges = [
{
id: 'provider-e1-2',
source: 'provider-1',
target: 'provider-2',
animated: true,
},
{ id: 'provider-e1-3', source: 'provider-1', target: 'provider-3' },
];
const ProviderFlow = () => {
const [nodes, setNodes, onNodesChange] = useNodesState(initialNodes);
const [edges, setEdges, onEdgesChange] = useEdgesState(initialEdges);
const onConnect = useCallback((params) => setEdges((els) => addEdge(params, els)), []);
return (
<div className="providerflow">
<ReactFlowProvider>
<div className="reactflow-wrapper">
<ReactFlow
nodes={nodes}
edges={edges}
onNodesChange={onNodesChange}
onEdgesChange={onEdgesChange}
onConnect={onConnect}
fitView
>
<Controls />
</ReactFlow>
</div>
<Sidebar nodes={nodes} setNodes={setNodes} />
</ReactFlowProvider>
</div>
);
};
export default ProviderFlow;
<Sidebar.js>
import React, { useCallback } from 'react';
import { useStore } from 'reactflow';
const transformSelector = (state) => state.transform;
export default ({ nodes, setNodes }) => {
const transform = useStore(transformSelector);
const selectAll = useCallback(() => {
setNodes((nds) =>
nds.map((node) => {
node.selected = true;
return node;
})
);
}, [setNodes]);
return (
<aside>
<div <className="description">
This is an example of how you can access the internal state outside of the ReactFlow
component.
</div>
<div className="title">Zoom & pan transform</div>
<div className="transform">
[{transform[0].toFixed(2)}, {transform[1].toFixed(2)}, {transform[2].toFixed(2)}]
</div>
<div className="title">Nodes</div>
{nodes.map((node) => (
<div key={node.id}>
Node {node.id} - x: {node.position.x.toFixed(2)}, y: {node.position.y.toFixed(2)}
</div>
))}
<div className="selectall">
<button onClick={selectAll}>select all nodes</button>
</div>
</aside>
);
};
<index.css>
.providerflow {
flex-direction: column;
display: flex;
flex-grow: 1;
height: 100%;
}
.providerflow aside {
border-left: 1px solid #eee;
padding: 15px 10px;
font-size: 12px;
background: #fff;
}
.providerflow aside .description {
margin-bottom: 10px;
}
.providerflow aside .title {
font-weight: 700;
margin-bottom: 5px;
}
.providerflow aside .transform {
margin-bottom: 20px;
}
.providerflow .reactflow-wrapper {
flex-grow: 1;
}
.providerflow .selectall {
margin-top: 10px;
}
@media screen and (min-width: 768px) {
.providerflow {
flex-direction: row;
}
.providerflow aside {
width: 20%;
max-width: 250px;
height: 200px;
}
}
참고 예제 코드로 구현된 CodeSandbox 및 캡쳐사진
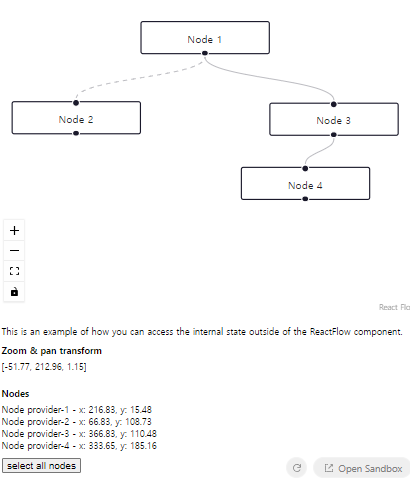
useReactFlow
This example illustrates how to use the useReactFlow hook. It comes with a lot of useful helpers to update your nodes and edges or adjust the viewport of your diagram. The hook returns a ReactFlow instance.
=> useReactFlow 훅을 사용하는 방법을 보여주는 이 예제입니다. 이 훅은 노드와 엣지를 업데이트하거나 다이어그램의 뷰포트를 조정하는 데 유용한 많은 도우미와 함께 제공됩니다. 이 훅은 ReactFlow 인스턴스를 반환합니다.
참고 예제 코드
<App.js>
import React, { useCallback } from 'react';
import ReactFlow, { ReactFlowProvider, addEdge, useNodesState, useEdgesState } from 'reactflow';
import Buttons from './Buttons';
import 'reactflow/dist/style.css';
const initialNodes = [
{
id: '1',
type: 'input',
data: { label: 'Node 1' },
position: { x: 250, y: 5 },
},
{ id: '2', data: { label: 'Node 2' }, position: { x: 100, y: 100 } },
{ id: '3', data: { label: 'Node 3' }, position: { x: 400, y: 100 } },
{ id: '4', data: { label: 'Node 4' }, position: { x: 400, y: 200 } },
];
const initialEdges = [
{
id: 'e1-2',
source: '1',
target: '2',
},
{ id: 'e1-3', source: '1', target: '3' },
];
const ProviderFlow = () => {
const [nodes, setNodes, onNodesChange] = useNodesState(initialNodes);
const [edges, setEdges, onEdgesChange] = useEdgesState(initialEdges);
const onConnect = useCallback((params) => setEdges((els) => addEdge(params, els)), []);
return (
<ReactFlowProvider>
<ReactFlow
nodes={nodes}
edges={edges}
onNodesChange={onNodesChange}
onEdgesChange={onEdgesChange}
onConnect={onConnect}
fitView
>
<Buttons />
</ReactFlow>
</ReactFlowProvider>
);
};
export default ProviderFlow;
<Buttons.js>
import React from 'react';
import { useStoreApi, useReactFlow, Panel } from 'reactflow';
const panelStyle = {
color: '#777',
fontSize: 12,
};
const buttonStyle = {
fontSize: 12,
marginRight: 5,
marginTop: 5,
};
export default () => {
const store = useStoreApi();
const { zoomIn, zoomOut, setCenter } = useReactFlow();
const focusNode = () => {
const { nodeInternals } = store.getState();
const nodes = Array.from(nodeInternals).map(([, node]) => node);
if (nodes.length > 0) {
const node = nodes[0];
const x = node.position.x + node.width / 2;
const y = node.position.y + node.height / 2;
const zoom = 1.85;
setCenter(x, y, { zoom, duration: 1000 });
}
};
return (
<Panel position="top-left" style={panelStyle}>
<div className="description">
This is an example of how you can use the zoom pan helper hook
</div>
<div>
<button onClick={focusNode} style={buttonStyle}>
focus node
</button>
<button onClick={zoomIn} style={buttonStyle}>
zoom in
</button>
<button onClick={zoomOut} style={buttonStyle}>
zoom out
</button>
</div>
</Panel>
);
};
참고 예제 코드로 구현된 CodeSandbox 및 캡쳐사진