Props Drilling
상위 컴포넌트의 state를 props를 통해 전달하고자 할 때 props를 전달하는 용도로만 쓰이는 컴포넌트를 거치면서 데이터를 전달하는 현상을 의미한다.
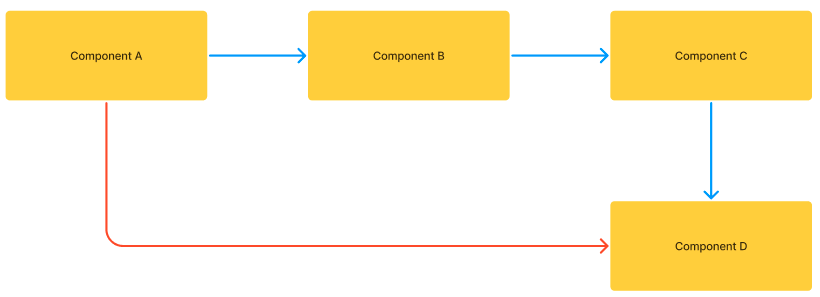
위의 그림 처럼 A에서 사용된 state가 필요한 D로 바로 전달되지 않고(빨간 선) D보다 상위 컴포넌트라는 이유로 전달체로만 사용되는 B,D 컴포넌트(파란 선)가 생기는 경우가 바로 Props Drilling이라고 한다.
문제점
Props의 전달 횟수가 많지 않으면 큰 문제가 되지는 않지만 프로젝트의 규모가 커지고 구조가 복잡해지면서 문제가 발생이 된다.
- 코드의 가독성이 매우 나빠지게 된다.
- 유지보수가 힘들어진다.
- state 변경시 Props 전달 과정에서 불필요하게 관여된 컴포넌트들 또한 리렌더링이 발생하여 웹 성능에 악영향을 줄 수가 있다.
예시
import * as React from 'react';
import './style.css';
import styled from 'styled-components';
import { useState } from 'react';

const Component = styled.div`
  border: 3px solid green;
  border-radius: 10px;
  flex-grow: 1;
  line-height: 30px;
  text-align: center;
  margin: 10px;
  >button{
    margin-left: 10px;
  }
`;

const Container = styled.div`
  display: flex;
  width: 100%;
  justify-contents: center;
`;

export default function App() {
  const [greeting, setGreeting] = useState('Hello');

  console.log('App');
  return (
    <Container>
      <Component>
        App
        <Container>
          <Child1 greeting={greeting} setGreeting={setGreeting} />
          <Child2 greeting={greeting} setGreeting={setGreeting} />
        </Container>
      </Component>
    </Container>
  );
}

function Child1({ greeting, setGreeting }) {
  console.log('Child1');
  return (
    <Component>
      Child1
      <Container>
        <Child3 greeting={greeting} setGreeting={setGreeting} />
        <Child4 />
      </Container>
    </Component>
  );
}

function Child2({ greeting, setGreeting }) {
  console.log('Child2');
  return (
    <Component>
      Child2
      <Container>
        <Child5 />
        <Child6 greeting={greeting} setGreeting={setGreeting} />
      </Container>
    </Component>
  );
}

function Child3({ greeting, setGreeting }) {
  console.log('Child3');
  return <Component>Child3 : {greeting} </Component>;
}

function Child4() {
  console.log('Child4');
  return <Component>Child4</Component>;
}

function Child5() {
  console.log('Child5');
  return <Component>Child5</Component>;
}

function Child6({ greeting, setGreeting }) {
  console.log('Child6');
  return (
    <Component>
      Child6
      <button onClick={() => setGreeting(greeting + '!')}>👋</button>
    </Component>
  );
}
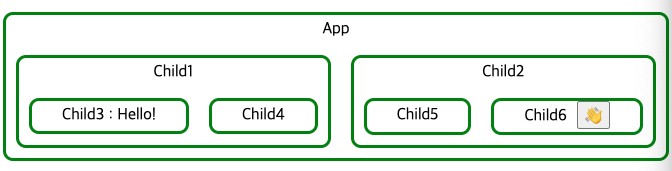
- Child6에 있는 👋버튼을 누르면 Child3에 느낌표가 하나씩 추가되는 애플리케이션이다.
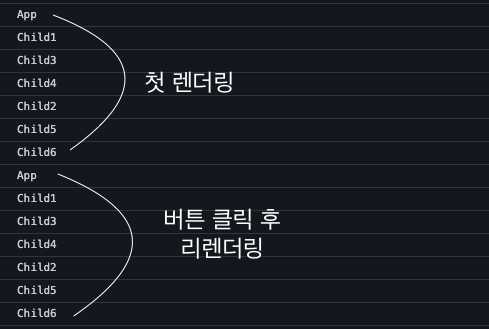
- Child3와 Child6가 state를 공유하기 때문에 최상위 컴포넌트(App)에서 상태를 관리하게 되어, state를 변경할 때마다 최상위 컴포넌트(App)가 리렌더링되면서 모든 컴포넌트가 불필요하게 리렌더링이 된다.
해결 방법
상태관리 라이브러리
상태관리 라이브러리는 전역으로 관리하는 저장소에서 직접 state를 꺼내서 사용할 수가 있기 때문에 Props Drilling을 방지하기에 매우 효과 적이며, 상태관리 라이브러리는 Redux, Context api, Mobx, Recoli 등이 있으며 그 중 Redux가 가장 대표적이다.
Redux는 다른 글에서 다뤄보도록 하겠다.
import * as React from 'react';
import './style.css';
import styled from 'styled-components';
import { useSelector, useDispatch } from 'react-redux';

const Component = styled.div`
  border: 3px solid green;
  border-radius: 10px;
  flex-grow: 1;
  line-height: 30px;
  text-align: center;
  margin: 10px;
  >button{
    margin-left: 10px;
  }
`;

const Container = styled.div`
  display: flex;
  width: 100%;
  justify-contents: center;
`;

export default function App() {
  console.log('App');
  return (
    <Container>
      <Component>
        App
        <Container>
          <Child1 />
          <Child2 />
        </Container>
      </Component>
    </Container>
  );
}

function Child1() {
  console.log('Child1');
  return (
    <Component>
      Child1
      <Container>
        <Child3 />
        <Child4 />
      </Container>
    </Component>
  );
}

function Child2() {
  console.log('Child2');
  return (
    <Component>
      Child2
      <Container>
        <Child5 />
        <Child6 />
      </Container>
    </Component>
  );
}

function Child3() {
  const greeting = useSelector((state) => state);
  console.log('Child3');
  return <Component>Child3 : {greeting} </Component>;
}

function Child4() {
  console.log('Child4');
  return <Component>Child4</Component>;
}

function Child5() {
  console.log('Child5');
  return <Component>Child5</Component>;
}

function Child6() {
  console.log('Child6');
  const dispatch = useDispatch();
  const addBang = () => {
    dispatch({ type: 'AddBang' });
  };
  return (
    <Component>
      Child6
      <button onClick={addBang}>👋</button>
    </Component>
  );
}
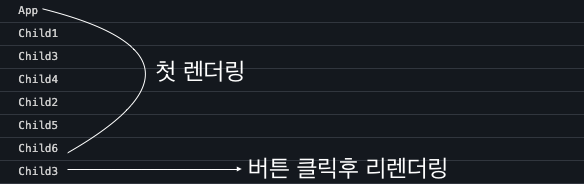
위의 코드는 Redux를 활용하여 전역 상태 관리를 할 수 있게 만들어 앞 전에 설명했던 코드와 다르게 버튼을 누르면 child3만 리렌더링이 되고 있다.