오늘 학습한 내용
JSX
JavaScript를 확장한 문법으로 Babel을 통해 JSX를 브라우저가 이해할 수 있는 JavaScript로 컴파일한다.
JSX는 DOM 코드보다 명시적으로 코드를 작성할 수 있으며, HTML문법을 동시에 이용해 기능과 구조를 한눈에 확인할 수 있다. (구조와 동작에 코드를 뭉쳐놓은 컴포넌트)
JSX 없이도 React요소를 만들 수 있지만 코드가 복잡해지고 가독성이 많이 떨어진다.
import "./styles.css";

const user = {
  firstName: "HTML",
  lastName: "DOM"
};

function formatName(user) {
  return user.firstName + " " + user.lastName;
}

const heading = document.createElement("h1");
heading.textContent = `Hello, ${formatName(user)}`;
document.body.appendChild(heading);
import React from "react";
import "./styles.css";

function App() {
  const user = {
    firstName: "React",
    lastName: "JSX Activity"
  };

  function formatName(user) {
    return user.firstName + " " + user.lastName;
  }
  // JSX 없이 활용한 React
  return React.createElement("h1", null, `Hello, ${formatName(user)}!`);

  // JSX 를 활용한 React
   return <h1>Hello, {formatName(user)}!</h1>;
}

export default App;
JSX 문법
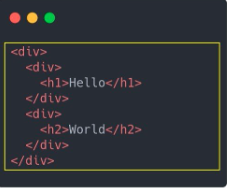
- 여러 엘리먼트를 사용해야 되는 경우 , 최상위에서
opening tag와closing tag로 감싸준다. - className = html의
class와는 달리 JSX는className을 사용한다. - JSX에서 Javascrpit를 사용할 시, 중괄호({})를 사용해주고 사용하지 않으면 일반 텍스트로 인식한다.
- React엘리먼트가 JSX로 작성되면
대문자로 시작 (사용자 정의 컴포넌트 )
function Hello(){
  return <div> Hello!</div>
}
function Helloread(){
  return <Hello />
}- 조건부 렌더링은 삼항연산자를 사용한다.
<div>
  {
    (1+1 ===2) ? (<p>정답</p>) : (<p>탈락</p>)
    }
</div>- 여러 개의 HTML엘리먼트를 표시할 때, map()함수 사용
map 함수는 꼭 'key' JSX속성을 넣어야한다. 넣지 않으면 key를 각 항목에 넣으라는 경고가 표시된다.
const posts = {
  {id: 1, title: 'Hello World', content : "Welcome to learning React!"},
  {id: 2, title: 'Install', content : "install React!"}
};

function Blog(){
  const content = post.map((post)=>
	<div> key = {post.id}
		<h3>{post.title}</h3>
		<p>{post.content}</p>
	</div>
	);
return (
	<div>
		{content}
	</div>
	);
}
예제
const posts = [
{ id: 1, title: "Hello World", content: "Welcome to learning React" },
{ id: 2, title: "Installation", content: "You can install React from npm" }
];
export default function App() {
// 한 포스트의 정보를 담은 객체 post를 매개변수로 받고
// obj를 JSX 표현식으로 바꿔 리턴해주는 함수 postToJSX
const postToJSX = (post) => {
return (
<div key={post.id}>
<h3>{post.title}</h3>
<p>{post.content}</p>
</div>
);
};
// TODO: postToJSX 함수를 이용하여 에러를 해결하고 여러 개의 엘리먼트롤 표시해보세요.
return (
<div className="App">
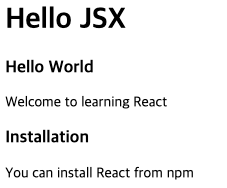
<h1>Hello JSX</h1>
{posts.map(postToJSX)}
</div>
);
}- 결과
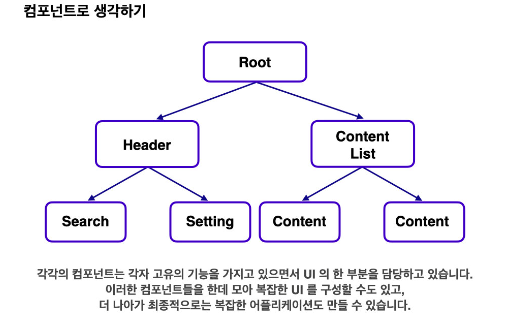
컴포넌트
'하나의 기능 구현을 위한 여러 종류의 코드 묶음' , 'UI를 구성하는 필수 요소'
- 모든 리액트 App은 최소 한 개의 컴포넌트를 가지고 있으며, 이 컴포넌트는 App 내부적으로 root가 되는 역할을 한다. 트리 구조로 계속해서 형상화를 할 수가 있다.
- 컴포넌트의 장점
- 기존 개발
1. HTML로 구조를 바꾼다.
2. CSS를 수정한다.
3. 변경된 구조와 디자인에 맞춰 DOM 조작 로직을 수정한다.
컴포넌트는 각자의 기능을 가지고 있고, UI의 한 부분을 맡고 있어 수정사항에 맞추어 기존 컴포넌트의 위치만 바꾸어 주면 된다.- 컴포넌트 개발 1. 변경하려는 UI에 맞추어 컴포넌트의 위치만 수정한다.
Creat React App
리액트 SPA를 쉽고 빠르게 개발할 수 있도록 만들어진 툴 체인
(SPA:필요한 데이터만 받아와서 부분을 업데이트 하는 방식으로 작동하는 웹사이트)
- React 생성법
- 원하는 디렉토리안으로 들어간다.
- npx create-reat-app (원하는 프로젝트명)
react-scripts startornpm run start: React의 앱을 실행할 수가 있다.
React Twittler intro
- Sidebar
FontAwesomeIcon을 받아와 sidebar에 출력 시켜준다. - Counter
'dummyData.js'에 데이터를 받아와 Object.key().length를 통해 total:{Todo}에 출력를 해준다. - Footer
시멘틱요소를 사용해서 'Copyright @ 2022 Code States'와 로고를 출력
4.Tweets
- map함수를 통해 dummyTweets의 키 값을 (tweet)로 받아준다.
- li.tweet에tweet__profile에는 img태그를 사용해 tweet.picture를 출력해준다.
- 'packhacker'의 경우 색이 다르게 출력을 해주기 위해 먼저 변수에 삼항연산자로
'parkhacker'이면 className ='tweet__username tweet__username--purple'이 되게 만들어준다.
- 마지막으로tweet__userinfo밖에 메세지를 출력해준다.
import React from 'react';
import './App.css';
import './global-style.css';
import { dummyTweets } from './static/dummyData';
import { FontAwesomeIcon } from "@fortawesome/react-fontawesome";
import { faCommentDots } from "@fortawesome/free-regular-svg-icons";

// ! 위 코드는 수정하지 않습니다.
console.log(dummyTweets); // 개발 단계에서 사용하는 더미 데이터입니다.


// 1번
const Sidebar = () => {

  const font = <FontAwesomeIcon icon={faCommentDots}/>
  return (
    <section className="sidebar">
      {<i className="far fa-comment-dots" src= {font}></i>}
    </section>
  );
};

const Counter = () => {
  return (
    <div className="tweetForm__input">
      <div className="tweetForm__inputWrapper">
        <div className="tweetForm__count" role="status">
          total:{Object.keys(dummyTweets).length}   //2번
        </div>
      </div>
    </div>
  );
};

const Footer = () => {
  return (
    <footer>
      <img id="logo" src={`${process.env.PUBLIC_URL}/codestates-logo.png`} />
      Copyright @ 2022 Code States
    </footer> //3번
  );
};
// TODO : Footer 함수 컴포넌트를 작성합니다. 시멘틱 엘리먼트 footer가 포함되어야 합니다.

const Tweets = () => {
  return (
    <ul className="tweets"> //4번
      {dummyTweets.map((tweet) => {
        const isPark = tweet.username === 'parkhacker'
        const tweetUserName = isPark ? 'tweet__username tweet__username--purple':'tweet__username'
        return (
          <li className="tweet" key={tweet.id}>
            <div className="tweet__profile">
              {<img src = {tweet.picture}></img>}
            </div>
            <div className="tweet__content">
              <div className="tweet__userInfo">
                {/* TODO : 이름이 "parkhacker"인 경우, 이름 배경색을 rgb(235, 229, 249)으로 바꿔야 합니다. */}
                {<span className={tweetUserName}>{tweet.username}</span>}
                {<span className='tweet__createdAt'>{tweet.createdAt}</span>}
              </div>
              <div className='tweet__message'>{tweet.content}</div>
            </div>
          </li>
        );
      })}
    </ul>
  );
};

const Features = () => {
  return (
    <section className="features">
      <div className="tweetForm__container">
        <div className="tweetForm__wrapper">
          <div className="tweetForm__profile"></div>
          <Counter />
        </div>
      </div>
        <Tweets />
      <Footer />
    </section>
  );
};

const App = () => {
  return (
    <div className="App">
      <main>
        <Sidebar />
        <Features />
      </main>
    </div>
  );
};

// ! 아래 코드는 수정하지 않습니다.
export { App, Sidebar, Counter, Tweets, Features, Footer };
잘 모르는 부분
- 평소에 사용하지 않는 문법을 새로 배우는 것이다 보니 아직 문법이 헷갈리는 부분들이 있다.
어려웠던 부분
- 어려웠던 부분은 없는 것 같다 단지, 문법이 아직 어색할 뿐인거 같다.
느낀점
- 오늘 Intro만 한 것이지만 앞써 웹 개발했던것 보다 눈에 잘보여 훨씬 수월하게 개발을 진행을 할 수 있을거 같으며, 원리나 원칙들은 조금 거 찾아보고 많이 접해보면서 실력을 키워가야겠다.