1. INTRO
안녕하세요, 폼과 ref 활용 방법을 배웠습니다. 회사에서 썼던 프론트 프레임워크는 도형을 가져다 놓으면 알아서 그림을 그려주고, 이벤트 함수를 링크해서 로직만 짜면 됐었는데, 예제로 경험한 리액트 라이브러리는 수동으로 모든 걸 설정하는 느낌이 들어요. 좀 더 자세히 개념을 익혀보기로 해요.
2. 폼

js의 폼 태그는 브라우저에서 입력된 데이터를 서버가 인식해서 데이터를 처리하게 하는 기능을 하는데, 리액트에선 서버에서 요청이 발생되지 않도록 해줘야한다. 폼 태그에서 onSubmit 이벤트 발생 시(전송 버튼을 클릭하면) 브라우저에서 서버로 요청이 발생해서 상태변수가 초기화되는 문제가 발생하기 때문이다. 핸들러로 이벤트 처리하여 서버로 요청이 전달되지 않도록 처리해야한다.
- 폼 태그 사용 시 유의하여 넣어줄 코드 : e.preventDefault();
const handleSubmit = e => {
console.log("form 태그의 기본 동작이 처리되지 않도록 설정")
e.preventDefault();
console.log("서버로 요청이 전달되지 않도록 처리");
console.log("자바스크립트 코드를 이용해서 서버로 값을 전달하고, 전달받은 값을 사용하는 기능을 구현");
};
import { useState } from "react";

function App() {
  const [count, setCount] = useState(0);

  const handleSubmit = e => {
    console.log("form 태그의 기본 동작이 처리되지 않도록 설정")
    e.preventDefault();
    console.log("서버로 요청이 전달되지 않도록 처리");
    console.log("자바스크립 코드를 이용해서 서버로 값을 전달하고, 전달받은 값을 사용하는 기능을 구현");
  };

  return (
    <>
      <h1>{count}</h1>
      <button onClick={() => setCount(count + 1)}>카운트 증가</button>

      <form onSubmit={handleSubmit}>
        <button type="submit">전송</button>
      </form>
    </>
  );
}
export default App;
3. ref
DOM 요소나 React 컴포넌트에 대한 참조를 생성하고 관리하는 데 사용되는 특별한 속성.
render 메서드에서 생성된 DOM 노드나 React 엘리먼트에 접근하는 방법을 제공한다.
- 사용 사례
포커스, 텍스트 선택 영역, 혹은 미디어의 재생을 관리할 때,
동영상을 직접 실행할 때, 3rd party DOM 라이브러리를 React와 같이 사용할 때
- 사용 방법
React.createRef() API를 이용하는 방법 (React 16.3에 추가. 사용 권장)
class MyComponent extends Component {
    constructor(props) {
        super(props);
        this.myRef = React.createRef();
    }
    render() {
        return <input ref={this.myRef}/>;
    }
    handler = () => {
        const node = this.myref.current;
        node.focus();
    }
}
콜백 ref를 이용하는 방법
ref 어트리뷰트에 React.createRef()를 통해 생성된 ref를 전달하는 대신, 함수를 전달한다.
전달된 함수는 다른 곳에 저장되고 접근될 수 있는 React 컴포넌트의 인스턴스나 DOM 엘리먼트를 인자로 받는다.

- 패스워드를 검증하는 컴포넌트 작성
패스워드 입력창의 내용이 0000이면 배경색을 파란색으로, 아니면 붉은색으로 설정
App.js 파일에 PasswordChecker 컴포넌트를 추가
[App.js]
import PasswordChecker from "./PasswordChecker";

export default function App() {
  return <PasswordChecker />;
}
PasswordChecker.js 컴포넌트 파일 생성 후 패스워드 검증 버튼을 클릭했을 때 동작을 추가
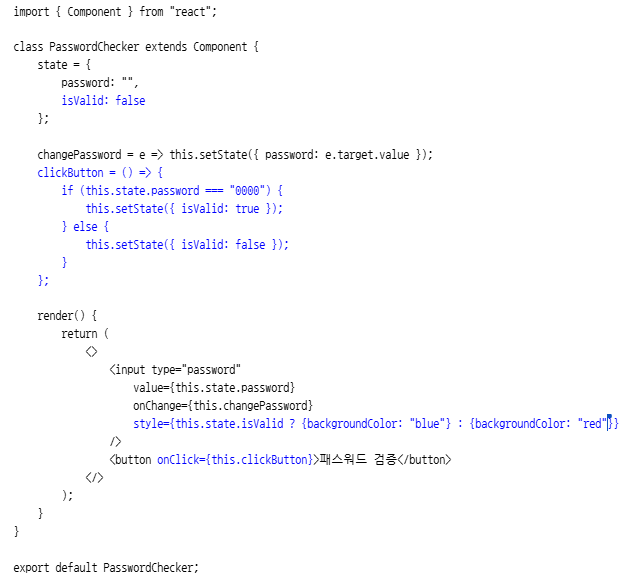
패스워드가 잘못되었을 때 패스워드 입력창에 포커스가 전달되도록 수정
- 콜백 함수를 이용하는 방법
clickButton = () => {
        if (this.state.password === "0000") {
            this.setState({ isValid: true });
        } else {
            this.setState({ isValid: false });
            **this.myInput.focus();**
        }
    };

    render() {
        return (
            <>
                <input type="password"
                    value={this.state.password}
                    onChange={this.changePassword}
                    style={this.state.isValid ? {backgroundColor: "blue"} : {backgroundColor: "red"}}
                    **ref={x => this.myInput = x}**
                />
                <button onClick={this.clickButton}>패스워드 검증</button>
            </>
        );
    }
- createRef()를 이용하는 방법
**import React, { Component } from "react";**

class PasswordChecker extends Component {
    state = {
        password: "",
        isValid: false
    };

   ** myInput = React.createRef();**

    changePassword = e => this.setState({ password: e.target.value });
    clickButton = () => {
        if (this.state.password === "0000") {
            this.setState({ isValid: true });
        } else {
            this.setState({ isValid: false });
            **this.myInput.current.focus();**
        }
    };

    render() {
        return (
            <>
                <input type="password"
                    value={this.state.password}
                    onChange={this.changePassword}
                    style={this.state.isValid ? {backgroundColor: "blue"} : {backgroundColor: "red"}}
                    **ref={this.myInput}**
                />
                <button onClick={this.clickButton}>패스워드 검증</button>
            </>
        );
    }
}

export default PasswordChecker;
- 스크롤 박스 구현
App.js
import ScrollBox from "./ref/ScrollBox";

function App() {
  return <ScrollBox />;
}
export default App;
ref 디렉터리를 생성하고, 생성한 디렉터리에 ScrollBox.js 파일을 추가
ScrollBox 컴포넌트에 맨 위로 이동, 맨 아래로 이동 버튼을 추가
import { Component } from "react";

class ScrollBox extends Component {
    scrollBottom = () => {
        /*
        const scrollHeight = this.myDiv.scrollHeight;
        const clientHeight = this.myDiv.clientHeight;
        */
        const { scrollHeight, clientHeight } = this.myDiv;
        this.myDiv.scrollTop = scrollHeight - clientHeight;
    };

    scrollTop = () => {
        this.myDiv.scrollTop = 0;
    };

    render() {
        const styles = {
            outer: {
                border: "1px solid black",
                height: 300,
                width: 300,
                overflow: "auto"
            },
            inner: {
                width: "100%",
                height: 650,
                background: "linear-gradient(white, black)"
            }
        };

        return (
            <>
                <div style={styles.outer} ref={x => this.myDiv = x}>
                    <div style={styles.inner}></div>
                </div>
                <div>
                    <button onClick={this.scrollTop}>맨 위로 이동</button>
                    <button onClick={this.scrollBottom}>맨 아래로 이동</button>
                </div>
            </>
        );
    }
}

export default ScrollBox;
createRef() 사용하는 것으로 변경
import React, { Component } from "react";

class ScrollBox extends Component {
    myDiv = React.createRef();

    scrollBottom = () => {
        const { scrollHeight, clientHeight } = this.myDiv.current;
        this.myDiv.current.scrollTop = scrollHeight - clientHeight;
    };

    scrollTop = () => {
        this.myDiv.current.scrollTop = 0;
    };

    render() {
        const styles = {
            outer: {
                border: "1px solid black",
                height: 300,
                width: 300,
                overflow: "auto"
            },
            inner: {
                width: "100%",
                height: 650,
                background: "linear-gradient(white, black)"
            }
        };

        return (
            <>
                <div style={styles.outer} ref={this.myDiv}>
                    <div style={styles.inner}></div>
                </div>
                <div>
                    <button onClick={this.scrollTop}>맨 위로 이동</button>
                    <button onClick={this.scrollBottom}>맨 아래로 이동</button>
                </div>
            </>
        );
    }
}

export default ScrollBox;
- 실습: ID, PW 검증
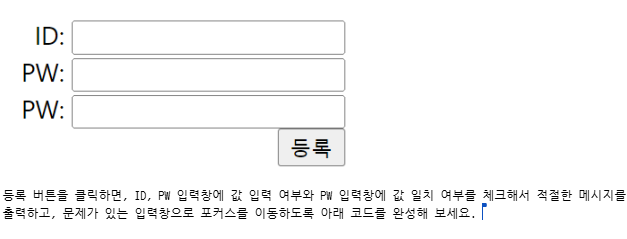
App.js
import { Component } from "react";

class App extends Component {
  render() {
    return (
      <div>
        ID: <input type="text" /><br />
        PW: <input type="password" /><br />
        PW: <input type="password" /><br />
        <button type="submit">등록</button>
      </div>
    );
  }
}

export default App;
상태변수와 상태변수를 변경하는 핸들러 함수를 정의하고 설정
계산된 속성명을 이용해서 이벤트 핸들러 함수를 하나의 함수로 변경
입력창을 직접 제어하기 위한 ref를 추가 (콜백 함수 형태)
등록 버튼을 클릭했을 때 동작을 추가
import { Component } from "react";

class App extends Component {
  state = {
    userId: "",
    userPw1: "",
    userPw2: "",
  };

  /*
  changeUserId = e => this.setState({ userId: e.target.value });
  changeUserPw1 = e => this.setState({ userPw1: e.target.value });
  changeUserPw2 = e => this.setState({ userPw2: e.target.value });
  */
  changeUser = e => this.setState({ [e.target.name]: e.target.value });

  render() {
    const { userId, userPw1, userPw2 } = this.state;
    return (
      <div>
        ID: <input ref={x => this.refUserId = x} type="text" value={userId} name="userId" onChange={this.changeUser} /><br />
        PW: <input ref={x => this.refUserPw1 = x} type="password" value={userPw1} name="userPw1" onChange={this.changeUser} /><br />
        PW: <input ref={x => this.refUserPw2 = x} type="password" value={userPw2} name="userPw2" onChange={this.changeUser} /><br />
        <button type="submit">등록</button>
      </div>
    );
  }
}

export default App;


등록 버튼을 클릭했을 때 동작을 추가
import { Component } from "react";

class App extends Component {
  state = {
    userId: "",
    userPw1: "",
    userPw2: "",
  };

  changeUser = e => this.setState({ [e.target.name]: e.target.value });
  clickButton = e => {
    // Submit 버튼의 기본 동작을 중지
    e.preventDefault();

    // 객체 비구조화를 통해 상태변수를 지역변수로 변경
    const { userId, userPw1, userPw2 } = this.state;

    // 입력 여부 체크
    if (userId.trim() === "") {
      alert("ID를 입력하세요.");
      this.refUserId.focus();
      return;
    }
    if (userPw1.trim() === "") {
      alert("PW1를 입력하세요.");
      this.refUserPw1.focus();
      return;
    }
    if (userPw2.trim() === "") {
      alert("PW2를 입력하세요.");
      this.refUserPw2.focus();
      return;
    }

    // 패스워드 일치 여부를 확인
    if (userPw1.trim() !== userPw2.trim()) {
      alert("PW와 PW 확인이 일치하지 않습니다.");
      this.setState({ userPw1: "", userPw2: "" });
      this.refUserPw1.focus();
      return;
    }

    // 입력 내용을 alert 창으로 출력
    alert(`ID: ${userId}\nPW1: ${userPw1}\nPW2: ${userPw2}`);
  };

  render() {
    const { userId, userPw1, userPw2 } = this.state;
    return (
      <div>
        ID: <input ref={x => this.refUserId = x} type="text" value={userId} name="userId" onChange={this.changeUser} /><br />
        PW: <input ref={x => this.refUserPw1 = x} type="password" value={userPw1} name="userPw1" onChange={this.changeUser} /><br />
        PW: <input ref={x => this.refUserPw2 = x} type="password" value={userPw2} name="userPw2" onChange={this.changeUser} /><br />
        <button type="submit" onClick={this.clickButton}>등록</button>
      </div>
    );
  }
}

export default App;
OUTRO
하루에 실습 예제 7개에 발전시키는 과정까지 진행하는데, 생각보다 양이 많아서 공부만이 답인 것 같습니다. 다시 대학생이 된 기분입니다! 화이팅