INTRO
안녕하세요, 오늘은 컴포넌트의 라이프사이클 메소드에 대한 실습을 진행했습니다. 여러 메서드 중, render(), 생성자, componentDidMount()- 시간이 걸리는 작업 (외부 데이터 가져 올때) 에 대해서는 필수적으로 알아놓아야합니다.
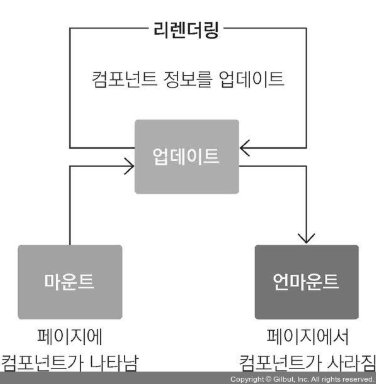
1. 컴포넌트의 라이프사이클 메소드
컴포넌트가 생성, 업데이트, 소멸되는 과정에서 특정 시점에 호출되는 메서드
- 예제
부모 컴포넌트(App)가 랜덤하게 생성한 글자색을 자식 컴포넌트(LifecycleSample)에게 전달하고, 자식 컴포넌트는 글자색을 반영한 카운트를 제공
App.js
App.js 파일에 버튼을 하나 더 추가하고, 해당 버튼을 클릭하면 랜덤 컬러 버튼과 자식 컴포넌트를 토글링해서 보이는 기능을 추가
import { Component } from "react";
import LifecycleSample from "./LifecycleSample";

// 랜덤하게 색상(#0 ~ #ffffff)을 생성하는 함수
const getRandomColor = () => "#" + Math.floor(Math.random() * 16777215).toString(16);

class App extends Component {
  state = {
    color: "#000000",
    isVisible: false
  };

  changeColor = () => {
    console.log("랜덤 컬러 버튼 클릭!!!");
    this.setState({ color: getRandomColor() });
  };

  changeIsVisible = () => {
    console.log(`자식 컴포넌트 ${this.state.isVisible ? "숨기기" : "보이기"} 버튼 클릭!!!`);
    this.setState({ isVisible: !this.state.isVisible });
  };

  render() {
    return (
      <>
        <button onClick={this.changeIsVisible}>자식 컴포넌트 {this.state.isVisible ? "숨기기" : "보이기"}</button>
        {
          this.state.isVisible &&
          <div style={{ border: "1px solid red", padding: 10, margin: 10, borderRadius: 10 }}>
            <button onClick={this.changeColor}>랜덤 컬러</button>
            <LifecycleSample color={this.state.color} />
          </div>
        }
      </>
    );
  }
}

export default App;
LifecycleSample.js 파일을 생성
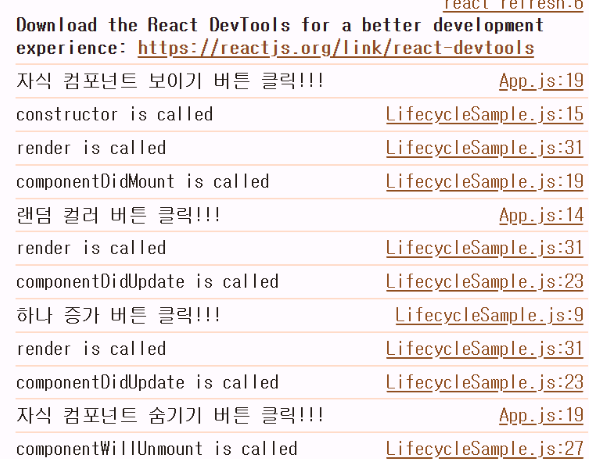
LifecycleSample 컴포넌트에 constructor, componentDidMount, componentDidUpdate, componentWillUnmount 메서드를 추가하고 해당 메서드에 로그를 추가
부모 컴포넌트로부터 전달되는 글자색을 상태변수로 설정하고, 해당 상태변수의 값을 화면에 출력하도록 수정
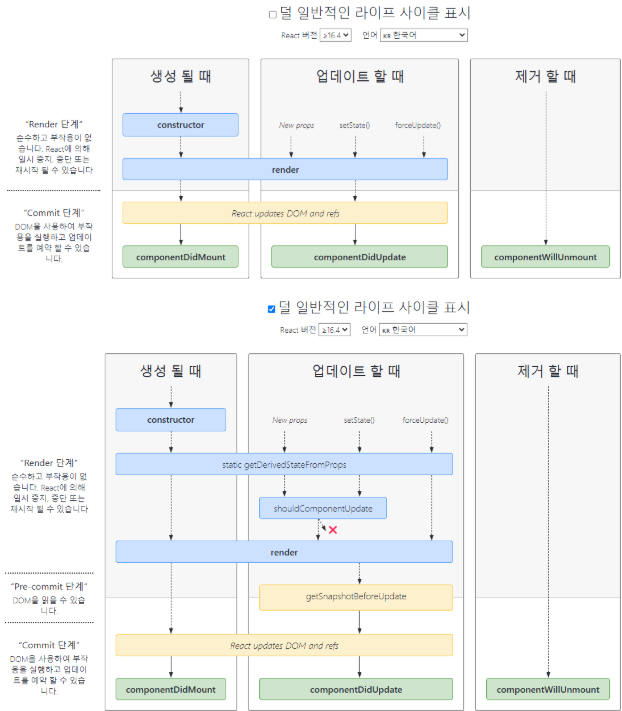
상태변수 업데이트 로직이 없기 때문에 변경된 글자색 정보가 반영되지 않음 ⇒ getDerivedStateFromProps 메서드를 이용해서 props 변수로 전달된 글자색 정보를 상태변수에 반영
카운트가 짝수인 경우에만 리렌더링되도록 수정
리렌더링 직전의 글자색을 로그로 출력하도록 수정
import { Component } from "react";

class LifecycleSample extends Component {
    state = {
        count: 0,
        color: this.props.color
    };

    changeCount = () => {
        console.log("하나 증가 버튼 클릭!!!");
        this.setState({ count: this.state.count + 1 });
    };

    constructor(props) {
        super(props);
        console.log("constructor is called");
    }

    componentDidMount() {
        console.log("componentDidMount is called");
    }

    componentDidUpdate(prevProps, prevState, snapshot) {
        console.log("componentDidUpdate is called");

        if (snapshot) {
            console.log(`업데이트 직전의 글자색: ${snapshot}`);
        }
    }

    componentWillUnmount() {
        console.log("componentWillUnmount is called");
    }

    static getDerivedStateFromProps(props, state) {
        console.log("getDerivedStateFromProps is called");

        if (state.color !== props.color) {
            return { color: props.color };
        }
        return null;
    }

    shouldComponentUpdate(nextProps, nextState) {
        console.log("shouldComponentUpdate is called");

        return nextState.count % 2 === 0
    }

    getSnapshotBeforeUpdate(prevProps, prevState) {
        console.log("getSnapshotBeforeUpdate is called");

        if (prevProps.color !== this.props.color) {
            return prevProps.color;
        }
        return null;
    }

    render() {
        console.log("render is called");

        return (
            <>
                <h1>자식 컴포넌트</h1>
                <h1 style={{ color: this.props.color }}>{this.state.count}</h1>
                <h1>color: {this.state.color}</h1>
                <button onClick={this.changeCount}>하나 증가</button>
            </>
        );
    }
}

export default LifecycleSample;
테스트

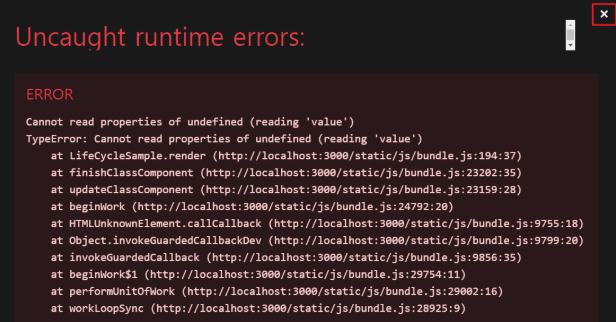
LifecycleSample 컴포넌트의 render 함수에 에러를 발생시키는 코드를 추가
개발 서버를 통해서 제공되는 오류 내용이 출력 ⇒ X 버튼을 클릭하면 오류 내용이 사라지고 아무런 내용이 출력되지 않는 것을 확인
render() {
        console.log("render is called");

        return (
            <>
                {this.state.missing.value} {/* 정의되지 않은 state 변수를 참조 */}
                <h1>자식 컴포넌트</h1>
                <h1 style={{ color: this.props.color }}>{this.state.count}</h1>
                <h1>color: {this.state.color}</h1>
                <button onClick={this.changeCount}>하나 증가</button>
            </>
        );
    }
ErrorBoundaty.js 파일을 생성하고, componentDidCatch 메서드를 추가하여 오류 감지 및 오류 정보 출력
[ErrorBoundaty.js]
componentDidCatch라는 라이프사이클 메세지를 통해 자식 컴포넌트에서 발생한 오류를 잡아내서 적절한 조치를 할 수 있게 한다.
import { Component } from "react";
class ErrorBoundary extends Component {
state = {
error: false,
message: ""
};
componentDidCatch(error, info) {
console.log("componentDidCatch is called");
console.log({ error, info });
this.setState({ error: true, message: error.message });
}
render() {
if (this.state.error) {
return (
<>
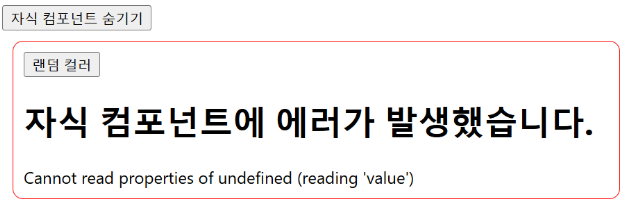
<h1>자식 컴포넌트에 에러가 발생했습니다.</h1>
<div>{this.state.message}</div>
</>
);
} else {
return this.props.children;
}
}
}
export default ErrorBoundary;
[App.js]
ErrorBoundary 를 life-cycle 밖에서 감싸주기.
개발 서버를 통해 제공되는 오류 메세지를 닫으면 ErrorBoundary에서 제공하는 오류 메시지가 출력되는 것을 확인할 수 있다.
import { Component } from "react";
import LifecycleSample from "./LifecycleSample";
import ErrorBoundary from "./ErrorBoundary";

// 랜덤하게 색상(#0 ~ #ffffff)을 생성하는 함수
const getRandomColor = () => "#" + Math.floor(Math.random() * 16777215).toString(16);

class App extends Component {
  state = {
    color: "#000000",
    isVisible: false
  };

  changeColor = () => {
    console.log("랜덤 컬러 버튼 클릭!!!");
    this.setState({ color: getRandomColor() });
  };

  changeIsVisible = () => {
    console.log(`자식 컴포넌트 ${this.state.isVisible ? "숨기기" : "보이기"} 버튼 클릭!!!`);
    this.setState({ isVisible: !this.state.isVisible });
  };

  render() {
    return (
      <>
        <button onClick={this.changeIsVisible}>자식 컴포넌트 {this.state.isVisible ? "숨기기" : "보이기"}</button>
        {
          this.state.isVisible &&
          <div style={{ border: "1px solid red", padding: 10, margin: 10, borderRadius: 10 }}>
            <button onClick={this.changeColor}>랜덤 컬러</button>
            <ErrorBoundary>
              <LifecycleSample color={this.state.color} />
            </ErrorBoundary>
          </div>
        }
      </>
    );
  }
}

export default App;
OUTRO
라이프사이클에 대해 이해하고 있으면, 실제 운영할 때 에러를 잡거나 데이터를 다룰 때 굉장히 유용하겠다는 생각이 듭니다. 간단한 흐름같지만, 아직 익숙하지않아 용어가 복잡하게 느껴집니다. 흐름도를 통해 의미와 문맥을 이해하며 알아두어야겠습니다.

지니니