특정 서비스에 회원가입을 하거나 휴대전화 인증, 이벤트 알림 등 SMS로 문자를 받는 경우가 있다.
이는 해당 서비스에서 CoolSMS, Naver Cloud, SendGrid 같은 외부 API 호출한 것이다.
어떠한 애플리케이션이 가진 기능을 API로 외부에 노출하고, 다른 서버에서 그 API를 호출해서 사용하는 즉, 각 서버가 다른 서버의 클라이언트가 되는 경우가 많다.
이처럼 서버 간 통신을 위해서는 다른 서버로 웹 요청을 보내고 응답을 받을 수 있게 하는 RestTemplate이나 WebClient을 사용해야 한다.
1. RestTemplate
RestTemplate은 스프링에서 Http 통신 기능을 사용할 수 있도록 설계된 Restful 형식을 갖춘 템플릿이다.
기본적으로 동기 방식이고 비동기 방식으로 사용하려면 AsyncRestTemplate을 사용하면 된다.
동작원리나 세부적인 특징은 생략하도록 하고, 학생 정보를 저장하고 조회할 수 있는 외부 API를 호출하는 상황을 설계하면서 RestTemplate의 사용법을 알아보자.
우선, 서버가 총 2개가 필요한데 학생 정보 API를 가진 서버1과 이를 호출하는 서버2를 구성하고 톰캣의 포트를 변경해야 한다.
서버1은 9090포트를, 서버2는 8080포트를 사용하겠다.
1) 별도의 서버 생성
가장 먼저 서버1은 구성해보자.
//application.properties
server.port=9090
포트 번호를 9090으로 변경한 후 학생 정보 데이터를 다룰 DTO를 설계하겠다.
@Getter
@Setter
@ToString
public class StudentDTO {
    private String name;
    private Integer age;
    private String grade;
}
학생 데이터를 저장하고 조회하려면 DB와 연동해야 하는데 단순 호출하고 확인하는 목적으로만 사용할 것이기 때문에 메모리에 저장하는 방식으로 구성하겠다.
public class StudentMemoryRepository {
    private final List<StudentDTO> studentDTOList = new ArrayList<>();

	//학생 정보 저장
    public void saveStudentInfo(StudentDTO studentDTO){
        studentDTOList.add(studentDTO);
    }
	//학생 리스트의 인덱스 번호 조회
    public Integer getStudentIndex(StudentDTO studentDTO){
        return studentDTOList.indexOf(studentDTO);
    }
	//인덱스 번호로 학생 정보 조회
    public StudentDTO findStudetByIndex(int indexNum){
        return studentDTOList.get(indexNum);
    }
}List에 학생 객체를 저장하고 조회할 수 있도록 메서드를 구성하였다.
인덱스 번호 조회하는 기능을 추가한 이유는 학생 정보 저장 시 몇 번 인덱스로 지정되었는지 응답 데이터를 구성하기 위해서이다.
간소화를 위해 서비스 계층은 생략하고 바로 컨트롤러 계층을 만들어보자.
@RestController
@RequestMapping("/studentinfo")
public class CrudController {

    private final StudentMemoryRepository studentMemoryRepository = new StudentMemoryRepository();

	//학생 정보를 저장하면 응답 데이터로 저장한 데이터 객체의 인덱스 번호를 포함
    @PostMapping("/save")
    public ResponseEntity<String> saveStudent(@RequestBody StudentDTO studentDTO){
        studentMemoryRepository.saveStudentInfo(studentDTO);
        return ResponseEntity.status(HttpStatus.OK)
                .body("IndexNumber : " + studentMemoryRepository.getStudentIndex(studentDTO) +" student save complete!");
    }
	//인덱스에 해당하는 학생 정보 데이터를 반환
    @GetMapping("find")
    public ResponseEntity<StudentDTO> findStudet(@RequestParam int indexNum){
        return ResponseEntity.status(HttpStatus.OK)
                .body(studentMemoryRepository.findStudetByIndex(indexNum));
    }

}
2) RestTemplate 구현
이제 서버1의 API를 호출할 서버2를 구성해보자.
컨트롤러와 서비스 계층으로 구성할 것이며 RestTemplate을 사용하기 위해 다음의 의존성을 추가해야 한다.
implementation 'org.springframework.boot:spring-boot-starter-web'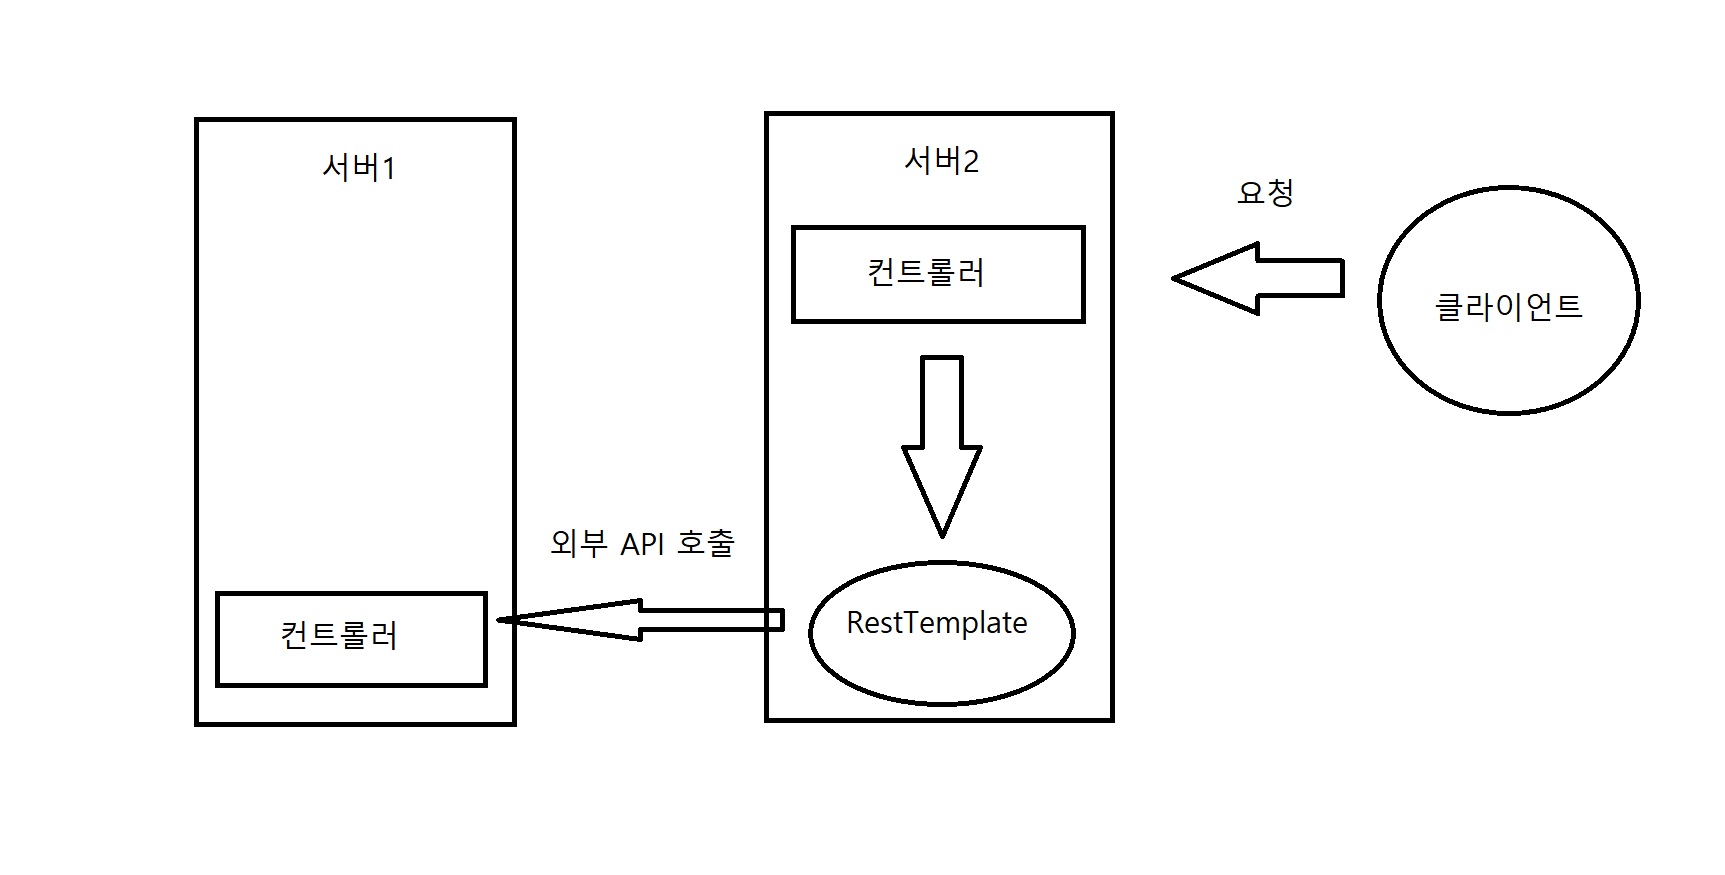
그림처럼 서버2에서 외부 API가 필요하여 호출하면 RestTemplate을 통해 서버1가 통신이 되는 것이고 해당 API를 호출할 수 있는 것이다.
그림에서는 컨트롤러가 요청했지만 서비스 계층이 있기 때문에 컨트롤러 -> 서비스 -> RestTemplate 순으로 요청이 될 것이다.
서비스 계층 구현
@Service
public class RestTemplateService {

    //학생 정보를 저장하는 기능
    public String saveStudentByParameter(StudentDTO studentDTO){
        URI uri = UriComponentsBuilder.fromUriString("http://localhost:9090")
        		.path("/studentinfo/save")
                .encode()
                .build()
                .toUri();
        RestTemplate restTemplate = new RestTemplate();

        return restTemplate.postForObject(uri,studentDTO, String.class);
    }

    //학생 정보를 조회하는 기능
    public StudentDTO findStudentByIndex(int index){
        URI uri = UriComponentsBuilder.fromUriString("http://localhost:9090")
        		.path("/studentinfo/find")
                .queryParam("indexNum", index)
                .encode()
                .build()
                .toUri();
        RestTemplate restTemplate = new RestTemplate();

        return restTemplate.getForObject(uri, StudentDTO.class);
    }
}
학생 정보 데이터를 저장하는 기능과 조회하는 기능을 구성하였고 각각 서버1의 POST방식의 API와 GET 방식의 API를 호출한다.
호출하려는 API의 서버와 연결하려면 해당 서버의 URI가 필요한데, UriComponentBuilder를 사용하면 해결된다.
fromUriString()으로 포트번호까지의 주소를 입력하고 path()로 세부경로를 지정하면 된다.
서버1의 POST 메서드의 경우 /studentinfo/save로, GET 메서드는 /studentinfo/find로 지정하였다.
encode()는 인코딩 문자셋을 설정할 수 있는 메서드인데 매개변수를 입력하지 않으면 기본값인 UTF-8로 설정된다.
build()를 호출한 후 마지막에 toUri()로 URI 타입으로 리턴하였는데 만약 String 타입으로 리턴하고 싶다면 toUriString()을 호출하면 된다.
이렇게 반환한 URI는 응답 데이터를 요청하는 RestTemplate의 인스턴스 메서드의 매개변수로 사용된다.(ex.getForEntity(),postForEntity(),exchange() 등)
학생 정보를 저장하는 기능에서 호출하려는 서버1의 메서드가 매개변수로 @RequestBody를 받기 때문에 이를 넘겨주려면 postForObject()의 2번째 인자를 사용하면 된다.
생성된 RestTemplate 객체에서 postForEntity()를 호출할 수 있는데 POST 요청을 보내고 응답 데이터 전체(헤더, 본문, 상태)를 받는 기능이다.
만약, 본문만 받고 싶다면 getBody()를 추가로 호출하거나 postForEntity() 대신 postForObject()를 호출하면 된다.
학생 정보를 조회하는 기능에서는 queryParam()이라는 메서드를 호출하였는데, 이는 외부 서버에 요청한 API가 @RequestParam으로 매개변수를 받는 API일 경우 그 매개변수로 들어갈 값을 정하는 기능이다.
key-value 형식으로 입력되며 위의 예시의 경우에는 http://localhost:9090/studentinfo/find?indexNum=입력값 형식으로 GET 요청을 하게 된다.
만약, 호출하려는 API가 @PathVariable로 매개변수를 받을 경우 queryParam() 대신 expand()를 호출하여 매개변수로 세부 경로에 입력될 값을 입력하면 된다.
//ex)호출하려는 메서드의 경로가 "http://localhost:9090/studentinfo/find/{indexnum}"인 경우
//expand()의 매개변수가 호출하려는 외부 API의 매개변수로 입력됨

URI uri = UriComponentsBuilder.fromUriString("http://localhost:9090")
			.path("/studentinfo/find/{indexnum}")
            .encode().build().expand(2).toUri();
한 가지 주의해야 할 점은 POST 메서드를 호출할 경우 postForObject()나 postForEntity()를 사용해야 한다.(반대의 경우도 마찬가지)
getForObject()를 호출할 경우 런타임 에러가 발생하기 때문에 반드시 주의해야 한다.
컨트롤러 계층 구성
위에서 만든 서비스 계층을 호출하는 컨트롤러 계층을 만들어보자.
@RestController
@RequestMapping("/rest-template")
public class RestTemplateController {

    private final RestTemplateService restTemplateService;

    public RestTemplateController(RestTemplateService restTemplateService) {
        this.restTemplateService = restTemplateService;
    }

    @PostMapping
    public ResponseEntity<String> saveStudent(@RequestBody StudentDTO studentDTO){
        return ResponseEntity.status(HttpStatus.OK)
                .body(restTemplateService.saveStudentByParameter(studentDTO));
    }

    @GetMapping
    public ResponseEntity<StudentDTO> findStudent(@RequestParam int index){
        return ResponseEntity.status(HttpStatus.OK)
        .body(restTemplateService.findStudentByIndex(index));
    }

}
단순 호출이기 때문에 크게 어려울 건 없다. Swagger UI로 정상적으로 서버 간 통신이 되는지 확인해보자.(서버 1,2 둘 다 실행해야 한다)
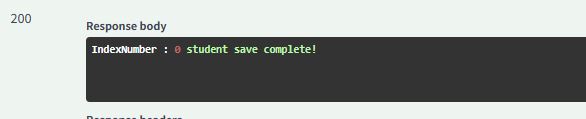
요청한 학생 정보 데이터가 저장되었고 가장 먼저 저장했기 때문에 인덱스 번호로 0이 된 것을 응답 데이터로 확인할 수 있다.
이제 학생 정보를 요청해보겠다.

정상적으로 작동한다.
예시로 만든 서버에서는 메모리에 저장하기 때문에 컴퓨터를 끄면 전부 휘발되어 버린다. 데이터를 지속 보관하고 사용하려면 DB와 연동해야 하고 동일하게 해당 API를 다른 서버에서 호출한다면 DB의 테이블 내용도 변하는 것을 확인할 수 있을 것이다.
2. WebClient
스프링 부트 최신 버전에서는 RestTemplate 지원이 중단(deprecated)되었기 때문에 Webclient를 사용할 것을 권장하고 있다.
Spring WebFlux에서 제공하는 WebClient는 리액터 기반으로 동작하며 비동기 형식으로 사용이 가능하다.
WebClient를 사용하려면 Spring WebFlux 의존성을 추가해야 한다.
implementation 'org.springframework.boot:spring-boot-starter-webflux'WebClient를 구현하는 방법은 2가지가 있는데 create()를 사용하거나 builder()를 사용하는 것이다.
1) create()로 구현
기존에 RestTemplate으로 구현한 예시를 WebClient로 변경할 것이기 때문에 서비스 계층만 수정해보자.
@Service
public class RestTemplateService {

	//학생 정보를 저장하는 기능
    public String saveStudentByParameter(StudentDTO studentDTO){
        WebClient webClient = WebClient.create("http://localhost:9090");
        return webClient.post()
                .uri(uriBuilder -> uriBuilder.path("/studentinfo/save").build())
                .bodyValue(studentDTO)
                .retrieve()
                .bodyToMono(String.class)
                .block();
    }

	//학생 정보를 조회하는 기능
    public StudentDTO findStudentByIndex(int index){
        WebClient webClient = WebClient.create("http://localhost:9090");
        return webClient.get()
        .uri(
        uriBuilder -> uriBuilder.path("/studentinfo/find").queryParam("indexNum",index).build()
        )
                .retrieve()
                .bodyToMono(StudentDTO.class)
                .block();
    }
}RestTemplate과 다르게 WebClient에서는 생성하면서 URI 설정이 가능하다.
9090 포트로 경로가 설정된 WebClient 객체를 생성 후 호출하려는 API에 따라 POST 요청일 경우 post()를, GET 요청일 경우 get()을 호출한다.
요청 방식을 지정하면 uri() 호출이 가능한데 세부경로만 입력하거나 람다식으로 추가 설정을 할 수 있다. queryParam()을 람다식에서 추가로 호출해서 매개변수로 넘겨줄 수 있고 build()에 매개변수를 입력하여 PathVariable 방식의 외부 API에 인자를 넘길 수도 있다.(expand()와 비슷함)
POST 방식으로 HTTP Body를 넘기고 싶다면 uri() 호출 후 bodyValue()의 인자로 입력하면 된다.
URI 설정이 끝났으면 retrive()를 호출하여 요청을 전송하고 응답을 받은 준비를 할 수 있는데 toEntity()를 호출하면 ResponseEntity 형식으로 응답을 받을 수 있고 bodyToMono()를 호출하면 매개변수로 지정된 타입으로 본문만 받을 수 있다.
마지막에 block()를 호출해주어야 하는데, WebClient는 기본적으로 Non-Blocking 방식으로 동작하기 때문에 Blocking 구조로 변경해야 하기 때문이다.
한 번 빌드된 WebClient는 변경될 수 없는데 복사는 가능하다.
@Service
public class RestTemplateService {

    private final WebClient webClient = WebClient.create("http://localhost:9090");

    //학생 정보를 저장하는 기능
    public String saveStudentByParameter(StudentDTO studentDTO){
        WebClient clone1 = webClient.mutate().build();
        return clone1.post()
                .uri(uriBuilder -> uriBuilder.path("/studentinfo/save").build())
                .bodyValue(studentDTO)
                .retrieve()
                .bodyToMono(String.class)
                .block();
    }

	//학생 정보를 조회하는 기능
    public StudentDTO findStudentByIndex(int index){
        WebClient clone2 = webClient.mutate().build();
        return clone2.get().uri(
        uriBuilder -> uriBuilder.path("/studentinfo/find").queryParam("indexNum",index).build()
        )
                .retrieve()
                .bodyToMono(StudentDTO.class)
                .block();
    }
}
이렇게 mutate()를 호출해서 이미 생성된 객체를 복사해서 사용할 수 있다.
2) builder()로 구현
@Service
public class RestTemplateService {

    //학생 정보를 저장하는 기능
    public String saveStudentByParameter(StudentDTO studentDTO){
        WebClient webClient = WebClient.builder().baseUrl("http://localhost:9090")
                .defaultHeader(HttpHeaders.CONTENT_TYPE, MediaType.APPLICATION_JSON_VALUE)
                .build();

        return webClient.post()
                .uri(uriBuilder -> uriBuilder.path("/studentinfo/save").build())
                .bodyValue(studentDTO)
                .retrieve()
                .bodyToMono(String.class)
                .block();
    }

	//학생 정보를 조회하는 기능
    public StudentDTO findStudentByIndex(int index){
        WebClient webClient = WebClient.builder().baseUrl("http://localhost:9090")
                .defaultHeader(HttpHeaders.CONTENT_TYPE,MediaType.APPLICATION_JSON_VALUE)
                .build();

        return webClient.get().uri(
        uriBuilder -> uriBuilder.path("/studentinfo/find").queryParam("indexNum",index).build()
        )
                .retrieve()
                .bodyToMono(StudentDTO.class)
                .block();
    }
}builder()로 구현을 하면 빌더 패턴으로 커스터마이징이 가능하고 기본 헤더, base URL, 타임아웃, 커넥션 풀 등 다양하게 설정 가능하다. 예시에서도 defaultHeader()를 호출하여 기본 헤더를 설정하였다.
WebClient 구현은 테스트나 간단한 구현이 아닌 이상 이 방식을 사용하는 것이 좋다.
3) 응답 결과에 따라 다르게 응답 설정
WebClient가 다른 서버에 API 호출을 요청 했는데 응답으로 받는 상태 코드가 다양할 수 있다.
예를 들어, 서버가 정상적으로 작동하여 200 응답을 받을 수 있고 아니면 존재하지 않는 데이터를 요청해서 404를 받을 수 있다.
exchangeToMono()를 사용하면 응답으로 받은 상태 코드에 따라 다르게 응답(클라이언트에게) 설정이 가능하다.
위 예시 중 학생 데이터를 조회하는 기능에 각각 200, 404, 500을 받을 경우 다르게 응답하게 구성해보자.
가장 먼저 서버1의 API를 수정해야한다.
    //서버1의 get 메서드

    @GetMapping("find")
    public ResponseEntity<StudentDTO> findStudet(@RequestParam int indexNum){
        if(indexNum >= studentMemoryRepository.getSizeOfList()){
            return ResponseEntity.status(HttpStatus.NOT_FOUND).build();
        }
        return ResponseEntity.status(HttpStatus.OK)
                .body(studentMemoryRepository.findStudetByIndex(indexNum));
}getSizeOfList()는 레포지토리에 있는 리스트의 크기를 반환하는 직접 만든 메서드이다.
리스트에 존재하지 않는 인덱스 번호는 리스트의 크기보다 크거나 같기 때문에 조건문으로 404 상태 코드를 반환하도록 수정하였다.
리스트에 존재하는 인덱스이면 정상적으로 응답 데이터를 반환한다.
다음은 서버2의 서비스 계층을 수정해보자.
//서비스 계층의 학생 정보 조회 기능

public StudentDTO findStudentByIndex(int index){
        WebClient webClient = WebClient.builder().baseUrl("http://localhost:9090")
                .defaultHeader(HttpHeaders.CONTENT_TYPE,MediaType.APPLICATION_JSON_VALUE).build();

return webClient.get().uri(uriBuilder -> uriBuilder.path("/studentinfo/find")
.queryParam("indexNum",index).build())
                .exchangeToMono(clientResponse -> {
                    HttpStatusCode status = clientResponse.statusCode();

                    if(status.is2xxSuccessful()){
                        return clientResponse.bodyToMono(StudentDTO.class);
                    }
                    else if (status.equals(HttpStatus.NOT_FOUND)) {
                        return Mono.error(new IllegalStateException("404 - 해당 데이터 없음"));
                    }
                    else if (status.is5xxServerError()) {
                        return Mono.error(new RuntimeException("서버에 문제가 있음"));
                    }
                    else {
                        return Mono.error(new RuntimeException("알 수 없는 오류"));
                    }
                })
                .block();
    }
클라이언트(서버1)의 응답에서 상태 코드를 statusCode()로 받아 해당하는 코드마다 다른 응답을 하도록 구성했다.
정상적일 경우(200) 본문을 받고 나머지의 경우에는 다르게 예외를 발생시킨다.
이제 컨트롤러를 조금 수정해야 하는데 예외 처리를 해야하기 때문이다.
//컨트롤러의 get 메서드

@GetMapping
public ResponseEntity<StudentDTO> findStudent(@RequestParam int index){
        try{
            return ResponseEntity.status(HttpStatus.OK)
            .body(restTemplateService.findStudentByIndex(index));
        }catch (IllegalStateException e){
            return ResponseEntity.status(HttpStatus.NOT_FOUND).build();
        }catch (RuntimeException e){
            return ResponseEntity.status(HttpStatus.INTERNAL_SERVER_ERROR).build();
        }
    }
예외가 발생하지 않은 경우 OK 상태 코드와 함께 본문으로 학생 데이터를 응답 데이터로 보내고 예외가 발생한 경우 예외에 따라 그에 맞는 상태 코드를 응답 데이터로 보낸다.
자 이제 서버를 실행시켜 존재하지 않는 인덱스 번호로 데이터를 조회해보자.
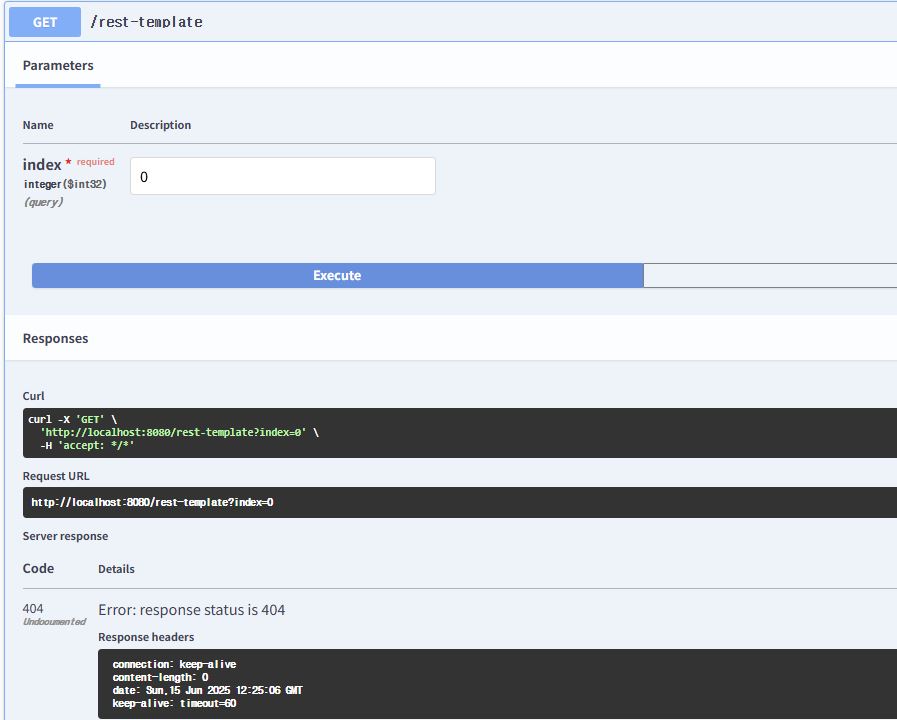
이전에는 없는 인덱스로 요청을 보내도 500을 응답으로 받았는데 상태 코드를 별도로 지정했기 때문에 404를 응답으로 받았다.
이제 서버1만 종료시키고 요청을 보내보자.
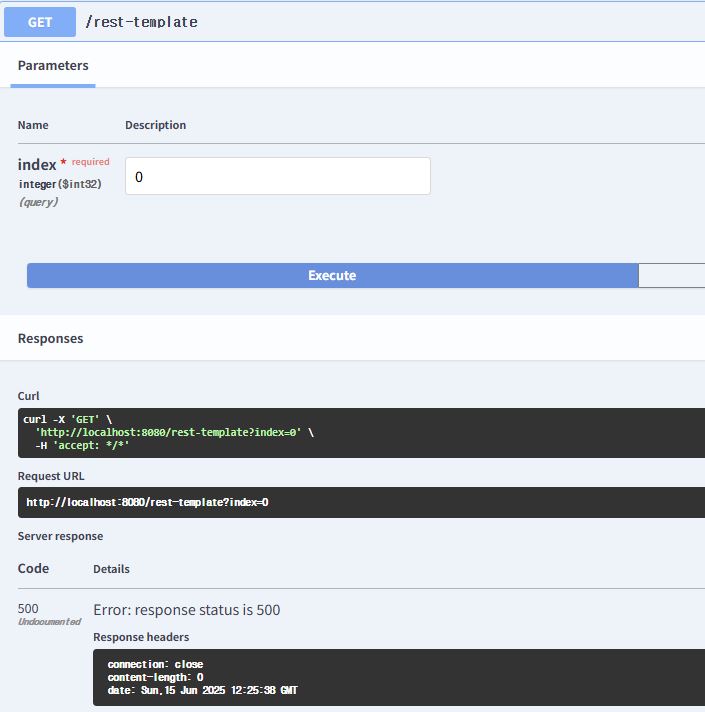
서버에 문제가 있는 500을 응답으로 받았다.
이렇게 API마다 발생할 수 있는 예외처리를 하여 상태 코드를 지정하면 클라이언트는 어디서 문제가 발생하였는지 알 수 있다.