출처: https://www.edureka.co/blog/angular-directive/
Angular Essentials 디렉티브 정리
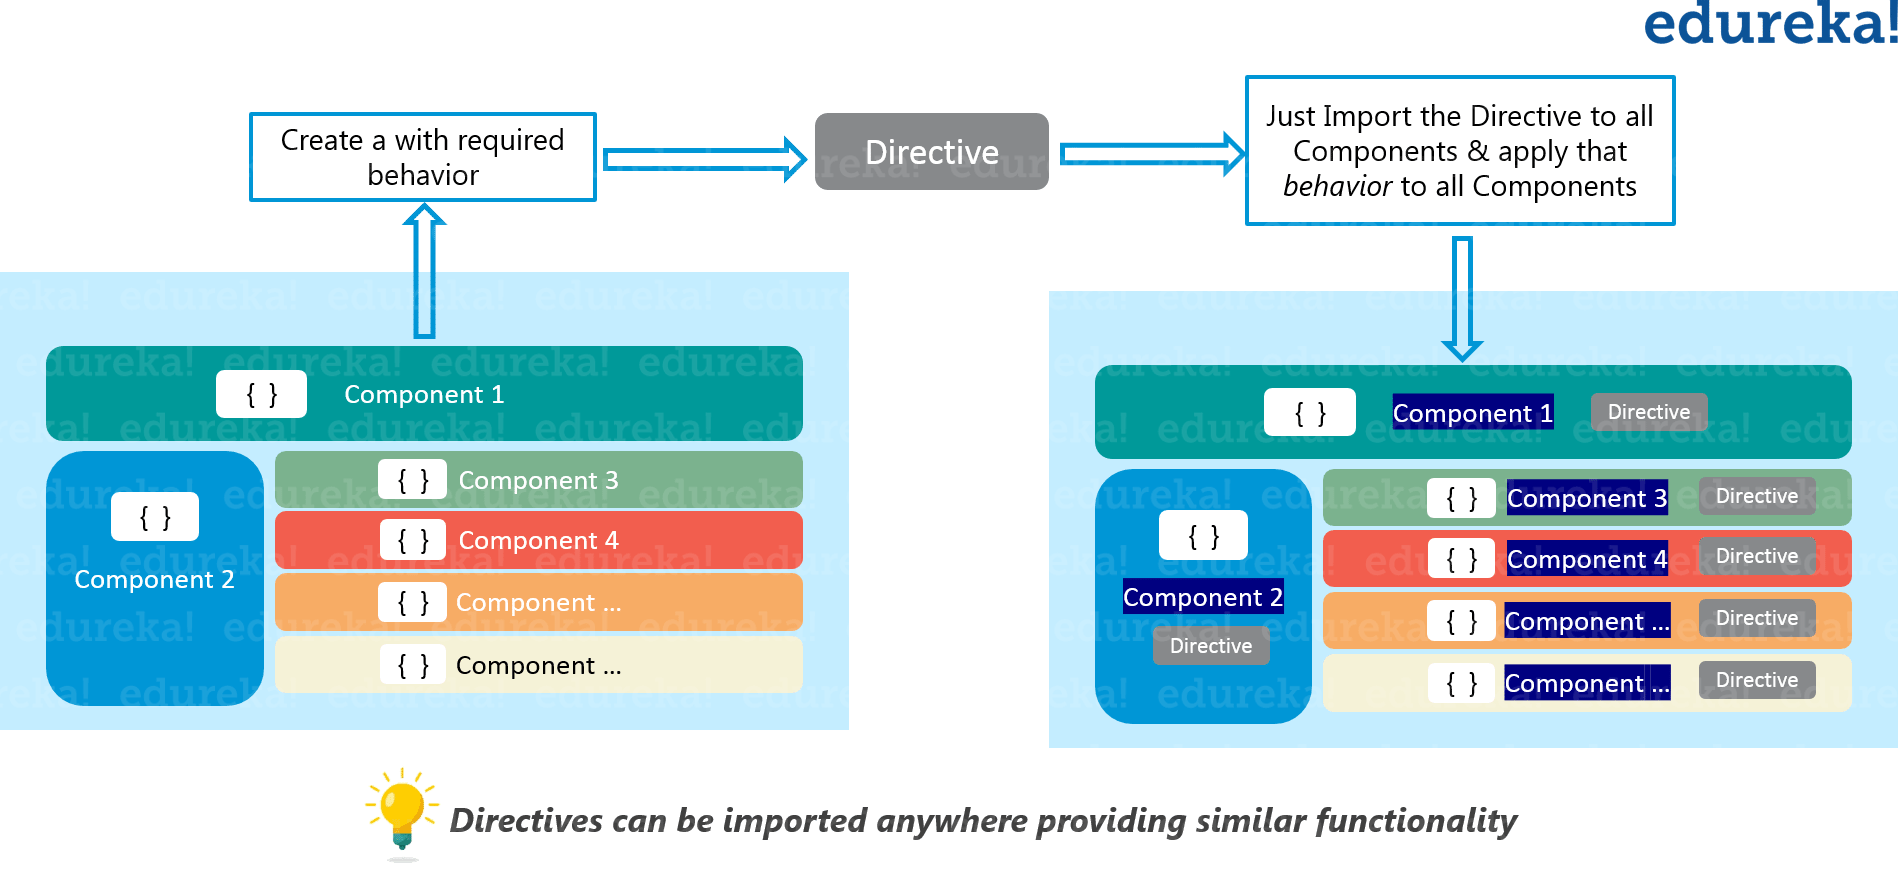
Directives ( built-in, attribute, structural ) 에서 attribute
디렉티브1
HTML attribute 처럼
HTML 요소, 컴포넌트에 특정 속성을 추가할 수 있다. 마치 attribute 처럼!
어떻게 사용하나?
<p textBlue>textBlue directive</p> textBlue 라는 디렉티브를 써서 p태그 안 텍스트 컬러를 blue로 만들거에요.
app.component.ts
import { Component } from '@angular/core';

@Component({
  selector: 'app-root',
  template: '<p textBlue>textBlue directive</p>'
})
export class AppComponent { }
어떻게 만들어짐?
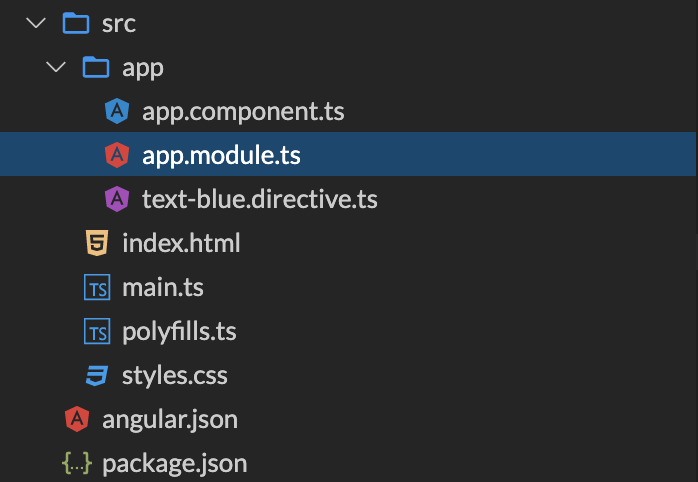
text-blue.directive.ts 파일을 생성합니다. 사용하려는 모듈이 존재하는 디렉토리 안에요! 왜냐하면 모듈에 등록해둬야 합니다.
import { Directive, ElementRef, Renderer2 } from '@angular/core';

// ① 디렉티브의 식별자를 @Directive 메타데이터 객체의 selector 프로퍼티에 지정한다.
@Directive({
  selector: '[textBlue]'
})
export class TextBlueDirective {
  // ② 생성자 함수에 주입된 ElementRef는 컴포넌트의 호스트 요소를 반환한다.
constructor(el: ElementRef, private Renderer2 renderer) {
  // 호스트 요소의 컬러를 변경한다.
    this.renderer.setStyle(el.nativeElement, 'color', 'blue');
  }
}
module에 디렉티브를 선언해야 모듈에 소속된 컴포넌트에서 사용할 수 있어요.
app.module.ts
import { BrowserModule } from '@angular/platform-browser';
import { NgModule } from '@angular/core';

import { AppComponent } from './app.component';
import { TextBlueDirective } from './text-blue.directive';

@NgModule({
  // 이 모듈에 소속하는 컴포넌트, 디렉티브, 파이프를 선언
  declarations: [AppComponent, TextBlueDirective],
  imports: [BrowserModule],
  providers: [],
  bootstrap: [AppComponent]
})
export class AppModule { }
프로젝트 구조는 다음과 같아요
디렉티브2
디렉티브로 이벤트 처리도 할 수 있어요. 디렉티브를 컴포넌트나 html 요소에 attribute처럼 선언하면 이벤트가 동작하는거에요.
디렉티브 코드만 바뀌고, component, module은 위에 코드와 동일합니다.
text-blue.directive.ts
import { Directive, ElementRef, Renderer2, HostListener } from '@angular/core';

@Directive({ selector: '[textBlue]' })
export class TextBlueDirective {
  constructor(private el: ElementRef, private renderer: Renderer2) {}

  // 호스트 요소에서 발생한 mouseenter 이벤트의 핸들러를 정의
  @HostListener('mouseenter') handleMouseEnter() {
    this.textColor('blue');
  }

  // 호스트 요소에서 발생한 mouseleave 이벤트의 핸들러를 정의
  @HostListener('mouseleave') handleMouseLeave() {
    this.textColor(null);
  }

  private textColor(color: string) {
    this.renderer.setStyle(this.el.nativeElement, 'color', color);
  }
}
디렉티브3
디렉티브에 인자를 줘서 더 융통성있는 구조의 디렉티브를 생성해봅니다.
text-color.directive.ts
import { Directive, Input, ElementRef, Renderer2, HostListener } from '@angular/core';

@Directive({
  selector: '[textColor]'
})
export class TextColorDirective {

  // 호스트 요소에서 프로퍼티 바인딩한 값을 전달 받는다.
  @Input() color: string;

  constructor(private el: ElementRef, private renderer: Renderer2) {}

  @HostListener('mouseenter') handleMouseEnter() {
    this.textColor(this.color);
  }

  @HostListener('mouseleave') handleMouseLeave() {
    this.textColor(null);
  }

  private textColor(color: string) {
    this.renderer.setStyle(this.el.nativeElement, 'color', color);
  }
}
app.component.ts
import { Component } from '@angular/core';

@Component({
  selector: 'app-root',
  template: '<p textColor [color]="color">Text Color</p>'
})
export class AppComponent {
  color = 'red'
}
별도의 color 프로퍼티를 안쓰고 textColor 디렉티브에 직접 바인딩할 수도 있어요.
attribute 디렉티브와 셀렉터가 일치하면 디렉티브가 적용돼요.
selector가 [textColor]죠.
app.component.ts
import { Component } from '@angular/core';

@Component({
  selector: 'app-root',
  template: '<p [textColor]="color">Text Color</p>'
})
export class AppComponent {
  color = 'red'
}
text-color.directive.ts
import { Directive, Input, ElementRef, Renderer2, HostListener } from '@angular/core';

@Directive({
  selector: '[textColor]'
})
export class TextColorDirective {

  // 호스트 요소에서 프로퍼티 바인딩한 값을 전달 받는다.
  @Input('textColor') color: string;

  constructor(private el: ElementRef, private renderer: Renderer2) {}

  @HostListener('mouseenter') handleMouseEnter() {
    this.textColor(this.color);
  }

  @HostListener('mouseleave') handleMouseLeave() {
    this.textColor(null);
  }

  private textColor(color: string) {
    this.renderer.setStyle(this.el.nativeElement, 'color', color);
  }
}
참고
<button myDirective [inputValue]="msg" staticValue="hi!">Click me</button>
위, 아래 코드는 동일해요.
<button myDirective [inputValue]="msg" [staticValue]="'hi!'">Click me</button>
my-directive.directive.ts
import { Directive, Input, HostListener } from '@angular/core';

@Directive({
  selector: '[myDirective]'
})
export class MyDirectiveDirective {
  // 프로퍼티 바인딩을 통한 상태 전달
  @Input() inputValue: string;
  // 일반 어트리뷰트의 정적 값의 전달
  @Input() staticValue: string;

  @HostListener('click') handleClick() {
    console.log('inputValue: ' + this.inputValue);   // 'button click'
    console.log('staticValue: ' + this.staticValue); // 'hi!'
  }
}
TODO
구조 디렉티브의 생성
일차원적으로 pipe랑 directive 성격이 헷갈리는데 ( 잘 모르기 때문에 헷갈림 )
https://stackoverflow.com/questions/41966635/angular-directives-vs-pipes