redux 동작에 대한 이해가 있으시면 이해할 수 있는 글입니다.
machine version
@angular/core : v5.0.0
Now using node v10.19.0 (npm v6.13.4)
ngrx 도입이유
미리 얘기하지만 ngrx 최신버전이 지금 도입하려는 버전보다 훠-얼씬 좋고, 훠-월씬 코드도 많고, boilerplate code가 줄어들고 좋습니다.
ngrx를 굳이 쓸려는 이유는 당연히 일을 편하게 하기 위해서고, 일주일안에 빠르게 습득해서 잦은 기획변경에 대응하여 1년 넘게 편히 지내보자라는 이유였습니다.
제가 중간에 참여한 프로젝트의 앵귤러 버전은 5.0.0 리액트를 공부할때부터 들었던 리덕스를 그대로 도입하려고 했으나, 문제였는데 rest api 요청부분이었습니다.
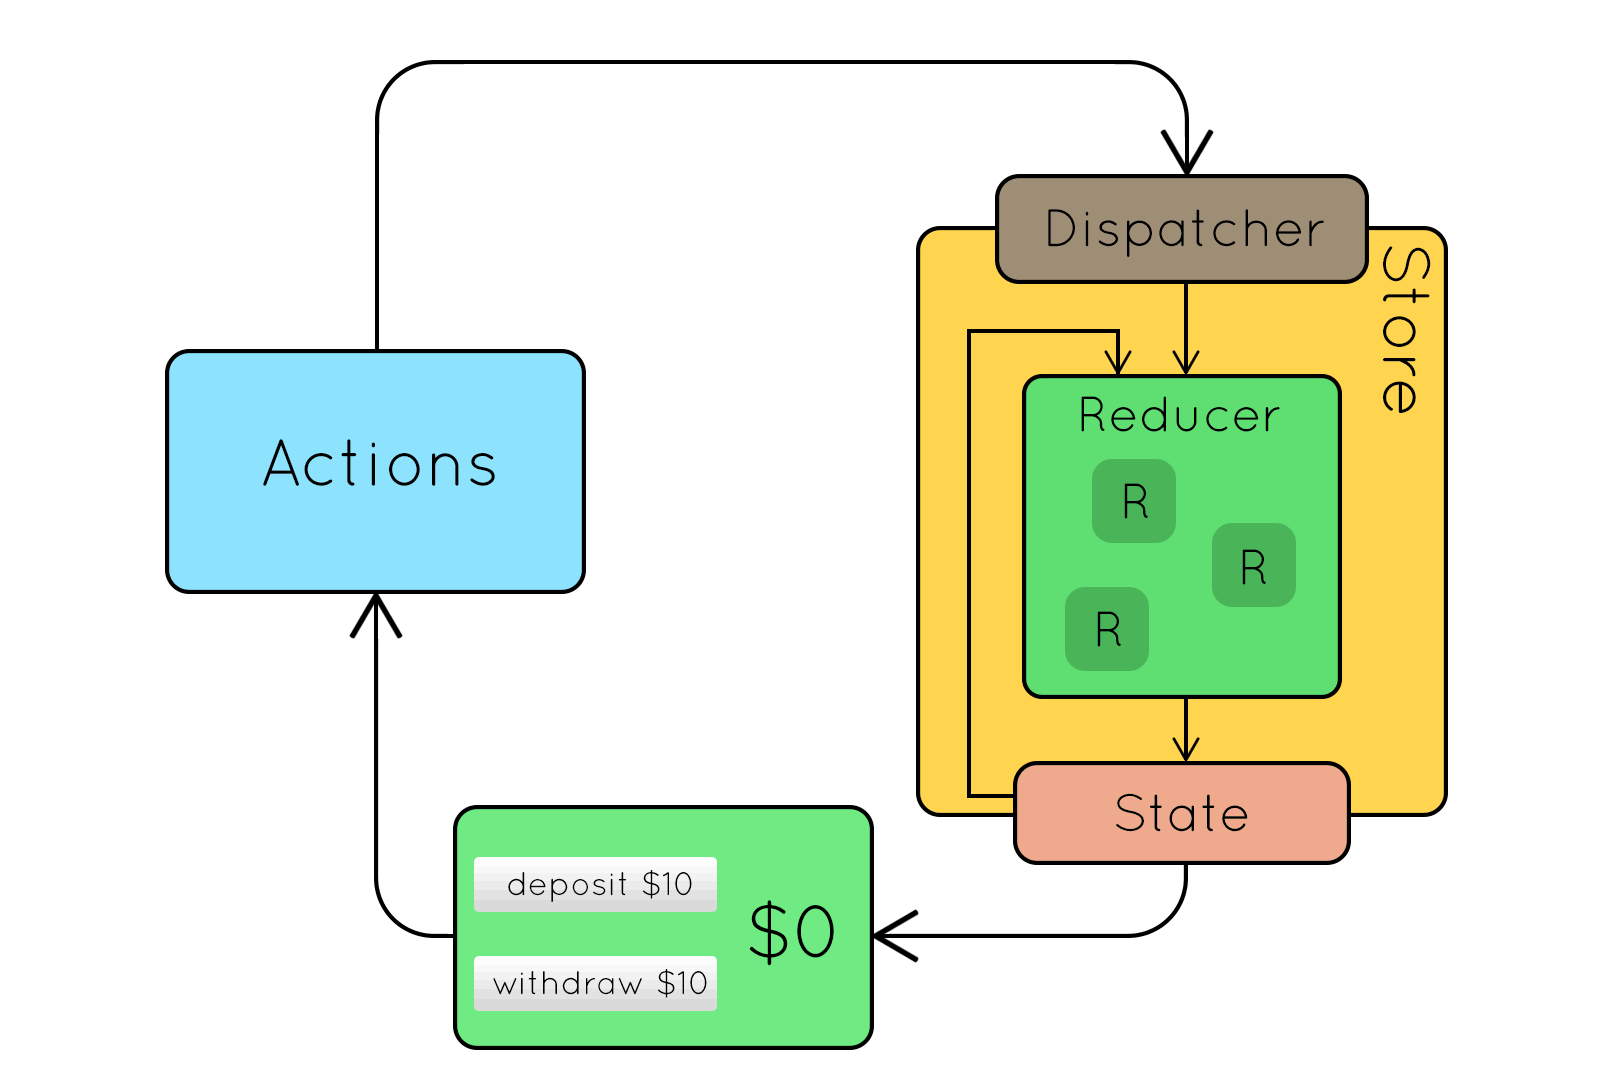
아래와 같은 애플리케이션 구조는 api 요청부분이 빠졌어요.
api부분이 들어간다면 그냥 redux로는 상태관리에 문제가 발생할 것임..
그래서 나온게 redux-saga인건지도 아직 리덕스 사가를 해보지 못했기 때문에 그렇게 생각 해봤습니다.
대충 경험으로 미뤄봐도 문제가 될거란것을 알 수 있고, 앵귤러쪽에도 당연히 redux와 rxjs를 접목시킨 유명한 상태관리 디자인패턴?라이브러리? 가 있었는데 ngrx! rest api에 문제는 @ngrx/effects 로 대응할 수 있다고 하니
ngrx를 도입하자고 확정 ( 아직은 뚫을 수 있는지 없는지 확답 못하는 상황 )
소요기간은 4일이었으며 redux core개념부터 다시 공부하고, angular에 redux를 붙이고 결국엔 ngrx를 통해 실제 프로젝트에 도입하였습니다.
다이어그램 출처: http://slides.com/jenyaterpil/redux-from-twitter-hype-to-production#/
ngrx 도입방법
branch 따기
물론 앵귤러를 특정버전으로 깔고싶은데 방법도 역시 있었음.
npx를 이용합니다.
만약에 새로 앵귤러 프로젝트를 특정 버전으로 구성하고싶다면 (angular-cli이용)
대충 이렇습니다.
mkdir ngrx
cd npx @angular/cli@<특정angular-cli버전> new <project 이름>현재 앵귤러 버전에 따른 ngrx 설치
npm install @ngrx/store@4.1.1 @ngrx/effects@4.1.1 @ngrx/router-store@4.1.1 @ngrx/store-devtools@4.1.1
@ngrx v4 documents
https://github.com/ngrx/platform/tree/v4.1.1/docs
다큐먼트로는 뭐가 어떻게 돌아가는지 모릅니다.
운좋게 돌아가는 코드를 찾아냈어요.
레퍼런스 : https://www.concretepage.com/angular-2/ngrx/ngrx-effects-4-example
버전에 맞추기 위해서 디렉토리 하나 생성해서 npx @angular/cli@1.7.4 new ngrx로 v1.7.4로 angular5버전으로 프로젝트 생성후에 위 링크에 src 디렉토리만 복붙하고
npm install @ngrx/store@4.1.1 @ngrx/effects@4.1.1 @ngrx/router-store@4.1.1 @ngrx/store-devtools@4.1.1
To run the application, find the following steps.
1. Download source code using download link given below on this page.
2. Use downloaded src in your Angular CLI application. To install Angular CLI, find the link.
3. Install NgRx/Store and NgRx/Effects and angular-in-memory-web-api@0.5.3 using NPM command.
4. Run ng serve using command prompt.
5. Now access the URL http://localhost:4200
자 이제 돌아가는 프로젝트를 이해하면서 기존 프로젝트에 ngrx 도입해봅시다.
현재 상황
해야할 것 시도, 시군구에 대한 rest api가 구성되어있는 상황입니다.
기존에 rxjs, async, await, 자식 컴포넌트에게 @Input() 전달을 통해 시도, 시군구 리스트를 받아오고 이걸 사용한 컴포넌트를 구현해놓은 상태였습니다.
해야할 것
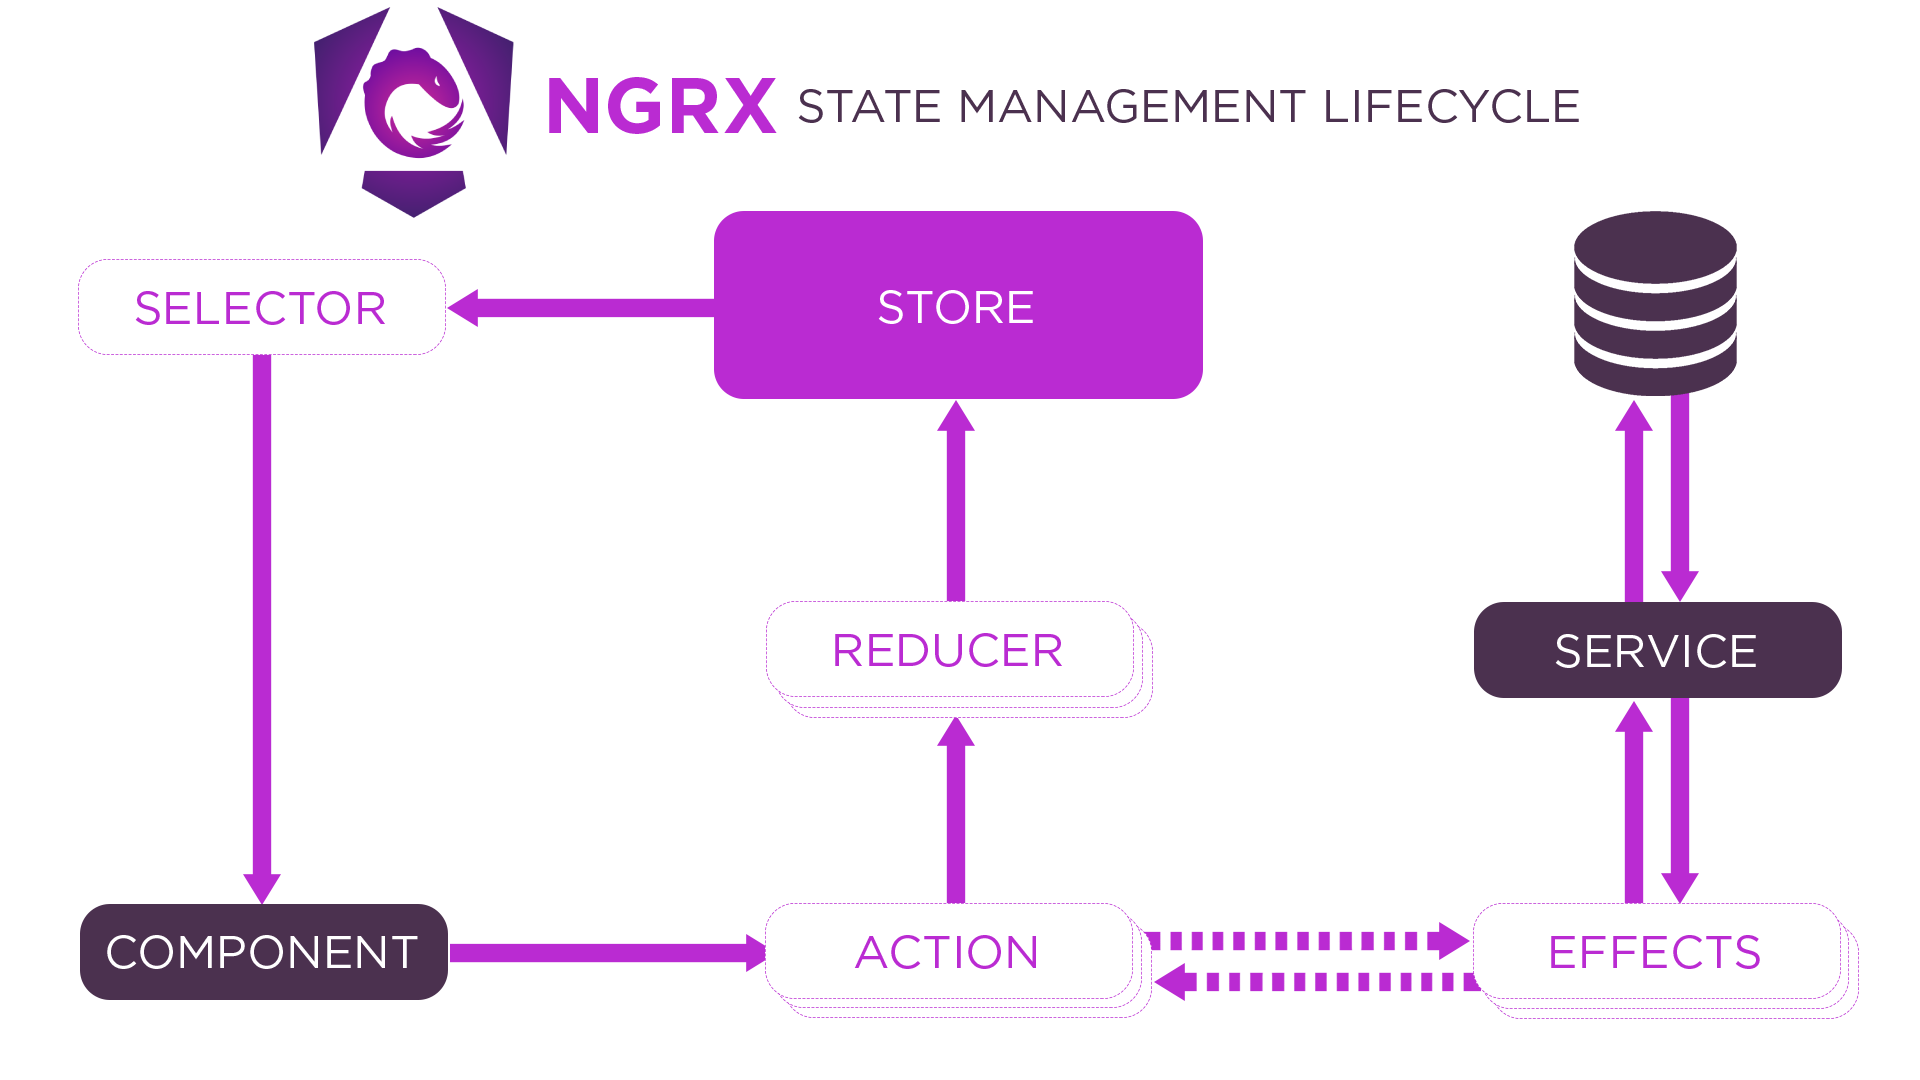
- 리덕스 패턴에서 함께 다니는 모델, 액션, 리듀서를 구현하기
- rest api도 상태관리를 잘~ 하기 위한 effects 구현
- @ngrx/router-store까지는 추가하지 않음.. angular router가 훨 간단하기 때문에 굳이 사용하지 않음.
공부는 해야겠습니다.
action 코드
export const GET_PNU_PROVINCE = '[power-plant] GET_PNU_PROVINCE';
export const GET_PNU_CITY = '[power-plant] GET_PNU_CITY';
export const GET_PNU_PROVINCE_SUCCESS = '[power-plant] GET_PNU_PROVINCE_SUCCESS';
export const GET_PNU_CITY_SUCCESS = '[power-plant] GET_PNU_CITY_SUCCESS';

export class GetPNUProvinceListAction implements Action {
  readonly type = GET_PNU_PROVINCE;
}

export class GetPNUProvinceListSuccessAction implements Action {
  readonly type = GET_PNU_PROVINCE_SUCCESS;
  constructor(public provinceList?: PwpPnuModel[]) {}
}

export class GetPnuCityListAction implements Action {
  readonly type = GET_PNU_CITY;
  constructor(public addr?: string) {}
}

export class GetPnuCityListSuccessAction implements Action {
  readonly type = GET_PNU_CITY_SUCCESS;
  constructor(public cityList?: PwpPnuModel[]) {}
}

export type ALL_PNU_ACTION = GetPNUProvinceListAction | GetPnuCityListAction | GetPNUProvinceListSuccessAction | GetPnuCityListSuccessAction;
오해했던 것중에 시/도 restAPI를 요청하면 시/도 요청! 액션이 하나만 필요하지 않나라고 생각할 수 있는데,
정확히는 시/도 rest API 요청! 과 시/도 rest API 요청 성공시 데어터 바인딩! 이 두 액션이 맞물려 있는겁니다.
effects 코드
import {Injectable} from '@angular/core';
import 'rxjs/add/operator/map';
import 'rxjs/add/operator/switchMap';
import 'rxjs/add/operator/mergeMap';
import 'rxjs/add/operator/catch';
import 'rxjs/add/operator/debounceTime';
import {Effect, Actions} from '@ngrx/effects';
import {Observable} from 'rxjs/Observable';
import {
  GET_PNU_PROVINCE,
  GET_PNU_CITY,
  GetPnuCityListAction,
  GetPnuCityListSuccessAction,
  GetPNUProvinceListSuccessAction
} from './power-plant.action';
import {Action} from '@ngrx/store';

@Injectable()
export class PowerPlantEffects {
  constructor(private actions$: Actions, private pmService: ProjectManagementService) {}

  @Effect() getPnuProvinceList$: Observable<Action> = this.actions$
    .ofType(GET_PNU_PROVINCE)
    .switchMap(() => this.pmService.selectPwpPnuCdProvinceList().map((result) => new GetPNUProvinceListSuccessAction(result.data)));

  @Effect() getPnuCityList$: Observable<Action> = this.actions$
    .ofType(GET_PNU_CITY)
    .map((action) => (<GetPnuCityListAction>action).addr)
    .switchMap((addr: string) => this.pmService.selectPwpPnuCdCityList(addr).map((result) => new GetPnuCityListSuccessAction(result.data)));
}
여기서 보시면 GET_PNU_PROVINCE이 액션타입은 말 그대로 rest API 요청하기 위한 것이고, GetPNUProvinceListSuccessAction은 rest API 요청에 대한 payload를 상태에 바인딩 하기 위한 액션입니다.
component에서 이제 dispatch를 통해 액션을 줘야겠죠.
import {Component, OnInit} from '@angular/core';
import {Router} from '@angular/router';
import {PwpPnuModel} from '../../../shared/model';
import {Title} from '@angular/platform-browser';
import {FormBuilder, FormGroup, Validators} from '@angular/forms';
import {Store} from '@ngrx/store';
import {GetPnuCityListAction, GetPNUProvinceListAction} from './power-plant.action';
import {AppState, getPnuCities, getPnuProvinces} from './power-plant.reducer';

@Component({
  selector: 'app-power-plant-new',
  templateUrl: './power-plant-new.component.html',
  styleUrls: ['./power-plant-new.component.scss']
})
export class PowerPlantNewComponent implements OnInit {
  ...
  pnuCdProvinceList: PwpPnuModel[]; // 시도 리스트
  pnuCdCityList: PwpPnuModel[]; // 시군구 리스트
  ...
  constructor(
  	...
    private store: Store<AppState>
  ) {
    store.select(getPnuProvinces).subscribe((list) => {
      this.pnuCdProvinceList = list;
    });
    store.select(getPnuCities).subscribe((list) => {
      this.pnuCdCityList = list;
    });
    this.store.dispatch(new GetPNUProvinceListAction());
  }

  ngOnInit() {
 	...
  }

  async onChangePnuCd(e: {target: {value: string}}): Promise<void> {
    ...

    this.store.dispatch(new GetPnuCityListAction(e.target.value));
  }

 ...
}
this.store.dispatch(new GetPNUProvinceListAction()); 요게 rest api 요청하라고 보내는 액션입니다. 시/도의 경우는 파라미터가 없습니다.
this.store.dispatch(new GetPnuCityListAction(e.target.value)); 시/도가 정해지면 시/군/구를 정하기 위해서는 시/도의 지역을 파라미터로 보내겠죠. 파라미터로 보내는 방식입니다.
	store.select(getPnuProvinces).subscribe((list) => {
      this.pnuCdProvinceList = list;
    });
    store.select(getPnuCities).subscribe((list) => {
      this.pnuCdCityList = list;
    });
요건 이제 dispatch가 발생할때마다 구독한 상태에 대한 콜백들을 설정해둘 수 있습니다.
액션이 발생할때마다 요게 실행되는거죠. getPnuProvinces, getPnuCities 에서는 selectors라는 개념이 나오는데요. reselect등 다양한 방법이 있고, 각 프레임워크 구조에 따라 비슷한 라이브러리가 있을 겁니다.
selector 레퍼런스 : https://wonism.github.io/redux-with-reselect/
마지막으로 액션에 대해서 상태를 업데이트하는 reducer
import {PwpPnuModel} from '../../../shared/model';
import {createFeatureSelector, createSelector, ActionReducerMap} from '@ngrx/store';
import {
  ALL_PNU_ACTION,
  GetPNUProvinceListSuccessAction,
  GetPnuCityListSuccessAction,
  GET_PNU_PROVINCE_SUCCESS,
  GET_PNU_CITY_SUCCESS
} from './power-plant.action';

/**
 * power-plant에서 사용될 상태들은 여기서 관리
 */

export interface PNUState {
  pnuCdProvinceList?: PwpPnuModel[];
  pnuCdCityList?: PwpPnuModel[];
}
export interface AppState {
  pnuState?: PNUState;
}

export const pnuReducers: ActionReducerMap<AppState> = {
  pnuState: pnuReducer
};

export const initialState: PNUState = {pnuCdProvinceList: [], pnuCdCityList: []};

export function pnuReducer(state = initialState, action: ALL_PNU_ACTION): PNUState {
  switch (action.type) {
    case GET_PNU_PROVINCE_SUCCESS: {
      const provinceList = (<GetPNUProvinceListSuccessAction>action).provinceList;
      return {...state, pnuCdProvinceList: provinceList};
    }
    case GET_PNU_CITY_SUCCESS: {
      const cityList = (<GetPnuCityListSuccessAction>action).cityList;
      return {...state, pnuCdCityList: cityList};
    }
    default: {
      return state;
    }
  }
}

export const getPnuState = createFeatureSelector<PNUState>('pnuState');

export const getPnuProvinces = createSelector(getPnuState, (state: PNUState) => {
  return state.pnuCdProvinceList;
});

export const getPnuCities = createSelector(getPnuState, (state: PNUState) => state.pnuCdCityList);
맨 아래 셀렉터들이 있고, api 요청이 성공시 시/도, 시/군/구 데이터를 상태 업데이트 시키는 코드들이 들어간겁니다.
todo
- 기존 프로젝트에 붙인거라 코드 리팩토링 필요
- 앵귤러 8에 대한 프로젝트에도 ngrx 도입할 기회가 있을 수도 있음. -> graphql을 예정임.
- @ngrx/router-store를 붙이지 않았는데 문제가 없는지, rxjs, ngrx/effects에 대한 이해를 높여야함.
- 에러 핸들링에 대한 코드들이 없음 그것도 대응해야함.
graphql 라이브러리인 apollo는 리덕스를 대신할 수 있는 기능이 있습니다.
몰랐네용..
https://www.apollographql.com/docs/angular/guides/state-management/
ngxs
https://www.daptontechnologies.com/angular-ngxs-crud/
As the name says, the focus was on minimising NgRx boilerplate that is simply too big for some use cases. Support for DevTools may be worse, but boilerplate reduction, along with plenty of features and a healthy community around the library balance these drawbacks.
ngrx의 boilerplate 코드들을 최소화,
https://www.cnc.io/en/blog/graphql-angular-state
ngxs sample
https://www.daptontechnologies.com/angular-ngxs-crud/
rxjs로 개발하면서 문득 생각난 ngrx의 장점..
ngrx devtools
https://www.youtube.com/watch?v=nTqcnYKGcpI
조건에 따라 UI가 바뀌는 상황이 빈번하다. 그럴때마다 fetch받은 데이터를 조작해서 compile해서 화면에서 본다? 지금 그렇게 개발하고 있음.. 너무 짜증
react redux는 devtools가 되듯이, angular에서도 그런게 없을까? 있음..