전 포스트에서 만든 로그인 페이지에 UPDATE, DELETE, INSERT 쿼리문을 수행할 수 있는 jsp파일을 추가해보겠습니다.
먼저 INSERT 쿼리문을 수행할 데이터를 입력받을
userJoinForm.jsp를 작성합니다.
<%@ page language="java" contentType="text/html; charset=UTF-8"
pageEncoding="UTF-8"%>
<link href="https://cdn.jsdelivr.net/npm/bootstrap@5.1.3/dist/css/bootstrap.min.css" rel="stylesheet" integrity="sha384-1BmE4kWBq78iYhFldvKuhfTAU6auU8tT94WrHftjDbrCEXSU1oBoqyl2QvZ6jIW3" crossorigin="anonymous">
<!DOCTYPE html>
<html>
<head>
<meta charset="UTF-8">
<title>Insert title here</title>
</head>
<row>
<div class="col-sm-6">
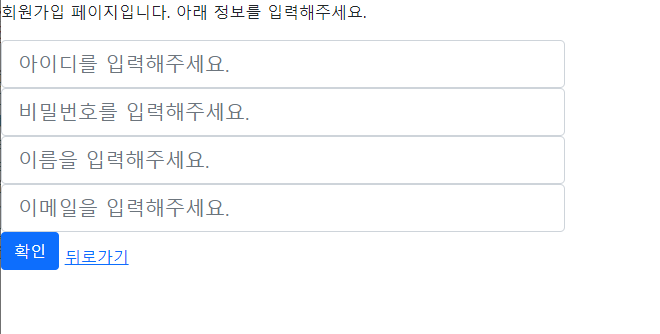
<p>회원가입 페이지입니다. 아래 정보를 입력해주세요.</p>
<form action="userJoinCheck.jsp" method="post">
<input type="text" name="userId" placeholder="아이디를 입력해주세요." class="form-control form-control-lg">
<input type="password" name="userPw" placeholder="비밀번호를 입력해주세요." class="form-control form-control-lg">
<input type="text" name="userName" placeholder="이름을 입력해주세요." class="form-control form-control-lg">
<input type="text" name="userMail" placeholder="이메일을 입력해주세요." class="form-control form-control-lg">
<input type="submit" value="확인" class="btn btn-primary mb-3">
<a href="userLoginForm.jsp">뒤로가기</a>
</form>
</div>
</row>
</body>
</html>action=""을 지정해 userJoinCheck로 입력받은 정보를 보내줍니다.
userJoinCheck.jsp에서는 request.getParameter를 통해
전달받은 데이터를 DB에 연동시킬 것 입니다.
아이디는 name="userId"
비밀번호는 name="userPw"
이름은 name="userName"
이메일은 name="userMail"
로 받겠습니다.
placeholder를 이용해를 이용해 사용자가 이를 알 수 있도록 명시하였습니다.
그럼 다음으로 userJoinCheck.jsp를 작성해보겠습니다.
userJoinCheck.jsp에서는 request.getParameter를 이용해 데이터를 전달받고 Query문에 대입할 것 입니다.
아래는 userJoinCheck.jsp의 전문입니다.
<%@page import="java.sql.PreparedStatement"%>
<%@page import="java.sql.DriverManager"%>
<%@page import="java.sql.Connection"%>
<%@ page language="java" contentType="text/html; charset=UTF-8"
    pageEncoding="UTF-8"%>
<link href="https://cdn.jsdelivr.net/npm/bootstrap@5.1.3/dist/css/bootstrap.min.css" rel="stylesheet" integrity="sha384-1BmE4kWBq78iYhFldvKuhfTAU6auU8tT94WrHftjDbrCEXSU1oBoqyl2QvZ6jIW3" crossorigin="anonymous">
<%
	request.setCharacterEncoding("UTF-8");
	String uId = request.getParameter("userId");
	String uPw = request.getParameter("userPw");
	String uName = request.getParameter("userName");
	String uMail = request.getParameter("userMail");

	String dbType = "com.mysql.cj.jdbc.Driver";
	String connectUrl = "jdbc:mysql://localhost:3306/jdbcprac2?serverTimezone=UTC";
	String connectId = "root";
	String connectPw = "????";

	try {
		Class.forName(dbType);

		Connection con = DriverManager.getConnection(connectUrl, connectId, connectPw);


		String sql = "INSERT INTO userinfo VALUES(?, ?, ?, ?)";
		PreparedStatement pstmt = con.prepareStatement(sql);

		pstmt.setString(1, uId);
		pstmt.setString(2, uPw);
		pstmt.setString(3, uName);
		pstmt.setString(4, uMail);

		pstmt.executeUpdate();

	} catch(Exception e) {
		e.printStackTrace();
	}


%>
<!DOCTYPE html>
<html>
<head>
<meta charset="UTF-8">
<title>Insert title here</title>
</head>
<body>
	<p><strong><%= uId %>님 회원가입 감사합니다!</strong></p>
	<p><strong><a href="userLoginForm.jsp">로그인하기</a></strong></p>


</body>
</html>
먼저
<%@page import="java.sql.PreparedStatement"%>
<%@page import="java.sql.DriverManager"%>
<%@page import="java.sql.Connection"%>
<%@ page language="java" contentType="text/html; charset=UTF-8"
    pageEncoding="UTF-8"%>
<link href="https://cdn.jsdelivr.net/npm/bootstrap@5.1.3/dist/css/bootstrap.min.css" rel="stylesheet" integrity="sha384-1BmE4kWBq78iYhFldvKuhfTAU6auU8tT94WrHftjDbrCEXSU1oBoqyl2QvZ6jIW3" crossorigin="anonymous">
를 선언하여 필요한 매서드들을 불어왔습니다.
그리고
	request.setCharacterEncoding("UTF-8");
	String uId = request.getParameter("userId");
	String uPw = request.getParameter("userPw");
	String uName = request.getParameter("userName");
	String uMail = request.getParameter("userMail");
request.setCharacterEncoding("UTF-8");로
혹시 모를 데이터 오류를 방지하였습니다.
다음으로 uId, uPw, uName, uMail 변수에
userJoinForm.jsp의 데이터들을 저장했습니다.
	String dbType = "com.mysql.cj.jdbc.Driver";
	String connectUrl = "jdbc:mysql://localhost:3306/jdbcprac2?serverTimezone=UTC";
	String connectId = "root";
	String connectPw = "????";
preparedStatement를 사용하기 위해 Connection에 들어갈 SQL 접속 변수들을 미리 지정해두었습니다.
이제 try~catch문 안에 원하는 명령어를 입력하면 됩니다.
	try {
		Class.forName(dbType);

		Connection con = DriverManager.getConnection(connectUrl, connectId, connectPw);


		String sql = "INSERT INTO userinfo VALUES(?, ?, ?, ?)";
		PreparedStatement pstmt = con.prepareStatement(sql);

		pstmt.setString(1, uId);
		pstmt.setString(2, uPw);
		pstmt.setString(3, uName);
		pstmt.setString(4, uMail);

		pstmt.executeUpdate();

	} catch(Exception e) {
		e.printStackTrace();
	}
Connection con을 통해 SQL DB와 연락이 닿았습니다.
String sql을 선언함으로 원하는 sql문의 변수가 들어갈 자리에만 ?를 4개 적어두었습니다.
이후 PreparedStatement를 이용해 1, 2, 3, 4번째 마다 하나씩 지정된 변수들을 대입해줍니다.
그후에 executeUpdate()를 선언하면
SQL DB가 수정될 것 입니다.
<body>
	<p><strong><%= uId %>님 회원가입 감사합니다!</strong></p>
	<p><strong><a href="userLoginForm.jsp">로그인하기</a></strong></p>


</body>
body 태그에는 조촐하게나마 하이퍼링크와 인삿말을 적어보았습니다.

일단은 여기까지 입니다..