JAVA SCRIPT
01_JS개요.html
<!DOCTYPE html>
<html lang="en">
<head>
<meta charset="UTF-8">
<meta name="viewport" content="width=device-width, initial-scale=1.0">
<title>01_JS개요</title>
<!-- external 방식 연결 -->
<script src="js/01_JS개요.js"></script>
<style>
#box {
width: 200px;
height: 200px;
border: 1px solid black;
}
</style>
</head>
<body>
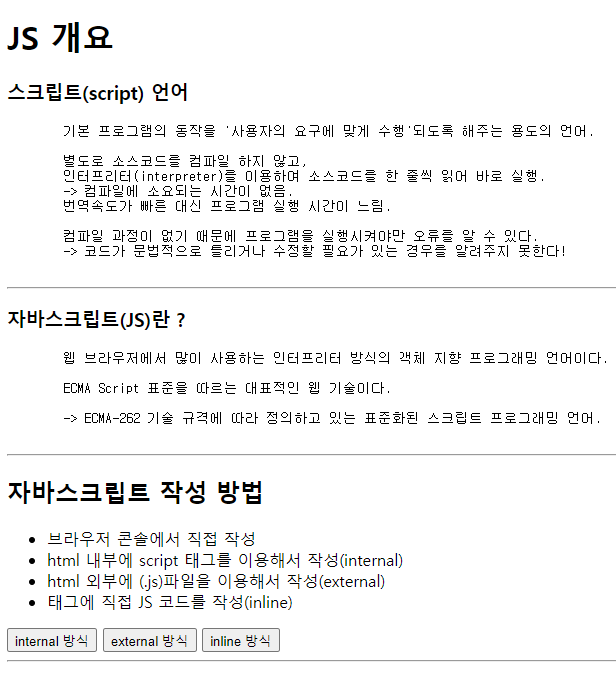
<h1>JS 개요</h1>
<h3>스크립트(script) 언어</h3>
<pre>
기본 프로그램의 동작을 '사용자의 요구에 맞게 수행'되도록 해주는 용도의 언어.
별도로 소스코드를 컴파일 하지 않고,
인터프리터(interpreter)를 이용하여 소스코드를 한 줄씩 읽어 바로 실행.
-> 컴파일에 소요되는 시간이 없음.
번역속도가 빠른 대신 프로그램 실행 시간이 느림.
컴파일 과정이 없기 때문에 프로그램을 실행시켜야만 오류를 알 수 있다.
-> 코드가 문법적으로 틀리거나 수정할 필요가 있는 경우를 알려주지 못한다!
</pre>
<hr>
<h3>자바스크립트(JS)란 ? </h3>
<pre>
웹 브라우저에서 많이 사용하는 인터프리터 방식의 객체 지향 프로그래밍 언어이다.
ECMA Script 표준을 따르는 대표적인 웹 기술이다.
-> ECMA-262 기술 규격에 따라 정의하고 있는 표준화된 스크립트 프로그래밍 언어.
</pre>
<hr>
<h2>자바스크립트 작성 방법</h2>
<ul>
<li>브라우저 콘솔에서 직접 작성</li>
<li>html 내부에 script 태그를 이용해서 작성(internal)</li>
<li>html 외부에 (.js)파일을 이용해서 작성(external)</li>
<li>태그에 직접 JS 코드를 작성(inline)</li>
</ul>
<!-- 버튼이 클릭되었을 때 btnClick1() 함수를 호출 -->
<button type="button" onclick="btnClick1()">internal 방식</button>
<!-- 소괄호 꼭 열고 닫아야 함. -->
<!-- external 방식 js파일을 연결해야 사용 가능 (head, body 태그 어디든 작성 가능)-->
<button type="button" onclick="btnClick2()">external 방식</button>
<!-- inline 방식 JS는 ""/'' 둘다 문자열 리터럴 표기법으로 인식됨 -->
<button type="button" onclick="alert('inline 버튼 클릭됨')">inline 방식</button>
<script>
function btnClick1() {
alert("internal 버튼이 클릭되었습니다.");
}
</script>
<hr>
<h3>JS 테스트</h3>
<div id="box"></div>
<button type="button" onclick="changeColor1()">red</button>
<button type="button" onclick="changeColor2()">yellow</button>
</body>
</html>01_JS개요.js
// 한줄 주석
/* 범위주석 */

// js 파일은 <script> 태그 내부라고 생각하면 됨

/* js 안될 경우 개발자 도구 켜서 오류 확인! */

function btnClick2() {
    alert("external 버튼이 클릭됨")
}

function changeColor1() {
    document.getElementById("box").style.backgroundColor = "red";
    // 문서에서
    // 이름이 "box"인 아이디 요소 얻어온다
    // 스타일
    // 배경화면
    // 붉은색 변경!
}

function changeColor2() {
    document.getElementById("box").style.backgroundColor = "yellow";
}
internal 방식 버튼 클릭 시,
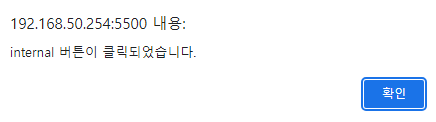 external 방식 버튼 클릭 시,
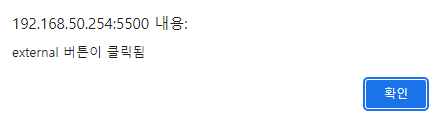 inline 방식 버튼 클릭 시,
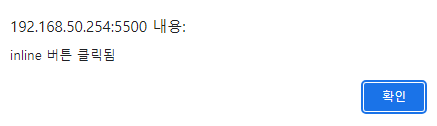 red 버튼 클릭 시,
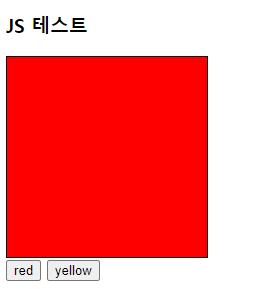 yellow 버튼 클릭 시,
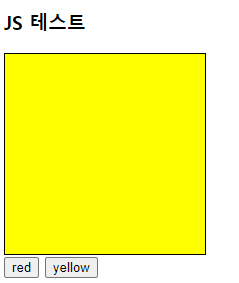
02_데이터입출력.html
<!DOCTYPE html>
<html lang="en">
<head>
<meta charset="UTF-8">
<meta name="viewport" content="width=device-width, initial-scale=1.0">
<title>02_데이터입출력</title>
<script src="js/02_데이터입출력.js"></script>
<style>
.box { border: 1px solid black; }
#area1 {
width: 520px;
height: 300px;
border: 1px solid black;
background-color: mediumaquamarine;
overflow: auto;
/* 내용이 감싼 영역을 넘어서는 경우 자동으로 스크롤 추가 */
display: flex;
flex-wrap: wrap;
align-items: flex-start;
}
.box2 {
width: 100px;
height: 100px;
background-color: yellow;
border: 2px solid red;
box-sizing: border-box;
}
</style>
</head>
<body>
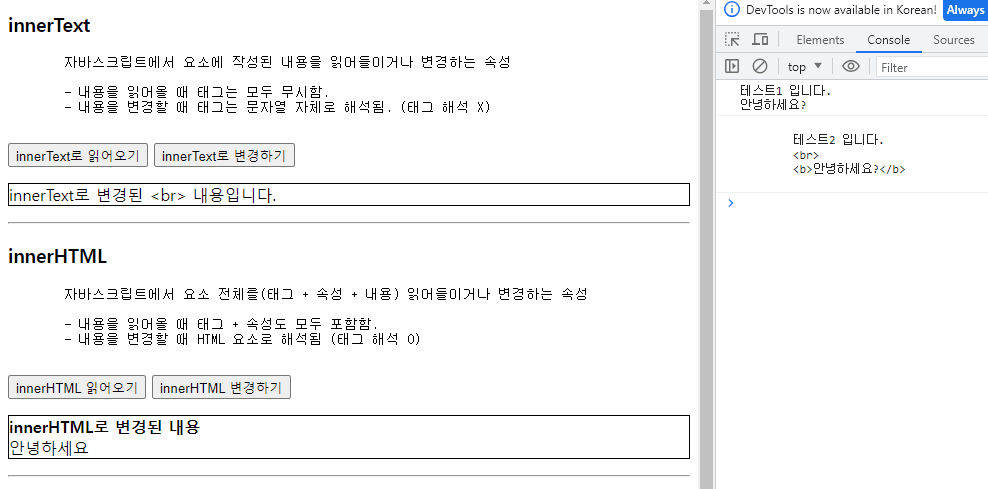
<h3>innerText</h3>
<pre>
자바스크립트에서 요소에 작성된 내용을 읽어들이거나 변경하는 속성
- 내용을 읽어올 때 태그는 모두 무시함.
- 내용을 변경할 때 태그는 문자열 자체로 해석됨. (태그 해석 X)
</pre>
<button type="button" onclick="getInnerText()">innerText로 읽어오기</button>
<button type="button" onclick="setInnerText()">innerText로 변경하기</button>
<p id="test1" class="box">
테스트1 입니다.
<br>
<b>안녕하세요?</b>
</p>
<hr>
<h3>innerHTML</h3>
<pre>
자바스크립트에서 요소 전체를(태그 + 속성 + 내용) 읽어들이거나 변경하는 속성
- 내용을 읽어올 때 태그 + 속성도 모두 포함함.
- 내용을 변경할 때 HTML 요소로 해석됨 (태그 해석 O)
</pre>
<button type="button" onclick="getInnerHTML1()">innerHTML 읽어오기</button>
<button type="button" onclick="setInnerHTML1()">innerHTML 변경하기</button>
<p id="test2" class="box">
테스트2 입니다.
<br>
<b>안녕하세요?</b>
</p>
<hr>
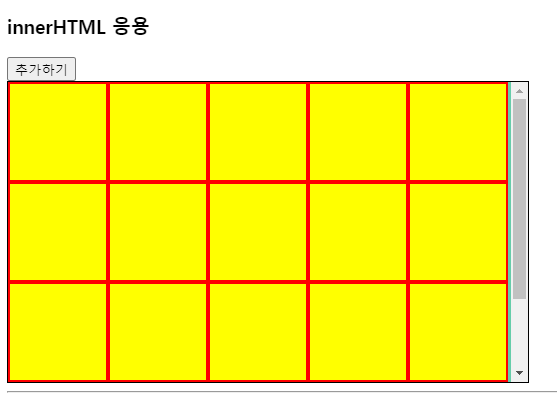
<h3>innerHTML 응용</h3>
<button type="button" onclick="add()">추가하기</button>
<div id="area1">
<div class="box2"></div>
</div>
<hr>
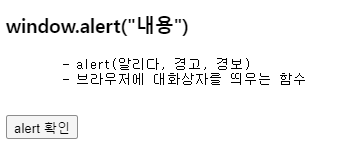
<h3>window.alert("내용")</h3>
<pre>
- alert(알리다, 경고, 경보)
- 브라우저에 대화상자를 띄우는 함수
</pre>
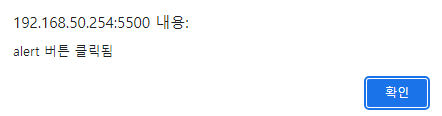
<!-- 클릭 시 alert 버튼 클릭됨 대화 상자 출력 -->
<button onclick="fnAlert()">alert 확인</button>
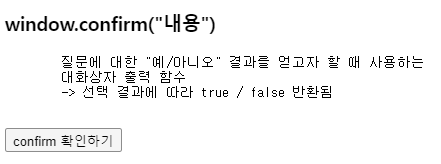
<h3>window.confirm("내용")</h3>
<pre>
질문에 대한 "예/아니오" 결과를 얻고자 할 때 사용하는
대화상자 출력 함수
-> 선택 결과에 따라 true / false 반환됨
</pre>
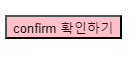
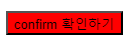
<button id="confirmBtn" onclick="fnConfirm()">confirm 확인하기</button>
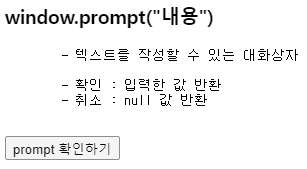
<h3>window.prompt("내용")</h3>
<pre>
- 텍스트를 작성할 수 있는 대화상자
- 확인 : 입력한 값 반환
- 취소 : null 값 반환
</pre>
<button onclick="fnPrompt()">prompt 확인하기</button>
<p id="promptResult"></p>
</body>
</html>02_데이터입출력.js
// innerText 읽어오기
function getInnerText() {

    // HTML 문서 내에서 아이디가 "test1"인 요소를 얻어와
    // test1 변수에 대입
    const test1 = document.getElementById("test1");

    // test1 변수에 대입된 요소에서 내용을 얻어와 console에 출력
    console.log(test1.innerText);
}

// innerText로 변경하기
function setInnerText() {
    // HTML 문서 내에서 아이디가 "test1"인 요소를 얻어와
    // test1 변수에 대입
    const test1 = document.getElementById("test1");

    // test1 변수에 대입된 요소에 새로운 내용을 작성
    test1.innerText = "innerText로 변경된 <br> 내용입니다.";
}


// innerHTML로 읽어오기
function getInnerHTML1() {
    const test2 = document.getElementById("test2");

    console.log(test2.innerHTML);
}

function setInnerHTML1() {
    const test2 = document.getElementById("test2");

    test2.innerHTML= "<b>innerHTML로 변경된 내용</b> <br> 안녕하세요";
}

// innerHTML 응용
function add() {

    // 1) 아이디가 area1인 요소 얻어오기
    const area1 = document.getElementById("area1");

    // 2) area1에 <div class="box2"></div> 누적 대입
    area1.innerHTML += "<div class='box2'></div>";
}

// html : 정적 요소!
// 버튼 클릭시 마다 박스 생기는 것 : 동적 요소!


// alert 확인
function fnAlert() {
    window.alert("alert 버튼 클릭됨");

    // window는 브라우저 자체를 나타내는 객체
    // -> JS 코드는 브라우저(window) 내부에서 실행되는 코드이기 때문에
    // window를 생략하고 작성할 수 있다.
}

// confirm 확인
function fnConfirm() {

    if( confirm("버튼색을 분홍색으로 바꿀래?") ) {
        document.getElementById("confirmBtn").style.backgroundColor = "pink";
    } else {
        document.getElementById("confirmBtn").style.backgroundColor = "red";
    }

}

// prompt 확인하기
function fnPrompt() {
    const input = prompt("이름을 입력해주세요");

    const promptResult = document.getElementById("promptResult");

    if(input != null) {
        promptResult.innerText = input + "님 환영합니다";
    } else {
        promptResult.innerText = "이름을 입력해주세요";
    }
}
 alert 확인 버튼 클릭 시,
 comfirm 확인하기 버튼 클릭 시,
 확인일 경우 :
 취소일 경우 :
 prompt 확인하기 버튼 클릭 시,
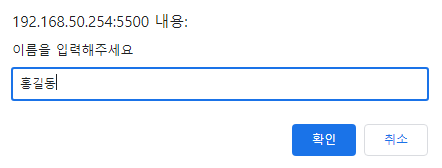 홍길동 입력 후 확인일 경우 :
 홍길동 입력 후 취소일 경우 :

03_요소접근방법.html
<!DOCTYPE html>
<html lang="en">
<head>
<meta charset="UTF-8">
<meta name="viewport" content="width=device-width, initial-scale=1.0">
<title>03_요소접근방법</title>
<script src="js/03_요소접근방법.js"></script>
<style>
.area {
width: 300px;
height: 100px;
border: 1px solid black;
}
/* 카카오톡 채팅 만들기 */
#chatting-bg{
width: 360px;
height: 400px;
border: 1px solid black;
background-color: rgb(178, 199, 217);
overflow: auto;
}
/* 채팅 내용 */
#chatting-bg > p > span{
background-color: rgb(254, 234, 51);
padding: 5px;
border-radius: 5px;
}
/* 채팅 출력 라인 */
#chatting-bg > p{
margin: 20px 10px;
text-align: right;
}
</style>
</head>
<body>
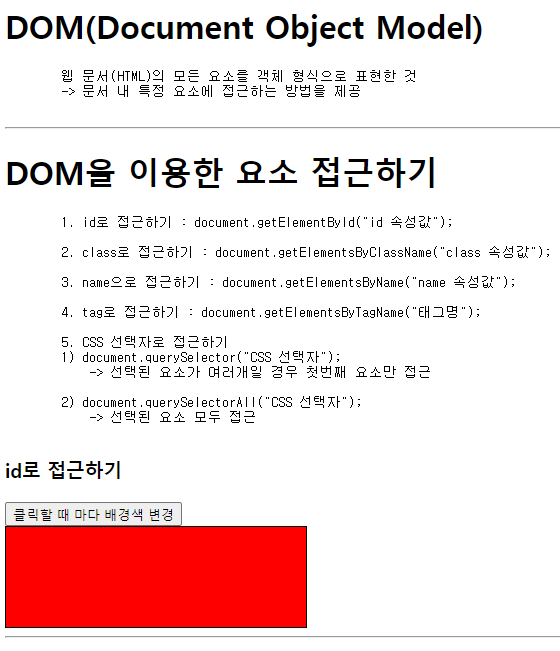
<h1>DOM(Document Object Model)</h1>
<pre>
웹 문서(HTML)의 모든 요소를 객체 형식으로 표현한 것
-> 문서 내 특정 요소에 접근하는 방법을 제공
</pre>
<hr>
<h1>DOM을 이용한 요소 접근하기</h1>
<pre>
1. id로 접근하기 : document.getElementById("id 속성값");
2. class로 접근하기 : document.getElementsByClassName("class 속성값");
3. name으로 접근하기 : document.getElementsByName("name 속성값");
4. tag로 접근하기 : document.getElementsByTagName("태그명");
5. CSS 선택자로 접근하기
1) document.querySelector("CSS 선택자");
-> 선택된 요소가 여러개일 경우 첫번째 요소만 접근
2) document.querySelectorAll("CSS 선택자");
-> 선택된 요소 모두 접근
</pre>
<h3>id로 접근하기</h3>
<button onclick="accessId()">클릭할 때 마다 배경색 변경</button>
<div id="div1" class="area"></div>
<hr>
<h3>class로 접근하기</h3>
<div class="area div2"></div>
<div class="area div2"></div>
<div class="area div2"></div>
<button onclick="accessClass()">배경색 변경하기</button>
<hr>
<h3>태그명으로 접근하기</h3>
<ul>
<li>1</li>
<li>2</li>
<li>3</li>
<li>4</li>
<li>5</li>
</ul>
<button onclick="accessTagName()">배경색 변경</button>
<hr>
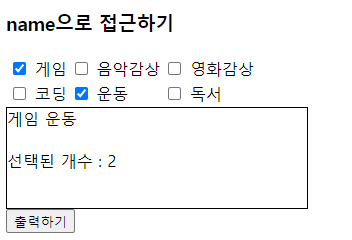
<h3>name으로 접근하기</h3>
<table>
<tr>
<td>
<input type="checkbox" name="hobby" id="game" value="게임">
<label for="game">게임</label>
</td>
<td>
<input type="checkbox" name="hobby" id="music" value="음악감상">
<label for="music">음악감상</label>
</td>
<td>
<input type="checkbox" name="hobby" id="movie" value="영화감상">
<label for="movie">영화감상</label>
</td>
</tr>
<tr>
<td>
<input type="checkbox" name="hobby" id="coding" value="코딩">
<label for="coding">코딩</label>
</td>
<td>
<input type="checkbox" name="hobby" id="exercise" value="운동">
<label for="exercise">운동</label>
</td>
<td>
<input type="checkbox" name="hobby" id="book" value="독서">
<label for="book">독서</label>
</td>
</tr>
</table>
<div class="area" id="name-div"></div>
<button onclick="accessName()">출력하기</button>
<hr>
<h3>CSS 선택자로 접근하기</h3>
<div id="css-div">
<div class="area">test1</div>
<div class="area">test2</div>
</div>
<button onclick="accessCss()">확인하기</button>
<hr>
<h3>카카오톡 채팅 화면 만들기</h3>
<div id="chatting-bg">
<p> <span>입력되는 채팅 출력</span> </p>
</div>
<!-- onkeydown : 키가 눌러졌을 때 -->
<!-- onkeypress : 키가 눌러지고 있을 때
쭉 누르고 있는 경우 무분별한 함수 호출이 발생함 (주의)
-->
<!-- onkeyup : 키가 올라올 때 (눌러진 후 딱 한번 이벤트 발생) -->
<input type="text" id="chatting-input" size="50" onkeyup="inputEnter()">
<button onclick="readValue()">입력</button>
</body>
</html>03_요소접근방법.js
// id로 접근하기
function accessId() {

    const div1 = document.getElementById("div1");

    // 접근한 요소의 배경색 얻어오기
    const bgColor = div1.style.backgroundColor;

    /**** 자바스크립트는 문자열 비교시에도 비교연산자(==) 사용한다 ! (equals 사용 X) ****/
    if( bgColor == "red" ) {
        div1.style.backgroundColor = "yellow";
    } else {
        div1.style.backgroundColor = "red";
    }
}

// class로 접근하기
function accessClass() {

    // 요소를 여러개 접근 하는 경우 [배열] 형태로 반환됨
    const arr = document.getElementsByClassName("div2");

    console.log(arr);

    // 인덱스를 이용해서 요소 하나씩 접근
    arr[0].style.backgroundColor = 'pink';
    arr[0].innerText = "첫번째 요소";

    arr[1].style.backgroundColor = 'tomato';
    arr[1].innerText = "두번째 요소";

    arr[2].style.backgroundColor = 'skyblue';
    arr[2].innerText = "세번째 요소";
}

// 태그명으로 접근하기
function accessTagName() {

    const arr = document.getElementsByTagName("li");

    console.log(arr);

    for(let i = 0; i < arr.length; i++) {

        const num = arr[i].innerText;
        arr[i].style.backgroundColor = "rgb(130, 220, " + (50 * num) + ")";
    }
}


// name으로 접근하기
function accessName() {

    const hobbyList = document.getElementsByName("hobby");

    let str = "";

    let count = 0;

    for(let i = 0; i < hobbyList.length; i++) {

        // * radio, checkbox 전용 속성 *
        // .checked : 해당요소가 체크되어 있으면 true, 아니면 false 반환
        if( hobbyList[i].checked ) {
            str += hobbyList[i].value + " ";

            count++;
        }
    }

    document.getElementById("name-div").innerText = str;

    document.getElementById("name-div").innerHTML += "<br><br>선택된 개수 : " + count;
}


// CSS 선택자로 접근하기
function accessCss() {

    // querySelector() : 요소 1개 선택 시 사용
    //  여러 요소가 있다면 첫번째 요소만 선택

    document.querySelector("#css-div").style.border = "3px solid red";

    document.querySelector("#css-div > div").style.fontSize = "30px";

    // querySelectorAll() : 모든 요소 선택 시 사용
    const arr = document.querySelectorAll("#css-div > div");

    for(let i = 0; i < arr.length; i++) {
        arr[i].style.backgroundColor = 'gold';
    }
}

// 카카오톡 채팅 만들기

function readValue() {

    const bg = document.getElementById("chatting-bg");

    const input = document.querySelector("#chatting-input");

    // input에 입력된 값이 있는 경우
    if( input.value.trim().length > 0 ) {

        // 문자열.trim() : 문자열 양 끝에 공백을 모두 제거
        // ex)   "          K  H          " => "K H"
        // ex) "             " => ""

        // input에 입력된 값을 얻어와 bg 추가 (누적)

        bg.innerHTML += "<p><span>" + input.value + "</span></p>";

        // 요소.scrollTop : 요소 내부 현재 스크롤 위치 반환
        // 요소.scrollHeight : 스크롤의 전체 높이
        // 요소.scrollTop = 요소.scrollHeight : 스크롤을 현재 스크롤 높이만큼
        // 위치를 이동

        bg.scrollTop = bg.scrollHeight;


    } else {
        alert("채팅 내용을 입력해주세요");
    }


    // 입력된 input의 value 지우기
    input.value = "";

    // 입력 후 다시 input에 포커스 맞추기
    input.focus();
}


// input 태그에 연결된 키가 눌러졌을 때 엔터인 경우를 검사하는 함수
function inputEnter() {
    console.log(window.event.key);

    if(window.event.key == "Enter") {
        readValue();
    }
}


04_변수와자료형.html
<!DOCTYPE html>
<html lang="en">
<head>
<meta charset="UTF-8">
<meta name="viewport" content="width=device-width, initial-scale=1.0">
<title>04_변수와자료형</title>
<script src="js/04_변수와자료형.js"></script>
<style>
#typeBox {
border: 2px solid black;
width: 500px;
height: 400px;
}
</style>
</head>
<body>
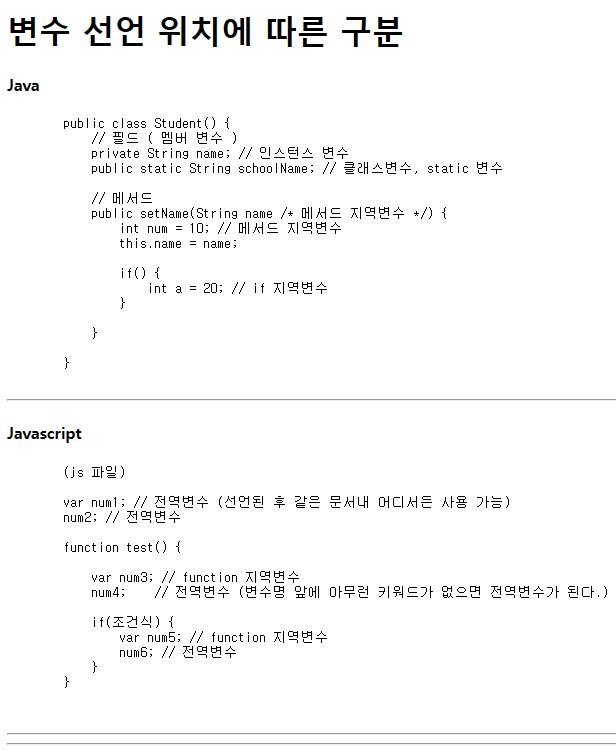
<h1>변수 선언 위치에 따른 구분</h1>
<h4>Java</h4>
<pre>
public class Student() {
// 필드 ( 멤버 변수 )
private String name; // 인스턴스 변수
public static String schoolName; // 클래스변수, static 변수
// 메서드
public setName(String name /* 메서드 지역변수 */) {
int num = 10; // 메서드 지역변수
this.name = name;
if() {
int a = 20; // if 지역변수
}
}
}
</pre>
<hr>
<h4>Javascript</h4>
<pre>
(js 파일)
var num1; // 전역변수 (선언된 후 같은 문서내 어디서든 사용 가능)
num2; // 전역변수
function test() {
var num3; // function 지역변수
num4; // 전역변수 (변수명 앞에 아무런 키워드가 없으면 전역변수가 된다.)
if(조건식) {
var num5; // function 지역변수
num6; // 전역변수
}
}
</pre>
<hr>
<hr>
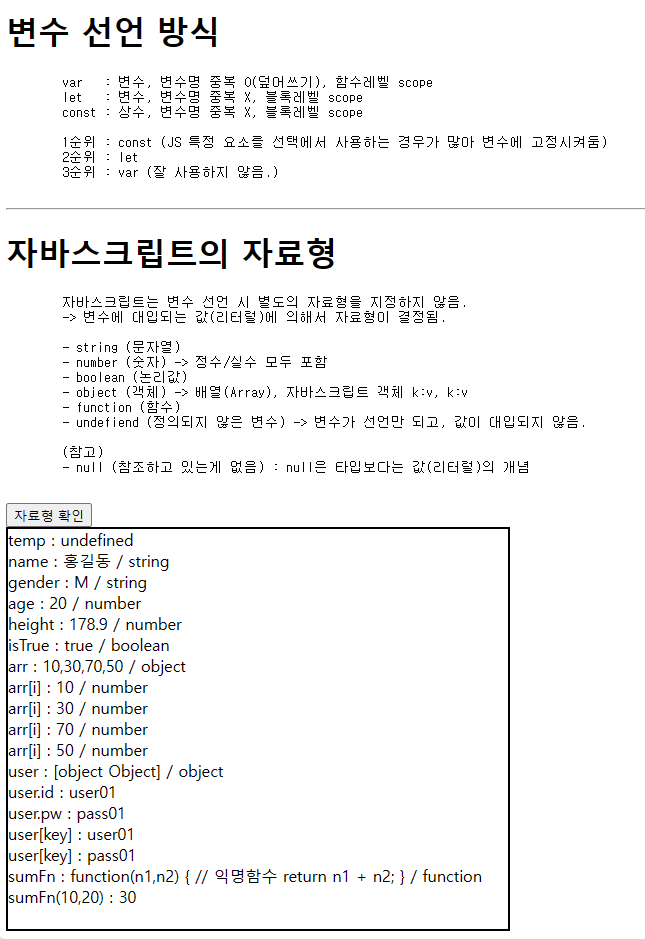
<h1>변수 선언 방식</h1>
<pre>
var : 변수, 변수명 중복 O(덮어쓰기), 함수레벨 scope
let : 변수, 변수명 중복 X, 블록레벨 scope
const : 상수, 변수명 중복 X, 블록레벨 scope
1순위 : const (JS 특정 요소를 선택에서 사용하는 경우가 많아 변수에 고정시켜둠)
2순위 : let
3순위 : var (잘 사용하지 않음.)
</pre>
<hr>
<h1>자바스크립트의 자료형</h1>
<pre>
자바스크립트는 변수 선언 시 별도의 자료형을 지정하지 않음.
-> 변수에 대입되는 값(리터럴)에 의해서 자료형이 결정됨.
- string (문자열)
- number (숫자) -> 정수/실수 모두 포함
- boolean (논리값)
- object (객체) -> 배열(Array), 자바스크립트 객체 k:v, k:v
- function (함수)
- undefiend (정의되지 않은 변수) -> 변수가 선언만 되고, 값이 대입되지 않음.
(참고)
- null (참조하고 있는게 없음) : null은 타입보다는 값(리터럴)의 개념
</pre>
<button onclick="typeTest()">자료형 확인</button>
<div id="typeBox"></div>
</body>
</html>04_변수와자료형.js
//  변수 선언 위치에 따른 구분

var num1 = 1; // 전역 변수
num2 = 2;     // 전역 변수

console.log(num1); // 1
console.log(num2); // 2

var num1 = 20;
num2 = 40;

console.log(num1); // 20
console.log(num2); // 40

console.log("JS 코드를 함수 내부가 아닌 JS 파일 또는 script 태그에 바로 작성하면 HTML 랜더링 시 바로 수행된다.")


function test() {
    var num3 = 3; // function 지역변수
    num4 = 4; // 전역 변수

    if(true) {
        // let num5 = 5; // function 지역변수
        var num5 = 5;
        num6 = 6; // 전역 변수
    }

    console.log(num5); // 5
}


test(); // 함수호출


// console.log(num3);
console.log(num4); // function 종료 후에도 사용 가능 -> 전역변수

// console.log(num5);
console.log(num6);


// 자료형 확인
function typeTest() {

    const typeBox = document.getElementById("typeBox");

    let temp; // 선언 후 값을 초기화하지 않음 == undefiend
    typeBox.innerHTML = "temp : " + temp;

    const name = "홍길동";

    // typeof 변수명 : 해당 변수의 자료형을 검사하는 연산자
    typeBox.innerHTML += "<br>name : " + name + " / " + typeof name;

    const gender = 'M';
    typeBox.innerHTML += "<br>gender : " + gender + " / " + typeof gender;

    // 자바스크립트는 char 자료형이 존재하지 않는다
    // -> "", '' 모두 string 리터럴 표기법

    const age = 20;
    const height = 178.9;

    typeBox.innerHTML += "<br>age : " + age + " / " + typeof age;
    typeBox.innerHTML += "<br>height : " + height + " / " + typeof height;


    const isTrue = true;
    typeBox.innerHTML += "<br>isTrue : " + isTrue + " / " + typeof isTrue;

    // object

    // java ( {} )
    // int[] arr = {1,2,3,4,5}

    // javascript [] 사용
    const arr = [10,30,70,50];
    typeBox.innerHTML += "<br>arr : " + arr + " / " + typeof arr;

    for(let i = 0; i < arr.length; i++) {
        typeBox.innerHTML += "<br>arr[i] : " + arr[i] + " / " + typeof arr[i];
    }

    // 자바스크립트 객체 K:V (Map 형식)로 작성
    const user = { "id":"user01", "pw":"pass01" };
    typeBox.innerHTML += "<br>user : " + user + " / " + typeof user;

    // 객체 내용 출력 방법 1
    typeBox.innerHTML += "<br>user.id : " + user.id;
    typeBox.innerHTML += "<br>user.pw : " + user.pw;

    // 객체 내용 출력 방법 1 (객체 전용 for문 for..in)
    for(let key in user) {
        // user 객체의 키(id, pw)를 반복할 때 마다 하나씩 얻어와 key 변수에 저장
        typeBox.innerHTML += "<br>user[key] : " + user[key];
    }


    // function (함수도 자료형이다!)

    // 1) 변수명 == 함수명
    const sumFn = function(n1,n2) { // 익명함수
        return n1 + n2;
    }

    // 함수명만 작성한 경우 -> 함수에 작성된 코드가 출력됨
    typeBox.innerHTML += "<br>sumFn : " + sumFn + " / " + typeof sumFn;

    // 함수명() 괄호를 포함해서 작성하는 경우 -> 함수 호출(실행)
    typeBox.innerHTML += "<br>sumFn(10,20) : " + sumFn(10,20);
}
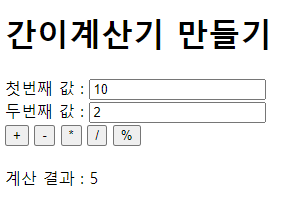
간이 계산기 만들기
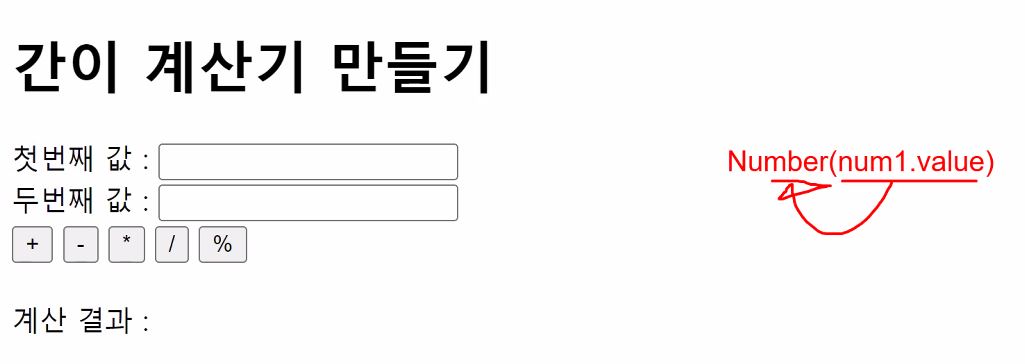
05_간이계산기.html
<!DOCTYPE html>
<html lang="en">
<head>
    <meta charset="UTF-8">
    <meta name="viewport" content="width=device-width, initial-scale=1.0">
    <title>간이계산기</title>
</head>
<body>
    <h1>간이계산기 만들기</h1>

    첫번째 값 : <input id="num1"><br>
    두번째 값 : <input id="num2"><br>

    <button onclick="calculate('+')">+</button>
    <button onclick="calculate('-')">-</button>
    <button onclick="calculate('*')">*</button>
    <button onclick="calculate('/')">/</button>
    <button onclick="calculate('%')">%</button>

    <br><br>

    계산 결과 : <span id="result"></span>

    <script>
        function calculate(op) {
            // op에는 +, -, *, /, % 중 전달되서 옴

            // input에 입력된 값을 얻어와 number 타입으로 변환

            const num1 = Number( document.getElementById("num1").value );
            const num2 = Number( document.getElementById("num2").value );

            // 결과 저장용 변수
            let res = 0;

            switch(op) {
            case '+' : res = num1 + num2; break;
            case '-' : res = num1 - num2; break;
            case '*' : res = num1 * num2; break;
            case '/' : res = num1 / num2; break;
            case '%' : res = num1 % num2; break;
            }

            // span 태그에 결과 출력
            document.getElementById("result").innerText = res;
        }
    </script>
</body>
</html>
[ 결과 ]