
🧩 링크
📌 마크업 랭귀지
- 내용에 추가적인 정보를 표시하는 언어
📌 HTML
- 링크로 연결된 문서를 만들때 사용
- 구조와 의미를 표시
📌 새 창 열기
<a href="주소창" target="_blank"> 주소 </a>📌 URL 프래그먼트
<a href="#bee"> 꿀벌🐝 </a>

<div id="bee"> 꿀벌 최고! </a>꿀벌🐝링크를 클릭시, id가bee인 태그로 이동
📌 URL 스킴
- 페이지 연결외 다른 동작들을 가능하게 해줌
📍 이메일
<a href="mailto:aaabbbccc@naver.com"> 메일 </a>- 해당 링크를 클릭하면, 바로
이메일 앱으로 연결
📍 전화
<a href="tel:010-1234-5678"> 전화 </a>- 해당 링크를 클릭하면, 바로
전화 앱으로 연결
🧩 리스트
📌 순서 리스트
<ol>
	<li> 리스트1 </li>
    <li> 리스트2 </li>
    ...
</ol>
📌 순서가 없는 리스트
<ul>
	<li> 리스트1 </li>
    <li> 리스트2 </li>
    ...
</ul>
📌 리스트 스타일링
- 순서 리스트에서는
type속성으로 기호 변경 가능
a: a, b, c, ...
i: i, ii, iii, ...
I: I, II, III, ...
1: 1, 2, 3, ...
- CSS에서는
list-style속성으로 변경 가능 - 리스트 항목을 한 줄로 쓰고 싶을 때
display: inline-block
🧩 테이블
📌 테이블 태그
<table>
	<tr>
    	<td> 내용1-1  </td>
        <td> 내용1-2  </td>
        <td> 내용1-3  </td>
    </tr>
    <tr>
    	<td> 내용2-1  </td>
        <td> 내용2-2  </td>
        <td> 내용2-3  </td>
    </tr>
    <tr>
    	<td> 내용3-1  </td>
        <td> 내용3-2  </td>
        <td> 내용3-3  </td>
    </tr>
</table>
<table> : table
<tr> : table row
<td> : table data sell
📌 머리글 바닥글
<table>
	<thaed>
      <tr>
          <th> 머리글  </th>
          <th> 머리글  </th>
          <th> 머리글  </th>
      </tr>
    </thaed>
    <tbody>
      <tr>
          <th> 주 내용2  </th>
          <td> 내용2-2  </td>
          <td> 내용2-3  </td>
      </tr>
    </tbody>
    <tfoot>
      <tr>
          <th> 내용3-1  </th>
          <th> 내용3-2  </th>
          <th> 내용3-3  </th>
      </tr>
    </tfoot>
</table>
📌 테이블 스타일링
table {
	border: 1px solid red;
}
📌 테두리 겹치기
table {
	border: 1px solid red;
    border-collapse: collapse;
}border-collapse: 간격을 없애고, 테두리를 겹치기
📌 테두리 간격
table {
  border: 1px solid red;
  border-spacing: 10px;
}border-spacing: 테두리 사이의 간격을 직접 조절
🧩 멀티미디어
📌 이미지
<img src="이미지 주소" alt="정보 표시">📌 비디오
<video src="bee.mp4" autoplay controls width="480" height="360"></video>autoplay : 자동재생
muted : 음소거 <- 크롬에서는 이걸 써야 동작함
controls : 영상 조작 버튼
📌 오디오
<audio src="bee.mp3" autoplay controls width="480" height="360"></audio>autoplay : 자동재생
muted : 음소거 <- 크롬에서는 이걸 써야 동작함
controls : 오디오 조작 버튼
📌 iframe
<iframe src="주소창" width="" height="">- 다른 웹페이지를 보여줄 때 사용하는 속성
🧩 폼 (Form)
- 작성한 데이터를 서버로 전송할 수 있는 태그
<form>
      <div>
        <label for="signup-email">이메일</label>
        <input id="signup-email" name="email" type="email">
      </div>
      <div>
        <label for="signup-password">비밀번호</label>
        <input id="signup-password" name="password" type="password">
      </div>
      <div>
        <label for="signup-password-repeat">비밀번호 확인</label>
        <input id="signup-password-repeat" name="password-repeat" type="password">
      </div>
    </form>
for : input의 id와 이름이 같으면 연결
id : label for와 이름이 같으면 연결
name : 데이터를 전송할 때 사용하는 이름 (정해진 값 없음)
type : 입력 받을 내용의 타입 (정해진 값 있음)
📌 input 태그 속성들
📍 checkbox
<label>
  <input name="agreement" type="checkbox">
  체크
</label>
📍 value
<label>
  <input type="checkbox" name="bee" value="fly">
  꿀벌
</label>- 쿼리 문자열에서는
&bee=fly
📍 날짜
<input name="ymd" type="date">📍 파일
<input name="bee" type="file">📍 파일형식 지정
<input name="bee" type="file" accept=".jpg, .raw">📍 파일개수 지정
<input name="bee" type="file" mutliple> <!-- 여러개 -->
<input name="bee" type="file"> 			<!-- 한 개 -->
📍 숫자
<!-- 100에서 1000사이 -->
<input type="number" min="100" max="1000">
📍 라디오 (radio)
<input id="1" name="feeling" value="0" type="radio">
<label for="1">1</label>
<input id="2" name="feeling" value="1" type="radio">
<label for="2">2</label>
<input id="3" name="feeling" value="2" type="radio">
<label for="3">3</label>
<input id="4" name="feeling" value="3" type="radio">
<label for="4">4</label>
<input id="5" name="feeling" value="4" type="radio">
<label for="5">5</label>
📌 버튼
<form>
      <div>
        <label for="signup-email">이메일</label>
        <input id="signup-email" name="email" type="email">
      </div>
      <div>
        <label for="signup-password">비밀번호</label>
        <input id="signup-passowrd" name="password" type="password">
      </div>
      <div>
        <label for="signup-password-repeat">비밀번호 확인</label>
        <input id="signup-password-repeat" name="password-repeat" type="password">
      </div>
      <button type="submit">확인</button>
      <button type="reset">취소</button>
    </form>
type : button, submit, reset 속성 값 존재
📌 placeholder
- 값이 비어져 있을때 설명이 적혀 있는것
<input name="input_id" placeholder="아이디를 입력하세요">📌 required
- 폼에서 반드시 입력해야 되는 값 설정
<input name="input_id" placeholder="아이디를 입력하세요" required>📌 autocomplete
- 자동 완성 속성
<input name="input_id" autocomplete="on"><input name="email" autocomplete="email">
<input name="tle" autocomplete="tel">- 이메일이나 전화번호를 지정해서도 가능
🧩 링크 태그 (link)
<link rel="stylesheet" href="style.css">rel : relation = 관계, 불러올 파일이 어떤 종류인지 작성
href : 파일의 경로
🧩 head 태그
- 데이터 집합
- 컴퓨터가 활용할 데이터를 정리해주는 공간
🧩 시맨틱 태그
-
의미를 가진 태그
-
의미만 다를 뿐 =
div랑 기능 같음 -
header: 영역의 도입부 -
nav: 사이트 안에서 이동 -
main: 본문 -
footer: 정보를 담고 있는 공간 -
article: 독립적인 공간, 하나의 완전한 내용 -
section: 어떤 것의 부분을 나타날 때 사용
🔥 main은 한번만 사용가능!!
📌 시맨틱 태그 장점
- 검색 최적화 (SEO)
- 웹 접근성
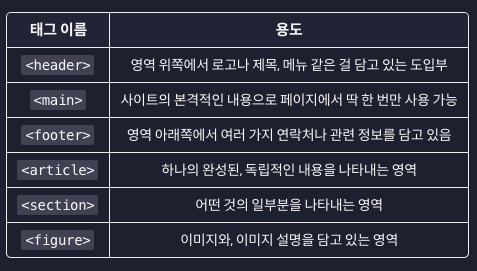
사진 출처 : 코드잇

해보고 싶은거 하기