키워드
PlayerControllerInput ActionInput Mapping ContextFInputActionValueUEnhancedInputLocalPlayerSubsystemAddControllerYawInput()BlueprintInitializeAnimation,Convert to Validated GetControl RigCached Pose
기억해야 할 것
- Input 입력값:
const FInputActionValue& value- Vector2D, bool 등 형식은 다양하다.
PlayerController클래스가UInputMappingContext*가짐.- 생성자에서
nullptr생성 후 블루프린트에서 넣기.
- 생성자에서
LocalPlayer->GetSubsystem<UEnhancedInputLocalPlayerSubsystem>()Subsystem->AddMappingContext(InputMappingContext, 0);EnhancedInput->BindAction( PlayerController->MoveAction, ETriggerEvent::Triggered, this, &ASpartaCharacter::Move );AddControllerYawInput(LookInput.X);AddMovementInput(GetActorForwardVector(), MoveInput.X)
[코드카타] 별 찍기 - 직사각형 출력
문제 링크
문제 요약
- 입력으로 정수
n,m이 주어진다. - 가로 길이가
n, 세로 길이가m인 직사각형을*로 출력한다. - 예를 들어
n = 5,m = 3이면*****를 3줄 출력한다.
내가 제출한 코드
- 최초 코드
#include <iostream>
#include <string>

using namespace std;

int main(void) {
    int n;
    int m;
    string rect;
    cin >> n >> m;
    for (int i = 0 ; i < n ; i++) rect.push_back('*');
    for (int j = 0 ; j < m ; j++) cout << rect << '\n';


    return 0;
}for-cout여러번 반복할 필요 없이string에 더할 것string row(n, '*');를 사용하면push_back반복문 없이 별 문자열을 바로 만들 수 있다.
개선 코드
int main(void)
{
    int n;
    int m;
    cin >> n >> m;
    string row(n, '*');
    for (int i = 0; i < m; i++) cout << row << '\n';
    return 0;
}
배운 점
for-cout여러번 반복할 필요 없이string에 더할 것push_back()은 문자열 뒤에 문자 하나를 추가할 때 사용할 수 있다.append()는 여러개- 같은 문자를 여러 개 가진 문자열은
string row(n, '*');형태로 만들 수 있다. '\n'은endl보다 단순 줄바꿈에 적합하며, 불필요한 flush가 없어 일반적으로 더 가볍다.
Enhanced Input System 이용한 PlayerController 구현
PlayerController란?
- "플레이어 입력은 PlayerController에서 처리" : 입력 처리 로직과 실제 캐릭터 동작 로직 분리. 코드 관리 수월.
PlayerController 중요 기능
- 입력 처리: Enhanced Input System
- 카메라 제어 로직
- UI와의 상호작용
- Possess(빙의), Unpossess
생성
- C++ 클래스로 생성 후 GameMode에 집어넣기.
PlayerControllerClass = ASpartaPlayerController::StaticClass();GameMode 생성자에 집어넣으면 됨.- 이후 블루프린트화 하고 BP_GameMode에서도 Player Controller Class 수정 해 줌
Enhanced Input System
-
Input Mapping System (IMC) : Input Action들 총괄해서 관리
- 사람 전용 IMC, 차량 전용 IMC... 이렇게 따로따로 관리 가능
-
Input Action (IA)
- 점프, 방향키이동, 공격 등 추상적인 행동 하나하나를 대상으로 함
- IA_Jump, IA_Move
-
IA는 전선, IMC는 스위치
-
우리 캐릭터가 하는 행동
- WASD 이동
- 마우스 회전 - 카메라 제어
- 점프
- 스프린트 (Shift 눌러서 빨리달리기)
Input Action
- 폴더 새로 만들고 (
Inputs) 우클릭으로 Input - Input Action 만들기. - Value Type
bool걍 누르고 떼는 스위치Axis1D:float값 단일 축. 전진/후진, 가속 페달Axis2D: 축 2개.Axis3D: 축 3 개 동시 처리. 비행 시뮬레이션 같은 것.
- Trigger: 입력 활성 조건
Pressed: 누를 때만 작동Released: 뗄 때 작동
- Modifier
- Dead Zone : 아날로그 스틱 등 일정 수준의 입력 무시
Negate: 입력값 반전Scalar: 입력값 배율 추가Swizzle Input Axis Values: 입력 축 변경 (X-Y 등)
- IMC에서 각 IA들 찾아서
Input연결해 주면 됨Move의 경우엔 Swizzle 잘 해주고Look의 경우
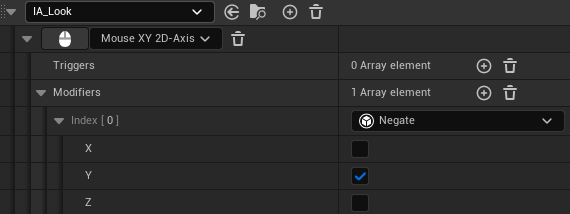
- 우리가 흔히 생각하는 카메라 움직임과 마우스가 전달하는 벡터랑 Y축이 반대방향이다
코드 대입
//SpartaPlayerController.h

//미리선언
class UInputMappingContext;
class UInputAction;

public:
	ASpartaPlayerController();

	UPROPERTY(EditAnywhere, BlueprintReadWrite, Category = "Input");
	UInputMappingContext* InputMappingContext;
	UPROPERTY(EditAnywhere, BlueprintReadWrite, Category = "Input");
	UInputAction* MoveAction;
	UPROPERTY(EditAnywhere, BlueprintReadWrite, Category = "Input");
	UInputAction* JumpAction;
	UPROPERTY(EditAnywhere, BlueprintReadWrite, Category = "Input");
	UInputAction* LookAction;
	UPROPERTY(EditAnywhere, BlueprintReadWrite, Category = "Input");
	UInputAction* SprintAction;

protected:
	virtual void BeginPlay() override;
//SpartaPlayerController.cpp
#include "EnhancedInputSubSystems.h"
ASpartaPlayerController::ASpartaPlayerController()
: InputMappingContext(nullptr),
MoveAction(nullptr),
JumpAction(nullptr),
LookAction(nullptr),
SprintAction(nullptr)
{
}
void ASpartaPlayerController::BeginPlay()
{
Super::BeginPlay();
if (ULocalPlayer* LocalPlayer = GetLocalPlayer())
{
if (UEnhancedInputLocalPlayerSubsystem* Subsystem = LocalPlayer->GetSubsystem<UEnhancedInputLocalPlayerSubsystem>())
{
if (InputMappingContext)
{
Subsystem->AddMappingContext(InputMappingContext, 0);
}
}
}
}- 블루프린트에서 넣을 수 있게
UPROPERTY붙여서 포인터 생성 - 생성자에서
nullptr화 해서 안전하게 LocalPlayer: 현재 플레이어 컨트롤러에 연결된 플레이어 객체EnhancedInputLocalPlayerSubsystem: 입력을 "받는" 서브시스템- 이
if라인에서 Subsystem 이란 이름의 객체 생성도 같이 한다.
- 이
Subsystem->AddMappingContext(InputMappingContext, 0);: 실제로 우리가 만든Input Mapping Context집어넣는 곳.0은 우선도다.
캐릭터 동작 구현과 입력 처리
액션 바인딩
- PlayerController는 키나 마우스 입력을 감지하고 각
IA를 활성화 할 뿐 - 캐릭터 클래스 내에서 어떤 함수가 호출될지는 직접 다시 바인딩 해주어야 한다.
- 위에서 이야기한
Local Player- 일종의 플레이어. 사용자. 그래서 얘가IMC를 들고 있게 된다.
- A키 누름
- PlayerController가 A 인식
- Local Player Subsystem에게 A 누를 시 어떤 행동하는 지 물어봄
- PlayerController가 Character에 어떤 행동을 실행할 지 함수 호출
- Character 가 함수 실행.
구현 - 헤더
//SpartaCharacter.h

//미리선언
struct FInputActionValue;
	virtual void SetupPlayerInputComponent(class UInputComponent* PlayerInputComponent) override;
	UFUNCTION() // 리플렉션 적용용. 블루프린트에서 수정할 필요는 없다.
	void Move(const FInputActionValue& value);
	UFUNCTION()
	void StartJump(const FInputActionValue& value);
	UFUNCTION()
	void StopJump(const FInputActionValue& value);
	UFUNCTION()
	void StartSprint(const FInputActionValue& value);
	UFUNCTION()
	void StopSprint(const FInputActionValue& value);
	UFUNCTION()
void Look(const FInputActionValue& value);-
StartJumpStopJump같이bool값을 받는 Input Action의 경우 시작과 끝 함수를 구분해서 지정하는 게 일반적이다 -
const FInputActionValue& value:FInputActionValue는 구조체. 크기가 큼. 그래서&으로 참조만. -
Sprint위한 멤버 변수들은private에 저장구현 - 코드
//SpartaCharacter.cp
#include "SpartaPlayerController.h"
#include "EnhancedInputComponent.h"
#include "GameFramework/CharacterMovementComponent.h"
//생성자에서 멤버변수 초기화
NormalSpeed = GetCharacterMovement()->MaxWalkSpeed;
SprintSpeedMultiplier = 1.7f;
SprintSpeed = NormalSpeed * SprintSpeedMultiplier;
PlayerInputComponent
void ASpartaCharacter::SetupPlayerInputComponent(UInputComponent* PlayerInputComponent)
{
	Super::SetupPlayerInputComponent(PlayerInputComponent);

	if (UEnhancedInputComponent* EnhancedInput = Cast<UEnhancedInputComponent>(PlayerInputComponent))
	{
		if (ASpartaPlayerController* PlayerController = Cast<ASpartaPlayerController>(GetController()))
		{
			if (PlayerController->MoveAction)
			{
				EnhancedInput->BindAction(
					PlayerController->MoveAction,
					ETriggerEvent::Triggered,
					this,
					&ASpartaCharacter::Move
				);
}...- 이런 식으로 각
MoveActionSprintAction등에 함수 불러오는BindAction실행하면 된다. - 키에서 손 뗐을 때 불러오는 함수는
ETriggerEvent::Completed
개별 함수들
void ASpartaCharacter::Move(const FInputActionValue& value)
{
	if (!Controller) return;

	const FVector2D MoveInput = value.Get<FVector2D>();

	if (!FMath::IsNearlyZero(MoveInput.X))
	{
		AddMovementInput(GetActorForwardVector(), MoveInput.X);
	}
if (!Controller) return;컨트롤러 체크Jump,GetCharacterMovement등 플레이어컨트롤러 없으면 작동 안하는 함수들 이용하면if(!Controller) return;필요없다FVector2D.X식으로 받기.- `AddMovementInput(방향, 세기)
IsNearlyZero는 부동소수점 처리용bool값은value.Get<bool>()
void ASpartaCharacter::StopSprint(const FInputActionValue& value)
{
	//if (!Controller) return;
	if (GetCharacterMovement())
	{
		GetCharacterMovement()->MaxWalkSpeed = NormalSpeed;
	}
}- 카메라 컨트롤은
AddControllerYawInput(LookInput.X);
게임기획 라이브 세션 - 컨텐츠 기획 이론
컨텐츠 기획이란
- 시스템은 그릇, 컨텐츠는 내용물
- 어떻게 플레이하는가? vs 무엇을 플레이하는가
- 틀이 잘 짜여져 있어도, 채워넣지 않으면 플레이어에게 닿지 않는다.
- 단순히 양을 채우는 게 아니라, "오늘 할 것" "내일 하고 싶은 것" 설계하는 것.
- 정의: 플레이어가 게임 안에서 실제로 경험하는 것들을 설계
| 시스템 기획 | 콘텐츠 기획 |
|---|---|
| 전투 메커니즘, 데미지 공식 | 어떤 적이 등장하고, 어떤 패턴을 가지는가 |
| 퀘스트 시스템 구조 | 어떤 퀘스트 이야기가 있는가 |
| 아이템 등급 체계 | 어떤 아이템이 존재하는가 |
| 강화 시스템 규칙 | 강화 재료를 어디서 얼마나 얻는가 |
| 레벨 에디터 도구 | 어떤 레벨이 만들어지는가(레벨기획 = 컨텐츠 기획) |
- 컨텐츠 목록, 양 관리, 해금 순서, 진행 구조, 소비속도 예측/관리, 업데이트 컨텐츠 계획
게임 루프
- 컨텐츠 만들기 전에, 컨텐츠가 어떤 루프 안에 놓이는지 이해.
- 코어 루프 - 세션 루프 - 메타 루프 (메조 - 매크로)
컨텐츠 유형
소비형 컨텐츠 : 한번 플레이하면 소비되는 컨텐츠
- 한번 플레이하면 소비되는 컨텐츠
- 메인 스토리 퀘스트
- 보스 최초격파
- 숨겨진 장소 발견
- 메인 캐릭터 이벤트
- 도전 과제(업적)
- 컨텐츠 절벽: 소비형 컨텐츠가 끊기는 순간. 게임 최대 이탈 구간 -> 반복형/생성형 컨텐츠 반드시 준비되어 있어야 한다.
반복형 컨텐츠
- 여러 번 반복해도 가치가 있는 컨텐츠. 반복 동기가 핵심
- 일일/주간 던전
- 레이드
- PvP 아레나
- 일일 미션/바운티
- 시즌 배틀패스
- 반복 동기 4가지
- 재화/보상 동기 : 강력하지만 "의무감" 으로 변질되면 번아웃
- 순위/경쟁 동기
- 커뮤니티/소속감 : 사회적 연결이 이탈 방지 역할
- 숙련/발견 동기 : 내적 동기. 가장 건강하고 지속성 높음
생성형 컨텐츠
- 플레이 할 때마다 다른 경험이 생성되는 컨텐츠
- 절차적 생성
- 빌드 다양성
- 플레이어 생성
- AI 반응
소셜 컨텐츠
- 다른 플레이어와의 상호작용에서 컨텐츠 생성
- 협동 레이드
- PvP/ 길드전
- 커뮤니티 이벤트
- 거래 시스템
- 컨텐츠 공유
- 충분한 플레이어 풀이 전제되어야 한다 -> F2P 또는 낮은 진입 장벽 필수. 솔로 플레이 대안 컨텐츠 필요
플레이 볼륨 설계
- HowLongToBeat - Main/Main+Sides/Completionist
- 메타 프로그레션: 한 런/세션이 끝나더라도 영구적으로 남는 성장 요소
- 하데스 축적. 인플레이션 요소.
리텐션
- D1/ D7 / D30 / D90
| 지표 | 의미 | 업계 평균 (모바일 기준) |
|---|---|---|
| D1 리텐션 | 첫날 플레이 후 다음 날 재접속 비율 | 30~40% |
| D7 리텐션 | 7일 후 재접속 비율 | 10~20% |
| D30 리텐션 | 30일 후 재접속 비율 | 5~10% |
| D90 리텐션 | 90일 후 재접속 비율 | 2~5% |
- 로드맵: Pre-Launch /출시~1개월/1~3개월/3~6개월 구간 나눠서 리텐션 유지할 동기 지속적으로 제공
State Machine 설계, 애니메이션
- Animation 넣기 용 Blueprint
- 대부분 아는 거...
필요 파일 들
- Animation Blueprint
ABP_Character - 애니메이션 애셋들. 블렌드스페이스
변수 세팅
- 애니메이션 블루프린트 Event Graph에서
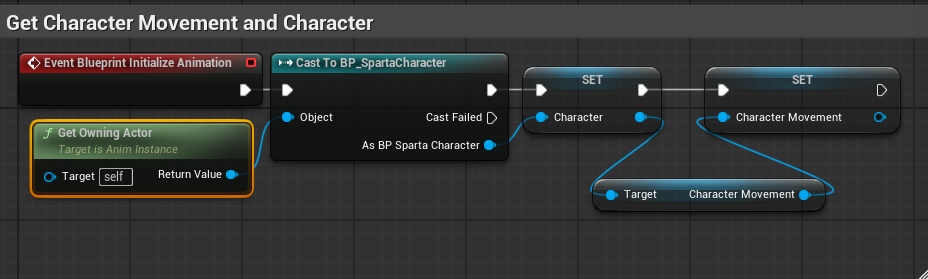
Event BlueprintInitializeAnimation이BeginPlay역할Get Owning Actor써도 된다.Try to get Pawn Owner도 같은 역할이겠지만.Cast To하고Get Character Movement해서 레퍼런스 변수로 세팅해 두기
업데이트 마다
Event BlueprintUpdateAnimation: 에니메이션 업데이트 할 때마다

46a66630039b/image.png)- 레퍼런스들
Get할 때마다Convert to Validated Get으로 검사 후 Get 할 수 있음. - 지상속도는
CharacterMovement-Get Velocity-Vector Length XY - "움직여야 하는지" 체크도 미리 여기서 만들어 두면 편하다.
bIsFalling도 만들어두기
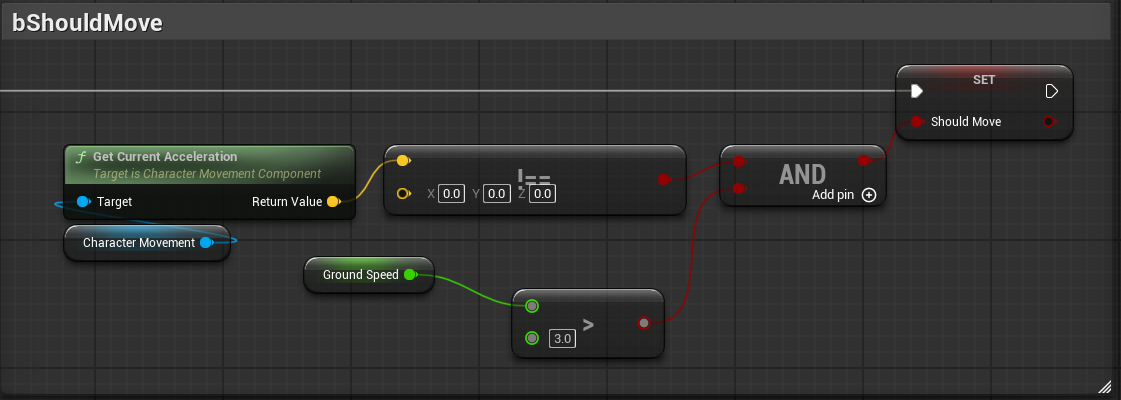

Locomotive
LocomotiveState Machine 생성.IdleWalkRunState 생성. 조건은bShouldMove로.WalkRun은 준비된BlendSpace 1D사용
Control Rig
- State Machine에서 나온 애니메이션을 다시 가공할 때 씀. 특히 지형에 발을 맞추고 싶을 때 Control Rig 사용.
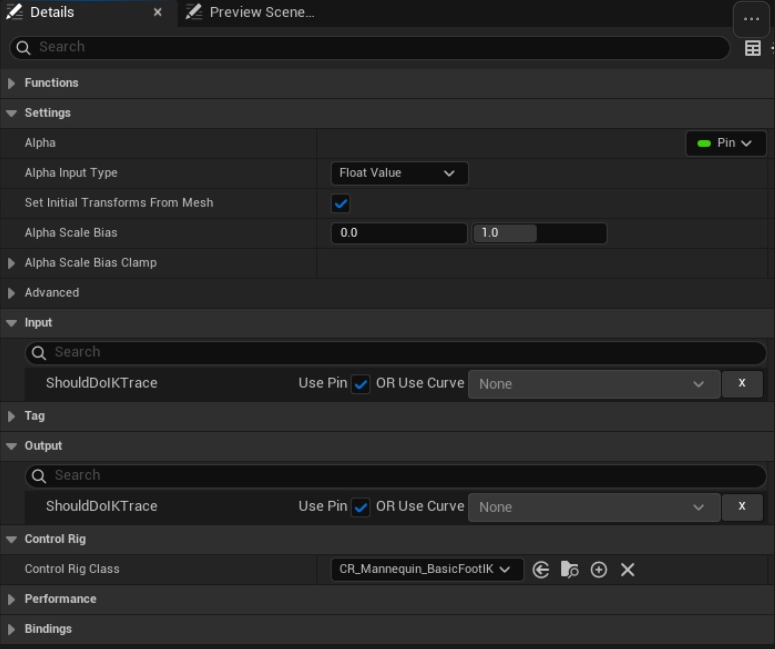
Settings-Set Initial Transforms From MeshControl Rig Class: 발 조정 용이므로BasicFootIK설정ShouldDoIKTrace: Jump 안할 때만 Trace 할 것이므로Use Pin설정. 이걸bIsFalling하고 연결
Save Cached Pose
- 한 State Machine에서 나온 애니메이션을 다른 State Machine에서 재사용하고 싶을 때
- State Machine 노드에서 드래그 -
New Save cached Pose
Land -> Locomotion
State Alias이용 : 특정 State 들에서 조건 만족하면 이 State로 전환한다는 노드To LandState Alias 노드 만들어Jump,FallLoop노드에 체크 해 두고LandState에 연결. 조건은!bIsFallingLand애니메이션은 Additive Animation이다 : 다른 Animation과 더해야 함.
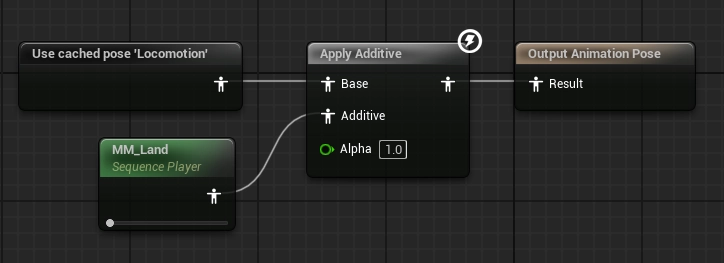
- Land -> Locomotion은 조건이 2개 필요하다.
- 착지하자마자 바로 움직여야 할 때:
bShouldMove - 착지하고 움직임이 없을 때: 느긋하게 애니메이션 다 재생되고
Idle로 이동할 수 있도록Transition-Automatic Rule Based on Sequence Player in State
- 착지하자마자 바로 움직여야 할 때:
MM_Land애니메이션에서Play Loop체크 해 놓아야 함에 주의! 여러 버그나, Additive 더하는 동안 생길 문제를 방지할 수 있다.
FallLoop
ToFallingState Alias 추가.Locomotion,LandState일 때 공중모션으로 전환될 수 있도록.ToFalling->Jump:bIsFalling체크하고Velocity.Z > 50활용ToFalling->FallLoop:Velocity.Z <= 50부분만 다르다.Jump->FallLoop: Automatic Rule 로 점프 애니메이션 재생된 후에 FallLoop로 가도록 한다.FallLoop는 Play Loop 체크, 점프는 필요없음.
개발지망생