이번 튜토리얼은 바인딩 된 컨트롤이있는 양식을 사용하면서 element 바인딩을 통해 선택한 엔티티에 바인딩한다.
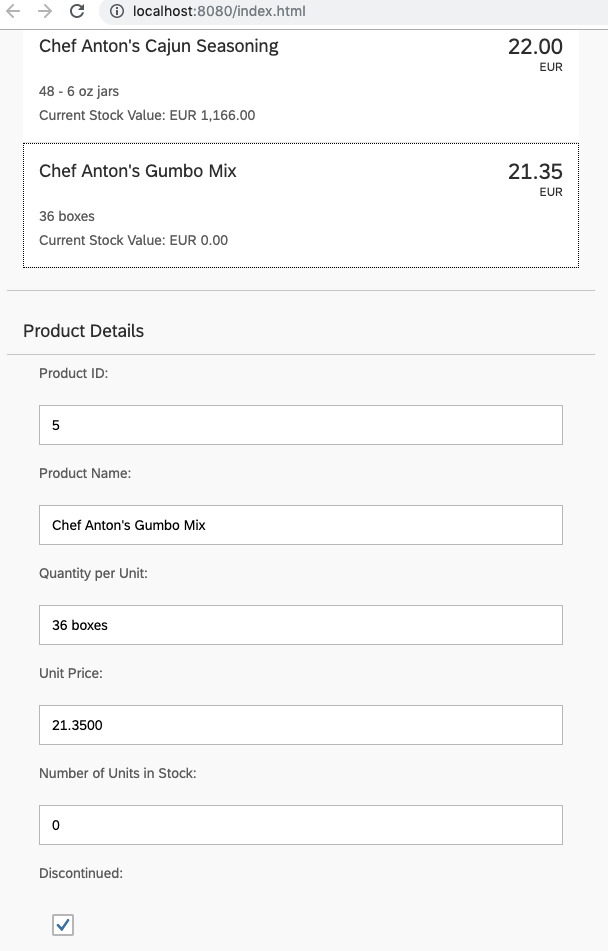
Preview
Coding
webapp/view/App.view.xml
...
	<Panel headerText="{i18n>panel3HeaderText}" class="sapUiResponsiveMargin" width="auto">
		<content>
			<List headerText="{i18n>productListTitle}" items="{products>/Products}">
				<items>
					<ObjectListItem
						press=".onItemSelected"
						type="Active"
						title="{products>ProductName}"
						number="{
							parts: [
								{path: 'products>UnitPrice'},
								{path: '/currencyCode'}
							],
							type: 'sap.ui.model.type.Currency',
							formatOptions: { showMeasure: false }
						}"
						numberUnit="{/currencyCode}">
						...
					</ObjectListItem>
				</items>
			</List>
		</content>
	</Panel>
	<Panel id="productDetailsPanel" headerText="{i18n>panel4HeaderText}" class="sapUiResponsiveMargin" width="auto">
		<l:Grid defaultSpan="L3 M6 S12" containerQuery="true">
			<Label text="{i18n>ProductID}:"/>
			<Input value="{products>ProductID}"/>

			<Label text="{i18n>ProductName}:"/>
			<Input value="{products>ProductName}"/>

			<Label text="{i18n>QuantityPerUnit}:"/>
			<Input value="{products>QuantityPerUnit}"/>

			<Label text="{i18n>UnitPrice}:"/>
			<Input value="{products>UnitPrice}"/>

			<Label text="{i18n>UnitsInStock}:"/>
			<Input value="{products>UnitsInStock}"/>

			<Label text="{i18n>Discontinued}:"/>
			<CheckBox selected="{products>Discontinued}"/>
		</l:Grid>
	</Panel>
</mvc:View>
클릭한 product데이터를 채우기 위해 ObjectListItem 컨트롤에서 onItemSelected 이벤트 핸들러를 등록하고 새로운 Panel 컨트롤을 만든다.
webapp/controller/App.controller.js
sap.ui.define([
	"sap/ui/core/mvc/Controller",
	"sap/m/library",
	"sap/ui/core/Locale",
	"sap/ui/core/LocaleData",
	"sap/ui/model/type/Currency"
], function (Controller, mobileLibrary, Locale, LocaleData, Currency) {
	"use strict";
	return Controller.extend("sap.ui.demo.db.controller.App", {
		...
		onItemSelected: function(oEvent) {
			var oSelectedItem = oEvent.getSource();
			var oContext = oSelectedItem.getBindingContext("products");
			var sPath = oContext.getPath();
			var oProductDetailPanel = this.byId("productDetailsPanel");
			oProductDetailPanel.bindElement({ path: sPath, model: "products" });

		}
	});
});
onItemSelected 함수에서 클릭 이벤트시 해당 객체를 oSelectedItem 변수에 담아주고 바인딩하고 패스 설정을 해준뒤 element에 바인딩 해준다.
우리는 양방향 방향을 통해서 바인딩 하였기 때문에 반대로 view에서 모델의 데이터 값을 변경할 수 있다.
webapp/i18n/i18n.properties
...
# Screen titles
panel1HeaderText=Data Binding Basics
panel2HeaderText=Address Details
panel3HeaderText=Aggregation Binding
panel4HeaderText=Product Details

# Product list
productListTitle=Product List
stockValue=Current Stock Value

# Product Details
ProductID=Product ID
ProductName=Product Name
QuantityPerUnit=Quantity per Unit
UnitPrice=Unit Price
UnitsInStock=Number of Units in Stock
Discontinued=Discontinued
webapp/i18n/i18n_de.properties
# Screen titles
panel1HeaderText=Data Binding Grundlagen
panel2HeaderText=Adressdetails
panel3HeaderText=Aggregation Binding
panel4HeaderText=Produktdetails

# Product list
productListTitle=Artikelliste
stockValue=Lagerbestand Wert

# Product Details
ProductID=Produkt-ID
ProductName=Produktname
QuantityPerUnit=Menge pro Einheit
UnitPrice=Preis der Einheit
UnitsInStock=Lagerbestand
Discontinued=Eingestellt
Related Information

UI5/Fiori/BTP 도큐먼트 번역 및 관련 정보 공유합니다.