패널 아래 목록에 표시되는 JSON 형식의 송장 데이터를 추가하여 데이터 Binding의 기능을 알아보자
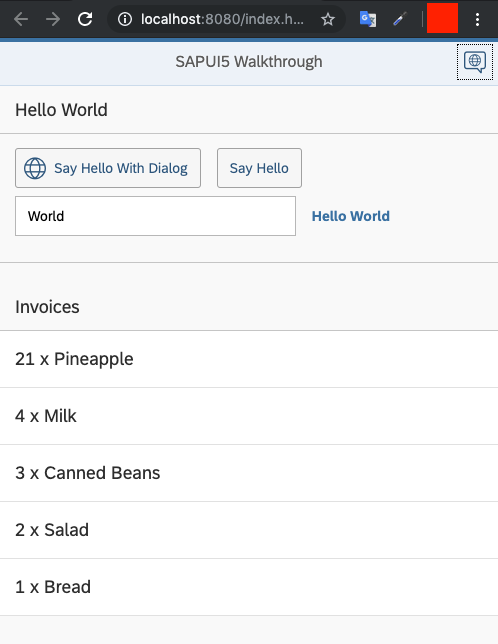
Preview
Coding
webapp/Invoices.json (New)
{
  "Invoices": [
	{
	  "ProductName": "Pineapple",
	  "Quantity": 21,
	  "ExtendedPrice": 87.2000,
	  "ShipperName": "Fun Inc.",
	  "ShippedDate": "2015-04-01T00:00:00",
	  "Status": "A"
	},
	{
	  "ProductName": "Milk",
	  "Quantity": 4,
	  "ExtendedPrice": 9.99999,
	  "ShipperName": "ACME",
	  "ShippedDate": "2015-02-18T00:00:00",
	  "Status": "B"
	},
	{
	  "ProductName": "Canned Beans",
	  "Quantity": 3,
	  "ExtendedPrice": 6.85000,
	  "ShipperName": "ACME",
	  "ShippedDate": "2015-03-02T00:00:00",
	  "Status": "B"
	},
	{
	  "ProductName": "Salad",
	  "Quantity": 2,
	  "ExtendedPrice": 8.8000,
	  "ShipperName": "ACME",
	  "ShippedDate": "2015-04-12T00:00:00",
	  "Status": "C"
	},
	{
	  "ProductName": "Bread",
	  "Quantity": 1,
	  "ExtendedPrice": 2.71212,
	  "ShipperName": "Fun Inc.",
	  "ShippedDate": "2015-01-27T00:00:00",
	  "Status": "A"
	}
  ]
}
Invoice file에는 응용프로그램에서 JSON 형식의 컨트롤을 Binding 하는데 사용할 수 있는 Data 5개(송장)가 포함되어 있다.
JSON은 데이터 저장을 위한 매우 가벼운 형식이며 SAPUI5 응용프로그램의 데이터 소스로 직접 사용될 수 있다.
webapp/manifest.json
{
…
  "sap.ui5": {
	"rootView": "sap.ui.demo.walkthrough.view.App",
[…]
	"models": {
	  "i18n": {
		"type": "sap.ui.model.resource.ResourceModel",
		"settings": {
		  "bundleName": "sap.ui.demo.walkthrough.i18n.i18n"
		}
	  },
	  "invoice": {
		"type": "sap.ui.model.json.JSONModel",
		"uri": "Invoices.json"
	  }
	}
  }
}
MVC의 (M[model])인 Invoice파일 정보를 descriptor의 sap.ui5 section에 추가한다.
JSONModel을 사용하기 위해 type을 sap.ui.model.json.JSONModel로 설정한다.
URI는 Component와의 상대경로 경로이다. Component는 자동으로 Invoices.json 파일에서 송장 데이터를 로드하여 JSONModel 형태의 Object Instance화 한다.
마지막으로 인스턴스화 된 JSONModel은 invoice라는 이름으로 명명 된다.
명명 된 invoice모델은 App 전체에서 사용할 수 있다.
note: 자동 모델 인스턴스화는 SAPUI5 버전 1.30 이상에서만 사용할 수 있다.
이전 버전을 사용하는 경우 Step 9의 Component 구성에서와 같이 Component.js 파일의 onInit 메서드에서 Resource Bundle과 다른 응용 프로그램 모델을 수동으로 인스턴스화 할 수 있다.
webapp/view/App.view.xml
<mvc:View
	controllerName="sap.ui.demo.walkthrough.controller.App"
	xmlns="sap.m"
	xmlns:mvc="sap.ui.core.mvc"
	displayBlock="true">
	<Shell>
		<App class="myAppDemoWT">
			<pages>
				<Page title="{i18n>homePageTitle}">
					<headerContent>
						<Button
							icon="sap-icon://hello-world"
							press=".onOpenDialog"/>
					</headerContent>
					<content>
						<mvc:XMLView viewName="sap.ui.demo.walkthrough.view.HelloPanel"/>
						<mvc:XMLView viewName="sap.ui.demo.walkthrough.view.InvoiceList"/>
					</content>
				</Page>
			</pages>
		</App>
	</Shell>
</mvc:View><App>에서 <Page>의 <content>에 두번째 view를 추가하여 패널 아래에 인보이스를 표시한다.
webapp/view/InvoiceList.view.xml (New)
<mvc:View
   xmlns="sap.m"
   xmlns:mvc="sap.ui.core.mvc">
   <List
      headerText="{i18n>invoiceListTitle}"
      class="sapUiResponsiveMargin"
      width="auto"
      items="{invoice>/Invoices}" >
      <items>
         <ObjectListItem
            title="{invoice>Quantity} x {invoice>ProductName}"/>
      </items>
   </List>
</mvc:View>
Invoice.view는 headerText가있는 List control에 표시한다.
List의 aggregation인 item은 JSON Data의 root경로인 invoices에 binding된다.
모델을 정의했기 때문에 각 바인딩 앞에 식별자 {invoice>}를 추가한다.
item aggregation에서 우리는 List에서 Invocie.json의 데이터들의 각 송장에 대해 자동으로 반복되는 목록의 템플릿을 정의한다.
이를 위해 ObjectListItem을 사용하여 item aggregation의 각 aggregated된 자식마다 각각의 control을 만든다.
List items에 manifest.json에 정의한 invoice 모델과 데이터를 받아올 Incovices.json파일에 접근을 한다.
즉 items = {invoice> / Invoices}를 통해 item aggregation을 invoice에 바인딩했기 때문에 json 데이터를 받아 올 수 있다.
webapp/i18n/i18n.properties
# App Descriptor
appTitle=Hello World
appDescription=A simple walkthrough app that explains the most important concepts of OpenUI5

# Hello Panel
showHelloButtonText=Say Hello
helloMsg=Hello {0}
homePageTitle=Walkthrough
helloPanelTitle=Hello World
openDialogButtonText=Say Hello With Dialog
dialogCloseButtonText=Ok

# Invoice List
invoiceListTitle=Invoices
Related Information