Step 8: Binding Paths: Accessing Properties in Hierarchically Structured Models
ui5-Data Binding
목록 보기
9/14
6 단계에서 우리는 ResourceModel의 필드가 평면 구조로 되었다고 설명했다.
그러나 이는 resource models만 해당된다.
JSON 및 OData 모델의 속성은 거의 계층 구조로 정렬된다.
따라서 이번 튜토리얼에선 계층 구조로된 모델 객체에서 필드를 참조하는 방법을 알아본다.
Preview
Coding
webapp/index.js
sap.ui.require([
"sap/ui/model/json/JSONModel",
"sap/ui/core/mvc/XMLView",
"sap/ui/model/resource/ResourceModel"
], function (JSONModel, XMLView, ResourceModel) {
"use strict";
// Attach an anonymous function to the SAPUI5 'init' event
sap.ui.getCore().attachInit(function () {
var oModel = new JSONModel({
firstName: "Harry",
lastName: "Hawk",
enabled: true,
address: {
street: "Dietmar-Hopp-Allee 16",
city: "Walldorf",
zip: "69190",
country: "Germany"
}
});
// Assign the model object to the SAPUI5 core
sap.ui.getCore().setModel(oModel);
var oResourceBundle = new ResourceModel({
bundleName: "sap.ui.demo.db.i18n.i18n"
});
sap.ui.getCore().setModel(oResourceBundle, "i18n");
// Display the XML view called "App"
new XMLView({
viewName: "sap.ui.demo.db.view.App"
}).placeAt("content");
});
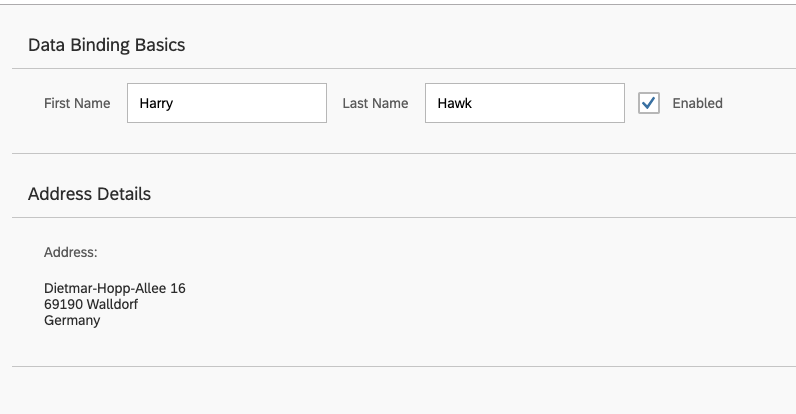
});json 모델 객체에 address라는 하위 객체를 포함시킨다.
webapp/view/App.view.xml
<mvc:View
xmlns="sap.m"
xmlns:l="sap.ui.layout"
xmlns:mvc="sap.ui.core.mvc">
<Panel headerText="{i18n>panel1HeaderText}" class="sapUiResponsiveMargin" width="auto">
<content>
<Label text="{i18n>firstName}" class="sapUiSmallMargin"/>
<Input value="{/firstName}" valueLiveUpdate="true" width="200px" enabled="{/enabled}"/>
<Label text="{i18n>lastName}" class="sapUiSmallMargin"/>
<Input value="{/lastName}" valueLiveUpdate="true" width="200px" enabled="{/enabled}"/>
<CheckBox selected="{/enabled}" text="Enabled"/>
</content>
</Panel>
<Panel headerText="{i18n>panel2HeaderText}" class="sapUiResponsiveMargin" width="auto">
<content>
<l:VerticalLayout>
<Label class="sapUiSmallMargin" text="{i18n>address}:"/>
<FormattedText class="sapUiSmallMarginBegin sapUiSmallMarginBottom" htmlText="{/address/street}<br>{/address/zip} {/address/city}<br>{/address/country}" width="200px"/>
</l:VerticalLayout>
</content>
</Panel>
</mvc:View>해당 view 파일에 새로운 Panel 컨트롤에 Label, FormattedText를 추가한다.
FormattedText 컨트롤의 htmlText 속성은 index.js의 address:{street: "Dietmar-Hopp-Allee 16",city: "Walldorf",zip: "69190",country: "Germany"}로 바인딩된다.
webapp/i18n/i18n.properties
# Field labels
firstName=First Name
lastName=Last Name
enabled=Enabled
address=Address


# Screen titles
panel1HeaderText=Data Binding Basics
panel2HeaderText=Address Details
webapp/i18n/i18n_de.properties
# Field labels
firstName=Vorname
lastName=Nachname
enabled=Aktiviert
address=Adresse


# Screen titles
panel1HeaderText=Data Binding Grundlagen
panel2HeaderText=Adressdetails
note:
이제 리소스 번들 파일에 Address 및 새 패널 머리글 텍스트의 새 속성이 포함된다. 두 패널 속성 모두 번호가 매겨져 있다.
XML view에서 Text 요소의 바인딩 경로에 대한 중괄호 안에 첫 번째 문자가슬래시임(/)을 유의한다.
이는 JSON 및 OData 모델에서 특성에 대한 절대 참조를 작성하는 바인딩 경로에 필요하지만 ResourceModel에는 사용하면 안된다.
첫 번째 슬래시 문자 다음에 바인딩 경로 구문은 슬래시 문자({/ address / street})로 구분된 객체 이름과 속성 이름을 사용한다.
Related Information

UI5/Fiori/BTP 도큐먼트 번역 및 관련 정보 공유합니다.