이번 튜토리얼에선 이메일을 보내는 링크를 추가 한다.
이를 위해 모델의 데이터를 sap.m.URLHelper.normalizeEmail API를 사용한다.
사용자가 이름을 변경하자 마자 전자 메일도 변경되도록 사용자 정의 포맷터 함수를 사용한다.
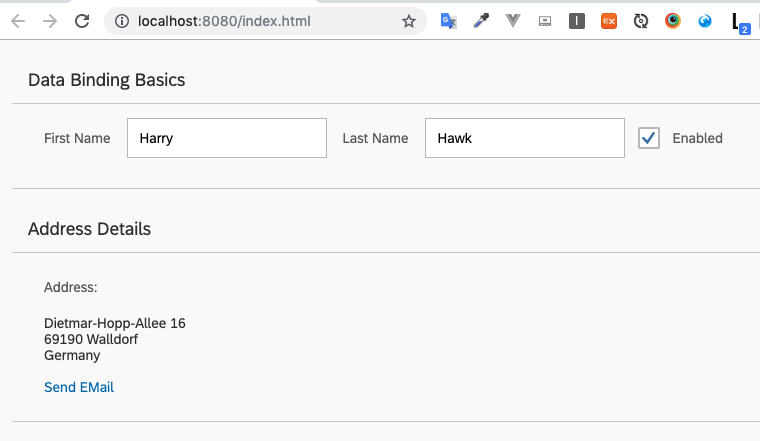
Preview
Coding
webapp/controller/App.controller.js (New)
sap.ui.define([
	"sap/ui/core/mvc/Controller",
	"sap/m/library"
], function (Controller, mobileLibrary) {
	"use strict";

	return Controller.extend("sap.ui.demo.db.controller.App", {
		formatMail: function(sFirstName, sLastName) {
			var oBundle = this.getView().getModel("i18n").getResourceBundle();
			return mobileLibrary.URLHelper.normalizeEmail(
				sFirstName + "." + sLastName + "@example.com",
				oBundle.getText("mailSubject", [sFirstName]),
				oBundle.getText("mailBody"));
		}
	});
});
webapp/controller경로에 해당 파일을 생성한다.
우리의 사용자정의 formatter에서 현재 모델에 있는 성과 이름을 매개 변수로 정의한다.
사용자가 입력 필드에 다른 이름을 입력하여 모델의 데이터를 변경하면 포맷터가 자동으로 호출된다.
formatter 함수에서 전자 메일 주소, 메일 제목 및 텍스트 본문을 필요로하는
sap.m.URLHelper.normalizeEmail 함수를 사용한다.
사용자가 링크를 선택하면 기본 이메일 클라이언트가이 매개 변수로 열린다.
API 참조 : sap.m.URLHelper.normalizeEmail(https://openui5.hana.ondemand.com/#/api/sap.m.URLHelper/methods/normalizeEmail)
mailSubject 리소스 번들 텍스트는 수신자의 첫번째 이름에 대한 자리 표시자를 포함한다.
따라서 sFirstName과 함께 이름을 제공합니다.
webapp/view/App.view.xml
<mvc:View
controllerName="sap.ui.demo.db.controller.App"
xmlns="sap.m"
xmlns:l="sap.ui.layout"
xmlns:mvc="sap.ui.core.mvc">
<Panel headerText="{i18n>panel1HeaderText}" class="sapUiResponsiveMargin" width="auto">
<content>
<Label text="{i18n>firstName}" class="sapUiSmallMargin"/>
<Input value="{/firstName}" valueLiveUpdate="true" width="200px" enabled="{/enabled}"/>
<Label text="{i18n>lastName}" class="sapUiSmallMargin"/>
<Input value="{/lastName}" valueLiveUpdate="true" width="200px" enabled="{/enabled}"/>
<CheckBox selected="{/enabled}" text="Enabled"/>
</content>
</Panel>
<Panel headerText="{i18n>panel2HeaderText}" class="sapUiResponsiveMargin" width="auto">
<content>
<l:VerticalLayout>
<Label class="sapUiSmallMargin" text="{i18n>address}:"/>
<FormattedText class="sapUiSmallMarginBegin sapUiSmallMarginBottom" htmlText="{/address/street}<br>{/address/zip} {/address/city}<br>{/address/country}" width="200px"/>
<Link class="sapUiSmallMarginBegin"
href="{
parts: [
'/firstName',
'/lastName'
],
formatter: '.formatMail'
}"
text="{i18n>sendEmail}"/>
</l:VerticalLayout>
</content>
</Panel>
</mvc:View>해당 view의 Link 요소를 보면 href 속성에 문자열 값 안에 전체 객체가 포함된다. 이 경우 객체에는 두 가지 속성이 있습니다.
-
parts : 각 요소가 path 속성을 포함하는 배열이다. 배열의 element의 수와 순서는 formatMail 함수에서 매개 변수에 해당한다.
-
formatter : parts 배열에 나열된 매개 변수를 받는 함수에 대한 참조이다. formatter 함수가 리턴하는 값은 이 특성에 대해 설정된 값이된다.
formatter 시작 부분의점(.)formatMail은 view의 controller 인스턴스에서 formatMail 함수를 찾기 위해 SAPUI5에게 알려준다.
webapp/i18n/i18n.properties
…
# Screen titles
panel1HeaderText=Data Binding Basics
panel2HeaderText=Address Details

When using formatter functions, the binding is automatically switched to
					"one-way". So you can’t use a formatter function for "two-way" scenarios, but
					you can use data types (which will be explained in the following steps).# E-mail
sendEmail=Send Mail
mailSubject=Hi {0}!
mailBody=How are you?
webapp/i18n/i18n_de.properties
…
# Screen titles
panel1HeaderText=Data Binding Grundlagen
panel2HeaderText=Adressdetails

# E-mail
sendEmail=E-mail versenden
mailSubject=Hallo {0}!
mailBody=Wie geht es dir?
Related Information