gzip
<기본 확장자>
-*.gz<압축>
#gzip [옵션] [파일명]
#gzip file1.txt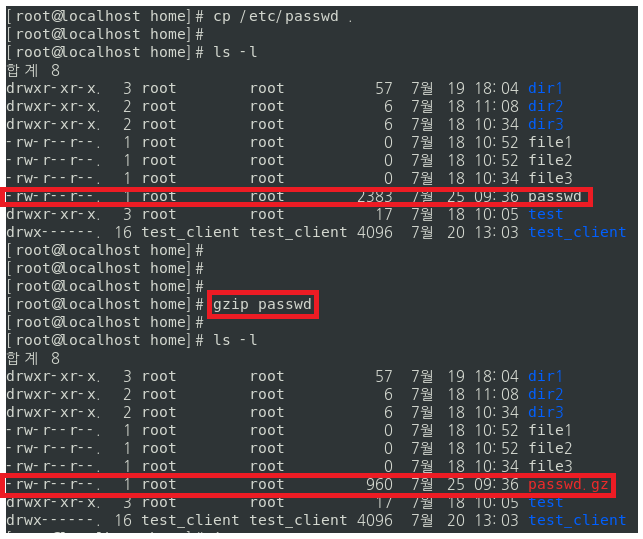

<해제>
#gunzip [옵션] [파일명]
#gunzip [압축된 파일명]
#gzip -d [압축된 파일명]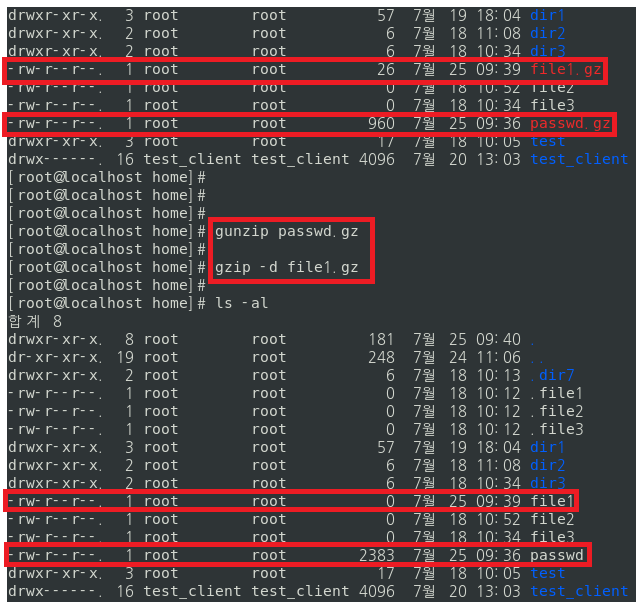
bzip2
<기본 확장자>
-*.bz2<압축>
#bzip2 [옵션] [파일명]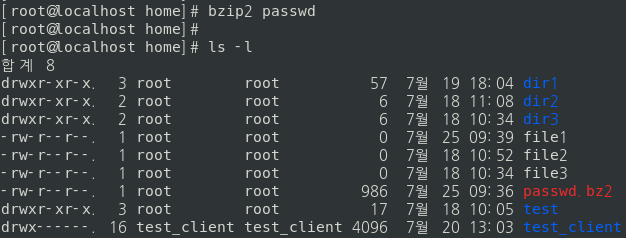
<해제>
#bunzip2 [옵션] [파일명]
#bunzip2 [압축된 파일명]
#bzip2 -d [압축된 파일명]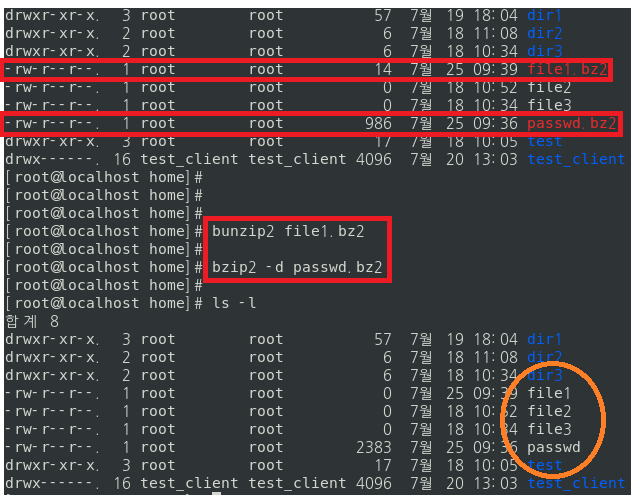
xz
<기본 확장자>
-*.xz<압축>
#xz [옵션] [파일명]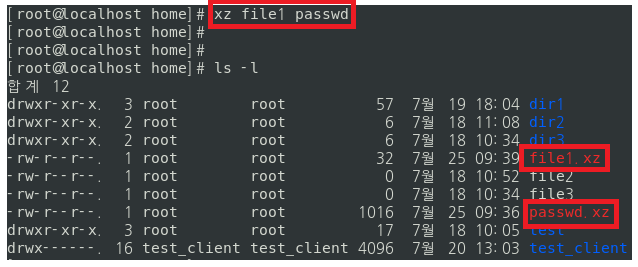
<해제>
#unxz [옵션] [파일명]
#unxz [압축된 파일명]
#xz -d [압축된 파일명]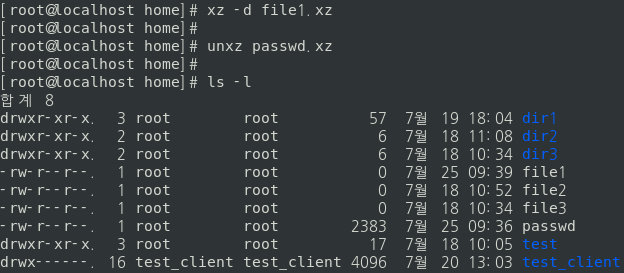
zip
<압축>
#zip [압축 파일명] [압축할 파일명]
#zip file.zip file1<해제>
#unzip [파일명]
#unzip file.zip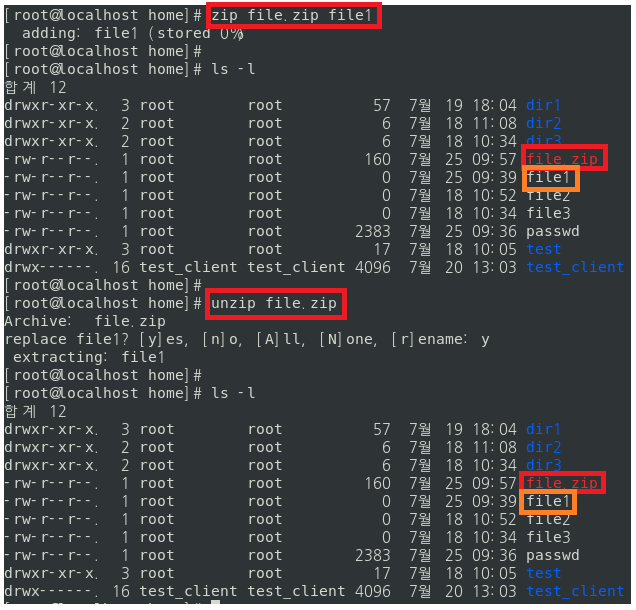
<디렉터리 압축>
#zip -r file7.zip dir1
<디렉터리 내부 파일 압축>
#zip file8.zip ./dir1/*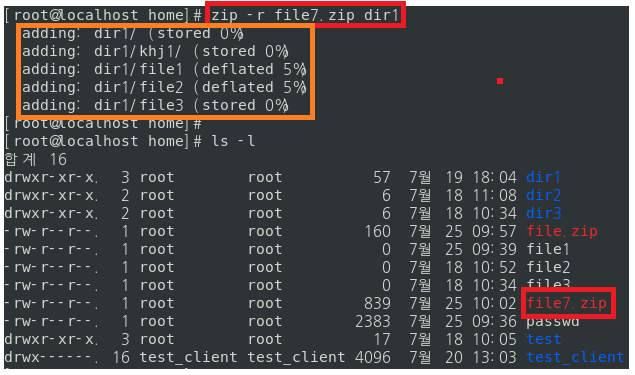 디렉터리 압축 (디렉터리까지 압축 됨)
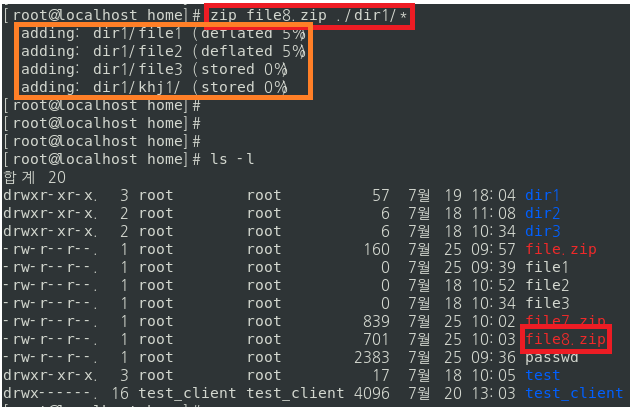 디렉터리 내부 파일 압축 (내부 파일만 압축 됨)
tar
#tar [옵션] [묶을 파일명] [대상 파일/디렉터리명]
#tar -cvf file.tar dir1

<옵션>
-c (create) : 생성
-v : 과정 출력
-f : 파일 지정[가장 맨 뒤에 와야하는 옵션]
-x : 해제
-t : 해제하지 않고 묶인 파일 목록
-r : 기존 파일에 추가

-z : gzip 압축
-j : bzip2 압축
-J : xz 압축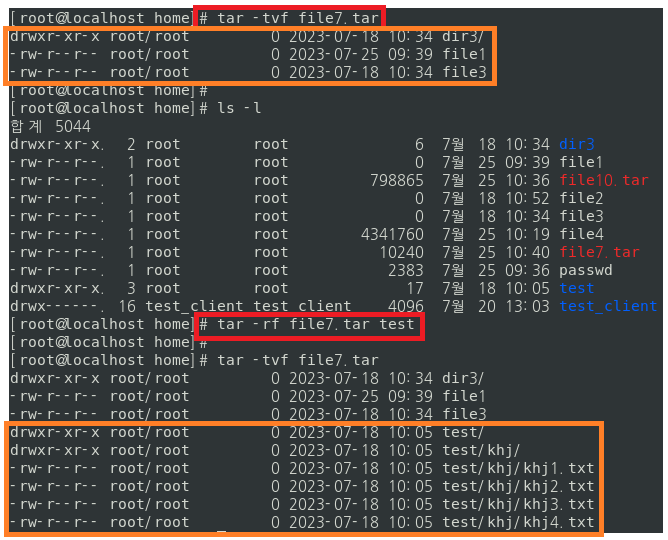
t옵션으로 묶인 파일 목록 확인 +r옵션으로 특정 파일을 압축파일에 추가
PXE 서버 구축
yum -y install syslinux
yum -y install dhcp
yum -y install tftp-server.x86_64
yum -y install vsftpd
yum -y install xinetd- 서버 구축을 위한 패키지 설치
1. DHCP 서버 구축
-
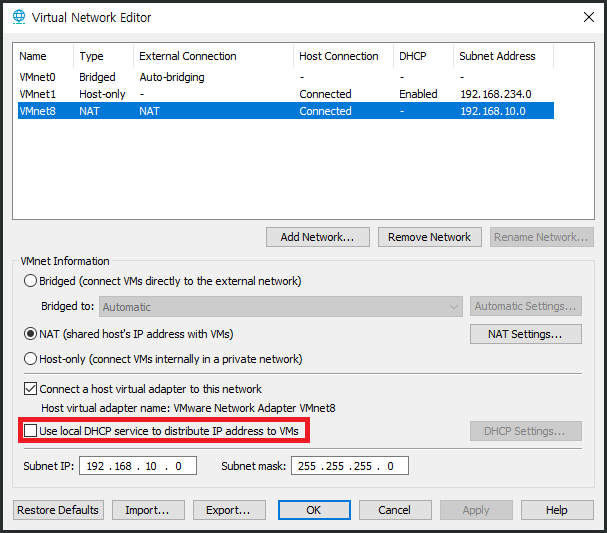 Virtual Network Editor의 DHCP의 설정을 꺼주기
<방화벽 끄기>
# systemctl stop firewalld
# setenforce 0<DHCP 수동 설정>
#vi /etc/dhcp/dhcpd.conf
(dhcpd.conf 파일 수정)
# systemctl restart dhcpddhcpd.conf 파일 수정
vi /etc/dhcp/dhcpd.conf ===> dhcp 관련 파일# DHCP Server Configuration file.sys # see /usr/share/doc/dhcp*/dhcpd.conf.example # see dhcpd.conf(5) man page # ------------------(추가해줄 내용)------------------ ddns-update-style interim; subnet 192.168.10.0 netmask 255.255.255.0 { option routers 192.168.10.2; option subnet-mask 255.255.255.0; range dynamic-bootp 192.168.10.150 192.168.10.254; option domain-name-servers 8.8.8.8; default-lease-time 10000; max-lease-time 50000; }
- DHCP서버 설정을 하고 서버 OS는 고정IP로 설정을 해주어야 한다.
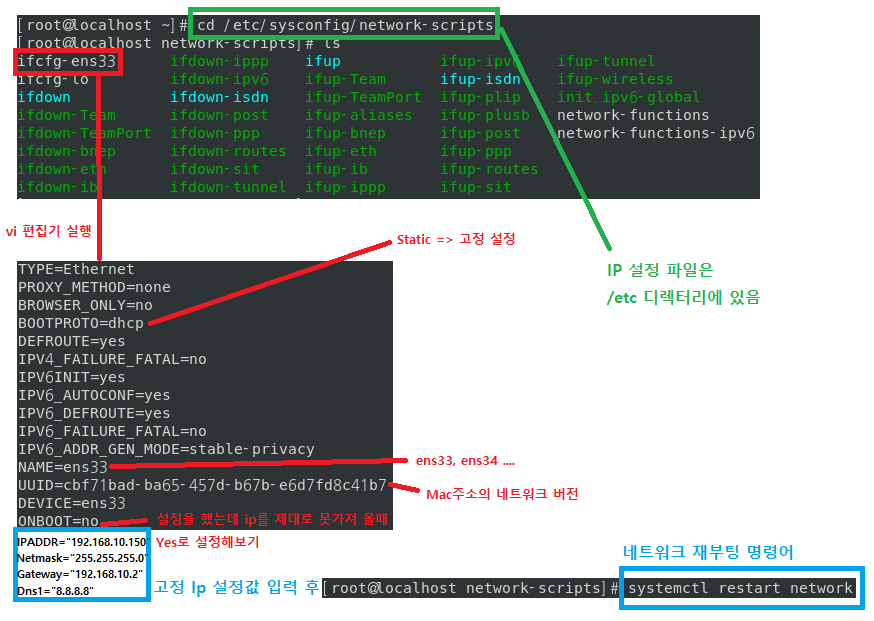
고정 IP 설정
#cd /etc/sysconfig/network-scripts   ===>IP 설정 파일이 존재하는 디렉터리
#systemctl restart network           ===>네트워크 재부팅
정리
방화벽 Stop -> ifcfg-ens33 파일 수정 -> network restart -> dhcpd.conf 파일 수정 -> dhcpd restart -> 클라이언트 OS dhcp 설정 확인
2. PXE 부팅 관련 파일 복사
#cd /etc/xinetd.d

#vi tftp
#umount /dev/cdrom
# mount /dev/cdrom /var/ftp/pub
mount: /dev/sr0 is write-protected, mounting read-only
#cp /var/ftp/pub/images/pxeboot/vmlinuz /var/lib/tftpboot
#cp /var/ftp/pub/images/pxeboot/initrd.img /var/lib/tftpboot
#cp /usr/share/syslinux/pxelinux.0 /var/lib/tftpboot3. 부팅 관련 설정 파일 디렉터리 생성
#mkdir /var/lib/tftpboot/pxelinux.cfg
#cd /var/lib/tftpboot/pxelinux.cfg
#touch default
#vi default<default 내용 추가>
DEFAULT CentOS7_Auto_Install
LABEL CentOS7_Auto_Install
kernel vmlinuz
APPEND initrd=initrd.img repo=ftp://192.168.10.150/pub</etc/dhcp/dhcpd.conf 내용 추가>
# DHCP Server Configuration file.
# see /usr/share/doc/dhcp*/dhcpd.conf.example
# see dhcpd.conf(5) man page
#
ddns-update-style interim;
subnet 192.168.10.0 netmask 255.255.255.0 {
option routers 192.168.10.2;
option subnet-mask 255.255.255.0;
range dynamic-bootp 192.168.10.150 192.168.10.254;
option domain-name-servers 8.8.8.8;
default-lease-time 10000;
max-lease-time 50000;
------------------(추가해줄 내용)------------------
allow booting;
allow bootp;
next-server 192.168.10.150;
filename "pxelinux.0";
}4. 서버시작
# systemctl restart vsftpd
# systemctl restart dhcpd
# ststemctl restart xinetd
해당 에러에서는?
삭제 후 다시 설치....
킥스타트
<킥스타트, 키보드 설치>
# yum -y install system-config-kickstart system-config-keyboard

<킥스타트 실행>
#system-config-kickstart
언어/시간 -> 암호 -> 설치후 시스템 재부팅
FTP 체크 -> FTP 서버 -> FTP 디렉터리
- 부트로더 옵션 = 새로운 부트로더 설치 체크
- 파티션 정보 = 마스터 부트 레코더 내용삭제 / 모든 기존 파티션 삭제 / 디스크 레이블 초기화
체크
스왑 파티션 -> 수정된 용량 : 2048
루트(/) 파티션 -> 사용안된 디스크 공간 모두 채움
/var/ftp/centos.cfg 저장
 <킥스타트 설정 파일 수정>
 #vi /var/ftp/centos.ks

<centos.cfg 파일 추가 내용>
...
 ~
...
# Disk partitioning information
part swap --fstype="swap" --size=2048
part / --asprimary --fstype="xfs" --grow --size=1

%packages
@base
@core
@directory-client
@fonts
@gnome-desktop
@input-methods
@internet-browser
@java-platform
@multimedia
@network-file-system-client
@x11
%end<환경 파일 편집>
#vi /var/lib/tftpboot/pxelinux.cfg/default
<파일 수정 내용>
EFAULT CentOS7_Auto_Install
LABEL CentOS7_Auto_Install
kernel vmlinuz
APPEND initrd=initrd.img repo=ftp://192.168.10.150/pub ks=ftp://192.168.10.150/ks.cfg재부팅 후 pxe서버 가동을 위한 명령어
umount /dev/cdrom
mount /dev/cdrom /var/ftp/pub
systemctl stop firewalld
setenforce 0
systemctl restart vsftpd
systemctl restart xinetd
systemctl restart dhcpd
처음 시작하는 사람